Learn how to download and install trial version of QuickBooks desktop (QuickBooks Pro, Premier, and Enterprise Solutions)
Dicey about investing in QuickBooks? Often when deciding whether to incorporate QuickBooks for day-to-day accounting activities or not, business owners get confused. However, to help in decision-making, Intuit offers a 30-day free trial for QuickBooks Pro, Premier, and Enterprise. One can download the 30-day free trial version of QuickBooks using a few links. Quickbooks for mac trial is also available for Mac users. Intuit permits to download and install the trial version of QuickBooks desktop valid for 30 days only and once it expires, the user will have to purchase the license key to continue using it. If you are also interested in trying QuickBooks and its functionalities before buying the license key, then this article will be of great assistance to you.
In today’s article, we are going to share the quickbooks trial download links for different versions of QuickBooks. Thus, make sure to read the segment with much care. However, if you require any technical assistance, then feel free to consult our tech team at +1-888-510-9198 and they will provide you with instant support and assistance.
NOTE: Before heading to the download links, keep in mind that the QuickBooks desktop 2016 version is no longer supported by Intuit and is not compatible with Windows 10.
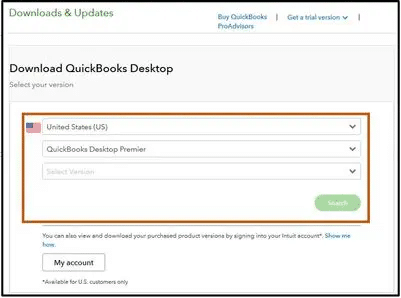
QuickBooks Desktop Trial Links for United States (US)
In case you are planning to buy the QuickBooks desktop trial links for US version, then you can check out the trial links below. You can use the link for the version you want to use and then save the install file. Make sure to save the file where you can access it easily. It should be noted that the trial links are different in each case. This means that the trial links for Pro/premier/ enterprise/ Mac might vary. Thus, make sure to keep this in mind while using a quickbooks free trial desktop link.
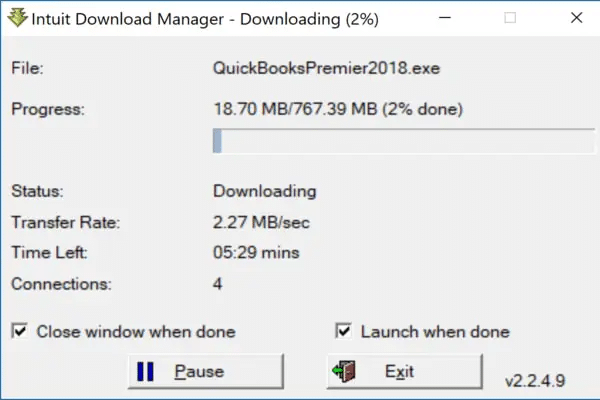
Download the 30-day trial for QuickBooks Desktop 2020
Are you interested in using QuickBooks Desktop Pro? Looking for free trial of quickbooks desktop? Well, QuickBooks Desktop Pro is a version of QuickBooks that is recommended to small and medium-sized businesses and allows the user to pay bills, print paychecks and sales order reports, craft an impeccable business, and even remote access QuickBooks. You can download and install a trial version of QuickBooks Desktop Pro using the below links. You can also make use of the codes listed below for downloading and installing the software for free.
License #: 0421-9621-3866-298
Product #: 611951
Trial Link for QuickBooks Desktop for Mac (Only USA)
If you use Mac, then you might need to download QuickBooks for theMac version. The Mac version of QuickBooks also involves a couple of features like tracking the inventory, paying bills, sending email invoices, managing business expenses, and finances, etc. You can use the following link to download the quickbooks mac trial.
If you are interested in downloading the Canada version of QuickBooks, then the below links might help. The features are like the US version up to a certain extent.
Download the QuickBooks Desktop 2021 Free Trial
Click on the link according to the version you want to download.
QuickBooks Desktop Trial Links for United Kingdom (UK)
Note that the UK version for QuickBooks desktop is quite similar to the other countries in context to features. The link for downloading this version is different. Choose the link according to the version you wish to use.
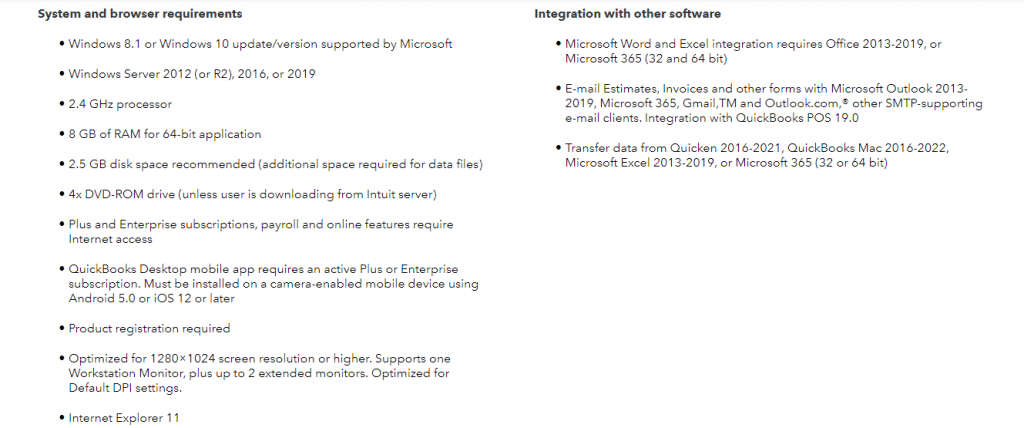
System Requirements for QuickBooks Desktop Trial Versions
Well, before install the trial versions for QuickBooks, it is essential to ascertain whether the system is ready to run the software or not. There are a handful of system requirements that you need to abide by for the smooth running of the software. Let us have a look:
System requirements for QuickBooks Desktop 2020 and Enterprise Solutions 20.0
In case you are planning to install QuickBooks desktop or Enterprise, then you would have to check the following system specs.
For QuickBooks Pro/Premier 2019 and Enterprise 19.0
Browser Requirement – You might require Internet Explorer 11 (32-bit)
Hardware and Operating Software requirements (Client and Server)
Processor: 2.4 GHz minimum
RAM: 8GB RAM is Recommended, whereas 4GB is minimum
Database Servers
Optical Drive
4 X DVD-ROM drive is required for CD installations.
Screen Resolution
Display optimized for 1280 x 1024 screen resolution or higher with up to 2 Extended monitors.
Best optimized for Default DPI setting for a given computer.
Disk space
Minimum 2.5GB of disk space is required for quickbooks download trial (whereas additional is required for data files).
Additional software: 60MB for Microsoft .NET 4.6 Run-time, provided on the QuickBooks CD.
Windows
US version of Windows is also a must for free trial quickbooks desktop
Regional settings are supported when set to English.
Administrator rights are needed for the server computer when hosting Multi-User access.
Natively installed – This means that it was installed on a particular system or environment it was designed for. Furthermore, it doesn’t need to run in a virtual environment or emulation software.
Windows (natively installed)
Windows Server 2016, Windows Server 2012 R2, Windows Server 2011, Windows Server 2008 R2 SP1, Windows 10, Windows 8.1 (update 1), Windows 7 SP1 (Enterprise and Professional editions only, supported until January 2020).
Note: Windows Small Business Server 2011 is not compatible with QuickBooks Desktop.
Linux (when using QuickBooks Enterprise Solutions Database Server-only installation)
OpenSuse 42.3, Fedora 27, Red Hat Enterprise 7 (RHEL 7.4)
Adobe Acrobat Reader: Business Planner, Payroll and viewing forms require Adobe Acrobat Reader 9.0 or later.
Payroll and other online features and services need Internet access with at least a 56 Kbps connection speed (1 Mbps recommended). DSL or cable modem is recommended.
Gmail, Yahoo Email, Windows Mail, Hotmail and AOL (i.e. Mozilla Thunderbird Email Client*). Note: *Supports plain text version in Mozilla.
Internet Explorer 11.
Firewall and Antivirus software compatibility
Our experts have tested QuickBooks Pro 2020, Premier 2020, and Enterprise 20.0 with the following firewall and antivirus programs. However, it should be noted that in some cases, one might need to adjust some settings in the program, to make sure the software works at its maximum strength.
Windows Server Firewall (all editions)
Windows 8.1 Firewall (all editions)
Windows 7 Firewall (all editions)
Microsoft Security Essentials
Avast
NortonLifeLock (formally Symantec)
Malwarebytes
ESET
Kaspersky
Bitdefender
McAfee
Avira, AVG
Note, QuickBooks with the systems that run a redundant array of inexpensive disks. However, this is not suggested, as it might trigger sluggish QuickBooks operations.
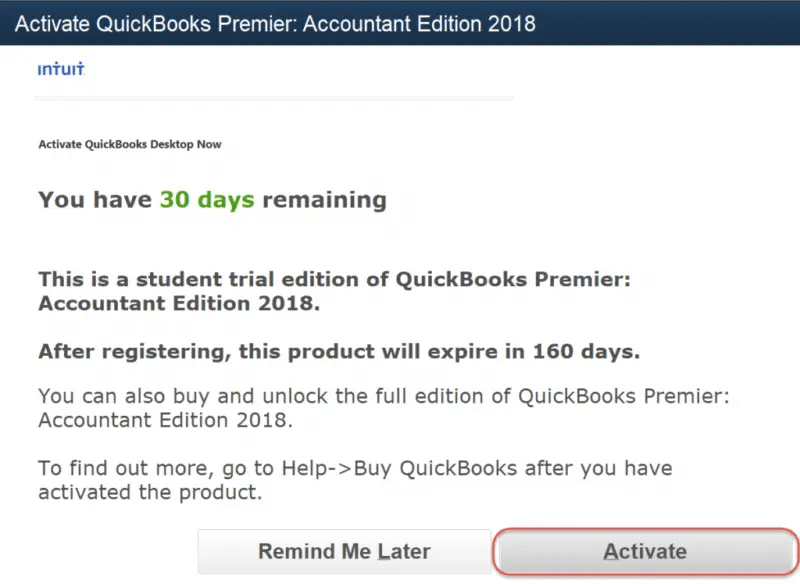
Also, the user will have 30 days to activate the QuickBooks software
Now, the user needs to click on Activate tab
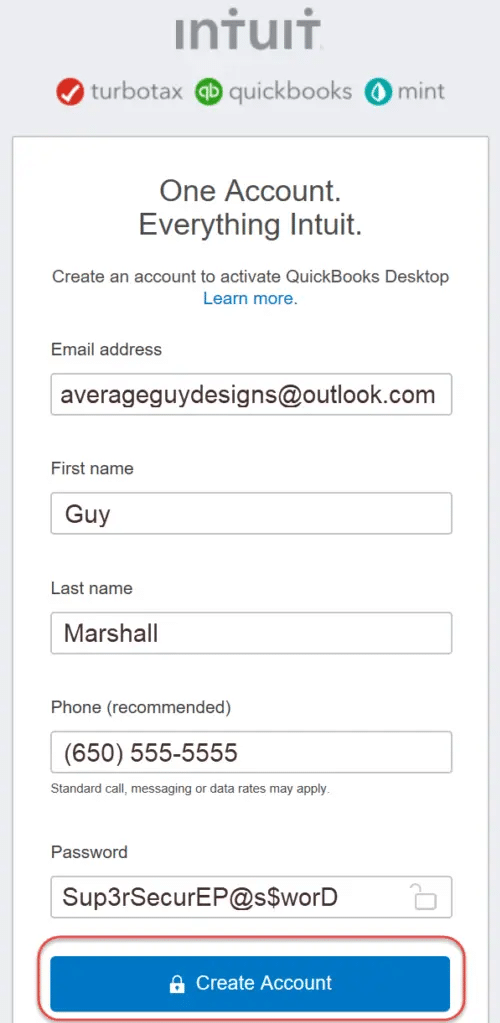
Moreover, enter the information
Also, click on Create an Account option
And also enter all the details to review the customer account
Furthermore, select the next tab
And head to the confirmation window
After that save the records or print the page
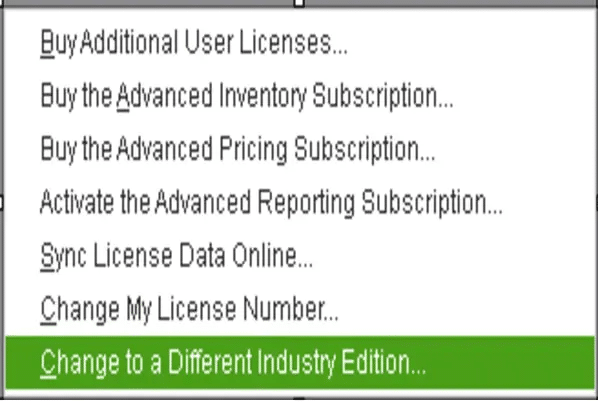
Steps to move to Pro Edition
One can switch to another QuickBooks version, as soon as he/she wishes to. Note that Intuit allows you to toggle your industry type. The feature is also available in the QuickBooks Desktop Premier, QuickBooks Accountant, Enterprise Solution Accountant, and Enterprise Solution. There is a list of specific editions available in QuickBooks:
General
Accountant
Contractor
Manufacturing and Wholesale
Nonprofit
Professional Services
Retail
Pro (not for QBESA/QBES)
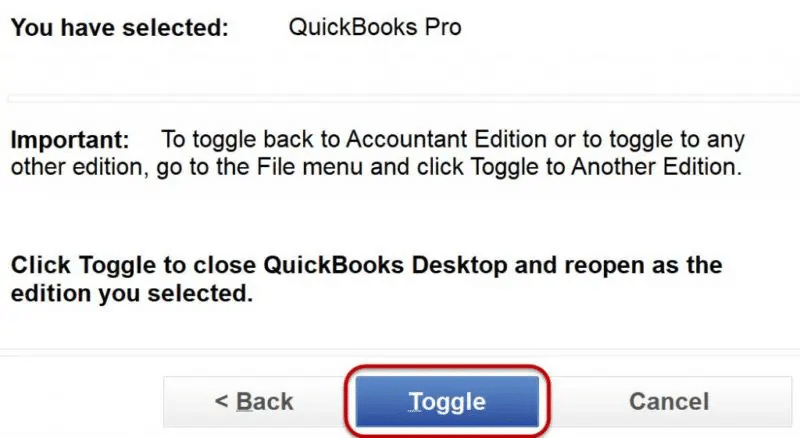
In order to move to Pro edition, the user needs to perform the below steps:
First, open the QuickBooks account.
Further, head to the file
Select the switch to another edition option.
After that click on the version from the list appearing on the screen.
Moreover, check the information windows and tap on Switch or toggle.
Also, this process might take some time
Furthermore, the process to switch to QuickBooks Pro might take a few moments. The user will be required to wait for a moment, and the new edition will be displayed in the title bar. And you are good to go.
To Wrap it up!
We end this segment right here, with the hope that the information discussed above might have helped you in downloading the trial version of the QuickBooks version you are looking for. However, in case of any query, you can consult our QuickBooks Support team at +1-888-510-9198 and they will providing you the instant support and assistance.
Frequently Asked Questions!
Can I download a trial version of QuickBooks Desktop?
In case you want to try QuickBooks Desktop before you buy it, you can download a 30-day trial. Note: If you’re looking for a trial of QuickBooks Online, see our QuickBooks online trial page.
Does QuickBooks have a 30-day free trial?
To avail this offer you must be a new QBO customer and sign up for the monthly plan using the “Free 30-Day Trial” option. This offer can’t be combined with any other QuickBooks offers.
How do I download QuickBooks Desktop for free?
The steps involved in the process to download QuickBooks desktop for free are as follows: 1. First, click on the Download button on the sidebar to go to the official QuickBooks download page. 2. Click on the “Free 30-day trial” button. 3. Pick any of the packages you prefer by clicking on “Free 30-day trial” again
Can I have QuickBooks without a subscription?
One can purchase Quickbooks desktop as a standalone application without having to pay a subscription fee.
Can I still use QuickBooks if I cancel my subscription?
In case you cancel your QuickBooks online subscription, then your data will be available in read-on;y access for one year from the date of cancellation.
Optimal Solutions to eliminate QuickBooks Error Code 2107
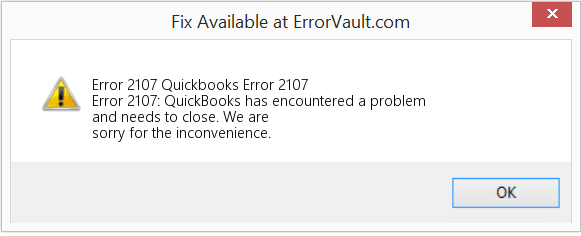
QuickBooks Error Code 2107 is the error that is related to salaries and direct deposit payment issues usually faced by users while distributing their salaries to its clients. Without a doubt, QuickBooks payroll is a tremendous accounting software loaded with different features and functionalities. It assists the accountants and bookkeepers in simplifying the workflow and adding to the accuracy. The QuickBooks payroll software helps in managing all payroll tasks quickly. Other than having some of the new and improved features, the software developer continues to release the latest version and upgrade the functionalities every year. The only drawback of the software is the errors that one might encounter while working on it. One such error can be QuickBooks error code 2107.
The QuickBooks Payroll error code 2107 is often seen when the user is unable to transfer salary to their employees through the direct deposit method. It might also appear when trying to download payroll in the systems. Here are some of the common factors causing the error. Also, when submitting a direct deposit for clients, you can get an error that says it is rejected because the direct deposit information is incomplete. To resolve this issue, you can try downloading the payroll tax table. Moreover, there are a bunch of measures that can be taken to culminate such an error in QuickBooks successfully. To explore what those measures are, make sure to stick around this piece of segment carefully.
Note: In case you do not want to implement the steps manually, feel free to connect with our QuickBooks Professionals at +1-888-510-9198, or can also connect with us via chat support on our website. Our technically sound team will ensure that all your queries are answered immediately. Having said that, let us understand the error code 2107 in QuickBooks in detail.
Usual Symptoms of QuickBooks Error Code 2107 are as follows
The below signs and symptoms can help you identify such an error in QuickBooks. Let us find it out:
QuickBooks Error 2107 is appears on the screen of your system.
Windows of your system will run slowly and gradually on mouse or keyboard input.
This Error 2107 Freezes your computer or QuickBooks software for a few moments.
While accessing a similar program it can crash your computer.
Internet security and personal firewall software setting.
Possible Reasons of QuickBooks Payroll Error Code 2107 are:
You can expect QuickBooks error 2107 as a consequence of the following factors. Let us explore each of the reasons one by one:
Partial or Improper installation of QuickBooks Program.
A virus attack on the system can also lead to this Payroll error.
Sometimes QuickBooks Error records are missing.
And above this, corrupted version of QuickBooks file installation by the user.
When the changes within the product weren’t performed in an orderly fashion and hence the Windows registry is corrupted.
Impeccable Solutions to resolve QuickBooks Error Code 2107
So, here are 4 extremely simple solutions that can easily fix this error are as follows:
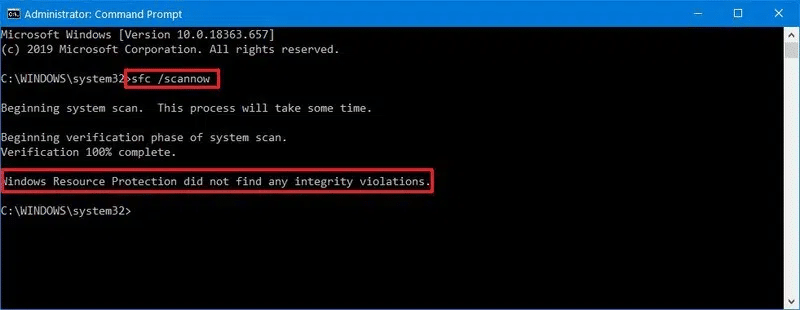
STEP 1: To Run the System File Checker
System File Checker is a tool used when the error usually occurs due to corrupted files that scans corrupted files, corrects them, and restores them to your Windows operating system.
Procedure to run System File Checker is as follows:
For this, First Click on the Start button at the bottom of the screen then type “Command’’ on the search bar.
Now don’t tap the ENTER button instead of that Press and hold Ctrl + Shift on the Keyboard.
A dialogue box for the permission appears and here you need to click on ‘YES’.
Next, A black box opening with blinking cursor appears on the screen where you have to type “sfc/scannow” and tap on ENTER button.
Once done, SFC automatically starts scanning corrupted files on your system.
Finally, follow the instructions given by this tool accordingly for the completion of the process.
STEP 2: Start Checking of Windows Registry of your system
Corrupted windows registry is another cause of this error 2107 which can be fixed manually by following these steps.
At first, click on the START button and then type “Command” on the search bar.
Now, don’t tap the ENTER button instead of that Press and hold Ctrl+Shift on the Keyboard.
A Permission dialogue box for windows update appears.
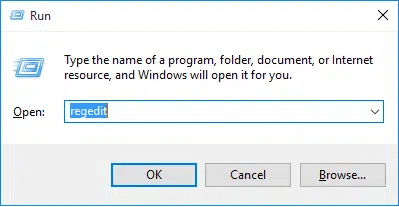
As you click on Yes, a black box with a blinking cursor will open where you need to type “regedit” and tap the ENTER button.
Select error 2107 to get back up in the registry editor and then click on the ‘Export’ in the file menu.
Select the folder to save the QuickBooks Backup key and then type a name for your backup file such as “QuickBooks Backup”.
Finally, do save the file first where file domain has to be “.reg”.
This will help you to get backup of your QuickBooks related registry entry, hence fix the issue.
# NOTE: This procedure requires huge chunks of data to make sure you have proper functioning Internet Connection.
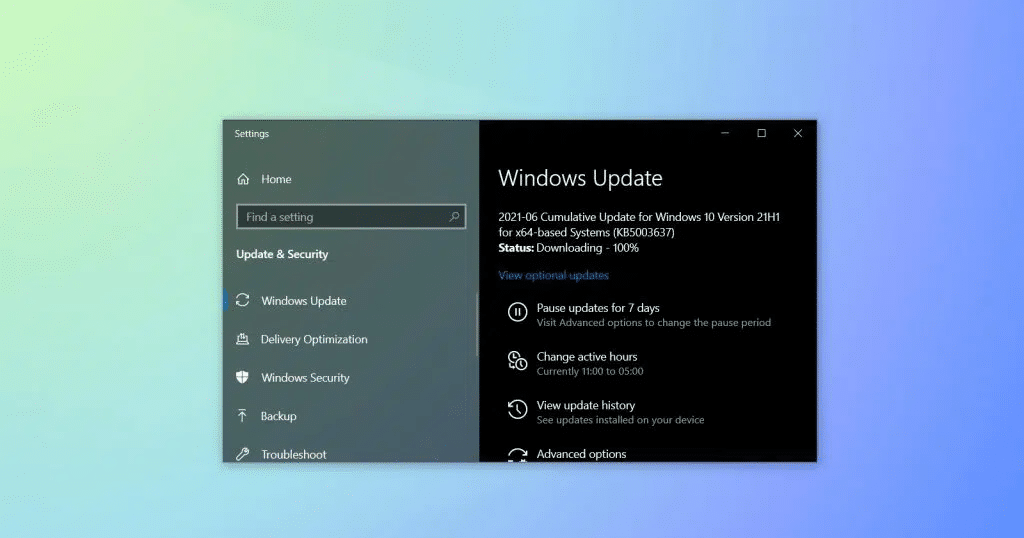
STEP 3: Checking for the Windows Update and Changes in it
When your windows are not updated it can cause this error 2107. It further affects your PC too and so it needs a regular check. Here is how you can correct this by following these steps.
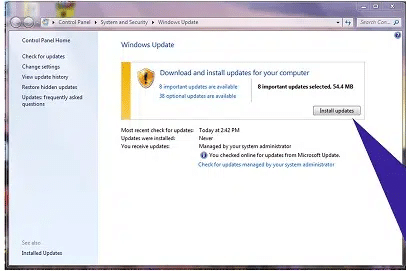
First, click on the START button and type “Update” in the search box and tap the ENTER button.
Then the dialogue box for the Windows update appears on the screen.
Then if an update is available, select “Install update”.
STEP 4: Perform Windows System Restore
Sometimes when the changes are made in the system this error occurs so this Windows Restore helps you to undo the recent system change. And if QuickBooks message code 2107 is constantly flashing on your screen, you can fix it by restoring the operating system.
Here are some steps to follow for solving this problem efficiently:
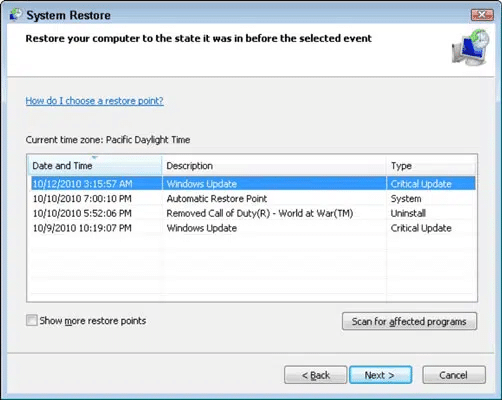
Start with START button icon and then type “System Restore” and tap the ENTER button where system restores the results.
Enter the “Administrative password” which you need to type in.
Once this is done wizard support appears on the screen which will guide you with a set of instructions that you need to follow.
On completing this Start rebooting your computer
As soon as the computer reopens, open QuickBooks and check if it is running properly or not.
In this way it will help you to get rid of this problem.
STEP 5: Temporarily Turn Off Your Antivirus
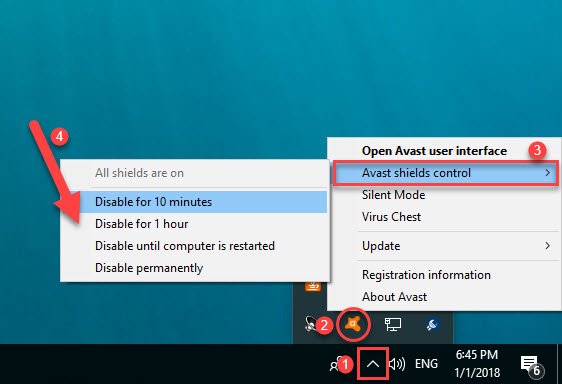
Just in case the above discussed set of steps didn’t work in your favor to culminate the error code 2107 in QuickBooks, then try turning off the antivirus. At times, antivirus or any third-party security software can trigger certain sorts of issues in QuickBooks. Thus, in such situations, it is recommended to try deactivating or disabling the antivirus temporarily. This can be done by right clicking the icon of the antivirus in the taskbar and further click on turn off protection option. You can navigate to the software again and check if the payroll error persists.
QuickBooks Payroll error 2107 is truly a problem that can be spotted due to several reasons. However, resolving such issues is quite easy. All you have to do is understand the leading cause and perform the method accordingly. If the error still persists or you are not able to use your software, then seek professional help directly by contacting our QuickBooks Payroll support team at +1-888-510-9198. And we hope that this article will be helpful in resolving this QuickBooks error 2107. By performing these four basic troubleshooting methods discussed above in this article you can possibly get the system fixed
This error can be seen with an error message: Code 2107 Problem Uploading Data to Service/ Sign on was Rejected. It can further switch to an error message stating: Encountered a Payroll Service Connection Error. This error is basically a payroll error that can be seen due to improper installation.
What causes Error 2107 in QuickBooks?
You can expect this issue in case: 1. The software file downloaded itself is corrupt. 2. The installation of QuickBooks is improper. 3. Also, if the windows registry got corrupt due to any change made with the software. 4. The malicious program attacks QuickBooks related files and windows files as well. 5. Also, if some of the QuickBooks files are missing.
How do I fix error code 2107 in QuickBooks?
To fix this issue in QuickBooks, you can try out the below steps: 1. Enable single user mode. This can be done when sending the payroll data to avoid such an error. 2. Configuring system date and time settings. 3. Further installing the QuickBooks desktop security certificate can also help in fixing such an error.
Error message Direct Deposit Information is Incomplete. How to fix it?
QuickBooks error code 2107 occurs when something needs to be verified with the payroll data. Such a situation requires pulling up your account. Contacting QuickBooks professionals can help you verify the cause behind the issue and further provide you with the troubleshooting steps.
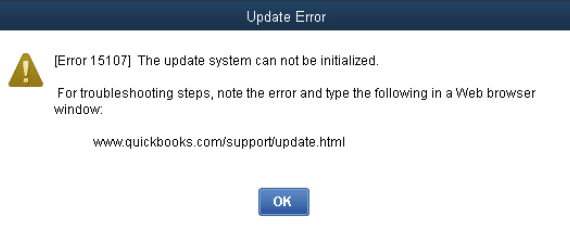
QuickBooks error code 15107 shows up when the QuickBooks is damaged. Well, payroll errors are usually experienced when updating or installing payroll. However, this particular technical glitch can also be seen when the user experiences any registry issues. In this article today, we are going to discuss the complete information about the QuickBooks payroll update error 15107, its triggers, and solutions.
You may get the following error message on your desktop screen:
Thus, if you are interested in learning the complete set of steps to eliminate QuickBooks error 15107 permanently, make sure to read the piece of writing till the end. You can also consult our tech support professionals at+1-888-510-9198 and they will provide you with immediate support and assistance.
As we mentioned earlier, there can be certain factors, particularly triggering the QuickBooks error 15107. So, here is a list of the most common factors.
One of the major reasons can be if the payroll files are damaged or corrupted
In case any damage occurs to the registry files then you might experience this issue
The user can also end up in this particular error if the firewall configurations are blocking the connection
Moreover, if the software update closes abruptly then it could land you into such an error
Common signs of QuickBooks Error code 15107
Identifying the error becomes easy, once you are aware of the signs and symptoms. Check out the common signs of the QuickBooks error code 15107.
An error message popping up on the screen is a common sign of this error
In case the update file cannot be accessed, then it indicates QuickBooks error code 15107
Moreover, if the software isn’t properly configured to the newest version, then you might come across this issue
Comprehensive solutions to QuickBooks Error 15107
Once you are aware of the factors triggering and signs to identify the issue, it is time for you to perform the necessary steps to eliminate the error permanently. Here are some of the most effective steps that you can implement.
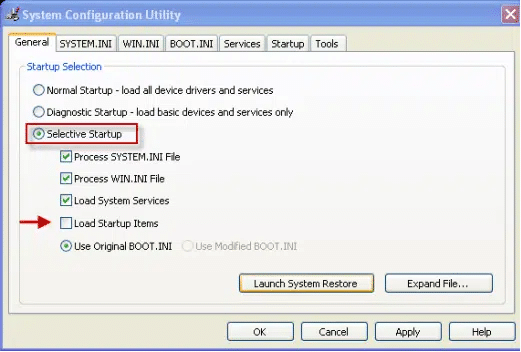
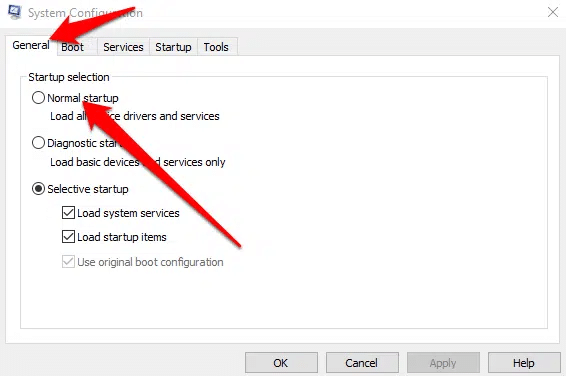
Once you are done with that perform the steps for switching to normal startup mode
Hit the apply and ok tabs respectively
And also reboot the system to save changes
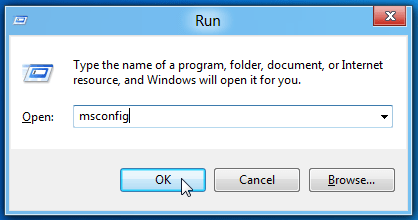
At first, enter msconfig and click on ok tab after accessing windows + R
And click on selectnormal startup option
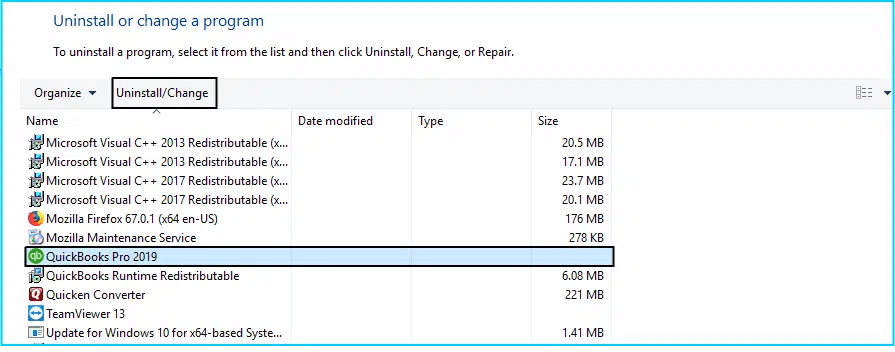
Technique 2: Install digital signature certificate
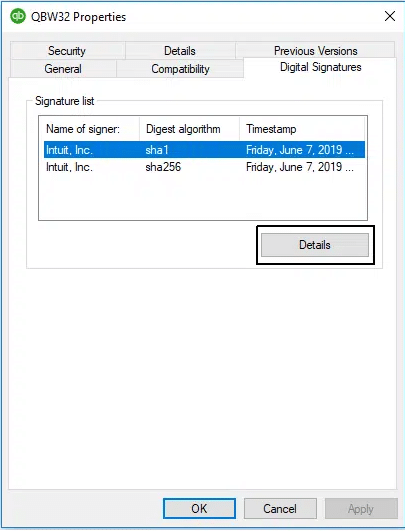
along this process, the user needs to head to the following path: C:\Program files (x86)\ Intuit\QuickBooksXX (XX means the QuickBooks version being used)
Followed by typing QBW.exe in the search bar
The next step is to right click the QBW32.exe file from the open list and also click on properties
Now, the user should find the digital signatures
And select intuit from the list
Followed by clicking on the details tab
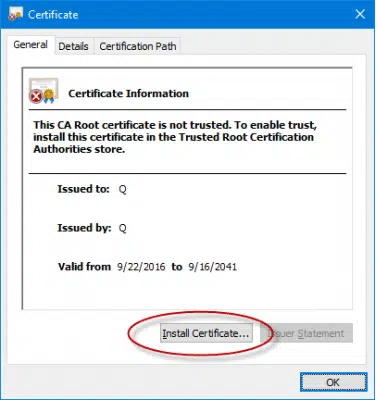
Also, go for the view certificate tab and also the install certificate option
The user should then hit the finish tab
And reboot the system to update the changes
Now, try to download the update to check , issue is resolve
At times a basic restart of the system can work in eliminating the error permanently. Thus, we suggest you try to reboot the system once and then check if the error continues.
Technique 5: Run reboot.bat file
Did you know that running the batch file named Reboot.bat in the QuickBooks folder can effectively fix the issue. The steps that can be performed in such scenario are as follows:
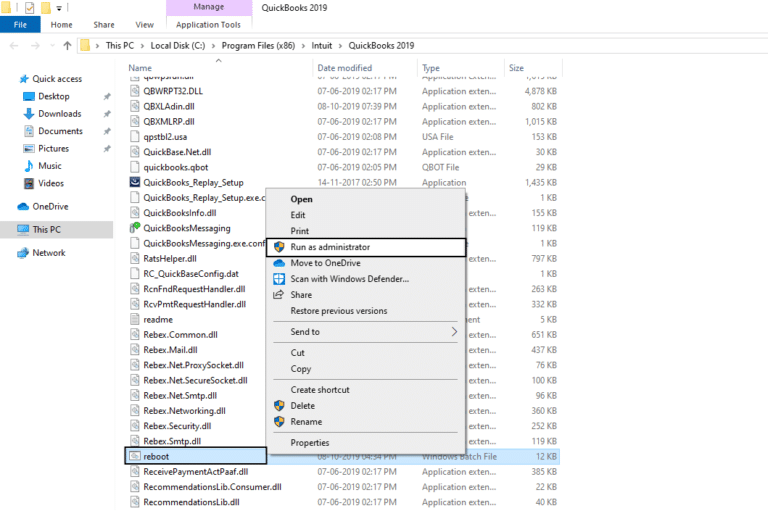
Head to the QuickBooks folder.
You can right click on QuickBooks icon and click on the properties tab to choose open file location tab.
Once in the QuickBooks folder, look for reboot.bat file and then right click and select run as admin tab.
Wait for the process to end.
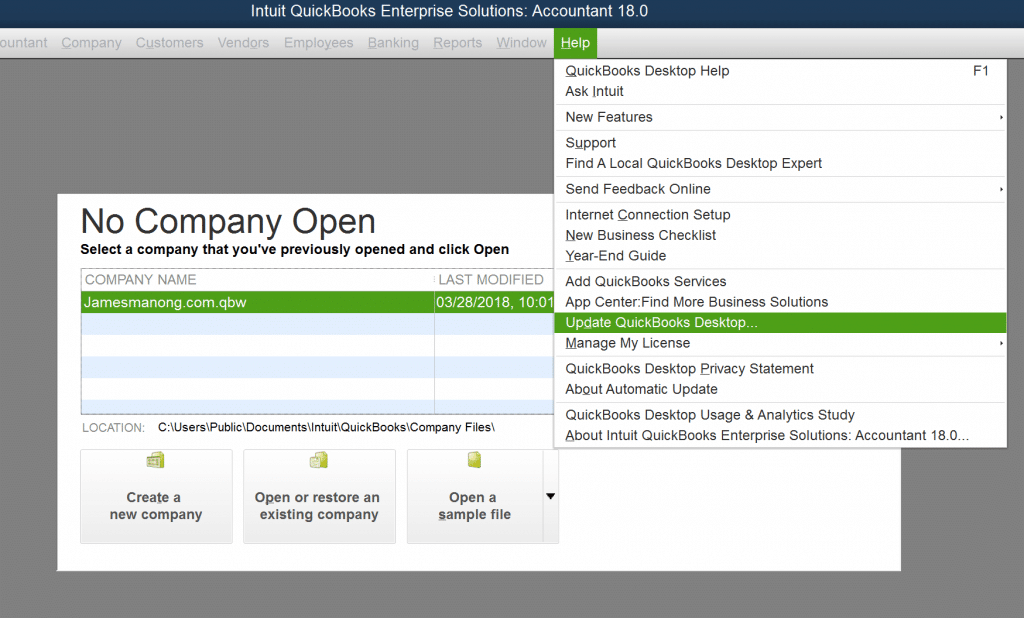
And towards the end, run QuickBooks and try the update process again by clicking on the help tab and selecting the update QuickBooks desktop option.
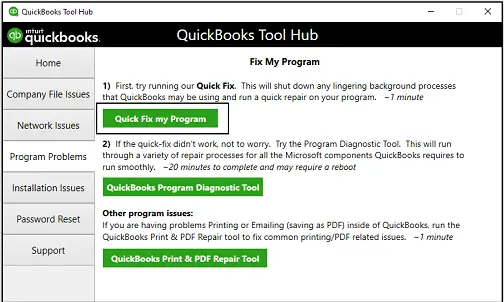
Technique 8: Download and install QuickBooks tool hub
To make error fixing easier for the users, Intuit has provided the users with QuickBooks tool hub, which is a one-stop solution to all your QuickBooks tool needs. You can download the QuickBooks tool hub using the steps below:
Coming towards the end of the segment, we believe that the reader might be able to eliminate the QuickBooks error code 15107 successfully using the set of steps listed above. You may reach out to our 24/7 QuickBooks Payroll error support professionals connect with our tech professionals right away at +1-888-510-9198 who work round the clock in providing instant support and assistance for all QuickBooks issues.
You can face QuickBooks error code 15107 when you are unable to download the payroll updates. It appears on the screen stating “The payroll can’t be initialized”. You can also experience this issue if the Internet Explorer settings are set incorrectly.
Does restarting system can fix QuickBooks error 15107?
In case you can across the error code 15107 due to some minor issue, then it can be resolved by performing a mere reboot or else you can go for clean installation.
How do I fix the QuickBooks payroll error 15107?
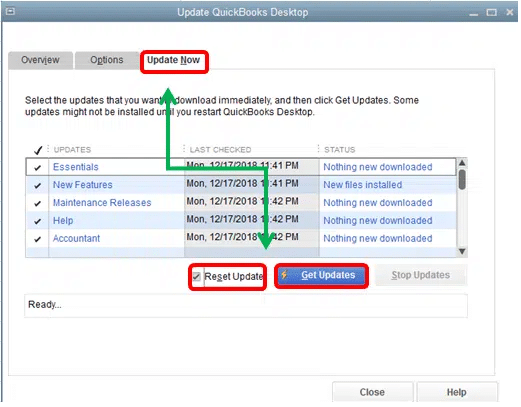
You can fix the payroll error 15107 by: 1. Exit QuickBooks 2. Access QuickBooksXX components by heading to C:/Program/Data/Intuit. 3. The version of QuickBooks is shown by XX. 4. Launch the QuickBooks desktop software and go for the update QuickBooks desktop option under the help menu. 5. You can then click on the update now tab. 6. And further click on reset update and get updates option 7. Wait for the process to end and reboot the system.
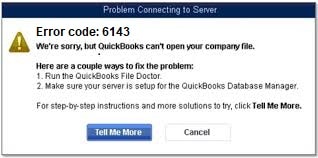
QuickBooks error code 6143 generally occurs if there is malfunction in the company files. The user can also end up in such an error when system files are corrupt. You might see a warning message on the screen when such an error occurs and as a result of this issue the window might crash, or the software might crash. Any sort of damage to the registry files can trigger this error in QuickBooks.
Also, if the Windows registry files got deleted mistakenly, then the occurrence of this error is probable. To learn more about this particular error, all you need to go through the piece of writing carefully and find out what measures can be taken to eliminate this issue in QuickBooks error code 6143. However, if you are stuck at any point in time or if you need our assistance, feel free to connect with our tech team at +1-888-510-9198 and they will provide you with instant support and assistance.
IMPORTANT:Before you implement the steps discussed below, it is essential to ascertain that Update QuickBooks Desktop to the latest version. Also, ensure to turn off the hosting on every system in the network leaving the server system hosting the company file.
There are certain factors due to which one might end up in such an error. Here is a list of the most common factors. Let us have a look:
One of the major reasons can be corrupted entries in the Windows system file
The user can also end up in such an error in the QuickBooks desktop installation is either incomplete or not performed properly
Another reason why such an error occurs on the screen is if the bank reconnects when there is a new credit card.
Damaged window system files can also lead to such an error in QuickBooks
Methods for TroubleshootingQuickBooks Error Code 6143
The QuickBooks error code 6143 can be resolved easily, by carrying out the methods enumerated in this article. Let us navigate across each of the methods one by one:
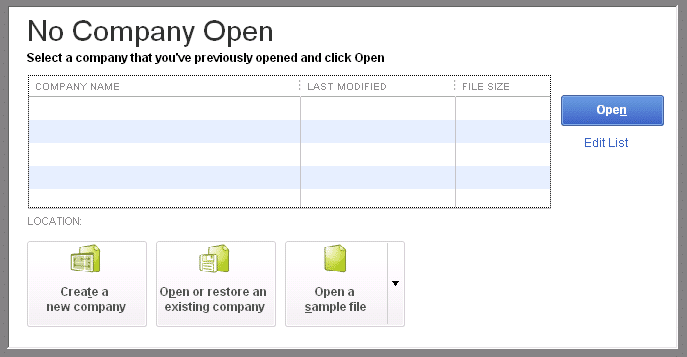
Method 1: Open a sample company file
The very first process can be to open a sample company file and check if there is any issue with the company file. The steps involved in this process are as follows:
The very first step is to open a sample file in the no company open window.
Once done with that select a file from the list of sample company files
Now, head to the next step and open the file locally.
This will open a sample company file and if the file opens, then it indicates that there is any issue with the company file. However, if the sample company file doesn’t open up, then it indicates issues with the software or any other issue
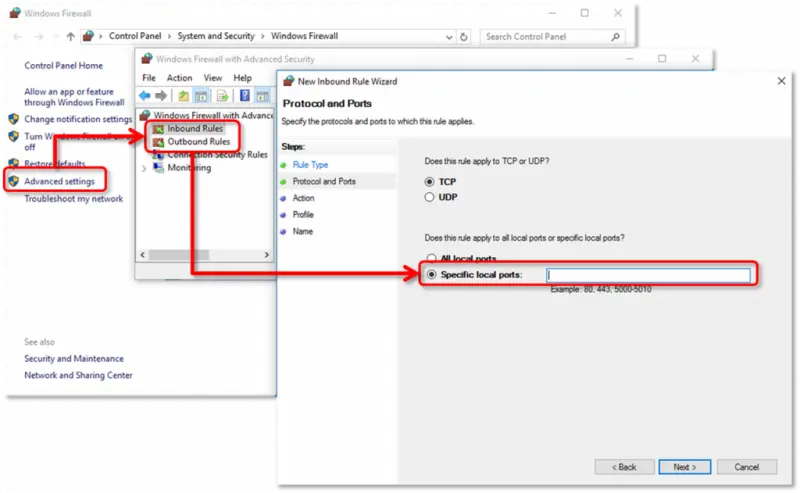
Method 2: Configure the antivirus software and firewall ports
Often antivirus or firewall ports might block the smooth working of the software. Thus, the user needs to configure the antivirus settings using the steps below.
Moreover, the user can also set up an exception for QuickBooks to the antivirus and try to eliminate this error
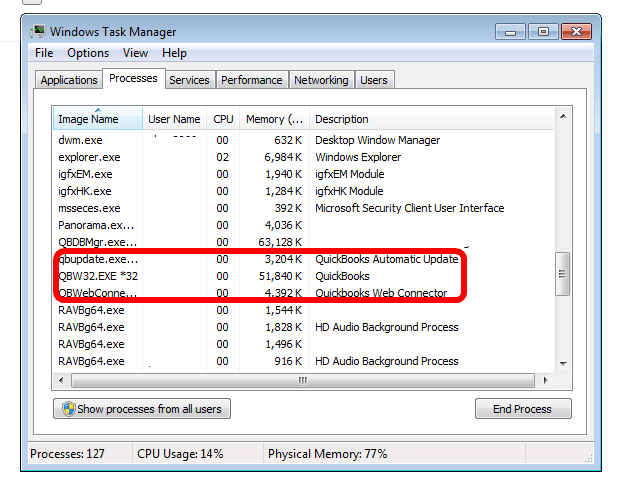
Method 3: Close all the QuickBooks processes.
At times the processes running in the background might trigger errors in QuickBooks. Thus, the user is recommended to perform the steps to close all the background processes.
The very first step is to log in to your system as admin.
Then press Ctrl + shift + ESC and the task manager will appear
After that head to the user tab and this will show the process running in the background
Once done with that close all tabs related to QuickBooks,
Click on the End Task tab
The last step is to close all the QuickBooks processes
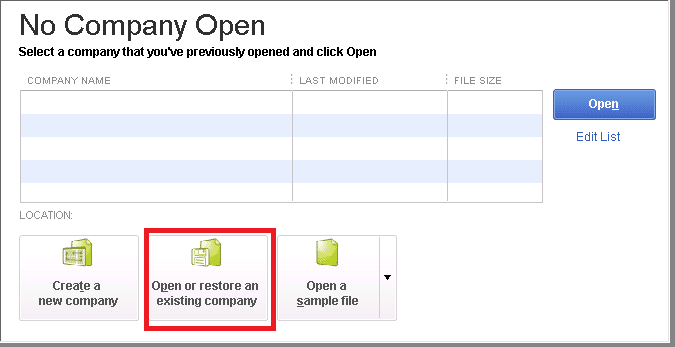
Method 4: Open the company file locally to fix QuickBooks error code 6143
Often the company file itself might be triggering errors in QuickBooks. Thus, in such a situation, it is suggested to open the company file locally. This can be done using the steps below:
The very first step is to open the folder with the company file.
And then check out the QB extension and right-click on the file
Once done with that select the copy option
And then paste the file on the Desktop.
After that press the ctrl key and try to open the QuickBooks and reach no company open window.
At last open or restore the existing company and close all the QuickBooks processes and this will resolve the issue up to the certain extent
Method 5: Clear space within the file name of the company file
This measure involves the deletion of the clear spaces included within the file name of the company file.
The very first step is to right-click on the desktop icon and select the properties tab.
After the user is in properties, click on the open file location.
This move will directly take users to the QuickBooks folder.
Look for the company files folder within this folder and open the same.
The subsequent step requires right-clicking on the company file and clicking on the rename tab.
Ensure that the exist no spaces in the file name of the company file.
Click on the screen to reflect the changes made to the file name.
Open QuickBooks and double-check if the technical issue still occurs.
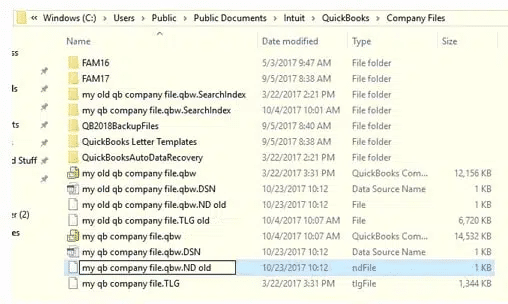
Method 6: Rename the .ND and .TLG files
Sometimes, renaming damaged files can also fix the error. By renaming the files, one might prevent QuickBooks from accessing the files. The steps to rename the file are as follows:
Access the directory containing the company files
Choose the file with the .nd and .tlg extension
Now, right-click on them and choose the rename tab
Add .old at the end of the files and click on the enter tab.
Reboot the system and check if the error continues
Now that you know what steps are involved in eliminating these sorts of issues in QuickBooks, it is time to perform these steps and try to get rid of the QuickBooks error code 6143. However, if there is any query or if the user needs our assistance at any point in time, then getting in touch with our tech team at +1-888-510-9198 is recommended. We are a team of technically sound QuickBooks professionals who work round the clock to provide instant customer support for QuickBoooks and assistance.
This error is shows up due to damage or corrupt company files, network connectivity issues, etc. The error code 6144, 304 often occur with a warning message that states: QuickBooks has encountered a problem and needs to close. We are sorry for the inconvenience.
What is QuickBooks error code 6138?
Error code 6138,-1005 signifies maybe your company file is still open in another location. It is a very general problem in QuickBooks. This problem has two resolving phases. Update QuickBooks to the latest version before performing any phase.
What is error code 6176 in QuickBooks?
QuickBooks error 6176 is an error that usually occurs due to incorrect folder permission, internet settings or firewall configuration. This error may also mean that QuickBooks is unable to fix the path to the company file.
What is error code 6143 in QuickBooks?
QuickBooks Error 6143 is a general error code that usually indicates a problem with the company file. A variety of different issues can cause this issue, such as any damage occurs to the file, or is missing. It can also show up due to incorrect folder permissions or incorrect network setup.
How do I fix a QuickBooks company file that won’t open?
Solution 1: Update QuickBooks and check your file type Solution 2: Don’t save the desktop when you close QuickBooks. Solution 3: Turn off hosting on your workstations. Solution 4: Open a sample company file. Solution 5: Move your company file.
Made up your mind to download QuickBooks Desktop? Well, QuickBooks is a feature-loaded software that is helpful to any sized business, regardless of the industry they belong to. If you have decided to incorporate this accounting software in your business process, then it is definitely a great decision. QuickBooks downloads desktop is an easy process that you can perform without any issue. All you need is to perform the right set of steps that are required to install and set up this software.
In this article, we will be discussing the steps that you need to follow to get your accounting software and start using it. Thus, if you are interested in knowing more about QuickBooks and the steps involved in its setup, make sure to read the article till the end. However, if you are a newbie and don’t want to perform the steps manually, then you can take assistance from our tech geeks at +1-888-510-9198 and they will provide you with instant support services.
An accounting software is something that eliminates the hassle to perform various accounting and bookkeeping activities. And when it comes to QuickBooks accounting software it is a feature-packed software that is easy to use and can be easily accessible. QuickBooks Desktop also offers a cloud-based subscription service that lets you access the entire database from anywhere and anytime. It is a subscription-based accounting software, and is highly productive. There are different versions and editions available that can be downloaded using some basic set of steps.
Download QuickBooks Desktop 2023 Pro, Premier, Accountant, Enterprise, for Mac and POS
QuickBooks Desktop Plus (Pro & Premier), QuickBooks Enterprise 23.0 users will have access to four new or improved features with QuickBooks Desktop 2023. The features of this software include a new cash flow hub, reporting optimization, updated track vehicle mileage capabilities, and improved banking connectivity. Not only that, but two additional payment subscriptions are available to all 2023 QuickBooks desktop users with active subscriptions. Both payment links and the Node card reader have received changes. Moreover, there are new payroll functionalities available for different subscriptions.
What do the New Features of QuickBooks Desktop Version have?
Intercompany Transactions- Managing many business units more properly and transparently can be easily tracking intercompany transactions.
Expiration Dates – This feature is a must-have for businesses dealing with perishable inventory, in order to sell items before expiry.
Inventory Categorization- The inventory categorization feature provides you the ability to sort and categorize item lists making it easier to search for things.
Cash Flow Hub- This feature lets you track the financial health of the business to maximize profits.
Business Mileage Tracking – This feature tracks and calculates miles between the trip’s start and end locations.
Improved Bank Connections- You can simply download and categorize transactions or credit card accounts and link external banks with this new and improved feature.
Node Card Reader- Another extremely helpful featureis a node card reader that lets you make contactless payments.
QuickBooks Downloads Desktop 2022 (Pro Plus 2022, Pro Plus 2022 Payroll, Premier, Accountant, Mac, and Enterprise 22.0)
Well, all the versions of QuickBooks Desktop 2022 such as Pro Plus 2022, Pro Plus 2022 payroll, Premier Plus 2022, Premier Plus 2022 payroll, Accountant, Mac Plus 2022, and Enterprise 22 are now available for download.
What is included in QuickBooks Desktop 2022?
In comparison with the previous versions, you can expect the 2022 desktop version of QuickBooks faster by 38%.
It further supports processing in 64 bits.
Moreover, you can use QuickBooks downloads to track business performance, backup data, and improve overall productivity with the mobile application.
You can set up your company’s finances and payroll services much faster.
You can download any of the versions of QuickBooks Desktop 2021 and avail new features, better performance, and other improvements that come along with it. What’s different about QuickBooks Desktop 2021 version:
It offers a basic user interface and a bunch of features like tracking invoices, making payments, keeping an eye on sales, and much more.
Moreover, you get access to tools like simple bank feeds, receipt management, automatic statements, payroll liabilities, etc.
Also, users that download the QuickBooks Enterprise 2021 version will get all the features required for business financial requirements.
You can easily download QuickBooks 2020 and all its editions easily and get access to the following features:
You get access to tools for financing your business through QuickBooks.
Another feature that you can avail of in QuickBooks Enterprise is additionally manage several emails, add client PO numbers, add customer payment reminders, and much more.
In addition to that, the premier edition will let up to 5 people and further automatically classifieds the transactions before requesting for approval.
You can enjoy the following features in QuickBooks Desktop 2018 Pro, Premier, Mac, and Enterprise. Features that an ideal software should have for accounting purposes are accessible in QuickBooks Desktop 2018.
You can get access to features like support for multiple monitors.
Salary reminders, vendor record merging, and other helpful functionalities.
You further get tools for payroll, reporting, cost management, quick and easy invoicing, along with time and money savings.
You can download QuickBooks 2010 and 2009 versions and get access to the features like keeping track of income and expenses, enabling users, enabling report center, managing documents, and adding further list entries.
QuickBooks desktop offers some of the best features, which include the below stated ones:
Cash toggle on reports: This particular feature permits the user to toggle displayed reports between cash or accrual basis.
Search chart of accounts: This particular feature allows you to find and select a chart of account or sub account by simply typing an account number and the account name or partial words of an account name.
Merge Vendor record: This feature provides a consolidated window to identify and combine duplicated vendor records efficiently.
Past due stamps on QuickBooks: This feature provides a visual confirmation that a customer’s invoice is past due displays on the screen when an invoice has a past due balance.
Payroll liability and payment reminder: Another feature that tops is the list the payroll liability and payment reminder. This particular feature ensures that the clients are reminded of the upcoming payroll liabilities payments.
Update email security: QuickBooks desktop furthermore includes securely sending emails from Gmail, outlook, and Windows live accounts using the feature of improved multi-factor authentication. This feature makes sending email extremely easy.
Inventory report customization: Reports like inventory valuation summary or detail, inventory stock status by item, and assembly shortage by item have an option to customize the display.
Mobile inventory scanning: It is now possible to pick quantities at warehouse using a barcode on a device or Android phone to record the inventory.
Check System Requirement of QuickBooks desktop
Simply downloading the software can lead to certain errors. Therefore, it is always recommended to install QuickBooks desktop after checking the minimum system requirements.
What is the Process for QuickBooks Download Desktop or MAC?
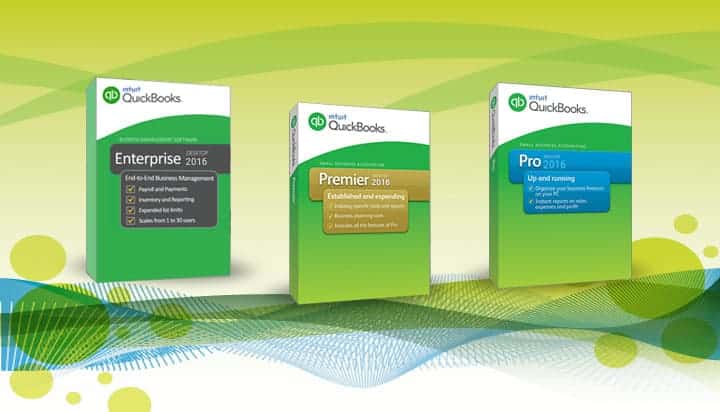
QuickBooks accounting software is available in three different editions, which include Pro, Premier, and Enterprise. Each version is having its own features and benefits. According to the business you own, you can go for a particular version. If you already have the QuickBooks software and want to download the latest version for it, then the below steps might help:
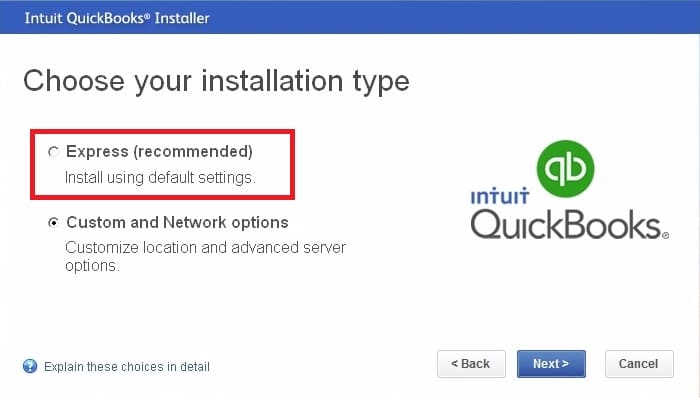
Initiate the process by downloading the product’s appropriate installation file and then head to the step ahead.
Process to Download QuickBooks Desktop for the first time (QuickBooks Download)
The steps to download QuickBooks for the first time are quite easy. However, as a user, you might have to keep certain things in mind, which we will be discussing later in this article. Note that, you can convert your QuickBooks desktop pro. This requires the following steps:
Step 1: Essential factors
Before you start with the installation and download QuickBooks procedure, make sure to check the following things:
Ascertain that the system meets the necessaryconfiguration
Ensure that your internet connection is stable
Always buy a legitimate version of QuickBooks
Step 2: Buy and Download QuickBooks
The very first step here is to head to the official intuit website
After that choose the version of QuickBooks you wish to download
You can compare the price of QuickBooks Desktop, Enterprise, Pro, and Premier on the website itself
And then click on the product your wish to download QuickBooks and purchase
Once done with that complete the payment process by entering the payment details
Furthermore, you will get your license and product code
Moreover, a confirmation will be sent to your email
You will also be able to see the download QuickBooks tab
Now, click on the tab
In addition to that, select the location where you wish to save the file
Once done with that, click on save and your QuickBooks download will start
Let the process end and then it will direct you to the installation process
Step 1: Make sure QuickBooks Mac Desktop will run on your system
In order to ensure that your QuickBooks installation is successful, make sure that your system meets the minimum requirements for QuickBooks for Mac.
System Requirements
Supported by macOS 10.13 (High Sierra), macOS 10.14, and at least macOS 10.12 (Sierra) (Mojave).
Intel Core 2 Duo or better processor.
An Intel Core 2 Duo or better processor is required to run a multiuser server.
2GB RAM (4GB RAM suggested)
250 MB of Disc Space in available
An Internet connection or CD/DVD drive is needed for downloaded installation.
Whether you wish to print receipts, checks, deposit slips, lists, purchase orders, mailing labels, reports or graphs, you would require a printer which is compatible with Macintosh.
To print checks, use Intuit checks.
Check for Canadian Image Ready are not supported.
Need product registration.
Software Compatibility – Note that the program should be transferred to a supported ecosystem for extra support if the issue is not fixed. Intuit won’t support the above-discussed items if Microsoft doesn’t.
Step 2: Get License and Product Numbers
Download the Product: You will get a confirmation email, which includes the product number and license. In case you do not get the license number, then you might get it back, or might have to speak to the support team.
Download with CD: The package’s scratch-off label shows the details regarding product and license numbers.
Step 3: Download and Install QuickBooks Mac Desktop
The very first step is to download QuickBooks Desktop for Mac.
In case you are having any sort of issue with the downloading process, you can try clearing your browser’s cache and cookies.
Now, close any background processes.
Further, insert the QuickBooks CD into the CD-ROM and further double click the installer. The window will open on its own.
Now, place the application folder’s QuickBooks icon there and the program folder will open.
You now have to open QuickBooks by double-clicking on it.
Step 4: Update and convert your company file
You must update your company file to work with the latest version. The steps involved in here are:
You need to first launch the latest version of the company file.
Further, go for upgrade option in case QuickBooks asks you to update or convert the company file.
Once done with that, click on ok tab.
You now have to verify your accounts, reports, and balances to ensure that the right company file was converted.
Step 5: Set up multi user (Not mandatory)
Just in case, you have more than one user license, then make sure to configure QuickBooks for multi user mode. The steps involved here are:
At first, open multi-user folder.
Furthermore, the program folder should now have the QuickBooks server icon.
You now have to insert the admin username and password.
Also, choose authenticate to mitigate the applications folder and further click on ok tab.
You can now launch QuickBooks and open the company file.
In order to share a company file, click on file and hit activate multi-user mode.
What does a User have to do after downloading QuickBooks Desktop Software?
It is important that the user downloads QuickBooks correctly and saves it in the default or desired location. Once done with that, it is essential to install and configure QuickBooks Desktop. Also, ascertain to choose appropriate installation option and further set up accounts after the install process ends.
How can an existing user get QuickBooks Desktop?
For an existing user, it is essential to first take a backup of the company file to recover them in the event of the data being damaged somehow. You are then required to download and install the new version of the program using the same procedure as above. This method works for the current users who want to remove the QuickBooks desktop version before downloading the latest version. Those who don’t want to update the software by removing the old version must use the update process within the software itself.
What are the features that you get in QuickBooks Desktop Software?
You can avail of the following features in QuickBooks Desktop:
PDF Invoice and Attachment Review: Well, with this feature, there is no need to manually open each and every attachment to verify the accuracy of the email’s content. You can further preview invoices and attachments using this feature.
Streamlined Bank Feeds: You can automatically categorize your bank transactions with additional information using improved matching, enhanced rules, and batch editing. In order to increase flexibility and efficiency, you might easily search, categorize, and define using enhanced rules.
QuickBooks tool hub: This tool can let you eliminated a bunch of errors and glitches in QuickBooks and further gives access to multiple tools.
QuickBooks Desktop Manager: With this, you can quickly find and install all of your QuickBooks Desktop products. And further install and upgrade the QuickBooks Desktop software with only a few clicks.
Customize and format payments receipts: By personalizing the payment receipt format and further including a logo, you can now make your customer communication a bit more formal and professional. You will further get a simple layout designer tool that will let you generate a variety of formats to use with your specific customers.
RFA Improvements: You can easily request a second admin for QuickBooks.
Changes to online banking: You can easily store the customizations made to the column. Further, create guidelines for conducting money-in or money-out transactions.
Advanced user management feature: It is now easy to control the roles of the users and their permissions using the advanced user management function. You can further limit the activity, especially for user access, so that you can further provide each user with a set of permissions.
Inventory Aging report: You get the detailed overview of stocks, age, age of acquisition, and quality with this report.
NEC and MISC tax forms 109: The 1099 MISC and 1099 NEC forms are now supported by QuickBooks and are easy to e-file and print.
Receipt Management: These features can easily let you create and categorize QuickBooks receipt expense transactions. Now, record, review, and import receipt data using the mobile QuickBooks app.
Now that you know what are the steps that you can carry out to download and set up QuickBooks successfully, it is time to implement those steps and make the most out of this software. However, in case of any queries or if you are stuck at any point of time, then our tech support professionals can help you with the process ahead. You simply have to contact our team at +1(844)405-0907 and let them perform the procedure for you. We are a team of technically sound QuickBooks professionals who work around the clock to provide immediate support and assistance.