How to move your QuickBooks Company data file from QuickBooks online to QuickBooks Desktop:
Opting for QuickBooks desktop or QuickBooks online depends upon the requirements of a business. At times, in order to meet those requirements, it becomes essential for a business to migrate from QuickBooks Desktop to QuickBooks Online. And this migration process requires you individually move QuickBooks Company file to QuickBooks online as well. To help you out with this, we have come up with this segment right here sharing the complete details about transferring QuickBooks company files data to QuickBooks online successfully. Thus, to explore further, make sure you stick around till the end, or if you are someone from a non-technical background or if you are skeptical about performing the steps manually, then feel free to reach out to our tech support professionals at+1-888-510-9198 and ask them to perform the required steps to migrate the file successfully.
Are you Sure about Migrating to QuickBooks Online?
Before you proceed with the migration, it is essential that you are sure whether this migration will turn out to be compatible for your business and its current requirements. There are certain situations that will help you in deciding whether this migration is ideal for you or not. The complexity of the company file plays a vital role in the success of the migration process. The company file stores the complete details about the company from inventory to accounting records. And when the company files are large, they are usually companies with extension histories, large inventories, and large sizes on the whole. And if such a company is using QuickBooks enterprise for the time being, then converting to QuickBooks online isn’t an ideal decision.
That simply doesn’t mean that QuickBooks enterprise users cannot migrate to QuickBooks online, but you might require some additional setup. In case you are a small or medium-sized company using QuickBooks desktop pro, premier, or premier accountant, then you can easily opt for migration.
Essential tips before moving ahead with the conversion
The process of converting the company file from QuickBooks online to the desktop can be a little tricky. However, there are certain pointers that need extra attention to avoid any kind of further mess. Here is a list of essential points that you need to focus on before implementing the steps for migration or conversion.
Often users miss out to keep a check on their internet explorer version, which can create certain issues later, especially compatibility issues. Thus, it is suggested to perform the necessary steps and check the version of the internet explorer being used. Note that the internet explorer should be windows version 10 or higher to perform the conversion smoothly. If not, then the user might need to perform the steps to upgrade to the latest version.
Another point that you can’t afford to miss out on is that the desktop software must be the 2004 edition or the latter one in the case of windows. The reason behind this can be that conversion is only possible with 2004 and later versions.
Note that the QuickBooks desktop software should be compatible with internet explorer. And internet explorer should be 32-bit. This is because the 64-bit version tends to show up an error and hinders the process.
In case you are making use of Mac version of QuickBooks, then direct conversion is not possible. And also, the process for this conversion might be different from the normal one.
Also, the user should have access to at least an invited accountant account if you are already a master or a company administrator, to avoid any kind of mess later.
The user might need an ActiveX to carry out the conversion. Thus, before performing the steps, make sure to get ActiveX.
Steps involved in transferring, migrating, or moving company file from QuickBooks Online to QuickBooks desktop
Now that the user is ready with to migrate the company file, he/she is required to perform the below steps to successfully move the company file from QuickBooks Online to QuickBooks desktop. Thus, make sure to implement the below-listed steps wisely:
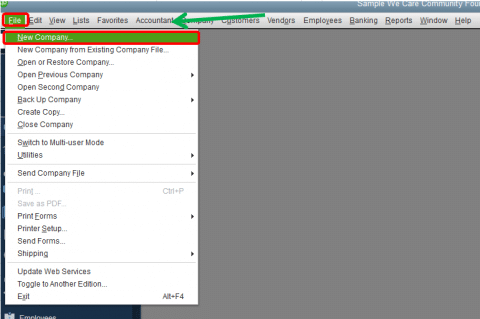
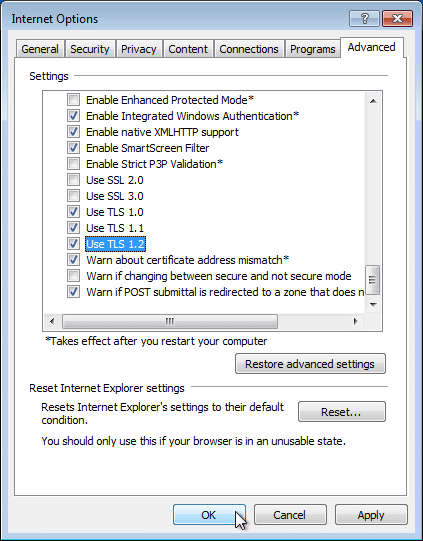
Step 1: Setting up security settings in Internet explorer
The process starts with setting up the security settings in internet explorer or Microsoft Edge. The steps below are to be performed to carry out this process. Let us have a look:
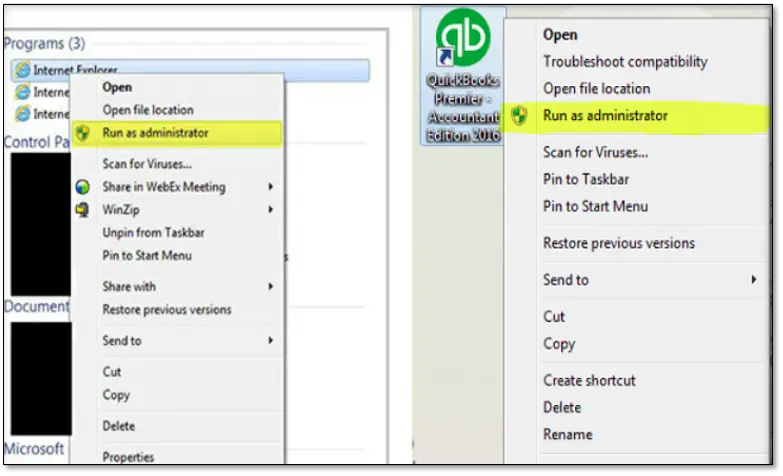
The process starts with right-clicking the Internet Explorer icon on the Run as admin option.
Once done with that, the user is supposed to click.
The user is then required to go for the Tools icon
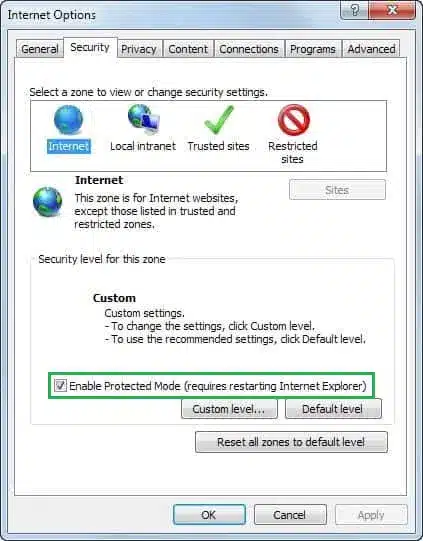
Followed by selecting the Internet options.
Once done with that, the user needs to go for the Security and trusted sites option.
Here, one must click on the Sites tab.
After that, in Add this website to the zone field, the user is supposed to enter: *.intuit.com and *.qbo.intuit.com
The next step is to uncheck the “Require server verification for all sites in this zone “.
And also, close the trusted sites window.
Later, go for the Apply option
After that uncheck Enable protected mode.
After that click on the Okay tab
And close and re-open Internet explorer to Disable the protected mode.
To end the process, one must leave internet explorer open.
Step 2: Setting up QuickBooks desktop for Export
The second step is to set up the QuickBooks desktop for export. This process involved the below sub-steps:
At first, the user is supposed to right-click the QuickBooks desktop icon
Once done with that go for the Run as admin tab
In case the user hasn’t downloaded the QuickBooks desktop already, then it is suggested to download the trial version.
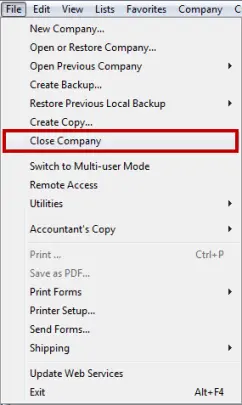
Once done with that, the user is supposed to move to the File and then go for the Close company option.
After that leave the QuickBooks desktop open at the time of completing the rest of the steps.
Step 3: Getting ready to export QuickBooks online data
After the above steps, the user will have to prepare for the export. This involves the steps below:
The very first step here is to open the version of QuickBooks that the company file will be converted to.
Note that the experts recommend to avoid opening the company file and also don’t go for no company open window.
Once done with that, the user is supposed to log in to the QuickBooks Online account.
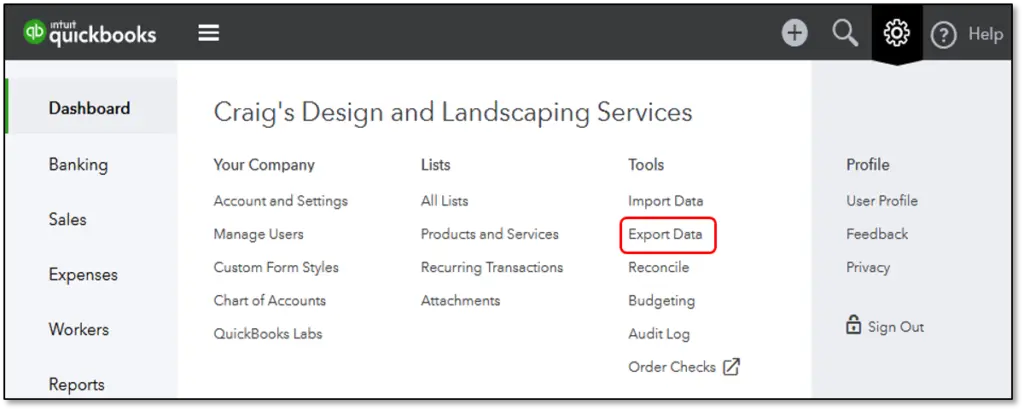
After that, opt for the Gear icon
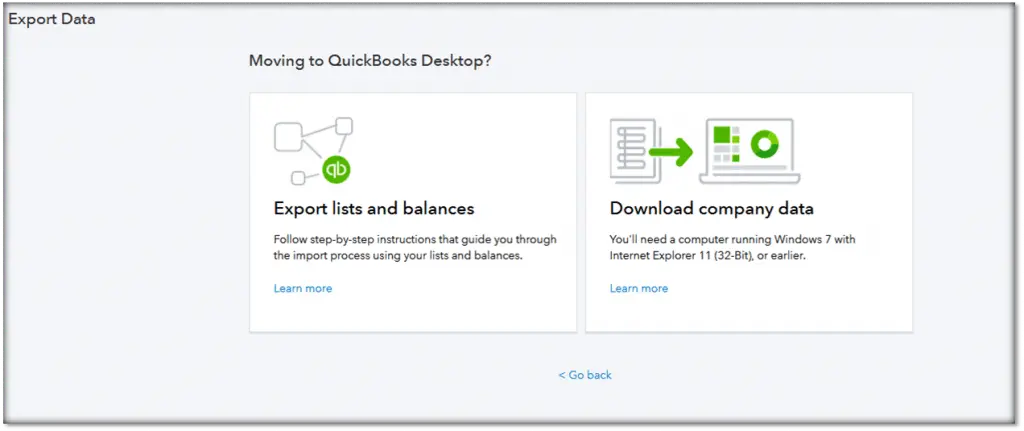
Now, under the Tools tab go for Export data.
And opt for the reason from the pop-up window
Also, click on continue tab
And then, select Learn more under the download company data.
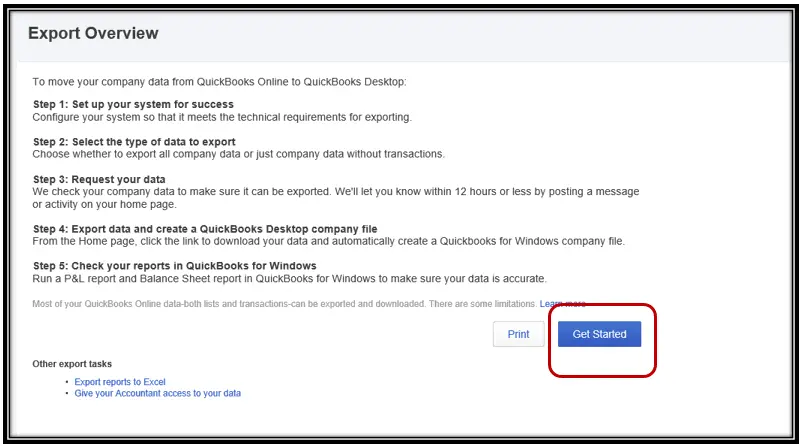
The next step is to review the Export overview.
And choose the get started tab
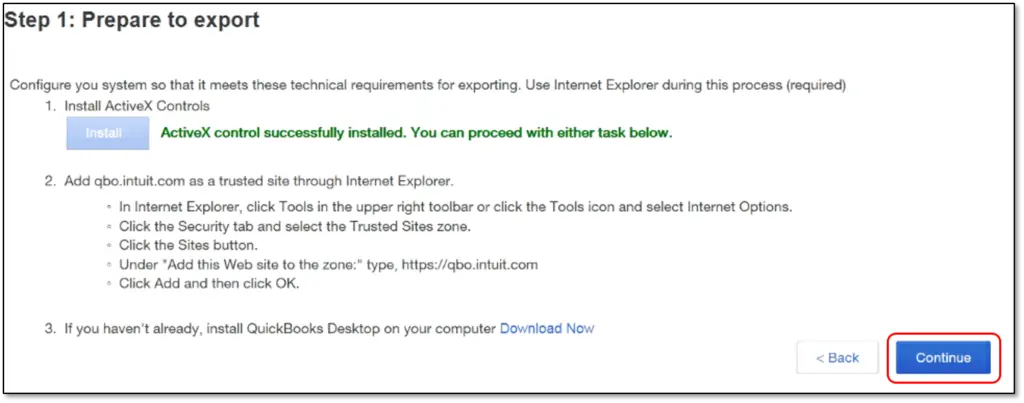
After that go for Install for ActiveX control
Pick to Install ActiveX Control Now to confirm the installation.
And also select to Continue after the installation comes to an end.
Now, pick the Data to export
Hit the Continue tab
Review the limitations of the data to export.
And click on the Continue tab respectively
The last step is to enter all the contact information and then choose the Continue option.
It should be noted here that the user might receive an email with steps to end the export conversion within a few minutes to hours. This depends upon the amount of data prepared.
Step 4: End exporting the data
This is the last set of steps to be performed to complete the process.
At first, get back to the export page
And then, head to the setting tab
The user is then required to select the Export data in QuickBooks Online.
Once done with that, the user should perform the same steps and prepare to export the QuickBooks online data.
After that go for the Continue tab to download on the exporting from QBO page.
And switch to QuickBooks desktop.
The user needs to ascertain that No company open screen appears and also check if the company file is open
We suggest the user to visit the file and choose the Close company option.
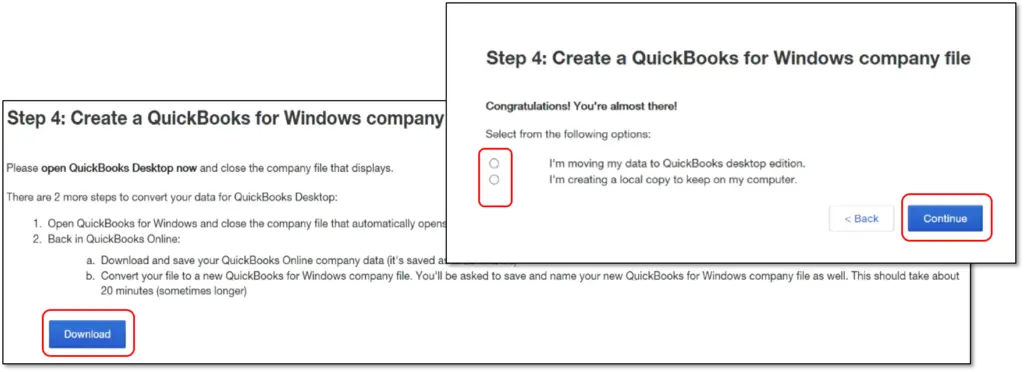
Also, go for the preferred option
The next step is to choose the Continue option.
And click on the Download option.
Once done with that the save the company file window will appear on the screen
And the user will be required to pick a location to save the file.
After that a pop-up window will appear asking where to save the file
After which the user will have to go for the Convert now option.
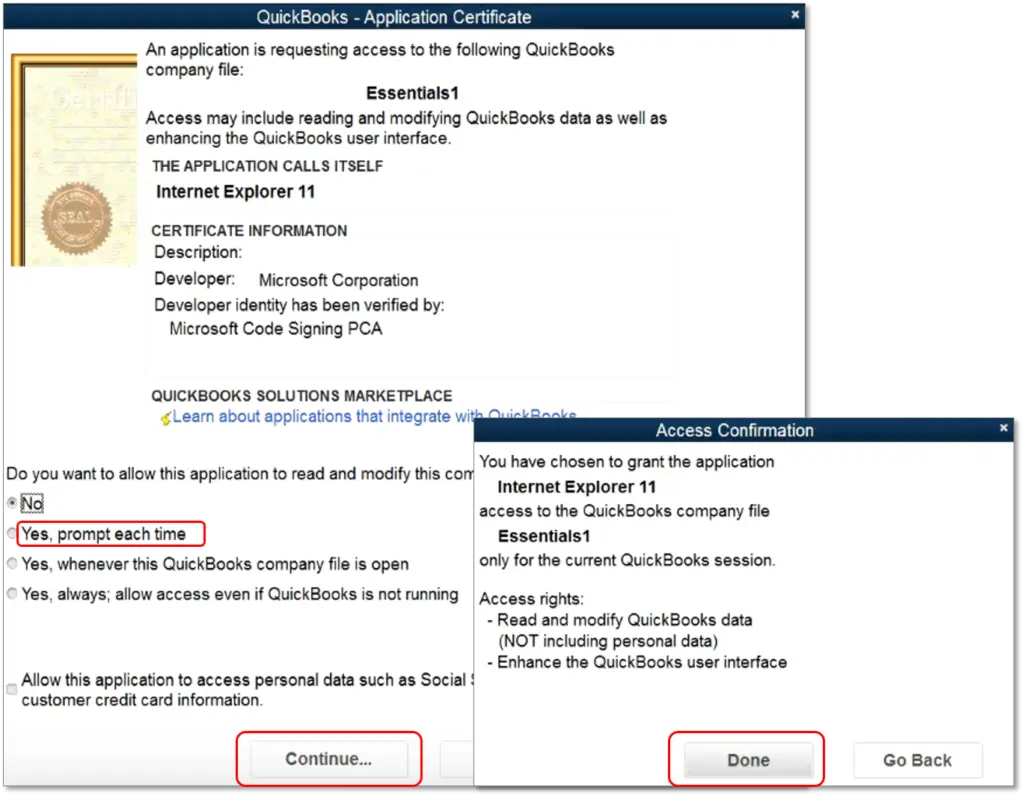
And hit the yes tab each time in the application certificate.
Now, choose Continue and then select Done.
Go for the Finished tab and then Run reports to end the process right here
This brings us to the end of the article, and we expect the reader to successfully move the company file from QuickBooks online to desktop making the best use of the steps listed above. On the contrary, if the user ends up in some or the other error or if the user gets stuck at any point in time, then contacting our tech personnel at +1-888-510-9198 is suggested. We are a team of certified QuickBooks professionals who work round the clock in providing the best support for QuickBooks-related issues. Thus, feel free to share your queries with our team and let them help you with the issue.
QuickBooks error code 1612 is usually seen when we try to open QuickBooks or a company file. One can come across such an error, when the update process stops suddenly, bring an error message on the screen. This error further shows up with a warning message. To help you deal with this issue, we have come up with this segment sharing the complete information including causes and fixes. To know more make sure to read the article till the end. Or you can also consult our team at +1-888-510-9198 and let them help you with the process.
What is QuickBooks error 1612?
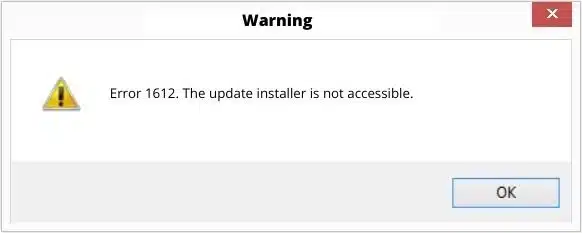
Talking about QuickBooks error code 1612, this error often arises when the user tries to open the software and the QuickBooks company file or when the user tries to update the software to the latest release QuickBooks desktop error 1612. This error appears on the screen with a warning message that states “Error 1612: The update installer is not accessible”. This can be a bit annoying error and might hinder the smooth working of the software and is required to be eliminated immediately.
“Error 1612: The update installer is not accessible”.
Implementing the steps discussed above can help the user eliminate the QuickBooks error code 1612 successfully. However, if for some reason the error does not resolve or if the user is unable to eliminate the issue for some reason, then in that scenarioour team of professionals can help the user in getting rid of the error permanently. We are a team of technically sound QuickBooks experts who are well-versed with the steps and procedures that are to be performed to rectify errors in QuickBooks. All you need to do is to call our QuickBooks customer Support number at +1-888-510-9198 and we will provide the user with instant support and assistance.
FAQs – QuickBooks error code 1612
What is Error code 1612 in QuickBooks?
The QuickBooks Error 1612 belongs to the series of installation errors that appear when installing QuickBooks or updates corresponding to QuickBooks. Such an error can also be seen when the installation of QuickBooks Desktop software is interrupted or incomplete due to various reasons, such as system issues, network issues, or incomplete installation files
What leads to error 1612 in QuickBooks?
This error can be seen due to the following causes: 1. A corrupted installation of QuickBooks. 2. Or if Windows Registry is damaged. 3. A virus or malware attack on the system can also lead to this error. 4. The installation process by obstructed by a sudden power failure.
How does QuickBooks Error 1612 appear?
Such an error is often experienced with a warning message that states “Error 1612: The update installer is not accessible”.
Just when you think everything is working fine, you might land upon random errors hindering the smooth working of the software. Some glitches should resolve by a simple reboot, while others might need to perform certain other steps. One such error that we are going to highlight in today’s article is QuickBooks error OL-334. Well, this error is basically a banking error or can also be termed as a banking setup and connection error. One might come across such an error when there is an interruption in the internet connection or if the internet connection is poor. This error basically highlights that there is some sort of issue with the bank. This can be either any sort of improvement offered by the bank related to the admin or related to the web connector. Tackling errors in QuickBooks Software is easy, as every error can be resolved using some steps and even the banking errors are no exceptions.
The QuickBooks Banking error OL-334 can be resolved easily using the steps that we will be mentioning later in this article. Thus, we recommend you stick around till the end and understand every method properly. But if you are a newbie or have zero technical knowledge, then you should consult a professional for eliminating the issue. You can contact our experts at +1-888-510-9198 and ask them to help you out in fixing the error permanently.
What lands you in QuickBooks banking error OL-334?
As mentioned earlier, there can be a couple of factors leading to QuickBooks banking error OL-334. Find out what those reasons are below:
One of the basic reasons can be an inactive bank account empowered for online banking in QuickBooks.
Performing download or import incorrectly can fix QuickBooks banking error OL-334.
Bank servers or internet service providers can also be a common reason behind the occurrence of such an error.
A discontinued adaptation of Windows or QuickBooks desktop can trigger error OL 334.
Important points
Before you jump on to the procedures to eliminate such an error, it is very much essential to perform certain activities or keep certain things in mind. Let us have a look:
Ascertaining that QuickBooks desktop is up to date to the latest release is a must to resolve QuickBooks banking error OL-334
Reaching out to the bank to verify the account information and that the bank is not experiencing any outages at that moment.
One has to re-check if there is an active internet connection. If yes, then verify the firewall and internet security settings to continue.
Procedures to eliminate QuickBooks banking error OL-334
We believe fixing the errors in QuickBooks require real time knowledge, and so we have curated the list of the solution steps that would help you fix the error.
Process 1: Create a new test company file
This method requires the user to choose and Click new company
The next step is to Add a Bank account, in the newly created test company
After that set up the account for Bank feeds.
Now, download bank feed transactions to test the account.
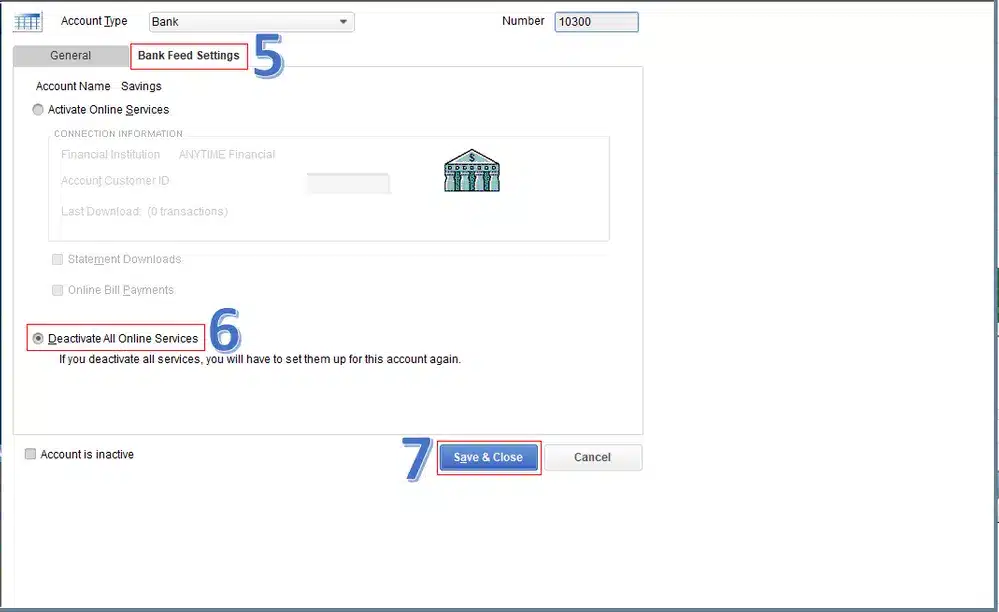
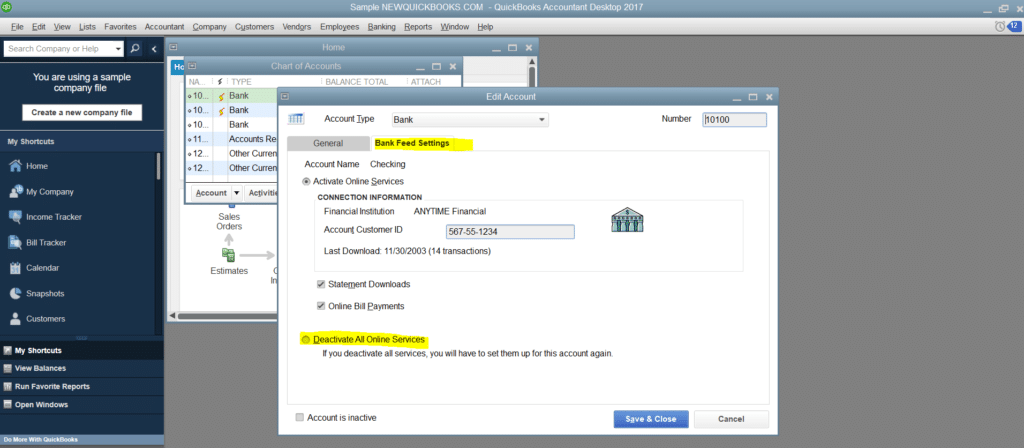
Process 2: Running the account set up with the ctrl key
This process demands creating a backup of QuickBooks company file.
Once done with that, look for the Inactive account in QuickBooks file.
After that, deactivate the account for Online services.
End the process by running Bank feeds setup again and pressing the Ctrl key.
Process 3: Deactivating all accounts
Towards the end, the user will get an option stating chart of accounts, where one has to select the include in active checkbox and further click on deactivate bank feeds.
Eliminating the QuickBooks banking error OL-334 becomes a cakewalk once you are thorough with the steps that can be performed to get rid of the error. In case the error continues to trouble the user, even after implementing the steps discussed above, then contacting our tech personnel at +1-888-510-9198 will help. Our technically sound professionals will be able to help you in removing the error from its root cause successfully. Thus, do not hesitate in sharing your queries with our professionals.
Frequently Asked Questions
What is QuickBooks Banking error OL 334?
QuickBooks Banking error OL 334 is basically an error code that occurs when there is an issue with downloading transactions or connecting to the bank when using online banking services in QuickBooks.
Is there a way to prevent QuickBooks banking error from occuring?
Note the below options to prevent QuickBooks banking error from occurring: 1. Make sure to correct and update bank login credentials entered in QuickBooks 2. Update QuickBooks to the latest release 3. Maintain a stable and reliable internet connection for online banking activities. 4. Review and update the bank accounting settings in QuickBooks periodically to ensure they are accurate and properly configured 5. Keep your system and network security measures up to date, and be cautious when accessing online banking services.
Can using a different browser help resolve QuickBooks banking error OL 334?
Well, yes in many cases, switching to a different browser or clearing the cache and temporary internet files of the current browser can resolve connectivity issues and therefore, fix the error.
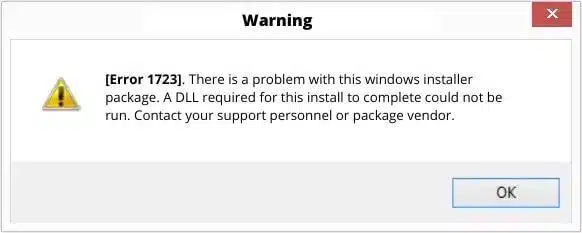
Who would enjoy working on a software that brings in issues out of nowhere? Well, of course none of us would entertain that, and so is in the case of QuickBooks error code 1723. One such error that any QuickBooks user can experience in QuickBooks is the QuickBooks error 1723. Not known to many, but there are a few components including the windows installer engine that are needed to install and update the software on windows. Any kind of damage to the installer can hamper the process and result in QuickBooks error code 1723. This error appears on the screen with a warning message that states: Error 1723: There is a problem with this Windows installer package.” This error indicates improper functionality of the QuickBooks application due to misconfiguration or missing windows components. One might come across this error due to a handful of reasons, which we will be depicting later in this article.
Thus, if you are interested in learning more about this issue, then scroll through the article with full concentration. However, if you are looking for a team of professionals who can help you with eliminating this issue, then feel free to reach out to our tech personnel at +1-888-510-9198 and they will provide the user with instant support and assistance.
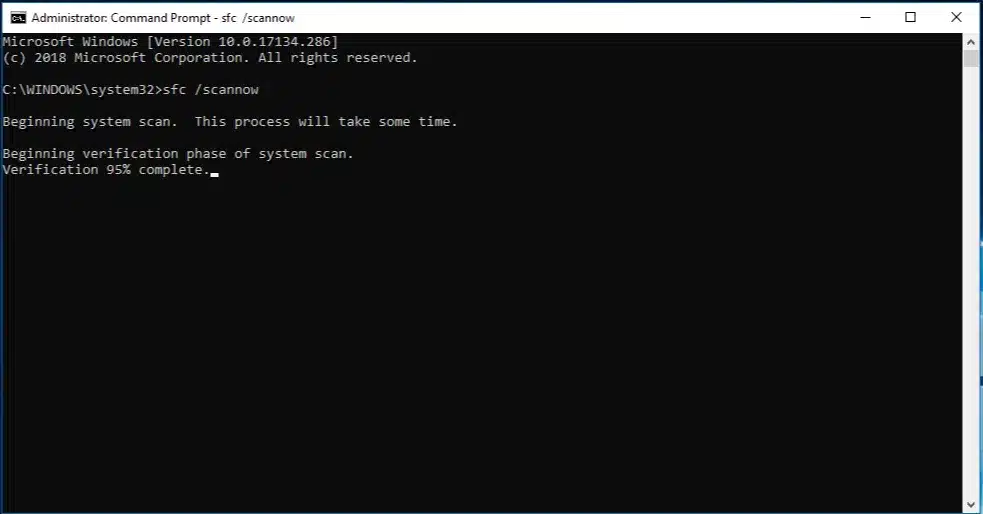
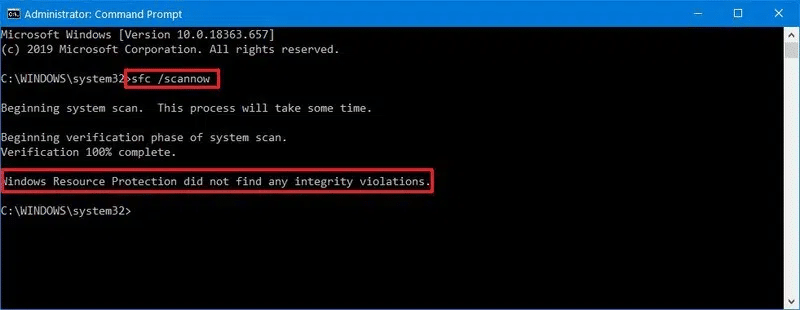
Go for Run as admin. In case prompted, Enter the password.
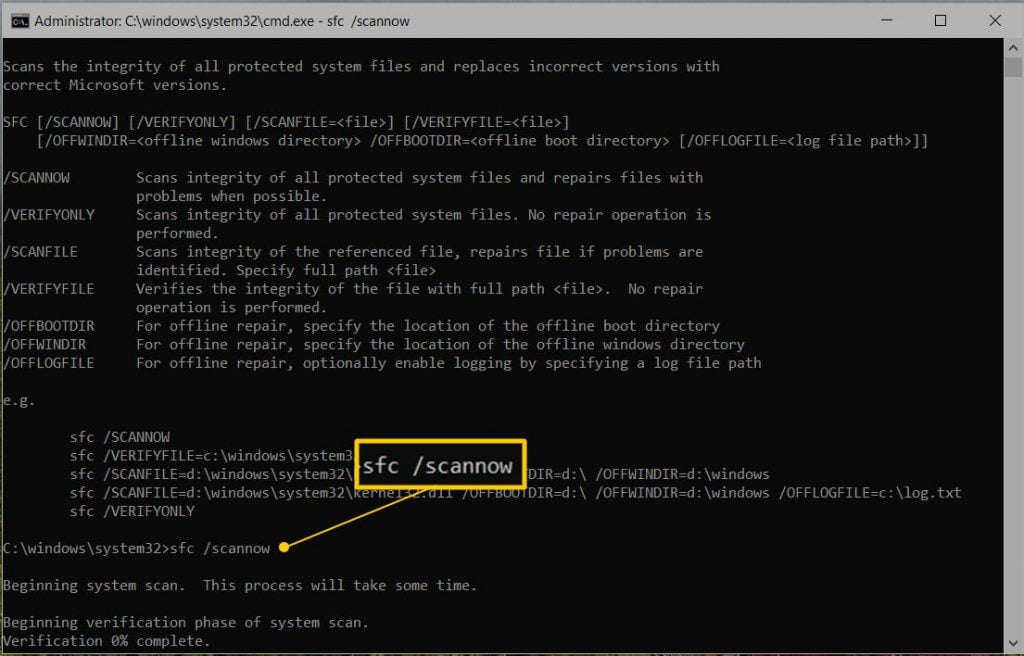
Enter in SFC/scannow in the command prompt window
Hit the Enter key.
The system file checker tool will scan and repair the corrupted files.
Wait for the tool complete the scan and reboot the system after the process ends
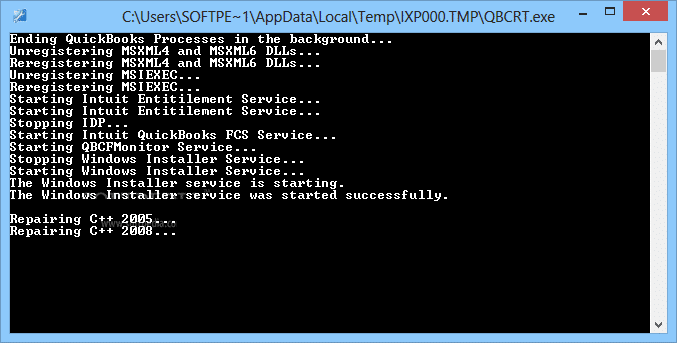
Process 5: Run QuickBooks component repair tool
Just in case you are unable to eliminate the error even after performing the methods above, then you can run the QuickBooks component repair tool. The steps involved in this process are as follows:
Start the procedure by rebuilding the .NET framework
Reconstruct the microsoft msxml manually
try the tasks with the help or under the guidance of the IT professionals
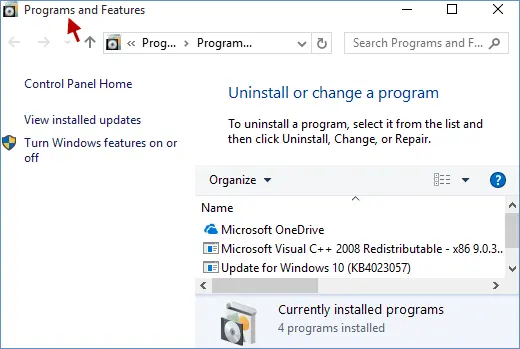
Process 6: Reinstall Java Program
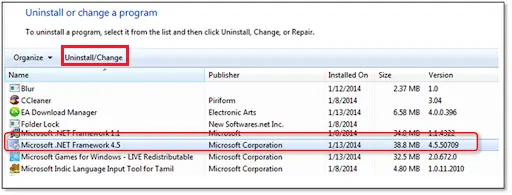
Other than the above stated methods, one can also try to uninstall and reinstall Java on your computer. The steps involved in this process are as follows:
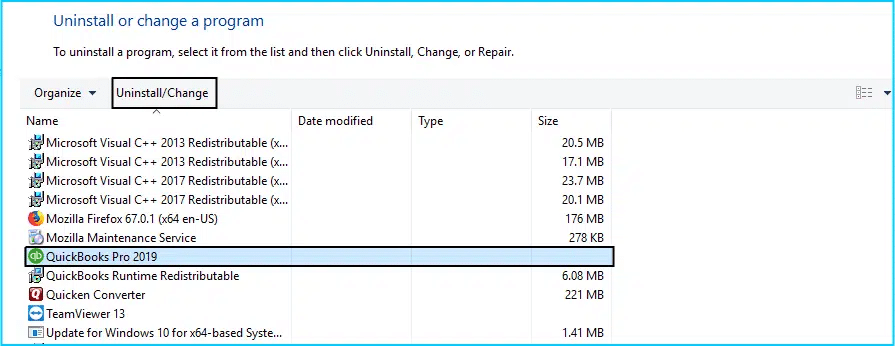
Start with heading to the control panel and choose Programs and Features
Find Java in the list programs and choose Uninstall
Perform the onscreen steps to complete the uninstallation process
Also, download and install the latest version of Java from the official Java website
Now that you are versed with the steps that you can try to implement to tackle the QuickBooks error code 1723, it is time to make use of those steps and try eliminating the issue from its root cause. However, if you are stuck at any point in time, or if you need our assistance in tackling the issue, then do not think much about contacting our support professionals at +1(844)405-0907 and they will instantly provide you with the right support and assistance.
QuickBooks error code 1723 is basically an installation error that often appears while installing QuickBooks desktop. It also occurs when the source of installation is damaged or corrupted or if the installer files are corrupted.
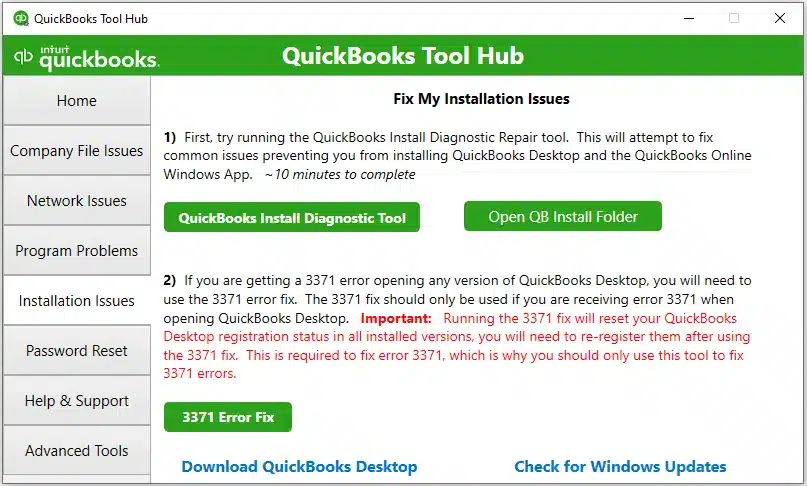
What is QuickBooks install diagnostic tool?
QuickBooks install diagnostic tool is an inbuilt feature accessible within QuickBooks tool hub. The install diagnostic tool can diagnose and fix a bunch of installation related errors. It further lets the user to eliminate errors related to the Microsoft Components.
How does QuickBooks error 1723 appears?
Error 1723 typically occurs in the form of the following message “There is a problem with this Windows installer package. A DLL required for this install to complete could not be run.”
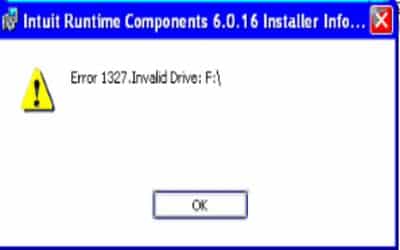
Experiencing QuickBooks error 1327? Well, such an error shows up when installing the program that refers invalid drive number. In case the USB device is disconnected from the computer system, then such an error is most likely to occur. This is basically an installation error i.e. an error that pops up while installing QuickBooks on your computer that appears on the screen with a warning message that states: “The drive [drive letter] is invalid. OR Invalid drive [drive letter]”. The message indicates that the QuickBooks is not able to find the destination drive, hence, blocking the installation process.
The drive [drive letter] is invalid. OR Invalid drive [drive letter]
If you are also facing QB error 1327, then read this article carefully. Whereas, if you are a newbie and aren’t aware of the technicalities of QuickBooks, then feel free to reach out to our QuickBooks technical support team at +1-888-510-9198 and they will ensure to help you get rid of such an error as soon as possible and that too permanently.
QuickBooks Error 1327 is usually an installation error that shows up when installing QuickBooks on the system. When you insert the installation media and try installing, then this error shows up with the following warning messages:
Error 1327
The Drive is Invalid.
Error 1327
Invalid Drive: letter.
The installed programs and their components are stored in the system in drives. In Windows, your system files and folders usually are stored in a C drive. You can check the list of drives available on the system by checking in My Computer or This PC. Such an error can be seen when the drive isn’t working properly. To help you deal with this issue, we have described the reasons behind the occurrence of such an error in detail below.
What instigates QuickBooks Error Code 1327 when installing QuickBooks?
One can land into such an error due to the following reasons:
Corrupted or moved storage devices- In case the user is trying to install QuickBooks into an external memory device, and suddenly loses connection, then he/she can see such an error.
Corrupt Microsoft .NET Framework- Microsoft .Net framework is component needed by QuickBooks to run smoothly and if this component gets corrupted for some reason, then the occurrence of such an error is quite possible.
Incorrect Registry Settings– If the entry for QuickBooks installation in your computer has the wrong drive name or location, QuickBooks Error 1327 occurs.
System-Specific Error– Other than the above causes, there might be some system-specific errors that can be solved only by a professional.
What are the symptoms of QuickBooks error 1327?
You can identify the error using the below signs and symptoms:
Windows operating system is not responding.
Or the QuickBooks program got crashed or froze.
QuickBooks desktop is frozen and not responding.
The Windows operating system got crashed.
Steps to Fix QuickBooks Error 1327
The user can try performing the below stated steps to fix the QuickBooks update error 1327 successfully:
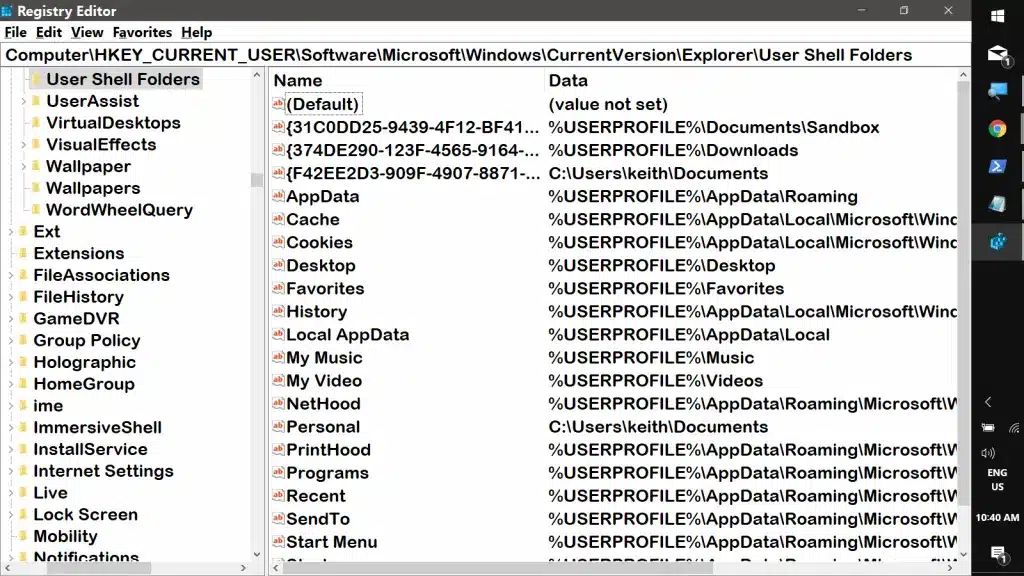
Moving ahead, head to the specific key: HKEY_CURRENT_USER\Software\Microsoft\CurrentVersion\Explorer\Shell Folders.
Once done with that spot the entries that list the drive letter mentioned in the message.
Moreover, configure the incorrect drive names to C:\
Conclude the process by saving the settings and restarting the system and try reinstalling. When the installation process comes to an end, revert the changes that were made to the registry earlier.
Also, make sure that shell folder unchecks reconnect at logon and write the path.
Hit OK tab.
Complete the process by rebooting Windows and installing the applications.
Method 3: Make sure that storage devices have a proper connection
Sometimes, connection problems can also lead to such an error. In that situation, it is recommended to ascertain that the cables and other related things are properly connected to the computer. Verify if the USBs or Flash devices that are being used to install QuickBooks desktop are functioning properly and are also connected properly.
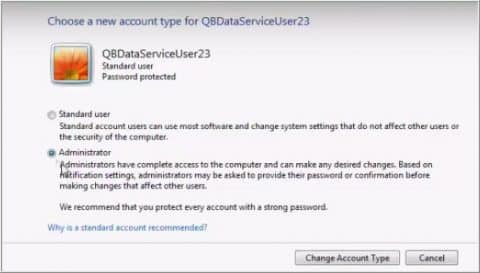
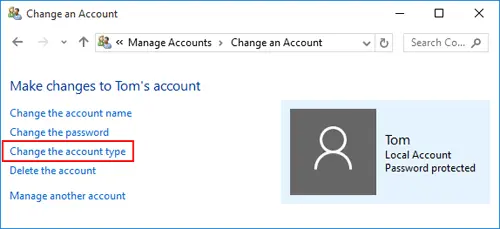
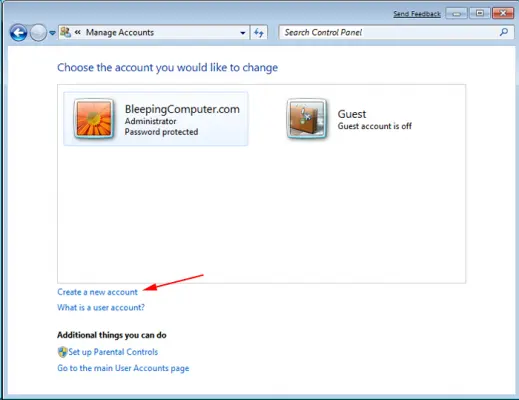
Method 4: Create a new window user and install windows
Creating a new windows user can help in fixing the issue up to a certain extent. However, the steps might differ for every version.
On Windows 10
Begin with hitting the start tab
Furthermore, click on the settings tab.
Hit accounts tab and choose family and other people.
Choose add someone else to this PC tab.
Now, enter a new password, name, password hint and
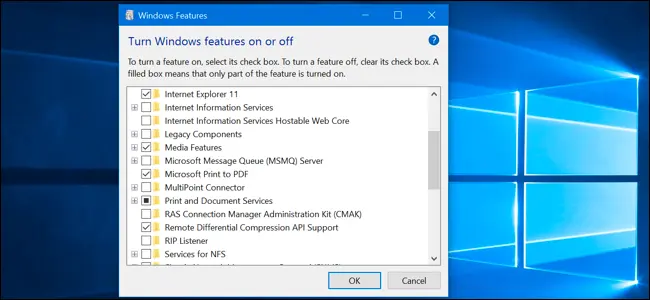
Conclude the process by opening programs and performing the same steps and also checking the box next to the Microsoft .net framework.
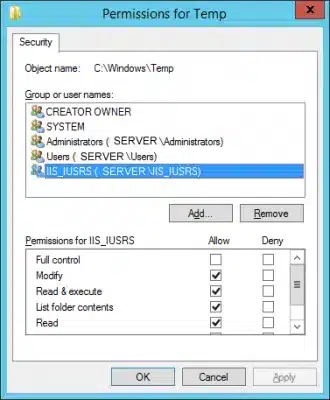
Method 6: Install when not connected to the network
Windows 10
The user needs to first press the particular windows + r on the given keyboard.
After that, open the particular run window.
Press the control panel.
Hit ok.
In the drop-down arrow, press view by and select small icons.
The next step is to open the particular network and sharing center.
Choose change adapter settings.
Press right-click on every adapter.
Also, press on disable where is available.
A message stating: the connection is lost. Make sure you do not reconnect with your network will appear on the screen.
Leave the window open.
Install QuickBooks once more.
Go back to the network connections window.
Now activate your network connections.
Windows 7 and Windows 8
Press the Windows start button, and then select the particular control panel.
In the drop-down of view by, go for small icons.
Now, open the network and sharing centre option.
Press change adapter settings.
After that, press right-click on every adapter.
Press disable wherever there is any opportunity.
The connection has been lost message appears.
Make sure you do not reconnect the network after getting this message.
Leave the window open.
Try installing QuickBooks desktop again.
Head to the network connections screen.
After the installation is complete, you must enable the network connections.
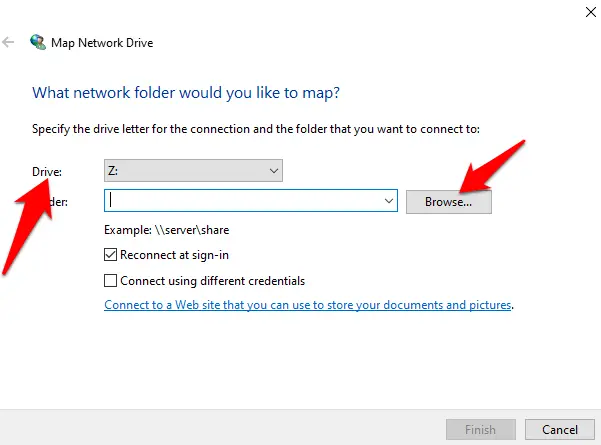
Method 7: Assign the drive letter again
The user needs to press start.
Then press on settings.
Choose the control panel.
And then, press the administrator tool two times.
After that press on computer management.
Right-click on the cd rom drive or the hard drive you wish to edit the letter of.
Choose the change drive letter.
Click on edit and then select the drive letter that is original.
Hit ok.
Conclusion!
Eliminating the QuickBooks error code 1327 invalid drive becomes a lot easier once you perform the set of steps we have scribbled in above. However, there can be situations when the user might not be able to rectify the issue even after performing the set of steps listed above, in that scenario, all you need to do is to get in touch with our team professionals using our support number i.e., +1-888-510-9198 and our technically sound experts will ensure to answer all your queries immediately. We are a team of technically sound experts who work round the clock to provide instant support and assistance. Feel free to discuss your queries with our experts and let them handle the issue for you.
QuickBooks Error 1327 generally appears when the QuickBooks program cannot locate the drive or the Network location as indicated in the error notification.
How to fix the QuickBooks Error 1327?
There can be various errors in QuickBooks and every error can be resolved using a different set of steps. Here are common set of steps that can fix the issue: 1. Fix registry settings 2. Remove the network drive to solve QuickBooks Error 1327. 3. Make sure that storage devices have a proper connection 4. Create a new window user and install windows 5. Configure Microsoft .Net framework 6. Install when not connected to the network 7. Assign the drive letter again
How do I fix error 1328 in QuickBooks?
You can try to fix QuickBooks error 1328 using the steps below: 1. Check for windows updates 2. Rename hidden files and folders 3. Run SFC tool 4. Run QuickBooks install diagnostic tool 5. Perform clean installation