QuickBooks is the world’s leading accounting & bookkeeping application for your business because it offers wide range of product as well as services. The QuickBooks Online Accountant is seamless for every category of industry and each & every sort of task. This accounting software can almost do whatsoever associated with financial management and make your tax season easier. As tax season is coming up, it is time to bring all the financial documents together. Being an entrepreneur or a business owner, this period is very hectic and tedious, if you don’t have QuickBooks financial application. Once you will purchase this accounting application for whole year, this will simply mean that you will no longer need to rush through gathering financial documents and end up with missed assets & deductions.
Having clean books and easy to understand financial statements, will lower your tax preparation costs and will give you much clearer understanding of the tax situation, not to mention the ability to plan and avoid surprises down the line. Through this post we have presented you benefits of QuickBooks accounting software which make your tax season easier.
Your Choices of Accounting Software Which is Suitable for your Business
QuickBooks Pro:
QB Desktop Pro also has fantastic attributes in it. It is the very best small business accounting software. QuickBooks Pro reveals you exactly where your organisation stands financially and far more. With the help of QuickBooks Pro software, you can manage your day-to-day tasks swiftly and efficiently.
QuickBooks Enterprise:
QuickBooks accounting software has actually included several versions, however a couple of are incredibly popular than other versions. For example, QuickBooks Enterprise solutions provides you 3 options:
Silver
Gold
And platinum edition.
QuickBooks Enterprise is a more powerful version as it can track all your accounting details, inventory items, vendors and much more.
QuickBooks silver edition has several powerful attributes.
The QuickBooks gold edition has everything consisted of in silver, plus improved payroll.
QuickBooks platinum version includes everything that the silver and also gold include, with a few bonus. As an example, it additionally comes with advanced inventory and also pricing.
QuickBooks Accounting Solutions – That Collects all Your Data
This software aids you arrange everything in one location. You do not need to fret to collect all your budget reports, financial records, and invoices. Consequently, the software is easier for you to access and even more user-friendly. You can deal with all your costs by tracking and paying expenses via the software.
It additionally offers you the option to sync with your online banking right to QuickBooks. The attribute called “Income Tracker” will aid you to produce a transaction record for your whole year or details duration. You will get automatic reports that you can select to personalize and also schedule. Obtaining reports and also solutions have never ever been simpler.
Eliminate Ghost Assets
A ghost asset is a fixed asset in general ledger which cannot be accounted because it is physically missing or rendered unusable. Not properly recording these collapses could lead to negative results in your taxes. QuickBooks accounting and inventory management software helps in avoiding these ghost assets.
This accounting software comes with tools which help in tracking your inventory along with advanced inventory tracking and inventory reporting. This report shows your company’s assets and helps calculate your COGs for the year, which you need to know for certain tax forms. Also you can customize these reports to include assembly summary, valuation summary and inventory reporting.
Don’t Forget Deductions
You may know a few deductions but less you remember you
could forget some which may have an impact on your taxes. Government uses these
deductions as a solution to encourage spending in places that they want you to.
Example of possible tax deductions includes the use of the contract labor,
vehicle expenses and then rental of business property, utilities, supplies and
more. It’s sad but many business owners forget about certain deductions,
resulting in less tax breaks than they deserve.
QuickBooks software can help you track your business with a click of a button. Reports containing information will now be easy to use and organized by category. The income-related transactions. By managing deductions you can ensure minimum mistakes and help maximize either many back or less money to pay.
QuickBooks accounting software offers many great choices but
some are more popular than others. For example, Enterprise version offers you
three options: silver, gold and platinum. It is the top-notch solution to track
all your customers, vendors, inventory items and much more.
Platinum edition includes every feature of silver and gold
including enhanced payroll, advanced inventory and pricing.
For small businesses, Desktop Pro is considered the best accounting software. It is true software showing exactly showing where your business stands financially and much more. It also helps in daily tasks efficiently and quickly. Desktop Pro Plus has the entire feature which Desktop Pro has plus some added specific features to complete daily business chores.
Organize all your data with the help of QuickBooks software
This software helps you in collect everything in one place. With QuickBooks you don’t have to worry to collect all your expense reports, receipts and financial records. This software is very to access and user-friendly. You can handle everything through the software like all your expenses by paying and tracking bills. It gives you an option to sync with your online baking straight to QuickBooks.
The tracker of income feature will help you create a transaction report for your entire year or for a specific year (based on your choice). You can choose customize and schedule feature to receive your automated reports. Easy way to get reports and answer is QuickBooks.
One of the most important aspects of using QuickBooks accounting software is that data loss can never happen, it automatically saves a backup of your company file in the main server, in case the software crashes. Just think of it that your company file is in wrong hands by accident, it can jeopardize all your business efforts. The abundance of confidential data, such as financial balance, account numbers, social security and employer identification numbers will be at huge risks.
Business owners must consider such accounting software which can describe security features in detail such as malware technology, anti-spyware and firewall protection.
Conclusion
I hope you found this information helpful for make your tax season easier. If you have any questions regarding make your tax season easier or need further information, you can simply dial our QuickBooks technical help service number .i.e ++1-888-510-9198. Our Intuit Certified ProAdvisors will look forward to your concerns and provide you a feasible solution for your queries.
FAQs
Can I use QuickBooks for tax return?
In case you use QuickBooks Self-Employed to track expenses, sort them, and record your income, filling out your tax return becomes easy. All you need to do is download your Tax Summary and use it to complete your Self Assessment
What functions does QuickBooks have for tax?
QuickBooks can automatically perform the sales tax calculations on invoices and receipts for easy and accurate filings. Then, it lets you know when your tax payment is due, so you can file on time and avoid extra fees.
How to use QuickBooks desktop for taxes?
To use the QuickBooks desktop for taxes, the user can use the steps below and add sales tax item and rate. 1. At first, head to the list menu and then choose the item list 2. After that, select new and open the new item window 3. The user is then required to select the sales tax item 4. Now, enter a sales tax name 5. After that enter a description 6. Also, enter the sales tax rate or dollar amount
How to run a tax report in QuickBooks online?
For this, you simply need to perform the steps below: 1. The first step is to head to the business overview and then choose reports 2. Now, in the find report by name field, look for sales tax liability report 3. The user needs to choose the report period dropdown 4. After that choose the tax agency dropdown 5. Now, select run report 6. And then, look at the tax amount column
At times, when you try working on the QuickBooks software, you end up in some unexpected errors like this one i.e., QuickBooks error C=1304. This is a commonly faced situation by the QuickBooks users and mostly occurs when the users update QuickBooks or install any program. The update and install errors might seem to be easy to handle, but at times are the most challenging ones, as they make your software stuck at a point from where there is no come back. As the error occurs, a pop-up appears on the screen which says, “error writing to file (file name)”. At this moment, the user needs to ensure that you have the access to the directory.
The user can also contact our QuickBooks data recovery support team at our helpline number i.e. +1-888-510-9198, but we would first recommend to make an attempt to resolve the error manually. This article can be helpful for you to rectify the error C=1304, by carrying out a few steps manually, but before that let us check out the causes of the error.
There are three major reasons for this error to occur, namely:
Any kind of problem with the CD Drive can be one of the most common reasons behind the occurrence of this type of error.
Another factor that might lead to error C=1304 can be, if the CD gets damaged or the CD driver is not functioning in the proper manner.
If there is any kind of damage to the Microsoft .Net components, then in that case the user might stumble upon QuickBooks error code C=1304.
Error Code C=1304 Analysis
Now that we know the causes of the issue, let us get a brief about QuickBooks error code C=1304. This kind of error can occur simply due to any issue with the CD or the CD drive. The problem can be fixed by copying the installation folders from CD to hard drive. Now, install QuickBooks from files copied from CD to hard drive. This would aid in resolving the error.
There are 3 troubleshooting steps for QuickBooks Error c=1304. You can follow these steps in sequence as they are given below.
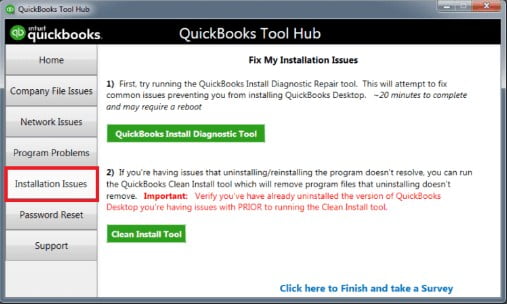
Method 1: Use the Installation CD to Replace Installation Files
In order to rectify the issue, the user can make use of the installation CD for replacing the installation files. This can be done by following a few simple steps enumerated below:
To begin with, the user needs to replace the installation files from CD to hard drive
For this, the user is supposed to insert QuickBooks CD into CD drive. As soon as the installation process gets started, the user needs to click on ‘QUIT‘ option.
Now, go to C: drive, create a new folder and paste the files there:
Select the desktop on the left pane of window, in Windows Vista, Click Organize and click on New Folder.
Once the New folder appears, rename it to QuickBooks.
After that, in left pane, right click the QuickBooks CD and also click on Explore.
Followed by finding QuickBooks, other third party folders, and setup.exe file in right pane.
The next step is to press and hold the Ctrl key, followed by selecting the folders and file.
Now, On the highlighted folder, right click and opt for Copy.
After that the user needs to come back to QuickBooks folder, right click on it and tap on Paste option.
Now, from the folders that were copied earlier, the user needs to install QuickBooks.
After that the user should open the QuickBooks folder where the files were copied.
On the setup.exe file, double click to start Installation process.
The last and final step is to follow the onscreen instructions and complete installation.
Method 2: Advanced Computer User Solution (To restore it manually)
In case the above method doesn’t work, then the user can opt for another solution namely Advanced computer user solution (To restore it manually). The steps involved in this process are as follows:
The very first step in the process is to login as the system administrator.
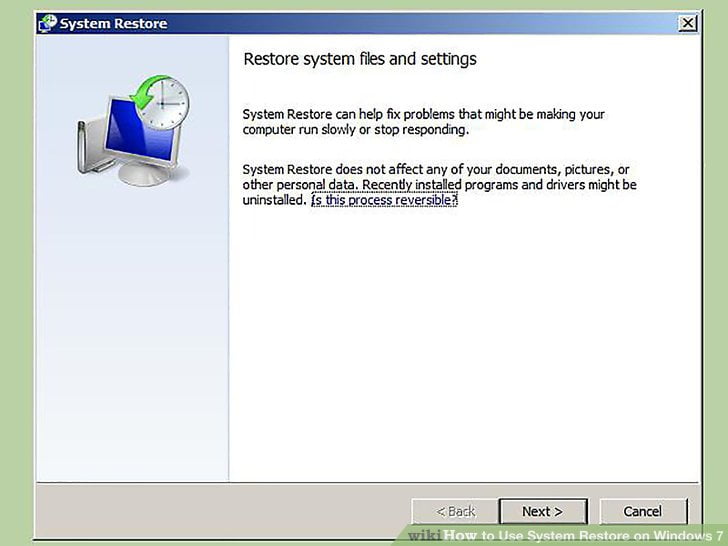
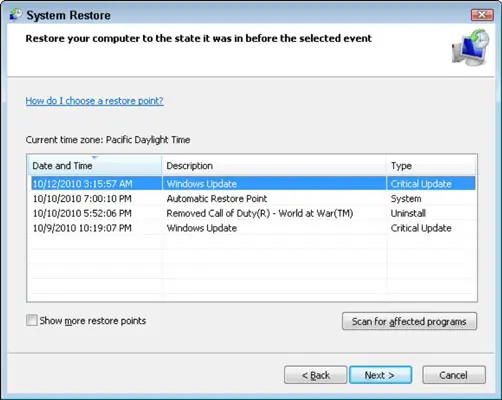
And then, click on the start button. Now, the user needs to select All Programs >System tools >Accessories, and then click System Restore settings.
Moving ahead, the user needs to select “Restore my computer to an earlier mature” button, in the growth window.
Reorganize Reduction from “On the list, click a modernize reduction list” and then, click Next.
The final step is to restart the system, as soon as the restoration is complete.
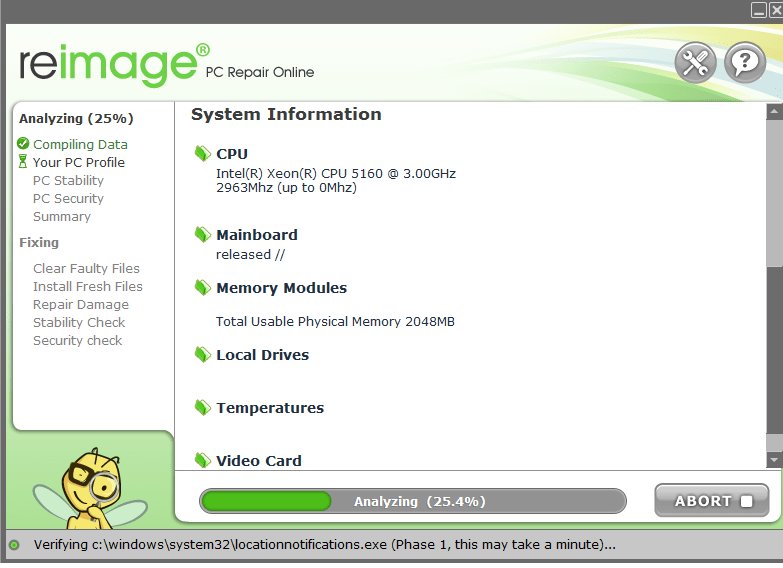
Method 3: Scanning the system with Reimage Repair Tool
The user can use re-image repair tool to scan, repair and detect the system errors such as 1304 error of QuickBooks:
Now, the user needs to navigate the file location and then double click on it. With this the Installation process will get started, after which the User Account Control (UAC) will prompt ‘if you non-existence to control the program, click Yes to continue.
After that the user will see a welcome screen, then the user needs to ensure that checkbox remain un-tick in order to allow the repair tool to scan. After this, click Install to start the installation process.
Now, the Reimage will install itself. Make sure that the internet connection is not broken.
And then the preliminary scan will also begin.
Once the scan is complete, the user will know the damaged areas of PC and would be able to repair. Click ‘Start Repair’ button in the bottom right corner.
The last and final step is to restart the system, when the repair process is complete.
Method 4: On a New Device Share CD-ROM
The very first step is to place QuickBooks installation Disc into a networked system.
Exit the window by clicking Quit when the download starts
After that head to Windows File Manager, and right-click the “CD-ROM”
The next step is to select Sharing and Security from the menu.
Now ensure that the “Share this folder” checkbox is tick mark.
The next step is to click on Apply and ok tabs respectively
Right-click on the My Computer symbol and go for Properties.
Once done with that go for the Computer Name
Click the Windows + R keys on the device you wish to download QuickBooks on
Enter the name of the computer having the QuickBooks CD.
Now, double-click the alphabet of the CD drive after pressing the Enter key.
The last step is to click on the setup file to start the download.
Method 5: Copy the Downloaded Application to Device’s Hard-Driver
The user needs to first enter the CD into the CD drive
In case the download procedure starts immediately, then click on quit tab
Now, right-click on the Windows Start button
And choose explore tab
Create a new folder in the appropriate position before transferring the data
Enter QuickBooks to make it the folder’s name.
Right-click on the CD and go for explore option
Now, locate QuickBooks and the setup.exe file on the right side of the window.
And also opt for both the file and the folder, press and hold the Ctrl key.
The next step is to right-click any folder and click on copy from the menu.
After that click on the QuickBooks folder, you established previously and choose Properties.
Now click on paste
Method 6: Repair the .NET Framework
The user needs to first install the QBDT.
This tool will resolve the issue that is related to the MS .NEt Framework.
Once done with that ascertain that you sign in your PC as admin.
Search for the QBDT & open it by clicking on them.
Download the file & save it on your PC.
Close all the running app in the background.
QBInstall_Tool_v2.exe will be seen.
The user should open the file.
Click on run to let the scanning process start
The last step is to let the repair process end
Method 7: Restore your computer system
The steps below can help in restoring the system successfully. Let us have a look:
The very first step is to sign in as admin
Now, click on start tab and choose all programs
After that, select system tools and accessories
The user needs to then click on the system restore settings
And also, choose the option to restore my computer to an earlier point
Click on the list of modernize reduction and click on next
The last step is to restart the system after the process ends
Implementing any of the above stated methods can help the user in fixing the QuickBooks error C=1304. In case, the user continues to face any error, then reaching out to our 24×7 QuickBooks error support team at +1-888-510-9198 can work in your favor. Our team of experts and certified professionals is available round the clock to resolve your errors and ensure that your work is streamlined. Thus, feel free to contact our Experts for any further details.
Frequently Asked Questions– QuickBooks Error C 1304
How do I fix error code C 1304 in QuickBooks?
The user can try eliminating the Error code C 1304 using any of the below methods: 1. The user needs to scan the system with the reimage repair tool 2. The user can also use the installation CD to replace installation files 3. Restore the system to fix the error 4. Repair Microsoft Components
What is error code 1304 in QuickBooks?
Error 1304 is an installation error in QuickBooks that appears when the system cannot read the installation files. Any kind of problem with the CD Drive can be one of the most common reasons behind the occurrence of this type of error
How do I fix a reconciliation error in QuickBooks?
Run a Reconciliation Discrepancy report 1. Go to the Reports menu. Hover over Banking and select Reconciliation Discrepancy. 2. Select the account you’re reconciling and then select OK. 3. Review the report. Look for any discrepancies. 4. Talk with the person who made the change. There may be a reason they made the change.
Are you a small or mid-sized business holder? Or an entrepreneur?? You should take a gaze upon the frequent QuickBooks Payroll and Bookkeeping Mistakes. Suppose if you present the gift card to the business employee’s & reckon them as a cash payment. Are you sure that you have a fast and easy payoff system for the taxes whilst you overpaid the employees?
It might be possible that you are using the vendor payments as payroll before receiving the Form W-9? If you don’t, then IRS would probably penalize you with some serious fines. Now read this technical article to avail complete insight on this topic. To learn further about this, make sure to stick around till the end, or you can get in touch with our QuickBooks support team of certified accounting professionals, who can help you with all your accounting and bookkeeping activities. Give us a call at ++1-888-510-9198, and get answers to all your queries.
Avoid 11 Common QuickBooks Payroll and Bookkeeping Mistakes
Avoid these 11 common payroll and bookkeeping problems that small company holders tend to make.
1. Failure to Issue Form 1099 Correctly
Be sure that Form 1099 be supposed to be issued only to self-governing or independent contractors & also to the vendors who endow the business with over $600 in services. If you fail to do so, you could tend to steep penalties.
2. Classify Employees as Independent Contractors
Your staff members may usually be either independent or self-governing contractors or employees. Selecting the correct classification is essential. Different forms are involved (1099 versus W-2), & some staff may be subject to tax preservation.
3. Proper Fringe Benefit Value Not Included Appropriately
You can take into account company cars, spousal travel, country club fees, and also housing benefits into the Taxable Fringe benefits. But it can be complicated to analyze fringe benefit value accurately.
4. If You Are Not Including the Fair Market Value of Prizes, Gift Cards, and Awards in Employee Income Totals
The majority awards are noticed as a taxable fringe benefit & the Gift cards are identified as cash should be assumed as a taxable wages.
5. Excluding Travel and Commuting from Employee Income
In numerous cases, commuting & travel expenditures are not measured as taxable income for a worker. But there are a number of unique cases such as travel expenses for short-term coursework that lengthened can be subject to income tax.
6. If You Are Doing It All Alone
There is a crisis with small business owners & entrepreneurs. They at all times struggle to deal with payroll tasks on their own. But they end up experiencing more pressure, stress, and may make costly errors.
7. Exclude Reimbursements for Expenses from Re-portable Wages
The correct exclusion of reimbursements for expenses depends upon an accountable plan where operating costs are reimbursed. Only if there is a business relationship, other reimbursements should be built-in in the taxable salary.
8. Executive Income is Not Including in Non-qualified Deferred Compensation
Here is the thing that maybe Executive compensation is a subject matter to an excise tax. You be familiar that if this is neglected, there is a relief program. But only certain oversights are eligible.
9. Neglect Backup Withholding for Vendor Payments
You probably know this very well that a company pays the vendor before receiving the Form W-9 (Request for Taxpayer Identification Number and Certification). It could be subject to a payment of 28 percent for backup withholding.
10. Not Depositing Withheld Taxes in a Timely Manner
Withheld taxes are supposed to be deposited in regular payment terms on a semi-weekly or monthly basis. However, some amounts need a deposit on the next business day. If you are unable to deposit it appropriately…! This can lead to late fee deposits, penalties, and also interest charges ranging from two to 15 percent.
11. Thinking your way through the task
Entrepreneurs will as a whole theory their way via accounting when they aren’t entirely specific what they’re doing. The problem is mystery mixes after time, potentially leaving a year of books that you have to fix at evaluation time.
Few Examples include:
Not categorizing costs properly
Overlooking tax deductions
Missing filing on declaring target dates since guides weren’t done in a timely manner
In case, you are also facing some unnecessary penalties from the IRS – you should Hire a professional bookkeeping service to handle your business payroll tax concerns and reporting…! Because the bookkeeping services give you tension-less accounting experience and also help you to grow your business.
To know more on QuickBooks Payroll and Bookkeeping mistakes or to hire a specialized bookkeeper for your business – you can dial our toll-free QuickBooks payroll helpline number with no hesitation .i.e. ++1-888-510-9198. Our Certified accountants and bookkeepers are ready there to help you out with your accounting and payroll related problems. We have covered a large area all over the USA and other countries.
FAQs Related to Payroll and Bookkeeping
What are the mistakes in payroll?
A common mistake that might be seen in payroll can be miscalculating pay. Poor time tracking capabilities can contribute to miscalculated pay. Moreover, if the company doesn’t have a reliable way to track employee hours or paid time off, then your chances of making a payroll overpayment or underpayment mistake skyrocket.
What are common bookkeeping mistakes?
A few common bookkeeping mistakes include: 1. Not hiring an experienced bookkeeper and professional accountant 2. Improper record-keeping of financial transactions. 3. Inaccurate categorization of income and expenses.
How do I fix payroll mistakes in QuickBooks desktop?
You can simply perform the below steps: 1. In the show paychecks from and through, enter the paycheck date. 2. Choose the paycheck that has the incorrect pay period and double click to open. 3. Once done with that, choose paycheck detail. 4. In the review paycheck window, enter the correct pay period dates.
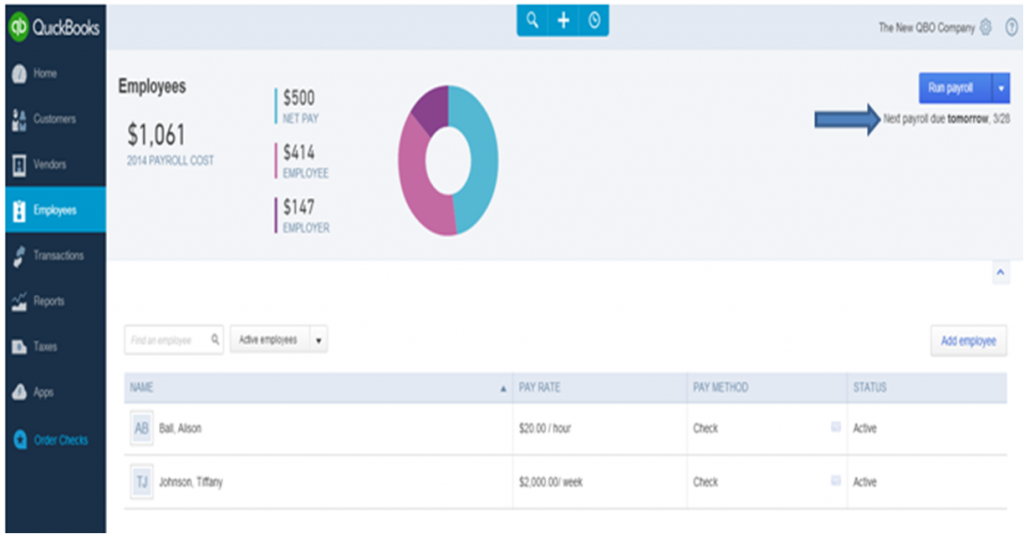
Paycheck is important for an employee, and the procedure to make one paycheck in QuickBooks Online is just like paying your employees simultaneously. The main difference is that, in this case, you will choose only the only employee to cover from the list- not all of your employees. If that you would like to create one-time payroll check in QuickBooks Online which means that you need to follow some steps.
The steps for create one-time payroll check in QuickBooks are mentioned below. However, if you want to ask any question or share your inquiries with us, you can join our QuickBooks payroll customer service team for immediate help. Give us a call at +1-888-510-9198, and we will provide you with immediate support and assistance. Our certified QuickBooks professionals will ensure to answer all your queries immediately.
A payroll reminder may also look under “Run payroll“. It’ll change dependent on the cover date. Or in case you have pay programs, then you will realize the date the payroll is expected. Cut off time is contained if deposit is busy.
The concept to get second payroll run will even upgrade once all workers are compensated. Or the pay date has now passed.
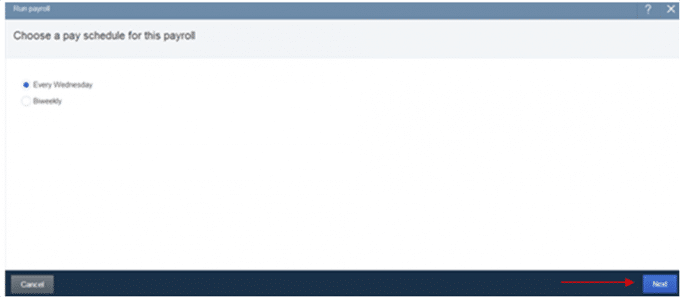
Choose the ‘Pay Schedule’ icon and then choose the “Continue” icon to proceed.
Choose the name of the desired employees that you would like to pay. Whether you’ve got the pay period and assess date check.
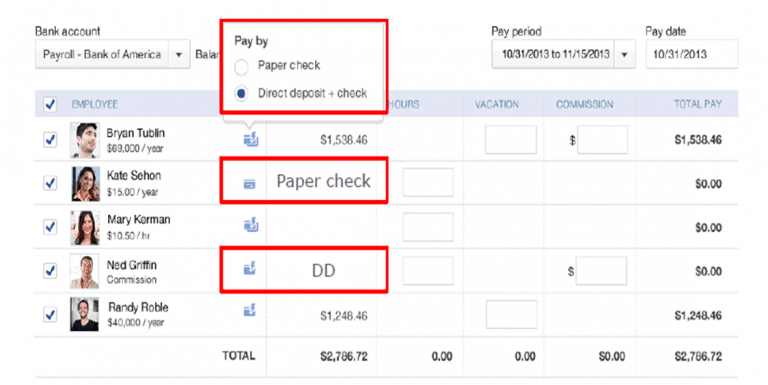
Input the amounts and hours to your workers.
In case you are not able to observe all pay forms, “resize or maximize” your browser window.
Choose the “Gear icon” to hide or show “Pay forms“.
Hourly, Salary and Commission cover forms cannot be concealed
To get rid of it from payday, simply assess the cover type. The system will remember the settings till you alter it.
You could also put in a memo about the Memo area. The amount is dependent upon width and the size. We advise that you restrict the amount of letters.
Choose the “Preview Payroll” to proceed further. Or you can also click on “Save for Later” icon to save the progress.
You also have the capability to toggle between DD, Direct Deposit +check, and Payday display. This is a 1 time change.
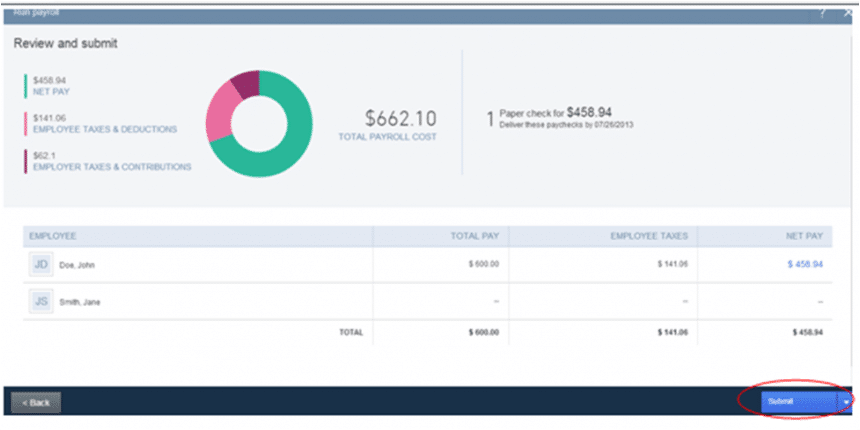
Choose the “Submit” the pages.
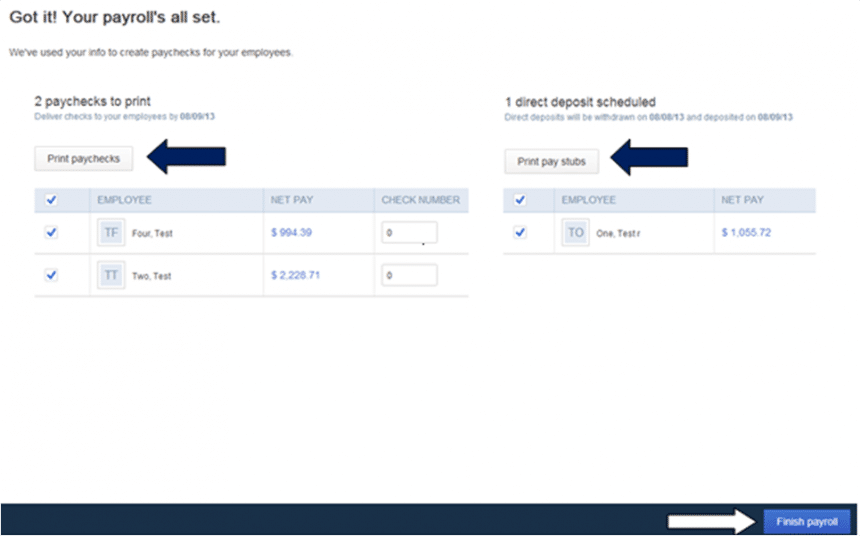
Choose the “Printing Paycheck” & “Printing Pay stubs” icon. Later, choose the “Finish Payroll” tab.
You’ve got an choice to auto-fill assess amounts. To accomplish this, enter the primary number and choose Auto-fill to fill out the list. It will override some amounts. This is available from the advance that is cash flow.
For direct deposit checks, an email is delivered before the cover date confirming direct deposit checks have start to process.
The number of deposit checks will show up in the mail. You might also see the TotalCost account (on the Reports tab) to examine your complete direct deposit payroll amount.
How to Resolve Error: Submitting payroll QuickBooks Online Payroll?
Most of the times, it happens that you may get an error: “You have selected tax liability account on a transactions where it is not allowed or have not specified a tax rate” when you submitting a payroll.
This error occurs if the accounting preferences mapping were incorrect.
How to Fix this error?
To resolve this error follow the below given steps:
Important: The account is set up for payroll liabilities and payroll expenses.
How to Create Paychecks — Intuit Online Payroll?
To create Paycheck in QuickBooks online Payroll, follow the following steps.
First of all Choose the “Payday” option.
Select a Pay schedule in case you’ve got multiple.
Enter in the amounts & hours for employees. When an employee does not appear on the initial page in Create Paychecks:
Mark the employee checkbox to deselect all employees.
Choose the ‘Continue’ icon to keep to another page of employees.
Choose the “Create Paychecks” tab.
Verify the pay check amounts, and also the payment procedure.
Direct deposit checks:
“Yes” icon will show in the Direct Deposit column when the tests will act as direct deposit.
“No“, in black text, means that the worker is put up to be given a paycheck rather than direct deposit. However, your payroll account isn’t yet active for direct deposit:
To validate the business bank evaluation trade, visit Verify test trade. (Choosing Approve Paychecks also spares direct deposit checks for transmission out of the bank to the worker’s bank. The true processing and transmission of capital will not happen until 5:00 p.m. PST two business days prior to the cover date.)
If one or more workers will be given a paper test, enter the test number(s). Then pick the “OK” icon.
After picking Approve Paychecks
You’ll have the ability to Printing Paychecks.
For immediate deposit checks, an email is delivered before the cover date confirming direct deposit checks have begun to process. The number of deposit checks will be displayed in the mail. You might also see the “Total Cost account” (on the Reports tab) to examine your complete direct deposit payroll amount.
Use the above-shown methods to create one-time payroll check in QuickBooks Online. If you are facing any technical hassle or issues, you can freely contact the QuickBooks online support number .i.e. +1-888-510-9198.
We appreciate for your visit..! To get more information related to QuickBooks and bookkeeping come back soon.
FAQs Related to Create one-time Payroll Check in QuickBooks Online
How do I run one time payroll in QuickBooks online?
You can run payroll using the steps below: 1. Navigate to the payroll menu and further choose run payroll. 2. After that, choose a pay schedule and hit continue. 3. The next step is to choose the employees you want to pay. 4. Further, verify that you have selected the correct pay period and pay date. 5. Once done with that change the employee’s pay method as required. 6. Enter hours worked, if applicable.
How do I create a check in QuickBooks online payroll?
You can do this by: 1. First select employees. 2. After that go for pay employees and choose from the check types scheduled payroll, unscheduled payroll, or termination check. 3. The next step is to choose the appropriate schedule a and choose start scheduled payroll. 4. Once done with that verify the pay period ends date, check date, and QuickBooks bank account.
Can I do payroll in QuickBooks online without subscription?
In case your client only needs payroll services, then you can simply offer then QuickBooks payroll service without QuickBooks online software subscription. This means that even without QuickBooks online, you can manage payroll-only client.
Is QuickBooks payroll free?
QuickBooks online payroll pricing are as follows: Each employee is an additional $6/month for core, $8/month for premium, and $10/month for Elite.
An easy guide to change QuickBooks services or Inventory item types
It’s important for every business owner to create inventories of their purchases, sales, products, services, and anything else that needs to be tracked. And since QuickBooks is extremely user-friendly accounting software, it makes it as simple. QuickBooks services or Inventory Item or QB inventories is not a tough task, here are some simple and effective methods to add them to QuickBooks. To learn further about changing service or inventory item types in QuickBooks, make sure to read this segment till the end. Or you can also consult our technical support team at +1-888-510-9198, and we will provide you with instant support and guidance.
Understand QuickBooks services or QuickBooks Inventory items
Before jumping onto any conclusion, it is important to understand the basic difference in between QuickBooks Services and QuickBooks Inventory Items:
An Inventory Item can be defined as anything that the company offers, resells or acquire within the course of company, just like the product, delivery fees as well as handling fees, discounts and excise responsibility (tax) (if applicable). It seems as a line on an invoice or various other sales forms. Setting up things integrate inventory part and also sub-assemblies right into a single product.
QuickBooks Services or Inventory Item
A Service is something that you offer to your clients to help them with their business and individual needs. You charge them to complete a task or by the hour. Service items can be created in QuickBooks Pro inside the list of items for the services that you provide. This helps the users to get rid of manually writing the similar item details into sales forms of the services that they offer.
QuickBooks Inventory Items:
A QuickBooks inventory item, on the other hand, is anything that your business sells, resells, or purchases within the course of business such as the product, charges for shipping, charges to handle the product, and applicable excise duty or tax. On invoice and other sales forms, it would appear as a line. Assemble items put together the inventory part and sub-assemblies.
The user can simply create service products in QuickBooks pro inside the Item list, for the services that are offered by the user. This assists in escaping repeatedly writing a comparable item information into sales forms for services offered.
Steps to create your service items in QuickBooks Pro
Go to the “Item List” window.
Click “Item” on the lower left.
Once the drop down box opens, click the “New” command.
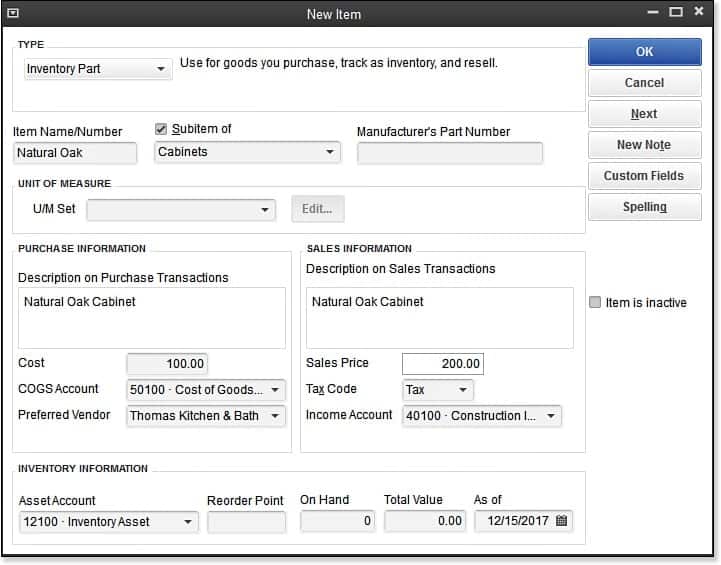
After “New Item” window pops up, choose “Service” from Type drop-down menu.
In the “New Item” window, the fields will appear and look like ones like creating “Inventory Part” items.
In case you face any trouble or require assistance you can contact Pro Accountant Advisor team that is certified from Intuit. Our team of certified QuickBooks enterprise support experts has cutting-edge tools and technology to fix all sort of QuickBooks related issues.
Different types of Products and Services and ways to change them
With an exception for bundle and inventory items, it should be noted that the products and services can be easily changed for one type of item to another. The items mentioned generally have a different way of tracking. It should also be noted that there are 4 item types in the Products and Services list on QuickBooks accounting software.
Different product/services types
Inventory items: Inventory items can be purchased and sold and
their quantities can be tracked. You will be required to choose the Tracking
Quantity on Hand option for this item type.
Non-inventory items: To define Non-inventory items, it can be said that they are those items that can be purchased and sold but it is not possible to track their quantities, such as nuts and bolts used in an installation.
Services: You provide services such as support, landscaping, and
training to your customers.
Bundle: They are like a collection of products and/or services you sell jointly, for example, a beach kit that includes sunscreen, towel, flip flops, and other items. It’s the decision of the user whether to hide or display bundle components, when sending/printing transactions.
In order to add or edit bundle items, the user needs to visit the products/services option via bundle section and set as he/she wishes to put on show your bundle items.
Important: It should be noted that the feature for tracking inventory is available just in QuickBooks Online Plus. Also, bundle items can only be used or created in the browser version of QuickBooks Online. Android or iOS mobile apps are yet to support them.
Ways to change the types of products/services
Below we have discussed few points to change the product/service type:
Change Service Item(s) to Non-inventory items:
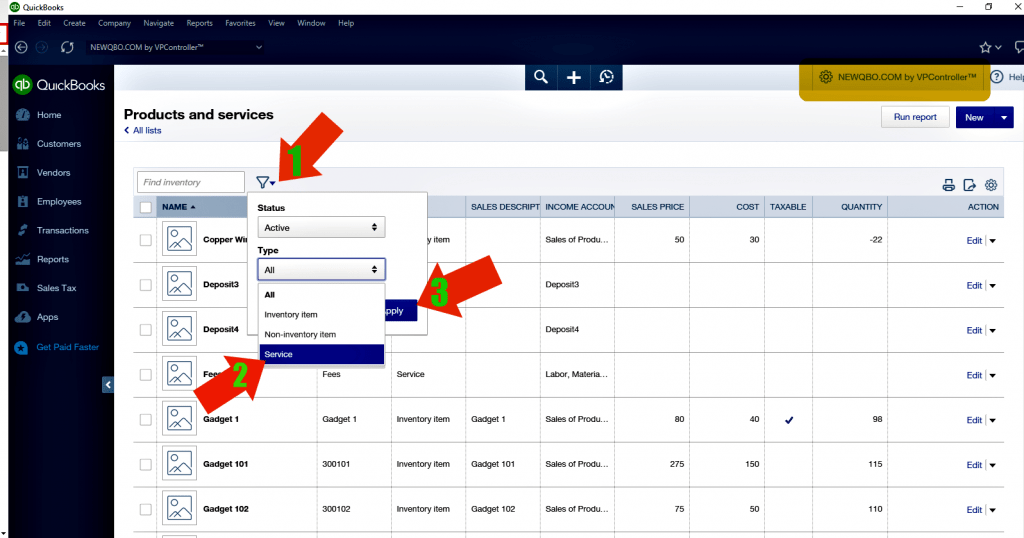
Click on the “Gear icon” on the top and select “Products and Services“.
Hit a click the checkbox in front of the service item you have to change.
And then the user needs to click on the “Batch actions” drop-down box, followed by selecting the “Make non-inventory” option.
Change Non-inventory item(s) to Service Items:
In this, firstly tap on the “Gear icon” on the top, and then select “Products and Services“.
Click the “Checkbox” in front of the non-inventory item(s) you have to change.
Now give a single Click on the “Batch actions” drop-down box and choose “Make service“.
Service or Non-inventory items to Inventory Items:
First of all, the user needs to tap the “Gear icon” on the top, along with that select “Products and Services“.
Now, search and spot the “Item you want to update” and then visit the “Action column” and click on “Edit” button.
Once done with that, the user needs to select the “Change type link” and select “Inventory” button.
Here are the additional details you’ve to enter:
Initial quantity on hand.
As of date or an effective date (It should be noted that the date mentioned must be a date prior to any transactions where this item was used).
Inventory Asset, Income, and Expense accounts.
Sales Price, Cost, and Sales/Purchasing information
The last and final step is to select “Save and Close“.
Steps to change service types in QuickBooks online
The steps below can be performed to change the service types in QuickBooks online. Let us have a look:
The very first step is to sign into the QuickBooks online
After that head to the settings tab.
Select the products and services option from the settings tab.
Once done with that, select the edit option from the action column.
Now, choose the change type tab.
And then, select the appropriate type.
The user will then have to select the save and close tabs to save all the changes.
Note that, you can use the batch action from the product and services list, in case you want to change multiple items to any type.
Important: Please note that inventory items can’t be converted to any other types. If you want to change the type of Inventory items, you will have to create a new item.
Steps to change the inventory items in QuickBooks online
The user can try performing the below set of steps to change the inventory items in QuickBooks online. Let us check it out.
Step 1: The user needs to adjust the Quantity of inventory item
The first step is to choose the products and services option from the settings tab.
After that, from the products and services list, look for the inventory item.
Now, choose the edit option from the action column.
And then head to the quantity on hand section.
After that select the edit option from the action column
Now, head to the quantity on hand section
And also choose adjust tab
Later on select quantity tab
In the inventory quantity adjustment window, enter the 0 value, in the new window.
Save the changes and close by clicking on save and close.
Step 2: Find the Total Value of Adjusted Inventory
Head to the settings tab
After that choose charts of accounts.
From the Chart of Accounts section, find out the Inventory Shrinkage Account.
Now, choose Run Report option.
Search for the inventory item that you have adjusted.
And keep the amount of the adjusted note in another place.
Step 3: Create a Journal Entry to Account
Start with clicking on the new tab and choose the journal entry
Head to the Account drop-down menu.
Now, choose the Opening Balance Equity option.
Debit Column – Enter the adjustment amount in this field. From the second line, go to the Account drop-down menu, and choose the Inventory Shrinkage option.
Credit Column- Enter the same adjustment amount in this field
We hope that you are able to add as any services or items as you wish and run your business with ease. In case you have any query or require assistance, you can contact our experienced QuickBooks technical support team at +1-888-510-9198.
We are available round-the-clock and offer nothing but the best solutions and services for all QuickBooks related issues.
FAQs
Can you change the type of an item in QuickBooks desktop?
Well, of course, one can change an item’s type, if the item is a non-inventory part, other charge item, or an inventory part. For this, you simply need to head to the lists menu and choose the item list for windows or items for Mac. And then, double click the item you want to change. After that, from the type drop-down, choose the new item type.
How to set up service and non-inventory items in QuickBooks?
For the non-inventory items: 1. The first step is to head to the sales menu. 2. After that choose products and services. 3. Once done with that click on new and then select non-inventory. 4. The user needs to then add the name of the item. 5. Followed by selecting the category that best describes the service item from the category dropdown. 6. The user will then have to enter the rest of the fields and information. 7. The last step is to click on save and close tabs.
How to change the default product or service in QuickBooks?
This can be done by performing the steps below: 1. At first, login and navigate to settings tab. 2. After that, in the top right corner, choose the gear icon. 3. The user needs to then head to the firm settings. 4. Now, under the integrations, choose QuickBooks. 5. Once done with that, choose the default QuickBooks service. 6. And save the changes. 7. Enter the information and you are done
How to edit the inventory items in QuickBooks desktop?
To edit the inventory items, the below steps would work: • In the inventory items, select lists and then choose the item list option for windows • If you are a Mac user select items. • Now, double click the item you want to change. • Also, edit the info for the item. • The last step is to click on ok tab.