QuickBooks is very reliable software for both medium and small sized businesses. It is available in various versions and caters to almost all the needs of such businesses. The software is quite easy to start and provides tech support for many issues. In this article, we will discuss how a user can navigate QuickBooks software in a faster way. QuickBooks navigation helps a user to identify where he/she can use QuickBooks.
Software like QuickBooks is quite easy to use. User can easily understand where he can create invoices and receipts. You get to know where the company information can be found and how you can work in company settings. As you know the location of everything in QuickBooks, you can be assured that you can now work efficiently and quickly. If your QuickBooks accounting software is running slow, then make sure to read this piece of writing till the end. Or you can further reach out to our technical support team, in case of any queries and our experts will help you with all your QuickBooks related queries immediately. You can give us a call at +1-888-510-9198, and get answers to all your queries immediately.
9 Easy Steps to Learn How to Navigate QuickBooks in Right Manner
Here are the nine steps that can aid in your learning QuickBooks Navigation:
1. Dashboard
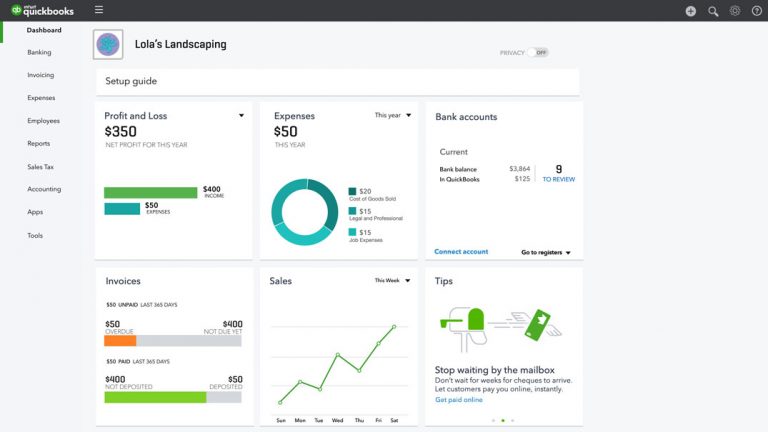
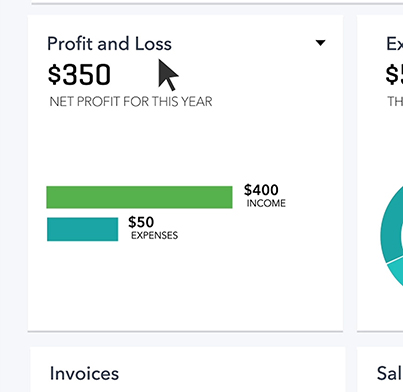
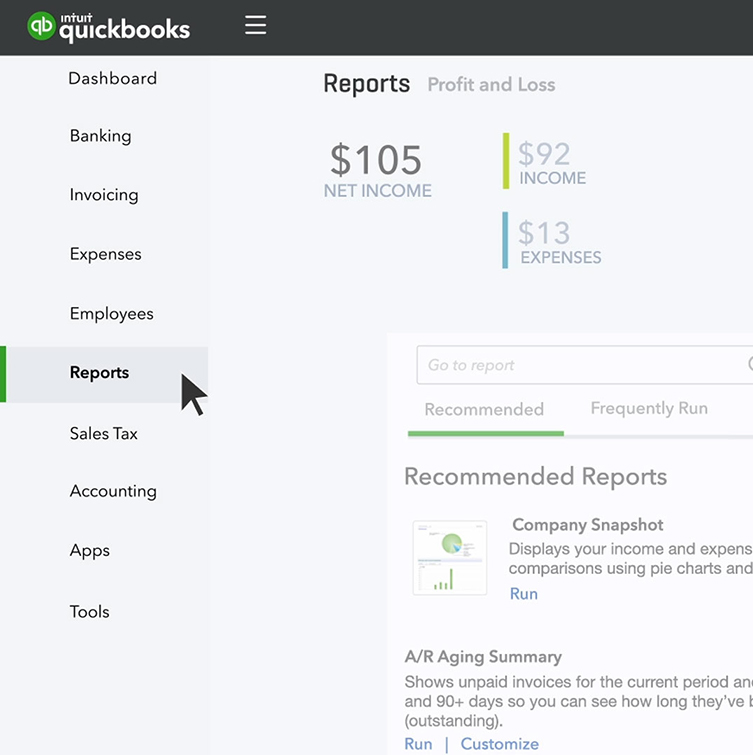
As you login to QuickBooks, you will land on to the Dashboard which is available on the top of Navigation Bar (on the left). This dashboard gives a complete and quick review of how your business is doing. The information provided here is quite useful to the users. To read the information about your business, you can click on the Dashboard.
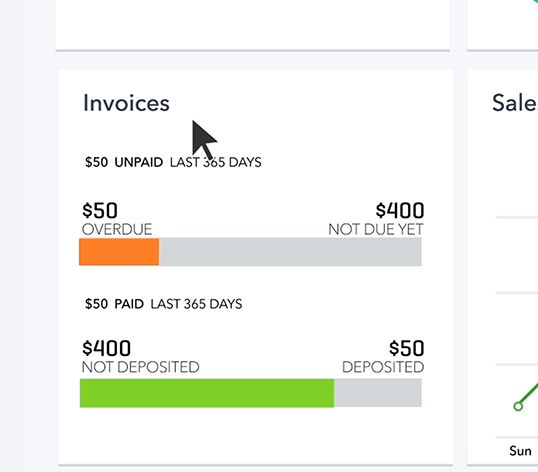
QuickBooks displays most of the information on the dashboard which includes:
Amount spent
Sales Summary
When an account is connected to QuickBooks, the transaction can be downloaded.
Check bank balance everyday
Check overdue reports of clients
Easy to understand with profit and loss
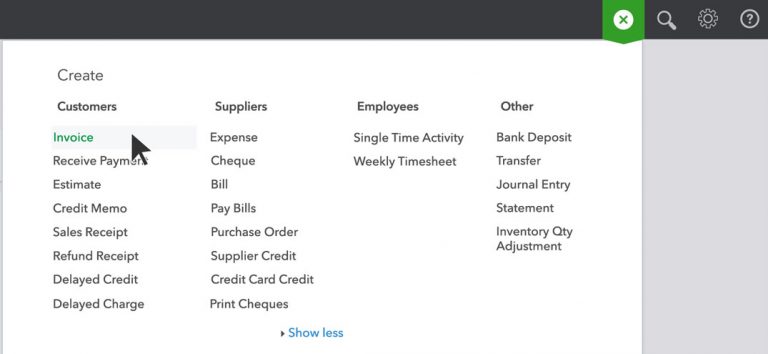
3. Creating First invoices
You can create your first invoices using the below steps:
Click on Invoices tab and hit the blue button for New Invoice
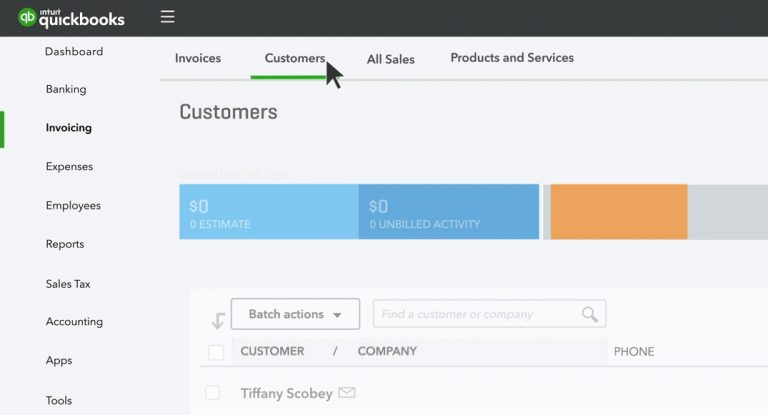
Put all the information of the client. Click on Save a customer. All the saved customers will be displayed in the drop-down menu. While creating invoices, when you choose one, the details will be auto filled.
Enter the details of the product, its amount and choose the tax percentage to be excluded or included.
You can choose the option invoices as per your convenience. These invoice options include the currency and total gross area net.
You also have an option to add special conditions like payment on delivery.
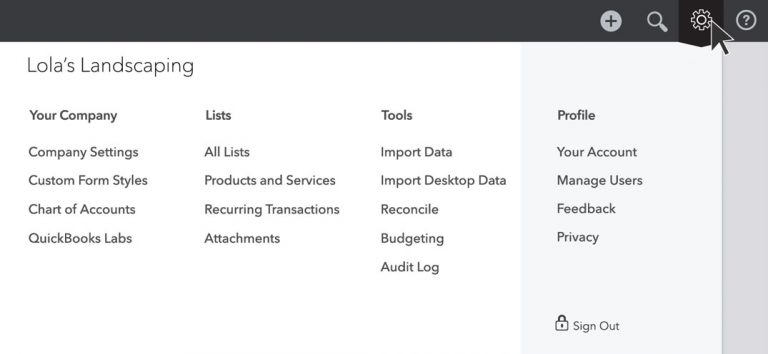
As the name suggests, this icon is quite useful to the users. Giving useful information about the company settings and profile information helps to manage everything.
Users make changes to the chart of accounts.
9. Advanced Accounting Tools
In this tab, you can see the accounting tools like,
I hope that all the nine navigation steps given above might be helpful to you to navigate QuickBooks accounting software. In case you have any questions or queries related to QuickBooks Desktop Version 2019 or the previous QB versions, you can contact our experts on our toll-free QuickBooks Support & Help Number+1-888-510-9198.
Our experts are always ready to help you with your every accounting problem.
FAQs Related to run QuickBooks faster
How can I make QuickBooks faster?
To speed up your QuickBooks online performance, you can try performing the below steps: 1. At first, run QuickBooks separately 2. After that upgrade your browser 3. Turn off any unwanted browser plugins or addons 4. Install the most recent version of java or flash 5. Switch to a different browser 6. Update your system
What are the shortcut keys in QuickBooks?
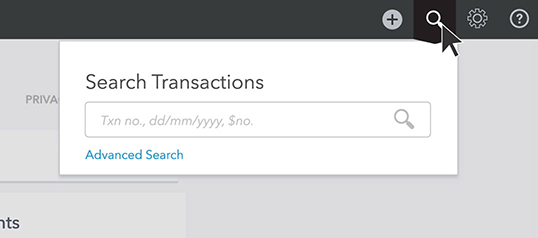
You can navigate around QuickBooks using the below keys: Open help window – F1 Close current window – Esc Open product information window – F2 or Ctrl + 1 Open the find transaction window – Ctrl +F
How do I use QuickBooks for the first time?
You can get started with QuickBooks using the steps below: 1. Add customers and vendors 2. Set up QuickBooks desktop payroll 3. Now, add your employees 4. Set up the items you buy and sell 5. Set up your other accounts 6. Make sure QuickBooks is updated by entering all transactions that occurred before your start date
It’s time to start paying your bills with the top rated service like Paytrust Software!!! Technology has taken over and no one likes stand in the queues or visit the center to pay bill for a specific item. The process now needs to be interesting, quick and safe. Right from receiving, reviewing, organizing, and paying your bills online, Paytrust can do the all for you! This will resolve the hassle of signing the cheques, stamping the papers, and you can avoid late payments. Paytrust is no doubt a better way to pay your bills. You can easily integrate Paytrust with QuickBooks to ensure smooth payments and quick processing. To learn further about Paytrust and QuickBooks, make sure to stick around till the end. Or you can also reach out to our technical support team at ++1-888-510-9198, and we will provide you with immediate support services.
Here are some of the amazing features of Paytrust Software
The security that Paytrust offers is because of the password-protected Bill Center. In addition to this, it also provides compelling customer experience. Features are as below:
Paytrust has the ability to combine both paper and electronic bills. This ensures that you receive all your bills online and do not miss any.
Get Complete Control: Paytrust equips you with the full control to manage your bills. You have the authority to set up a payment or recurring payment rules.
Pay Easily & Quickly: It enables fast and secure payments.
Banks on Paytrust: You can use any bank or brokerage account with check-writing privileges. You can also set multiple payment accounts to pay different bills and that too from different accounts.
Track your records: All the bills that are received or paid through Paytrust are saved online for an year and for eight months when offline. At the year-end, you can buy a CD-ROM which has all the bill images from the past year. You also have an option to export all the information into Microsoft Money, Excel or Quicken.
Paytrust helps you avoid late payments and skipping due dates.
You can easily track the status of all your finances.
Paytrust is a kind of life saver for small business as it offers a Small Business Edition for the small business owners.
This will give you access to the simplest way to pay and track your bills online.
As you login with the help of www.paytrust.quicken.com, you also get access to various benefits. Company also offers various great deals through which you can save a lot of money.
With Paytrust, you can eliminate all your paper bill work, scanning, and emailing. This will also help you invest your precious time somewhere else.
Steps to login to Paytrust
Log on to Paytrust website.
This will direct you to the homepage of Paytrust website where you will get your User ID and then, you can tap on the ‘Continue’ button.
Then, you will go to the next page, enter your password for Pay Trust User ID. Now, Login.
Paying Bills by hand
Traditional Web Bill Pay
PayTrust
All your paper and electronic bills are received
—
—
√
Scan all your paper bills and convert them into electronic ones
—
—
√
Accept e-bills
√
√
√
Detailed Bill is shown to you
√
—
√
Set standards to pay each of your bill
—
√
√
Set payment rules
—
—
√
Access to pay from multiple banks all in one place
—
—
√
The need for envelopes, stamps and checks is eliminated
—
√
√
Reminder for non-receiving of any bill
—
—
√
Alerts you about bill arrival, bill becoming due and payment confirmation
—
√
√
One-point destination for receiving bills, whether you move or switch banks
—
—
√
You’ll find your money comes out of the account the day the bill is paid, not sent
There is no doubt that PayTrust takes care of all the bills you would have on paper or electronic. This will eliminate not just your paperwork but will also spare your time to spend somewhere productively. You can also integrate PayTrust with QuickBooks Accounting Software to track financial transactions round the clock.
PayTrust receives all your bills and upload them to the account you have created on it. This also removes the hassle of paying any bill late or missing on any bill. It alerts you whenever a bill is received or not received on time.
All the bills are posted in online and offline account as well. In this way, you can easily view your bills without leaving the website.
All the information related to paytrust software has been incorporated in the article. The benefit of making use of Paytrust online bill pay is that it assists to save time, and also offers you peace-of-mind simply by streamlining the bill pay process. Paytrust merely enables you to authorize repayments separately every month or set up recurring payments. It supplies e-mail and telephone support 24-hour a day, 7 days a week. I have been using Paytrust for many years – from its inception. It has organized bill paying and made a very tedious task very easy and reliable. Bills are never misplaced or lost – or late. If you have any other query or want to more discuss about this topic then dial our toll-free QuickBooks help number ++1-888-510-9198.
FAQs Related to Paytrust: Online Bill Paying Software And Service
Can I pay vendors through QuickBooks Online?
You can make a vendor payment using the steps below: 1. At first login to your QuickBooks online account. 2. Now, on dashboard, choose the bill pay online widget. 3. Further, choose the make a payment tab. 4. Also, enter payment information for vendor.
How do I pay bills directly from QuickBooks Online?
You can pay bills using the steps below: 1. Initially, sign in to QuickBooks online account. 2. After that, choose + New. 3. Once done with that, choose pay bills online. 4. And further go for checkbox on the bills you want to pay and hit next. 5. The next step is to review the payment info, in case you need to make any updates, and choose edit details. 6. Now, choose submit payment to submit your scheduled payments.
Can you pay directly through QuickBooks?
You can easily pay bills directly from QuickBooks with your bank account, debit or credit card. You can further choose how your vendors receive the payment by ACH or check.
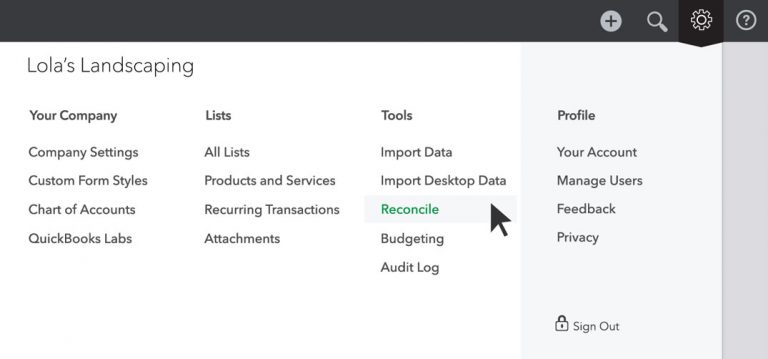
Where are payment methods in QuickBooks Online?
You can find the payment methods by performing the below activities in QuickBooks online. 1. Move to the settings ⚙ tab. 2. After that, choose all lists in the LISTS column. 3. After that, go for the payment methods. 4. You now have to find the payment method you want to edit or disable.
Self-employed is one of the most admired words now-a-days. Self-employed refers to being not pressurized and work on one’s own principles. This aspect makes one boss of their own business. QuickBooks is essential and beneficial for those who aspire to work for themselves and grow in their career. In this article, we are going to discuss the pros and cons of QuickBooks self-employed. To understand this better, make sure to read this segment carefully.
QuickBooks Self-employed suits best for the following:
Freelancers
Coaches
Creatives
Bloggers
Social Media Strategist and more.
Business Consulting:
The one who is self-employed do their business on their own terms and manage their bookkeeping account. If your client is using this form of QuickBooks, means that he is using QuickBooks Self employed as a partner in business success or commodity service provider.
Tax Planning:
Tax planning is among the important terms for a
self-employed person and they need to assemble their records and prepare their
tax. Clients usually face issue with filing for tax and find it difficult to do
tax planning.
It is available for their rescue as it helps them with tax planning and managing them. With this, they get information related to tax planning.
Retirement Planning:
For self-employed persons, it is necessary to plan for their retirement as they are not given any government recognized retirement plan. With QuickBooks self-employed, users have an option to plan their retirement at the right time and with the right standards. It has been observed that a client depends on accountant to manage his tax planning and QuickBooks self-employed help to manage all the things of business.
Here’s a table that lists the pros and cons of QuickBooks Self-Employed:
Pros
Cons
1. User-friendly interface that is easy to navigate.
1. Limited features compared to the full QuickBooks software.
2. Automatically categorizes business expenses.
2. Does not support multiple users.
3. Also, integrates with popular payment platforms like PayPal and Square.
3. Does not handle inventory management.
4. Provides detailed reports on income and expenses.
4. Limited access to customer support.
5. Offers mileage tracking to help with tax deductions.
5. No option to upgrade to a more advanced version of QuickBooks.
Overall, QuickBooks Self-Employed is a great option for freelancers and self-employed individuals who need a simple way to track their finances and manage their business expenses. However, if you have a larger business with multiple employees, more advanced financial needs, or require more robust features, you may need to look for a different accounting software or choose QuickBooks Desktop.
Benefits of using QuickBooks Self-Employed
Below we have discussed five major points of QuickBooks Self Employed that makes it unique from the other providers.
✔ Mobile Technology
Mobile technology is growing on a rapid rate because of the ease and access it provides. Users have an advantage that they can use QuickBooks self-employed on their phones which makes it quite mobile friendly.
✔ Cloud-based Data
QuickBooks also comes with an option to upload all the data on Cloud making it quite easy to handle and work upon.
✔ Data Collection
In addition to the other features, all the data is collected by QuickBooks self-employed in the similar way done by QuickBooks online.
✔ Globalization
When a user is using a product which is popular in the world, then it makes the best position in the market.
✔ Single person business and contract workers
Single person business means that you are handing all the things of your business and the aim of your product is also the one person business. QuickBooks Self Employed allows you to fetch the client’s data by just adding the account in the QuickBooks Accountant client list. In addition to this, it also allows you to review the work rather than just doing it.
✔ Globalization is the key
It makes the best the best position in the market. QuickBooks is self-employed available in the UK, USA and Australia. But, as soon this product is available in all states.
✔ Single person Business and on contract workers
Single-handed business is a good idea because you need to handle all the tasks of your own business. Aim of this product is one person business. This product is best suited for contract workers or part-time- 1099 workers rather than the W2 employee.
Focused of his product is all the tasks of business are classified and working in proper order. Everything’s gone through a process. With the help this product, you will review the work rather than to do all the data entry. It is quite easy to access all the client data by summing the clients QuickBooks Self Employed account in your QuickBooks Accountant client.
Hope the provided information is enough to understand about QuickBooks Self Employed and it’s benefits. To get immediate support or additional information, you can call us at our toll-free QuickBooks Support and Helpline number at ++1-888-510-9198. We are Intuit Certified ProAdvisors and always ready to help you.
Balancing a balance sheet is one of the most time-consuming task. You should always ascertain that the total number of assets and the amount of liability and equity in QuickBooks balance sheet must always be same. In case the numbers are not in sync, you might receive the balance sheet out of balance issue in QuickBooks. Moreover, regardless of the changes in cash flow, according to accrual basis, The QuickBooks accounting software records revenues and expenses as they occur. And in majority of the cases, the reports might reveal variations in the balance sheet.
However, there are solutions that can be performed to fix the balance sheet out of balance issue in QuickBooks. To understand what those fixes are, make sure that you read this segment carefully, or you can also connect with our technical support team at +1-888-510-9198, and we will help you with your queries immediately.
What is Balance Sheet Out of Balance Error in QuickBooks?
A balance sheet is basically a statement of business-related data that jots down the assets and liabilities of a business. A balance sheet needs to be equal on both the asset and liability side. The balance sheet out-of-balance error indicates the contrast between the aggregates of assets and liabilities. There can be a bunch of reasons behind the occurrence of such an error, which we have discussed later in this segment.
Know When Your Balance Sheet Went Out of Balance
To know when your balance sheet went out of balance, you simply need to carry out the steps below:
You need to first open Reports and choose Company and Financial.
Once done with that, you need to head to the balance sheet summary and select Customize report.
After that, click on the display tab.
And also, set the report basis to cash.
Perform necessary changes in the columns as per the year/month/week/day when the QuickBooks balance sheet out-of-balance issue occurred.
Common issues leading to Balance Sheet Out of balance
You need to check in case any type of transaction is causing the balance sheet out of balance in QuickBooks. You need to keep a check on the following transactions.
Inventory return and discount on an invoice.
Possible Scenarios
Recommended Fix
One or more inventory items are sold.
For the Sale and the discount, you have to create a new invoice.
The customer returns one or more inventory items.
For the inventory return, create a credit memo.
Discount items are there.
In the Receive Payments, link the credit memo.
Unconventional Inventory Transactions
Possible Scenarios
Recommended Fix
1. Transaction Reports that adversely affect your inventory such as # Transactions which make your Quantity on Hand negative. # Transactions records that revert the Quantity on Hand for the last entered assemblies and cause the assemblies to be labeled pending. # Washing Transactions with (-) and (+) units of the same item on the same price. # Transactions that use a damaged item and a damaged customer or vendor are damaged.
You have a negative inventory that affects your Cash Basis Balance Sheet. You have tried implementing basic data damage troubleshooting your company file when your Balance Sheet becomes out of balance one more time.
1. Transaction Reports that adversely affect your inventory such as # Transactions which make your Quantity on Hand negative. # Transactions records that revert the Quantity on Hand for the last entered assemblies and cause the assemblies to be labeled pending. # Washing Transactions with (-) and (+) units of the same item at the same price. # Transactions that use a damaged item and a damaged customer or vendor are damaged.
You have a negative inventory that affects your Cash Basis Balance Sheet. You have tried implementing basic data damage troubleshooting your company file when your Balance Sheet becomes out of balance one more time.
A Discount Applied at Job Level When Entered At Customer Level
Possible Scenarios
Recommended Fix
# Your cash basis balance sheet will be out of balance. You have a customer with several jobs. You receive a payment for the invoice, but your customer includes a discount for Job in the payment. # Enter or record the payment to the invoice when you Enter the discount on the credit tab. # You completed all of the jobs and invoices of the customer, including all jobs on the invoice.
# You have to re-enter the payment and crack open it among the job. Now enter discount at the job the level so it matches the invoice.
Journal Entry linked to a credit memo
Possible Scenario
Recommended Fix
# Open Credit Memo and enter an offsetting General Journal Entry (GJE) and then link it to the Credit Memo.
# Edit Journal Entry. # Move the A/R account to the source line, generally the first line of the GJE. # Save the GJE and ensure it still linked to Credit Memo.
Discount that offsets to a Balance Sheet account.
Possible Scenario
Recommended Fix
# You have recorded a discount and used a Balance Sheet account to offset the discount.
Change the discount account to an income or expense account. If you are instructed by your accountant to use a Balance Sheet account, and it is essential that you have to use Accrual basis reporting, instead apply this: # Offset the discount to an expense account. # Make a journal entry moving the discount from the accounting expense to the account of the balance sheet. # This will pop the discount to the Balance Sheet account while keeping your Balance Sheet in balance.
Essential Points To Remember for Balance Sheet out of Balance issue in QuickBooks
If the report is back in your balance after then you need to change the report to total by Year.
For more information check Balance sheet Report out of balance- Recurring.
If the report is back that you have to log out and login back into your balance sheet report.
Make sure to repair the server computer, if you are using QuickBooks multi-user environment.
Quick Fixes to Balance Sheet Out of Balance Issue in QuickBooks
Before you perform the detailed steps to rectify the QuickBooks balance sheet out-of-balance issue, it is essential to perform some quick steps.
You need to modify the reported total by the year and then check if the balance sheet is back in balance.
Log out the QuickBooks file and then log back in. Furthermore, check if the balance sheet is back in balance.
Back up QuickBooks company file before carrying out any troubleshooting steps.
In case you are working in a multi-user environment, then it can end up in damaged company file and the balance sheet might go out of balance. Thus, you need to fix data damage and use the main system from where the file is being hosted.
Verify and rebuild QBWIN logs before proceeding.
How to solve the Balance Sheet out of Balance Issue in QuickBooks?
Here are the measures that can be performed to fix QuickBooks balance sheet out of balance. Let us explorer
You have to enter the date/s when the Balance Sheet goes out of balance, to help you identify the transaction/s causing the problem to create a Custom Transaction Detail Report.
Click on Reports menu and then select the Custom Report.
Click on Transaction Detail.
The Modify Report window should open and if not then select Customize Report and then go to the Display tab.
From Report Date Range, enter the date when your Balance Sheet went out of balance in the From and to fields. Example: From= 3/14/00 To 3/14/00.
Make Report Basis to Accrual.
Uncheck Account, Split, Clr and Class then check Amount. It will make the report more comfortable to read.
Select OK.
The ending balance on this report will be the amount that is out of balance.
Verify the Amount column for a transaction that equals the balance of end of the report. In case there is a single transaction which matches the ending balance then implement step 3.
If you are not able to find the transaction/s which is responsible, then run the following reports.
Customer Report
Click on Reports menu and then select Customer Reports.
Click on Transactions Details.
Customize the Display tab:
Change the Report Basis to Accrual.
Customize the From and To Fields to the day the Balance Sheet has gone out of balance.
Change Total by Customer.
Click on Filter tab and then:
Onto the Filters list, click on Transaction Type.
Select Multiple Transactions from the Transaction Type drop-down and then mark Invoice, Credit Memo and Payment.
Click on OK.
✔ If the total is the amount by which the Balance Sheet went out of balance of this date: Identify the customer who has a non-zero (negative or positive) subtotal.
✔ If the total is non-zero (negative or positive) and the Balance Sheet went out of balance on this date by both the amount. Add other transactions to the Transaction Type filter such as Journal Entries and Checks.
Vendor Report
Click on Reports menu and then click on select Customer Reports and then click on Transaction Detail.
Modify Report window will open automatically. If it does not open, then you can select Customize Report, to do that click on the Display tab.
On the Display tab:
Change the Report Basis to Accrual.
Alter the From and To Fields to the day the Balance Sheet goes out of balance.
Change Total to Customer.
Click on Filter tab:
Select Transaction Type, on the Filters list.
Select Multiple Transactions and then mark Bill and Bill Credit and Bill Payment.
Click on OK.
✔ If the total is the amount by which the Balance Sheet went out of the balance on this date: Verify the vendor who has a non-zero (negative or positive) sub-total. This Vendor is the reason for damaged transactions.
✔ If the total is non-zero (negative or positive) and not the amount by which the balance sheet went out of the balance on this data: Add other transactions to the Transaction Type filter such as Journal Entries.
Journal Report
Click on Reports menu and then select Accountant and Taxes.
Click on the Journal button.
Select the Customize Report and then go to the Display tab.
Change the Report Basis to Accrual.
Change the From and To fields to the day the Balance Sheet goes out of the balance.
Click on OK.
Important Note: The Credit and Debit Totals will not match, which indicates that you have the right date when the Balance Sheet is out of balance.
Other transactions
Click on Reports menu and then select Custom Report.
Click on Transaction Detail.
A Modify Report window will open automatically, and if does not then you have to click on Customize Report and then redirect to Display tab.
From the Display tab:
Select the Report Basis to Accrual.
Choose All, from the Dates drop-down.
Change Total by to Account List.
Mark Item, from the Columns list.
Click on OK.
Go to the bottom of the report, if the last group of transactions has the heading No account and the Account column is blank, and then these transaction targets have no accounts assigned to them. Fix this by:
Click Item List from the Lists Menu.
Click on Edit Item by right click on the item.
Change the Account.
Select OK.
You can repeat all the steps for every transaction on the above given report that does not have an account.
Determine whether a particular type of transaction is putting the Balance Sheet out of Balance issue in QuickBooks.
Solution 3: Check and resolve specific forms of data damage
If there are not transactions leading the Balance Sheet to be out of balance, you will have some data damage that usual data damage resolution cannot fix. The options mentioned below provide some specific forms of data damage troubleshooting you can do. Ensure that you have created a backup before going through any of them.
Summary of Balance Sheet is out of balance while the Balance Sheet Details are in balance or vice versa.
Solution 4: If both reports have the same basis and the same data range then you may have a corrupted account.
To solve this follow the steps mentioned below:
Differentiate the two reports. Identify the account/s having two different amounts on the two reports.
Combine the corrupted account into a new account.
NOTE: You can only combine accounts which are the same type.
First of all you need to go to the Lists menu.
Now Select Chart of Accounts.
Right-click on the damaged account.
Click on Edit Account.
Add an asterisk (*) to the name of the account.
Click on Save & Close.
Perform right-click operation and then choose New.
Recreate the original account with its original name.
Click on Save & Close.
Right-click on the original account, then select Edit Account.
Remove the asterisk (*) from the name.
Finally Click on Yes to confirm that you are agree to combine the 2 accounts.
Accrual Basis Balance Sheet is in balance for Dates= All Dates, but out of balance for any other range of data.
Perform the right-click operation on the Uncategorized Expense account.
Click on QuickReport.
Now customize report.
After that click on the report date range and then select all.
Tap on filters menu and select the posting status.
Select All, from the Dates drop-down.
On to the Filters tab and then select Posting Status from the Filters list.
Click on Either and then select OK.
Repair each transaction.
Your accrual Balance Sheet is out of balance, but your cash Balance Sheet is in Balance.
Solution 6: To repair this, you have to identify damaged income or expense accounts that have a balance but have nil transactions and then combine them into the new accounts.
Learn the difference between assets and liabilities.
Click on the Reports menu and then select Company & Financial.
Click on Balance Sheet Standard.
Tap on the Customize button.
Select All from the Dates drop-down.
Change Report basis to Accrual.
Note down the difference between Liabilities & Equities and Assets.
Search the corrupted or damaged account.
Export your chart of accounts and then open the file in MS Excel.
Highlight the first two rows of the spreadsheet and then delete them.
Highlight Column G-onwards and then delete them. These columns not needed for our purposes.
You have to see OBAMOUNT in Column F and Row 1.
Choose the cell above Row Header 1 and left of the Column Header A to highlight the whole spreadsheet.
Sort the whole spreadsheet by Column F.
Search the row whose Column F amount is the difference between the Liabilities & Equities and Assets.
Make sure to write down the name of the account.
Fix the damaged account
In QuickBooks, run a QuickReport for All Dates on the account listed in Step 3B-8 above in QuickBooks.
If there are no transactions, then the reason is in Account.
There should be no balance if there are no transactions in the Account.
Make a check for one cent ($0.01) to this account.
Run the basic data damage troubleshooting on the company data file.
QuickZoom (double-click) on the account and delete the check for one cent.
Finally Run the accrual basis balance sheet to be sure it is in balance.
If your Balance Sheet is out of balance and the JE’s displays the amounts without associated accounts.
After Condensing your data, your balance sheet is out of balance, and the JE’s show amounts without associated accounts.
Solution 7: Correct the affected journal entries:
This problem will occur if you change the associated account on a payroll item after it was used on a paycheck and then run the Condensed utility.
Click on Reports menu and then select Accountant & Taxes.
Click on Transactions List by Date.
Verify the report for Transaction Type: Journal and All Dates.
Slide down and identify any Journal Entries showing an amount without an associated account.
Double-click the report entry to open the Make General Journal Entries window.
Click on Edit menu and then select Delete General Journal.
Again, go to Edit menu and then click on New General Journal.
Select Save and New.
If One column setting (e.g. Total Only) shows out of balance, other column settings (e.g., by Year) show in balance.
When viewing a Balance Sheet, total assets match total liabilities and equity in some column views, but not in others. One or more of your accounts may be damaged.
Solution 8: Identify the damaged account and merge it into a new one.
Know which view of the report data is out of balance:
Click on Reports menu and then select Company & Financial and then click on Balance Sheet Summary.
After that click on Dates drop-down arrow and select All.
Now tap on OK.
Onto the Columns drop-down arrow, select Total only and then note whether Total Assets match Total Liabilities and Equity.
When total does not match in at least one column, then note the column.
From the Columns, drop-down arrow, note whether Total Assets match Total Liabilities and Equity for all the columns onto the report.
If the total does not match in at least one column, list the column heading of the earliest instance where the totals not match.
Verify the damaged account:
Click on Reports menu and then select Company & Financial.
Choose Profit & Loss Standard.
Enter a date range in the From and To fields that match the column heading you noted in Step 1. Select OK.
On the report, Audit the integrity of each account:
Note the amount next to the first account displayed on the report.
Double-click the amount to open the Transaction Detail by Account
Scroll to the bottom of the report and note the total in the Balance
Close the Transaction Detail by Account
Combine the corrupted account(s) with the new one(s).
Your Balance Sheet is out of balance on both Accrual and Cash bases.
Solution 9: To fix this, verify and solve transactions which do not have accounts assigned.
Run the Custom Transaction Detail report
Change the Dates to All.
Now Change the Basis to Cash.
Change Total by to Account List.
Add Item column.
Finally Click on OK.
Now Scroll down of the report. If the last group of transactions has the heading No account and the Account column is vacant, then in that case transaction Targets have no accounts assigned to them. Try the method below:
Open the Edit Item window for the Item.
Set the Account and click on OK.
Restart the Edit Item window.
Change the Account back to the original account and then click on OK.
For the above report that does not have an account, You have to repeat Steps 1 – 4 for each transaction.
Some FAQ Related to Balance Sheet Out of Balance in Accrual Basis Error
What is a balance sheet out of balance in accrual accounting?
A balance sheet out of balance in accrual accounting occurs when the sum of the debits does not equal the sum of the credits in the balance sheet. This can happen if there are errors in recording transactions or if adjustments have not been made to reflect accrual accounting principles.
How can I resolve a balance sheet out of balance in accrual accounting?
One way to resolve a balance sheet out of balance in accrual accounting is to review all transactions and make sure that they have been recorded correctly. If you need further assistance, feel free to call our toll-free number at +1-888-510-9198. Our team of experts will be happy to assist you.
How can I prevent a balance sheet out of balance in accrual accounting in the future?
To prevent a balance sheet out of balance in accrual accounting in the future, it is important to have a clear understanding of accrual accounting principles and to ensure that all transactions are recorded correctly. If you have any questions or concerns, please don’t hesitate to call our toll-free number at +1-888-510-9198.
QuickBooks is a highly advance accounting software which is garnering praises from users all across the world. Also, the makers are constantly at work to make it better day by day. If you are a QB user, you are supposed to keep receiving updates and upgrades that may be of immense importance to you. Performing an upgrade or converting a company file, however, is not recommended without proper knowledge of the process. Thus, we are presenting you this article that consists of all the required steps to upgrade or convert your company files with ease.
Keep reading this piece of writing to upgrade or convert the company file to a new QuickBooks desktop version. However, you can also connect with our tech support professionals for any sort of technical support services. Our technically sound team of professionals can help you with instant support services.
Important Tips before you Upgrade or Convert the File
Here are a few things you must know before upgrading or converting your company file:
Before upgrading or converting your company file you should rebuild and verify the integrity of your file.
This would make the process of upgrading company file smooth. In case any error pops up, you can refer to the official website of Intuit or contact QuickBooks Support Service providers.
Perks of updating QuickBooks Desktop Version
Updating the QuickBooks accounting software and company file to the latest version, brings in various new features and functionalities. There are a lot more features and perks of upgrading the company file to new version. Let us explore:
One can enjoy better security of data with an update
Another perk for the same can be, elimination of bugs and error codes
Updating the software also gives you real time invoice status tracking, improved data file, etc.
We have to double check the data for issues in the company file. As soon the company file is converted, you cannot make any changes in the file. These are the things that help company file for converting and upgrading.
Avoid using alphanumeric characters (! @#$ %^&*) in the name of the company file.
Re-Sort all the six of the major list
Open the list of Vendors, customers and employees by clicking the icon of the top bar. Search the list after viewing the list.
Click on View and then select Re-sort list.
Item List: Go to the list and then select Item list and then Click on Account which is situated in the bottom left you, can also see the last option is resort list.
The chart of Account: Select the Chart of an account by clicking on Account in the bottom left, the last option is Re-sort list.
Now, you will Reset the admin password or password hint because sometimes pass code rises the problem so change the password for security purposes.
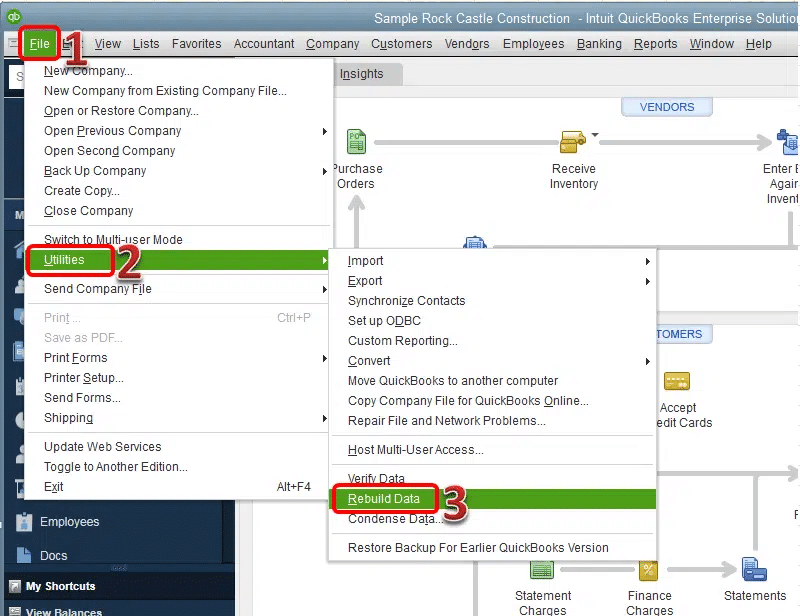
Rebuild the data: Rebuilding your company data by official Intuit website.
Verify the Data: Read up the verifying related information by Intuit site.
Search the error in QBWin.log file and read the file for any errors- Read up on the QuickBooks log file.
First of all, you have to install the latest version of QuickBooks Desktop software (QuickBooks Desktop 2019) and after that you can upgrade/convert your company file.
Only Admin user can convert or upgrade company file in QuickBooks
If you are the only user of your company file then obviously you are an administrator and you will need to sign into the “Admin” user to continue with these steps.
If you are not admin and you want to upgrade your QuickBooks Company file then you will receive the message “The Company file needs to be updated”.
Please ask your QuickBooks administrator to update the company file.
Do not update your QuickBooks Company file over a network
You need to that it is not important to update company file while stored on a network or a mapped drive. This will take conversion unsecured. It also puts the file at risk of being corrupted.
The QuickBooks Desktop Company file must need to save locally on the desktop you are operating it from.
Upgraded QuickBooks Data file can’t be opened in previous versions
If you convert the QuickBooks Company file to a newer version after that older version of QuickBooks will not able to open it.
QuickBooks Desktop will automatically backup your data file before updating it. If you want to return to the older version, you can always restore this back up with your previous version of QuickBooks.
If the transfer process is interrupted for any of the reason then you can restore the backup with your latest version of QuickBooks Desktop to reboot the upgrade.
Enterprise company file just work in QuickBooks Desktop Enterprise editions
If you wish to try old version to latest version for updating or converting company file then just follow the steps given below:
Recover and verify your company data file.
If the verification process fails then use the qbwin.log file to identify and solve error commands.
After the up gradation is completed to make sure that the modified data file is in good shape by running to verify data utility. If this step fails then repeat the previous steps.
Steps to Upgrade or Convert Company File to a Newer Version
An Easy Upgrade feature will itself create an updated copy of your latest files if you have a QB subscription that is active. Furthermore, you can perform the following steps to upgrade additional company files.
Important Note: If the Move Company File window appears, follow the instructions shown.
Know about the New Version pane by reading thoroughly the info in the Update Company File. Check the checkbox to notify you understand, and select Update Now.
Follow the steps provided to back up your file. Make a note of the location where you save your file.
If you are going to open a company file using a newer version of QuickBooks, you may receive a prompt that would read, “Do you want to continue?” Select Yes.
Also, perform the following steps once the file is updated:
Make sure you save the backup in a safe location until you are certain that it won’t be required again.
In case the file was copied from a different PC, create a file copy in the computer the file initially belonged to (or was copied from).
If you are not able to find your data file in its original location or in the particular folder, check your hard drive for *.QBW files. Also, search Display hidden files, folders, and files using Windows for more information.
In case you have QB Desktop Payroll attached, check out your payroll service. Open the Employees menu > select My Payroll Service > see Account/Billing Information.
Some tips to get a smooth Upgrade of your QuickBooks Company File
Before updating Your company file you need to perform a few things in your previous QB version, you need to follow some important points that are given below:
Resorting of Your lists.
Rebuild your data file.
Verify your data file.
Check your Qbwin.log file for error messages.
Ensure the QB updated data files are in good shape.
Note: You can run a verify data utility manager once the update completed.
Final Note!
We hope this article will assist you to upgrade/convert your company file to a newer version of QB Desktop. But if you face any trouble, or have any QuickBooks related query, you can contact our 24×7 QuickBooks support helpline team at ++1-888-510-9198.
How can you move your QuickBooks desktop company file to a new computer?
You can try moving the company file in QuickBooks desktop to a new computer by performing the steps below: 1. The user needs to first head to the file menu from QuickBooks 2. Now, choose utilities tab and select the move QuickBooks to another computer tab
How do I transfer data to a new version of QuickBooks?
For this, you need to open your new version of QuickBooks. And then, move to the file menu and choose open or restore company if you don’t have the company file open. Choose open a company file and hit next. In case you have a backup company file, then choose restore a backup copy.
How do I upgrade QuickBooks?
You need to choose the settings tab first and then select the account and settings tab. Once done with that choose billing and subscription tab. Ensure that the payment info is updated. In the QuickBooks online section, choose upgrade the plan.