QuickBooks Error 2277 is usually seen when there is a damaged or corrupted file in the QuickBooks company data. It is also known as Intuit data protect backup failed error. There can be a handful of reasons causing such an error. Considering the problem of QuickBooks users, we have come up with this article that deals in the quick fixes for the QuickBooks error 2277, along with the triggers to the same. Thus, if you are also facing this error, then go through the entire article. However, another quick fix can be reaching out our 24/7 QuickBooks error support team by dialing our toll-free number i.e. +1-888-510-9198.
While exploring the features and functionalities of QuickBooks, the user might encounter this serious error code 2277 along with a message displayed on the computer screen. While creating the backup of the company file, this error can be seen.
Following simple steps might help the QuickBooks users in getting rid of this error, but before that let us have a look at the causes of the QuickBooks Error Code 2277.
Triggers of QuickBooks Backup Error Code 2277
There are a few factors causing such an error. Let us evaluate them one by one:
The first and foremost reason can be unsuccessful and incomplete backup of the files.
If you are tired of the QuickBooks Error 2277 and want to get rid of it, then all you need to do is follow the simple troubleshooting steps, and make sure you follow the same order. To shun off the error, QuickBooks users can follow different methods, as stated below. So, without further delay, let us explore the methods to get rid of the QB Error code 2277:
Method#1: Run Intuit Data Protect Diagnostic Tool
To begin with, the user is required to right click the ‘Intuit data protect‘ icon that is located at the bottom of the screen.
Moving ahead, tap on ‘About Intuit Data Protect‘ option.
And then, Press ‘Ctrl+ F2 keys‘ simultaneously to launch the ‘IDP tool‘.
Now, in this step the user is required to look for the ‘Run Diagnostics‘ option and select the same. Also, there is a need to ‘reconfigure the software‘ and/or the hardware in order to permit access to the ‘IDP files‘.
In the final step, if the tool is able to detect the issue with firewall or a third-party security software, then the user is required to check the manufacturer’s website as it will help the user to gather the information regarding configuration.
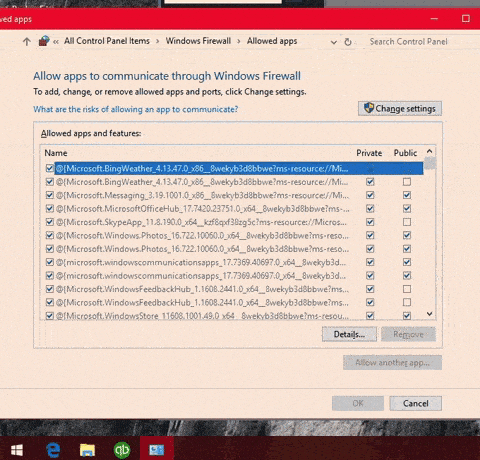
After that the user is required to add the following files for exceptions form the folder “C:\Program Files(X86)\Common Files\Intuit\Data Protect.”
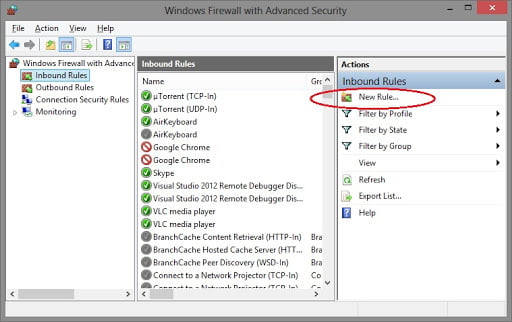
The very first step is to open the ‘Control Panel‘, followed by visiting the System and ‘Security‘ section.
Now, the next step is to tap on the ‘Windows Firewall> Advanced Settings‘.
The user is now required to select the ‘Inbound rules‘ option from the ‘Advanced Settings‘ Window.
Moving ahead, click on the ‘New Rules’ option from the right side of the same window.
The last step is to enter the ports and the hit the ‘Next‘ tab.
Incoming Port 80
Outgoing Ports 443, 16841
After that the user is required to follow, the prompts and follow the above four steps for ‘Outbound rules‘.
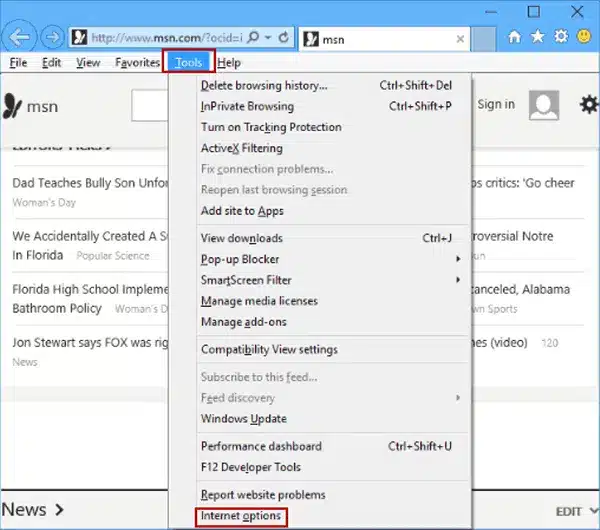
Method#3: Cleaning the internet explorer cache, cookies, SSL state, and temporary files
To begin with, the user is required to open the ‘Internet Explorer‘
After that, visit the ‘Tools‘ menu, followed by clicking on the ‘Internet Options‘
Moving ahead, the next step is to go to the ‘General‘ tab, then clicking on ‘Delete‘ which will be seen under the browsing history tabs.
Now, the user is required to check the following boxes: ‘Temporary Internet files‘ and ‘website files‘, ‘Cookies and website data‘, ‘History‘, ‘Form Data, and InPrivate Filtering‘, after that the user is required to uncheck the ‘Preserve Favorites‘ and website data box.
After that, the user has to choose the ‘Delete‘ option to clear the items.
The next step is to visit the ‘Content Tab‘.
And lastly, the user is required to choose ‘Clear SSL state‘, and then hit the ‘OK‘ tab.
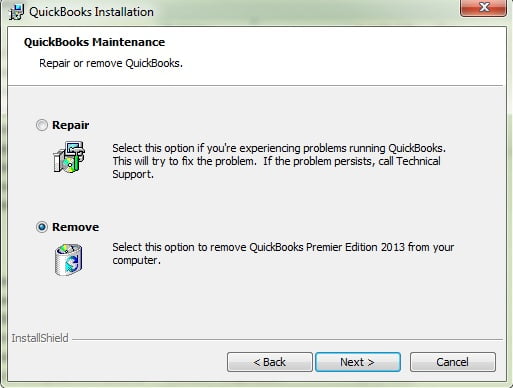
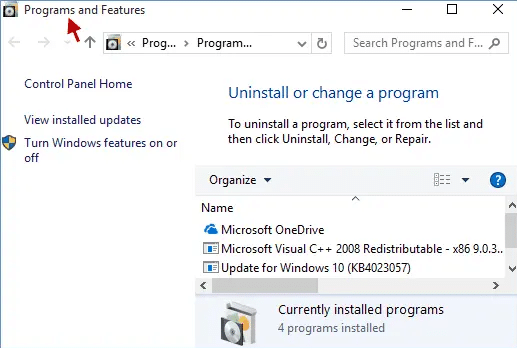
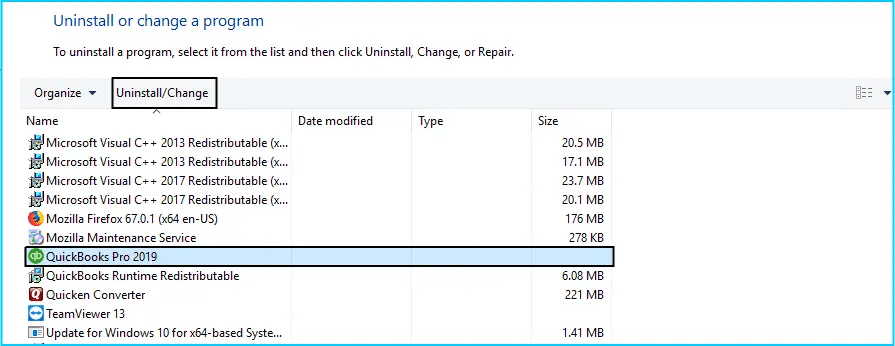
The user needs to press control panel which can be accessed through the windows start menu.
After that, hover and move to the program and features tab.
The new screen shows a list of installed programs within the system.
Look for QuickBooks and choose it.
Select uninstall/change tab and also click on repair tab.
Perform the onscreen steps to repair the software
Reboot the system and try to back up the company file in QuickBooks.
Conclusion
With this, we come to the end of this article, and we believe that with the help of this article and the methods listed above, the reader might be able to tackle the QuickBooks backup error code 2277.
However, in case of any difficulty or if by any chance the user is unable to get rid of the error even after following the above enumerated troubleshooting methods, then he/she can feel free to get in touch with our QuickBooks payroll support team. Just dial our toll-free number i.e. +1-888-510-9198, and our team of experts and highly skilled professionals will be there to assist you in a single call.
QuickBooks users can experience the error 2277 when backing up their company files. Due to this error, the entire backup process comes to a complete standstill.
How can we fix error code 2277 in QuickBooks?
The user can try eliminating this error using the steps below: 1. Using IDP Diagnostic Tool 2. Add Intuit as a Trusted site 3. Add QuickBooks ports to the Firewall. 4. Clean system junk and Temporary files. 5. Repair QuickBooks Desktop.
How do I rebuild data in QuickBooks backup failed?
You need to, go to the File menu, then hover over Utilities and select Rebuild Data. On the QuickBooks Information window, select OK. Follow the onscreen steps to save a backup. Let the tool repair your file.
Why can’t I back up my QuickBooks files?
If the “QuickBooks file is open and cannot be backed up” error continues, you should reinstall QuickBooks. However, that is not the best option, as you must repeat the full QuickBooks setup process. Alternatively, you could check for software upgrades.
Suddenly bumped into QuickBooks Abort Error and can’t find the right away to terminate it? Well, errors in QuickBooks are quite common, however, these errors can be extremely devastating for QuickBooks users. One such error that we are going to address today in this piece of writing is the QuickBooks abort error. Talking about the abort error in QuickBooks, it usually indicates a damaged QBWUSER.ini. This error can further crash your software unexpectedly. To help you out in eliminating the QuickBooks connection that has been lost abort error, we have designed this piece of writing, where we are going to discuss the complete details regarding this error, its fixes, and much more.
Thus, stick around to this segment till the end. Or if you have several questions in your mind like, what is QuickBooks Abort Error? How is this error generally caused? How to get rid of this error? What are the symptoms of QuickBooks Abort error? And many more, feel free to get in touch with QuickBooks desktop support team on our toll-free number .i.e. +1-888-510-9198. They will resolve all your queries in no time.
QuickBooks Abort Error is the error that damaged the QBWUSER.INI file. At times, due to this error, QuickBooks crashes unexpectedly, while saving process or also at the time of making changes to the files. Merely because of regular crashing, the majority of the operation of QuickBooks generally stop working. At times when the transaction is too heavy for the software, there are possibilities for this error to occur.
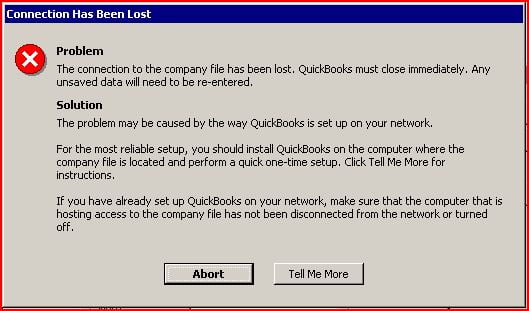
Error
Description
Connection Has Been Lost
The connection to the company files has been lost. QuickBooks must close immediately. Any unsaved data will need to be re-entered
In case the user accidentally interrupted the save process, by either shutting down or switching to the sleep mode.
Somehow the flow of data between the storage locations has been interrupted might lead to such error.
A corrupted hard drive can be another reason to such error.
Any kind of damage to Windows operating system might also lead to such error.
Symptoms of the QuickBooks Abort Error
It is important to spot the issue in order to perform the right steps to eliminate it. One can try to identify the abort error in QuickBooks using the steps below:
Random system crashing can be a major factor to spot this issue
Another sign can be frequent shutdowns and that too without any error message.
In Windows 8, the QuickBooks Desktop gets terminated out of nowhere, then you can expect this issue.
In case the software freezes regularly and it shuts down the whole program automatically.
The program aborts and there is also a chance of Fatal App Exit.
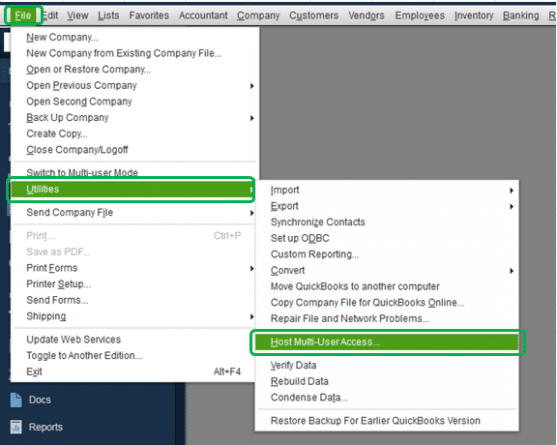
QuickBooks desktop needs a proper and regular network connection to the data file from the server. Thus, it is crucial to ensure that the hosting status of QuickBooks on the system is right in a multi-user environment. You can try performing the following steps:
Click on the file menu
After that, select the utilities tab
Furthermore, click on the stop hosting multi-user access option.
It is essential to configure a windows firewall to work well with QuickBooks desktop. A firewall can block essential network access, in turn blocking access to many QuickBooks programs.
Solutions to Resolve QuickBooks Abort Error
The solution list to this error is not huge, but there are a few effective ones. To get the best results, QuickBooks users can follow the below-enumerated methods. Or can get help from QuickBooks error support professionals and get their help in dealing with such irritating errors.
This is a very simple procedure. The user is required to go to the ‘files option‘.
After that tap on ‘Utilities‘ option.
Once done with that, tap on the ‘stop hosting‘ to multi-user access.
Now, the user is required to open the company file on the multi-user mode.
Lastly, the user is required to look for the checkmark in the box, which is labeled as “Open file in multi-user mode.”
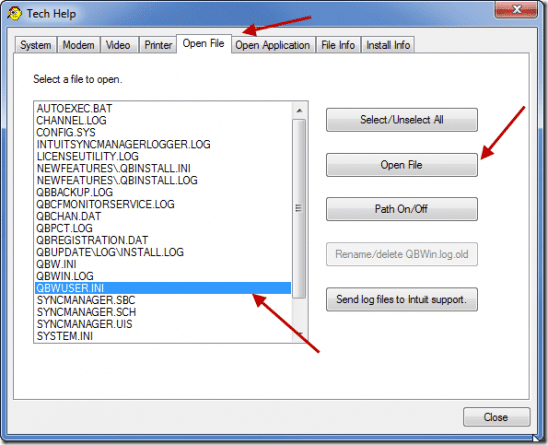
Solution 3: Renaming the QBWUSE.INI file
The very first step in this process is to enable the hidden folders where the ‘QBWUSE.INI file‘ is present.
Now, navigate to ‘location: \ [user name] \AppData\Intuit\quickbooks[year]\‘
Once done with the above steps, right-click ‘QBWUSE.INI‘ .
The next step is to click on ‘rename‘ and add ‘.OLD‘ at the end of the file name.
Now, moving ahead, rename the ‘.ecml file‘
Once you have followed all the above steps, just try again and open the file
Once you complete the steps, if still you are facing problems while signing into your company file. Then most probably there are damaged files in your company file. At this situation, you have to restore an earlier backup of that file.
You can try these steps in case the above steps are not helpful to your.
The above-enumerated are a few of the methods that might help the QuickBooks users to get rid of this error. Even if you are new user, you can successfully implement these steps. We conclude this article, with the hope that following the above enumerated steps might be helpful for you to get rid of such errors.
However, if the methods and solutions didn’t work, then it should be noted that the issue can be deep-rooted. Thus, it would be better to consult QuickBooks premier support team, as they will come up with some effective resolution strategy. In such cases, you can dial our toll-free number .i.e. +1-888-510-9198, and our team of experts and QuickBooks professionals will be there to assist you.
FAQs Related to QuickBooks Abort Error
How do I fix an abort error in QuickBooks?
You can try performing the below steps to eliminate abort error: 1. Download and run QuickBooks diagnostic tool 2. After that disable the antivirus application as well as your Windows firewall 3. Rename QBWUSER 4. Restore QuickBooks from backup
What is the abort issue in QuickBooks?
QuickBooks connect has been abort issue is often seen when QBWuser.ini file gets damaged, and in multi-user mode either essential program like QBDBMgrn, QBCFMonitorservice isn’t running or incorrect configuration.
How do I fix an overflow error in QuickBooks?
Export your lists to your desktop using the steps listed below: 1. Export your lists to the desktop. 2. Minimize QuickBooks 3. Right-click the export file and select open with Microsoft excel 4. Find all transaction with overflow value 5. Switch to QuickBooks and correct data for the field in the account, name or item that contains it.
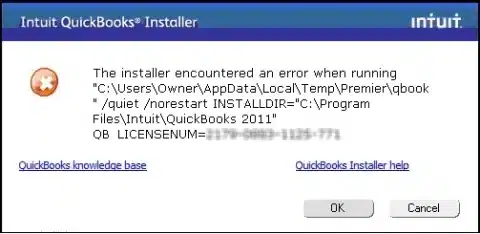
QuickBooks Error code 61686 is one of the most uncommon error at the time of installation of QuickBooks. In general, this error is generated due to a damaged Framework.xml file. If you are also facing this type of error and are unable to get out of it, then this article might help you in dealing with such error. The QuickBooks error 61686 shows up on the screen with a warning message:
Warning 1 :‘’ The installer encountered an error when running “Drive:\Users\Owner\AppData\Local\Temp\Premier\QBooks” /quiet /norestart INSTALLDIR=”C:\Program Files\Intuit\QuickBooks 2011″ QB LICENSENUM=####-####-####-###’’
Warning 2: Location: “C:\Users\Owner\AppData\Local\Temp\Premier\QBooks\windowsinstaller-kb93803.exe ” EXEAdapter Error: InstallExe method received the system error from CreateProCess , command – “C:\Users\Owner\AppData\Local\Temp\Premier\QBooks\windowsinstaller-kb93803.exe” /quiet /norestart INSTALLDIR=”C:\Program Files\Intuit\QuickBooks 2011″ QB LICENSENUM=####-####-####-###
If you are experiencing similar sort of error, then you probably need to go through the segment, and learn further about the QuickBooks error 61686.
What are the signs & symptoms of QuickBooks Error 61686?
Every error comes with certain warning signs and identifying those signs, might help the user to rectify the error at its early stage and avoid any further mess. The warning signs might include the following:
When the Mistake 61686 appears on the screen, and also it burns the dynamic program window.
Also in the case when the PC freezes for some moment repeatedly at the time when the program is in use.
Another symptom can be when the system sluggishly responds to the mouse and keyboard inputs.
A pop-up message stating Windows Installation Error Code 61686 appears on the screen.
What Causes Error 61686?
There can be numerous factors causing the QuickBooks Error
Code 61686, some of which are jotted down:
In case when any other program roughly erases the windows installer related documents
When the no speed download or break down of the Windows Installer Programming happens
Also, in case of any misconduct in Windows registry from a recent Windows Installer associated programming change.
Another cause can be when there is an infection or malware corruption that might damage the Windows Framework files.
Once the installation process is complete, and the user has detected the cause of the error, it is time to implement the quick fixes to the error. In order to shun off this error, the user is required to follow certain steps:
Solution 1: Repair the registry entries associated with the error
You can try out repairing your registry entries that are related to your error, so as to get through the error successfully.
The next step is to tap on the ‘Start‘ button.
The description Notification will be there in the inquiry box, but the user should make sure that he doesn’t press ‘Enter‘ yet.
Moving forward, press ‘Ctrl‘ and ‘Shift‘ tab simultaneously, followed by pressing ‘Enter‘.
The user will be encouraged with an understanding discussion box on the screen.
The ‘Yes‘ option available on the screen is to be selected by the user.
After that, a black box will open with an uncertain device there.
Moving forward, sort ‘re-edit‘, followed by hitting ‘Enter‘.
The user is required to select the error 61686 related key, in registry editor.
Choose the ‘Export here‘ option after scrolling down the ‘File Menu‘.
The next step is to save it in the list.
Now, the user is required to choose the ‘Organizer‘ where they need to unoccupied the Windows Installer file key.
Moving ahead, pick the name for the file in the name box. The user can choose the names like the ‘Windows Installer Backup‘.
The user is required to ensure that the ‘Chose Branch‘ option available in the ‘Export Range‘ box is selected.
Now to save the edits made, hit the ‘Save‘ option.
After that, the record will be unoccupied with a ‘.reg document‘ enlargement.
The user now has a relative of the Windows Installer related registry section.
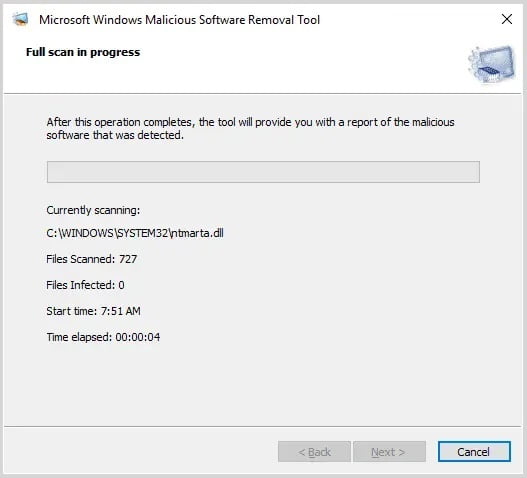
Solution 2: Conducting Full Malware Scan
In certain cases, there can be any sort of malware diseases on the PC, and in order to identify those malware diseases, a full malware scan of the computer might work in a majority of the cases. This process should not be ignored by the user, as any kind of malware can be extremely harmful, and it might vanish Runtime Error related records.
Cleaning the system junk may cause the Windows Installer to react gradually or give a 61686 Error code, due to an overburden hard drive or misunderstanding the document.
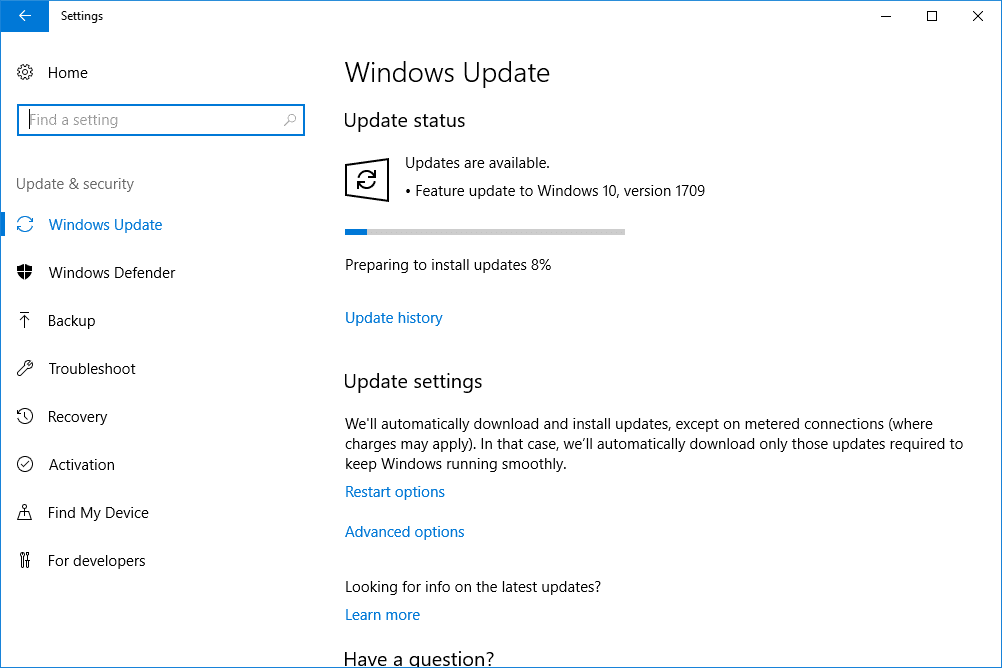
Tap on to the ‘Start‘ option and then refresh into the existing box and followed by hitting ‘Enter‘.
After performing the above step, the user will encounter the Windows Update discourse box.
Moving ahead, the user is required to tap on ‘Install Updates‘.
Solution 4: Update the PC Device Drivers
It should be noted that the QuickBooks Error Code 61686 can be identified with decayed or gadget drivers. At times the drivers all of a sudden stop working due to various reasons, but in such cases, the user can frequently refresh the gadget driver to settle this kind of error.
Solution 5: Performing a Clean Installation of the Windows
The last choice while determining the error code 61686 is the process of clean installation. It should be noted that reinstalling the Windows would eliminate the data from the hard drive, which means the user will be able to begin again with a fresh framework.
Solution 6: Uninstall and Reinstall the Windows Installer Programs
To begin with, open the ‘Programs and Features‘ tab by selecting the ‘Start‘ option.
After that, tap on ‘Control Panel‘ option visible on the right side menu.
Moving ahead, the user is required pick the option ‘Programs‘.
And after that, mark the ‘Features and Programs‘ option.
In order to find the ‘Windows Installer Error Code 61686‘ related program, the user is required to visit the name segment.
Next step is to select the ‘Windows Installer‘ related section.
Nowon the best menu strip, hit the ‘Uninstall catch‘ option.
Complete the uninstallation of the error 61686 related program.
With this, we come to the end of this article, and also hope that this article might be of any help to the reader. After going through this article, the user might be able to identify and fix the QuickBooks Error Code 61686. However, if in case the error persists, the user can feel free to consult our team of experts by dialing our toll-free number .i.e. +1-888-510-9198. Our 24X7 QuickBooks error support team will provide you with the best possible assistance in a single call.
Frequently Asked Questions
How do I fix printer settings in QuickBooks?
Reset the default printer in Windows. 1. From Start button, select Settings 2. Also, choose Printers and Faxes. 3. From the Printers and Faxes dialog window, right click on a working printer. 4. Select Set as Default Printer. 5. Open QuickBooks and open the Printer Setup window to verify changes.
What is error code 16026 in QuickBooks desktop?
The QuickBooks error code 16026 often occurs when you are trying to download or install the updates. You can come across this error when the company file is corrupted. Sometimes using an older version of the application can also lead to the issue.
Unleash the procedure to troubleshoot QuickBooks Error 4120
One of the premier accounting software, QuickBooks is used by small and medium sized businesses for their basic to advanced accounting needs. Offering a great variety of tools, QuickBooks helps organizations in preparing invoices, bills, payments, managing payroll and many other things. All these features make QuickBooks the most sought after. But it is prone to bugs and errors which may disturb the process and ultimately the workflow. One needs to be aware and alert when the error occurs, so that they can resolved without any data loss.
QuickBooks Error 4120 is one such error which displays a message-
‘QuickBooks has encountered a problem and needs to be shut down for any further explanation’. In case the operating system is corrupt or any of the QuickBooks desktop components is not stable or working, then one can experience a list of errors. Other than 4120, one can experience similar errors like QuickBooks error code 1935, Error related to damaged , etc. If you are also facing QuickBooks error code 4120, then reading this segment till the end will surely help. However, you can also consult our tech support team and let them help you with the fixes.
There are a series of reasons that can cause this error:
If any software change has occurred to QuickBooks, then the windows register has been corrupted.
When the QuickBooks executable file or other components are maked as unsafe by any anti-virus or security software.
When virus on your system harms the files that are related to Windows. This also poses a threat to QuickBooks related files.
When the files of QuickBooks are deleted by some program by mistake.
When QuickBooks is incompletely installed or there is some defective or corrupt download.
What are the signs and symptoms of QuickBooks error 4120?
The user can try identifying this issue using the below signs and symptoms. Let us have a look:
QuickBooks become slow is a common sign
Another sign can be system not accepting keyboard and mouse inputs
The user can also identify the issue if the system crashes
Or if the system freezes at times
Effects of QuickBooks Error 4120
When QuickBooks Error 4120 occurs, the software works slowly and responds slowly to the action, i.e. to the mouse and keyboard inputs. The computer may also be crashed due to the occurrence of Error code 4120. Your computer may also freeze or hand for few minutes at some times.
How to Resolve QuickBooks Error Code 4120?
There are some steps that can help you resolve this error.
Solution 1: Check for any System Errors
Update the antivirus and the antimalware programs on your system.
Do a full scan of your system once the program is activated
Now, eliminate the virus and fix the bugs
If you find that no virus is causing this error, then try other solutions.
After that run the tool and let the tool perform the necessary steps to eliminate the error successfully.
Solution 3: Copy Company Files to Another System
First of all, copy all the company related files to some other system. Now, check if you can open the files in another system or not.
If the file opens, then repair the windows of the previous system
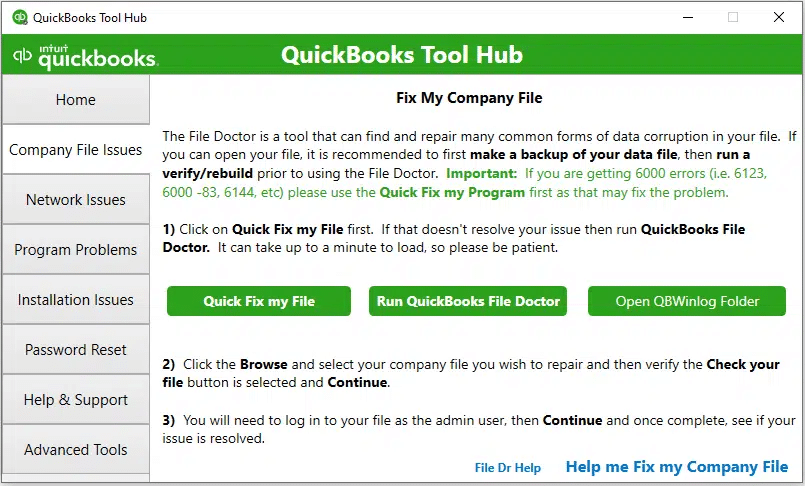
If the files do not open in the other system as well, that means that the files are damaged. These damaged files can be repaired by using QuickBooks File Doctor Tool.
Using Windows System Restore, undo the recent changes
Solution 5: Run disk cleanup
You can experience runtime errors due to less space. Thus, create a backup of the company file.
The user can free some space in the hard drive
Now, the user needs to create a backup of the company file and then free some space in the hard drive
After that clear the cache and then reboot the system
Run the disk cleanup followed by opening the explorer window
Also, right click on the main directory.
The last step is to click on the properties option and also make a disk cleanup
Solution 6: Repair and reinstall Micrososft .Net framework
The very first step is to close the open applications
Now, reach the windows start menu and head to the control panel
After that, select add/remove options
The user needs to reach the Microsoft .net framework 4 extended
Once done with that, the user needs to select change/uninstall
Also, click on remove/repair
This will open a wizard window where you need to choose repair option
Press next tab and perform the wizard for repairing .net framework installation
The last step is to reboot the system
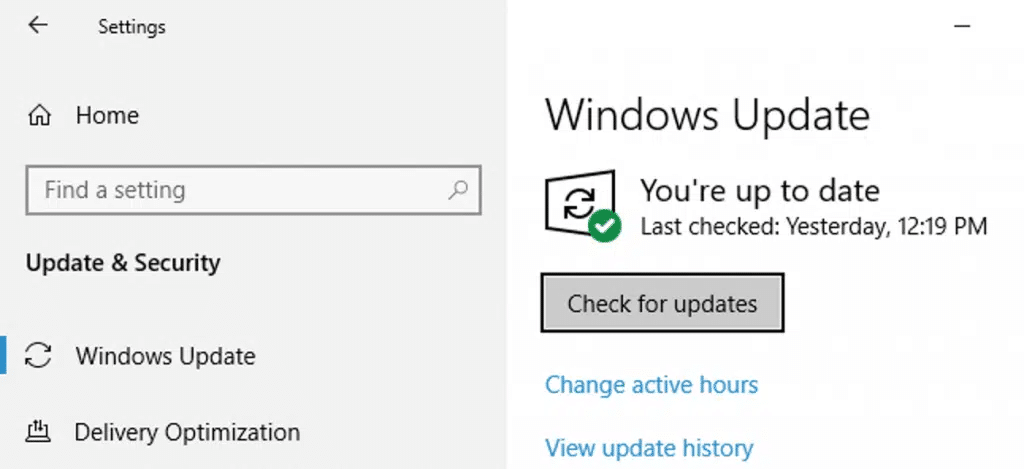
Solution 7: Download windows update
Once downloading the updates for windows, it will install any missing fixes for .net framework, MSXML, and C++ issues. The steps involved here are as follows:
The user needs to press windows start option
After that. enter windows update
Now, restart the system once the installation is successful.
Now that you are well versed with the steps involved in dealing with the QuickBooks error code 4120, it is time to implement the above stated steps to get rid of the QuickBooks error code successfully. However, if you are not able to resolve the error using any of the above solutions, then contact our QuickBooks error support team at our toll-free .i.e. +1-888-510-9198. Our experts stay alert 24*7 and are highly experience to resolve your errors in the least possible time.
FAQs
How do I fix error 4120 in QuickBooks?
The user can try to fix the error code 4120 using any of the methods below: 1. Reinstalling or repairing QuickBooks 2. Copy company files to another system 3. Check for any system errors 4. Use QuickBooks file doctor tool 5. Run disk cleanup 6. Repair and reinstall Microsoft .net framework
How do I fix corrupted QuickBooks file?
The user can try the rebuild data tool to fix a corrupted QuickBooks file. The steps involved in fixing data issues are as follows: 1. The very first step is to head to the file menu, and then hover over utilities tab and choose rebuild data 2. Also, on QuickBooks information window, choose ok tab 3. The user needs to let the tool repair your file 4.When the tool finishes its task, the user needs to choose ok tab 5. The last step is to head to the file menu
What causes data corruption?
Data corruptions occur when a file somehow flips or mixes its binary code (bits of 0s and 1s). Bits are mixed up for many reasons, including hardware problems, software-based issues, and human mistakes. Common symptoms of data corruption: A computer slows down or keeps freezing.
With an objective to make every day transactions easy and quite simple, Intuit had developed QuickBooks Point of Sale (POS) wherein the users not only get latest tools and features to make their work easier, besides they also get access to the authentic and reliable QuickBooks support services. QuickBooks support services enter the area as QuickBooks POS Error 175305, with all its benefits, comes with various errors and issues as well.
If the user has basic troubleshooting knowledge, he can get rid of these errors. But when some of the critical issues do not get resolved by basic method, expert advice is necessary, i.e. intervention of QuickBooks experts is necessary. You can connect with a QuickBooks point of sale expert at their toll-free helpline number .i.e. +1-888-510-9198.
What is QuickBooks POS error 175305?
Before you jump on to the factors triggering this issue or the fixes for the same, it is important that you understand a little about the error. QuickBooks error code 175305 is basically a point of sale error that can be seen with a warning message that states “Errors were encountered, choose VIEW LOG to get more details”. This is a store exchange error that can occur when you are transferring the files. As a result of this issue, the actions for transfer can be restricted by the firewall, damaged files, or for not being signed in as the admin. You can continue reading this piece of writing to get rid of this error permanently in QuickBooks.
All the five solutions given above are highly recommended to resolve the QuickBooks POS Error 175305. But these solutions may not work for all of the users, reason being the damage caused is very severe and require an expert guidance and QuickBooks support.
Our QuickBooks ProAdvisors help your resolve this error and repair all the important files manually. The process takes a little more time than usual but we do not have any other alternative for the same. To get in touch with our QuickBooks Experts or ProAdvisors, you can contact us at our toll-free QuickBooks error support number i.e. ++1-888-510-9198. Our toll-free helpline is active round the clock and helps users in need.
Frequently Asked Questions!
What is error 175305 in QuickBooks point of sale?
There can be inconsistencies in the password of the stores which might further trigger such an error in QuickBooks. Thus, a user can try creating identical passwords for all stores to get rid of QuickBooks point of sale error 175305.
How do I setup POS multi-store in QuickBooks?
In order to set up POS multi-store in QuickBooks, one can try performing the below set of steps: 1. You can create and hold the point of sale company file 2. Back up, restore and rename the company file 3. Once done with that, exchange information with the QuickBooks desktop 4. After that import data through the data import tool 5. Set item and customer ranking preferences 6. Exchange information with other stores
Can I connect POS to QuickBooks?
It is possible to integrate point of sale system with QuickBooks account and it minimizes double data entry and also ensures sales are reflected in the books accurately. For a small business owner, it is a great way to save time and energy and make sure that the things are done with much accuracy.