QuickBooks won’t open or doesn’t start error can be extremely annoying. As a result of this error, QuickBooks might stop working, stuck on loading screen, or not responding at all. Often when trying to open QuickBooks, QuickBooks desktop does not start error shows up on the screen. In case QuickBooks won’t respond or you get an error that says it stopped working, then this segment is surely going to help you. It should be noted that if you choose your QuickBooks desktop icon multiple times, sometimes, it won’t open. Let QuickBooks take enough time to load before you continue.
Note that, if you see the message, that QuickBooks needs a subscription, then you are either in an unsupported version of QuickBooks Desktop or your subscription has expired. You can simply download a supported version or check out your subscription status from the Customer Account Management Portal.
To help you fix the QuickBooks desktop won’t open or not responding error, we have come up with this segment sharing the complete steps to fix the issue. However, if you have any queries or if you need any sort of technical assistance, give us a call at +1-888-510-9198, and we will provide you with immediate support and assistance.
What Causes QuickBooks Desktop Doesn’t Start Error?
When one clicks on Quickbooks or company file, but the program doesn’t start or won’t open, such an error shows up. It is important to identify what factors can lead to such an error, in order to perform the right set of steps. Let us have a look:
Very long company name
Corrupted Hard disk
Improper installation of QuickBooks Desktop
Missing or damaged QBWUSER.INI file
Out of date operating system
Symptoms of QuickBooks desktop does not start
The software freezes.
The QuickBooks company file doesn’t open.
Windows runs slowly
The computer hangs every now and then.
Computer responds very slowly to mouse and keyboard
Important Note: When you click on QuickBooks icon many times (double clicking repeatedly), it can result in QuickBooks desktop not responding or not working. It is better to wait for a while and give time to launch QuickBooks again. Don’t click too many times to send multiple requests.
Important tips before troubleshooting the error
The user is suggested to perform the following things before carrying out the fixation steps.
The user is recommended to update the software to the latest version
Also turn off the hosting on the system
Ensure to Suppress the QuickBooks Desktop software
Change the name of the .TLG and .ND files
Repair the QuickBooks Desktop Software installed on your PC.
Methods to rectify QuickBooks Desktop does not start or won’t open error
This issue of QuickBooks can be easily solved and below are some of the solutions to this problem. However, if you want expert’s help to resolve these errors quickly then you can get in touch with our QuickBooks support team anytime.
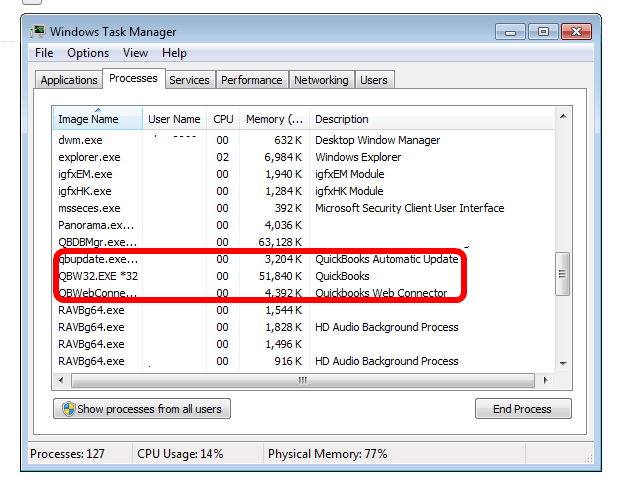
Solution 1: Close QBW32.exe process
First thing to do is Right-Click on the “Windows taskbar” in the system and then select “Start Task Manager” option.
Now click on the “Process tab” and then click on “Image Name” header so as to arrange the processes alphabetically.
Then locate and select “EXE“.
Finally click on “End Process” to close the “exe process“
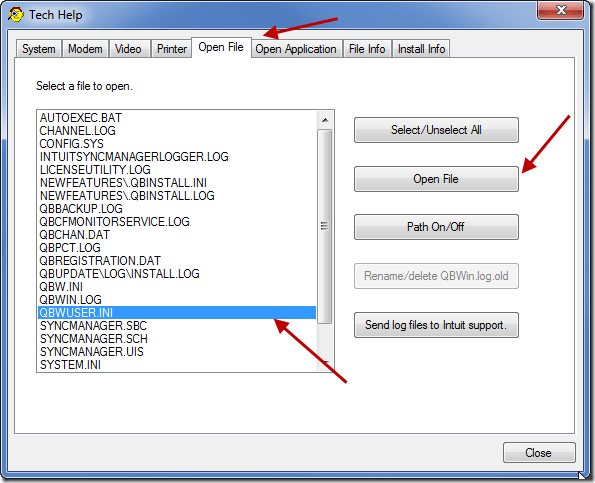
Solution 2: Renaming the QBWUSER.ini. file
Try accessing the folder where ini file is there and if you cannot trace it then enable hidden folders and file.
Once the folder is found then click on the “QBWUSER.ini.file” and then select “Rename” option.
After this type “Insert.old” in the last file name.
Now change the name of “ecml.file“. After renaming the file if QuickBooks works then the issue is solved.
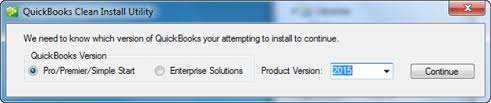
First of all, you have to uninstall the QuickBooks software and after then reinstall the QuickBooks software using clean install and then rename the installation folders.
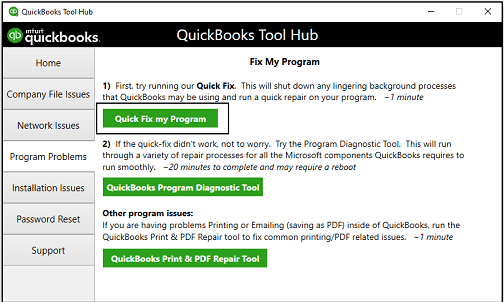
Solution 8: Use Quick Fix My Program tool
Under this process, the user is first recommended to download and install the tool hub
After that save the file where it can be accessed easily
Once done with that, the user should install the tool hub and double click on the icon when installation ends
Now choose Quick Fix my program tool under the program problems tab and run it
Once done with that run QuickBooks and check if the issue is resolved or not
Solution 9: Access the company file from different location
The very first step is to hit the windows + E
This will open up the windows explorer
After that look for the file with qbw file extension
When you look for a file location on a network server, do it in the Network drive on which the data file is located.
Right click the file and select copy
After that locate the C: drive and make a new folder
Rename it as QbTest
Open the folder and paste the company file in it
Now, open QuickBooks while holding ctrl
And access the company file you copied
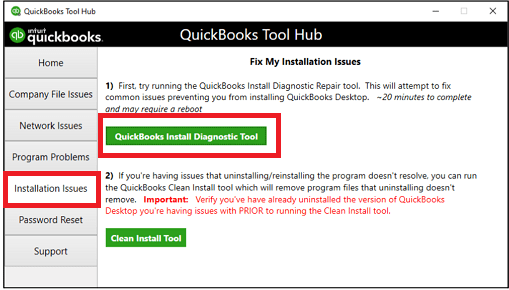
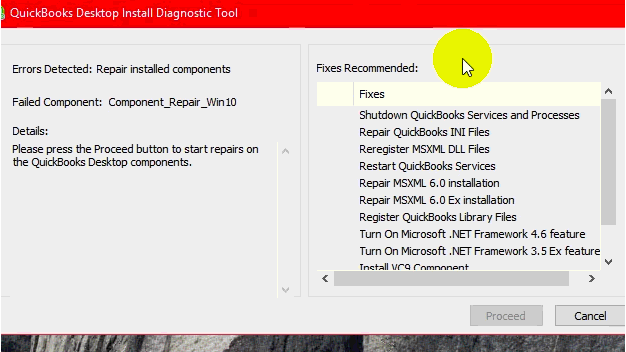
Solution 10: Run the QuickBooks install diagnostic tool
The very first step here is to open the QuickBooks tool hub
And then head to the installation issues tab
Also, select the QuickBooks install diagnostic tool
Run the tool and let it perform the necessary scan
After the tool identifies the issue, it automatically performs the necessary steps to rectify the issue
Hope this small article help you to resolve this error. If you are looking for further help and QuickBooks Enterprise customer support then contact Hostdocket to get instant solution from U.S based best accounting experts, feel free to dial our helpline i.e. +1-888-510-9198.
Some FAQs Related to QuickBooks Desktop doesn’t Start Error
What should I do if QuickBooks Desktop won’t launch on my computer?
First, check if your computer meets the system requirements for QuickBooks Desktop. If it does, try rebooting your computer and then launching QuickBooks Desktop again. If the problem persists, try repairing or reinstalling the software.
Why is QuickBooks Desktop not responding when I try to open it?
This could be due to several reasons such as damaged or missing files, compatibility issues with your operating system, or a software conflict with another program installed on your computer. If you are unable to resolve the issue, feel free to call our toll-free number at +1-888-510-9198 for assistance.
How do I fix the “QBW32.EXE has stopped working” error when trying to open QuickBooks Desktop?
This error is usually caused by outdated or corrupted Windows files. Try updating your operating system and then repair or reinstall QuickBooks Desktop. If the problem persists, it may be a good idea to consult a professional.
My QuickBooks Desktop company file won’t open, what should I do?
If your QuickBooks Desktop company file won’t open, it may be damaged. Try using the QuickBooks File Doctor tool to repair the file. If the problem persists, you can also try creating a backup of your file and then restoring it. If you need further assistance, give us a call at +1-888-510-9198.
How can I troubleshoot QuickBooks Desktop does not open due to a missing component?
If QuickBooks desktop does not start due to a missing component, try repairing or reinstalling the software. If the problem still persists, it may be due to a damaged Microsoft .NET framework. In this case, try repairing or reinstalling the framework and then launch QuickBooks Desktop again. If you need further assistance, our support team is always available at +1-888-510-9198.
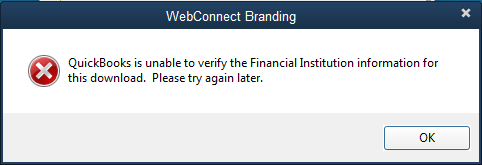
“QuickBooks is unable to verify the Financial Institution information for this download. Please try again later.” Have you received this pop up on your screen while providing a bank ID? This error generally happens when QuickBooks does not accept a specific bank ID. So Here, in this article, we will discuss in details the causes and solutions of this error. This error appears on the screen stating “QuickBooks is unable to verify the Financial Institution Information for this download, when importing a webconnect file from Chase.” There can be a couple of factors triggering such an error in QuickBooks, which we will try to elaborate later in this article.
The image as shown below is similar which appears on your desktop.
For more details, make sure to stick around this piece of writing till the end, or you can also connect with us at +1-888-510-9198, and we will provide you with immediate support and assistance. Our technically sound QuickBooks ProAdvisors will ensure to answer all your queries related to QuickBooks.
Reasons and impacts of financial institution error
This error generally arises when QuickBooks accounting software denies accepting any particular Bank ID. There can be a handful of factors causing this issue, which include:
When your QuickBooks copy is three years older, then it will not import .QBO files.
Moreover, if you update to the advanced version or use CSV2IIF converters, or use Bank2IIF file rather than QBO files, then you can experience this particular error.
Another possible factor causing such an error can be if the credit card company or bank is not allowed through QuickBooks.
You can further come across similar issue if you use Bank2QBO to create your QBO file from the allowed banking institutions.
Such an error can also be seen when you have created incorrect .QBO file.
Also if QuickBooks online file is downloaded from a US bank and it is being imported to Canadian version of QuickBooks.
Solution for ‘Unable to verify the financial institution’ Error
Sometime, even QuickBooks users may come across some issues while using it. When you get this financial institution error it is advised that initially, you should get in touch with QuickBooks error support team so that they can guide you to fix the error.
If you receive the financial institution error, you can try to fix it by changing the affected Bank ID that you were trying to provide and use a recognized QuickBooks fix error code in QuickBooks Online.
Note: Open QuickBooks Online Files in excel or notepad and follow the bellow mention tips to fix financial institution error.
Open QuickBooks Online file in excel or notepad
Select line ‘20 – <INTUIT.BID>2002‘.
Change last four digits to ‘3000‘.
Save the file using keyboard or mouse, so that the changes are preserved.
If you are short of time and need a quick and temporary solution, you can do the following:
Find the ‘fidir.txt‘ that is found in the first Folder.
Open the ‘file‘ with the notepad.
If you are using MS Windows Vista, 7 or 8, open – C:\ProgramData\Intuit\QuickBooks20XX\Components\OLB\branding\filist
If you use windows XP, open C:\Documents and Settings\All Users\Application Data\Intuit\QuickBooks20XX\Components\OLB\branding\filist
Next, find the bank’s name ‘MB Financial‘, you will find 4 sets of number, that will appear like this “XXXXX XXXXXXXXXXXXXXX”
Note the numbers.
Open the file ‘.QBO‘ with notepad and search for ‘<FID>, <BANKID> or <BID>‘ and proceed to change the number next to the characters with the number given in ‘FIDIR‘.
Save the Changes as ‘.QBO‘
Open your Company file in QuickBooks and import it.
Solutions to error “Unable to verify the financial institution”
You can try fixing the error unable to verify the financial institution information error using the steps enumerated below. Let us explore:
Method 1: Download the web connect
You need to first login to your respective bank’s website.
After that, locate the web connect to file and download it.
You are then required to open QuickBooks and open the company file.
Once done with that, start importing the .QBO file by performing the onscreen instructions.
In case the error continues, perform the steps below or reach out to your bank.
It is essential to ensure that the file which you have downloaded from the bank’s site has the file format to that of a .QBO file.
You can proceed to the next solution, if it is .QBO file.
In case not, then login to your bank’s site and download the file in .QBO format.
Method 3: Review bank notification
Just in case your bank has made any changes in how it supports the QuickBooks application, then you have received some sort of notification related to the same. You are suggested to login to your respective bank’s site and locate for such notification and perform the instructions mentioned there. In case asked to, verify your identity before accessing the QuickBooks data.
These steps should help you to get rid off from the QuickBooks unable to verify financial institution error. If the error still persists, you can contact 24*7 QuickBooks online Support team or you can dial our toll free support number +1-888-510-9198. We can look into the issue and offer you the quickest solutions.
FAQs Related to QuickBooks Unable to Verify Financial Institution
What does QuickBooks is unable to verify the financial information for this download?
You can come across such an error when QuickBooks has been denied from accepting a particular bank ID.
How do I verify my bank account in QuickBooks?
For this: 1. After you find the cleared test transaction in your bank statement, open QuickBooks online and sign in. 2. Once done with that, choose payroll and select overview. 3. You now have to find the check your bank account item in the TO DO list and hit edit. 4. Now, select verify amount.
Why is QuickBooks not connecting to my bank account?
The user can experience issues when linking or finding bank account, if your bank has multiple names on the list. Or if the bank doesn’t connect to all types of accounts.
How do I activate my bank account in QuickBooks?
This can be done as follows: 1. You need to choose continue tab. 2. And further, enter your online banking user ID and password. 3. Once done with that, go for connect to connect your QuickBooks to the bank’s server. 4. After that, choose the bank account you wish to connect to your account in QuickBooks 5. And choose finish after the connection finishes.
There are many configuration files that allow QuickBooks to access the company files in a network or multi-user environment. When these configuration files get corrupted or damaged, then there is some QuickBooks technical error. These technical errors can be encountered while opening QuickBooks files. When a user works on QuickBooks accounting software, then he may face many types of errors which include functional, configuration, server related errors and many others which are related to data issues. In this post we will discuss about Fixing of Most Technical Errors in QuickBooks Desktop Enterprise Solutions.
While Installing QuickBooks Enterprise, there are some errors and problems faced by the user. The installation problem usually occurs when Microsoft Windows components are missing or outdated. QuickBooks Desktop usually uses the most updated Microsoft Windows components in order to make software work properly.
QuickBooks Install Diagnostic Tool is among those which can resolve many issues related to this error. To install the missing components of the Microsoft Windows, one can begin with giving a try to Windows update. Windows updates can be easily found on Microsoft’s website.
There are also many registrations which can be faced during registration as well. When you buy a new QuickBooks Desktop Software, then you have to register yourself as you are going to use a new product. While registering, you may not be able to open or create QuickBooks company files, for that, you will have to register every time whenever you install QuickBooks on your computer.
Problem: Issue Faced with Accessibility to QuickBooks Enterprise:
If you have QuickBooks Enterprise version, then you need to install the software with all the right configuration and settings for other users. These setting should allow the user to easily access the database and record the entries. If the issue is not resolved, then you can call Pro Accountant Advisor at their QuickBooks Enterprise Support Number .i.e. +1-888-510-9198. You may also face some performance related issues if you are using QuickBooks Desktop over a longer period of time over a logging network and with a large company file. These issues can be slowness, behavior issues and the issue in which the software or file takes a longer time to open. There are other issues that can also occur and include:
Company file tasks slow down in the multi-user environment.
Company file runs well and successfully in the beginning but slows down as the time progresses.
Every employee faces performance issues due to slow working of the software.
Intermittent performance issues which can be easily sensed as some work too fast and some are slow.
Multiple data files face the same issue which simply indicates that the network is damaging the data files.
Problem: Issues faced while importing on QuickBooks Enterprise:
When you work as an Enterprise user, then there are some advanced features which you work on. But these advanced features are not supported by or available in QB or QuickBooks online. Sometimes you may find yourself working on QuickBooks Enterprise, or only using the bare essentials, then this moving will not be a major problem.
Steps to Import files from QuickBooks Enterprise Solutions to QuickBooks Online:
Firstly, Open your QuickBooks Enterprise Solution.
Open Product information and press ‘Ctrl + 1‘ and then press ‘Ctrl + B + Q‘.
After this, press ‘OK‘ button in order to close the information window screen which pops up automatically.
Enter your QuickBooks login information and click ‘ON‘ as to ‘agree to the terms of service‘. Then, ‘submit‘.
Then, choose the online company in which you want to import data.
If the screen does not show ‘Continue’ button, then proceed with the steps below:
First of all, Press and hold ‘Alt+T‘ for tool menu and go to ‘security tab‘ and uncheck the ‘Enable Protected Mode‘ box.
After Then, click on ‘Sites‘ and add files one by one.
Now Click on the zone with an image of a glob. Then, drag the slider to low or medium.
Finally, Click ‘Apply‘ then ‘OK‘.
Problem: Management Inventory issues that are related to QuickBooks Enterprise:
Inventory bar-code scanning:QuickBooks Enterprise inventory management system allows you to track your inventory in real-time as it provides you the visibility to create the best business decision. Additionally, it also reduces the data entry errors with mobile inventory barcode scanning and speeds up the process of accessing the data in the file.
Improvement in sales management and inventory picking: Under this, it looks on to the demanding information in order to fulfill the orders of the customers and satisfy their requirements.
Customized inventory reports: The system estimate inventory stock by item and assembly shortage by item.
Multiple locations tracking systems: For every location, it tracks the inventory, i.e. the order.
Problem: Issues while Registration in most technical errors in quickbooks desktop
For using new QuickBooks Desktop software, you have to register (also known as Activate) it with us. As for as you register the product, you are not able to open or create QuickBooks company files. You have to register every time when you want to install QuickBooks on a computer (new or reinstall on an existing computer).
Problem: Issues related to Report mailing On QuickBooks
When we are going to update QuickBooks Desktop 2017, almost we found this issue. It is very useful for small businesses to manage their financial issues i.e. for example (employee payroll management, tracking of their credit card payments etc).
It is useful for generating the invoice and send to the client for payments. A regular client can use a recurring payment feature of QuickBooks to send the generated invoice at an expected time.
However, in case of any difficulty in Most Technical Errors in QuickBooks Desktop Enterprise Solutions, our QuickBooks support team is there to guide you. You can consult our team of experts at our toll-free number .i.e. +1-888-510-9198.
Some FAQs Related to Most Technical Errors in QuickBooks Desktop
What is Error 3371 in QuickBooks Desktop Enterprise and how can I fix it?
Error 3371 is a common technical error in QuickBooks Desktop Enterprise that usually occurs when the software is unable to load the license data. To fix this error, you can try renaming the entitlement file, running the QBInstall Tool, or contacting QuickBooks support at our toll-free number +1-888-510-9198 for further assistance.
How can I resolve the “Connection has been lost” error in QuickBooks Desktop Enterprise?
The “Connection has been lost” error in QuickBooks Desktop Enterprise usually occurs due to network issues or firewall settings. To resolve this error, you can try disabling your firewall, checking your internet connection, or resetting your network settings. If you still encounter issues, you can reach out to our support team at +1-888-510-9198 for further assistance.
What is the QuickBooks error code H202 and how can I fix it?
QuickBooks error code H202 usually occurs when the software is unable to access the company file due to network issues. To fix this error, you can try adding your server to the Windows host file, configuring your firewall settings, or verifying your hosting settings. If you need further assistance, you can contact our support team at +1-888-510-9198.
How can I resolve the QuickBooks Desktop Enterprise update errors?
If you encounter errors while updating QuickBooks Desktop Enterprise, you can try restarting your computer, running the QuickBooks Install Diagnostic Tool, or manually updating the software. If you are still unable to update the software, you can contact our support team at +1-888-510-9198 for further assistance.
What should I do if I encounter data damage in QuickBooks Desktop Enterprise?
If you encounter data damage in QuickBooks Desktop Enterprise, you should first create a backup of your company file. Then, you can use the QuickBooks File Doctor tool to repair the damaged file. If the tool is unable to repair the file, you can contact our support team at +1-888-510-9198 for further assistance.
QuickBooks is world’s premier accounting software being used by small and mid-sized business owners to adeptly manage their company data. QuickBooks is an innovative software however, it isn’t completely free from errors. One of the frequent errors that QuickBooks users often face is – QuickBooks Error 6209.
In this post, right here we talk about an error faced by QuickBooks users that is “QuickBooks Error 6209“. This error is normally produced while installing QuickBooks desktop or updating the windows. Here We are most likely to inform you the whole process to resolve the “error 6209” and also the factors behind it. Here is everything you should know about this error code.
This error code may pop up on your screen while installing QuickBooks, opening a company file, or updating windows. Also this error occurs in the versions of QuickBooks Desktop that runs on the Windows 10 OS. The error you may receive at the occurrence of this error may be:
“An error occurred when QuickBooks tried to access the company file. Please try again. If the Problem persists, contact Intuit Technical Support and provide them with the following error code: 6209.”
Signs of QuickBooks Error 6209, 0:
Here are some most notable symptoms of QB Error Code 6209
The active program window crashes
Your computer may crash again and again while running the program
“QuickBooks Error Code 6209 o” appears on the screen
Windows becomes very slow
Windows response time to the commands from your keyboard or mouse may become sluggish
Computer freezes at regular intervals for a few seconds at a time
Main Causes of QuickBooks Error 6209, 0
Following are the causes that trigger QuickBooks Error 6209:
Corrupt Download of QuickBooks software or files
Partial installation of QuickBooks accounting software
Virus or malware
There is few important files and settings of QuickBooks get deleted
To resolve QuickBooks error 6209, 0 – there are multiple solutions across the web. You can fix it manually or with the help of QuickBooks technical support team. Try the following solutions and get rid of from this error.
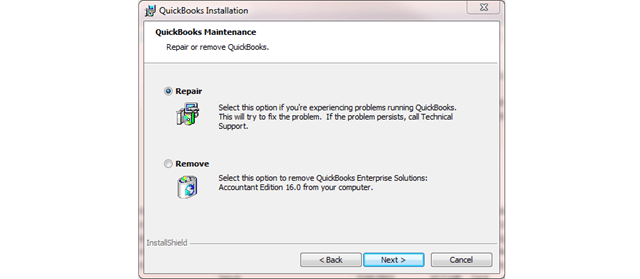
Solution 1: Repair Your QuickBooks Desktop
First of all Click on ‘Start‘ button.
Go to ‘Control Panel‘ settings.
After that choose ‘Uninstall a Program‘
Then choose ‘QuickBooks‘ and click on ‘Uninstall‘ (you will receive an option to repair QuickBooks during uninstallation process)
Once the uninstallation process done, Reboot your computer system
See if QuickBooks is working fine. If the problem persists, try the Next solution.
Solution 3: Run the QuickBooks Install Diagnostic Tool
First of all Run the QuickBooks Install Diagnostic Tool. This tool diagnoses and also fixes problems with ‘Microsoft.NET Framework, C++ and also MSXML‘ instantly.
Important: Don’t do anything manually, Just try to run this tool to solve the problem.
Download ‘QBInstall tool‘ from Internet.
A prompt message comes on display screen, now just ‘Save the file‘ to the local Desktop.
Now Close all the ‘Open Programs‘.
Run the program by double-clicking on the ‘QBInstall_Tool_v2. exe’. file
When the process is finished, just ‘Reboot your PC‘ and also make sure that upgrade of components is done correctly.
Note: Call a certified professional, While face any type of error during Windows Update.
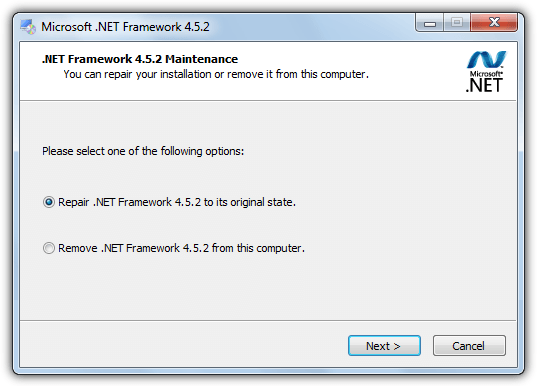
Solution 4: Manually Resolve Error 6209, 0
If you think that you could do it by hand on your own, Follow the actions for Windows 10, 8.1 and also 8:
First of all Click on ‘Windows+ R‘ keys to open up the ‘Run‘ window, on your keyboard.
Now Type in ‘Control Panel‘ and then Press ‘OK‘.
Select ‘Uninstall a Program‘ and click on ‘Turn Windows showcases On/off‘.
Now Click on ‘OK‘ to close the ‘Windows Feature‘ window.
Here you need to ‘Reboot the computer‘ once.
‘Re-enable .Net Framework 4.5‘ after the restart.
Now you need to restart the computer system again.
After that Check ‘.Net Framework 3.5 SP1‘ is enabled or not.
Enable it by clicking on box if not enabled.
After that click ‘OK‘ to close the Windows Feature window.
Once again Reboot the computer system.
Now ‘Re-enable .Net Framework 3.5 SP1‘ and reboot the computer again.
Now, try to use QuickBooks and see if it’s working fine.
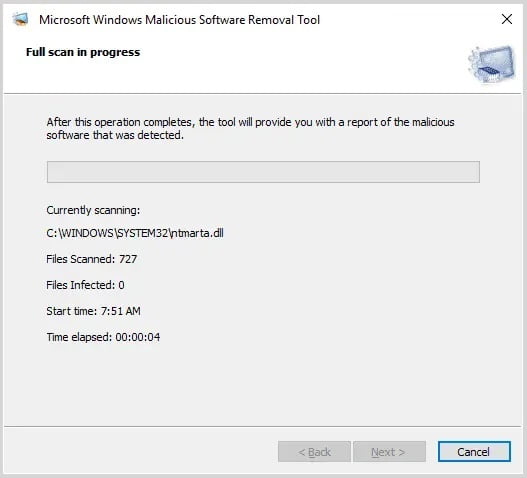
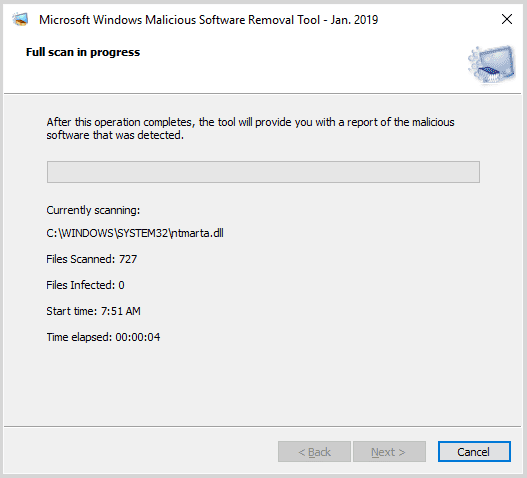
Solution 5: Carry out a full malware scan on the system
Often malicious intruders damage or completely remove runtime error related files. Moreover, this can further end up in certain sort of errors in QuickBooks, one such error can be 6209. Thus, it becomes important for the users to get rid of the malicious program. The user can simply perform the steps related to full malware scan on the system and try getting rid of any sort of malicious activities and the error caused due to it.
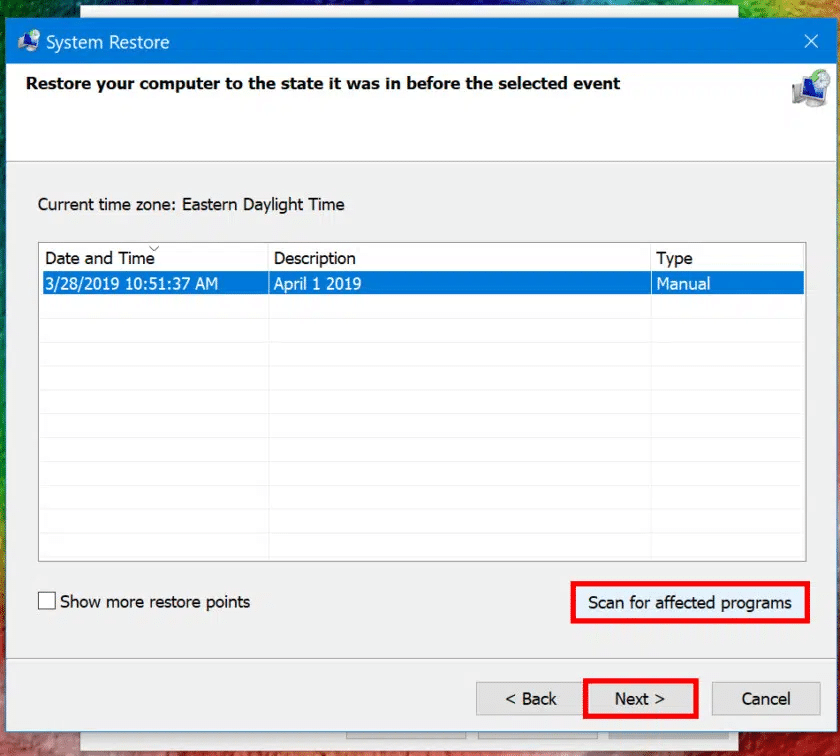
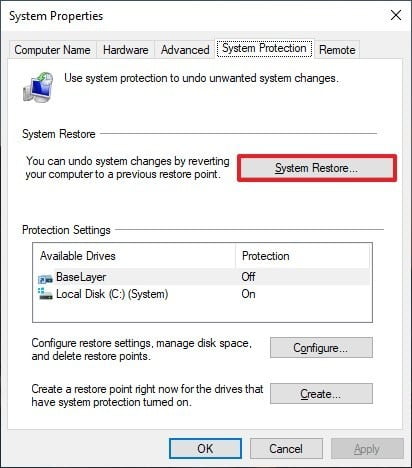
Solution 6: Using windows system restore to undo system changes
To start off with, the user needs to go for the start tab
After that, enter system restore in the results
Once done with that, click on the system restore tab.
The user is then required to enter the admin password
The next step is to perform the instructions in the wizard to choose a restore point
The last step here is to restore the system
Solution 7: Repairing registry entries
To start with, the user simply needs to click on the start tab.
Once done with that, enter the command tab and also avoid pressing enter yet.
The user is then required to press and hold Ctrl + Shift and then click on enter tab.
The next step is to click on yes tab on the permission dialog box that appears on the screen.
A black box will then appear on the screen with a blinking cursor.
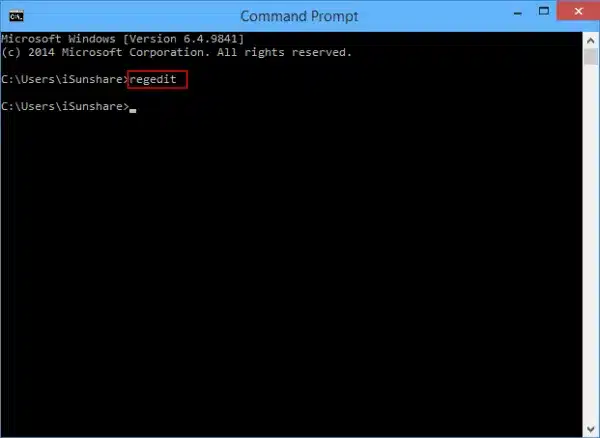
After that, enter the regedit and click on enter tab.
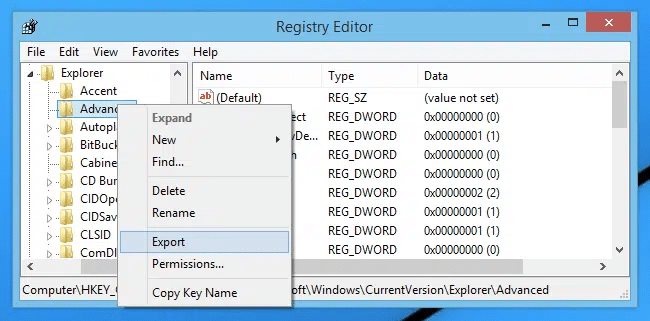
Choose the error 6209 related key in the registry editor, in case you want to back up.
Now, from the file menu, choose export.
After that, in save in list, go for the folder where you wish to save the QuickBooks backup key.
The next step is to enter a name for the backup file in the file name box.
The user is then required to head to the export range box and make sure that the selected branch option is opted.
Choose the save option.
And then, save the file with a .reg extension.
The next step is to backup QuickBooks related registry entry.
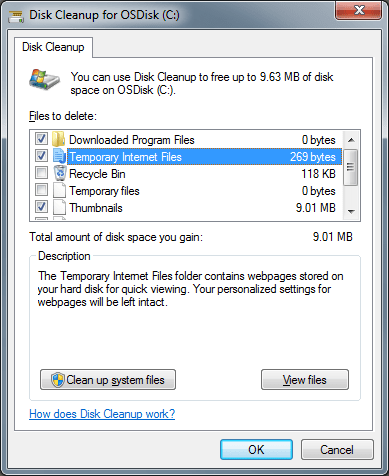
Solution 8: Disk Cleanup
The user needs to first push the start tab.
After that, enter command in the search box, but ensure that you do not hit the enter tab.
Once done with that press ctrl + shift and then click on enter tab.
The user is then required to click on yes after a blinking cursor window appears on teh screen.
Now, enter cleanmgr and click on enter tab.
Cleaning system junk with Disk Cleanup
After the steps above are completed, disk cleanup will automatically start with calculating the amount of occupied disk space that can be reclaimed.
This will now open the disk cleanup dialog box, where the user will see temporary files option.
End the process by checking the boxes of the categories that want to clean and also click on ok tab.
Final Note!
Now that you know the right set of steps that can be performed in eliminating the QuickBooks error 6209, it is time to implement the steps manually. If still, you are unable to resolve the error on your very own, don’t hesitate to contact us at our toll-free QuickBooks Support Number at +1-888-510-9198. We are constantly there to help you in eliminating any sort of issue related to QuickBooks. Our team of certified QuickBooks professionals will help you with all your queries instantly.
FAQs
How do I fix QuickBooks error code 6209?
QuickBooks error code 6209 is often seen due to corrupted or damaged QuickBooks desktop files. The user can try fixing the issue using the steps below: 1. Head to the start tab 2. And then, click on windows icon 3. The next step is to enter control in the run window an click on ok tab 4. Now, select uninstall a program and click on turn windows showcases on/off 5. The next step is to click on ok tab to close the windows feature window 6. Once done with that reboot the system 7. After that check .Net framework 3.5 SPI 8. Also, enable by clicking on the box beside it. 9. And click on the ok tab and close the windows features 10. reboot the system and reenable the .net framework 3.5SP1 and reboot the system
How do you resolve potential data issues in QuickBooks?
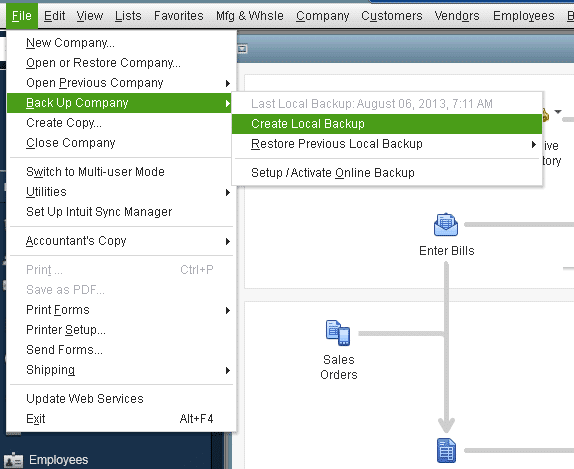
To fix potential data issues, the user needs to head to the QuickBooks File menu, choose Utilities, then go for Verify Data. Now, choose OK when you see the message “QuickBooks detected no problem with your data”. Continue using your company file. If Verify finds an issue with your data, you will be prompted to Rebuild Now or View Errors.
What is error code 6069 in QuickBooks?
The 6000 error series includes the QuickBooks error 6069, which further restricts users from accessing the QuickBooks company file. This error occurs when a copy of the backup file with the same name is substituted for the original company data file.
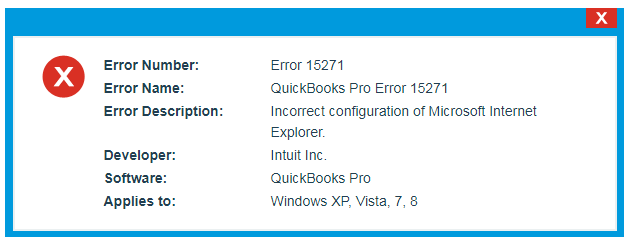
15xxx series errors are pretty common in QuickBooks, especially when trying to update or install QuickBooks. One such error that we are going to talk about in this segment right here is QuickBooks error code 15271. This error can be a bit annoying as it hinders the update process. To help you out in dealing with QuickBooks error 15271, here we are sharing the details about the error, along with the factors causing the issue, and ways to rectify the same. Thus, stick to this piece of writing till the end and learn more about error code 15271 in QuickBooks.
In any case, if you are not able to fix it on your own or you are having any trouble while fixing it then you can get help from our experts who are highly skilled and have years of experience. You can contact them by dialing our QuickBooks Enterprise help number at +1-888-510-9198, and all your queries will be addressed immediately.
Generally, this error occurs when a user is updating/installing QuickBooks Desktop Version .i.e., QuickBooks Pro/Payroll/Desktop. You get one of the following errors:
Error
Description
Error 15271:
The payroll update did not complete successfully. A file cannot be validated.
Error 15271:
The update did not complete successfully. A file cannot be validated.
This error usually indicates that there is a file that cannot be validated. There can be a bunch of factors triggering such an error in QuickBooks, which we have tried to elaborate on later in this segment.
What Causes QuickBooks Error 15271?
Here are a few common reasons, why you can come across QuickBooks error code 15271. Let us evaluate them one by one:
Corrupt download or fragmented establishment of QuickBooks Pro software.
Corruption in Windows registry from a current QuickBooks Pro-related software change.
Having an attack of Infectious malware contamination that has ruined Windows framework files or QuickBooks Pro-related program records.
Another program perniciously or wrongly erased as related to this QuickBooks Pro-reports.
Solution steps to resolve QuickBooks Error code 15271
Many times, this type of error can be resolved by turning off the UAC in Windows, and then update your software again.
Solution 1: Turn Off UAC in Windows
To resolve this, you need to turn off the “User Account Control(UAC)” in “Windows“. Please follow the steps below:
✔ In Windows Vista:
Firstly choose “Windows” option.
Now select as “Control panel“.
Type “UAC” in the given search dialog box. Hit the “Enter key” button.
Now click to the turn user account control (UAC), “ON” or “OFF“.
Click to the “Ok key” button.
Finally, reboot your device once.
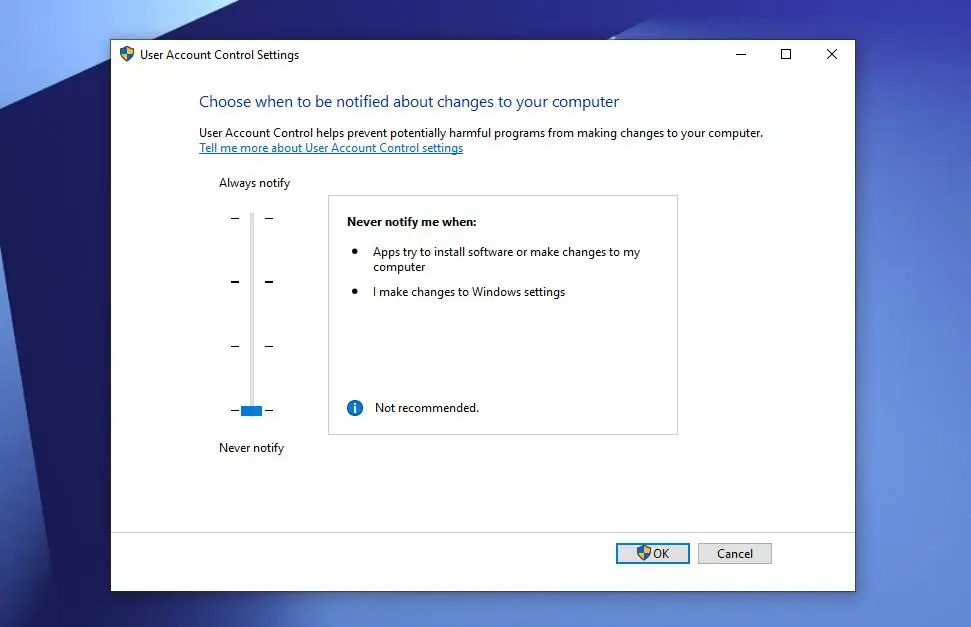
✔ In Windows 7, 8 and 10
Go to the “Control Panel” settings.
In Windows 7: Choose Start > Control Panel.
Windows 8: From the Start menu type Control Panel, then click Control Panel.
In the search box, enter “UAC“.
Click “Change User Account Control“ settings.
To turn off the UAC: Move the slider to “Never notify“.
Click “OK“. If you are prompted for the “Admin password” or confirmation, enter the password or provide confirmation. If want to make any changes, restart your system.
Now turn as “ON” your UAC: Move the slider to when you want to be notified.
Click to the “Ok key” button.
Important Notes:
Hopefully, this will help you in your critical time. If the error still persists there please restart your QuickBooks.
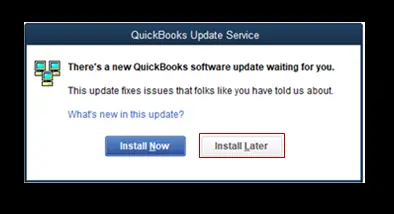
If the QuickBooks Update Service message window appears, click “Install Later“, and then reset your “QB release update“.
First of all, apply any registry repair system where a user can easily repair the harmed registry entries that are related to the QuickBooks applications.
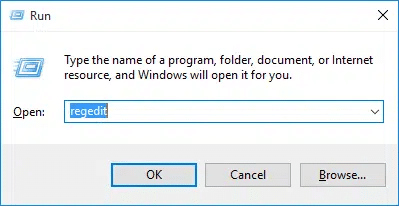
First press the “Start” key button.
Then write a command in the given search dialog box. Don’t hit the enter key button.
Now press or hold the “Ctrl + Shift” keys & hit the “Enter key” on your keyboard.
A permission box opens, select the “Yes” option.
A black box will start a twinkle cursor.
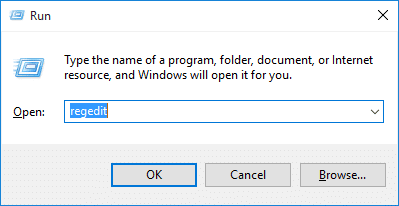
Then write “regedit” & then choose an option to hit the “Enter” key.
Select the “failure 15271” (at which the file you want to take backup) from a registry editor.
Now choose to “Export” from the main file menu.
Select the folder where you want to save your data back up from the save option in the list.
Save a file, & then assure the selected branch into your selected from the export range.
Then fix the attack of malware contamination. Now utilize the malware expulsion system and then arrange the malware from your system.
Now remove all undesirable as well as garbage records from a system (this will consists temp files & folders).
Solution 3: Clean Your Systems Junk Files
Firstly Conduct a “full malware scan” on your computer.
Clean all your “Junk files” (including temp files).
Update your PC device drivers as instantly.
Now try to utilize windows system to restore them and fix it as recently system changes.
Uninstall or reinstall your QuickBooks pro app that is associated with this critical error 15271.
Run your “Windows System File Checker” (‘sfc scannow”).
Try to install all your latest windows updates.
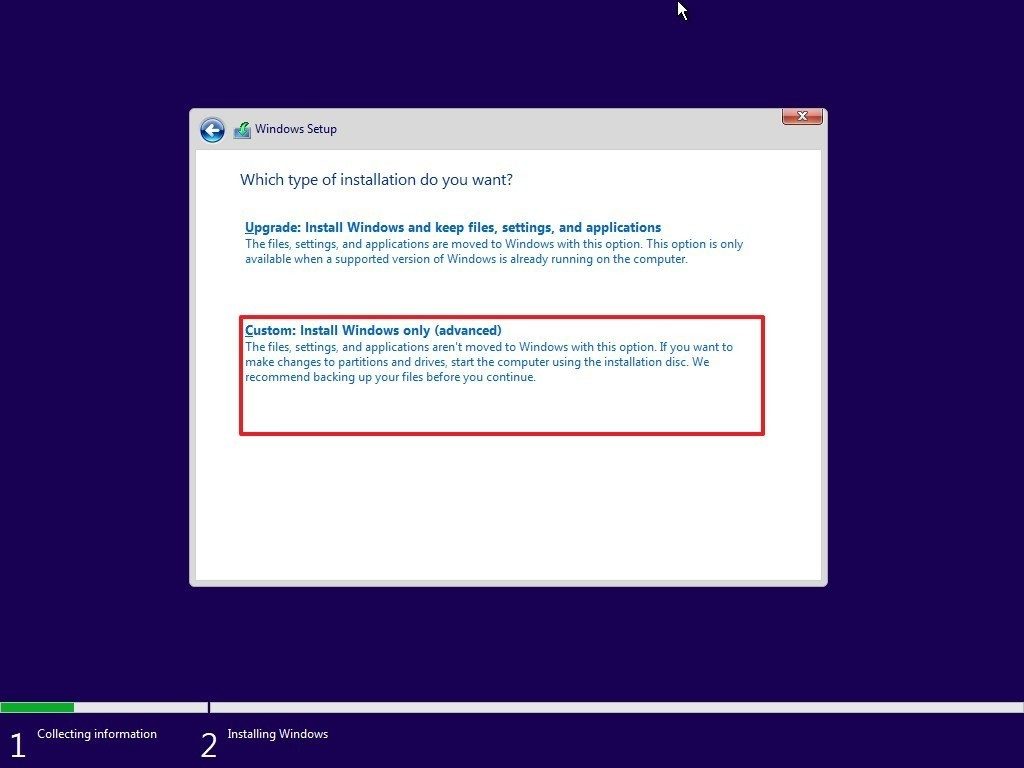
Finally perform a clean Installation of your Windows OS.
We Hope you found this article helpful and also now you are able to fix the QuickBooks error 15271 by own. If you are not good in technical aspects or have any query related to your QuickBooks Software, you may ask it directly to our QuickBooks experts. Call us at our QuickBooks payroll technical support number i.e. +1-888-510-9198.
FAQs – QuickBooks error 15271
How can I identify the QuickBooks error code 15271?
Other than the error message itself displaying on the screen, there can be bunch of other signs that can help in identifying the error. Here are a few symptoms: 1. Windows begins running slowly 2. Computers freeze on a timely basis for a few seconds. 3. The system crashes post encountering the error. 4. Windows face latency issues and responds slowly to the given input
Does turning off UAC can fix the QuickBooks payroll update error 15271?
Yes, if UAC is turned off on the system, the the payroll update error code 15271 can be eliminated easily. The user can try fixing the issue using the steps below: 1. The user needs to press windows + R 2. Now, a run box will be visible. 3. The next step is to enter the control panel in search bar and then click on ok tab. 4. Navigate to the user accounts and again click on user accounts option. 5. Click on change user account control settings. 6. Select the never notify option. 7. The last step is to press ok tab and then reboot the system.
How to fix errors in QuickBooks?
The user can try to fix the errors in QuickBooks by running a quick repair on the program. The steps listed below can surely help. 1. The very first step is to select program problems in the QuickBooks tool hub. 2. Now, choose quick fix my program. 3. The next step is to start QuickBooks desktop an open the data file.