Searching for the procedure to change registered email address in QuickBooks? Well, while accessing or logging in QuickBooks, at times a thought of changing the registered email address might strike to the user’s mind, due to various reasons. Now, Intuit Inc. made it easy for the users to do it. Later, you can update the desired email address with the help of the old email address. Updating the email address is essential, as it is one of the basic or primary means of sending crucial and sensitive notifications and communications. Also, email address is one way of retrieving the User ID or password. All these factors make it necessary for the users to keep updating the email address after a certain time period.
If you also feel the need to alter the email address, but do not know what to do, then this article is a savior for you. In this post, we will briefly introduce you the process to do so…! If you no longer have access to your old registered email, check out the Email change request. Or you can even directly reach the QuickBooks online support team via our toll-free number i.e. +1-888-510-9198 Our team will perform the procedure for you without any hassle.
Do you want to change the registered email address? Now updating the QuickBooks associated email address is simple & effortless. There can be two possible situations listed below, let us check them out:
If the old registered email is accessible, then in that case log into QuickBooks Online & pursue a few straightforward steps to update the registered email address.
Or if the old registered email is no longer accessible, go to the “Email change request” option.
Notifications you will receive
Notifications are one of the important aspects, as they can mean many things. There can be many forms of notification that the user might receive via email, a few of the examples are as follows:
Procedure to change the email address associated with your business
Choose the “Gear” icon on the Toolbar.
In “Your Company” section, choose the “Account and Settings” tab (or Company Settings).
In the menu section, select the “Company” tab.
From the “Contact Info” section, choose the “Pencil” icon.
In the “Company email” field, type in the new email address. (Note: Check the box for the same as company email, if it’s the same email address that you use for your sales forms).
Select the “Save” icon, and then click on the “Done” tab.
How to change the email associated with a location (for location tracking)?
Select the “Gear” icon on the Toolbar.
In the “Lists” tab, select the “All Lists” tab.
Choose the “Locations” tab.
Select the desired location you want to edit, and then in the drop-down lists on the action column, select the “Edit” tab.
Check the box for this location has a different email address for communicating with customers.
Type-in the email address, and then choose the “Save” tab.
Update email address for notifications
First of all, sign in to “My Account”.
In the next step, on the “Manage your QuickBooks page”, the user is required to select the product that is to be managed.
After that, the user should check if he/she has logged in to the correct company, by looking at the top right corner. If not, the user should select the correct company from the drop-down list.
Moving ahead, the user should scroll down to the “Authorized users list”.
And then, select the “Edit” option, beside the name.
The next step in the process is to enter the “new email address” and hit “Save”. Also, select the “X” button to get back to the home page.
Lastly, the user will receive notifications regarding the change in the email address.
Change email address in QuickBooks desktop
One can choose any of the below options to change email address in QuickBooks:
Option 1: Change an Email Address in QuickBooks Desktop for Signing in
One can try to modify the current email address and try to login into QuickBooks with another ID. The user is recommended to pick a product or service from the manage tab of your QuickBooks page. After that find the company name option and choose the drop-down menu which is next to it. One can further view edit login with the drop down. And further the email address can be changed using this feature. Let us have a look at the steps to be performed to change the email address:
The first step is to sign in to QuickBooks desktop and then head to manage your QuickBooks.
The next step is to choose a service or product that you need to manage.
Now, press the dropdown option which is next to the company name.
After that, click on the edit login tab
And also hit the enter tab for profile
Go for the edit option which is available near the email address
The user is then required to enter in a new id in the email address
And press confirm email address
Enter the password that you are using to login and press save tab
On the new email id, wait for the verification
And then, open the verification in inbox and click on the verify my email
Make sure to click on continue after seeing the verified email
Option 2: Change an Email Address in QuickBooks Desktop for the Notifications
It should be noted that only after signing into your account can the process be performed. You can use the existing email address. The steps involved here are as follows:
The very first step is to sign in by entering my account
After that on manage your QuickBooks, choose a product or service
The next step is to ensure that the correct component is logged in. You can also select the appropriate business by selecting the menu tab.
Note, the search list for authorized users right now.
After that click edit by the name
And also mention the modified or new email address.
The user needs to choose the save from the menu.
And also press the X button.
After the steps have been performed, a notice will be delivered to the new email.
This will confirm the email
How to Change Your Email Address in QuickBooks Online?
When you want to update or add new email to QuickBooks online, you can simply go for settings and choose a new ID to sign in to tour account by using settings. Note that the steps for QuickBooks online accountant change. Let us have a look at the steps to be performed to change email address in QuickBooks online.
Option 1: Changing QuickBooks Online Email Address for the Company
For changing an email address for your company, you can first open settings. For accountant and settings, look for your company. Select the company option and this will show up the contact information. Make sure you choose the correct id. And continue with the steps below.
At first, the user needs to press the icon stating the settings tab.
Now, look for the complete tab.
The next step is to head to the account and settings tab.
Once done with that, the user needs to choose the company from the available options.
Followed by, click on the contact info.
Now, enter the company’s updated or new email address.
The next step is to choose the customer facing email.
After that, hit save tab after entering the new email id
The user is then required to click on new and also click on invoice that is below the customers.
Once done with that, make a sample mail and click on save.
Now, check that the new email id has is present in the field and click on send and close.
Once you receive the email, ensure that it mentions the new email address
Option 2: Change an Email Address in QuickBooks Online for Signing in
If you use QuickBooks online, then you need an email to access the account. You might not want to use the registered or preferred email ID for various reasons. You can simply change it by performing some set of steps. Head to the settings option to modify/update your email address. The steps below will help in changing the email address.
The very first step is to open it by clicking on QuickBooks Online.
Head to the Settings option of the software.
Click on the options that are available.
Furthermore, click on one of the following:
Intuit Account
Your Account
Head to the section of Email Address.
Click on the Edit option.
End the process by signing in and entering the new email ID and then save it later on.
Option 3: In QuickBooks Online Accountant Change a Registered Email Address
This can be done by clicking the Gear icon and selecting the Company from the menu. Also click the Account tab. The steps below will help in completing the process.
The first step is to click on the Gear button in QuickBooks Online Accountant.
Navigate to the Your Company option.
You have to click on the tab titled Your Accountant.
Go for the icon that looks like a Personal Profile.
Furthermore, click on the symbol of Edit Personal Information.
Head to the section that says Your Sign-in Information and then you have to visit the tab for Change Sign-in Info.
Now, press the option of Continue.
Also, mention your username and password on the sign-in page.
Go for the Sign in option.
Head to the profile and look for the section of the Email Address. Enter this section.
Now, hit the Edit tab and enter your new email ID.
For this ID you have to enter the password and then click on the Save option.
Wait for the confirmation message that will confirm that the email address has been changed in QuickBooks Online Accountant.
Once you save the modifications, the email address will be updated on the associated servers. Hopefully, this article will turn out to be helpful for you to know how to change your email address in QuickBooks ..! If you are still unable to change your registered email address even after following the above steps are prescribed, then you can contact our QuickBooks toll-free helpline number .i.e. +1-888-510-9198 without waiting much time and effort.
FAQs Related to change email address in QuickBooks
How to change primary admin email address in QuickBooks?
You can sign in with Intuit Account info. And this should be different from what you use to sign in to the company file. Further scroll down to the primary contact section and further choose change. And also go for the new primary contact from the list of contacts on the account.
How do I set up email in QuickBooks desktop?
You can set up a secure webmail using the steps below: 1. You need to head to the QuickBooks edit menu and further choose preferences. 2. Further, choose send forms. 3. Also, go for web mail and select add. 4. The next step is to choose provider from the drop down and enter the email address. 5. Once done with that, choose the use enhanced security checkbox and hit ok tab. 6. When asked, sign in to the Intuit account.
How do I add multiple email addresses to QuickBooks desktop?
You can add multiple email addresses to a report using the steps below: 1. Head to the reports tab. 2. Once done with that choose the report you want to send, and choose the email icon. 3. Now opt for email and in the to field, enter the email addresses separated by a comma and space. 4. You now have to enter the email addresses in the CC field. 5. Choose send and you are done.
Reconciling is simply the process to arrange matching financial transaction available on the bank statement so as to ensure that it matches the records. It’s important to understand the significance of the QuickBooks bank reconciliation with the help of cash flow analysis of the business. The need for QuickBooks bank reconciliation might arise due to various possible reasons. In this article, we will discussing the need as well as other aspects associated with Bank Reconciliation via QuickBooks. So, the users can go through the article carefully, to understand the concept in a better way. However, for more details, the user can also get in touch with our QuickBooks online support team via our toll-free number i.e. +1-888-510-9198.
Undoubtedly, it is significant to reconcile business bank accounts on a monthly basis, in order to avoid any kind of inaccuracy. Reconciling the bank accounts on a regular basis ensures the user about the following points:
This process allows the user to analyze the discrepancies between the records & the banks and ensure that they are fixed in an apt manner.
Well-timed notification of any fraudulent transactions that may occur is another benefit of reconciliation.
Significant Notes for QuickBooks Bank Reconciliation
Before the user begins with the reconciliation process, make certain to have:
In case the beginning in the start Reconciliation window doesn’t match the beginning balance in your bank or debit card statement, then the user shouldn’t wage bank Reconciliation in QuickBooks.
Setting up the bank or credit card account in QuickBooks with the correct beginning balance is also an essential factor.
The user should not edit any type of transaction that has been currently resolved. As it will certainly trigger a discrepancy in the account and the user will end up in different beginning balance.
Another factor that the user should ensure is to receive a duplicate of the bank or credit card statement.
One of the best methods is to always reconcile the account as he/she receives his/her bank or credit card statement to ensure that the QuickBooks account is always in balance with the paper statement.
Lastly, the user is required to ensure that he/she has entered all un-cleared transactions for the statement period.
Significance of QuickBooks Reconciliation with Bank Account
Basically, the Bank Reconciliation is a financial accounting technique that uses two sets of records to make certain that there are authentic figures in concurrence. Reconciling bank accounts with QuickBooks can be used to conclude whether the funds move an account event & the total sum spent. The user is supposed to make secure the two values equalized at the end of the recording period.
Reconciling a bank or credit card declaration evidently implies to observe in contrast the accounting records, accounts receivable, and accounts payable & identical them up to the equivalent transaction as recorded on the bank statement. At the end of each financial month & quarter, it’s a fine idea to reconcile an account. When reconciling an account, businesses, and singular person prove that each transaction sums to the correct ending account balance.
The very first benefit of QuickBooks Reconciliation with Bank account is that the entire financial transactions and bank statements get recorded in QuickBooks software.
Also the entire reconciled transactions are marked as cleared in the QuickBooks.
This makes the user competent to run the bank reconciliation reports that will endow the information of the items that have cleared the bank & those that remain outstanding (uncleared).
The financial report such as balance sheet and profit & loss statements and balance sheet is advanced.
The entire reconciled financial transactions are apparent in QuickBooks as emptied.
The user is able to run the bank reconciliation address that will provide the information of the items that have emptied the bank & those that stay exceptional.
All transactions of the bank statement get listed in QuickBooks.
Before the user pursue the steps to reconcile QuickBooks with bank account, it is important to ensure to have the bank statement available for the bank account to be reconciled.
The user is required to arrange the bank or credit card account in QuickBooks with the accurate beginning balance.
Also, back up the QuickBooks company file.
A pencil for designating the selected items on your statement may also be nearby. Taken a copy of your bank or credit card statement.
Filed all uncleared transactions for the statement period.
This video will assist the user to Reconcile the accounts in QuickBooks,
Facts associated with QuickBooks Reconciliation with Bank Account
It is significant to reconcile the bank account as an everyday review of the bank accounts can assist the user in identifying problems before it become a brain teasing hassle. This is mainly important for businesses, accounts, & individuals to inspect wrong activity and to continuing financial statement errors.
Catch Hoax:
One of the major things to look for is any sort of indication of hoax.
Were reliable analyses that the trouble creates a replica or alteration, leading to more money leaving the analysis account?
Were checks troubles without permission?
Are there unapproved transfers out of the bank account, or has anyone made unapproved withdrawals?
Pay Employees:
QuickBooks has time-tracking and integrated payroll features. Employees log their hours, the employer can assess as well as approve them, whereas QuickBooks does the rest.
With the help of QuickBooks the user can Cut the checks or pay staff members by means of direct deposit, issue W2s at tax time, as well as file taxes online.
Avoid Troubles:
Reconciling the bank account also facilitates the users to recognize issues that might entail attention. For instance, the user might probably desire to re-examine how he/she handles or manage the cash flow & accounts receivable, or possibly wish to modify the activity performed by someone that has been recorded in the system or the accounting processes the user generally applies.
The user must know the availability in accounts.
Stop bank charge for not sufficient funds or going into lines of credit when the user doesn’t really want to.
Refrain from bouncing analysis or failed computerized payments to coworkers & suppliers.
Familiarize with the bounced or unsuccessful customer payments and also if any action required.
Track the outstanding checks.
Ensure that entirety is going into the accounting system appropriately.
Enable the user to see the bank errors.
Receive Payments:
The user can easily accept payments with QuickBooks. Simply giving the customers an option to pay through credit card, debit card, PayPal, or bank transfer, will work in this case.
QuickBooks refines the repayment and also transfers the money directly to the bank account.
The user can swipe or dip the card from the phone or tablet if there is even a mobile card reader.
Reconciliation Time:
It’s logical to analyze the bank accounts at least every month. For high-volume businesses or positions where hoax is jeopardy, more often is better. Some businesses reconcile their bank accounts every day.
The user can also build care into the bank accounts – ask the bank for ideas. One of such solution is – Positive Pay, which various banks propose, continuing the bank from accept payments unless the user has beforehand notified them about the payment.
If the Accounts don’t get reconcile:
At times, it is might be happen that the user might not be able to reconcile the bank accounts. No need to be anxious if the difference among the two statements is tiny. As most of the reconciliation module authorize to label it as an error. Most possibly, the user will be capable to resolve the missing transaction during next month’s reconciliation.
This brings us to the end of the article, where we hope that the information stated in the article might help the user to understand the QuickBooks Reconciliation in a better manner. For further information or assistance for any issue associated with QuickBooks – directly make a call to our QuickBooks Enterprise support team by dialing toll-free +1-888-510-9198. Our experts will be more happy to help you.
What is QuickBooks bank reconciliation, and why is it important?
Bank reconciliation is the process of matching the transactions in your bank statement with those in your QuickBooks account. QuickBooks bank reconciliation ensures that your accounting records match your bank statement, which helps you identify discrepancies, prevent overdrafts, and maintain accurate financial records.
How do I reconcile my bank account in QuickBooks?
To reconcile your bank account in QuickBooks, first, navigate to the Banking menu and select the account you want to reconcile. Then, click the Gear icon and select “Reconcile.” Follow the prompts to enter the statement date, ending balance, and any service charges or interest earned. Next, compare the transactions on your bank statement with those in QuickBooks and mark them as cleared. Once all transactions match, click “Finish Now” to complete the reconciliation.
What if my bank reconciliation doesn’t balance in QuickBooks?
If your bank reconciliation in QuickBooks doesn’t balance, you may have missed a transaction or entered an incorrect amount. Double-check your entries and compare them to your bank statement. You can also try reconciling again from the beginning or reaching out to QuickBooks support at +1-888-510-9198 for assistance.
Can I reconcile multiple bank accounts in QuickBooks?
Yes, QuickBooks allows you to reconcile multiple bank accounts at once. Simply select each account you want to reconcile from the Banking menu and follow the same steps as you would for a single account.
How often should I reconcile my bank accounts in QuickBooks?
It’s best to reconcile your bank accounts in QuickBooks at least once a month to ensure accuracy and catch any discrepancies early. However, the frequency may depend on the volume of transactions and the size of your business. For more information on the ideal reconciliation schedule for your business, call our toll-free number +1-888-510-9198 to speak with a QuickBooks expert.
Reconciling an account in QuickBooks is essential so that they match the bank and credit card statements. The way to balance your checkbook, you are supposed to review your accounts in QuickBooks and ascertain that they tally with your real-life bank and credit card statements. The entire process of reviewing is what it means when you say as reconcile an account in QuickBooks. When you get your bank statement, you will have to compare each of the transactions with the ones that you entered into QuickBooks. If everything tallies, then this means that your accounts are balanced and accurate. It is recommended to reconcile QuickBooks including checking, savings, and credit card accounts every month.
To help you with the process to reconcile an account in QuickBooks, here we are with this segment sharing the complete set of steps that can be performed. Note that, the procedure for QuickBooks online and QuickBooks desktop might vary. Thus, we have tried to cover both procedures in detail. For better understanding, read this segment carefully, or you can further get on a call with our QuickBooks technical support team, for any sort of professionals guidance. Dial our toll-free customer support number i.e., +1-888-510-9198, and all your queries will be answered immediately.
Steps to Reconcile an Account in QuickBooks Online
Here are the steps that can be performed by QuickBooks Online users to successfully reconcile an account in QBO.
Step 1: Review your Opening Balance
When you are reconciling an account for the very first time, it is crucial that you review the opening balance. It is important that it matches to the balance of your real-life bank account for the day you started tracking transactions in QuickBooks.
A quick tip- You can save your effort by connecting your bank and credit cards to online banking, as it automatically downloads transactions and further records the opening balance in QuickBooks for you. In case you forgot to enter an opening balance in QuickBooks previously, then need not to worry, you can perform the steps to enter an opening balance later on.
Also note that, entering a service charge and interest earned options are only available when the bank account is not connected to online banking.
Step 2: Start a Reconciliation
After you have your monthly bank or credit card statement, it is time to start with the QuickBooks reconciliation. Keep in mind that if you are reconciling multiple months, do them one statement at a time, starting with your oldest statement. The steps involved here are:
Just in case your accounts are connected to online banking, ensure you match and categorize all the downloaded bank feed transactions.
Now, head to the Settings tab ⚙ and further click on Reconcile. In case you are reconciling for the very first time, then click on Get Started.
After that, from the Account ▼ drop-down, choose the account you wish to reconcile. Ensure it is the same one on your statement.
It should be noted that, if you witness a message regarding a previous reconciliation, then you need to opt for We can help you fix it. This needs to be fixed before you continue with the steps.
Furthermore, review the Beginning Balance. Ensure that the beginning balance in QuickBooks matches the one on the statement.
Now, enter the Ending balance and Ending date on the statement. Note that, certain banks might call the ending balance a new balance or a closing balance.
In case you see it, review the last statement ending date.
This is basically the end date of the last reconciliation. Your current bank statement should begin the day after.
Once you are ready to begin, click on Start Reconciliation.
It is now time to simply compare the transactions on the statement with what’s in QuickBooks. Review them one by one. As this can be a tricky part, you need to ensure that you have the right dates and transactions in QuickBooks. Continue with the steps below for the type of account that you are reconciling.
Reconcile accounts connected to online banking
As all of the transaction info is obtained directly from the bank, reconciling becomes easy. In certain cases, the accounts are already balanced.
You need to start with the first transaction on the statement.
Now, look for the same transactions in the Reconciliation window in QuickBooks.
After that, compare the two transactions. In case they tally, put a Checkmark next to the amount in QuickBooks. This usually marks it as reconciled.
To speed up things a little bit, the transactions that you added or tallied from online banking are already selected.
In case a transaction doesn’t show up on the statement, but it is present in QuickBooks, then do not put a checkmark.
You need to compare each transaction on the statement with what’s in QuickBooks.
A quick tip: In case you are sure that you have found a match but something small isn’t right, like the payee, then you can choose the transaction in QuickBooks to expand the view. Further, click on edit and make the edits so the details tally.
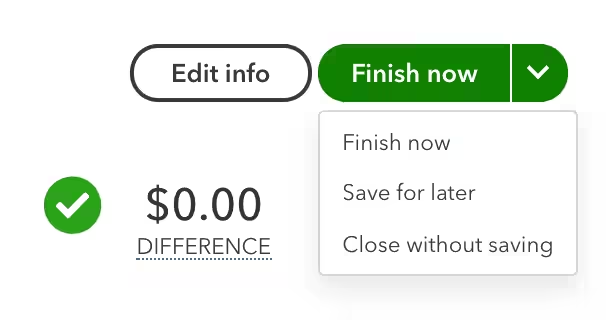
After you reach the end, the difference between the statement and QuickBooks should be $0.00. If it is, then make sure to click on Finish Now.
Reconcile accounts that aren’t connected to online banking
If your accounts are not connected to online banking, then here is what you can do:
Begin with the first transaction on the statement.
Find the transaction in the Reconciliation window in QuickBooks.
You now have to compare the two transactions. In case they tally, you need to put a checkmark next to the amount in QuickBooks. This will mark it as reconciled.
In case a transaction doesn’t show up on the statement, but you see it in QuickBooks, skip putting a checkmark.
Furthermore, compare each of the transactions on the statement with QuickBooks.
Quick Tip- In case you are sure that you found a match but there is some small issue, then you can simply Edit the transaction.
Now, toward the end, you will see the difference between the statement and QuickBooks as $0.00. If that is the case, then click on Finish Now.
Steps to Review Past Reconciliations
You will have to run a QuickBooks reconciliation report to review your work. The steps involved in here are:
Initially, head to Settings tab ⚙ and also click on Reconcile.
Furthermore, choose History by Account.
Now, make use of the dropdown menus to choose the account and date range.
Or you can further print or export your reconciliation reports, in case you need to share them.
Steps to edit completed reconciliations
You can perform necessary changes to past reconciliations, but keep in mind that changes can unbalance the accounts and other reconciliations. It further affects the beginning balance of the next reconciliation. You need to start by reviewing a previous reconciliation report. In case you reconciled a transaction mistakenly, then you need to start over again or connect with an accountant. Note that, these changes can get a bit complicated for you to handle.
Steps to Reconcile an Account in QuickBooks Desktop
If you are a QuickBooks Desktop user, then here are the steps that you need to perform to reconcile accounts in QuickBooks Desktop.
Step 1: Review Your Opening Balance
Before you begin with reconciliation, ensure that you back up the company file. In case you are reconciling an account for the first time, then simply review the opening balance.
Step 2: Prepare for Reconciliation
Ensure that you enter all the transactions for the bank statement period you plan to reconcile. In case there are transactions that haven’t cleared the bank yet and aren’t on the statement, you need to wait to enter them.
Step 3: Start Reconciliation
After you get your bank statement, you can start reconciling. In case you are reconciling multiple months, start with your oldest bank statement. You can reconcile each month separately, one statement at a time. It should be noted that, in case you are reconciling a merchant or payments account and QuickBooks desktop sees that you aren’t signed in, then you will see a sign-in window. This further ensures that your account is successfully linked to a valid company ID.
Head to the Banking menu and further choose Reconcile.
Once done with that, in the Account field, choose the bank or credit card account you want to reconcile.
The statement date is entered on its own. Usually, it is 30 or 31 days after the statement date of the previous reconciliation. You need to change it as needed, in order to match the bank statement.
QuickBooks further enters the beginning balance. It uses the ending balance from the last reconciliation to get this number.
Further, enter the ending balance based on the bank statement.
You now have to enter the service charge and interest earned based on the bank statement.
Do not enter charges that you have already entered in QuickBooks.
Also, review the fields. In case the info is correct, choose the continue or ok tab.
In case you beginning balance doesn’t match your statement, then need not to worry. There are a few tools that can help you.
Just in case the number doesn’t match, choose Locate Discrepancies. This gives you reports that can be used to find discrepancies and other reconciliation issues.
In case you have issues, then try fixing the opening balance and beginning balance.
To start over from scratch, select undo the last reconciliation.
It should be noted that, when you undo a previous reconciliation, your beginning balance reverts to the beginning balance of the previous reconciliation. Moreover, all cleared transactions on the reconciliation become uncleared.
In order to reconcile, simply compare the list of transactions on the bank statement with what’s in QuickBooks. Ensure that you have the right dates and transactions. After you are done reviewing the statement, you will know everything made it into QuickBooks.
Here are a few things that you can do to make reconciliation is little easier.
In case you only want to see the transactions for the statement period you are working on, simply choose Hide transactions after the statement’s end date.
Or if you are reconciling a credit card account, then the sections are Charges and Cash Advances and Payments and Credits. Focus on one section at a time.
In case you are reconciling an account for online banking, then choose Matched.
You now have to enter the Statement Ending Date from your bank statement. This automatically selects transactions QuickBooks downloaded and matched.
Note that, a matched transaction in the register has a lightning bolt next to ti. Once you reconcile it, a checkmark replaces the lightning bolt.
In case you want to sort the list, choose the header or title of a column.
Or if there are more transactions in QuickBooks than there are on your bank statement, resort the list.
Match Your Transactions
Once you are ready, start with the first transaction on the statement.
Now, find the same one in the reconciliation window in QuickBooks.
You now have to compare the two transactions. In case the transactions match, choose and put a checkmark in the checkmark column.
This reconciles the transaction.
You need to compare each transaction on your statement with what’s in QuickBooks.
As you clear or add transactions to the reconciliation, the Cleared Balance amount decreases.
The amount increases, in case you clear or add deposits and other credit amounts.
In case a transaction doesn’t appear on the statement, do not mark it as reconciled. Here are the ways to check if things tally or not:
In case you wish to see the total number and amount of transactions you have added to the reconciliation, you need to look for the items you have marked in the cleared section. The majority of banks provide the same summary of transactions on bank statements. You need to compare the total number of transactions to see if anything is missing.
Just in case you want to edit or get more info about a specific transaction, then select the transaction and then click on Go To or double click.
If you want to take a step back and make a change to the info you entered in Step 3: Start your reconciliation, then choose Modify. The service charges, interest, and ending balance info are available in the section next to it.
After you reach the end, the difference between the bank statement and QuickBooks should be $0.00. If that is the case, then choose Reconcile Now.
What to do if balances don’t match after you Reconcile QuickBooks?
In case the difference isn’t zero, then you can fix it using a bunch of steps. For bank accounts, QuickBooks opens the Reconcile Adjustment window. You have the following options:
Return to Reconcile: Head to the reconciliation to review everything again.
Leave Reconcile: You need to save the reconciliation so you can review or edit any existing transactions causing issues. You can come back and finish the reconciliation process later on.
Enter Adjustment: In case you wish to complete the reconciliation, you can force QuickBooks to create an adjustment to balance everything. This should only be done if you know all of the correct transactions are in QuickBooks and what you entered is right. QuickBooks will automatically enter the adjustment as a journal entry.
The journal entry goes into a special expense account termed as reconciliation discrepancies.
Steps to review the reconciliation Adjustment
In order to find all your adjustments on your list, you can simply review a previous reconciliation report for the reconciliation you adjusted. This will show the cleared transactions and any changes that are made after the transaction that may not show in the discrepancies.
Begin with the edit menu, and choose the find tab.
Now, in the find window, choose the Advanced tab and then head to Memo.
The next step in the memo field, type Balance Adjustment, and choose Find.
You can try to review all the cleared transactions using the set of steps enumerated below. Let us have a look:
At first, navigate to the Reports Menu and choose Reports Center.
After that, search and open the Previous Reconciliation Report
Now, choose the account you reconciled, then either detail, summary or both.
Go for transactions cleared, plus any changes that are made to those transactions since the reconciliation.
You now have to choose Display.
Note that, for other types of accounts, QuickBooks opens the Make Payment Window. This will let you write a check or enter a bill to pay to cover the outstanding balance. In case you do not want to record a payment, then choose the Cancel tab.
In case you run into issues or discrepancies, which simply means that the transactions in QuickBooks do not tally to the bank statement, then need not to worry. You can fix the mismatches by performing some simple steps.
Review Reconcile QuickBooks
Once you reconcile, you can choose the Display tab to view the Reconciliation report or Print to print it. In case you want to review a reconciliation report later on, then simply carry out the below steps:
Head to the Report menu, and choose Reports Center.
Now, search and open a previous reconciliation report.
Choose the account you reconciled, then either Detail, Summary, or Both.
Conclusion!
Now that you know the correct ways to reconcile an account in QuickBooks desktop and QuickBooks online, it is time to implement these steps. Hopefully, this segment might be helpful in successfully reconciling in QuickBooks. However, if you have any queries, or if you need our support and assistance at any point in time, then give us a call at +1-888-510-9198, and all your queries will answered immediately.
Did you know that QuickBooks database server manager is a must-have to access QuickBooks in multi-user mode? Well, QuickBooks database server manager, also known as Intuit personal database manager tool makes it quick and easy to create network data files for each and every company file on the host system. QBDBSM is the only way to access multi-user mode in QuickBooks.
In today’s article, we are going to discuss the various aspects related to QuickBooks server manager. Thus, make sure to read this post till the end. However, if you are looking for expert assistance, then in that case you can get in touch with our QuickBooks desktop support team via our toll-free number i.e. +1-888-510-9198. Our experts will help you with all your queries immediately.
QuickBooks database server manager is tool in QuickBooks that lets you configure QuickBooks server for the multi-user access. This tool develops network data file (.ND) for the company file on the host computer. It is also famous as Inuit’s personal database manager tool. This amazing tool makes it easy for the users to create network data files for the company file present on the host system or on the host workstation.
In case the user wants to use multiple desktop version of QuickBooks, then the user will have to install this effective tool. Note that without this tool, it is not possible for the user to access multi-user mode. Each version of QuickBooks database server manager installed on the system adds to a new user to the desktop version. Later in this article, we will discuss how to install, update and setup the QuickBooks Database Server Manager.
Following are the activities it can perform:
Scan the QuickBooks company file as it is important for the multi-user access
Check the local storage device so as to detect new company file automatically
Important Note: The QuickBooks Desktop needs the optimum file performance on the network and so you can install and set up the tool on your system in the location of the company files.
Easy and Quick Tips to follow
The QuickBooks Database Server Manager 2023 develops Network data files and stores the company file in the host computer. In case, you want to use the multiple version of QuickBooks Desktop it is important to install each version of the Database server manager.
If you are planning to install multiple versions of Database Server Manager then it will provide you with only multiple versions of processes. However, it cannot provide multiple versions of the software.
Install the Database server Manager in a chronological order, which is from the oldest to the newest version, when you want to use multiple versions of QuickBooks Desktop.
Be informed that the year’s database services are running in the background when the server works for each year. Ensure that the services of the windows interface that can be accessed through the Windows and the Control Panel than this service is mentioned in the QuickBooks DBXX where the xx shows the number of versions.
Each of the QuickBooks versions add one user when the QuickBooks Database Manager is installed. (ex. QBDataServiceUser28 for 2018 and QBDataServiceUsers27 for 2017).
Steps to Download QuickBooks Database Server Manager
The database server manager can be downloaded without any issue. It is usually a part of QuickBooks. If you are not having database server manager already, then you can download it from the official Intuit website. The steps involved in the procedure to download quickbooks database server manager are:
Start with downloading QuickBooks tool hub from Intuit’s website, and further navigate to the downloads by pressing Ctrl + J.
Now, click on QuickBooksToolshub.exe file.
You now have to click on yes tab to allow the app to make changes.
Once done with that, click on next tab to install it and also click on the yes tab to accept the license agreement.
Furthermore, click on next tab and install options.
The process might take some time.
Once the installation ends, click on finish tab.
And also open QuickBooks tool hub icon.
Now, under the network issues tab, choose QuickBooks database server manager.
When the process ends, give all the users permission to access the company folders. However, QBDBSM will create a unique user for each installation by default. This will download QuickBooks database manager successfully.
Steps to Install QuickBooks Database Server Manager
Here is how to install quickbooks database server manager. Let us have a look:
In order to install QuickBooks desktop database server manager, the initial step is to double-click on the installer and the “Start” with the installation of the “Wizard“.
If your computer has internet then to download an update click on “Next“. In case the computer is not connected with the internet then tap on “No” and then on “Next“.
Now, the user will have to close “All programs” that are open and click on “Next“.
The user is also required to carefully read the “Terms of the software license agreement” and if you agree with the “Terms and conditions” then select “I accept the terms and license agreement” and click on “Next“.
Once done with that the user needs to opt for “Custom or Network options“
After this click on the installation type
Select “I’ll be using QuickBooks on this computer And I’ll be storing“….and when you want to run the program in your system.
Opt for the “I will not be using QuickBooks on this computer…” when only QuickBooks data will be stored on this computer.
The next step in the process is to click on “Yes“, Allow “Access“.
Steps to Update QuickBooks Database Server Manager
It is necessary to update QuickBooks Database Server Manager. It is important because when a critical update is released or when the new version of QuickBooks Desktop is installed in the computers. Let us explore the steps for downloading quickbooks database server manager update.
After the completion of the installation, you have to reboot the server and it is very important to do so.
Once the server is updated on each of the workstations you will get the message: The Company File needs to be updated to work with this “version of QuickBooks Desktop.”
After that, the updates can modify the database structure and in such instances, you will get the message to “Create a backup“.
This will allow the users to open the file when you follow the prompts once you complete the backup.
Steps to Set up and Use the QuickBooks Database Server Manager
The Database Server Manager tool can do the following:
The folders and QuickBooks company files that needs to be configured for multi-user access are scanned
The local hard drives are used so as to automatically configure new company files
“Hope this infographic will be informative for you to understand about set up of QuickBooks Database Server Manager”
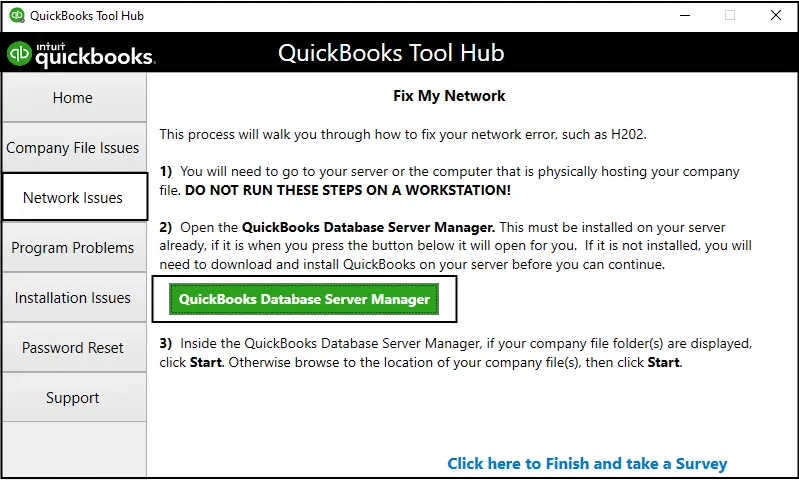
Step 1: Open QuickBooks Database server manager
Get to know how you should open the QuickBooks Database Server Manager:
The initial step in the process is to Go to “Start” button then click on “Programs”, then click on QuickBooks, and then click on “QuickBooks Database Server Manager“.
The company files that you store on the server should be scanned to ensure that they are configured to permit other users to access these company files easily.
Go to the “Start” button and then click on “Programs“. After this click on QuickBooks. Then on QuickBooks Server Manager.
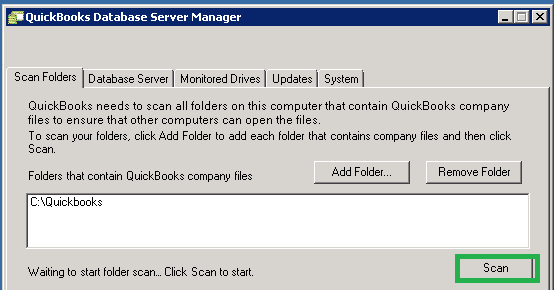
And then click on “Scan Folders“
After this look for the folders that contain “QuickBooks company files“. In case you don’t know which files then scan the entire the whole disk.
Lastly click on the “Scan” button.
All the company files that are configured in the scanned folders for multi-user access when they are completely scanned.
Step 3: Steps to Add Folder
Click on “Add folders” button and then select the “folder” you wish to include there.
The location of the folder under the folders which contain the “QuickBooks company file“.
When you add new company file to the server, you can use the “Monitored Drive features” which keeps your QuickBooks Database Server Manager 2016 updated
First of all, go to the “Start” button and then click on “Programs“, then on QuickBooks and then click on QuickBooks Database Manager.
And then, click on “Monitored Drive tab“
“Remove and rename” and then click on “Select“, in case you want all the “local drives” that you want to monitor for company files.
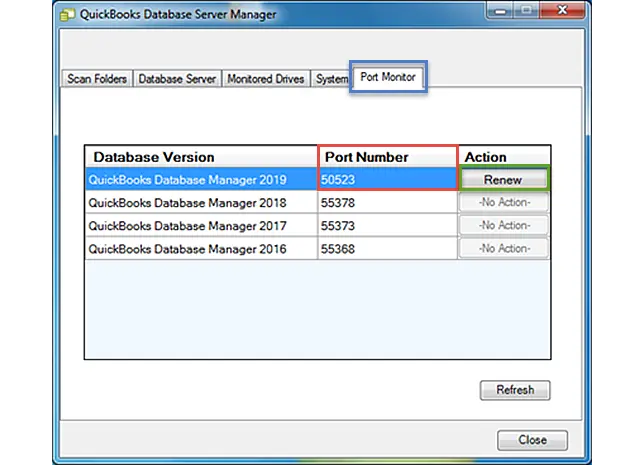
Permit QuickBooks database server manager to run on the server computer
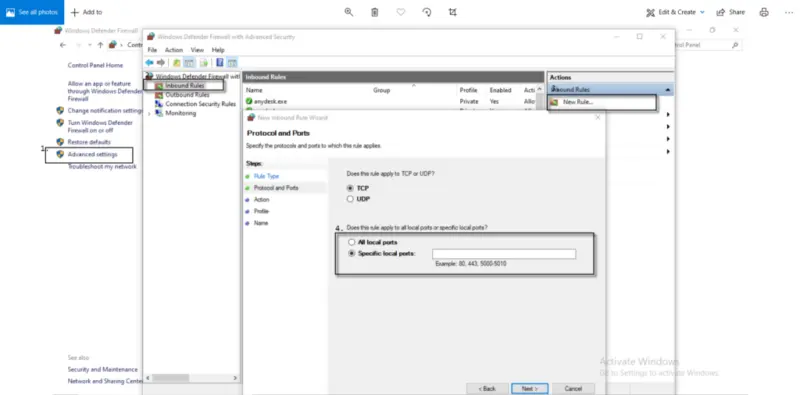
You can try performing the below steps to allow QuickBooks database server manager to run on the server system.
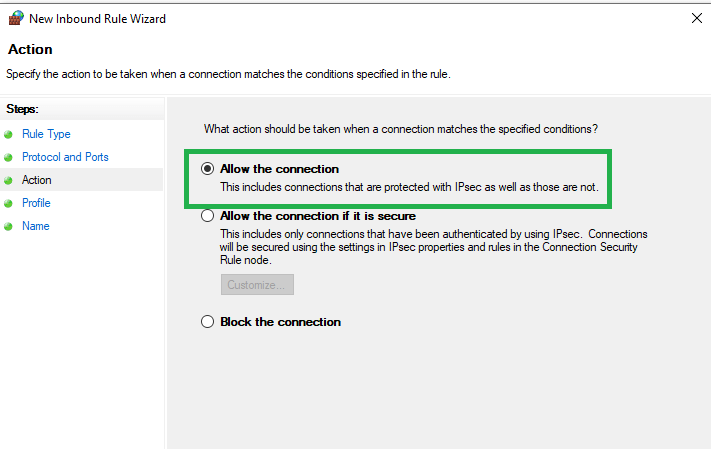
Once done with that, open QB database server manager and click on Port monitor tab.
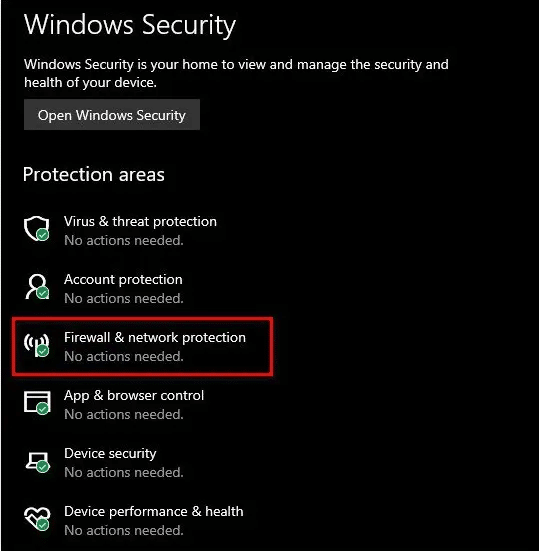
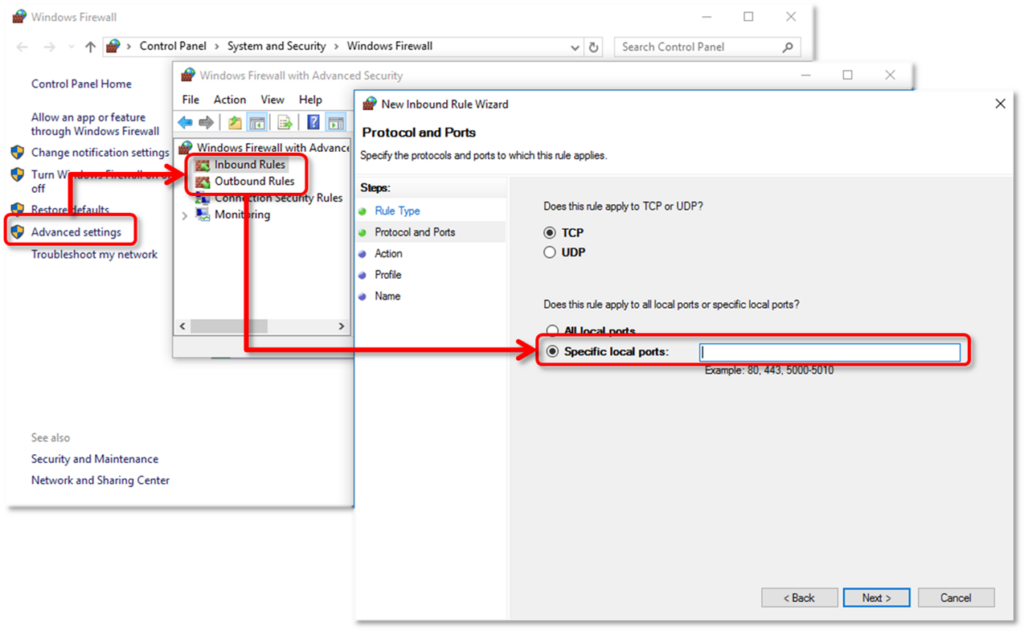
You now need to click on start menu and further look for windows firewall and open it.
Once done with that, right click the inbound rules from the advanced settinsga and further choose rule.
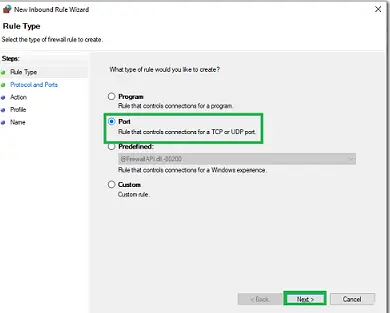
Now, choose port and hit next tab.
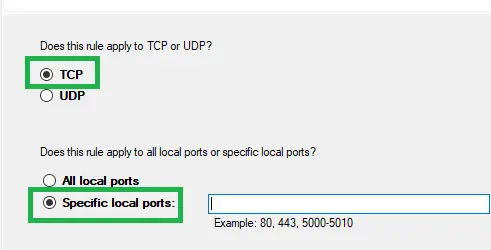
Choose TCP
Enter in specific ports in specific local ports option.
The port format is as per the QuickBooks currently in use:
QuickBooks Desktop 2020: 8019, XXXXX
QB Desktop 2019: 8019, XXXXX
QuickBooks Desktop 2018: 8019, 56728, 55378-55382
QuickBooks Desktop 2017: 8019, 56727, 55373-55377
You now have to click on next tab and also allow the connection.
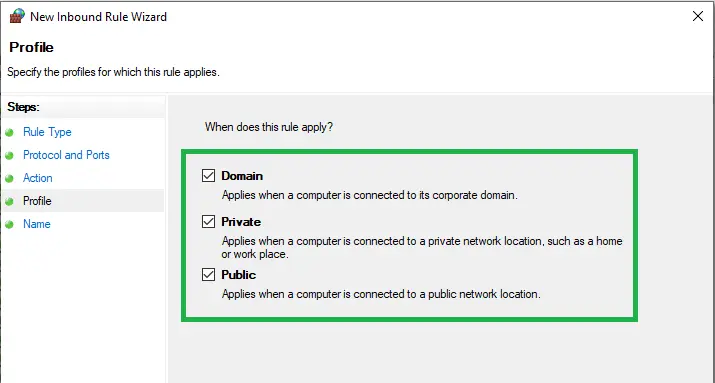
Click on next tab when needed and further mark all the profiles.
Once done with that click on next again.
Create a rule and also assign a name to it.
The last step is to click on finish option and also repeat the steps for outbound rules.
What are the features of QuickBooks database server manager?
Following are the features of QB database server manager.
Database Server Features
To determine open your QBDSM:
The list of users who are log into each company file and the company files that connect to the server.
The status which displays the services of the QuickBooks Database Server. All the services should be running when the server is hosting the company files.
In case, you want a change in the status of the services then use the Services Administrative Tool to configure the services QBDBXX.
We hope that this article has helped you with QuickBooks database server manager download, Install, Update and Set up. In any case, you have any query regarding Database Server Manager then seek assistance from QuickBooks enterprise technical support team.
Host Docket is a team of Intuit Certified ProAdvisors and available for 24/7 to help you. Our experienced technicians are available to provide you with any kind of guidance or solve any error faced by QuickBooks Database Server Manager. Dial our toll-free support number i.e. +1-888-510-9198
Frequently Asked Questions!
Where is QuickBooks database server manager stored?
You can perform the steps below to spot the database server manager. Note that quickbooks database server manager free download is available to QuickBooks users. 1. The very first step is to head to the host or server system. 2. After that, click on the Windows tab. 3. Now, in the search menu type database. 4. Also, click on the enter tab to open QBDMS. 5. The last step is to click on properties. And find the location of QBDMS.
Do I have to update QuickBooks database server manager?
Well, it is important to update the QuickBooks database manager because it is critical to update when the new version is updated.
How to delete old QuickBooks database server manager?
The user can try performing the below-stated steps to uninstall the QuickBooks database manager. 1. The first step is to press windows + R 2. After that, run dialog box will open on the screen 3. Now, type appwiz.cpl and press the enter tab 4. The next step is to navigate to the programs and features and choose QBDSM 5. Right-click the drop-down menu and also choose uninstall tab 6. Perform onscreen steps and this would end the uninstall process
QuickBooks error 15241 shows up when a user tries to download or update the payroll services. Another reason behind the occurrence of this error might be, if the QuickBooks Desktop File Copy Service (FCS) is disabled. QuickBooks payroll update error code 15241 can be very annoying for the users to tackle. To learn further about QuickBooks error 15241, make sure to stick around this piece of writing till the end.
However, you can make an immediate call at +1-888-510-9198 to speak with our QuickBooks error support team to solve this error. Our support team will be pleased to help you.
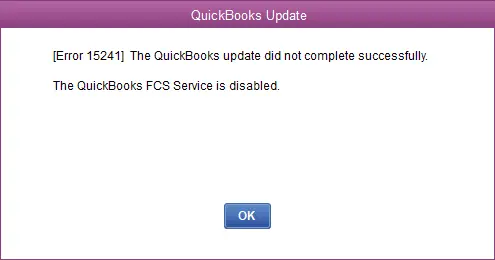
QuickBooks error code 15241 comes up with an error message being popped up on the screen stating:
QuickBooks Update
Error 15241: The payroll update did not complete successfully. The QuickBooks FCS service is disabled.
There can be multiple factors leading to this payroll error. It can be caused due to damaged Microsoft Windows Installer or due to damaged QuickBooks desktop installation. The error code 15241 creates a difficulty in QuickBooks payroll function, and is usually seen when the user installs or updates the payroll. There are plenty of facts related to this error, which will be discussed later in this post.
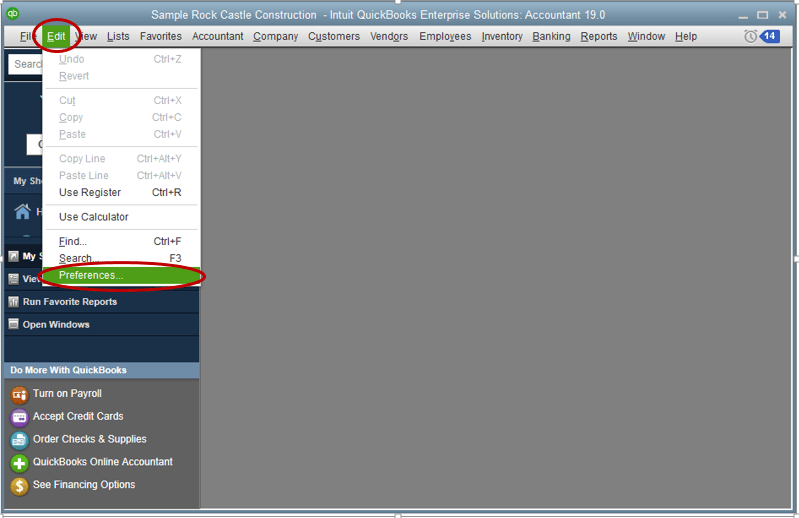
How to Establish Preference in QuickBooks Desktop?
Just go to ‘Edit menu‘ and then select ‘Preferences‘ tab.
After clicking of preferences please choose ‘Reports‘ and ‘Graphs located‘ on the left side.
Now, choose any of the one like ‘My Preferences’ or ‘Company Preferences‘ option.
For My Preferences
Ensure to ‘modify report option‘ and check before opening a report.
Then every time you create a report the modify report window will open automatically.
After refresh, set graph and ‘report preferences‘ to confirm.
Ask me to refresh- When the report is refreshed a prompt message will display on the screen which shows that the graph or graph has to be refreshed.
Automatic refresh- Whenever you have to make any changes in the report QuickBooks Desktop automatically refreshes it.
Important Note: This is the slowest of the 3 mentioned options. In case, if you are working with a graph or report in a multi-user mode then you have to face a long interruption and if other users are making changes to QuickBooks Desktop data, then there is high chance cause QB to refresh the graph/report.
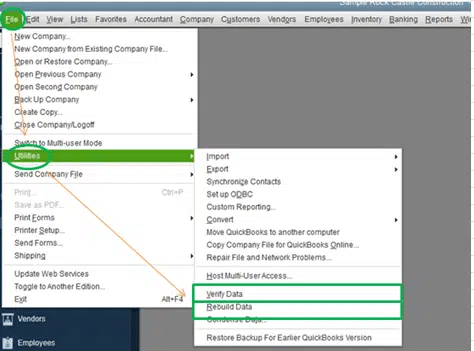
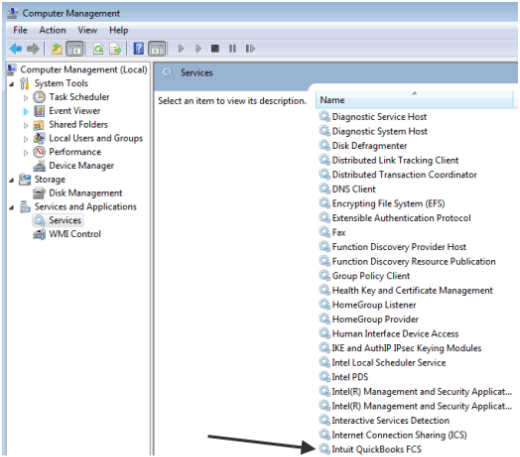
And then tap on ‘Windows Start‘ button from your keyboard and then right-click on the Computer.
After that, the user is supposed to select ‘Manage‘ tab.
For Windows 10 Users: Click on the Search button located on the taskbar and then search for Computer. Right-click on this PC and then choose Manage tab.
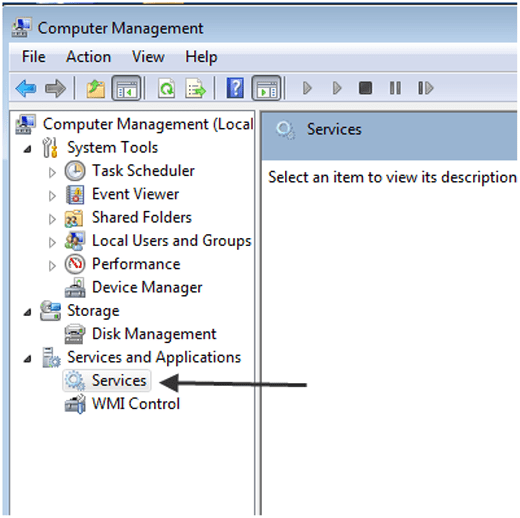
Followed by clicking on ‘Services‘ and then select ‘Applications‘, from the left pane
The next step is to click on ‘Services‘, in the right pane.
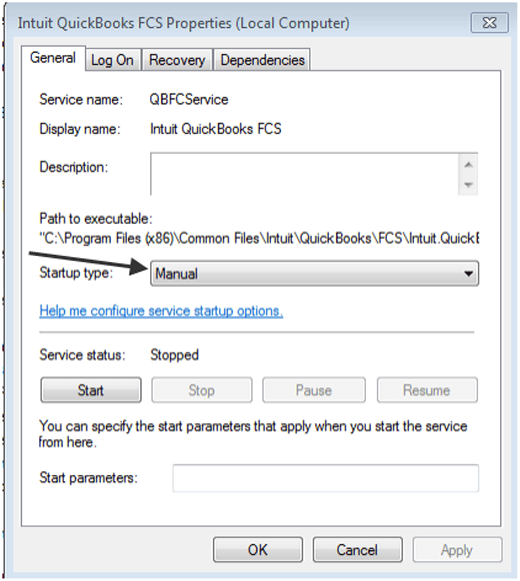
Perform a double-click operation on ‘Intuit QuickBooks FSC‘.
Click on Startup type drop-down option.
Select ‘Manual‘ in the startup window.
Select ‘Apply‘ button.
Choose the Start option and then select ‘OK button’.
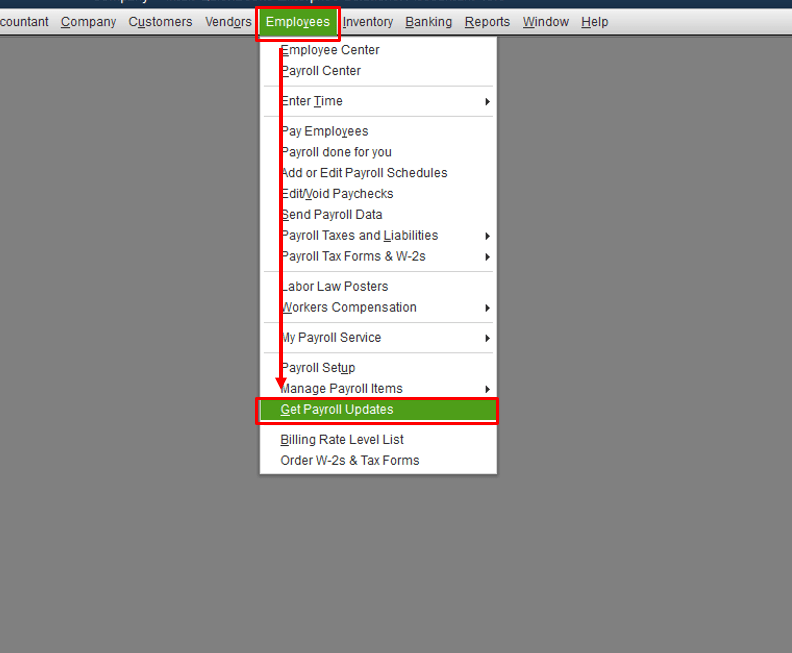
Hover to Employees and then click on Get ‘Payroll Updates‘.
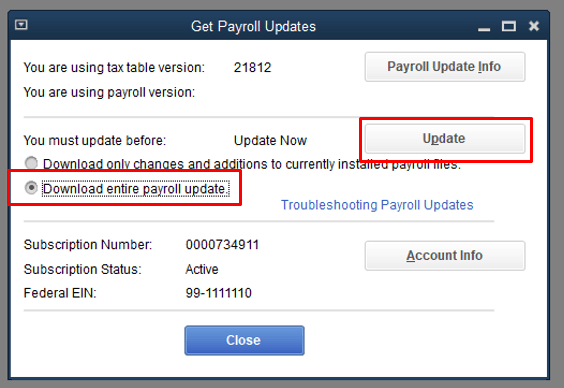
Select Download the entire payroll update.
Select ‘Update‘ tab.
When the download process will it will display a message, “A new tax table and/or updates to your payroll tax forms have been installed on your computer“.
End the process by clicking on ‘OK‘ to read about the changes which will be displayed on your screen.
An Additional Solution
You can also setup your QuickBooks for automatic update. This would keep you from manually updating your QuickBooks Desktop and its various tools and applications. Here is how you can do it:
I hope you found this blog helpful. However, if the QuickBooks error code 15241 is still disturbing you then you can get in touch with QuickBooks payroll customer service team by dialing +1-888-510-9198. Our certified ProAdvisor team is always here to assist you in the right manner. Thus, do not hesitate in calling us anytime, our team will surely fix the error for you.
FAQs Related to QuickBooks error 15241
What is error code 15241 in QuickBooks desktop?
In case the file copy service or Intuit.QuickBooks. FCS.exe process is disabled due to some unintentional user action, then QuickBooks won’t be able to complete the download or installation of the update.
How do I fix a reconciliation error in QuickBooks?
For this you need to ensure you entered the correct amount: 1. When you are reconciling an account, go to the reconciliation window and choose edit info. 2. After that, review the ending balance and ending date. 3. Check your bank statement. Make edits as needed. 4. When you are done, choose the save tab.
How do I fix a locked file error in QuickBooks desktop?
To fix locked file error, you simply need to confirm multi-user hosting and then on the server and workstation, update QuickBooks desktop. Now, use the task manager to restart QuickBooks database service.
What is error 15212 in QuickBooks desktop?
QuickBooks Error 15212 can occur due to the following Reasons: When the particular shared download is turned off and the particular data file is accessed from a different location. If the download updates or shared location is mapped to a presently unavailable drive.