Opening balance in QuickBooks is basically the amount of money in a company’s account at the beginning of a new financial period or year. This is known as the first entry that is done when a company starts its processes or after a year-end. The process to record opening balance in QuickBooks Desktop involves a few basic steps, which we will be focusing later in this segment. The user might the process to be a bit technical, so in that scenario, we would expect the readers to keep scrolling through the segment till the end, and this might help them to understand the process a little better.
Points to Note while recording opening balance in QuickBooks:
It is considered a good option to contact the accounting professional always before entering the opening balance. While setting up the account, you can press F1 key or you can simply click on the link that says- ‘Should I enter an opening balance?’. In this way, you can get information about the opening balances.
Also, you must not enter the opening balance, if you do not have balance prior to the QuickBooks start date.
You are allowed to enter the Opening Balances using one or more GJE that you may have created from the Balance Sheet for the previous fiscal year. This can be done when you start a new company with the date later than the actual one. You should keep the following points in mind if you are using journal entries in order to record the opening balances:
Use Opening Balance Equity account as the offset account so that you keep the journal entries in balance.
When you enter balances from the beginning of the year, then you can enter balance for the previous year’s retained earnings instead of entering each income, expense and cost of goods sold.
Per journal entry, you can enter only one accounts payable or receivable transaction. Therefore, you need to have multiple journal entries to load the balances for these accounts.
Do not forget to include the name of the vendor or customer in the names column of journal entries to accounts receivable, sales tax payable and accounts payable.
You can choose to use the Inventory Adjustment screen instead of entering the Inventory Asset Balance through a journal entry so that you can adjust both inventory quantity and value.
The steps to record opening balance in QuickBooks involves different set of steps, which we have tried to justify below:
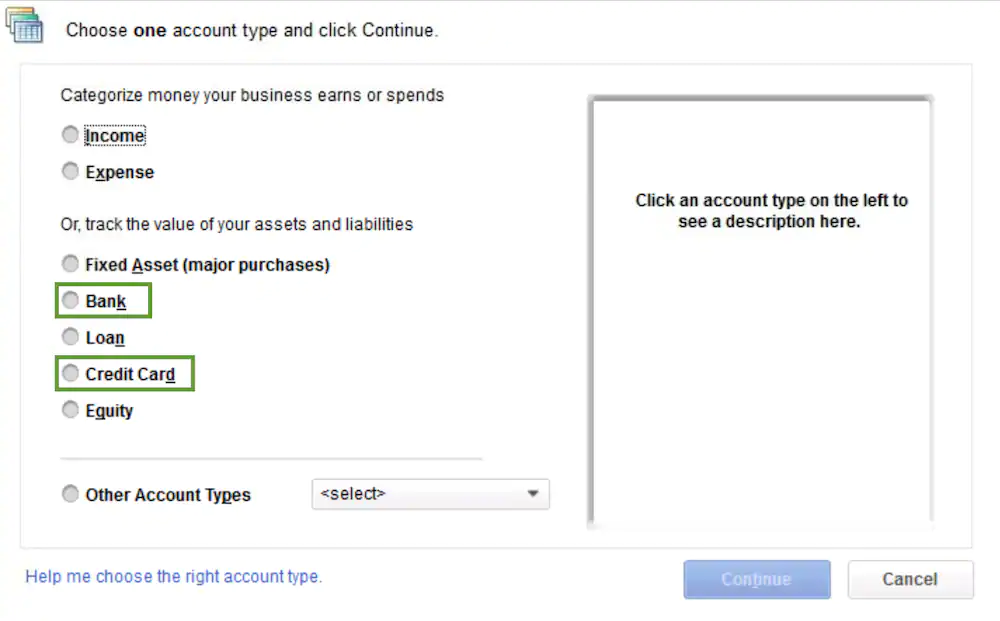
Bank or credit card accounts
Click on Chart of Accounts from the Company menu.
In this window, right click and select ‘New’.
Then, choose the account type- Bank or Credit Card.
On the ‘Add New Account’ Screen:
Fill all the required details.
Click Enter Opening Balance Button. This button will only be available if you have not entered any transaction yet. As soon as you enter a transaction, the button will change to Change Opening Balance button.
Now, enter ending date and ending balance from your credit card statement or last bank statement.
Then, click OK.
Click ‘Save & Close’.
To ensure that all your future reconciliation is accurate, you would be required to account for all the outstanding transactions in the credit card or bank.
After Entering opening balances, follow the steps below
Take the ending balance from bank statement and increase the amount by any outstanding checks, and decrease the amount by outstanding deposits.
Enter the journal entry debiting the bank or credit card, and crediting opening balance equity.
Select ‘Make General Journal Entries’ from the Company menu
Set the date and enter a number of journal entry
Now, choose the bank or credit card account from the Account column and enter the amount calculated in step 2 in the Debit column.
In the next line, click on Account and choose ‘Opening Balance Equity’ from the drop-down.
Now, in the credit column, put the amount calculated.
Create checks and deposits by using Opening Balance Equity and enter all the outstanding transactions.
This will become available for reconciliation without any impact on the prior balance sheet.
Now, reconcile the opening balance journal entry for each account through mini reconciliation, a process to do it.
While entering an opening balance for Equity, Fixed Asset, other Asset, Current Asset, and Other Current Liability, be careful as it is possible that you may create a double accounting entry. In QuickBooks, both the Accounts Payable and Accounts Receivable are considered different.
✔ Through the Chart of Accounts:
Click on Chart of Accounts from the Company menu
Right click anywhere on the window appeared and select New, in the Chart of Accounts window
Choose the right Account Type
In the Add New Account screen:
Fill all required details.
Click Enter Opening Balance button.
Enter amount of opening balance and the date. You can use the date before the QuickBooks start date.
Now, click ‘OK‘.
Click Save and Close.
✔ Using a Journal Entry:
Select ‘Make General Journal Entries’ from the Company menu.
Now, set the date and enter the number required for the journal entry.
From the Account column, select the account you want to enter.
You can also enter the accounts in the order in which they appear on the balance sheet or trial balance.
Depending on the type of account, enter the account balance as a positive amount and that too, in the right column.
For example:
Positive balances will appear in the Debit column, for Asset accounts.
For Liability and Equity, these positive balances appear in the Credit column.
Now, for each account, you shall repeat the steps 3 and 4.
Make sure that once all the balances have been entered, the total amount in Debit and Credit column is equal. You can use the Opening Balance Equity as the offset to check any difference noticed between the two columns.
Click Save and Close.
To enter the balance for accounts payable, accounts receivables, and sales tax payable create an additional journal entry. You can also enter any other account that is not included on the first journal entry.
Now, create a final journal entry in order to distribute any remaining balance in the opening balance equity account among other retained earnings and equity accounts as desired.
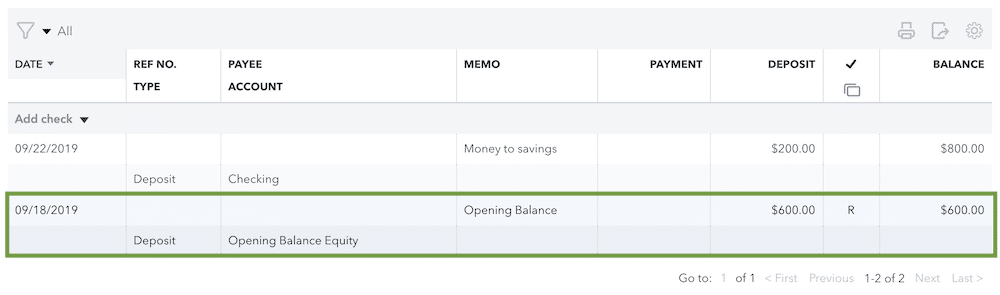
✔ Through the Register:
When you have transactions in the account, you are required to go to the account register so as to enter the opening balance.
Click on ‘Chart of Accounts’ from the Company menu.
Choose the account for which you wish to enter the opening balance. Then, select Use Register from the Edit drop-down list.
Fill the following fields for the new transaction:
Date of the opening balance
Number/Type- Leave this section blank
Payee- Type Opening Balance (Optional)
Account- Choose Opening Balance Equity
Payment or Deposit: In this field, enter the opening balance in the Deposit field if it is positive and in the Payment field if it is negative.
Click ‘Record’.
✔ Income and Expense Accounts:
There is no option to enter balance for income and expense accounts because the balance for these accounts comes from transactions that are entered like bills, invoices and checks.
If any of your customer or vendor has an outstanding balance BEFORE the commencement date, following options can be used:
Option 1: Put the outstanding balance in the Opening balance field with as of date equal to your start date. These opening balance entries will track to Uncategorized Income or Expense. You can enter opening balance for the individual jobs in case you are planning to setup jobs for customers. Moreover, the name of the customer will reflect the total balance for all the jobs. Also note that when you add new customers or vendors, the opening balance field is available only at that time.
Option 2: To create opening balances for vendors and customers, use the opening balance item that you will create anew and use the same in invoices. This will aid in determining the account you want entries to track to.
Option 3: Enter the individual unpaid bill or invoice rather than entering the total balance for each of the customers or vendors. All the unpaid transactions will result in open balances for vendors and customers. And these will ultimately result in A/R and A/P opening balances. This option will help you keep track of all the individual sales and bills that make up your vendor and customer opening balances.
For Transactions which occurred after your start date:
When you find that the transactions of the customer or the vendor have occurred on or after the start date, then you have an option to use standard QuickBooks forms so that you are able to enter the appropriate individual transactions which include:
Bill Payments
Deposits
Sales tax payments
Vendor Bills
Vendor Credits
Invoices and Sales Receipts
Customer payments and returns
How to Edit Opening Balance?
✔ Bank, Credit Card and other balance sheet accounts
Choose the Chart of Accounts from the Lists menu
Double click on the account that you want to edit.
Then, find the opening balance transaction (usually the first one) in the account register. It will also have Opening Balance Equity in the Account field.
If essential, also edit the date as well as amount.
Click on Record to save all the changes.
✔ Income or Expense Accounts
Select Chart of Accounts from the Lists Menu.
Double click on the income or expense that you wish to edit.
Change the date to your start date in the Account Quick Report. If you don’t know the exact start date, then you can choose ALL in the Dates drop-down.
After this, you can search the report for the correct transactions that are usually among the first transactions.
Hover the mouse pointer over a transaction and QuickZoom it. As soon as the magnifying glass appears, double click on that.
Do all the required changes. If changes done affect journal entry, then General Journal Entry transaction requires- total debits equal total credits.
Some FAQs related to – Record Opening Balance in QuickBooks
What is a Balance Sheet?
A balance sheet in terms of financial accounting is a summary report of company assets, liabilities, and shareholder equity of an individual or an organization, whether it is a sole proprietorship, a corporation, a business partnership, private limited company or other organization such as a not-profit entity or government organization.
Why do you need to pay the outstanding balance?
It is mandatory to pay the due balance each month in order to improve the savings and credit score of your organization. It is also necessary to pay all the due taxes on time to maintain a good standing of your business with the state.
How to record an opening balance in QuickBooks?
From “Company” menu click on “Charts of Accounts” Right click and select ‘New’. Choose the account type On the ‘Add New Account’ Screen: Fill all the required details. Click on “Enter Opening Balance” Button. Now, enter ending date and ending balance. Then, click OK. Click ‘Save & Close’.
How to change the opening Balance in QuickBooks Desktop?
From Accounting menu, choose Chart of Accounts Choose the Account Select View Register Search for the opening balance Note the balance and date Compare your real-life account with the entered opening balance Find you bank’s statement Check the account’s balance on the same day of the opening balance If QuickBooks doesn’t match with your bank records: Select the opening balance entry Edit the balance, in the Deposit column, so it matches your bank records
This article gives you information about all the tips and tricks that you can use to grow your business. Various QuickBooks bank reconciliation users are not able to solve the reconciliation screen properly. When you have many transactions and you know how you can find them, then it is essential to clear them quickly. This will save a lot of time.
Furthermore, when a credit card merchant deposits approaching into the checking account, or you have a good number of unique numbers, then you can click on that column and solve by the amount. This will make your QuickBooks reconciliation more effective.
It is an obvious option to resolving your checks and also payment side of the reconciliation by check is an apparent choice. When going through a bank declaration line by line we constantly ignoring checks up until every end. The reason is bank account constantly listing removed checks in numerical order at the end of the declaration. To learn further about the tips to successfully perform bank reconciliation in QuickBooks, make sure to stick around to this piece of writing till the end. Or you can further connect with our team at +1-888-510-9198, and our certified QuickBooks ProAdvisors will provide you with immediate assistance.
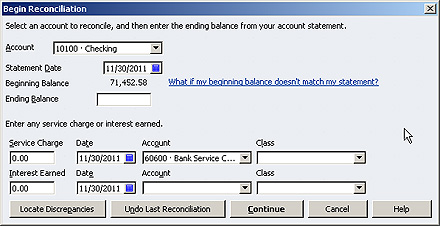
Here are some quick tips that you can go through before performing reconciliation in QuickBooks.
✔ Find Discrepancies
Click on the Discrepancy Record Button in order to show yourself the record. This feature picks our all the rewrite or removed transactions that can affect or influence your reconciliation in any way.
✔ Validate your balance
Ensure that your creation balance links with your bank account but in any case, if it does not links, then you should tap the Undo Last Reconciliation button but that has to be tapped just before extending a point where the beginning balance matches your bank statement.
Note: You must start again the reconciliations to carry your books common and also fix the discrepancy.
✔ Double-check ending balance
Whenever you start the reconciliation, make sure that you double-tap your ending balance. A small mistake can make you miss a transaction. Thus, stay careful and double-check.
You may face dissimilarity in your transactions while you mark them as removed. In that case, you can divide the dissimilarity by 9. If it is separate out on an even plate, then you can switch a number on a transaction.
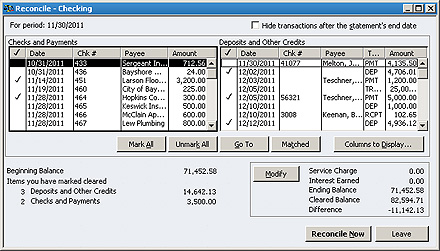
✔ Entering all missing transactions
Add all the absent and missing transactions without closing the last reconciliation window. You can choose a command on the Home Screen and then, saved transactions will automatically arrive at the reconciliation window.
✔ Void Old Transactions
Detect all the old transactions in your register, edit them and the Void. This is necessary to know that old and uncleared transactions can delay for a very long time. Also, banking system considers checks stale after a span of six months.
Moreover, you shall also empty your transactions that have zero balance as these are not going to influence your reconciliation in any way. In the same manner, you can hide transactions after the Statement’s End Date check box so that the minor transactions are removed.
You can make your new transactions easy as there are organizations which allow a user to adjust their record to their online statement. This method includes a matching method that clears transactions, and ultimately makes your work easier.
✔ Reconcile More Frequently
When you have access to your bank account online, then it is obvious that you can reconcile your bank statement as frequently as desired. You can take a look at the value of reconciling accounts either weekly or twice a month.
✔ Do not forget to remember interest and fees
Ensure to record any type of attraction as well as costs in the window. Ideally you can record deposit and also inspect transactions to record attraction as well as fees, or the really shrewd can make use of journal entries.
✔ Check undeposited funds
Choose Banking, and then Make Deposits. Undeposited funds can pose problems with your reconciliation.
The first thing you do is, ensure to debit money and also credit history attraction income for attraction revenues or credit cash as well as debit bank charges for any kind of charges obtained if you go this instructions.
There can be majorly four types of reconciliation namely: 1. Bank Reconciliation 2. Vendor Reconciliation 3. Customer Reconciliation 4. Business-specific reconciliation
Can I reconcile QuickBooks daily?
Reconciling QuickBooks on a daily basis can be helpful. In case you are reconciling your accounts daily, then you will have a grip of the key metrics.
Can you restart QuickBooks reconciliation?
You can choose the account you wish to reconcile again, and further head to the bank register. The next step is to go the reconcile option and further enter the info from your statement in the ending balance field and ending date field. Also, choose reconciling tab.
How do I clear a reconciliation in QuickBooks?
You can unreconcile a transaction using the steps below: 1. First, head to the bookkeeping or accounting tab and further choose chart of accounts from there. 2. Once done with that, find the account that has the reconciled transaction. 3. You now have to find the transaction. 4. The next step is to choose the transaction to expand the view. 5. The last step is to checkmark the column and choose box with R till the box is blank.
QuickBooks Accounting software is widely used and recognized software that has been developed by Intuit and offers great accounting services to the users. It is used by small as well as medium-sized businesses helping individuals and businesspersons to manage their accounting and bookkeeping effectively. This software has wide usage such that it is used in multi-user and networked environment. This is one of its great benefits that it allows more than one user to work on it online. Along with this, come frequent errors that may hamper the work of the user. A user can overcome these errors with appropriate customer support. QuickBooks customer support experts have their hands-on on all the editions and versions of QuickBooks.
There is no doubt in the fact the QuickBooks software products are least troublesome when compared to the other software applications available in the market. Each of the QuickBooks Products goes through a rigorous testing process. The software after many testing sessions has fewer chances to encounter problems. And in this case, QuickBooks customer support team lends a great help to the user by resolving the errors in no time.
QuickBooks is a software that has been especially built for the computers and other support devices. At Host Docket, we have prepared our technical support professionals to resolve the issues in the least time possible and with maximum accuracy. Here in this article today we are going to discuss about one of the frequent error which is faced by many users “This is a Corrupt or Damaged QuickBooks Database”. Get Step-by-Step troubleshooting steps to resolve this error by your own.
What is Corrupt or Damaged QuickBooks Database Error?
Usually when QuickBooks database error occurs, the error is displayed on the screen as:
“Error: This is a corrupt or damaged QuickBooks database”
Here, we will discuss all the possible errors and the reason behind the occurrence of these errors. This will help you resolve the error to some extent. Also note that this error applies to all versions of QuickBooks accounting software.
Note: This error may occur on all the QuickBooks software versions.
With the huge database server, QuickBooks allows many businesses to manage their company data and access the data easily. It is known to all the users that QuickBooks has a vast virtual space and this leads to some errors with the database. Among all the errors, one is corrupt or damaged QuickBooks database.
This error makes it difficult for the users to understand. If you are encountering this error for the first time, then you should seek the proper QuickBooks help & support to resolve your issues. Our Customer oriented support team is available round the clock and is highly experienced. A computer software program, Database is mainly used to store and retrieve information through an internet connection. In the same manner, QuickBooks database lets a user not just access, but also store and retrieve the company data files. This can be done on a system, smart phone or on a tablet.
QuickBooks database usually encounters problems or errors unknowingly. And in this case, it also throws up errors that need to treated and resolved seriously. In its conventional database, the lack of resilience comes to the surface and the .QWB file makes it difficult to determine the file corruption. When QuickBooks detect the files, most often they become corrupt. Thus, to resolve these errors, you need to have a guided step-by-step process, and also a QuickBooks file recovery solution.
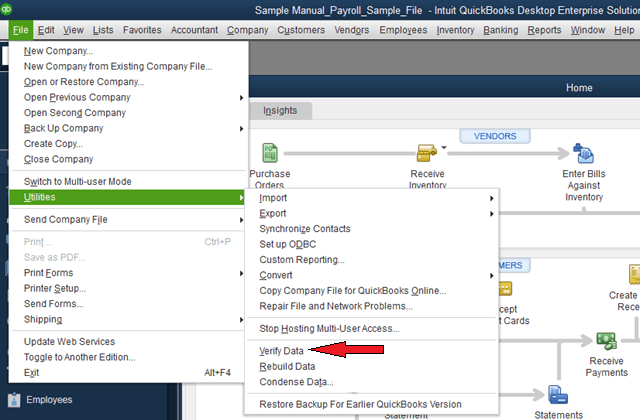
If the error has occurred and you try to access the QuickBooks, then this message will appear: “Error: This is a corrupt or damaged QuickBooks database.” There are few chances that the error occurs due to the network problem, In that case, we would advise you to:
Choose Close Company/Log off option in QuickBooks
And then run the Verify Data utility
This option can be found in the QuickBooks File menu
Moreover, it is worth noting that if the file is corrupt, QuickBooks will display message- “Data has lost integrity”. So, as and when you receive this message, repair the file or connect with the reliable customer support team so that they can assist you.
Signs and symptoms of QuickBooks company file corruption
Identifying the error becomes easy, once you go through the below signs and symptoms. Let us have a look:
Just in case the system or QuickBooks shuts down suddenly
Errors like a data problem stop the QuickBooks software from continuing with the process to verify data utility
Another sign can be missing transactions or entries from the lists
If there are any faulty reports such as balance sheets and the total assets and liabilities doesn’t tally
Another common sign can be if the paid bills and invoices show up as unpaid
Also, if the account named are preceded with an asterisk due to original accounts being missing
How to prevent QuickBooks company file corruption?
You can’t prevent the error, but try to minimize the risk factors. The preventive measures can be:
Ensure to backup the data multiple times, that too at different locations.
You can further opt for online banking.
Another preventive measure can be to keep tabs on the size of the QuickBooks database file, and if it threatens to exceed the limit, then try to reduce the size using third party tools.
Step 3: Repair your company file manually by rebuilding your data
The following steps will allow you fix the database manually. Always create a backup of your data before performing the below-mentioned steps. If you are not comfortable in performing the manual repair, contact a specialist.
Open QuickBooks and go to the File menu
Then hover your mouse over Utilities and tap Verify Data
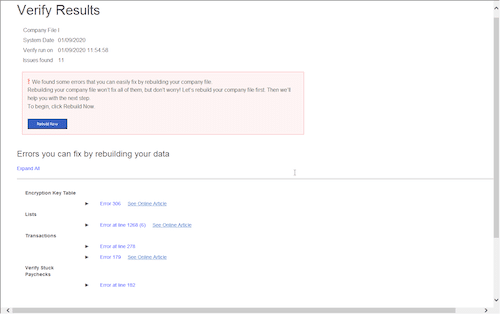
Wait while the tool checks your file for data issues
Next, from the Verify Results screen, choose Expand All to see the errors
Once you have the list of errors, proceed to fix them accordingly
Step 4: Free tools to fix the company file issues
Other than the file doctor tool the user can access the below tools from the QuickBooks tool hub to get rid of the company file or database issues in QuickBooks. Let us have a look:
QuickBooks install diagnostic tool– This tool is designed to fix issues that appear at the time of installation of QuickBooks desktop. Company file issues mainly related to Microsoft .NET framework can also be diagnosed using this tool.
QuickBooks component repair tool– Another tool you can access is the QuickBooks component repair tool. It fixes the error that prevents QuickBooks from running.
Running Quick fix my file -One can also access the quick fix my file tool from the tool hub to eliminate the issue related to the company file in QuickBooks.
If you still face any problem, you can connect with Intuit Certified ProAdvisors. Our QuickBooks Customer Support specialists are constantly there to assist you with 24 hour of customer service. For more details concerning the errors, reach us at our toll-free number i.e. +1-888-510-9198. We will be more happy to help you out in this.
Frequently Asked Questions regarding Corrupt or Damaged QuickBooks Database Error!
What is Rebuild Data Tool in QuickBooks?
The rebuild data tool is a built-in tool that automatically fixes the minor data issues in QuickBooks company file. In case there is corruption in QuickBooks file or if the user is finding damaged data issues, this tool comes in handy. It can be used by performing some basic steps.
What is QuickBooks Tool Hub?
Intuit, the developer of QuickBooks offers tons of tools to deal with the issues that the user might come across while working on QuickBooks. QuickBooks tool hub is one stop-solution for all QuickBooks issues. The QuickBooks users can easily access different tools in this tool hub and try eliminating different issues in QuickBooks.
How to install or update QuickBooks desktop?
The user can install QuickBooks desktop from the official Intuit website. It should be noted that a license key and product number will be required to complete the installation. And for updating the user can simply update the software by performing some set of steps.
For any system or software, be it QuickBooks or any other software, it is necessary to clean up the system so that the system works properly and seamlessly. Therefore, before a user upgrade to QuickBooks 2019, the system should be cleaned. The upgraded software grabs attention of numerous users because of its amazing features. Users now-a-days are in great rush to get the upgraded version of QuickBooks. Moreover, the new upgrade is available with the latest technology. It has many new features that are a proof that QuickBooks is a step ahead when it comes to technology.
But during this process of up gradation, there are high chances of installation errors. Hence, it is quite essential to clean the system before one updates the software. This cleaning will clean all the unwanted files and cache from your system making it run smooth. Additionally, this will also eliminate all the problems that slow down your system and cause data corruption. You can further read this piece of writing to learn about clean up and upgrade to QuickBooks 2019. However, in case you have any queries, or if you need our assistance at any point in time, then in that case, connect with us at +1-888-510-9198, and we will provide you with instant support and assistance.
While Cleaning up these Elements are being Reviewed
Database Review- This review is done on database audit which is usually conducted for the detailing highlights exchange sorts document estimate and list use. To affirm the efficient utilization of detailing bases and determining potential issues, execution of general database checks is done.
Monetary Record Review- This review is second on the list in which the correlations of the material changes are determined on the month-over-month basis. It aids in demonstrating the issues and ensures the legitimacy of records. A check into the asset report and general structure is involved in it.
Benefit and Loss Review- This review looks into the monthly correlation of material changes to identify the issues, if there are any. It also determines that the fair utilization of things is done which prompt difference in gross net revenues. With an aim to influence proposals on the proficient methods, it includes survey of the general structure of wage and cost accounts.
Work Process Review- The work process review looks into the records and exchanges utilized as a QB part of. It also suggests ways to utilize records and exchange adequately.
All the reviews mentioned above ensure a clean and clear installation of the upgraded QuickBooks. But with these reviews, cleaning and re-installing the new QuickBooks software is also important.
The process will bring many unwanted errors with it. But these errors will crop up while the software is updating or installing. The elimination of these errors will ensure that the QuickBooks is utilized properly.
Winding Up
Towards the end of this article, we hope that the information shared in above might be of some help in cleaning up QuickBooks. However, if you face any problem in this process that you are not able to upgrade to QuickBooks 2019, connect with our QuickBooks desktop support team at our toll-free number +1-888-510-9198.
FAQs Related to Clean up before you upgrade to QuickBooks desktop
What is the best way to clean up QuickBooks?
You can clean up QuickBooks by: 1. Avoid deleting the QuickBooks historical data 2. Making a list of known issues. 3. Reviewing Chart of accounts 4. Finding a long-term bookkeeping team.
How do I free up space on QuickBooks Desktop?
It is recommended to have at least 2.5 GB free for QuickBooks to run optimally. The steps involved are: 1. Clean up your disk 2. Clear your temp folder 3. Remove programs you don’t use 4. Clean up your photos and documents. 5. Refresh your install file
How do I clean up uncleared transactions in QuickBooks desktop?
You can manually clear bank transactions in QuickBooks using the below steps: 1. Head to the gear icon and choose chart of accounts. 2. Once done with that, locate the account of the transaction. 3. The next step is to select view register from the action column. 4. You now have to identify the transaction to clear. 5. And then, under the reconcile status column, choose C for cleared. 6. The last step is to choose save.
We all know that due to some reason Intuit Inc. stopped launching the new updates of QuickBooks for Mac. The last updated QuickBooks for Mac version was QuickBooks Mac 2016. You must be wondering why..! Why Intuit Inc. stopped the updates of QuickBooks for Mac 2019?? Well, the only reason behind this was – QuickBooks Mac 2016 wasn’t much compatible to run over all kind of operating system.
Many QuickBooks for Mac 2016 version users were facing issues in operating it over their system. Therefore, Intuit Inc. especially about to launch the newly released QuickBooks for Mac 2019 updated version. The QuickBooks Mac 2016 users can update the QuickBooks to the latest released QuickBooks Mac 2019 version in spite of purchasing the whole new QuickBooks Mac 2019 software. To make this QuickBooks for Mac 2019 version compatible with the users, Intuit Inc. provided the minimum system requirement guideline for the US citizens. Make sure to read this article till the end, to learn the basic system requirements for QuickBooks Desktop for Mac 2019. However, in case you have any queries, or if you require our assistance at any point in time, then in that case connect with us at +1-888-510-9198, and we will provide you with instant support and guidance.
System requirements QuickBooks for Mac 2019 are following
Minimum System Requirements
At least Mac operating system 10.12 (Sierra); supported by Mac operating system 10.13 (High Sierra), Mac operating system 10.14 (Mojave)
Core 2 Duo or higher Intel processor
Multi-user server
At least 2 GB RAM, 4 GB RAM recommended
At least 250 MB free or available disk space
For the QB downloaded installation, a CD/DVD drive with a proper internet connection is mandatory.
Printer: In case, you are planning to print graphs, reports, purchase order, deposit slips invoices, mailing labels, lists, or checks. Make sure that the printer is 100% compatible with the Macintosh
Checks: In case, you want to print the checks – Use the Intuit Checks. It does not support the Canadian image ready checks.
It also requires the product registration.
Integration/Compatibility Requirements
Export Report Data: The Export Report Data requires the Apple Number v3.5; Microsoft Excel 2016 or later, including Mac Office 365.
Email: The Email requires the Apple Mail, Microsoft Outlook 2016 or later, including Mac office 365, almost all support to Email.
QuickBooks Payroll for Mac: QuickBooks Mac integrated with the payroll processing requires a paid subscription, EIN, & Internet access. The QuickBooks 2019 for Mac works swiftly with the QuickBooks Payroll for Mac.
QuickBooks Payroll for Mac requires Internet connection & Adobe Reader to print the checks and forms.
System requirements for the QuickBooks Payroll for Mac & Matrix
Top pay may differ from those of QB. even more, details visit the website at www.macpayroll.com and www.matrix.com
QBD for Mac 2019 helps a one-way conversion in QuickBooks online because one-way conversion is secure.
It also helps one-way conversion from QBD for windows 2016-2018.
Helps Round-Tripping with QB for Windows 2019 because round-tripping is a better option to send the data file to the Accountant.
System Requirements for QuickBooks for Mac Older Versions
Read the QuickBooks system requirement for mac earlier versions:
QuickBooks for Mac 2016 R5 or earlier- MacOS 10.10.2 (Yosemite), MacOS 10.11 (EI Caption).
QuickBooks for Mac 2016 R6 and later- MacOS 10.11(EL Caption), and MacOS 10.12(Sierra).
Mac processor should be Intel Core 2 Duo or higher.
For Multi-user server, your Mac processor should be Intel Core 2 Duo or higher processor to run a server.
Mac Ram should be 2GB RAM(4 GB RAM recommended).
250MB of disk space should be available on Mac.
For Printer: 100% Macintosh-compatible printer, if you plan to print invoices, checks, deposit slips, purchase orders, mailing labels, reports or graphs.
For Checks: use intuit checks if you intended to print checks. Canadian Image prepared cheques are not supported.
We hope that this article provided you the right information. It might be possible that you encounter any problem related to QuickBooks for Mac 2019 or require any information related to it. In such case, we recommend you contact the QuickBooks Support for Mac. For an urgent QuickBooks for Mac 2019 information, you can get in touch with the QuickBooks Support & Help team on their toll-free helpline number .i.e. +1-888-510-9198.
FAQs Related to System requirements for QuickBooks for Mac 2019
What are the minimum system requirements for QuickBooks 2019?
QuickBooks Desktop Enterprise Windows 10 (64 bit), or Windows 11, update/version supported by Microsoft. … Server: Windows Server 2012 (or R2), 2016, 2019, or 2022 (Regular or Small Business Server) 2.4 GHz processor. Client RAM: 8 GB RAM; 16 GB recommended.
Can QuickBooks run on a Mac?
QuickBooks online works on your PC, Mac, tablets and phones. You can also purchase QuickBooks desktop for Mac.
Is QuickBooks free for Mac?
QuickBooks Mac Plus 2023 is available on an annual subscription that costs $549 for a user, $749 for two users, and $949 for three users. All plans include unlimited customer support and you cannot purchase QuickBooks for mac directly from the Intuit website.
Is QuickBooks Pro available for Mac?
QuickBooks is compatible with Mac: OS X “El Capitan” 10.11 or newer.