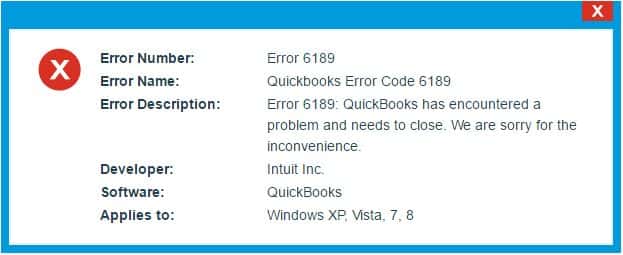
Peculiar errors like QuickBooks error code 6189, 816 can definitely impact your smooth working experience on QuickBooks. And of course, none of us like to be interrupted again and again by any sort of technical snag, when performing some crucial activity on QuickBooks. Certain hindrances in QuickBooks are associated to the company file, whereas others may be either related to human mistakes, virus attack, or any sort of internet issue. Talking about this particular error, it is basically linked with the company file itself. The company file errors can lead to any sort of data loss, due to which it becomes crucial to culminate such errors in QuickBooks.
Thus, to help you shun off this particular glitch in QuickBooks smoothly, here we are with this piece of writing, which will walk you through the complete information related to the error, its causes, and of course the steps you can implement to dump it permanently. So, stick around this segment to unleash the complete guide to end this error in QuickBooks. On the other hand, if you are someone having zero knowledge about eliminating errors in QuickBooks or don’t want to play around with the technicalities and need someone to help you deal with these errors, then in that case give us a call at +1-888-510-9198, and our team will help you in all possible ways. Having said that, let us together check out the insight into this particular error in QuickBooks.
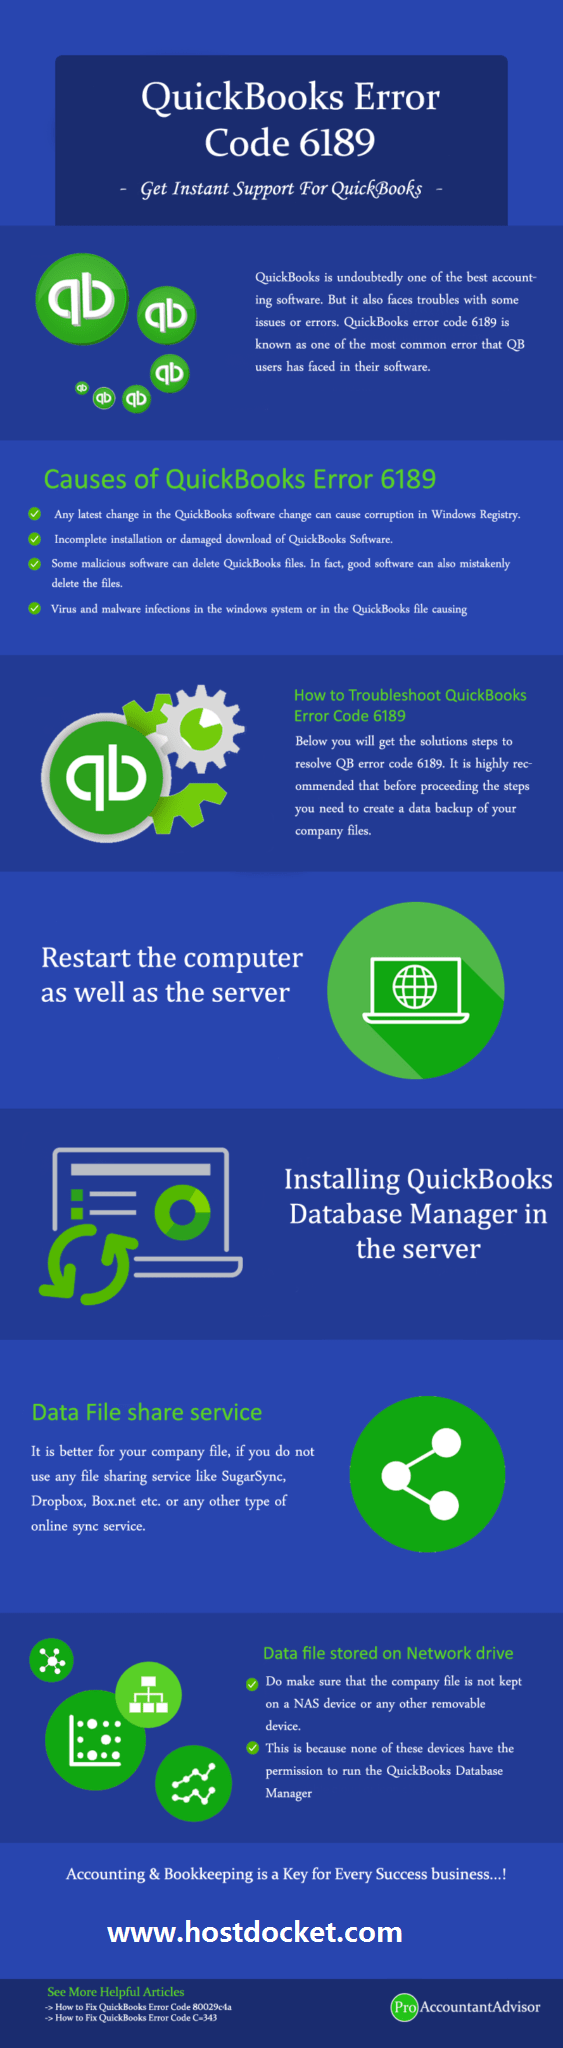
Brief into QuickBooks error code 6189, 816
Delving deep into the fixation steps for the error will turn out to be more helpful, once you have sound knowledge about the error itself. This error ideally belongs to the 6000- error series category, which is associated with the company file. It appears on the screen while stating a warning message that states:
An error occurs when QuickBooks tried to access the company file (-6189, -816)
Or
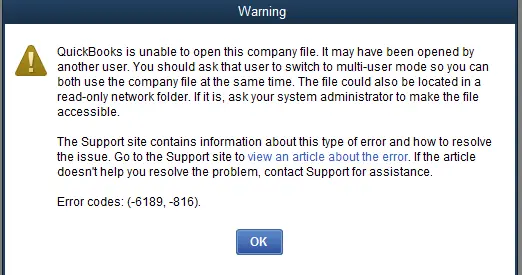
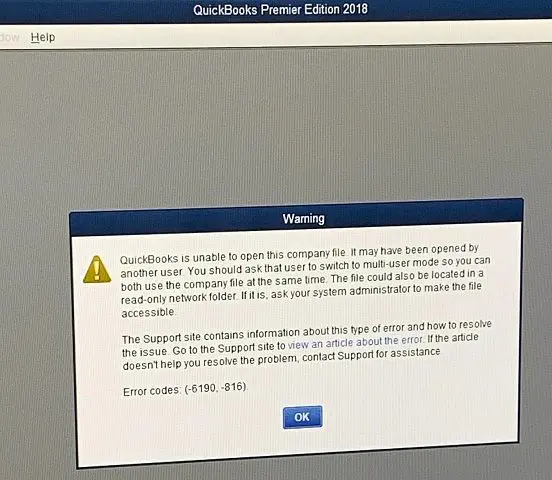
QuickBooks is unable to open this company file. It may have been opened by another user. You should ask that user to switch to multi-user mode so you can both use the company file at the same time. The file could also be located in a read-only network folder. If it is, ask your system administrator to make the file accessible.
Error Status: On the desktop screen, it shows QuickBooks Error Code 6190, it is caused when a user tries to access the company file and this appears an error code as -6189. Thus, it means that you are not authorized to access the company file. It further indicates that the error is with the multi-user network and not with the accounting data. According the Intuit, this error mainly happens when you try to open a company file but the company file is inaccessible. It is necessary to ensure that you have QuickBooks file storage instructions in place. Let us explore more about this technical snag.
Following Error Message User May See in their Desktop Screen.
Errors are often a result of various triggers, and the same applies to error code 6189, and 816. So, here are a few common reasons that might trigger this particular issue in QuickBooks.
Any latest change in the QuickBooks software change can cause corruption in the Windows Registry.
Some malicious software can delete QuickBooks files. In fact, good software can also mistakenly delete files.
Virus and malware infections in the Windows system or in the QuickBooks file cause damage to them.
Windows registry was corrupted due to the latest QB software change.
Solutions for QuickBooks Error 6189 816 (When Opening Company File)
Below you will get the solutions steps to resolve QB error code 6189. It is highly recommended that before proceeding with the next steps you need to create a data backup of your company files.
Method 1: Restart the computer as well as the Server
Restarting the system helps in fixing certain errors in QuickBooks. The steps involved in restarting the software are as follows:
Restarted each desktop that has access to the company file.
Note that it is crucial to find out where the company file is hosted, In case you are using QuickBooks enterprise hosting instead of the server system, reach out to professionals for further assistance.
If the data server is on, then restart the server.
Method 2: Installing QuickBooks Database Manager in the Serverto Resolve QuickBooks Error 6189
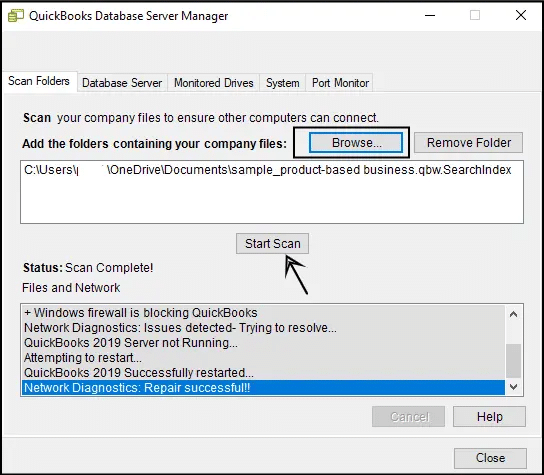
The server system usually stores the company file and other QuickBooks files, and the other systems are the workstations. In case you are hosting your own network, then the QuickBooks database server manager will help in keeping the multiuser network stable. The steps involved here are:
Make sure that QuickBooks or QuickBooks Database Manager is installed on your server where the company files are stored.
During the installation of the Database Manager no additional license is required.
In case you do not see the QB database user, install Database Manager.
Once the installation is complete opt for start scan in case you see the company files. Browse to the location and click on start scan.
Now the database server manager will fix the firewall permissions on its own. Also, click on close tab after the process ends.
You now have to open QuickBooks.
Note: Installing the Database Manager does not require an additional license.
Method 3: Data File share service
Another method you can perform to eliminate this issue in QuickBooks is the data file share service. The steps involved are enumerated below:
It is better for your company file, if you do not use any file sharing service like SugarSync, Dropbox, Box.net etc. or any other type of online sync service.
One of the major causes can be if you are using online auto backup utilities for QuickBooks.
If you are trying to access company files via file sharing services then you are likely to face the error 6189.
To avoid this, remove the company file from Dropbox and copy it in the ‘C drive’ of your desktop.
Do make sure that the company file is not on a NAS device or any other removable device.
This is because none of these devices have the permission to run the QuickBooks Database Manager
And it often happens that this setup can cause data corruption.
Method 5: Moving the company files to the local hard drive
You need to move the company file to the local drive if the error continues and if the company file is stored on a removable drive.
Store QuickBooks files on the server system’s hard drive. However, online file hosting services, including Dropbox, Google Drive, etc., might seem easy but are prone to certain errors.
Avoid storing the files on removable drives, as they aren’t designed in a way to run QuickBooks or multi-user networks.
Furthermore, avoid encrypting the QuickBooks files on the hard drive storing them, as it can block the multi-user network connection.
Method 6: Manually fix the QuickBooks Error 6189
If the above procedures didn’t help you much, try manually resolving the error in QuickBooks. The steps to be performed in this procedure are as follows:
Look for the transaction log file and then rename it.
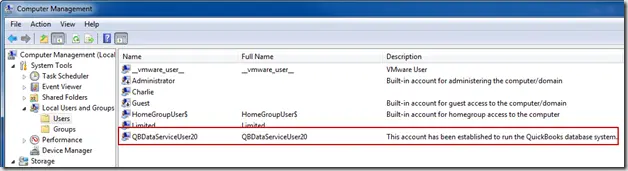
Verify users’ permission to QBDataServiceUserXX for the QuickBooks application
Ascertain that the QuickBooks files are not encrypted
Also, make a backup of the portable company file of the QB file and then paste it onto the desktop
The last step is to move to the folder where it was located earlier.
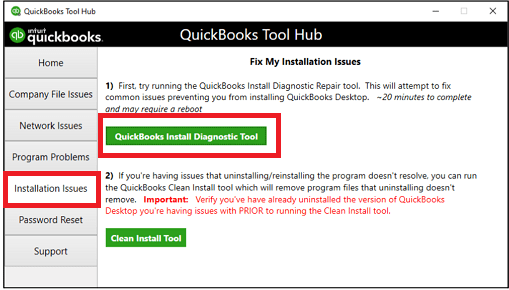
Method 7: Fix installation issues with the QuickBooks software
If you are having any sort of installation issue with your accounting software, it increases the probability of coming across error code 6189 816. Thus, it becomes crucial to deal with any sort of installation issues. The steps to be performed in such scenario are listed below:
Initially, open QuickBooks tool hub that you previously installed
In certain cases, system configurations might be out of date which might take extra time, so do not stop the process in the middle.
Access the company file once more to check if the issue is resolved.
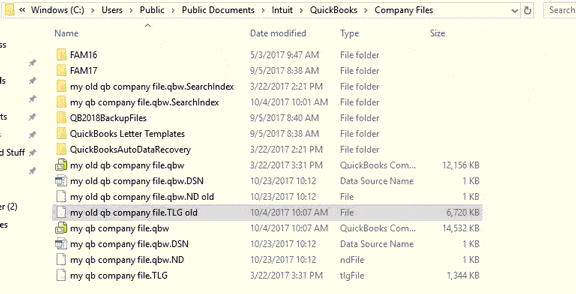
Method 8: Rename ND and TLG files
At times corrupted or misconfigured files in QuickBooks can trigger various errors. Thus, it is recommended to add old at the end of the TLG and nd files and try fixing such errors in QuickBooks. The steps involved in this process are:
Navigate to the folder having the company file
Find files with the same name as the company files but stored with different extensions
Now, look for the .nd and .tlg files
Also, right-click each file and click on the rename tab
Add old at the end of the file name and click anywhere on the screen to save the file name
The last step is to reopen QuickBooks and sign in to the company file again and then the issue might be resolved.
Or make use of a network if the systems are connected
Restore the backup on the new system
Method 10: Download and run the QuickBooks refresher tool
Downloading and running QuickBooks refresher tool is suggested as it closes all the background programs that might trigger the error and refreshes the entire process. The steps to be performed in this case are:
Download the QuickBooks refresher tool and then install the files from it
Save the files to access them easily
Now, keep a check on whether no other task is running on the QuickBooks
The user then needs to check and close all the versions of QuickBooks running on the system
Double-click the QBrefresher.exe file to run the program
The tool runs in 30 seconds and make sure to perform the onscreen instructions
The last step is to reopen the QuickBooks desktop when the installation is complete
To Wrap It Up!
I hope you find this blog helpful. If still, you face the error then get in touch with QuickBooks support team who will give you an instant solution to your problem. Our experts are always ready to provide feasible solutions, so feel hassle-free to contact us and get high-quality services from our professionals. To connect with U.S. based QuickBooks Experts – Dial toll-free number +1-888-510-9198.
The user needs to choose the reload tab and press F5 to download the entire page. In case the problem persists, make sure to reboot the browser and then log in to QuickBooks online. In case you are getting the error message, then connect with the QuickBooks professionals.
How to fix QuickBooks 6000 series error?
The user can try fixing the error code by performing any of the below methods: 1. Check if hosting is on for all workstations 2. You can also open a sample company file from a workstation 3. Copy the QuickBooks file to the desktop 4. Another option is to close all QuickBooks processes
What is a QuickBooks company file?
A company file is where you store the company’s financial records in QuickBooks, so it is the first thing that you need to work on in the program.
How to fix QuickBooks network connection failure?
The user needs to choose the reload or press F5 on the keyboard to download the entire page. In case the problem persists, the user needs to restart the browser and then log in to QuickBooks online. In case you are still getting the error message, contact our QuickBooks support team.
What is QuickBooks Error Code 6189 and what causes it?
QuickBooks Error Code 6189 is a common error that users may encounter when attempting to open a company file. The error indicates that the file is either not accessible or is in use by another program. Some common causes of this error include issues with file permissions, data corruption, network connectivity problems, or conflicts with third-party software. Contact our expert support team at +1-888-510-9198 for personalized assistance.
QuickBooks Error 6190 and 816 is one of those multi-user errors that hits at an awkward time typically when someone is trying to access the company file while another user still has it open in single-user mode. The on-screen message says it plainly: “QuickBooks was unable to open the company file on the hosted computer.” And until that conflict is resolved, no one else can get in. What makes this error worth understanding properly is that it’s not always a single-user mode conflict it can also be caused by a mismatch between the company file and its transaction log (TLG) file, data corruption, or an update that was applied on one computer without updating the TLG file on another. Getting the diagnosis right makes the fix much faster.
This article covers what causes Error 6190 and 816, how to identify it, 4 main solutions, and 8 additional methods for more persistent cases. Since this error can also affect your QBW file data, keeping a backup ready before troubleshooting is strongly recommended. For immediate help, our QuickBooks support phone number team is available at +1-888-510-9198.
QuickBooks Error Code 6190 816 suggests that the company file won’t open when another user is logged into the company file in single-user mode. It is possible to fix this issue by switching from single-user mode to multi-user mode. It appears with a warning message “QuickBooks was unable to open the company file on the hosted computer.” can’t access QuickBooks company file.
You may see the following error message on your desktop screen:
Why QuickBooks Error 6190 and 816 Occur?
Error code 6190 and 816 may occur for the following reasons:
This error may take place when the transaction log file (TLG file) doesn’t match with the company file. The TLG file keeps the record of all the transactions performed by the company and is automatically saved by QuickBooks accounting software.
The file is then stored as (the name of the company file).qbw .tlg file. This file can’t be accessed to be converted into a Company Data File (qbw). Therefore, QuickBooks demonstrates error – 6190, – 816 when the “QBW” file is not in accordance with its linked “TLG” file.
This error code may also occur in case of update failure when a user updates a company file on a different computer without updating the transaction log file.
Another key cause of this error is another user accessing the company files in Single User Mode.
Data Corruption in the QuickBooks data file also causes this error. Identifying the data corruption in QuickBooks data file, therefore, is essential.
Common Signs to identify QuickBooks error code 6190 816
The below signs and symptoms will help the user to spot the error successfully:
The error code appears on the screen crashing the active program window is one of the basic signs of this issue
Or if the system freezes for some time again and again
Another sign can be if the transaction log file and company file don’t match, causing a corrupted company file
The system runs slowly and doesn’t respond to keyboard inputs
How to Fix QuickBooks Error Code 6190 and 816?
There are several solutions we can try to resolve this.
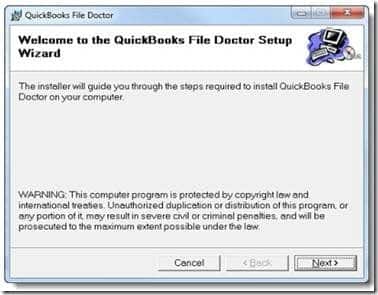
Solution 1: Use QuickBooks File Doctor tool
Firstly, you should make sure that you have the latest version of QuickBooks before performing the troubleshooting steps. If you do not already have the latest version, update it and then fix the issue using QuickBooks file doctor tool:
You can download the QuickBooks file doctor tool from here. Click here
Download and install QuickBooks File Doctor from the official website of Intuit.
Make sure to log in as administrator and run the tool.
Two options will pop up on the system;
Both File Damage and Connectivity.
Network Connectivity Only.
Choose the first option and it will identify the damaged file and allow you to resolve error -6190
Enter your admin password.
Next, you will be asked if the company file is stored on Workstation or Server.
If the file is on server click “yes” else click “No.”
Results regarding the error will be displayed on the system. The corrupt or damaged file should automatically be detected and repaired. If the issue still is unresolved, you can perform the next troubleshooting – Fix the mismatch.
Use the system having the company file. Next, rename the .ND and TLG files to repair the company damaged data files following steps;
Find and open the company folder.
Search for the company file. The TLG file and company file will be of the same name but will have different extensions.
company_file.qbw.nd
company_file.qbw.tlg
Rename the company file. Change the name or just add “old” or anything at the end of the file name. Note: Make sure that you don’t delete or change extension or “qbw.nd” which is at the end of the company file. Ex: company_file.qbw.nd.OLD
Also, rename the transaction log following the same instructions mentioned in the previous point.
Click “Exit.”
Open QuickBooks and check if you can login to the company file.
Copy data file to the desktop or any location other than its source.
Copy the data file once again to its original location.
Put credentials to sign into QuickBooks.
Note: If the error code still persists, follow the next solution – Single Mode User Check. There should be no user logged in the QuickBooks Data File when you perform the following steps;
Solution 4: Update the QuickBooks software and the backup files
In case the user is facing an issue as he/she has updated the company file using a different system, but not changing the transaction log file, then it is suggested to update the software for the backup files to fix the issue. Continue with the following steps:
The user needs to first update the QuickBooks desktop.
Move to the Help menu of the menu bar
Go for Update the QuickBooks desktop option
Head to the Options tab
Hit the Mark all option
Now click on the save option.
Also, click on the Update Now tab
And hit the Reset update box.
Click on the Get updates option.
When the message update displays on the screen, close QuickBooks.
Now, reopen QuickBooks, and Install updates, if any.
Reboot the system and check if the issue is resolved or not
Other Methods for fixing QuickBooks error -6190 and -816
In case the above methods didn’t help in fixing the issue, then we recommend you to perform the below methods and try eliminating the issue:
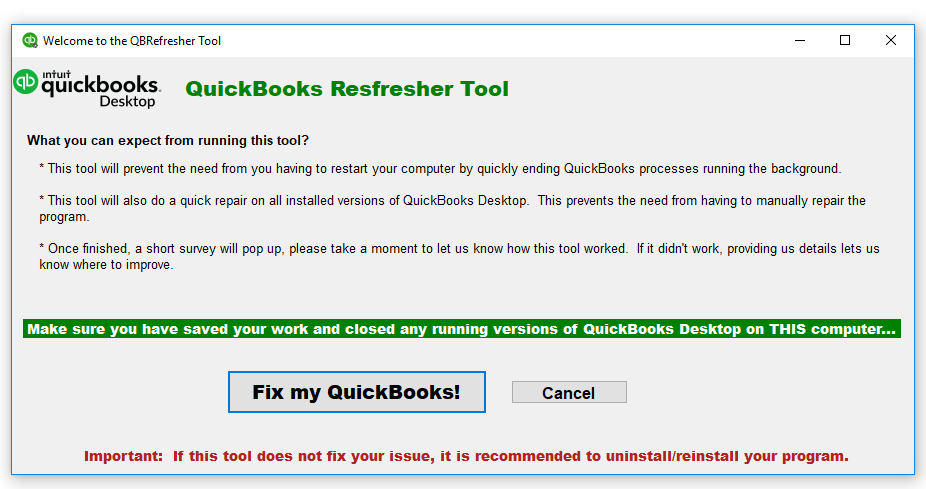
Method 1: Use the QuickBooks refresher tool
Under this procedure, it is suggested to close the QuickBooks desktop on all the systems.
Once done with that, download the QB refresher tool from the official Intuit website.
And then, search for the qbrefresherv1.exe file in the downloads and open it.
The user needs to then click on the option stating Fix my QuickBooks in refresher tool and wait till the diagnosing process is complete.
Now, open the QuickBooks desktop and check if you are able to open the company files or not.
Method 2: Update the Windows
The user needs to first opt for the Start menu.
Now, click on the settings tab and choose the Update and security option.
The user needs to then open the Windows update tab.
Followed by, clicking on the Check for updates option.
After the update is complete, Reinstall QuickBooks software, and you are done with the process
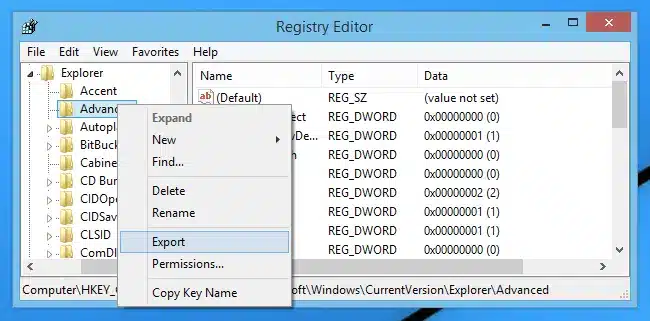
Method 3: Repair the Windows Registry files
Here, the user needs to hit the Start menu.
Once done with that enter in command in the search bar
Followed by pressing ctrl + shift + enter tabs respectively
This will ask the user to enter the admin details
Now enter regedit and hit the enter tab
Followed by, clicking on the key linked with the error.
And then hit the Export tab.
Press the Save tab.
Ensure to save the file with the .reg extension.
Now, perform the onscreen steps
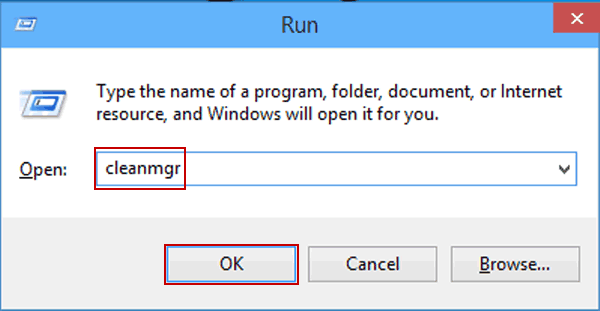
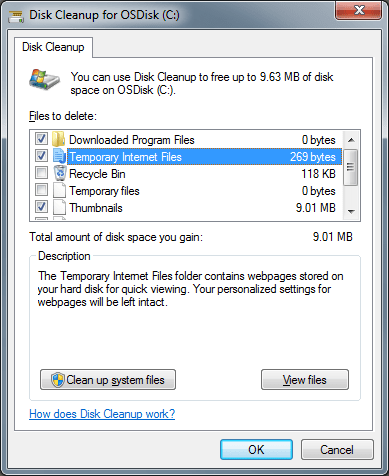
Method 4: Remove the temporary files
At first, open the windows search bar and then click on the start menu
Followed by entering run in the search bar
Enter cleanmgr and hit the enter tab
A disk cleanup window will appear on the screen
Opt for the Junk file size and also hit on the OK tab.
Method 5: Install QuickBooks database server manager on the server
The user needs to first download the QuickBooks database server manager on the server and then install it.
After that head to the Start menu.
Now, in the Search tab, enter QuickBooks database server manager.
Also, open QBDBSM.
Update this database manager to the latest version.
Reboot the server after the update process ends.
Open the QuickBooks desktop on all of the workstations and servers.
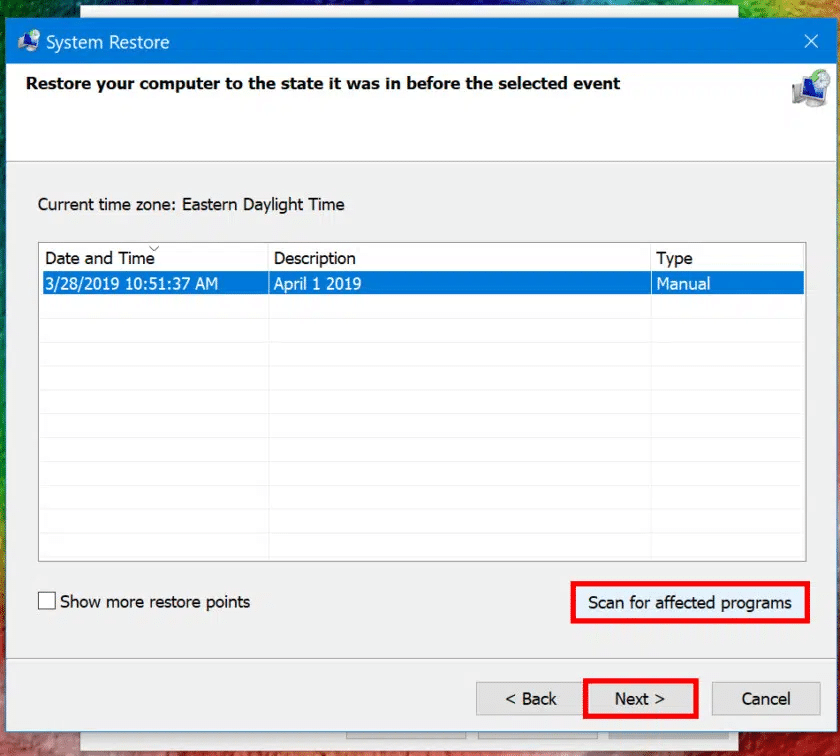
Method 6: Go for System Restore
Under this process, you need to press windows icon and also click on start tab
Once done with that search for system restore using the search bar
After that hit the enter tab
Open the system restore tool tab
Now carry out the onscreen steps
Followed by entering the password if needed
The restoration process might take a few minutes to complete
Lastly, continue working with the QuickBooks software
Method 7: Repair QuickBooks Installation
You can repair the QuickBooks installation, in case there is issue with the program itself triggering QuickBooks error 6190 816. This process involves the following steps:
Prepare for repair:
You need to close QuickBooks and all related processes.
Once done with that, ensure you have your Quickbooks installation CD or downloadable installer ready, in case required.
The user needs to then back up the QuickBooks company file to avoid any sort of data loss.
Access control panel
Here, you need to open the start menu and type control panel and then opt for it.
The next step is to look for programs and features or uninstall a program in the control panel.
Begin with the repair process
Here, in the installed programs, you need to find and choose QuickBooks.
After that, clock on uninstall/change. This will open QuickBooks installation window.
Instead of uninstalling, you need to opt for repair tab and follow the onscreen prompts to begin the repair process.
The repair utility will run and try to fix any issues with the QuickBooks installation. This process might take some time.
In case asked, you need to restart the system to complete repair.
Verify QuickBooks
You need to now open QuickBooks and check if the issue continues
Try to access the company file to ensure that the repair is complete.
Method 8: Run QuickBooks in safe mode
You need to press Win + R to open run tab
Now, enter msconfig and hit enter tab
Head to the boot tab
Select safe boot option under boot options and choose minimal
Also, click on the apply tab and choose ok tab and reboot the system.
You need to have to open system configuration again and head to services tab
Check the box at the bottom that says hide all Microsoft services.
Ensure that any QuickBooks related services are checked to run
Try opening QuickBooks and the company file.
This will help you determine in case the issue is due to an external application conflict.
Conclusion
Between the 4 main solutions and 8 additional methods, the TLG file mismatch fix (Solution 2) and the QuickBooks File Doctor (Solution 1) clear up Error 6190, 816 for the majority of users. The 8 additional methods are designed for scenarios where the issue is tied to Windows, the QuickBooks installation itself, or an external application conflict Method 8 (safe mode) is particularly useful for ruling out third-party interference.
If you’ve worked through the relevant fixes and still can’t get into your company file, Intuit’s Auto Data Recovery tool is worth exploring as a last resort or simply reach out to our QuickBooks Data Recovery Support team at +1-888-510-9198. We’re available 24/7 and can handle the recovery process directly for you.
FAQs
What is QuickBooks file doctor tool?
QuickBooks file doctor is a tool designed to eliminate issues that are related to company files or other files associated with QuickBooks. This tool is available in two different types i.e., standalone version and built in version. It can be downloaded from the Intuit website easily or can be accessed using QuickBooks tool hub.
What is QuickBooks database server manager?
QuickBooks Database Server Manager usually lets the user share the company files with another system over network. It further helps in monitoring your multi-user network. When you set up a network, you need to have QuickBooks Database Server Manager running so users can access your company files.
What are registry files in QuickBooks?
The Windows registry is a database that stores important operating information for the user profiles, utilities and programs installed on the computer. The registry entries for QuickBooks stores data that can disrupt future installations of the software if not properly removed.
What is QuickBooks tool hub?
The QuickBooks tool hub is a one stop solution for all sorts of QuickBooks related tools. One can access different tools from tool hub to eliminate the errors that come across while working on the software.
Can Error 6190, 816 be triggered by a QuickBooks update that was applied on only one computer in a multi-user setup?
Yes, this is actually one of the more common and overlooked causes. If a company file is updated on one computer but the associated transaction log (TLG) file on another computer or on the server isn’t updated at the same time, the two files become out of sync which triggers Error 6190, 816. Solution 4 in this guide specifically addresses this scenario by walking through how to update QuickBooks across all systems to bring the files back into alignment.
Will renaming the .ND and .TLG files in Solution 2 permanently delete my transaction history?
No, renaming the .ND and .TLG files does not delete any of your transaction data. The .ND file is a network descriptor that helps QuickBooks locate the company file on the network, and the .TLG file is a transaction log that QuickBooks uses for data recovery neither contains your actual accounting records. When you rename them with “.OLD” at the end, QuickBooks simply creates fresh versions of both files the next time it opens the company file, which often resolves the mismatch without touching your data at all.
What does it mean if Error 6190, 816 only appears on some workstations but not others in a multi-user setup?
If only specific workstations are affected, it usually means the issue is localized to those machines rather than being a server-side or company file problem. The most common workstation-specific causes are outdated QuickBooks versions (Solution 4 updating QuickBooks across all machines), or a Windows update that’s pending only on the affected workstations (Method 2). Comparing the QuickBooks version number across all machines is a good first diagnostic step in this situation.
Few Other 6000 Series Errors:
Few Different type of QuickBooks 6000 Series Errors User May See in QuickBooks:
QB Error Code -6000, -83 – This Error occurred when QuickBooks tried to access the company file.
QB Error Code -6000 – The QuickBooks Errors -6000 can happen on both local and network setup.
QB Error Code -6000-304 – This error occurs when a user tries to open a company file, or QuickBooks Desktop attempts to open a company file.
QB Error Code -6000-82-or-6000-106 – QuickBooks Error -6000, -82 or -6000, -106 occur when the user tries to open or access a company file in QuickBooks Desktop.
QB Error Code -6000-301 – The QuickBooks Errors 6000, 301 occurred when QuickBooks Desktop tried to access the company file.
Payroll is bookkeeping software that keeps all employees information in a sequence with its complete details. If you want to change employee payroll information details through QB then this blog will guide you and make a better way to work on this software.
Note: Payroll customers can change an employee’s payroll information as described below. If you use Direct Deposit or QuickBooks Desktop Payroll Assisted, you must send a zero payroll after you have completed your updates.
First choose Employees & after this click on employee center.
After doing so, give a double-click on a name of that particular employee through which you need to change its payroll information or as modify it.
Then Under the Edit-Employee window, give a click on the Payroll Info tab.
To do so, now edit all details of an employee’s payroll.
Another Method to Change Employee’s Name
First, select Employees heading and then select or click on the Employee center.
Now, press the double-click on a heading of employee’s name.
After that, go to the personal tab and then enter corrected employee name under Legal Name.
At last, click to the OK key button.
Steps to Add payroll Item:
First of all, give a single click on a beneath of the last item under the Item Name column.
Then into the drop down menu, choose a payroll item. If a user needs to make a setup of a new payroll item then click to the Add locate button.
Finally, in the end click on the OK button and apply to save all changes which you have been made recently.
Steps for Reactivating Terminated or Released Employee Payroll Information
First of all, select Employee center & then make a few changes so that you can view all employee details.
After doing so, give a double click on a employee that a user want to reactivate it.
Now click to the Employment info tab.
After that, remove that release date so that the given field is blank.
Under the QuickBooks desktop 2015, first click on the termination tab & then eliminate all your termination details.
To do so, unmark the employee & make it as inactive box.
At the end, click on OK button & save all your modified information that you have made recently.
Hopefully now you are able to change employee’s payroll information in QuickBooks software. However, if there is any query or need any type of help then connect with our U.S based QuickBooks customer support team anytime by dialing toll-free @ +1-888-510-9198 and have a direct conversation with them.
Facing errors in your QuickBooks payroll software? It’s time to seek technical assistance provided by Certified ProAdvisors. Feel no more hassle and dial our QuickBooks Payroll customer service number i.e. +1-888-510-9198. Our experts are available on various modes over Chat, Emails or on a Phone Contact.
Outstanding Services for QuickBooks Payroll as: –
Reliable Technical Support Services and Help for QuickBooks related issues.
Offering QB software at very low cost
Accessible via remote session controller
Available through 24 hrs a day & 7 days including weekends
The Certified technicians are always being here to troubleshoot your problems effortlessly. Our Certified team help you to resolve all type of problems and queries. For more, drop your queries via online and we provide a complete assistance through remotely or telephonic number @ +1-888-510-9198 .
Company file is one of the most crucial elements in QuickBooks, as it stores all the sensitive data of the business. At times, these company files might get damaged for some or other reasons. A damaged company file can be one of most devastating errors that you might come across. A corrupted data file can end up in loss of crucial data, and ultimately hampering the productivity of a business. However, to save you from all these worries, Intuit, the developer of QuickBooks has designed a couple of tools and functionalities that can assist you in eliminating these ‘QuickBooks Errors’ from the root cause. Not just company file issues, there are certain network issues as well that can be experienced when working on QuickBooks accounting software.
As a result of damaged company file, you might face errors like 6150, 6000 82, 6000 305, 6000 301, 6147, 6130, etc. Moreover, you might find missing or blank customer, vendor, or employee lists. All these errors can be eliminated successfully using a couple of tools, one of which is the QuickBooks file doctor tool. In this piece of writing, we have tried to elaborate the complete steps to eliminate the damaged company file and network issues using the file doctor tool. Thus, if you are interested in dumping these errors permanently, stick around to this segment till the end, or you also have an option to connect with our technical support team at +1-888-510-9198, and get answers to all your queries from professionals.
Having said that, let us explore further about the damaged company file and network issues in QuickBooks.
Effective Methods to Fix Damaged File and Network Issues
There can be a handful of steps that can fix damaged company files, but one of the most effective measures is to make use of QuickBooks file doctor tool and a few other tools. Let us check out the steps involved in fixing the damaged company file and network issues in QuickBooks successfully:
Step 1: Download and Install QuickBooks Tool Hub
Accessing various tools in QuickBooks has become much easier with QuickBooks tool hub. You can make use of the Tool hub on windows 10, 64-bit, for the best experience. The steps involved in downloading and installing QuickBooks tool hub are as follows:
Once done with that, save the file where it can be accessed easily.
It should be noted that, in case you have installed tool hub earlier, then check out the version installed by heading to the home tab.
Now, open the file you downloaded earlier i.e., QuickBooksToolHub.exe
Perform the on-screen steps to start the installation process and further agree to the terms and conditions.
Once the installation process ends, make sure to double click the icon on the windows desktop, which will open up the tool hub.
Note that if you are unable to spot the icon, then search it in windows for QuickBooks tool hub and choose program.
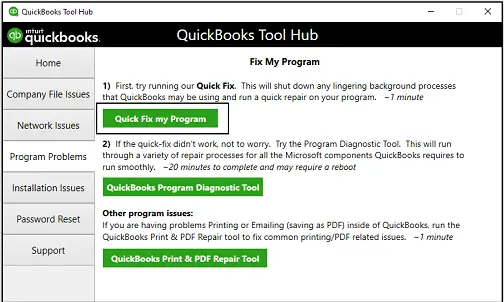
Step 2: Run Quick Fix my File
After installing QuickBooks tool hub, you can try fixing the error using the quick fix my file tool. It is designed in a way to help QuickBooks users to eliminate the error permanently with company file. The steps to be performed here are as follows:
You can choose the company file issues tab from the tool hub.
After that select the Quick fix my file
The tool will perform necessary diagnoses and fixes.
You now have to choose the ok tab when it completes the fixation process and launch QuickBooks.
In case the quick fix my tool didn’t help you much in eliminating the damaged company file error, you can try performing the steps related to QuickBooks file doctor tool to fix the company file and network issues.
Start with heading to the tool hub downloaded in previous steps.
You now have to choose Run QuickBooks file doctor.
This might take up to a minute or two.
Wait for the tool to open. However, if the tool doesn’t open, manually search for the QuickBooks file doctor tool and open it.
Now, in the QuickBooks file doctor, choose the company file from the drop-down menu.
You now have to choose check your file and hit the continue tab.
Lastly enter the QuickBooks admin password and choose the next tab.
Note that the scan time usually depends upon the size of the file. The estimated time is around 10-15 minutes. Moreover, the scan might show up unsuccessful even after fixing the error. After the scan ends, try opening QuickBooks and the company file and check if the error gets fixed or not.
Though we have tried to scribble the complete information related to the damaged company file issues and file doctor tool in the above article, in case, you are facing any difficulty, you can click on the Help (?) icon that will take you to the support page. And to get instant help, you can dial our toll-free QuickBooks help number @ +1-888-510-9198 and get in touch with our advisors now.
Frequently Asked Questions About QuickBooks File Doctor
What is a company file in QuickBooks?
Your QuickBooks company file is a crucial element of QuickBooks that saves all your financial info and grows with your business. You can save multiple company files for multiple businesses. Each business needs to have a separate company file.
How do I repair a corrupted company file in QuickBooks?
You can repair corrupted company files using rebuild data tool. 1. Head to file menu and move to utilities tab and choose rebuild data 2. Select ok on the QuickBooks information window 3. Let the tool repair the file 4. Hit ok tab 5. Move to the file menu and let the tool check your file for any data issues.
How do I fix QuickBooks network connection failure?
You can fix the error by: 1. Rebooting the system and router 2. Disabling the antivirus and firewall temporarily. 3. Running file doctor tool in QuickBooks 4. Verify and rebuild company file
How do I restore my QuickBooks company file?
To restore your QuickBooks company file, you can perform the below steps: 1. Go to the file menu, and choose open or restore company. 2. After that, choose restore a backup copy and hit next. 3. You now have to choose local backup and hit next. 4. Once done with that, browse your computer for your backup company file. 5. Choose a folder to decide where to save your restored company file.
All set to install QuickBooks Desktop on your system? Though the installation process might seem to be a bit daunting to many new users, carrying it out becomes easy with this guide right here. To help you download and install QuickBooks Desktop 2024, we have designed this piece of writing sharing the complete download and installation procedure in detail. Before you begin, make sure that your computer meets the system requirements for QuickBooks Desktop. You can find this information on the QuickBooks website or on the packaging of the software. You should also have your product license and installation CD or downloaded installation file on hand.
To understand the process, make sure to stick around till the end, or you can seek professional guidance by ringing us up at +1-888-510-9198, and we will provide you with immediate assistance related to QuickBooks. Having said that, let us explore some crucial information related to QuickBooks download and installation.
QuickBooks Desktop is one of the finest accounting software that helps you to manage your financial transactions, track expenses, create invoices, and generate reports, all in one place. QuickBooks Desktop is available in three major editions i.e., QuickBooks Desktop Premier, QuickBooks Desktop Pro, QuickBooks Desktop Enterprise. Every business can pick the most suitable edition according to the size and requirements. Each plan offers a different set of features and number of users. Let us evaluate the features of QuickBooks Desktop to understand it better.
Features of QuickBooks Desktop
Search in Chart of Accounts: The search feature in QuickBooks lets you search your accounts or sub-accounts by name, account number, or any partial words.
Customized Inventory Report: It is possible to customize your reports of inventory such as inventory stick status by item, assembly shortage by item, and inventory valuation summary or detail.
Add PO of a Customer in the Email Automatically: You can now automatically add PO to the subject line when sending emails to customers and further combine the emails. This lets you further modify the template for your customer invoices with much ease.
Smart Help: For help you can press F1 to access customer assistance experts.
Past Due Stamps on QuickBooks: This feature gives you confirmation for the invoice of a customer that is due and displays on the screen, if there is past due balance.
Merge Vendor Record: This feature displays consolidated window, so that you can easily find and combine the vendor records that are duplicates.
Mobile Inventory Scanning: When you use a mobile device, scanning inventory becomes easy with this feature. All you need is to pick the product and scan the barcode using the phone.
Payroll Liability and Payment Reminder: You and your clients can now remember about the payments with this feature of QuickBooks.
Multi-Monitor Support – Connect with up to 3 monitors using the top menu into your QuickBooks. You can click on the view menu option and further choose the multi monitor mode and perform the instructions to add a monitor.
Cash Toggle: Toggle the reports displayed in between the cash basis or accrual basis easily with the cash toggle feature.
Expand or Collapse Columns: Just in case you have a long report, you can simply collapse the column to view it in short.
Update Email Security: Using Outlook, Windows Live Accounts, Gmail, etc., you can send the email from your QuickBooks account securely. Sign in with your Intuit ID and set it up.
Steps to download the latest version of QuickBooks Desktop
To simply download QuickBooks into your system, perform the process to download the software completely.
To start off with, head to the Download and Update page of Intuit, and get the download link for the version you want to download.
For Accountants: Log into CAMPs to download the software.
You will have to choose your country, product, and version to initiate the download.
Click on the Download tab.
The installation file will start downloading. You will then have to save it in the location you wish to.
And further, open the file explorer.
Navigate to the download folder and look for the installation file with .exe extension.
Download QuickBooks Via CD
In order to download QuickBooks using CD, you can perform the steps below:
The very first step is to insert QuickBooks CD into the CD drive.
Furthermore, in case the installation process doesn’t start on its own, navigate to the CD drive on the system and double click the QuickBooks setup file.
You will then have to perform the onscreen instructions to install QuickBooks. During the install process, you might be asked to agree to the license agreement and mention the location to save QuickBooks.
After the installation is complete perform the onscreen instructions to activate QuickBooks and set up your company file.
When the setup is complete, start using QuickBooks.
The user generally having two options for installing QuickBooks: express, or custom and network.
Express Install- This type of installation is recommended in situations such as, first time user, reinstalling QuickBooks, using QuickBooks on a single system, etc. The steps involved in express install are as follows:
First of all, the user must choose select the Express and Next option.
And then, select Install option.
And lastly, opt for Open QuickBooks.
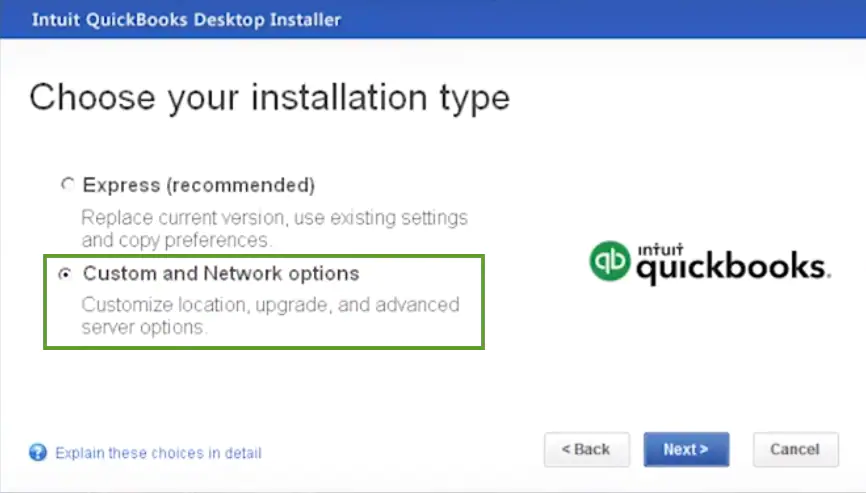
Customer and Network install: This type of install is recommended while installing QuickBooks somewhere other than the default location, or also when the user hosts the company files on a server, or for setting up a multi-user network.
The steps involved in custom or network install are as follows:
To begin with, the user needs to select the Custom and Network options, and hit Next.
After that, opt for the option that describes the way you will use QuickBooks.
The next step is to select the change the install location option, on the next screen.
Also, select Browse option to decide where to put the QuickBooks folder. Majority people put it in their Programs folder.
And then, opt for the Next option to begin with the install process.
Once the installation process gets finish, then click on the Open QuickBooks option.
Get the step-by-step instructions to install QuickBooks desktop on your system, make sure to follow the steps listed below:
Step 1: Prepare your computer
The first step is to prepare your computer for the installation. Make sure that your computer meets the system requirements for QuickBooks Desktop. You should also close any open programs or applications before you begin the installation process.
Step 2: Download or insert the installation CD
If you have a downloaded installation file, double-click on it to begin the installation process. If you have an installation CD, insert it into your computer and follow the prompts that appear.
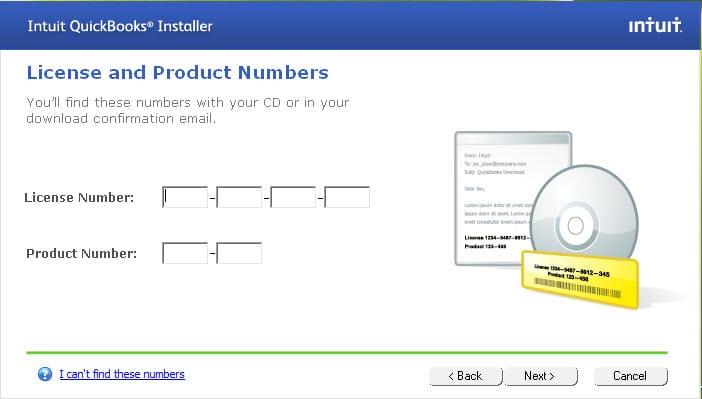
Step 3: Enter your product license information
Once you have started the installation process, you will be prompted to enter your product license information. This information can usually be found on the packaging of the software or in an email if you purchased the software online.
Step 4: Choose your installation type
Next, you will be asked to choose the type of installation that you want. You can choose to install the software on a single computer or on a network of computers. If you are installing the software on a network, you will need to make sure that you have the appropriate network settings.
Step 5: Customize your installation settings
In this step, you can choose to customize your installation settings. You can choose the location where you want to install the software, and you can also choose which components you want to install. If you are unsure, it is best to leave the default settings.
Step 6: Wait for the installation to complete
Once you have chosen your installation settings, the installation process will begin. The length of time that it takes to install QuickBooks Desktop will depend on the speed of your computer and the type of installation that you have chosen.
Step 7: Activate QuickBooks Desktop
After the installation is complete, you will need to activate QuickBooks Desktop. To do this, open the software and follow the prompts to enter your product information and activate the software.
In line with the Intuit’s discontinuation plan for older products, the user cannot register the discontinued product for the first time. However, it is possible to re-register the discontinued products, if they have been registered before and are being reinstalled.
If you want any help or require any technical assistance, you can take help from us by calling at our QuickBooks help number i.e. +1-888-510-9198 and feel irked free. Furthermore, our experts have a versatile adept and niche in resolving QuickBooks desktop installation issues at the present time. Feel free in connecting our technicians that are available for round the clock as 24/7. Ask expert guidance by connecting our experts today!


![Steps to Install QuickBooks Desktop Software [Complete Guide]](https://www.hostdocket.com/wp-content/uploads/2018/03/Install-and-Setup-QuickBooks-Desktop-Software-1.jpg)