QuickBooks is a versatile tool that has been created to operate numerous business operations such as accounting, tax filing, bookkeeping, and payroll. The Tax 1099.com QuickBooks Desktop plugin didn’t update automatically with the latest QuickBooks version, 1.5.2, as in November 2016 and the version have helped many new versions to flourish.
In today’s informative article, we are going to discuss ‘how to install/ uninstall the plug-in on the QuickBooks Desktop?’.
Anyone with the older version and it also gets installed which makes complete with the steps below to uninstall with the old version and also install the new one. The subsequent updates loads automatically and with the new version of the plug-in.
The plug-in works with the versions as far as 2010 along with QuickBooks 1099 Wizard which is called completing the process. Also up to the year 2015, 2016, and 2017 with accountant and enterprise along with no newer versions.
NOTE: If you’re QuickBooks Desktop is hosted on a server or just through a hosting company. You may also need to see your IT person. The process can also host a company. Or you can directly get in touch with the QuickBooks Support team immediately..!
What are plugins in QuickBooks?
Plugins have the log of every entry in a detailed format that is either sent or not delivered to QuickBooks. They can be send to any entry in QuickBooks online easily. Often all orders are send to QuickBooks by default. However, if you can use setup roles and filters to restrict the number of orders sent to QuickBooks. In order to add a plugin to QuickBooks, you just need to head to the import tab available on the left menu of the QuickBooks desktop icon. Then select the QuickBooks desktop plugin and use the button displayed on the top in order to download the particular zip file that has the guidelines for the plugin and the exe file which will help to install the plugin.
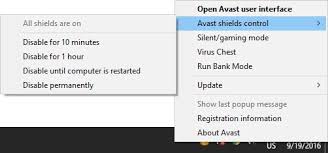
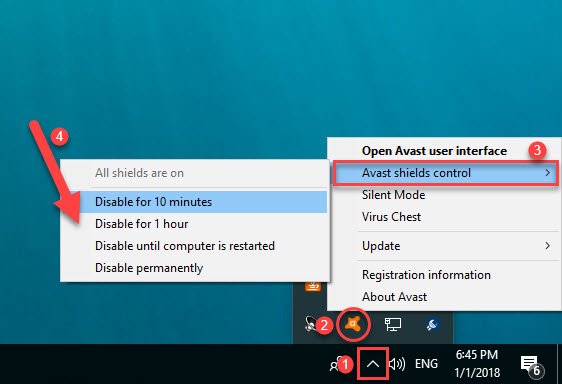
At first, one needs to deactivate the antivirus/ firewall system which temporarily while downloading.
After that, one could sign into the TAX1099.com.
After that, go to the “Import” tab => “QuickBooks Desktop” icon on the left “Menu” tab.
Then, click on the “QuickBooks Desktop Plugin” icon.
After that, use the button at the top to download the zip file containing the instructions for the plug-in and the executable (.exe) file that will install the plug-in.
At first, close the QuickBooks Desktop application that you have open before installing.
After that, disable with the ‘Antivirus/Network firewall program’ while installing the plug-in.
Then, extract/unzip the files that you have downloaded.
After that, double-click the .exe file to install the plug-in, if you have Windows 7 or Vista operating systems, you will need to right-click the .exe file & use the “Run as administrator”.
On the certificate pop up, choose the 3rd option (Yes, whenever the QuickBooks company file is open) and check the box which is next to “Allow” icon, this application to access personal data…!
That completes the installation of the plug-in.
Activate the antivirus/network firewall.
Why install plugins in QuickBooks?
Plugins are basically third-party software components that can be installed in QuickBooks to enhance its functionality and capabilities. These plugins are designed to work with QuickBooks and further provide additional features and services which makes your task easier, that are not available in the standard QuickBooks software.
These plugins are meant to extend the software’s functionality and customize it to better fit the specific needs of a business. They can further provide features such as advanced reporting, inventory management, e-commerce integration, time tracking, credit card processing, and some accounting procedures as well as many other tasks.
Using these plugins, you can also help streamline workflows and automate tasks, which can save time and increase efficiency. They can further help businesses get more out of QuickBooks an optimize their accounting and financial management processes.
Why do users fail to uninstall plugins?
Often user fails to uninstall plugins in QuickBooks due to many reasons listed below:
Hope that we endow you complete insight of the topic ‘how to uninstall and install the plug-in on QuickBooks Desktop’ has been resolved. For more information, you call us to our QuickBooks online support team at ++1-888-510-9198.
Thanks for visit us. Your always welcome on our website. We regularly shares blogs, ideas and latest news about the accounting and bookkeeping related issues and their fixation.
Intuit Field Service Management (IFSM), powered by Corrigo, is a web-based work order scheduling & dispatching system developed and designed for the QuickBooks service, repair, and installation companies. IFSM integrates QuickBooks Online (US versions) and QuickBooks Desktop (Pro/Premier/Enterprise) (US versions). It also has a mobile app for the field technicians in Apple as well as Android mobile devices.
Intuit Field Service Management supplies such functions, in which you are able to handle and schedule almost everything. Such as Jobs, staff members, and inventory in the fields as well as clients. It can conveniently install as well as handle businesses efficiently. It has additionally a mobile application whereby the services can be accessed from anywhere. This app is available for apple and android tools.
Intuit Field Service Management endows following features:
Real-time updates from the field.
Proficient job scheduling.
Time card integration
A smart Work Order Management
Instant invoicing & payment capture.
Mobile invoicing, payment & signature capture
Intuit and Corrigo both share the support coverage for IFSM. If your intend to talk to any of the Intuit or Corrigo executives for support, then it might be possible that you find their line busy. To avoid long hold time, you can get in touch with our QuickBooks Support team immediately.
Sign up/buy extra seats
In case, you want to sign up for the free seat (one incorporated with each QB Desktop Enterprise Solutions subscription), or to obtain additional seats, you can reach to their Sales Team or our Intuit Certified QuickBooks ProAdvisors (Mon-Fri, 6 am to 5 pm PT).
Note: Make sure that you see the pricing per seat for the Intuit Field Service Management from their official website.
Once the IFSM is processed, you can anticipate the following from the partner Corrigo or from us within the next 8 business hours.
Login information & a subscription confirmation via email.
Receive a follow-up call to confirm that user is able to log in & get started.
In case, you don’t get a follow up from Corrigo, then you suppose to get started faster, or if you have query about the Intuit Field Service Management, you can make a call to the Corrigo Pro Specialist Team (Mon-Fri, 8 am to 8 pm ET) or Email ID: [email protected]. On the flip side, if you take our services – you can come directly to our QuickBooks online expert professionals.
Invoice Numbering
While configuring the synchronization settings between the Service Management (IFSM) and QuickBooks Online (QBO), pay concentration to the invoices number & how it will show in QuickBooks Online (QBO).
In a situation where you use the ‘When Invoices are copied uses QuickBooks Online numbering’ option, then the invoice in the QuickBooks Online will be the next invoice inside QuickBooks Online.
If you use the ‘When Invoices are copied use Service Management numbering’ option, ensure that any manually built invoices in QuickBooks Online (QBO) possesses a different number format than the synced invoice of the Intuit Field Service Management (IFSM). If in any circumstance there is an existing invoice number in QuickBooks Online (QBO) that is same or identical to one of the synced invoices of Intuit Field Service Management (IFSM), then the invoice in QuickBooks Online (QBO) will be overwritten by the new invoice from the Intuit Field Service Management (IFSM).
The database structure may vary in QuickBooks Desktop & QuickBooks Online (QBO). Subscribers of Intuit Field Service Management (IFSM) should pay attention to support documentation before QuickBooks Desktop data migration to QuickBooks Online (QBO).
Steps to set up basic settings for Intuit field service management
You can perform the below steps after logging in to it. You can check out the basic settings as first, which include:
Settings
Terminology
Time zone
Service package
Categories and services
Uploading company logo
Verifying subscripotion details
Existing Field Service Management customers migrating from QB Desktop to QB Online
Kindly follow these steps in the IFMS site before migrating the QuickBooks Desktop data to QuickBooks Online (QBO). Failure to follow these steps will result in duplicated Items and probably lost data in the Intuit Field Service Management account “IFSM”.
We hope that this informative blog endows you proper knowledge of how much Intuit Field Service Management (IFSM) is important for the business. If still you seek expert advice, get a deep conversation on this topic or any support related to QuickBooks. Dial our dedicated toll-free QuickBooks help number .i.e. ++1-888-510-9198.
We, Hostdocket, are a leading and renowned company for quick & utmost troubleshooting methods for QuickBooks issues such as QuickBooks Update Errors, QB Installation Errors, QuickBooks Setup Issues, etc.
FAQs Related to Intuit Field Service Manager
How do I set up an Intuit Accountant?
You can follow these steps, in case you are a new user, or you want a separate user account for yourself: 1. Move to the Intuit Accounts page 2. After that choose the create an account link 3. Once done with that, enter your email address and phone number 4. Create a password 5. When you are ready, choose create account.
Do I need to set up an Intuit Account?
You will have to have an Intuit account to sign in when you create a new company file. You also need it when using a connected service like payments, payroll, receipt management, or QuickBooks Time.
How do I manage my Intuit Account Information or payment information?
You can do that by: 1. Heading to www.quickbooks.com/account 2. Entering the User ID and password and opting for login. 3. In the account information box, you need to choose edit to make changes to the company address, company phone, or email.
Does Intuit Field Service Management has a Mobile Application?
Yes, Intuit field service management has a mobile application for android mobile and apple devices, specially designed for field technicians.
As you know QuickBooks application is financial accounting software & just like any other application or software, you may encounter some technical problem while using the QuickBooks. ‘QuickBooks Unable To Display Accountant’s Changes’ is one of those technical issues that are experienced by some of the QB users. When this error occurs, you might see the following error message on your computer screen: “QuickBooks is unable to display the accountant’s changes, please contact Intuit technical support for more help”
Here in this informative article, we are going to let you know the cause behind it & also the error solution. In case, after reading this article if you still require assistance to troubleshoot this problem or any other QB issue. You can get in touch with us at our toll-free QuickBooks Support phone number, .i.e. +1-888-510-9198.
Possible Reasons QuickBooks Unable to Display Accountant’s Changes
QuickBooks financial accounting & bookkeeping software is very simple and versatile tool to share a copy of the data between the business owner & accountant as compared to the others. Perhaps occasionally you might see one of the errors as shown below: –
Error in sending files to the accountant.
Error to display accountant’s changes.
Signs and Symptoms
Checkout some of the possible signs that might appear: –
QuickBooks software needs to be updated.
QuickBooks file is larger.
Slow/sluggish internet connection.
Browser setting may be interfering with the upload.
Solutions of Unable to Display Accountant’s Changes in QuickBooks
Now, we will briefly discuss with you on ‘how to resolve this problem’ effectively. There are multiple solutions for this issue, you can pursue any of them to troubleshoot it. After this, if you necessitate more assistance then, contact us at our QuickBooks premier support team.
Solution 1: Clear your browser history
Open your firefox web browser.
Click on “Menu” button and select the “Options” tab.
After that choose the “Privacy panel“.
Now set firefox will to “Use custom settings” for history, in the history area.
After that check the box to clear the web history when Firefox browser shut down.
Click on “Settings” tab.
In the Settings for “Clearing History” window, click on a check mark next to the “Cache” option.
Hopefully, this informative article would be useful for you to be aware of the ‘QuickBooks Unable To Display Accountant’s Changes’ issue in a better way.
In case, you need instant help for any problem associated with QuickBooks – you can directly make a call to our Intuit Certified ProAdvisors at our toll-free QuickBooks enterprise helpline .i.e. ++1-888-510-9198. Our team is available 24*7 for you.
Some FAQs regarding QuickBooks Unable to Display Accountant’s Changes:
What does “QuickBooks Unable to Display Accountant’s Changes” mean?
“QuickBooks Unable to Display Accountant’s Changes” is an error message that appears when you try to view or access the changes made by your accountant in QuickBooks. It typically occurs when the accountant’s copy of the QuickBooks company file is not properly synced with your own copy, or when there are issues with the network connection.
How can I fix “QuickBooks Unable to Display Accountant’s Changes” error?
To fix this error, there are several steps you can take, including checking your internet connection, ensuring that both you and your accountant are using the same version of QuickBooks, verifying that you have the necessary permissions to view changes, and making sure that both the accountant’s copy and your own copy of the QuickBooks file are properly synced.
What are some common reasons for “QuickBooks Unable to Display Accountant’s Changes” error?
Some of the most common reasons for this error include a poor network connection or lack of internet connectivity, using different versions of QuickBooks than your accountant, insufficient user permissions, or syncing issues between the accountant’s copy and your own copy of the QuickBooks file. It’s important to identify the root cause of the error in order to effectively troubleshoot and resolve it.
How do I view accountants changes in QuickBooks?
From the File menu, select Send Company File. Select Accountant’s Copy then View/Export Changes for Client. Note: Select + to show detailed information of the changes you made. (Optional) Save a copy of the changes by selecting Save as PDF or print it by selecting Print.
An error message stating Error 1321: The installer has insufficient privileges to modify the file appeared on the screen, and you are unable to find a way to fix it? Well, if that is the case, then going through this piece of writing will surely help. You might come across this issue when you don’t have sufficient privileges to modify the file. There can be a few factors triggering errors like these in QuickBooks, which we will be highlighting later in this article along with the quick fixes for the same. Let us explore further. However, in case of any queries, you can consult our technical support team at +1-888-510-9198, and let our team professionals help you with any of your queries related to QuickBooks immediately.
QuickBooks Error Code 1321 appears when the permission issue or system occurs due to incapable of the installer to write a file. To fix this QB error code, update the permissions or privileges on the parent file/folder of the file/folder or source enlisted in the error message.
You may get a similar error message on your computer screen:
When installing or updating, you see Error 1321, followed by one of these messages:
Problem
Error Description
Warning:
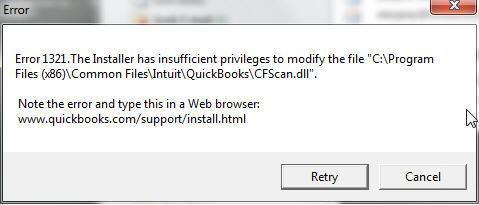
Error 1321: The installer has insufficient privileges to modify the file
Error:
The installer has insufficient privileges to modify the file C:\Program Files\Intuit\QuickBooks\sdkeventl.DLL
Error:
The installer has insufficient privileges to modify the file C:\Program Files\Intuit\QuickBooks\CfScan.DLL
Error:
Error 1321: System has insufficient privileges to modify this file
Error:
The installer has insufficient privileges to modify the file at C:\Program Files\Intuit\QuickBooks YEAR\QBONLI32.DLL
Error:
The installer has insufficient privileges to modify the file [2]
Error:
The installer has insufficient privileges to modify the file C:\Program Files\Intuit\QuickBooks Point of Sale X.0\dataimporter.exe
Important Note: The precise file (.dll) path shown in the error message may vary depending upon the method of QB installation. If you select Retry, you may see more than one message and the installation or update may fail.
Signs of QuickBooks error 1321
You can identify the error code 1321 in QuickBooks using the below signs:
In case the QuickBooks file gets damaged, then it might indicate such an error.
Another possible symptom can be if the speed of the software lowers down.
You can expect a similar issue if the windows restrict the folder.
Possible Causes Behind to QuickBooks Error 1321
Your antivirus or security software is conflicting or blocking QuickBooks access.
Windows permissions for the folder containing the file are set to restrict access.
The file is damaged.
In case, the Windows permissions for the folder comprising the file are placed to “restrict access”.
Due to improper shut-down of the system.
If the file update procedure is faster than the file copy procedure.
If the system security software or antivirus or personal firewall is blocking or creating the problem in QuickBooks update installation.
Fixation methods of QuickBooks Error 1321: The installer has Insufficient Privileges
Below we have given 5 troubleshooting methods to resolve this error. Follow every step carefully and fix this error code permanently from your QuickBooks.
Method 1: Retry the update process
The very first procedure is to retry the update process. The steps involved here are:
Hit onto the “Retry” button to authorize the update to complete.
If it doesn’t work out, choose the “Cancel” icon that appears on the error message.
Navigate to the “Option” tab.
Temporarily disable the system security software or antivirus.
Method 2: Update all the User Insufficient Privileges to Files
The information dialogue box will show the generated error code & message during the QuickBooks installation process.
In the following instance, AcrobatConnect.cfg created the error message.
QB Error 1321.The Installer has insufficient privileges to modify the file C:\Windows\system32\Macromed\Flash\FlashPlayerTrust\AcrobatConnect.cfg. Action ended 11:21:48: InstallValidate.
Put the privileges for the folder given in the error message, instance: \Windows\system32\Macromed\Flash\FlashPlayerTrust\AcrobatConnect.cfg
In Windows XP Professional:
Before you get started, see the concealed files/folders situated in the OS & that easy disable file sharing.
See appearing hidden files & folders, and simple file sharing on the Microsoft support website.
Open the “Windows Explorer” tab, go to the parent folder enlisted in the QB error code 1321 message in the log file.
For illustration, in the path C:\Windows\system32\Macromed\Flash\FlashPlayerTrust\AcrobatConnect.cfg the parent folder is FlashPlayerTrust. The parent folder could be different as shown in the error message.
Press right-click on the parent folder & later select the “Properties” tab.
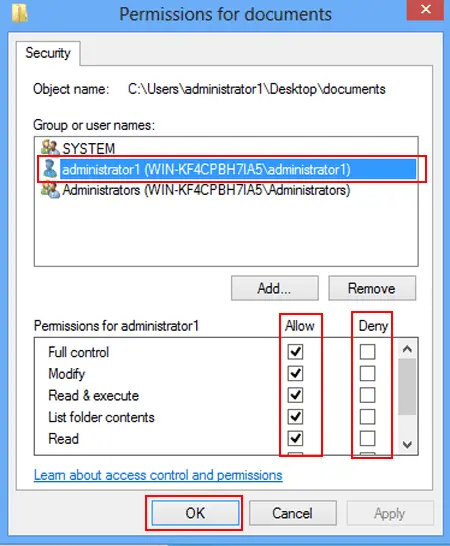
Go to the “Properties” tab; choose the “Security” icon.
In “Group” or “User Names” tabs, choose the “Administrators” tab.
In Windows XP Home:
Turn-off the machine, wait for 5 seconds, and then again turn on the system.
As soon as the “Windows” logo displayed on the screen, tap on the “F8” key. By implementing the arrow keys, choose the “Safe Mode with Networking” & press the “Enter” button on the keyboard.
In the Windows XP Professional, pursue the directions to update user privileges. Restart the machine before reinstalling the QuickBooks software.
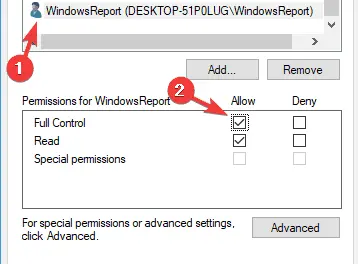
In the “Group” or “User Names” tab, choose the “System” icon. Then, in the ‘Permissions for System’ tab, ensure that the ‘Full Control’ icon is set to ‘Allow’ icon.
In the “Security” tab, click on the “Advanced” tab.
In the “Advanced Security Settings” window, confirm that you’re on the “Permissions” tab.
Choose the “Replace Permission Entries on All Child Objects with Entries Shown Here That Apply To Child Objects” and later click on the “OK” icon.
Click on the “OK” icon to shut-down the “Properties” display.
Turn the simple file sharing back on & then reinstall the Adobe product.
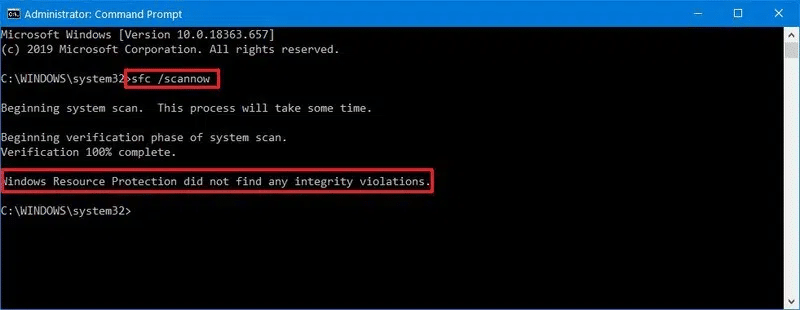
In order to run the windows system file checker, perform the steps below:
You can first press windows + R to open the run dialog box.
Once done with that, enter CMD and hit enter tab. This will open the command prompt.
You are now required to right click the command prompt and choose run as admin.
The next step is to type in sfc/scannow and also hit enter tab.
This will initiate the scanning process.
This might take some time. Thus, wait for the process to complete.
After the scanning process ends, you will see a message indicating whether any errors were found and whether they were repaired.
Method 7: Temporarily turn off antivirus and reinstall or update it
You need to temporarily disable your antivirus or other security software installed on the system.
After that, install your QuickBooks or update it to the latest release.
The next step is to turn on antivirus again.
Note that disabling the software when you are connected to the internet using a persistent connection like DSL or cable is not suggested. Disconnect the system from the internet before disabling the antivirus software.
Final Note!
I believe that we have covered all the major point to remember, here in this informative technical blog post. However, if you still suffer through any discrepancy associated with this error or any other issue – you can contact QuickBooks error support phone number i.e. +1-888-510-9198 Our experts are readily available 24/7 to help you.
FAQs Related to QuickBooks error 1321
How do I fix error code 1321 in QuickBooks?
You can try fixing the issue by temporarily disabling the antivirus or security software. You can further refer to the software vendor’s website or our support professionals for further assistance.
Why is my QuickBooks payroll not working?
This error can occur due to invalid security certificate or sending payroll data in multi user mode. Another possible trigger can be a network time out preventing QuickBooks from accessing the server.
How do I fix an overflow error in QuickBooks?
To fix an overflow error, you can export lists to the desktop using the below steps: 1. Export the lists to the desktop 2. Minimize QuickBooks 3. Right click the export file and select open with Microsoft excel 4. You now have to find all the transactions with overflow value 5. Switch to QuickBooks and correct the data for the field in the account, name or item that contains it.
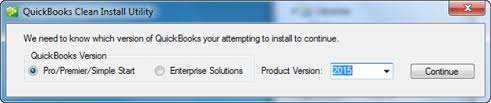
How to do clean install in QuickBooks Desktop?
You can access the clean installation tool from QuickBooks tool hub by opting for the installation issues tab. However, for more details check out our complete blog i.e., QuickBooks Clean Install Tool: Download, Install, & Run
QuickBooks throws an error code just when things are going smoothly. Today, let’s take a look at QuickBooks Internet Connection Errors IC 67186429, 67186457, 67186445 & 6718407, why it appears, and how to fix it without calling tech support. Internet Connection or IC errors are among some of the most common QuickBooks errors any user may face. These errors generally caused by damaged files, system firewalls, or incorrect Internet Settings.
You may often receive them while downloading a payroll update and some of the most frequent IC errors are:
IC67186429
IC67186457
IC6718407
2079784187
Expected Outcome
You will be competent to download the latest QB payroll updates.
Assumptions
You have an active QuickBooks Desktop payroll subscription.
Details
Note: Computer restart has been well-known to resolve this QuickBooks issue. If you haven’t tried this way so far then restart the PC to test it. In case, the problem didn’t fix then, endeavor to reconfigure the Internet connection. However, if you seek efficient and quick help – you can reach to the QuickBooks Payroll tech support team at any time.
Fixing Internet Connection Errors IC 67186429, 67186457, 67186445 and 6718407
Further in this article, we will discuss the most reliable ways to fix QuickBooks Internet Connection errors. So let’s begin with the troubleshooting steps:
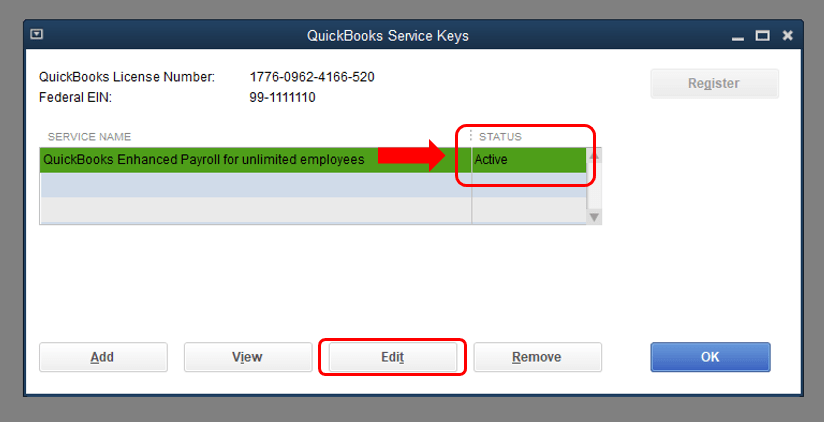
Confirm that the QuickBooks payroll subscription is set to ‘Active’
Restart the machine and later, open the QuickBooks application
Select the “Employees” icon => “My Payroll Service” icon
Hit onto the “Account/Billing Information” tab. Ensure that the QB payroll subscription status is set to ‘Active’
We expect that this technical blog would be supportive for you to understand QuickBooks Internet Connection Errors IC 67186429, 67186457, 67186445 and 6718407 in a better approach. However, it could be possible that there are some indistinct topics or trouble associated with the QuickBooks. In such scenario, you can directly speak to the QuickBooks help and support team.
We are a specialized team of QuickBooks expertise technicians to fix QuickBooks issues. You can even avail our service by just making a call on our toll-free helpline i.e. +1-888-510-9198. We are available round the clock.
Some FAQs related to QuickBooks Internet Connection Errors
What are QuickBooks Internet Connection Errors IC 67186429, 67186457, 67186445 & 6718407?
These errors typically occur when QuickBooks Desktop is unable to establish a stable internet connection with the company file or with the QuickBooks server.
What causes QuickBooks Internet Connection Errors IC 67186429, 67186457, 67186445 & 6718407?
There could be a number of reasons why these errors occur, including issues with your internet service provider, firewall settings, security software, or the QuickBooks software itself.
How can I fix QuickBooks Internet Connection Errors IC 67186429, 67186457, 67186445 & 6718407?
There are a number of troubleshooting steps that you can try to resolve these errors, including checking your internet connection, disabling your firewall and security software temporarily, and updating your QuickBooks software.
What should I do if I can’t resolve QuickBooks Internet Connection Errors IC 67186429, 67186457, 67186445 & 6718407 on my own?
If you are unable to resolve these errors on your own, you can contact QuickBooks support for assistance. Our toll-free number is +1-888-510-9198, and we offer support for QuickBooks and all related errors.
Does QuickBooks offer support for Internet Connection Errors IC 67186429, 67186457, 67186445 & 6718407?
Yes, QuickBooks offers support for these and all other errors that you may encounter while using the software. You can contact QuickBooks support for assistance by calling our toll-free number +1-888-510-9198.