Sometimes, QuickBooks software encounters unknown malefic error messages such as:- R# (M=1153, L=133, C=88, V=28 (FFFFFFF4). The ‘C’ errors or data error usually appear in the QBWin.log as shown in the above format. This error code is more likely to be seen in the older version as compared to the newer version. The QuickBooks Error Code C=88 (Problem Reading One or More of the Data Trees in the File) generally occur in the following circumstances:-
While working on the QuickBooks software
During using the authentic data within the company file
When some data issue occurs
Under such situations, the QuickBooks Error Code C=88 appears repeatedly.
Intuit Inc. developed the QuickBooks software in the year 1983 to reduce time consumption & stress of accounting for businesses. Since then, it captured around 73% market of the United States in the sphere of accounting & bookkeeping solution.
M=1153: It stands for a module within the QuickBooks related with the error. This module endows technical support and programmer personnel with a frame of reference about the operation in progress at the time of the error.
L=133: The “L=133” stands for the line number on which the error encounters. This line number endows the details as to execute point in program execution. This is the point where error resulted in shut-down.
C=88: “C=88” stands for a specific error code. The fatal error messages containing “C=88” is a result of the data damage. This value usually appears when the QuickBooks doesn’t have any idea what to do with the damaged transaction.
V=28: when the error message contains “V=28”, it indicates that the technical support & programmer personnel may find useful in error resolution.
Error C=88 can occur when you check the data within the company file and find any data related problem. Standard QuickBooks data repair methods are enough to repair your data.
Fix QuickBooks Error Code C=88 (Problem Reading One or More of the Data trees in the File)
Below we have provided some quick tips and tricks to solve QuickBooks error code C=88. You need to follow each steps carefully to get rid of from the problem.
The above-mentioned troubleshooting steps should fix QuickBooks error code C=88 in most cases. You can also restart your system and server and see if the issue is fixed. That however may be a temporary fix and you may face the same error again. The following steps might help you prevent data damage caused by low resources on your system or network in the future.
Increase or add more “RAM” (memory) on your systems and server. The amount of memory your systems require is parallel with the QuickBooks version you use and is run on your system.
Make changes to the “processor clock speed”. Increase that on your workstation.
Set all of your Network Interfaces to “Auto Detect” or “Auto Select”. If you are not comfortable performing this step, take help for a professional.
If you use a hub, replace it with a switch with “1 gigabit port” for the server and “100 megabit ports” for the systems.
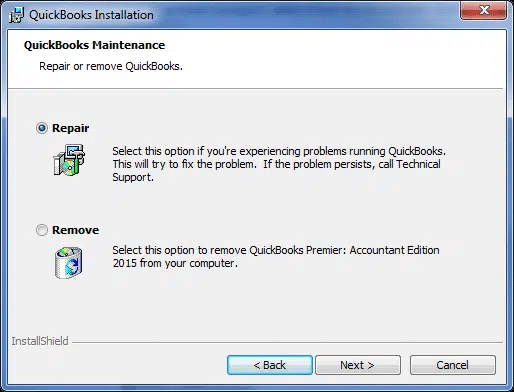
Situation 3: Clean Install QuickBooks
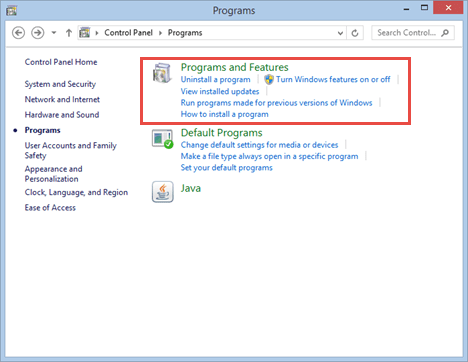
Clean installing QuickBooks simply means uninstalling and then installing the software again in order to fix installation issues. These issues can be causing QuickBooks Error Code C=88. Here are the steps involved in this process.
The very first step is to open the file explorer.
After that, head to the programs and features tab.
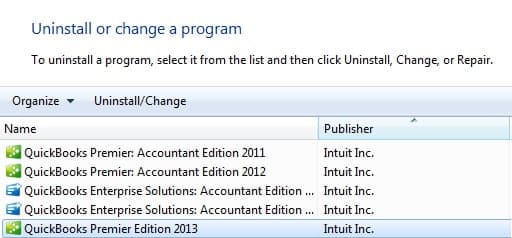
The user needs to locate the .exe file.
Once done with that, right-click on it and click on uninstall tab.
The user is then required to head to the official website of Intuit.
And download QuickBooks again.
Perform the onscreen steps and then open the QuickBooks and log in using the license and product key.
Situation 4: Restore Companyy File Backup
In case your currently opened company file has data damage, then you can restore the backup. The steps to do that are as follows:
The user needs to first open the QuickBooks software and then head to the file menu.
After that, click on open or restore company.
The user needs to click on restore a backup copy.
And click on next tab.
Also, click on local backup option.
The next step is to click on next tab.
Locate the backup on the system. And the company file backup will be stored with the .qbb extension.
The user needs to now choose the folder where the restored company file will be stored.
Also, click on open.
After you have performed all the above steps, hit save.
In case an overwriting prompt appears, go for whichever option best suits you.
Ensure not to overwrite unless necessary.
Situation 5: Run QuickBooks File Doctor
The file doctor tool identifies and resolves damages to any QuickBooks components without hassle or much effort. The steps to run this tool are as follows:
The user needs to first shut down QuickBooks, in case it is open.
After that, download and install the QuickBooks tool hub from the official Intuit website.
The user is then required to right-click and open the tool.
Also, head to the company file issues tab.
And click on Run QuickBooks file doctor. Press okay if it prompts you to ask for backing up.
Once the backup of the company file is created, the tool will start scanning on its own.
The process might be time-consuming.
The damages will be resolved once the tool completes scanning
It might be possible that you find the above-shown steps a little time taking…! If you require a professional service to solve this error – we suggest you to contact our QuickBooks Data Recovery Customer Service team.
Our Intuit Certified ProAdvisors provides a premium QuickBooks desktop support team that provides instant support with the help of advanced edge-cutting tools and technology. So, get in touch with us today through our toll-free number i.e. +1-888-510-9198. We are available round the clock with 24 hour of customer service.
FAQs
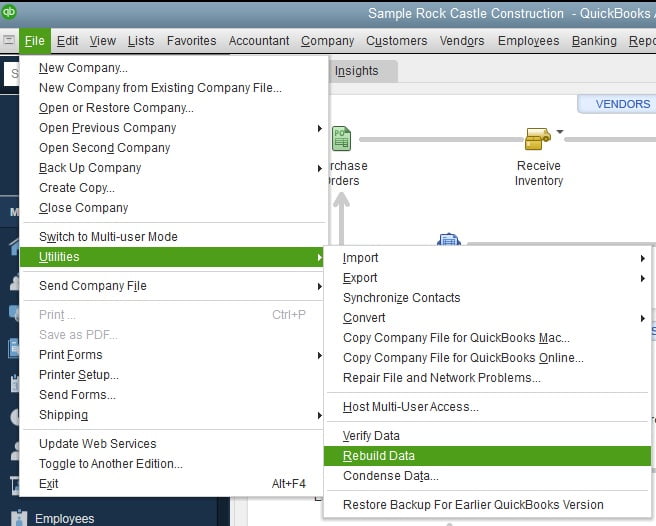
How to fix rebuild errors in QuickBooks?
The user can fix the rebuild errors using the steps below: 1. Open QuickBooks. 2. Go to the file menu. 3. Select utilities. 4. Tap on rebuild data utility. 5. This tool will resolve the rebuild error.
How to fix QuickBooks Desktop installation errors?
Installation errors are often experienced when installing QuickBooks. They can be fixed using the steps below: 1. Install diagnostic tool. 2. Download and run the QuickBooks tool hub. 3. Run QB file doctor. 4. Clean and install QuickBooks in select startup mode.
What is QuickBooks file doctor tool?
QuickBooks offers various tools to deal with the errors that can be experienced when working on the software. One such tool is the QuickBooks file doctor tool. This tool comes in handy in case there are any sort of company file or QuickBooks-related file-associated issues. This tool can be easily accessed from Intuit website or via the QuickBooks tool hub.
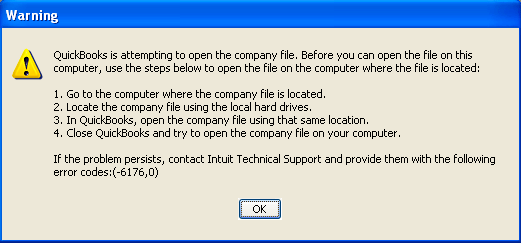
QuickBooks Errors are a reason of some fault at the user end or it is the system fault. QuickBooks error 6176 is an error that usually occurs due to the incorrect folder permission, internet settings or firewall configuration. This error may also mean that QuickBooks is unable to fix the path to the company file. But there is nothing to worry as it a common error and can be resolved very easily.
You can seek proper assistance for this error by contacting our QuickBooks error support helpline. Read this in-depth article with complete overview and solution steps. When this error occurs, user faces two issues which are as follows:
You are not able to receive network id of server
QuickBooks software is not able to connect with the system which indicates the location of the company file
Note: Remember that the structure of QuickBooks software is not considered compatible to practice its functions with the virtual server or Novell Netware.
What is QuickBooks error 6176,0?
Before you dig in deep to learn the steps involved in fixing the error code 6176, it is important to first understand a little more about the issue. This particular issue indicates the location of the company file. It can further lead to the software being unable to access the network identification of the server. This error also occurs when QuickBooks tries to get the server’s system address but fails to do so. This particular issue can be seen if the firewall configuration is incorrect or the windows has an errorneous internet setting.
Common Causes behind the QuickBooks error 6176
Incomplete installation or damaged download of QuickBooks software
QuickBooks related software change during install and uninstall process
Virus or malware or any other QB related program files
Windows 10, 8, 7, Win Vista, XP, ME and Windows 2000 are the operating systems that may have this error.
Effects of QuickBooks error code 6176
The user can identify the issue with the help of the below signs and symptoms. Let us have a look:
One of the basic signs can be windows crashing repeatedly
Another sign can be sluggish windows
The user can also identify this issue if there are no response to keyboard and mouse inputs.
Or if the system freezes regulalry
Also, in case the input device is facing a delay in processing
Easy Methods to Troubleshoot the QuickBooks error 6176
Here are the steps to resolve this problem. We have listed three solutions with steps to follow:
Solution 1: Diagnose the Window for System Errors
When update the definition of antivirus software, ensure that you do a full scan.
Scan the system to identify and fix bugs
Upgrade the antivirus program
Run the full scan once the antivirus software is activated (When you are not able to update the antivirus software, then there may be a virus present).
If software finds no virus then copy the company files to another system and open it.
Repair Windows Installation on the computer.
If same error is being displayed by the QuickBooks company file, then there are chances that the company file is damaged.
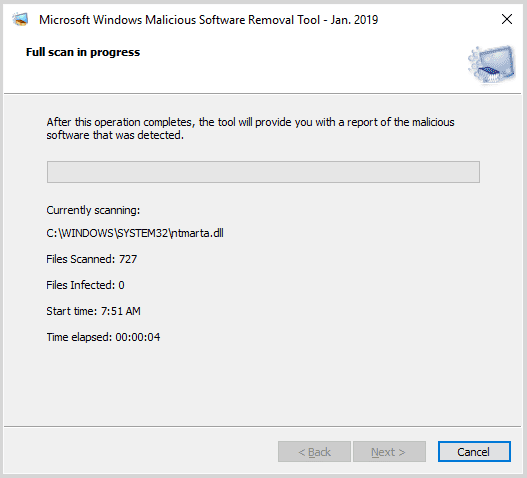
Solution 6: Perform a Full Malware Scan of Your Computer
Malware infection is another major cause behind QuickBooks error 6176. These intruder software may delete, damage or corrupt file related to runtime errors. The more malware infection you have on your system, the more probability of you receiving QuickBooks error 6176. Consider running a full Malware scan using a reliable anti-malware. The steps involved in this process are as follows:
The very first step is to scan the system to identify and fix the issues.
The user will then have to upgrade the antivirus software.
After that, run the full scan after the activation of the antivirus software
In case the user is unable to run or update antivirus, then the system might have virus
If no virus gets detected, then the user needs to copy the company file to another system and open it
Now, repair the windows installation on the system. This is essential when the company file opened successfully on another system.
If the company file shows the same error, then the company file might get damaged.
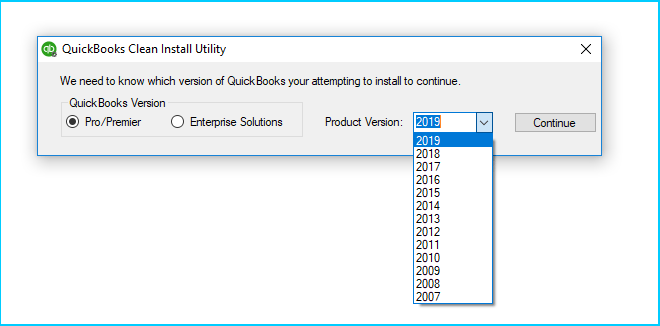
Solution 7: Reinstall QuickBooks Desktop using QuickBooks Clean Install Tool
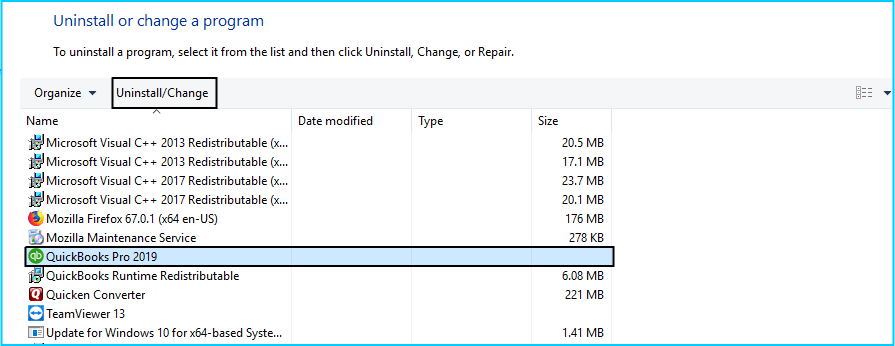
Press the Windows key or Start button and type Control Panel.
After the Control Panel window opens, select “Uninstall a program” under “Program”.
Find QuickBooks Desktop, do a right-click and select uninstall.
After all these steps, if the QuickBooks error 6176 still persists, then it is advisable to contact our QuickBooks support number i.e. +1-888-510-9198 to get your QuickBooks software installation repaired. You can consult our tech support professionals and ask them to help you with the software issues.
FAQs– QuickBooks error 6175
How to fix QuickBooks error code 6175?
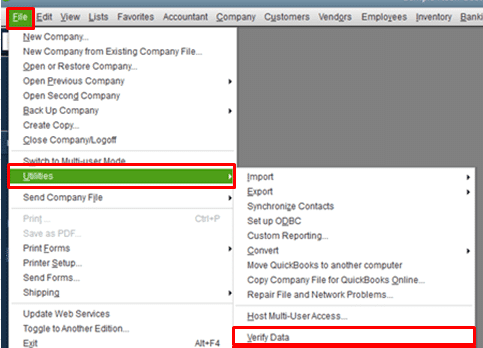
One can try to fix the issue using the steps below: 1. The first step is to open QuickBooks on the server system. 2. Open the file menu and then hover over utilities 3. Now, if the host multi user access is an option, choose it. 4. Repeat the process one more time and choose host multi user access
How to repair QuickBooks?
The user can try to repair QuickBooks by heading to the file menu and then hover utilities and choose rebuild data and on the QuickBooks information window, choose ok tab. Perform the onscreen steps to save a backup and let the tool repair the file.
How to fix QuickBooks error code 6000?
The QuickBooks error code 6000 is a company file issue. You can check the firewall and internet settings on the server system and workstations to get rid of the issue.
What is error code 6176 0?
QuickBooks Error code 6176 might lead to an issue in connecting QuickBooks software to the system that indicates the location of the company file. Further, it might lead to the software being unable to access the network identification of the server.
Facing QuickBooks Error Code 193 when opening or using QuickBooks in multi-user or when starting QuickBooks database server manager? Well, if that is the case, then this segment is something that you need to keep an eye on. Such an error doesn’t let you access programs and features of the accounting software. Furthermore, the Quickbooks error 193:0xc1 is a store exchange error that can be seen when you try to use the database server manager. This error message shows up with the following warning message:
You may see the following error message when it occurs: Error 193:0xc1 Windows could not start the QuickBooks DBXX service on Local Computer Services: Windows could not start the QuickBooks DBXX service on Local Computer.
In case you are facing the same issue again and again, then going through this segment will surely help. To learn further, stick around this segment carefully, or you can also contact our tech support team at +1-888-510-9198, and we will provide you with instant support and guidance.
The fixation of QB error 193 can only be possible once you know the reasons behind to it. When this error occurs, your system receives a pop up message- ‘Error- 193 Primary key for dept keywords is not unique’. This pop up appears every time you try to send a mailbag from headquarters to remote store.
The error can occur because of the following reasons:
Troubleshooting for Store Exchange Errors (193, 175305, 175411 and 175414)
Follow the given steps instructed below in order to fix these error codes. If you have any problems while following the instruction, our technical support for QuickBooks error codes is always available to assist you.
Solution 1:Manually do windows 10 version 1803 update
Focusing on the Remote Store, these steps send a mailbag to headquarters and receive the same:
First of all, go to Customer > Customer List.
Now, choose the names and delete them (if you wish to choose more than one customer, then you can click on first one with Shift key pressed and click on the last name.
Solution 2:Update point of sale
Go to Point of Sale
Click on Help > Software Updates > Check for Updates
Solution 3:Delete .qbt files in headquaters and remote store
This solution focuses on deleting the .qbt files in both the Headquarters and Remote store. Now create a new remote .qbt file.
Step 1: Delete the .qbt files at Headquarters
You can do the same by following the path on your Windows OS: C:/Program Data/ Intuit/ QuickBooks Point of Sale x.x / STex
Check all the folders and if you find any .qbt files there, then delete them.
Step 2: At the Remote Store
Type .qbt in the search box
Delete the .qbt files which you find in result
Now, close the windows and also empty the recycle bin.
Step 3: Create a new remote file
Choose Files > Company Operations > Create New Company
Type Company Name> Choose Remote Store> Fill the store number
Resend the mailbag from Headquarters to Remote Store
Note: Following troubleshooting steps are only for Windows OS, which is not an Intuit product. So, If you are not comfy with these steps on your own, Intuit suggests you speak with your computer’s manufacturer or an IT specialist.
Solution 4: Clean install QuickBooks
The very first step is to click on the windows start tab on the system.
After that, click on control panel and open it.
Now, select the programs and features tab or uninstall a program
Select QuickBooks desktop from the list of installed programs
Select uninstall/change option and select remove
The last step is to click on next and reinstall the QuickBooks desktop.
Solution 5: Delete customers in QuickBooks
The very first step is to choose the reports tab after launching QuickBooks
And then, select customer lists
At list will show up on the screen, then pick the very first client
Now, click on the customer twice
The next step is to open the list of this customer
Also, choose all options and choose I want to
The next step is to choose delete the customer
And also select the file menu and also opt for the utilities and resend
The mailbag of the store must then be examined
The last step is to demand launching QuickBooks and examine if the error is fixed
The above given three solutions will help in resolving the QuickBooks error code 193. If you are facing any difficulty while following these steps, in this process, you can contact our QuickBooks Point of Sale support experts at +1-888-510-9198.
FAQs – QuickBooks error 193
How to fix connection error in QuickBooks?
The user can try to fix the issue using the steps below: 1. Select the Reload button or press F5 on your keyboard (Command + R if you’re using a Mac) to download the entire page. 2. If the problem persists, restart your browser and then log in to QuickBooks Online.
How to resolve QuickBooks error 193?
This error is typically caused by an outdated driver, a corrupted system file, or incompatibility with NordVPN. You can try to fix this error by running the Hardware and Devices Troubleshooter, the System File Checker scan, or uninstalling NordVPN (if applicable).
How to fix windows firewall is blocking in QuickBooks?
If QuickBooks File Doctor didn’t fix your firewall issue, you can set things up manually. 1. Add Firewall port exception for QuickBooks. 2. Create Windows firewall exceptions for QuickBooks programs. 3. Check your antivirus or firewall settings. 4. Add QuickBooks ports exception on your antivirus or firewall. 5. Restart your computer.
Steps to resolve email issues in QuickBooks desktop
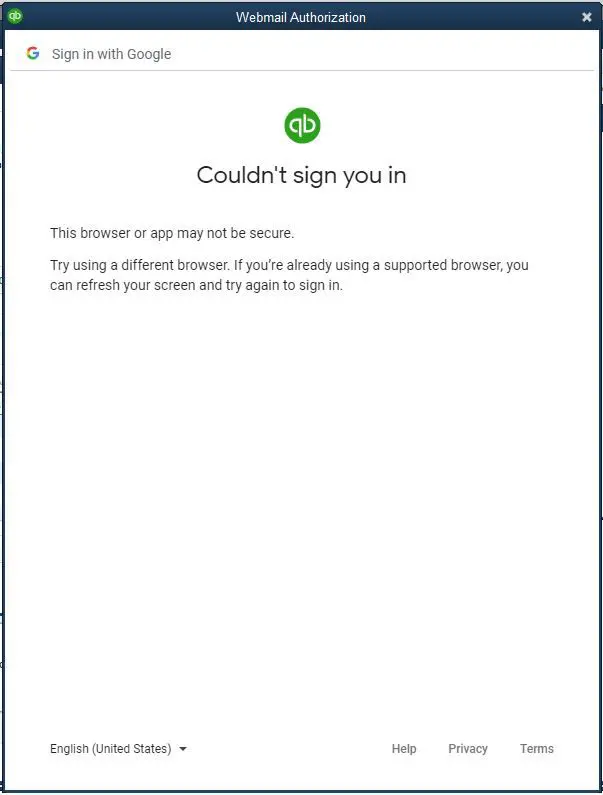
Suddenly your QuickBooks software stopped accepting the password when you tried to sign in to the email? Well, if you find this relatable, then this is something that we are addressing in this piece of writing. QuickBooks also ensures quick and smooth transaction of emails to all the concerned. But sometimes, QuickBooks won’t send email. This error basically indicates that the QuickBooks desktop doesn’t accept the password when using email services like Gmail, Outlook, or Yahoo Mail. And as a result of this issue, you might not be able to connect to the online email services and send transactions directly from QuickBooks Desktop. The email issues of QuickBooks desktop occur while mailing invoice to the client through QuickBooks.
This error might often be seen with a warning message that states “Incorrect email or password”. To get rid of such errors, you might have to configure the programs blocking the software. To make tackling such errors easy for you, here we are with this segment. However, if you feel like connecting with a team of professionals, do not hesitate to contact us. All you need is to get on a call with our tech team at ++1-888-510-9198, and all your queries will be answered by our professionals immediately.
Steps to Resolve Email Issues in QuickBooks Desktop
Below listed are some solutions that you can try to resolve this problem. If the problem persists after following these steps, then you can contact our QuickBooks Error Support & advisors at +1-888-510-9198 to save your time and efforts.
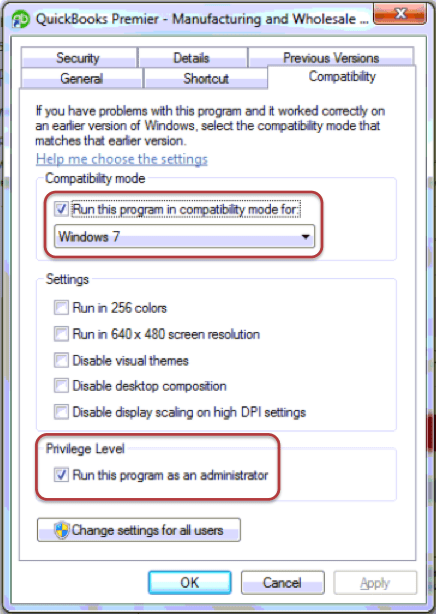
Solution 1: Make sure that the QuickBooks is not running as administrator
Right click on the icon of QuickBooks. Select ‘Properties‘.
Now choose the ‘Compatibility‘ tab
If Run this program as Administrator is selected, then ‘Unselect‘ it. (If you find that the color of ‘Run this program as Administrator‘ is grey then first choose the ‘Show Settings for All Users’
Click ‘Okay‘
Now, restart QuickBooks which will resolve QuickBooks won’t send emails issue.
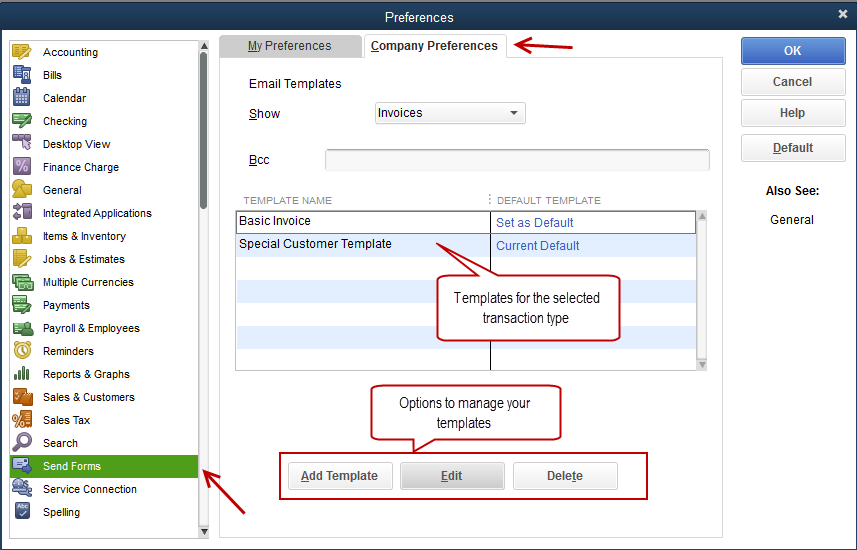
Solution 2: Ensure that Email Preference has been correctly set in QuickBooks
If you use Microsoft Outlook with Microsoft Exchange Server, then Open Outlook and sign in before you start checking the preferences set in QuickBooks.
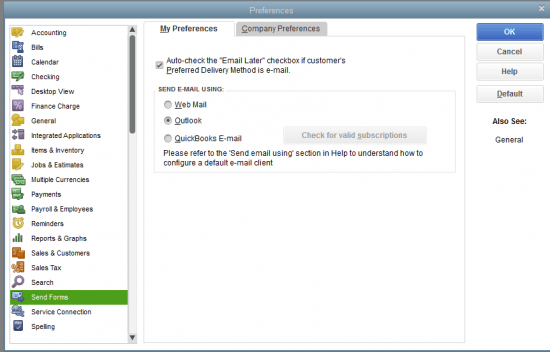
Select ‘Edit-> Preferences -> Send Forms‘
Now click on ‘My Preferences‘ tab and set ‘Send E-mail using’ and the option you want to use. Then, click ‘OK‘.
If you find the preference to be set correctly, then follow the following steps:
Choose ‘Edit -> Preferences -> Send Forms’
Choose the tab of ‘My Preferences‘ select ‘QuickBooks E-mail‘ and Click ‘OK‘.
Click on ‘Edit -> Preferences‘
Select ‘Outlook‘ and Click ‘OK‘.
Now, close QuickBooks and other programs.
Restart Windows and then, restart QuickBooks
Now email the report.
Solution 3: Ensure that email preference is set correctly in Internet Explorer to resolve Email issues in QuickBooks
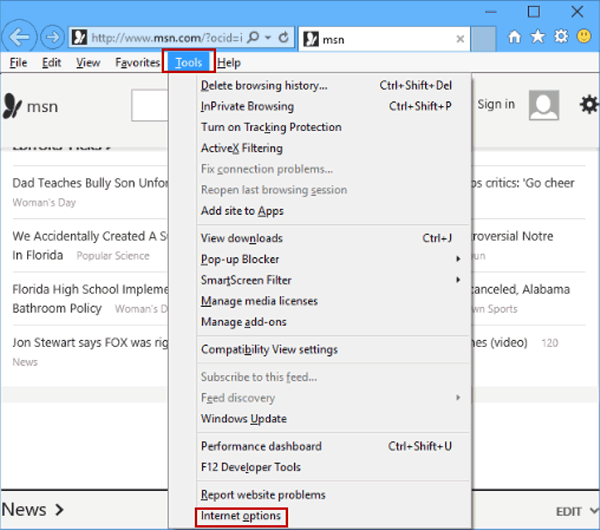
First of all, close QuickBooks and Open ‘Internet Explorer’
Select ‘Tools > Internet Options‘
Now, click on ‘Programs‘ tab
Check whether correct email program has been set as the default email program, i.e. when you send email through Outlook, then Outlook should be select and vice versa for Outlook Express.
The steps to test and repair are technical and should be performed by an IT professional. If you need IT support to resolve this issue, you can contact us too for help (Charges May Apply).
Use Microsoft Word to test the functionality of MAPI32.dll
Restart the computer and reopen Windows
Open a document in Microsoft Word
Select ‘File > send > Email as PDF document‘
If no error occurs, contact the technical support for assistance
If an error occurs, then contact Microsoft Help and Support to resolve issues with Outlook or Office Suite and the MAPI settings
Once the issue is resolved, email the report.
Repair MAPI32.dll
Close all ‘Windows‘ and click on ‘Windows Start’
Go to ‘Computers‘ and Go to ‘C:\Windows\System32‘
Double-click on ‘Fixmapi.exe file‘ and follow all the instructions on the screen
After ‘Fixmapi.exe‘ stops running, you can restart your computer.
Rename MAPI32.dll
This should only be done if repairing MAPI32.dll does not resolve the problem.
Firstly, Close your all programs.
Use ‘file explorer‘ and ago to ‘C:\Program Files (x86)\Common Files\System\MSMAPI\1033‘
Rename ‘MAPI32.dll‘ to ‘MAPI32.dll.OLD‘
Restart your computer and run ‘Fixmapi.exe‘ again
When ‘Fixmapi.exe‘ stops, restart the computer
Solution 5: Reinstall QuickBooks with Clean Install Tool to repair email issues in QuickBooks
Close all the open web pages and applications after saving all unsaved works.
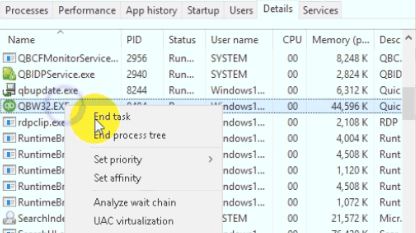
Press the ‘Start‘ button and Type ‘Task Manager‘.
After the ‘Task Manager‘ window opens, end all the QuickBooks related processes.
Here, the user is supposed to head to the Windows in the System, and then open the Control Panel
Once done with that click on the Programs option
Now, click on the Programs again or click on Uninstall a program
The user is then required to search and select the Microsoft outlook program from the list that appears on the screen
Once done with that, click on uninstall/change option in the uninstall wizard and also select the repair tab
Moreover, Perform the steps to fix the MS Outlook program
And then click on the finish tab
After the process ends, try to send an email from QuickBooks to Outlook and check if the issue resolves
Solution 7: Missing Primary Interop Assembly
If the user has installed QuickBooks first and then Microsoft office, then it means that the primary interop assembly has not been installed in your system. Thus, the user is required to check into your system that the assembly is installed.
This can be done by checking the directory: – C: \ Program Files (×86) \ Intuit Statement Writer 20XX XX is the version of QuickBooks software you have in your system.
If the directory is present, then run the vstor.exe file.
This will help in installing the assembly that is missing
Solution 8: Verifying the QuickBooks Compatibility with your Microsoft Outlook Version
Under this method, check the software version in use
In case the user is using the updated version, then he/she needs to verify the Microsoft version compatible with the accounting software
In case the version isn’t the same, then update the Microsoft Product
After which the user can check whether the issue ends or not.
Solution 9: Update the Microsoft Outlook Program
For this, the user needs to click on the File menu
After that go for the account option
And then head to the Product information
Now, choose the Update Options O Click on the Update now to start the update
The user will get a notification when done
Furthermore, check if the issue ends
Solution 10: Update QuickBooks to latest release
Outdated QuickBooks software is something that might land you into a bunch of different problems. Thus, it becomes crucial to update QuickBooks to the latest release. And this can be done using the steps below:
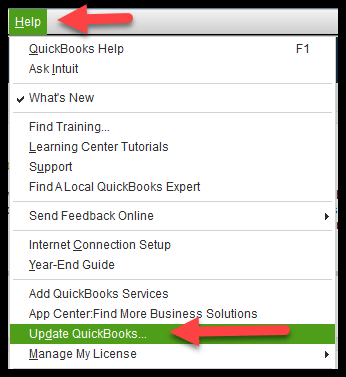
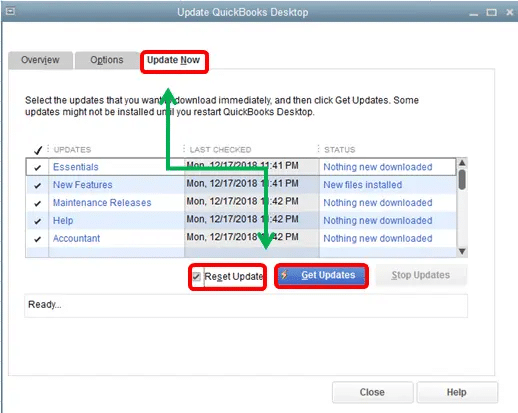
Start off by heading to the help menu and selecting the Update QuickBooks Desktop option.
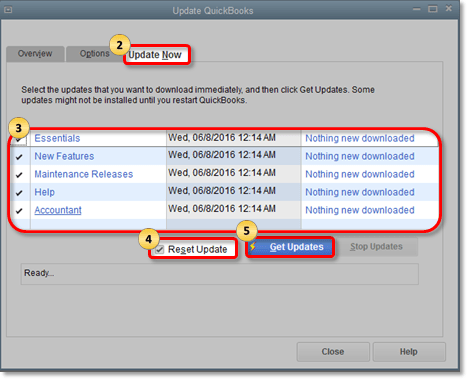
Also, Visit the Update now tab.
Moreover, choose the reset update checkbox to clear all updates downloaded.
Now, choose Get updates and start the download process.
Reboot QuickBooks when the download ends
Furthermore, Accept the terms and install new release.
Alternate Methods for Webmail Password Issues in QuickBooks
Other than the above steps, you can also perform the below steps for webmail password issues in QuickBooks. Let us have a look:
Method 1: Check the settings for antivirus
In certain cases, antivirus might block the connection to QuickBooks. Thus, one can perform the steps below to fix such issues:
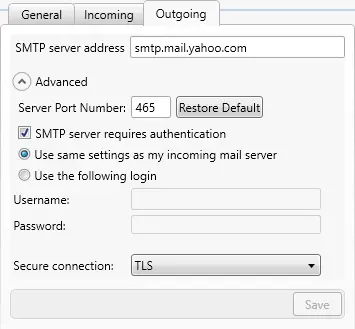
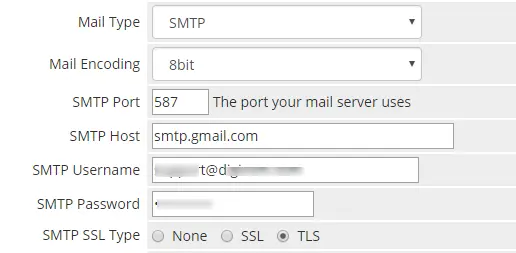
Start by making Port 465 and opening for Yahoo mail
Also, make Port 587 open for Gmail and all other email services.
This would help you resolve the issue, if not them make sure to check by sending a test email.
Method 2: Check for the email settings
Gmail Users
Perform the steps to enable access for less secure apps.
Set access preferences for specific apps like QuickBooks.
Head back to QuickBooks and email to test.
Yahoo Mail users
Head to the Yahoo account security page
Turn on the Two step verification
Permit the apps that se less secure sign in features
Now, check if you are able to send an email or not.
Final Words…!
We hope that the above given steps are helpful for you to resolve email issues in QuickBooks desktop and you will get rid of QuickBooks won’t send emails error. In the meanwhile, if you need any further information, you can contact us on our QuickBooks technical support number i.e. ++1-888-510-9198. Help is available round the clock.
Frequently Asked Questions!
How do I resolve email issues in QuickBooks desktop?
You can perform a bunch of steps to fix email issues in QuickBooks. Let us have a look: Solution 1: Make sure that QuickBooks is not running as administrator. Solution 2: Also, Check Email Preference are correct in QuickBooks. Solution 3: Ensure that email preference is correct in Internet Explorer to resolve Email issues in QuickBooks.
How do I reset my email in QuickBooks?
For this, you can change your QuickBooks user ID, email address, password, and other info 1. Sign in to QuickBooks Online. 2. Also, Choose your profile icon next to Settings ⚙. 3. Furthermore, head Manage your Intuit Account. 4. Moreover, Select the Sign in & security menu. 5. Also go for the User ID, Email address, or Password section. 6. Make your changes.
How do I fix QuickBooks not sending emails?
You can fix QuickBooks by opening QuickBooks desktop and under the edit tab, choose preferences tab and click on the send forms. Under my preferences tab, select the option for sending email under the send email using section and click ok. Also, go for the outlook email, if you use Outlook to send emails and click ok.
In the modern world of global businesses & technology, accounting and bookkeeping solution has become a primary necessity. Therefore, the benefit & rapid growth of companies with no hassle, Intuit Inc. developed an accounting software that is – QuickBooks. This software has garnered an immense reputation in the business market of the United States & Canada. But in the last few years, it has been observed by the few users that this it frequently get affected by the QuickBooks Error Code 3100.
Here in this post, we are going to endow the best information from our understanding of this issue. We will provide a complete overview of the symptoms, causes, and solution of the QuickBooks error code 3100. However, you can take guidance from our QuickBooks error support services in case you have any queries or looking for help.
QuickBooks Error Code 3100 generally occurs when you try to add a new customer to QuickBooks. The Customer, Vendor or Employee name or record you are trying to enter may already exist in the create Customer request. The accounting software always takes unique Full Names in Customer, Vendor or Employee data and that includes both active and inactive records. You should check the names for the three entity types if this error appears and then rename that if necessary.
When this error occurs you will see the following error message on your screen:
Customer Insert/Update Error – [CustomerName] – 3100 – The name “[CustomerName]” of the list element is already in use.
QuickBooks Error 3100 Symptoms
Check out the signs and symptoms of QuickBooks error code 3100 given below:
Check out the systematic troubleshooting steps to resolve the QuickBooks Error 3100:
Step 1: Use Unique Customer, Vendor or Employee Names
Use appropriate credentials and login into your Salesforce account.
Click on the Accounts tab.
Select Merge Accounts at the bottom right side of the window.
Type in the name of duplicate account in the text field and proceed to validating for merging them. Remember to not remove the Customer List ID value.
You should now be able to add a new customer, vendor or employee.
In QuickBooks POS
Just in case you are a QuickBooks POS user, then you simply need to move to the Customer Menu and then, click on the Customer List.
After that, you need to head to the Search field and then insert the name shown in the error and search for any duplicates.
You are then required to go for I want to drop down menu and then click on Merge
Once done with that, a merge window will appear on the screen, where the user needs to select the customer vendor that he/she needs to keep and discard.
The last step in the process is to go for the merge customers/vendors
It should be noted that the transactions made on both names will be named after the name you will keep.
If the issue persists, perform the below-mentions solutions.
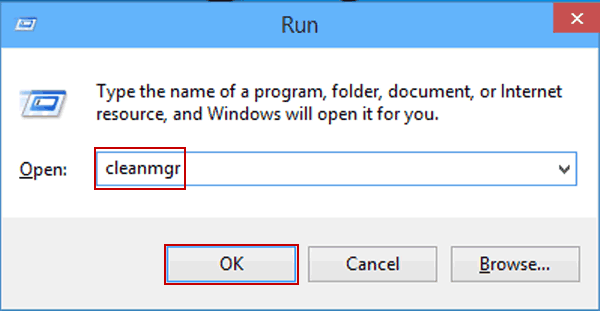
As we use our system daily, the system accumulates dozens of junk files & programs. It may slow down your system or cause the error code 3100..! Hence, use the antivirus software to eliminate the gibberish files, folders, and programs out from the computer. Use the below given steps to remove junk files through Disk Cleanup (cleanmgr).
Hit the “Start” or “Windows” button.
Enter the “command” in the search box… DO NOT hit the Enter yet..!
Press the Ctrl+Shift & hit the Enter tab.
Furthermore, you will be redirected to a permission dialog box.
Moreover, click the “Yes” icon.
The command prompt will appear.
Type the “cleanmgr” & hit the Enter tab.
Disk Cleanup will estimate the occupied disk space.
Check the boxes & hit the OK icon.
Step 5: Update the System Drivers
Go to Programs and Features.
Find NETGEAR Adapter and right click to select Uninstall.
Restart you computer and reinstall the software drivers again using the CD or the website.
When prompted, plug in or insert the adopter in order to keep from countering any conflicts with existing devices.
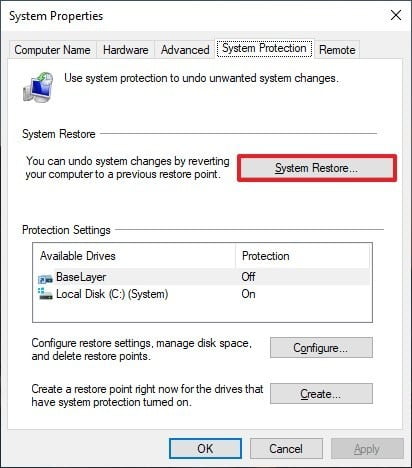
Step 6: “Undo” the Recent System Changes by Using Windows System Restore
Hit the “Start” or “Windows” button.
Type “System Restore” in the search box & hit the “Enter”.
Hit the System Restore.
If prompted, enter the administrator password.
Finally, restore the system.
Step 7: Uninstall & Reinstall the QuickBooks Program (Windows 7, Windows Vista, XP, 8)
First of all you need to Hit the “Start” button to open the Programs and Features.
After that, Click the “Control Panel”.
Click the “Programs”.
Furthermore, click the “Programs and Features”.
Trace the QB programs associated with the “QuickBooks Error Code 3100″.
Moreover, select the QuickBooks associated entry.
Hit the Uninstall button.
Finally, reinstall the QuickBooks software.
Step 8: Fix damaged customer names
Create a new customer
The very first step is to head to the customers menu and select the customer center.
After that, the user needs to pick the new customer and job tab and click on new customer from th drop down list.
The last step is to insert the test customer from the name, ignore the other given fields blank, and click on the ok tab.
Steps to merge names
At first, the user needs to search for customer name and right click on it and click on the edit customer
Also note that if there is a job below the customer and opt for the job and a blank cross will show. You need to drag cross and adjust it below the new customer’s name.
You will further have to displace the customer’s name, type customer, and then hit a click on the ok tab.
You will see the merge window will display on the screen and choose the ok tab.
After that the user needs to edit the customer’s name by setting in back the original name and click on ok tab.
The last step is to quit the QuickBooks desktop and also again open it.
It might be possible that the above manual steps might not help out in order to troubleshoot the QuickBooks error code 3100. Or possibly you couldn’t perform the above steps accurately..! Well, you can contact the Intuit certified professionals immediately for the support.


