QuickBooks Error Code OLSU 1013 is one such banking error that triggers when you are performing any banking activity or when there is an issue while setting up online banking. This OLSU 1013 error does now all you to update your account information and prevents you from doing further activities. This error is a bit crafty to deal with and if it is not resolved its error message will keep popping up on your screen. So, if you are unable to figure out how to proceed ahead and want to get rid of this QuickBooks Error OLSU 1013 error message while working in QuickBooks, considering all these things we have come up with this article that will help you how you can resolve this error bank connection error.
Online Banking is one of the most powerful tools of QuickBooks accounting Software that is very useful for the users by directly linking their bank accounts and credit card accounts and manages their finances much more efficiently and quickly. It also saves your time by downloading all of your latest transactions automatically. QuickBooks Online Banking despite being a powerful tool, has some loop holes also where users have to encounter various errors while performing banking operations on it.
So, you just have to stay tuned with this article till the end to know the basic aspects of this QuickBooks OLSU 1013 error. Before moving ahead let’s find out what kind of error is this OLSU 1013 that hampers bank connectivity in QuickBooks.
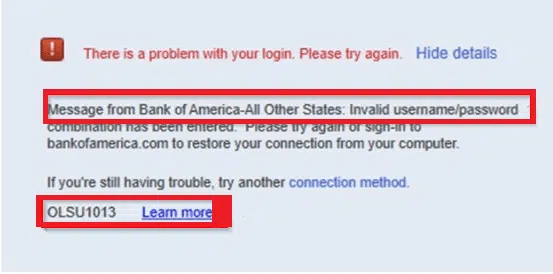
While performing banking operations in QuickBooks Online users usually have to face technical error, it usually happens due to this bank feed error also known as QuickBooks Error Code OLSU 1013. And the error message of OLSU 1013 that appears on your desktop screen is stated as:
“An unexpected error occurred. The branding and profile servers could not be accessed”.There is a problem with your login. Please try again.At this point, you can click Cancel to discontinue setup and then retry setting up the account for online services again.
What are the reasons that Triggers this error?
There are several triggers of this bank feed OLSU Error Code 1013 in QuickBooks but one of the main reasons behind this OLSU error code 1013 is issue with the bank institution of the user also referred to as financial institution or FI. Though we have also listed below some more effective reasons behind the occurrence of these reasons and they are as follows:
Using the outdated version of the QuickBooks Desktop can be one of the major flaws.
Due to interruption in internet connectivity.
By entering wrong login credentials.
No response from the servers of the bank institution due to their undergoing maintenance or the update process.
Probably using other mode instead of using Express mode or Side by Side mode.
Always use QuickBooks in a single user mode not in a multi-user mode.
Lastly it is also important to match any pending download transactions.
Handy Solutions to fix the error
After you are well versed about this QuickBooks OLSU Error 1013 now it’s time to perform fixation process of this error, for this carry out the below stated following solutions in sequence:
SOLUTION I: Generate a new company file
Following these steps to generate a new company file:
Initially, move to the File menu and then select New Company.
Now click on Express start option.
Add the bank account that is having the issues
Once done now set up the account for bank feeds on the new test company.
Lastly you have to download the bank feed transactions to test the account.
SOLUTION II: Update the Financial Institution Directory (FIDIR)
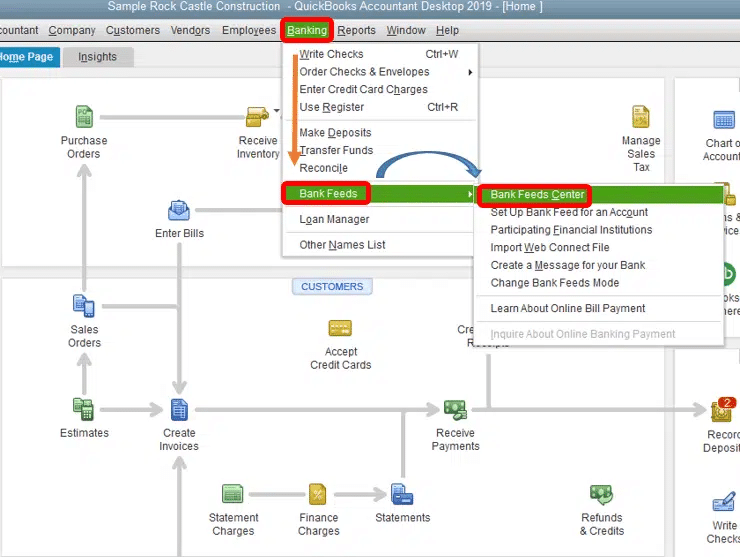
In this method you have to update the Financial Institution Directory which is an online directory by making changes on it using Bank tab in QuickBooks.
And hit a click on Bank Feeds Center in this step.
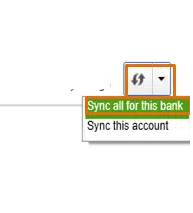
Now from the options available in the drop-down bar, Choose Sync all for this Bank.
This will update your FIDIR which in turn will fix the problem of OLSU 1013 error in QuickBooks software.
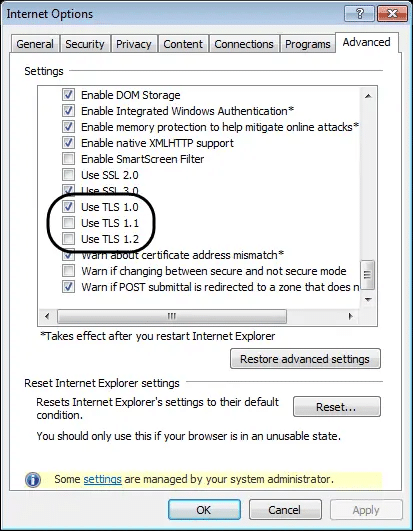
SOLUTION III: Enable TSL1.2 Internet protocol
If somehow the above solutions didn’t work out, we would recommend you to try this solution using TSL1.2 Internet protocol. Following steps of this method are given below:
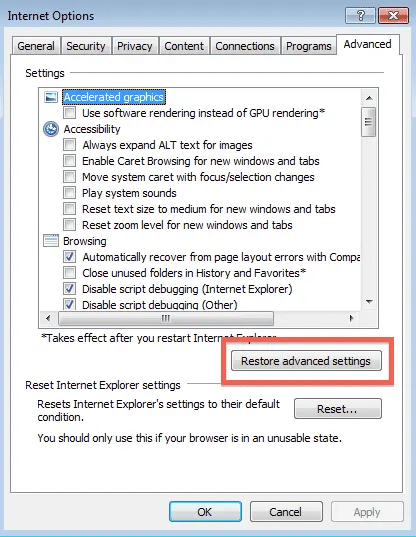
Initially, go to Internet explorer 11 and also verify the current version and if not update to it to the latest one.
Hit a click on the Gear icon located on the upper right section of the browser.
Now you need to Go to the internet option then choose and click on Advanced tab.
After that scroll down to the Security section and un-mark the UseTLS 1.0 and Mark Use TLS 1.2.
Next click on Apply option and OK tab to save the applied actions.
At last close all the running programs and reboot the system.
SOLUTION IV: Create and Merge accounts
Another solution is to create accounts and merge them. Do follow the steps in the same way as mentioned below:
Initially, right click on the Accounts in which you are facing issues and then choose Edit account.
After that highlight the Account name and then click on the Copy button.
Also, you need to add an Asterisk (*) at the end of the account name.
Once done with that hit a click on the Bank feed settings tab and then go to Deactivate the All-online services option.
Moving ahead, click on Save and close option.
Now Click on the Chart of accountants and make a new account.
Thereafter you need to paste the Account name by removing the Asterisk (*) mark.
After that close the File and open it again then hit a click on the Chart of accountants with asterisk.
Now right click on the Account and hit click on Edit option.
Next, eliminate the asterisk (*) and click on Save and Close button.
Then Click on Yes when the merge warning message appears on your screen.
Thereafter Go for Setup an account for bank feeds.
Finally download all the transactions to the newly merged account.
SOLUTION V: Deactivate the Account’s having online services
In order to fix the OLSU error 1013 in QuickBooks, you need to deactivate the account’s having online services. The steps to be followed are:
In this solution, first check the Include inactive option located at the bottom of the Chart of Accountants.
After that, you are required to deactivate bank feeds for the inactive account.
Now you need to close the file and then open it again.
Finally, you can set up every account for Bank Feeds.
SOLUTION VI: Refresh the bank connection with the account
To avoid this OLSU 1013 error it is important to refresh the bank connection with the account facing issues and the steps to be performed to carry out this process are:
First of all, check all Inactive bank accounts and turn off online banking in them.
After that select the include inactive box. Mark the inactive account with the lightning bolt.
An important point to be noted here is that while setting up, hold the Ctrl key each time you have to select a tab. The exception is while entering the information; it will refresh the connection with the bank.
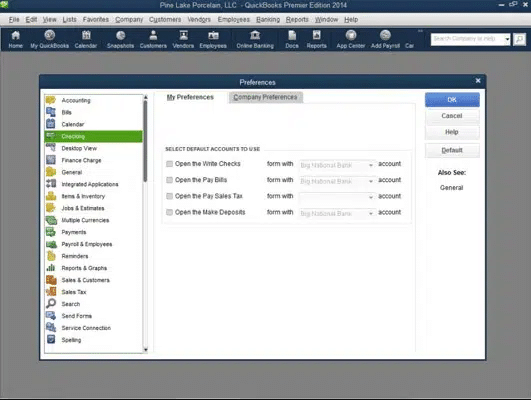
SOLUTION VII: Setting QuickBooks to be Used in Express Mode
At first, open the QuickBooks Desktop in your system.
Now you are required to Sign into the company file as an admin.
Next, Click on the Preferences under the Edit tab in QuickBooks Desktop.
Then from the left side of the dashboard click on Checking tab.
After that click on the Company Preferences tab and choose ExpressMode in the Bank Feed window.
Press the OK tab in order to save the changes.
Summing up
At this point we just hope that this article was beneficial for you and you will be able to resolve this OLSU 1013 error permanently. But, if by chance the error persists to trouble you, or if you have any queries related to it, please don’t hesitate to reach out to QuickBooks customer support team immediately via our helpline i.e. +1-888-510-9198 We have a team of Intuit certified experts, who are available round the clock to assist you with the best possible solutions immediately.
FAQs related to OLSU 1013 Error in QuickBooks
Does QB Premier 2014 support OceanFirst for bank feed?
Well, at this time, any version earlier than 2017 isn’t supported. It is recommended to upgrade to a supported version, to have access to all the functions in QuickBooks including bank feeds.
Unable to connect banks to QB Accountant 2020 version. What should I do?
In order to fix the issue in connecting your banks in QuickBooks desktop, the below steps can help: 1. Open QuickBooks. 2. In the no company open window, choose create a new company. 3. Select either express start or detailed start. 4. Try connecting your bank
Can I use QuickBooks Desktop on Microsoft Edge?
The browser requirements for QuickBooks desktop state that you must have Internet Explorer 11 (32-bit). Hence, Microsoft edge is one of the unsupported browsers. To make the best use of QuickBooks, make sure to check the system requirements first.
What is error code olsu1013 in QuickBooks desktop?
It is an error that can be seen when communication is not able to be established between the bank and the account. This could be due to issues with the server of the bank.
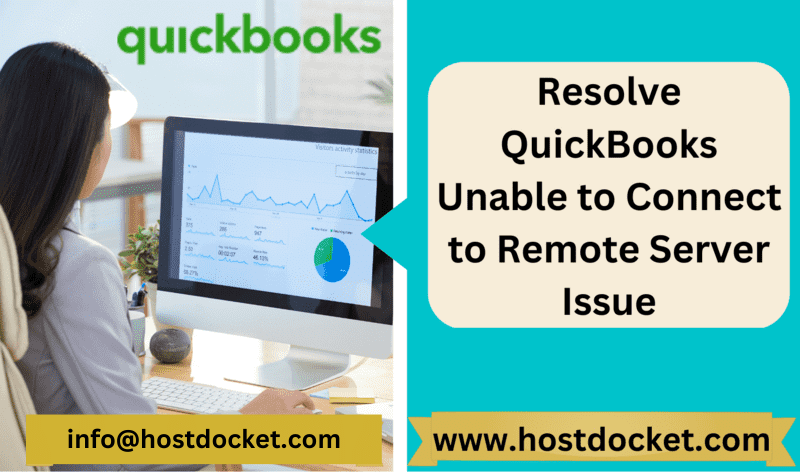
Have you got stuck upon QuickBooks unable to connect to remote server issue and you have no clue what to do next? Well, if this is so then no worries you are in the right place. This article will serve you with everything required to fix this issue. This QuickBooks can also be used in QuickBooks multi user mode allowing this software to work simultaneously with QuickBooks company file where a dedicated server is used to access this file. For this, QuickBooks data server manager works as a host and connects all the workstations of QuickBooks to communicate with company file. But sometimes while communicating with company file due to connectivity issues of QuickBooks users have to face difficulties and are unable to connect to the remote server.
There are many possible causes and verified solutions of this error in order to resolve this issue. So, in this article we will discuss and understand this QuickBooks unable to connect to remote server issue along with its causes and optimum troubleshooting solutions. If in case that the error seems too complicated for you, then contact us immediately using our assistance line i.e., +1-888-510-9198 Our QuickBooks error support experts will assist you solve the issue for you.
Brief into QuickBooks unable to connect to remote server error
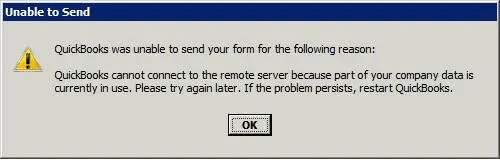
The error messages during QuickBooks unable to connect to remote server error that displays on the screen are stated as:
Can’t communicate with QuickBooks server
QuickBooks desktop unable to connect to the remote server
QuickBooks server and workstation communication problems.
There are various remote screen tools available, including the QuickBooks remote access service from Intuit. The concept remains the same that one can connect remotely to the screen of the system and run QuickBooks. This generally gives control over the whole system, and a remote user has access to the whole system and anyone with access will be permitted to see what the remote system is working on. Let us further understand the QuickBooks unable to connect to remote server error in a little detail.
Signs and Symptoms seen when the QuickBooks is unable to connect to remote server
Below are some common symptoms shown when the system is unable to connect to the remote server.
Above error message pops up on your screen.
Your System is unable to share the files.
Crashing up of the system or hanging of the system again and again.
When the peripherals of your system do not work properly it doesn’t respond to the command given to it.
Another reason could be using the outdated version of QuickBooks.
Using Dynamic IP address can also cause such errors.
Troubleshooting Methods to resolve QuickBooks is unable to connect to remote server issue
In order to get rid of this QuickBooks connectivity issue with remote server, there are several troubleshooting methods that can be implemented. Some of them are mentioned below, which you can check them out are:
STEP 2: Then Click on the Tools option (Alt + T) or the gear icon.
STEP 3: Now Select the Internet option.
STEP 4: From the list of Internet options navigate to the Advance tab and click on it.
STEP 5: Now from the Advance screen menu select the restore advance settings.
STEP 6: Finally, to confirm the settings Click on the OK button and then close he browser.
STEP 7: Now recheck by connecting remote server whether the connectivity issue is resolved or not.
Method 2: Checking the settings of webmail preferences
If somehow the above method is unable to resolve the issue you can now try this method to check the settings of webmail preferences. Steps to be followed in this method are as follows:
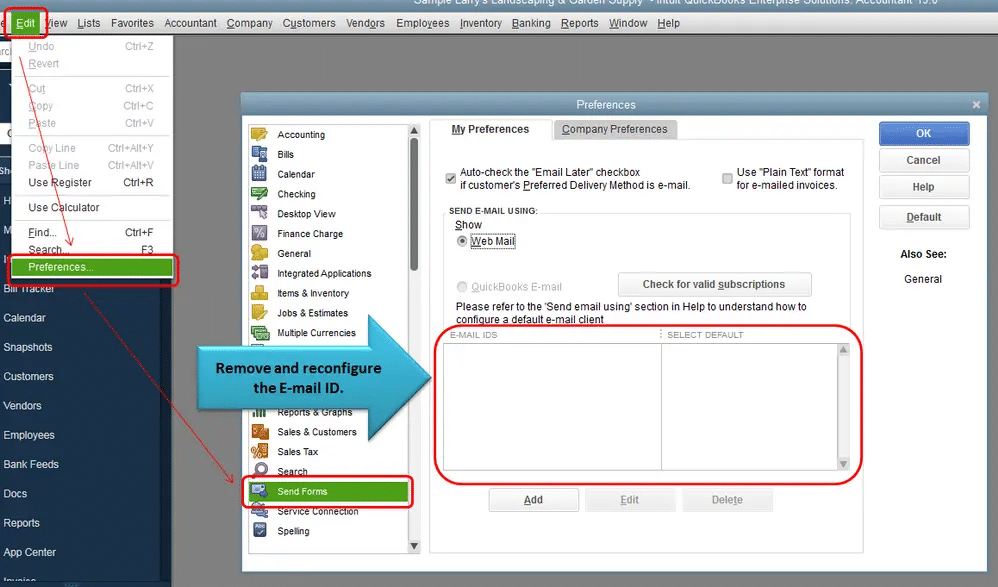
STEP 1: For this, navigate to the QuickBooks Edit menu and opt for the Preferences from this menu.
STEP 2: Now from the left pane of the preferences select Send forms option from it.
STEP3: Next, Using Under my preferences option choose the email accounting being used option and hit on the edit option.
STEP 4: Then Go to the SMTP server details section and set the server’s name and port to the email provider settings in the edit email info screen that will help in searching the connection on the network.
STEP5: Once done with the above steps, finally set the email service in QuickBooks for a list of SMTP server and ports.
If the above method did not work in resolving the error, then you can go for this method. Follow these following steps to create the data file on the network that will troubleshoot the issue.
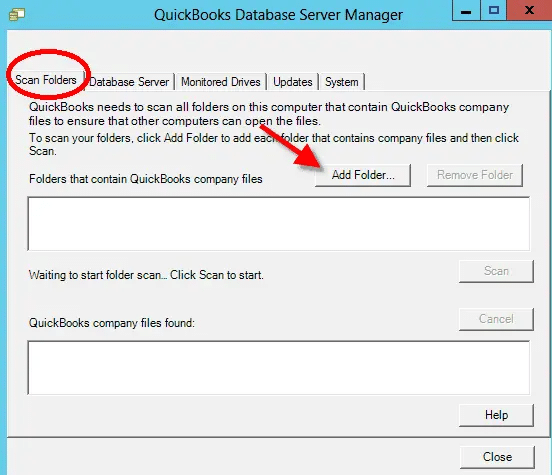
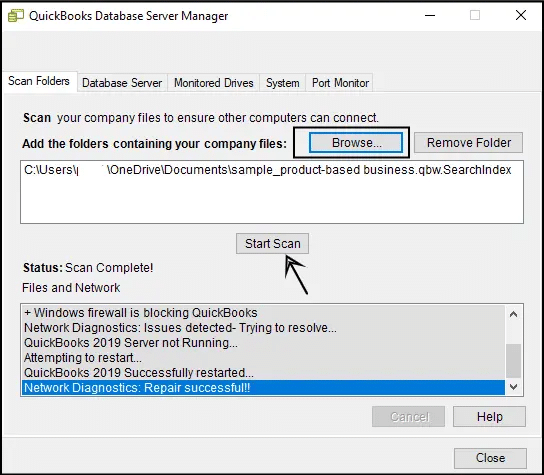
For this, firstly click on the Window tab and type QuickBooks Data server manager and select that.
If somehow QuickBooks data server manager is not available there in the program list, then you need to uninstall and reinstall QuickBooks.
Once you are done with the installation process, then go to the QuickBooks data server manager window and browse the location of the company file folder then open it.
Now click on the Add Folder button in order to add the folder to the list.
After adding all the folders hit the Scan now button.
Also scan the QuickBooks Company files.
‘At the end of the process verify whether that .ND file is present for data each file in QuickBooks.
Method 4: Updating QuickBooks to the latest release.
This method is very helpful in fixing the issue. Follow the steps below:
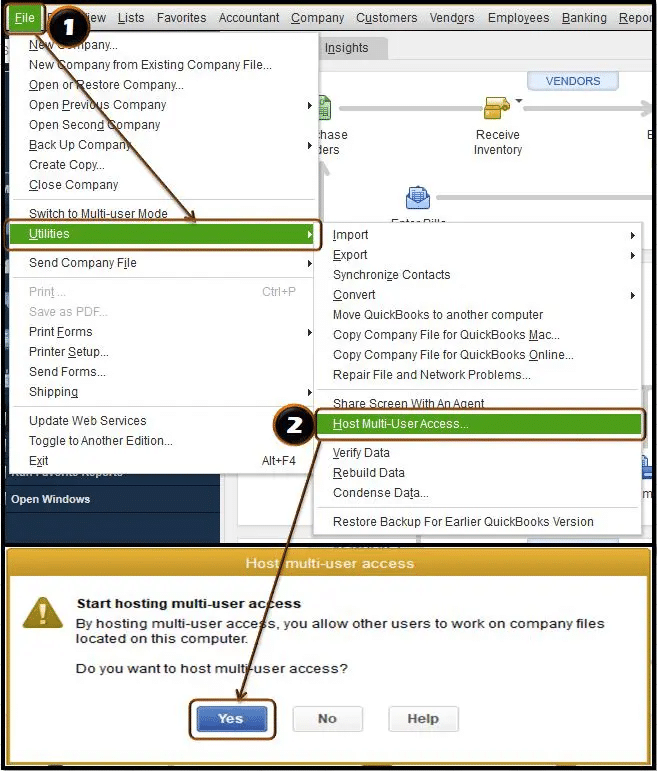
Method 6: Verifying the hosting of QuickBooks Desktop File.
Verify the hosting of QuickBooks Desktop File hosting services as there might be strife between server and the workstations. Make use of the steps below to verify hosting:
Step 1: Turn off the hosting in all the workstations.
For this, firstly go to the QuickBooks file menu and choose utilities from the drop-down menu
Select stop hosting multi-user access option.
Now if you can’t find the above stop hosting multi-user access option then you can go for other option of host multi-user access, click the Yes tab and confirm it.
Step 2: Turn on the hosting on the server computer.
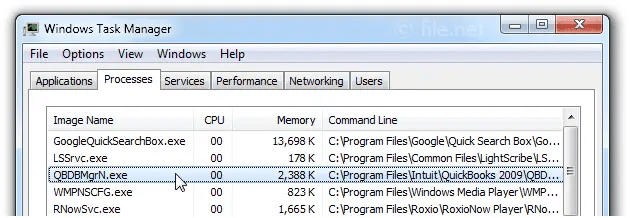
For turning on Press the Window key on the keyboard and open it.
Now type windows task manager in the search bar and press enter in order to open it on your system.
Once the task manager is open now opt for more details tab.
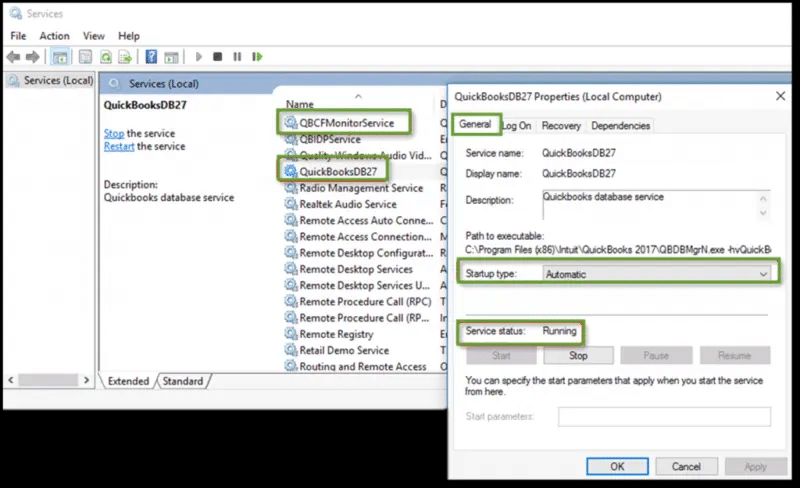
Now Select the Services tab on the top of the task manager and choose QBBDBMgrN.exe from the list of options.
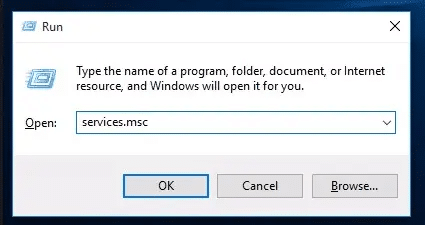
Then verify the file by pressing Window+ R key simultaneously on the keyboard.
Enter services.msc in run window and click on OK button in order to run it.
Now in order to find the QBDBMgrN.exe hit the Q button on the keyboard.
At the end of the process start the service by clicking on the automatic start option.
Hopefully all the methods discussed in this article will be helpful in resolving the QuickBooks unable to connect to the remote server issue. But if in case this error is still creating trouble for you then get some technical assistance immediately by contacting our dedicated QuickBooks support team number at +1-888-510-9198 and where our QuickBooks desktop support team experts will always be there to assist you in a single call. They will help you to get rid of this QuickBooks error from its root cause in a prompt manner.
FAQs related to QuickBooks unable to connect to remote server issue
What is QuickBooks remote access?
Accessing and managing QuickBooks and company files in remote mode is something that remote access means. It allows timely submission of financial documents while eliminating any undue delay.
Why is my QuickBooks not connecting to the server?
QuickBooks unable to connect to server error occurs if QuickBooks server is not set up properly. Also, if the firewall is hindering the connection.
How do I connect QuickBooks remotely?
You can try accessing QuickBooks remotely using the steps below: 1. On your desktop, launch a web browser. 2. Log in to your account on the official website. 3. Go to the box next to the defined computer nickname and select ‘Connect’ in the Action column. 4. Enter the passcode or use phone authentication and authorize your computer.
How do I restore my QuickBooks server?
For this: 1. Move to the file menu and select open or restore company 2. Select restore a backup copy 3. Click on next tab 4. Choose local backup and hit next 5. Browse your computer for your backup company file 6. Select a folder to save the restored company file
Did you notice an error bothering you out of nowhere while you try accessing your QuickBooks software? This kind of bug is known as QuickBooks Error 401. Well, facing QuickBooks unauthorized error code 401 and unable to find any solution to fix it, never mind; we are here to assist you in every way possible. QuickBooks Unauthorized error code 401 is basically an unauthorized request that affects both the versions (online as well as desktop) of QuickBooks varyingly. QuickBooks error code 401 appears on QuickBooks Desktop whereas QuickBooks API HTTP error 401 occurs with QuickBooks online (QBO).
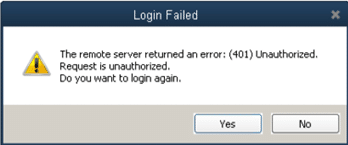
Error message that appears on your screen while facing QuickBooks error code 401:
This error code can be easily tackled by several quick steps which are discussed later in this article. So, we would recommend you to read this article carefully till the end and implement the steps discussed below in order to fix this error with much ease. If in case you can’t get the proper resolution, you can also call the QuickBooks helpline number to troubleshoot it instantly.
It can also occur at the time of sending an invoice with QuickBooks payments.
Other possible causes
Expired access tokens – Note that all the access tokens come with a maximum validity of 180 days. After the validity expires, users are supposed to complete the authorization process again.
Wrong E-mail ID- At times entering an incorrect e-mail id by users other than the master admin, when logging in, can trigger such an error.
Admin changes – In case the master admin serves the link between a realm or company and then some user tries to access an associated file. This might trigger QuickBooks error code 401. Manually disconnections of files might trigger automatic invalidation of access tokens, no matter what the expiration date is.
Master admin privileges disconnected from QBO – Note that the master admin authorizes all connections. In case their access and privileges are deleted from the QBO file, then it can trigger an error.
Troubleshooting Methods to Fix QuickBooks Error Code 401
There are not many methods to fix QuickBooks Error Code 401; you simply have to perform the steps given below whenever the error message appears on the screen.
At first, Press the NO tab and then close down the error message window.
Now, Upgrade the QuickBooks software to the latest version as outdated version of the software could be another major reason for the occurrence of QuickBooks 401 error in the desktop.
Method 1: To upgrade the QuickBooks software to the latest version.
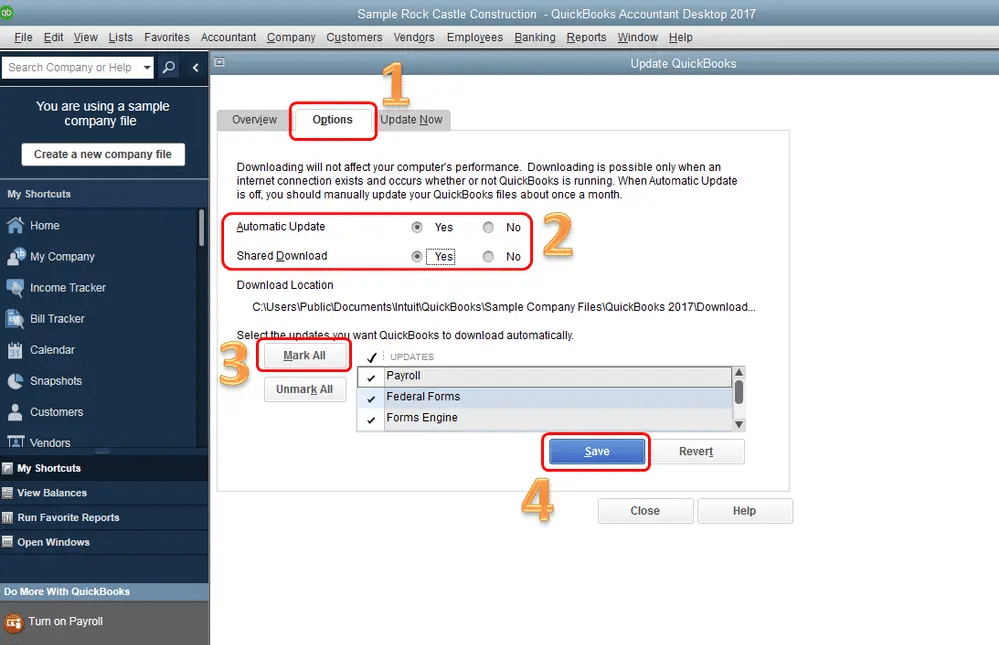
In order to upgrade to QuickBooks latest version, opt for setting up automatic updates which will save your lot of time also ensures timely updates. And the Steps involved are:
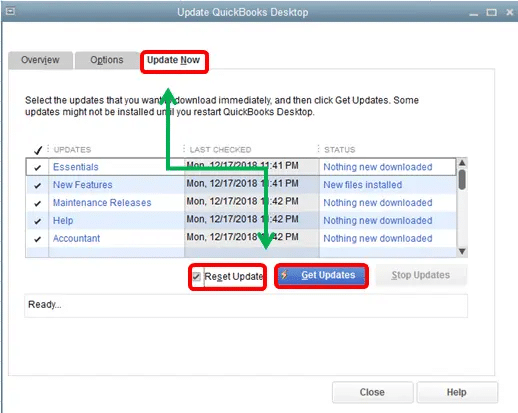
Firstly, Go to the Help menu and choose the Update QuickBooks Desktop option.
Next, go ahead for the Update now tab and then select the reset updates checkbox and also delete all the previous update downloads.
Now to start the download select the Get updates option.
Once done with downloads, make sure to reboot the software.
Finally, Click on the YES option to install the new release.
Facing issues when setting up the automatic updates
If there is any issue with setting automatic updates, then the below pointers can help.
One need to ensure that he/she is using an interrupted internet connection
In case the issues continue, the user is recommended to restart the windows in safe mode with networking option. The same can be assessed either by visiting Msconfig in the run window, and select safe mode or click on F8 repeatedly upon restarting the system.
The user needs to further go for the option that states Safe mode with networking. And further try updating the software
Furthermore, close all the running programs in the background. As this might fix any issues with the QuickBooks update process
You should also consider turning off the antivirus software temporarily when the updates are in process.
In this method you can arrange QuickBooks updates according to their comfort, and software will get update on its own. For this follow the steps in the same way as given below:
Apart from automatic update of software you can also opt for manual update procedure of the software. So, for updating manually, perform the steps given below which would be helpful for you:
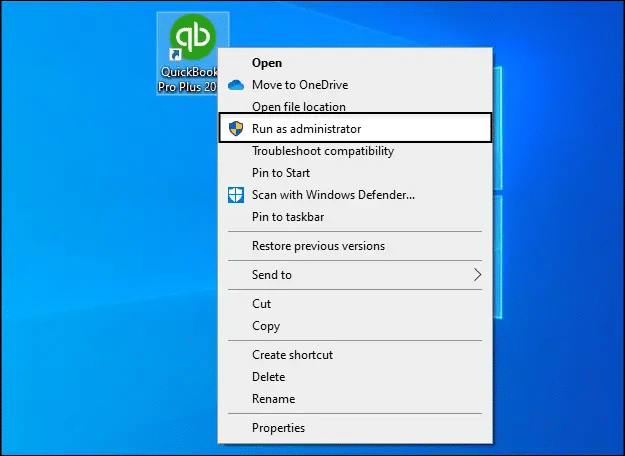
Initially, Close the company file and QuickBooks
Then, Open the Windows start menu
Now you have to look for QuickBooks desktop.
And also do a right-click on the icon and select run as Admin
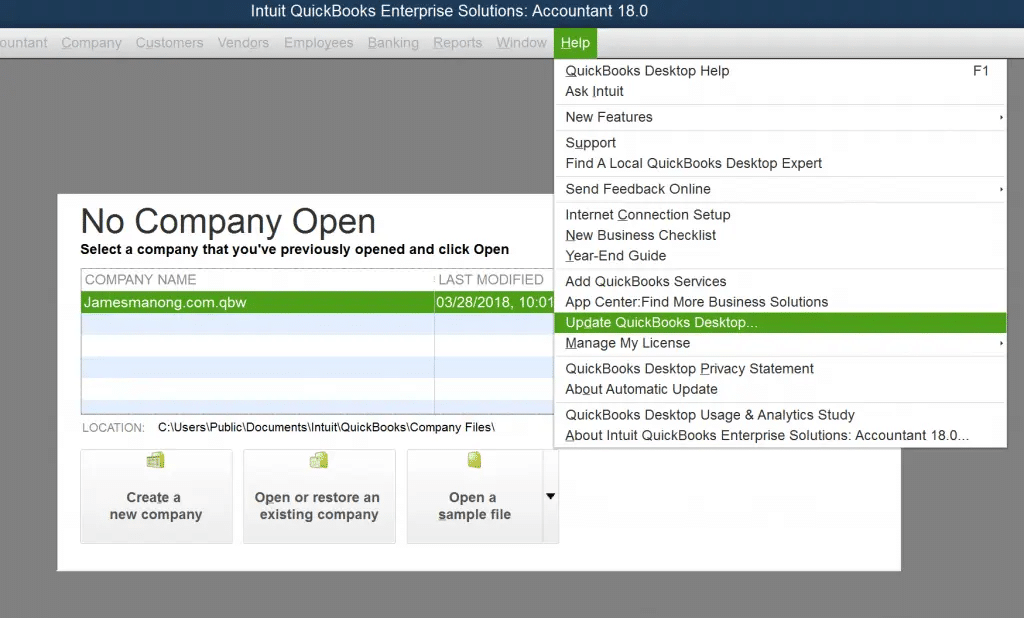
Navigate to the Help menu while on the no company access screen and then press on updates QuickBooks desktop
Once done with that head to the options tab and then choose mark all and select to save also.
Now, move to the Update Now account and also select the Reset Update Checkbox
Finally, select to get updates. This will update the software to the latest updates.
Winding Up!
Well with this we wind up the article over here, hoping that by implementing the above-mentioned method QuickBooks errorcode 401 is fixed and it is no longer creating problem to you. However, for the same reason if this error still troubles you, then you can immediately dial QuickBooks error support team for technical assistance at+1-888-510-9198 Our dedicated technical team will provide the immediate help to you with the error to be tackled easily.
Frequently Asked Questions
How do I fix a 401 unauthorized status code?
One can try fixing the error code 401 using the steps below: 1. The user needs to confirm that the URL is correct 2. Clearing browser cache and cookies 3. Further checking authentication credentials 4. Disabling password protection
What causes QuickBooks error 401?
There can be a bunch of factors that can trigger QuickBooks error 401 which include incorrect login credentials, expired or invalid subscription, issues with the intuit server, firewall or security software blocking the connection, or issues with the company file.
Can restarting computer fix QuickBooks error 401?
Well, yes, at times certain errors get fixed by simply restarting the software and the system. One can try to restart the system to eliminate the error instead of performing fixes further.
Learn the steps to deal with QuickBooks Error TD500 from its root cause.
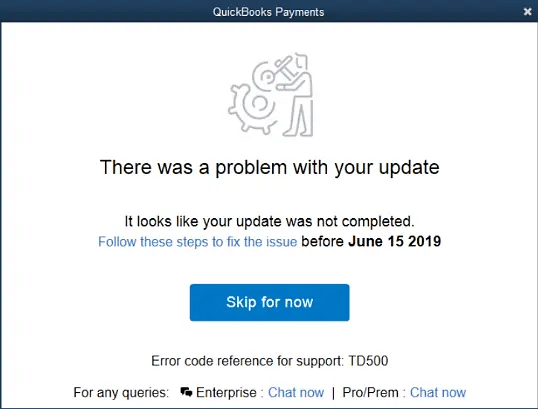
Errors and glitches in QuickBooks are common. When software uses different codes and algorithms to provide a different set of features, it is common to come across various glitches. The best part about QuickBooks is that those glitches can be resolved easily using some set of steps. Today, we are going to discuss a unique and uncommon error that QuickBooks users might come across i.e., QuickBooks error TD500. The user might see a warning message popping up on the screen stating: “There was a problem with the update”. To learn further about this glitch, make sure to scroll through this piece of writing carefully. You can also contact our QuickBooks support professionals at +1-888-510-9198 and ask them to eliminate the issue from its root cause.
Brief into QuickBooks error TD500
As we mentioned earlier this is a unique error that can be seen in rare cases. The causes behind this issue aren’t completely identifiable. The user might experience this issue when trying to process a credit card in QuickBooks. Also, it can be seen when more than one version of QuickBooks is present on the system. The error can be resolved by performing some set of steps, which we have tried to elaborate on later in this segment.
Measures to resolve the error code TD500 ‘There was a problem with your update’
One can try to perform the below set of steps to eliminate QuickBooks error code TD500.
Method 1: Update all the versions of QuickBooks and repair the install file
A mere update and repair can fix the error from its root cause. Thus, the user can try to perform the below set of steps and eliminate the issue permanently. Let us have a look:
The user needs to first note the version of QuickBooks and further press the F2 key
Later on, close QuickBooks and if more than one version of QuickBooks is available, the user can press F2 key
Now, search for the version of QuickBooks being used
Later on, select the windows start icon
Once done with that, go for the windows start icon
Method 2: Uninstall QuickBooks 2016 and install repair file
This method tends to work only in the case of QuickBooks 2017 and later versions. It won’t help QuickBooks 2016 users. Moreover, note that uninstalling QuickBooks doesn’t eliminate the QuickBooks company file. The steps to be performed here are as follows:
The very first step here is to press F2 key in QuickBooks and note the version of QuickBooks being used
Followed by closing the software
If the user is making use of more than one version, then ensuring that all versions are closed is recommended
Followed by selecting the windows start icon
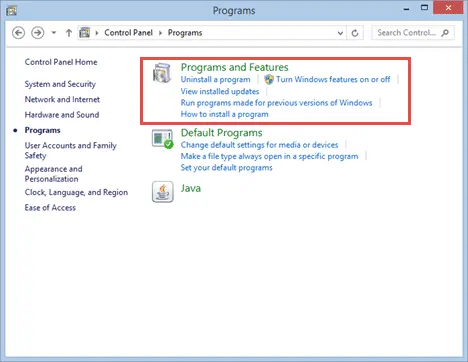
Look for the control panel and also open the same
Choose programs and feature tab
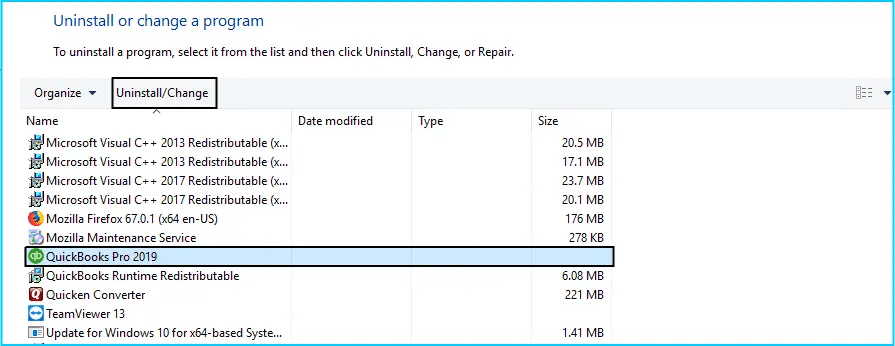
And hit uninstall a program
Now move ahead and choose QuickBooks desktop 2016 or QuickBooks or QuickBooks 16.0
Hit the uninstall/change tab
Perform the onscreen instructions
And save it
Double-click on the file to unzip it
And right click on the quickbooks_fix_tdtool.bat and then select run as admin.
You might find this error a bit difficult to rectify the QuickBooks error code TD500. However, once the above steps are implemented, it is believed that the reader might be able to rectify the issue up to a certain extent. On the contrary, if you are unable to eliminate the issue even after using the above set of steps, or if you require any sort of technical assistance in eliminating the error code TD500, then contact our tech support professionals is recommended.
You can contact our team at +1-888-510-9198 and ask them to perform the necessary steps on your behalf to get rid of the issue. We are a team of certified QuickBooks professionals who work round the clock in providing immediate QuickBooks support services for all sorts of associated issues.
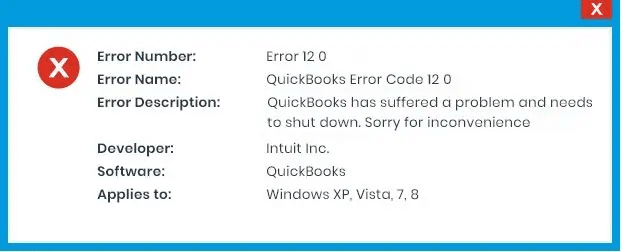
Suddenly interrupted by QuickBooks error code 12,0? Well, this is a unique error that users might not come across quite often. You can experience this issue when you do not have admin rights. Moreover, if there is any issue in the Windows registry, then experiencing this error is common. As this error can be unique, you might find it difficult to fix it. To know more about this error. All you need is to read this segment carefully.
This article will help you to find out the causes and fixes of this error. You might land into this issue, if you are not having enough admin rights. Just in case, you came across QuickBooks error code 12,0, then stick around and let us find out the right fix for it together. You can also connect with our experts right away using our dedicated support number i.e., +1-888-510-9198, and let the professionals handle the issue for you.
Brief into QuickBooks error code 12, 0
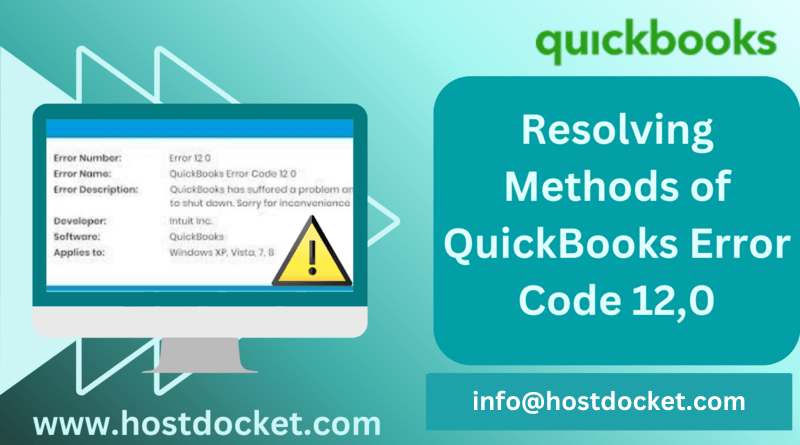
As we discussed previously, this issue isn’t very common and can be experienced due to insufficient admin rights. This particular error can also appear if the system settings aren’t configured properly. It appears on the screen stating: QuickBooks has encountered a problem and needs to close. We are sorry for the inconvenience.
Error Number:
Error (-12 0)
Error name:
QuickBooks error code 12-0
Developer:
Intuit Inc
Software:
QuickBooks
Applies to:
Windows XP, Vista, 7, 8, 10, and 11
Error Description:
QuickBooks has encountered a problem and needs to close. We are sorry for the inconvenience.
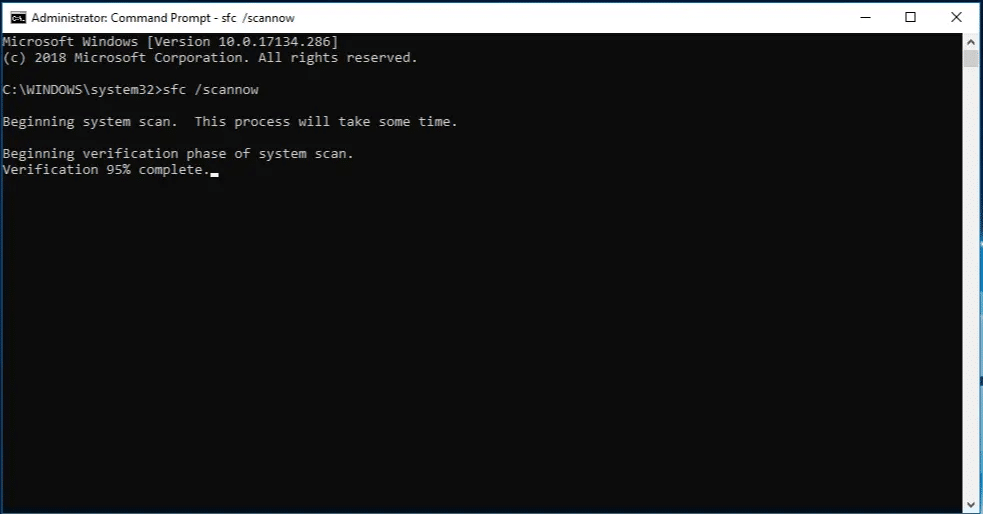
Simply using the scan now command can scan the system for junk files and fix the issue up to a certain extent. The steps to be performed here are as follows:
At first, click on the Start tab.
Now, move to Search box, and then enter ‘Command‘
Click on the Enter key.
Press and hold the Ctrl + Shift keys
Hit the Enter tab
This will open a permission dialog box
Click on the Yes tab.
Now, a black box with a blinking cursor will appear on the screen.
Type in ‘SFC/scannow’ and then click on the Enter tab.
This will scan for errors and other system file issues.
Perform the onscreen steps and end the process
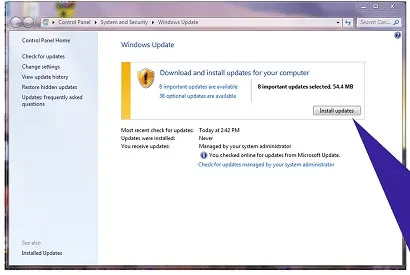
Procedure 2: Update Windows
Here, you need to click on the Start tab.
After that enter the Update in the Search box and hit on the Enter tab.
This will open the Windows update dialog box on the screen.
Click on the Install updates tab and end the process
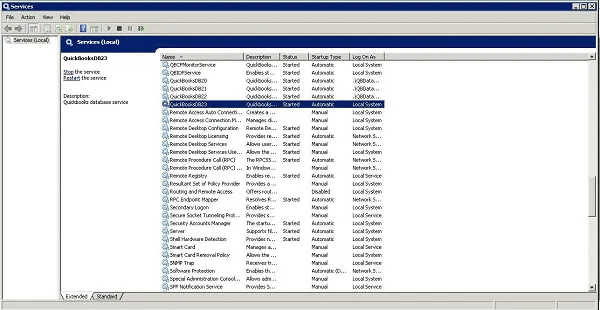
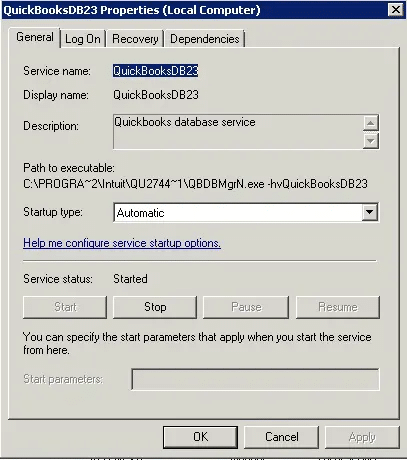
Procedure 3: Enable the QBdatabaseserviceuser23 service
Under this process, you need to first Verify the QuickBooks version.
The service will be QBDatabaseserviceuser23.0, if you are accessing QuickBooks
Head to Services.MSC
Check if the service mentioned has stopped or is still working.
Now, press on QBdatabaseserviceuser23.
Also, right-click QBdatabaseserviceuser23
After that head to the Properties tab
Just in case the service has stopped working, make sure to click on the Start service option.
End the process by reopening the company file and checking if the error got resolved or not.
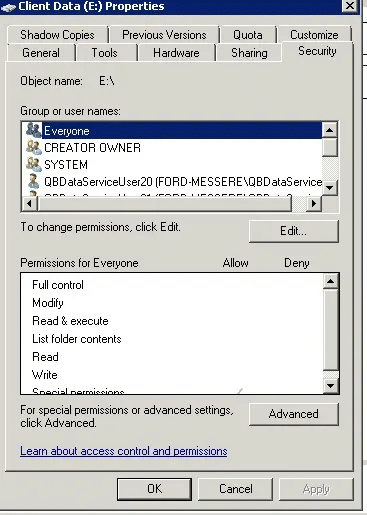
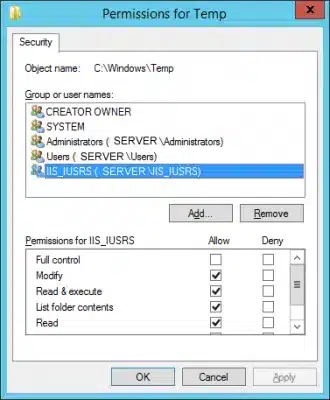
Also check permissions on the folder having the company fileusing the steps below:
You need to right-click on the Client data then select Properties
Now choose Security tab.
And check if you have Permission to access the file or not.
If you don’t have permission to access the folder, get access to the permission and try opening the company file again
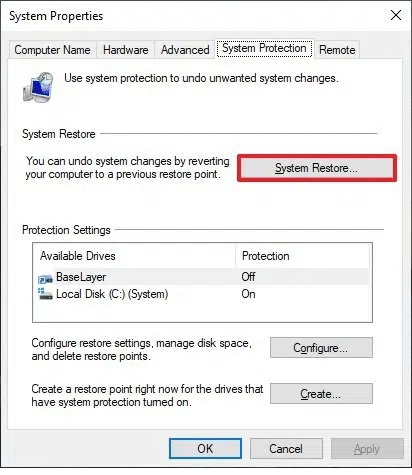
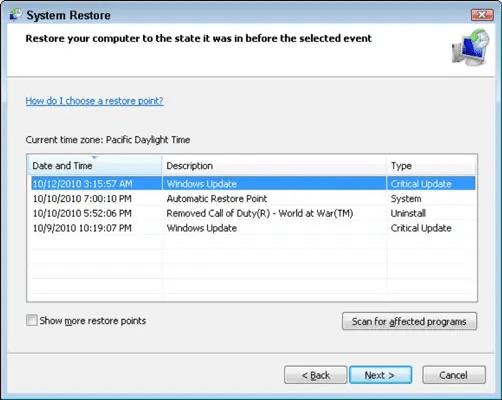
Procedure 4: Select the System Restore
At first, click on Start tab.
Also enter System Restore in the search box
Hit the Enter tab.
Select System Restore tab in the results section
Enter Admin passwords.
Perform all the necessary steps in the wizard to pick a Restore point.
Lastly, restore the system and start working on QuickBooks.
Here you need to right-click the Client data option.
Opt for the Properties tab.
Also, click on the Security tab.
Furthermore, check if you have permission to access the file or not.
If not, then provide the necessary permission.
Now, open the company file and check if the error is fixed or not
Procedure 6:Update QuickBooks version
The user can try to update QuickBooks desktop using the steps below:
The very first step is to open the QuickBooks desktop and head to the help menu
Furthermore, click on Update QuickBooks desktop
And then, click on the option to update now
Followed by, check marking reset updates box and clicking on get updates tab to start downloading the updates
Conclusion!
We end this segment right here with the hope that the steps listed above might be of some assistance in fixing the QuickBooks error code 12,0. if you continue to come across similar issues again and again, then in that case contacting our tech team at +1-888-510-9198 is suggested. We are a team of certified QuickBooks professionals who work round the clock to provide instant QuickBooks Error support services. Our experts know what it takes to fix issues from their root cause.
Frequently Asked Questions
How do I fix error code 12 0 in QuickBooks?
To fix the QuickBooks error code 12, 0 when opening a company file, one can try to perform the below steps: 1. The user needs to first click on the start tab 2. And then, in the search box type the command and click on the enter tab 3. Hold the Ctrl + shift keys and then click on the enter tab 4. You will see a permission dialog box and click on yes tab 5. Once done with that, a black box with a blinking cursor will appear on the screen 6. Furthermore, type SFC/Scannow and click on the enter tab 7. The system file checker will scan the error and other system file issues 8. You will then have to carry out the on-screen prompts and end the process
How do I fix QuickBooks payroll update error?
The user can try to fix the payroll update error by running Verify and rebuilding Data in your QuickBooks Desktop. Get your QB updated to the most recent version. Now, restart your system in Safe mode and update the QuickBooks payroll tax table.
What is QuickBooks update error 12002?
Some of the reasons behind the QuickBooks Error Code 12002 are: The QuickBooks is not able to access the server due to network timeout. The incorrect SSL Settings. The error also arises due to the internet or firewall settings.