Looking for the process to recover the lost data using the auto data recovery tool? If yes, then your hunt ends right here. Auto data recovery is basically a feature of QuickBooks that can be used in case of data loss or corruption. This also helps to recover all or nearly all of the data. Intuit Data Services can help with data recovery most of the time. However, the process can take some time and restrict the user from using QuickBooks for some time. However, using the QuickBooks Auto Data Recovery tool can be a faster way of recovering lost or corrupted data. We suggest to use this method only when other methods don’t work.
If you wish to know the answers of questions such as “How do I recover ADR files?” or “How do I recover a deleted file in QuickBooks?”, then your quest ends here. Read on to understand the working and various features of the QuickBooks Auto Data Recovery tool in order to help yourself recover your precious lost data. You can also get in touch with our QuickBooks support team at +1-888-510-9198, in case you need any sort of technical assistance in recovering your company file data. Having said that, let us understand the process further!
What is Auto Data Recovery Tool in QuickBooks?
Intuit, the developer of QuickBooks provides a bunch of tools to the its users to get rid of the issues that one might face when working on QuickBooks. And the auto data recovery tool is one such tool that can be a savior for QuickBooks users, in case they lose their crucial data when working on QuickBooks company file. The QuickBooks Auto data recovery tool can help the user to recover the lost file in QuickBooks by:
It helps in restoring the lost transactions with the help of the current transaction log file and a copy of the company file.
Also, it can help in restoring all but the last few hours of transactions with a copy of both your Company file and your Transaction Log file.
Steps to make the most of QuickBooks Auto data recovery tool
The user can recover recent transactions using the original .TLG file with .QBW.adr file. And can also make use of the original Transaction Log file and ADR version of the company file to recover all recent transactions.
The user should to create a new folder on the desktop named as QBTest
And then open the folder where the company file is saved.
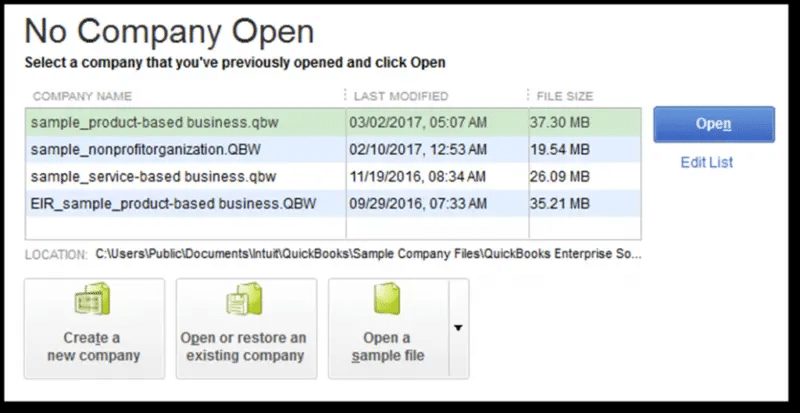
After that, check the location of the company file on the Product Information screen (press F2 or Ctrl+1 on your keyboard) and No Company Open Window.
The next step is to look for the .tlg file in your company file’s folder. It has the same name as your company file.
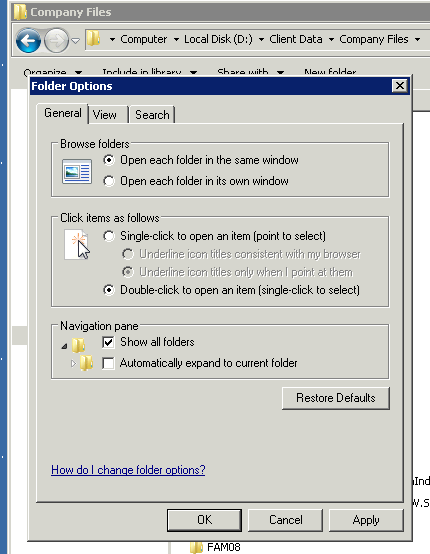
The user should then show file extensions
In case the user is unable to spot the tlg file, then performing the below steps to show the file extensions would help:
At first, one has to open the file explorer by pressing Windows + E
And then choose organize and select folder and search options
For Windows 10, 8.1 & 8: Choose View, then select File name extension.
And then choose Hide extensions for known file types.
Now, go for Apply, then OK.
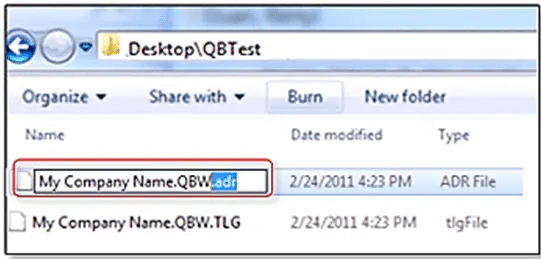
The user should copy the corresponding .tlg file of your company file, and paste it to the QBTest folder on your Desktop.
Now, the user should open the QuickBooksAutoDataRecovery folder. It is in the same location as the company file.
After that copy the .QBW.adr file and paste it to the QBTest folder.
Now you will have the.QBW.adr and .tlg file on your QBTest folder.
In your QBTest folder, the user is required to right-click the .QBW.adr file and select Rename.
And then, delete .adr at the end of the file name.
After that open QuickBooks.
The next step is to open the company file that is saved on your QBTest folder.
We suggest that you use your account register to verify if all transactions are there.
Now, choose File then Utilities and then Verify Data to check the data integrity of the recovered file.
In case this copy of the company file is good, then you can move the damaged company file to a different location and transfer the copy from QBTest to the original location.
Recover recent transactions using .QBW.adr and .TLG.adr files
In this solution, we will be using the ADR version of both the qbw and .tlg files. This will recover all but past 12 hours of transactions.
The user is should create a new folder on your Desktop named QBTest.
And then open the folder where the company file is saved look for the QuickBooksAutoDataRecovery folder.
Now, it is suggested to check the location of the company file on the Product Information screen (press F2 or Ctrl+1 on your keyboard) and No Company Open Window.
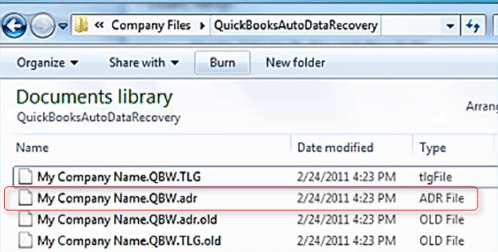
After that check for the .TLG.adr and .QBW.adr files. These files have the same name as your company file.
Perform the steps to show file extensions
In case the user is unable to spot the the .TLG.adr and .QBW.adr files, steps below will help:
In order to open the file explorer, the user needs to open file explorer and press windows + E
After that choose to organize and select folder and search options
For Windows 10, 8.1 & 8: Choose View, then select File name extension.
After that go for Hide extensions for known file types.
And choose Apply, then OK.
The next step is to copy the .TLG.adr and .QBW.adr files and paste them to the QBTest folder.
On your QBTest folder, remove the .adr from the end of the file name. That should give you a .qbw and .tlg files on your QBTest folder.
The user should then open QuickBooks.
And also, open the company file that is saved on your QBTest folder. Use your account register to verify all transactions are there.
The next step is to check the data integrity of the recovered file: in the top left, select File then Utilities and then Verify Data.
If this copy of the company file is good, you can move the damaged company file to a different location and transfer the copy from QBTest to the original location.
Conclusion
With this, we come to the end of the article, where we hope that the information shared in above might help in successfully retrieving the lost data using the QuickBooks auto data recovery tool. However, in case the user isn’t able to retrieve the data even after performing the steps above, then contact our QuickBooks tech support team. Feel free to reach out to us at +1-888-510-9198 and our tech personnel will help you in getting back your data successfully.
Which versions of QuickBooks have Auto Data Recovery Feature?
The Auto Data Recovery feature is available in every version of QuickBooks including Pro, premier, and Enterprise. However, the accountants edition can’t access this tool.
What is QuickBooks auto data recovery?
QuickBooks Auto Data Recovery tool lets the user to retrieve the lost or corrupted data, which might otherwise can be a impossible task. This tool helps in recovering the lost data majority of the times, when either user mistakenly deleted the data or the file gets corrupted.
Does QuickBooks do automatic backups?
When there are any changes made to the company file, the data is saved to two hard drives. Automatic backups if activated are performed every night.
How do I retrieve data from QuickBooks?
For this, you can: 1. Move to the file menu. 2. Select open or restore company 3. Choose the backup copy and hit next. 4. Select local backup and hit next. 5. Browse the system for backup company file
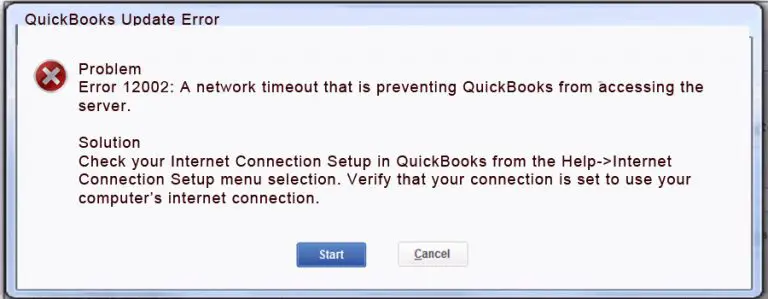
Experiencing QuickBooks error code 12002 and can’t find the right way to rectify it? Well, to help you out in tackling such an error in QuickBooks, here we are with a comprehensive guide sharing the complete details. Talking about QuickBooks error code 12002, it is an error that usually occurs due to network timeout, slow internet connection, or any other internet connectivity issue preventing QuickBooks from connecting to the internet. To learn what fixes this error in QuickBooks, make sure to stick around this piece of writing till the end. Or you can further dial our technical support number i.e., +1-888-510-9198, and our certified QuickBooks ProAdvisors will answer your queries immediately.
QuickBooks error code 12002 occurs when the QuickBooks software is unable to access the internet connection. At times due to some basic reasons, QuickBooks is unable to connect to the internet, which can further cause issues while updating the software. This can be due to incorrect browser and security settings, or an application like an antivirus or firewall program interfering with the update. There are a few other reasons behind the occurrence of such errors, we have tried to elaborate on them later. Here is what error message you see when error 12002 in QuickBooks occurs.
“A network timeout that is preventing QuickBooks from accessing the server”
What triggers the QuickBooks error code 12002?
Certain factors might trigger such an error, of which the common ones are stated below:
In case the QuickBooks software is unable to access the server as there is a network timeout
Moreover, if the internet connection is poor
The user can also experience a similar issue if the SSL setting is incorrect
Or if the internet security or firewall is leading to some or the other issue
Moreover, if the internet explorer isn’t set as default, then experiencing such an error is probable
Important steps before troubleshooting 12002
Before you proceed with the steps to eliminate the QuickBooks error code 12002, it is essential to perform the steps listed below:
Step 1: Create a Company File Backup
It is important to back up the company file before performing any necessary set of steps to get rid of the issue.
The very first step is to open QuickBooks on the system.
After that, head to the file menu and select the backup company file option.
The user will then have to make a local backup of the data.
Here are a few quick methods that can be performed to eliminate QuickBooks error code 12002 successfully.
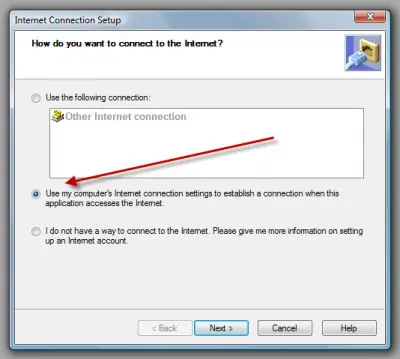
Method 1: Verify the Internet Explorer Settings
The user needs to first close QuickBooks and open Internet Explorer.
And then choose the Tools and then select the Internet Option.
After that, select the Security Setting and ensure that the security setting is set to Medium High.
The next step is to click on the Globe icon and then choose the Content tab.
After that ensure that the content advisor tab is enabled
Moreover, click on the connection tab and perform the steps ahead:
The user needs to choose Never a Dial connection.
Also, ascertain that you choose the right ISP and hit ok tab
Select the LAN setting tab
Also, verify if the automatically detected settings checkbox is enabled
Now, check if the use of a proxy server is disabled
In case, you come across port 80 uncheck the box.
Now, hit ok tab
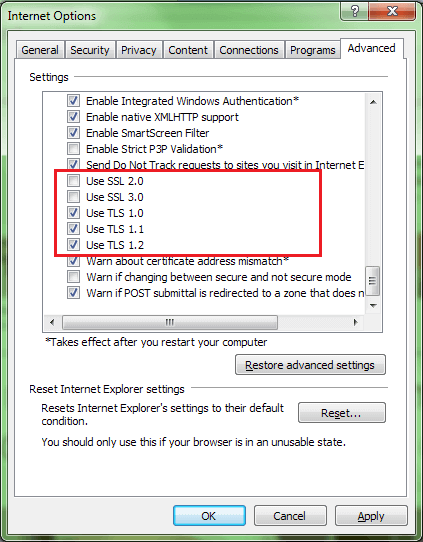
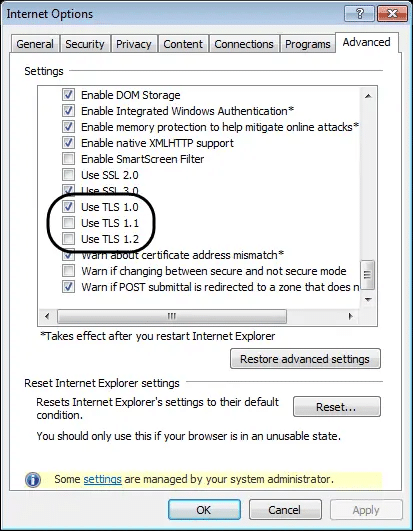
Go for the Advanced Tab:
Click on the Restore Advanced Setting option.
Look for Use TLS 1.0, Use TLS 1.1, and Use TLS 1.2 options.
Ensure that the Use TLS 1.0 is checked and the other two are unchecked.
Close the Internet Option and then click on OK button.
Shut down the Internet Explorer and restart the system.
The next step is to open QuickBooks and update it again.
Method 2: Install/Uninstall QuickBooks in Selective Startup Mode
Hopefully have already created a backup of the data. Keep your QuickBooks desktop license and product details before you continue with the steps below:
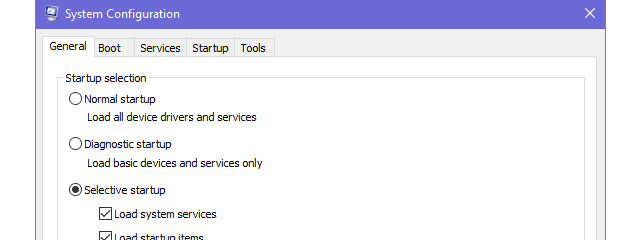
Step 1: Start the System in Selective startup mode
You can stop all the applications from restricting your repair process. It is suggested to switch to selective startup mode.
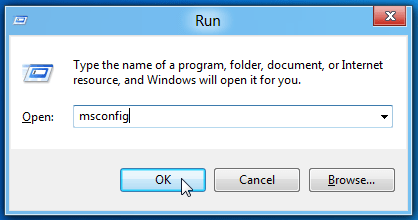
The user needs to first press the Windows and R tab to open the run command box on the bottom left of the system screen
Then type msconfig and choose the ok tab
Once done with that hit Windows + R and open the run command
Enter in msconfig and hit the ok tab
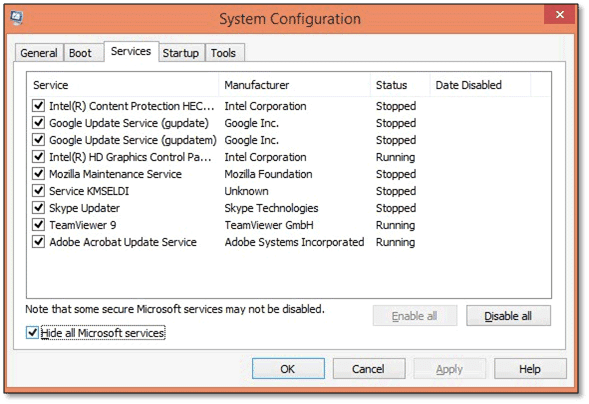
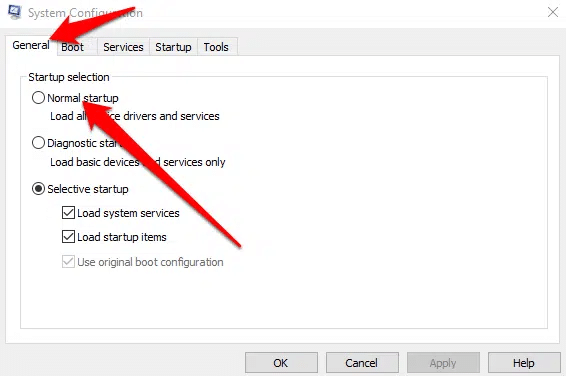
Also, head to the general tab and choose selective startup and load system services
Click on the services tab and choose Hide all Microsoft services
Choose disable all option
Uncheck the checkbox for Hide all Microsoft services.
The user should check and ensure that the Windows Installer checkbox is selected from the list of services
Hit ok tab
And then choose the reboot option on the system configuration window
Method 6: Reset Update settings in Internet options
The user should first click on the Update Now tab.
The next step is to select the Reset Update Checkbox.
Now, hit the get updates tab and if the updates fail, then the user can continue with the steps below:
At first, one has to click on the advanced settings tab.
After that look for the Use TLS 1.0, USE TLS 1.1, and Use TLS 1.2 options.
Also, ascertain that the Use TLS 1.0 is checked and the other two are unchecked.
This would reset the update settings in the internet options fixing the issue up to a certain extent
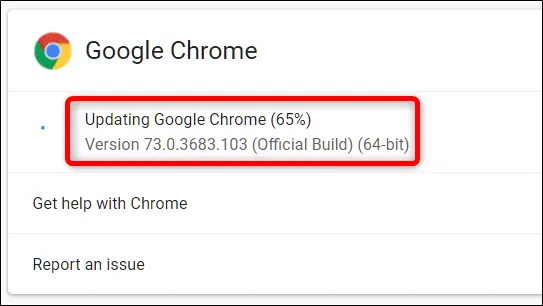
Method 7: Update your Chrome browser
Installing the latest version of Chrome can help in fixing the issue up to a certain extent, as often an outdated Chrome browser can trigger issues in QuickBooks. The steps involved in fixing such errors are as follows:
The very first step is to open the Chrome browser on the system.
After that, click on the More tab.
The user is required to select the updated Google Chrome.
Once done with that wait for a while to update the browser.
After the process is over, click on relaunch. If the user is unable to find the update option, then it indicates that he/she is using the latest version of Chrome.
Now that you know what it takes to get rid of the QuickBooks error code 12002, it is time to implement these steps carefully and check if the error gets resolved or not. However, if for some reason the user continues to end up in a similar issue again and again, then in that scenario, talking to our QuickBooks Support professional at +1-888-510-9198 is suggested. We are a team of technically sound experts who work round the clock to provide you with immediate tech assistance.
FAQs
How many 12000 Series Error Codes are There?
Here is the list of 12000 series error codes that users experience: · QuickBooks Error 12007 · QuickBooks Error 12031 · QuickBooks Error 12152 · Error 12002 · Error Code 12009 · Error 12029 · Error Code 12057 · Error 12157
How to repair the corrupted company file in QuickBooks?
To repair the company file using the rebuild data tool, the below set of steps will help: 1. The first step is to open the file menu. 2. Click on the utilities and choose the rebuilt data. 3. Go for the OK tab on the QuickBooks information window. 4. Search for the tool to repair your file. 5. Choose the OK tab. 6. Head to the file menu from the top of the screen. 7. Go for the tool in order to check your file for data issues.
How to Reset the QuickBooks?
Carry out the below steps to reset QuickBooks. · The very first step is to head to the help menu in QuickBooks. · After that, select the search tab and click on contact us option. · Sign in to your QuickBooks online account with your admin log in ID and Password. · Now, confirm the action by clicking on the yes button. · Choose the wipe data option from the next page.
It is a common question amongst people whether they can install QuickBooks on multiple computers or not, and the answer to this is yes. It is possible to synchronize QuickBooks on two or more computers with the help of multi-user mode features. Using this feature more than one person can work on a single company file at the same time. This saves a lot of time and makes a business highly productive. One can install QuickBooks on multiple computers by performing a certain set of steps. This particular feature of QuickBooks is helpful when the company has a large number of employees and every employee requires access to QuickBooks.
It should be noted that there are three versions of QuickBooks desktop which allow the different number of users to work on the same file at the same time. These versions include QuickBooks desktop, QuickBooks desktop pro, QuickBooks desktop enterprise. Each of them offers 3, 5, and 30 respectively. Before performing the steps to set up multiple QuickBooks, it is essential to ensure to have l a separate licensed copy of QuickBooks installed in all the systems in which you want to run QuickBooks simultaneously on multiple computers. To know more make sure to read the article carefully till the end. Or in case you aren’t well-versed in the technical aspects of QuickBooks, feel free to reach out to our technical professionals at +1-888-510-9198, and they will provide you with the right guidance possible. Now that you know how you can reach out to our technical professionals, let us explore further the installation process of QuickBooks on multiple computers.
Steps to setup and install multi user network or QuickBooks desktop on multiple computers.
The below steps can be performed to successfully set up and install multiple user network in QuickBooks.
Step 1: Install QuickBooks on multiple computers
On a multi-user network, one system hosts your company files. This is your server system. All other systems connected to your network that don’t host your company files are known as workstations.
The very first step is to download QuickBooks on your server system.
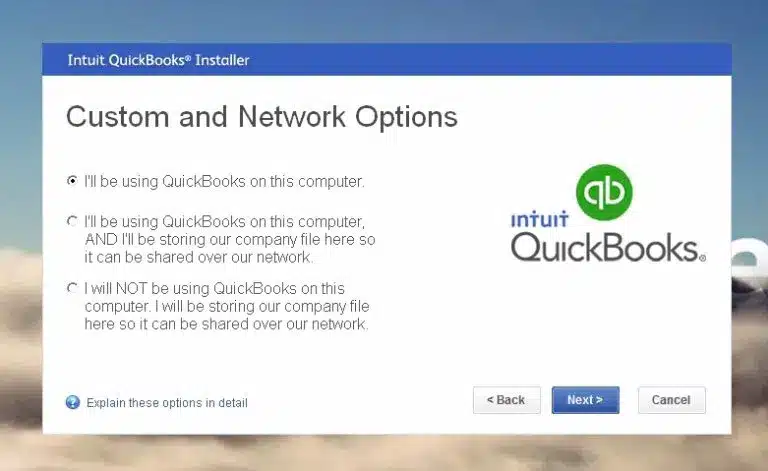
After that click on custom and network install for the install time type
And then click on I’II be using QuickBooks Desktop on this computer option, And I’ll be storing…if you have the required full version of QuickBooks Desktop on your server system. Either you just want your server system to host your files, then click on I Will Not Be Using QuickBooks Desktop on This Computer.
Perform on screen steps to install
Map network Drive-in window
Steps to follow to put your files on a mapped network drive:
For Windows 8/10:
The very first step is to search for this pc in the windows search bar and choose the same
The user needs to perform the steps to set up folder permissions on the server system. And also ensure that the folder having the company file is on the network
Important points to remember
Be particular while performing the steps
Ensure that the installation directory have the right permission
In case you are running Microsoft Windows Home Edition, then the security tab will not be available in normal mode in it. Thus, you need to restart your system in Safe Mode to complete the process.
This can be done by performing the following steps:
The very first step is to restart the system, and then press F8 to open Advanced Boot Window.
Now choose Safe Mode on the Advanced Boot window, and press Enter.
Set up folder and Windows access permission to share company file:
Ensure that the permissions are given correctly
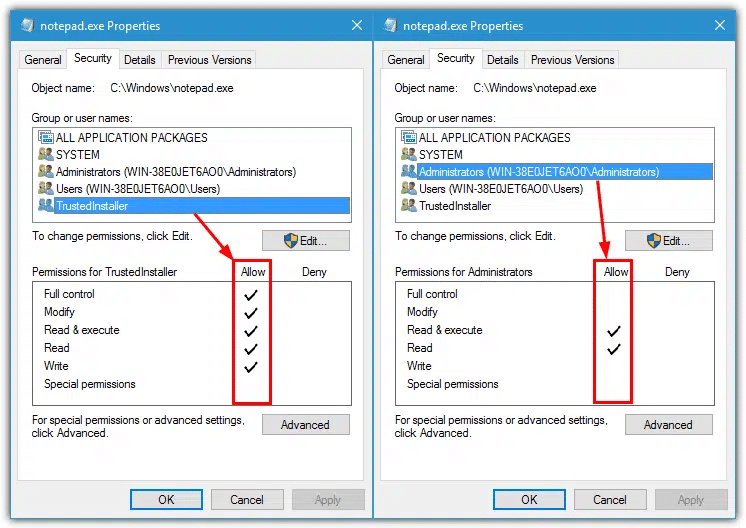
And then right click the company folder to choose properties
After that click on Advance, on Security tab
Now, choose QBDataServiceUserXX and click on the Edit option
The user needs to ensure that the settings are set to Allowed
Traverse Folder/ Execute File
List Folder/Read Data
Read Attributes
Read Extended Attributes
Create files/Write Data
Create Folders/Append Data
Write Attributes
Write extended Attributes
Read Permissions
In case the permissions are not set properly then follow these steps:
The user needs to first right-click the company file folder and hit on Properties tab
Now, click on Security and choose Edit
Go for QBDataServiceUserXX and click on Full Control, then Allow.
Hit Apply option, then OK.
Change Folder Permission
The very first step is to open File Explorer (Window + E)
After that head to the parent folder, and choose the Properties option.
It should be noted that these steps are to be performed for every folder on the list but all folders may not apply to each installation as they apply to a particular version of QuickBooks Desktop
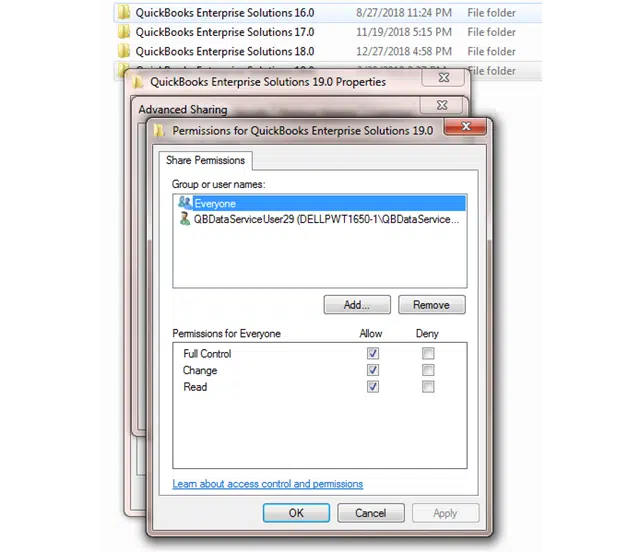
It should be noted that in case Everyone option is not listed in Group or User Name box, choose Add and type in Everyone, then go for OK.
The user needs to choose Full Control, then pick Apply and OK
After that choose Everyone on the Security tab
Note: If for any reason Everyone is not listed in Group and Username box, then need to select Add and type in Everyone, then choose Ok.
And tap on Full Control and click on Apply then Ok.
Set Windows access permissions to share company files
Ensure that QuickBooks has the right access permission that can help in getting rid of future issues while working with your company files across the network.
Windows 10, 8 and 7
The very first step is to press Windows + E to open File Explorer
After that right-click that folder contains your Company file.
Now choose Properties option,> then Sharing > Share Add.
The next step is to choose the QBDataServiceUserXX that corresponds to your version.
In order to access full control over the file set the permission level.
Windows 8.1
The user needs to initially take control of the file
Now, choose the folder for taking ownership of and choose Share.
Head to Advanced Security > Change > Advanced > Find Now.
The user needs to choose the folder and then the Share option.
After that head to Advanced Security option> Add > choose a principal.
Now hit Advanced option> then Find Now.
And go for the user and click OK
Opt for Full Control and OK.
Windows Server 2012
Before heading to the steps, ascertain that the File and Storage Services are installed.
The user needs to then press Ctrl + R to open Run Command
Now, enter Server Manager and click OK.
And also head to file and Storage Services > and then Shares.
Now, on the Task drop-down, select New Share. A list of File Share Profile shows.
The next step is to hit SMB Share – Quick.
Now, in share location selection, go for Type a custom path > Browse to locate the folder you wish to share.
And then choose the folder > then hit Next.
In order to find out more, head to the setting up a folder and windows access permission
Step 3: Install Database Server Manager (Verify an existing setup)
The user needs to make use of the QuickBooks Desktop Manager to verify an existing setup. And also, to scan the company file in the system where the file is located. The user should ascertain that the database server manager is installed in the system, as it will help the user to share the company files with other systems over the network.
Step 4: Set admin rights to install QuickBooks on Multiple Computers
When the user signs in with the user account, it is essential to ensure that the account has Windows admin rights and the Database Server Manager has admin rights.
Step 5: Using Database Server Manager
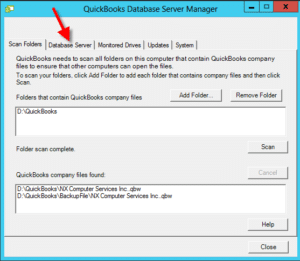
When the installation process ends, the user is suggested to use Database Server Manager to scan the folder that holds your company files.
Once the process ends the file in the “QuickBooks company files found” will be seen. The user can access the company files in these folders through other systems via a network.
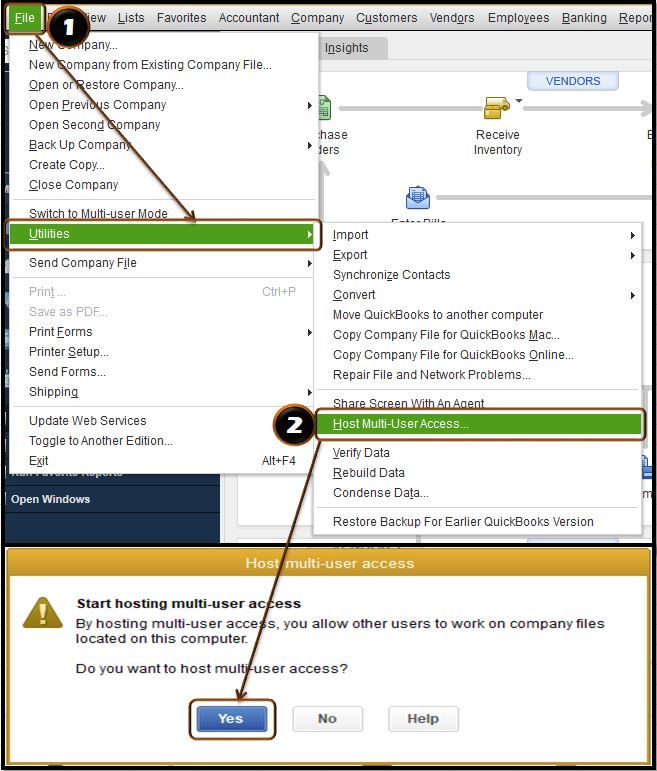
Step 6: Turn on hosting
All the steps are now performed to complete the set up outside QuickBooks, now the user needs to only turn on Multi-user Access on the server. However, ensure that the server system should be the only one in which this feature is turned on.
The user should head to the QuickBooks desktop
And then head to the file menu and navigate to utilities tab
Once done with that click on host multi user access and click on yes to confirm
The user can now easily host your company files through your network.
Whenever the user wishes to access the multi-user network, all that is needed is a sign-up as a user with admin rights in the server system and workstations.
In case they are connected, copy the backup file to your new one via flash drive or another external device or network.
And now restore all the backup data on your new PC.
You can perform these steps on all the workstations.
Conclusion!
This brings us to the end of the article, where we hope that the information shared above might be of some help in installing QuickBooks on multiple computers. However, if you are unable to perform the steps above or need our assistance at any point in time, then feel free to contact our team professionals at +1-888-510-9198, and they will help you in successfully installing QuickBooks on multiple computers.
Yes, it is possible to install QuickBooks on multiple computers. However, for this, it is a must to have a multi-user license. Note that the standard QuickBooks pro license allows you to install it on up to 3 computers and every edition has a different number of users allotted, depending upon the subscription.
Can I use the same QuickBooks license on two computers in different locations?
Yes, you can use the same license for two computers in different locations.
How many users can use QuickBooks Desktop?
QuickBooks Desktop Pro lets 3 users to work on the same company file. Whereas, QuickBooks Premier lets 5 users to work on the same company file.
How do I open QuickBooks on multiple computers?
To do that, you can install QuickBooks data server manager on your server and enable multi user access, and further the authorized users can access the same QuickBooks company file. Each multi-user has a valid license to use the QuickBooks program, according to Intuit.
Mapped drives in QuickBooks help the user in accessing the QuickBooks files on another server, system, or drive over the network. It further makes it easy for the user to access the company file from the shared storage. However, sometimes, the QuickBooks user might come across certain issues with the mapped drive. These issues can be pretty much annoying for the user, and thus should be fixed instantly. In this article, we are going to talk about all possible fixes to this issue. Thus, if you are interested, make sure that you read the article carefully till the end. Or you also have an option to get in touch with our QuickBooks support team at our toll free +1-888-510-9198 for any sort of further tech assistance.
Points you can’t afford to miss
There are certain pointers that need your attention. Note that the user can guide a particular shared folder. If the client on PC 2 has shared the C: drive with the PC, then the user can easily guide that particular C: drive, but not the subfolders. The user will further have to right-click the company file folder and if the user is unable to discover the mapped network drive alternative, then the user should scroll upwards and find more significant level folders. In case the user is making use of QuickBooks hosting, then he/she is recommended to check with the cloud admin of the mapped drive.
In case the company file is available on a similar PC where QuickBooks is being used, then it is suggested to open the record from the information document’s drive.
Effective measures that can be taken to get fix QuickBooks not showing mapped drives
The user can try performing the below set of steps to successfully fix the mapped network drive error in QuickBooks.
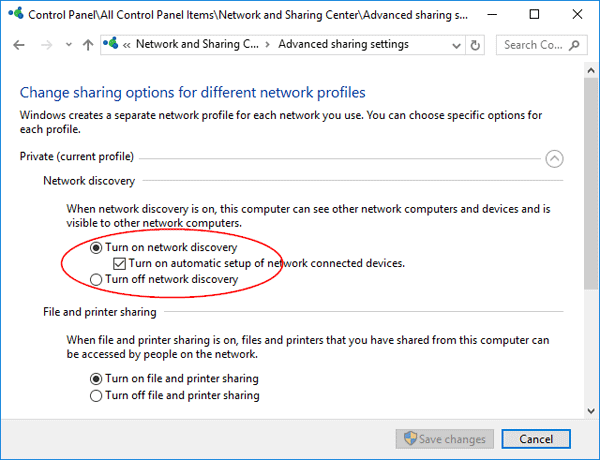
Method 1: Check the mapping drives and turn on network discovery
The very first step is to move to the search bar and enter in settings tab
Now, select the sharing tab
The user should then click on private network.
Once done with that, the user is suggested to make sure that the choices that he/she has made from turn on network discovery are correct and then turn on automatic set up.
The last step in the process is to click on save changes and hit next tab
Method 2: Fix the issue by obtaining IP and DNS address
It should be noted that at times, the user might try to obtain the IP address and DNS manually, due to which the outcomes in the QuickBooks do not show mapped drives. The steps involved in here are:
The user is recommended to first open the settings tab and then choose change adapter option.
After that open the network connection window.
The next step is to enter the next tab and right click the ethernet and choose properties form the available list.
After that click on the networking tab.
And then click on the internet protocol version 4. If the user finds it tick marked, then uncheck and recheck the box.
The next step is to click on properties tab.
After that from the IPV 4 properties window, go for the options Obtain an IP address automatically and obtain DNS server address automatically.
This brings us to the end of the article, where we hope that the information, we shared in above might have helped you in dealing with the mapped network drive issues in QuickBooks. However, if the error continues to trouble you even after performing the right set of steps, then feel free to contact us at +1-888-510-9198, and let our experts handle the complete situation for you.
FAQs related to QuickBooks Mapped Drives
What is QuickBooks not showing mapped drives problem?
QuickBooks does not show mapped drives error occur when the QuickBooks program is unable to recognize the mapped drives. This further prevents users from getting access to the company files.
What causes QuickBooks not showing mapped drives issue?
A few of the common factors causing such an error are as follows: 1. The firewall or antivirus is blocking the network 2. QuickBooks installation files is corrupt 3. Misconfigured network settings
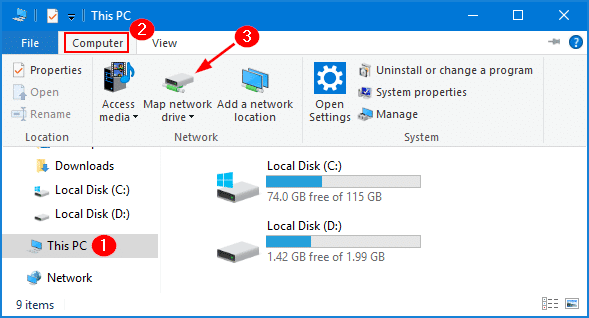
How to map a network drive in Windows
You can map a network drive in windows using the steps below: 1. Press windows icon 2. Type this PC in the search bar 3. After that, select a map a network drive 4. Choose any unused drive letter then choose browse 5. Head to the network location where the company file is available 6. Click on ok tab and then hit finish tab as well.
Why is my mapped drive not showing up?
It can be possible if you use UAC (User Account Control). Whenever you login onto any window as an admin, there’re two options available on the screen. One admin is provided with the rights, and the other one is without any rights.
Are you searching for the process to install QuickBooks desktop 2016? If yes, then reading this article till the end will definitely help you in doing so. QuickBooks accounting software is available in various versions, one of which is QuickBooks desktop 2016. The features of the QuickBooks 2016 version have different modules from the rest of the versions and is available in premier, pro and enterprise edition. It allows a user to manage various accounting and bookkeeping solutions, involving invoice management, payroll management, vendor management, and inventory management. Moreover, it helps in the calculation of income, expenses, tax, profit & loss, etc. To get a future knowledge about this software, version and installation, make sure to read the article till the end. Or feel free to contact us at +1-888-510-9198 and let our experts answer your queries immediately.
Before performing the steps to download and install the software make sure that your system is compatible enough to work properly with the software. Thus, make sure to keep up with the following system requirements.
Operating Systems Generally Supported:
Windows 7, all editions including 64-bit, natively installed
Windows 8.1, all editions including 64-bit, natively installed
Windows 10: People often ask “Is QuickBooks 2016 compatible with windows 10?”. And the answer to that is “Yes”. But please note that Enterprise 16.0 R7 and QuickBooks 2016 R7 are only compatible with Windows 10.
Windows Vista (SP2 or later), all editions including 64-bit, natively installed
Windows Server 2008 R2, Windows Server 2008, and Windows Server 2003 (SP2) * including 64-bit, natively installed
Windows Server 2008, 2011, 2012 Windows Small Business Server 2011, small Business Server 2008.
Database Servers:
Windows: natively installed & Windows 7 or Vista (SP2) with UAC on Windows Server 2011, Windows Server 2008, Windows Server 2008 R2, Windows Server 2008- Terminal Server Config, Windows Server 2003 (SP2) *, and Windows Small Business Server 2008.
Server RAM requirements
0-5 Users: 8GB RAM
10+ Users: 12GB RAM
15+ Users: 16GB RAM
20+ Users: 20+GB RAM
Display optimized for 1024 x 768 screen resolution or higher with up to 2 Extended monitors
4x CD-ROM drive required for CD installations
Internet Connection is required
Best optimized for Default DPI setting (96 DPI or 100%)
Also, medium DPI (120 DPI or 110%) is supported to ensure an optimal experience for 110% scaling.
Hardware and Software Requirements:
At least processor required: 2.4 GHz.
At least RAM needed: 4 GB, though 8 GB is highly recommended.
Display resolution required: 1024 X 768.
4x CD ROM drive.
Disk Space Requirements:
5GB of disk space (additional space required for data files)250 MB: For Microsoft .NET installation. This will be required for better work experience with QuickBooks.
Additional requirements for Intuit Data Protect in QuickBooks Connected Services offerings
Additional software: 250 MB for Microsoft .NET 4.0 Runtime, provided on the QuickBooks CD.
Office 2010 and Office 2013/365 (including Outlook 2010 and Outlook 2013) are both on 32 and 64 bits. (Note: Office 365 is only supported when it is locally installed, not the web version.)
Preparing letters requires Microsoft Word 2013, 2010, or 2007 (32 bit)
Exporting reports requires Microsoft Excel 2013, 2010, or 2007.
Contact Synchronization with Microsoft Outlook requires Outlook 2013, 2010, or 2007.
Synchronization with Outlook requires QuickBooks Contact Sync for Outlook (the download is available at no charge).
Contact Sync does not work with the Microsoft Business Contact Manager Outlook plug-in. If a sync is performed, duplicate records could result
QuickBooks Point of Sale 2014 (V12.0), V11.0, V10.0
Adobe Acrobat Reader: Business Planner functionality and viewing forms require Adobe Acrobat Reader 5.0 or later.
Payroll and other online features and services require Internet access with at least a 56 Kbps connection speed (DSL or cable modem recommended).
TurboTax 2016 and 2014 (Personal and Business)
Lacerte 2016 and 2014.
Pro-Series tax years 2016 and 2014.
QuickBooks for Mac 2016.
Gmail, Yahoo Email, Windows Mail, Hotmail, and AOL.
Choose the type of installation named Express Install
Click the next button
Tap on the Install button to start the installation
When the installation is done, click on the Open QuickBooks option
Hit finish tab
Then it opens up the QuickBooks Desktop2016 as you choose to open QuickBooks after complete installation.
Step 4: Activation of QuickBooks Desktop 2016
Once the download and install are done, perform the steps to activate the software.
Open the software by clicking on hep menu
And then select activate QuickBooks desktop
Perform the onscreen steps to activate
Also, check the details shown to you
After that, you are done and the software is activated and ready to use.
Conslusion!
This was all you need to know to successfully download and install QuickBooks desktop 2016. However, if the user faces any sort of difficulty at any point of time, then in that case contacting our technical support team at +1-888-510-9198 is recommended. We are a team of technically sound professionals who work round the clock to provide the best possible support services in the least possible time.
FAQs Related to Install QuickBooks Desktop 2016
How do I install QuickBooks 2016?
You can install QuickBooks 2016 using the steps below: 1. Open the file QuickBooks.exe 2. Perform the onscreen prompts and accept the software license agreement and hit next. 3. Enter the product and license number and choose the next tab.
Can I still use QuickBooks Desktop 2016?
May 31, 2019 was the set date for discontinuation of add-on services for QuickBooks Desktop 2016(Mac and Windows). This includes all QuickBooks Desktop 2016 versions (Enterprise Solutions, Premier, Pro, and Accountant Edition). In addition, there are also a few other QuickBooks products that are affected by it.
Can I install an older version of QuickBooks?
In case you have used QuickBooks for a while, or you’re an accountant with lots of QuickBooks clients, use newer and older versions of QuickBooks Desktop. You can have multiple versions (years) and editions (Pro, Premier, Enterprise) on the same computer.