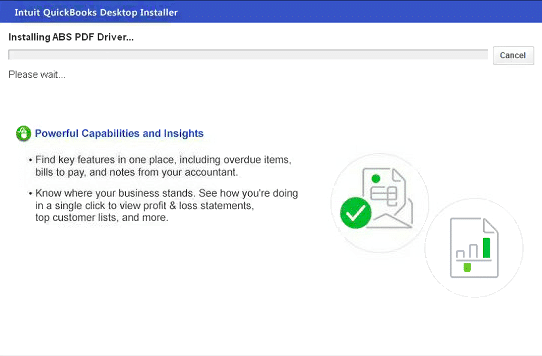
Ever came across an error when installing the ABS PDF driver? Well, this error might freeze your process when installing QuickBooks desktop. Or it might stop responding when installing QuickBooks desktop. This error can be experienced if there is any system issue or a slow internet connection. The QuickBooks accounting software uses the ABS PDF to print transactions, which makes it important for the component to be installed. Though the error isn’t a common one, can be fixed using some basic set of steps. To understand how to install ABS PDF driver in QuickBooks, make sure to read this segment carefully. Or you also have the option to consult our technically sound QuickBooks professionals who might help you with the fixation of the error permanently. Get on a call with our team at +1-844-499-6700, and we will help you with the process further.
What causes QuickBooks installation stuck on installing ABS PDF drive?
Well, there are certain factors triggering the QuickBooks freezing while Installing ABS PDF driver message or the installer being frozen. Let us have a look: One of the basic factors can be a slow internet connection. Another trigger can be if there is any problem with the device itself.
Steps to fix Error: Stuck on “Installing ABS PDF driver issue…” while installing QuickBooks Desktop
As the error isn’t a common one, there are only a few defined steps that can be followed to install ABS PDF Driver in QuickBooks. In case of any queries, it is suggested to consult a QuickBooks professional. Let us check out the steps involved one by one:
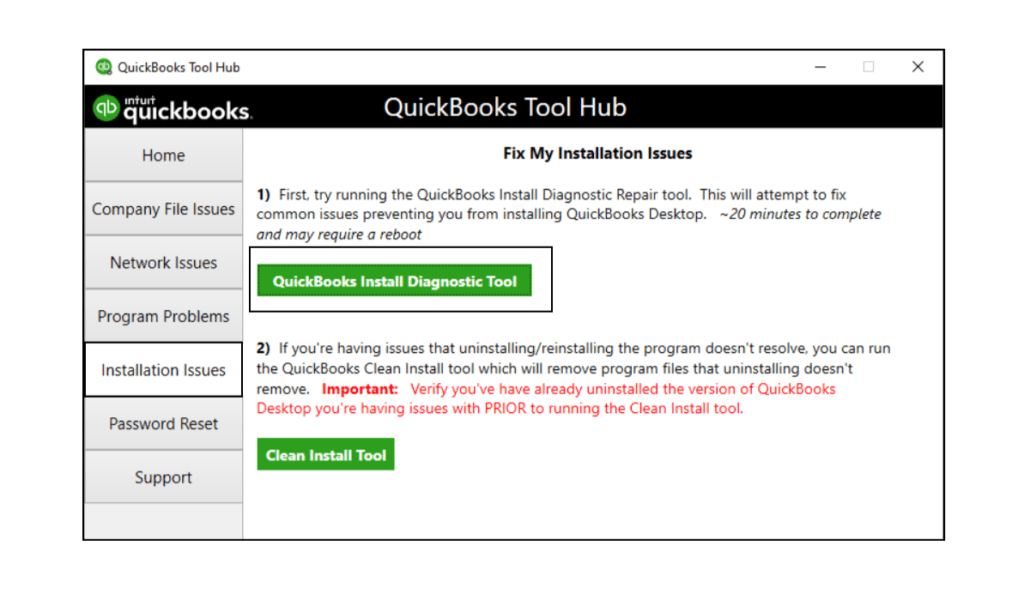
Step 1: Download and install the QuickBooks tool hub
Tool hub can fix some of the major issues in QuickBooks and can be used in this case as well. You are recommended to perform the steps below to download and install QuickBooks tool hub. Let us check it out:
The very first step is to close QuickBooks.
Once done with that, you need to download the QuickBooks tool hub latest version.
Now, save the file where you can spot it easily.
After that, open the file that was downloaded earlier.
The file should look like QuickBooksToolHub.exe
Now, perform the onscreen steps to install the tool hub.
Also, make sure to agree to the terms and conditions.
Once the install process ends, double click the Icon on the windows desktop for opening the QuickBooks tool hub.
Note that, in you are unable to spot the icon, then make sure to search for the same in windows for QuickBooks tool hub and go for the Program.
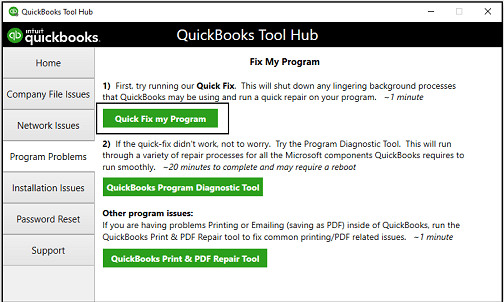
Step 2: Run Quick fix my program from the QuickBooks tool hub
The very first step here is to go for the Program problems in tool hub downloaded earlier.
And then, pick the Quick fix my program.
Now, open the Run command.
And then press Windows + R keys.
The user will now have to enter %TEMP% and hit Enter key.
Select the TEMP Folder
Search for the Prx_usXXrX or Enterprise_usXXrX folder Note: that the X’s on this folder indicates the version, year, and release of the QuickBooks.
Moving ahead, open the Third-party folder and also go for ABS.
The user is now required to double-click ABSPDF412Setup for running the file.
Once you are done with the install process, make sure to open and register QuickBooks.
If the ABS PDF installer continues to freeze or stops responding, then make sure to connect with an IT expert and let the professionals check for the issue in your system.
Now that you know what steps can be performed in fixing the stuck ABS PDF driver error when installing QuickBooks, it is the right time to perform those steps and get rid of the issue permanently. On the contrary, if you are unable to deal with the issue even after performing the set of steps discussed above, then connecting with a bunch of professionals is the only key to success. You can simply get in touch with QuickBooks support professionals at +1-844-499-6700 and ask them to perform the necessary steps for you in eliminating the issue. We are a team of certified QuickBooks professionals who work round the clock in providing instant QuickBooks Support Services.
Some FAQs on How to Install ABS PDF Driver issue in QuickBooks
What is ABS PDF Driver and how to install it?
ABS PDF Driver is a software component that helps in creating and managing PDF files. It is important because it enables users to convert any document or image into a portable document format (PDF), which is widely used for its universal compatibility and security features.
What are some common ABS PDF Driver issues and how can I resolve them?
Some common ABS PDF Driver issues include compatibility problems with newer operating systems, outdated software, and conflicts with other PDF software. To resolve these issues, you can try updating the ABS PDF Driver software to the latest version or uninstalling and reinstalling it.
What if I still face ABS PDF Driver issues even after trying to resolve them?
If you are still confused about how to install ABS PDF Driver issues even after trying to resolve them, you can contact our toll-free support number +1-844-499-6700 for assistance. Our expert technicians will be happy to help you resolve the issue.
How do I update ABS PDF Driver to the latest version?
To update ABS PDF Driver to the latest version, you can go to the software’s official website and download the latest version. Alternatively, you can also contact our toll-free support number +1-844-499-6700 for assistance in updating the software.
Can ABS PDF Driver issues affect the performance of my computer or the security of my data?
ABS PDF Driver issues can sometimes affect the performance of your computer, but they generally do not pose a threat to the security of your data. However, it’s always a good idea to keep your software updated to ensure optimal performance and security. If you have any concerns about the security of your data, you can contact our toll-free support number +1-844-499-6700 for assistance.
Comprehensive Guide to troubleshoot QuickBooks Error code C=1304:
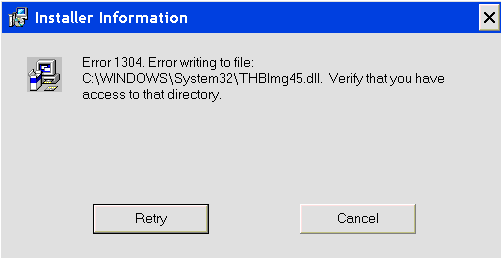
Stuck at QuickBooks error C=1304 and don’t know how to get rid of it?
This is a commonly faced situation by the QuickBooks users and mostly occurs when the users update QuickBooks or install any program. As the error occurs, a pop-up appears on the screen which says, “error writing to file (file name)”. At this moment, the user needs to ensure that you have the access to the directory.
The user can also contact our QuickBooks data recovery support team at our helpline number i.e. +1-844-499-6700, but we would first recommend to make an attempt to resolve the error manually. This article can be helpful for you to rectify the error C=1304, by carrying out a few steps manually, but before that let us check out the causes of the error.
There are three major reasons for this error to occur, namely:
Any kind of problem with the CD Drive can be one of the most common reasons behind the occurrence of this type of error.
Another factor that might lead to error C=1304 can be, if the CD gets damaged or the CD driver is not functioning in the proper manner.
If there is any kind of damage to the Microsoft .Net components, then in that case the user might stumble upon QuickBooks error code C=1304.
Error Code C=1304 Analysis
Now that we know the causes of the issue, let us get a brief about QuickBooks error code C=1304. This kind of error can occur simply due to any issue with the CD or the CD drive. The problem can be fixed by copying the installation folders from CD to hard drive. Now, install QuickBooks from files copied from CD to hard drive. This would aid in resolving the error.
There are 3 troubleshooting steps for QuickBooks Error c=1304. You can follow these steps in sequence as they are given below.
Method 1: Use the Installation CD to Replace Installation Files
In order to rectify the issue, the user can make use of the installation CD for replacing the installation files. This can be done by following a few simple steps enumerated below:
To begin with, the user needs to replace the installation files from CD to hard drive
For this, the user is supposed to insert QuickBooks CD into CD drive. As soon as the installation process gets started, the user needs to click on ‘QUIT‘ option.
Now, go to C: drive, create a new folder and paste the files there:
Select the desktop on the left pane of window, in Windows Vista, Click Organize and click on New Folder.
Once the New folder appears, rename it to QuickBooks.
After that, in left pane, right click the QuickBooks CD and also click on Explore.
Followed by finding QuickBooks, other third party folders, and setup.exe file in right pane.
The next step is to press and hold the Ctrl key, followed by selecting the folders and file.
Now, On the highlighted folder, right click and opt for Copy.
After that the user needs to come back to QuickBooks folder, right click on it and tap on Paste option.
Now, from the folders that were copied earlier, the user needs to install QuickBooks.
After that the user should open the QuickBooks folder where the files were copied.
On the setup.exe file, double click to start Installation process.
The last and final step is to follow the onscreen instructions and complete installation.
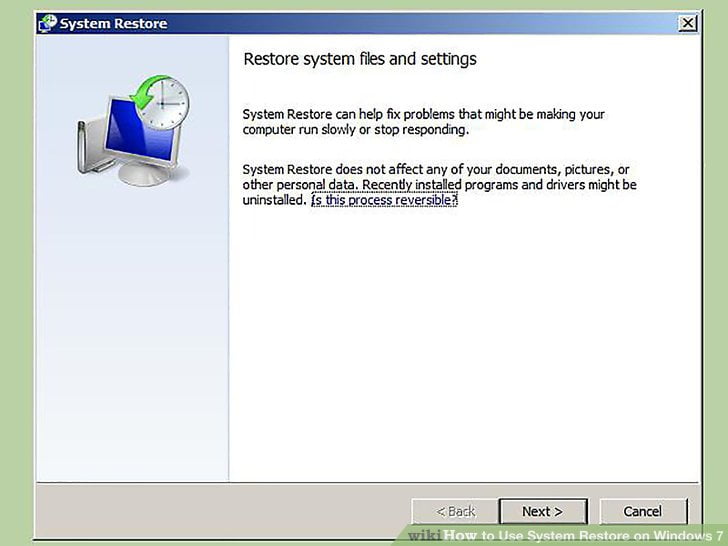
Method 2: Advanced Computer User Solution (To restore it manually)
In case the above method doesn’t work, then the user can opt for another solution namely Advanced computer user solution (To restore it manually). The steps involved in this process are as follows:
The very first step in the process is to login as the system administrator.
And then, click on the start button. Now, the user needs to select All Programs >System tools >Accessories, and then click System Restore settings.
Moving ahead, the user needs to select “Restore my computer to an earlier mature” button, in the growth window.
Reorganize Reduction from “On the list, click a modernize reduction list” and then, click Next.
The final step is to restart the system, as soon as the restoration is complete.
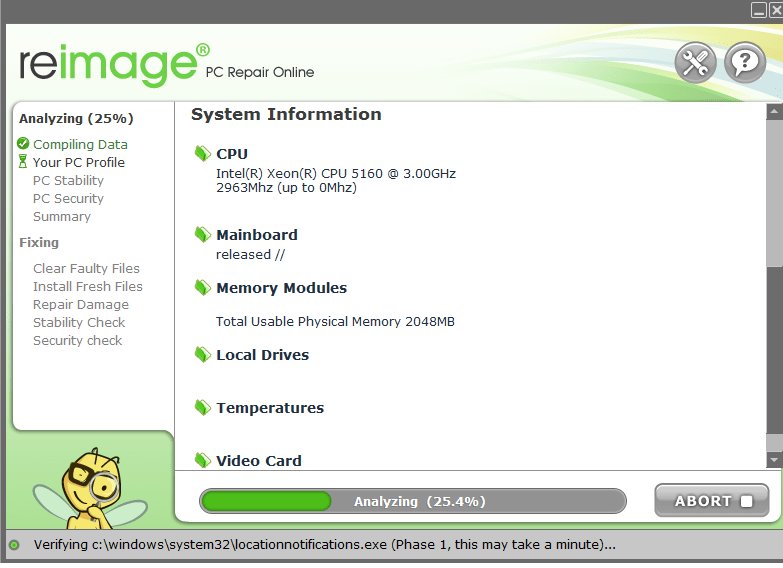
Method 3: Scanning the system with Reimage Repair Tool
The user can use re-image repair tool to scan, repair and detect the system errors such as 1304 error of QuickBooks:
Now, the user needs to navigate the file location and then double click on it. With this the Installation process will get started, after which the User Account Control (UAC) will prompt ‘if you non-existence to control the program, click Yes to continue.
After that the user will see a welcome screen, then the user needs to ensure that checkbox remain un-tick in order to allow the repair tool to scan. After this, click Install to start the installation process.
Now, the Reimage will install itself. Make sure that the internet connection is not broken.
And then the preliminary scan will also begin.
Once the scan is complete, the user will know the damaged areas of PC and would be able to repair. Click ‘Start Repair’ button in the bottom right corner.
The last and final step is to restart the system, when the repair process is complete.
Method 4: On a New Device Share CD-ROM
The very first step is to place QuickBooks installation Disc into a networked system.
Exit the window by clicking Quit when the download starts
After that head to Windows File Manager, and right-click the “CD-ROM”
The next step is to select Sharing and Security from the menu.
Now ensure that the “Share this folder” checkbox is basically chosen.
The next step is to click on Apply and ok tabs respectively
Right-click on the My Computer symbol and go for Properties.
Once done with that go for the Computer Name
Click the Windows + R keys on the device you wish to download QuickBooks on
Enter the name of the computer having the QuickBooks CD.
Now, double-click the alphabet of the CD drive after pressing the Enter key.
The last step is to click on the setup file to start the download.
Method 5: Copy the Downloaded Application to Device’s Hard-Driver
The user needs to first enter the CD into the CD drive
In case the download procedure starts immediately, then it is suggested to click on quit tab
Now, right-click on the Windows Start button
And choose explore tab
Create a new folder in the appropriate position before transferring the data
Enter QuickBooks to make it the folder’s name.
Right-click on the CD and go for explore option
Now, locate QuickBooks and the setup.exe file on the right side of the window.
And also opt for both the file and the folder, press and hold the Ctrl key.
The next step is to right-click any folder and click on copy from the menu.
After that click on the QuickBooks folder, you established previously and choose Properties.
Now click on paste
Method 6: Repair the .NET Framework
The user needs to first install the QBDT.
This tool will resolve the issue that is related to the MS .NEt Framework.
Once done with that ascertain that you sign in your PC as admin.
Search for the QBDT & open it by clicking on them.
Download the file & save it on your PC.
Close all the running app in the background.
QBInstall_Tool_v2.exe will be seen.
The user should open the file.
Click on run to let the scanning process start
The last step is to let the repair process end
Method 7: Restore your computer system
The steps below can help in restoring the system successfully. Let us have a look:
The very first step is to sign in as admin
Now, click on start tab and choose all programs
After that, select system tools and accessories
The user needs to then click on the system restore settings
And also, choose the option to restore my computer to an earlier point
Click on the list of modernize reduction and click on next
The last step is to restart the system after the process ends
Implementing any of the above stated methods can help the user in fixing the QuickBooks error C=1304. In case, the user continues to face any error, then reaching out to our 24×7 QuickBooks error support team at +1-844-499-6700 can work in your favor. Our team of experts and certified professionals is available round the clock to resolve your errors and ensure that your work is streamlined. Thus, feel free to contact our Experts for any further details.
Frequently Asked Questions
How do I fix error code C 1304 in QuickBooks?
The user can try eliminating the Error code C 1304 using any of the below methods: 1. The user needs to scan the system with the reimage repair tool 2. The user can also use the installation CD to replace installation files 3. Restore the system to fix the error 4. Repair Microsoft Components
What is error code 1304 in QuickBooks?
Error 1304 is an installation error in QuickBooks that appears when the system cannot read the installation files. Any kind of problem with the CD Drive can be one of the most common reasons behind the occurrence of this type of error
How do I fix a reconciliation error in QuickBooks?
Run a Reconciliation Discrepancy report 1. Go to the Reports menu. Hover over Banking and select Reconciliation Discrepancy. 2. Select the account you’re reconciling and then select OK. 3. Review the report. Look for any discrepancies. 4. Talk with the person who made the change. There may be a reason they made the change.
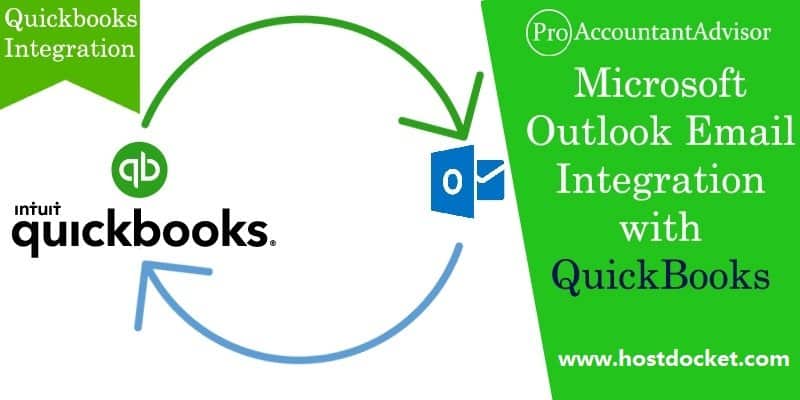
Simple Steps to Setup Microsoft Outlook Email Integration in QuickBooks
One of the most advantageous features of QuickBooks software is that – a QB user can integrate a wide array of applications in QuickBooks such as PayPal, Microsoft Office, etc. QuickBooks accounting software is highly compatible with such an application. Hence, a QB user can operate the desired application in the QuickBooks altogether.
Possibly, you would like to use the Microsoft Outlook Email along with QuickBooks. To do so, a QB user recommended using the QB Contact Sync application that is available in the QuickBooks Online.
The QB users suppose to download & install the application first. Once the download & installation completed, the user is allowed to adjust the contact list quickly and swiftly. QuickBooks Desktop features some of the web-based services that include – Electronic Payments, Remote Access Ability, Online Banking, etc. Businessmen & corporate sectors widely use the Microsoft Outlooks as an email exchange Server globally.
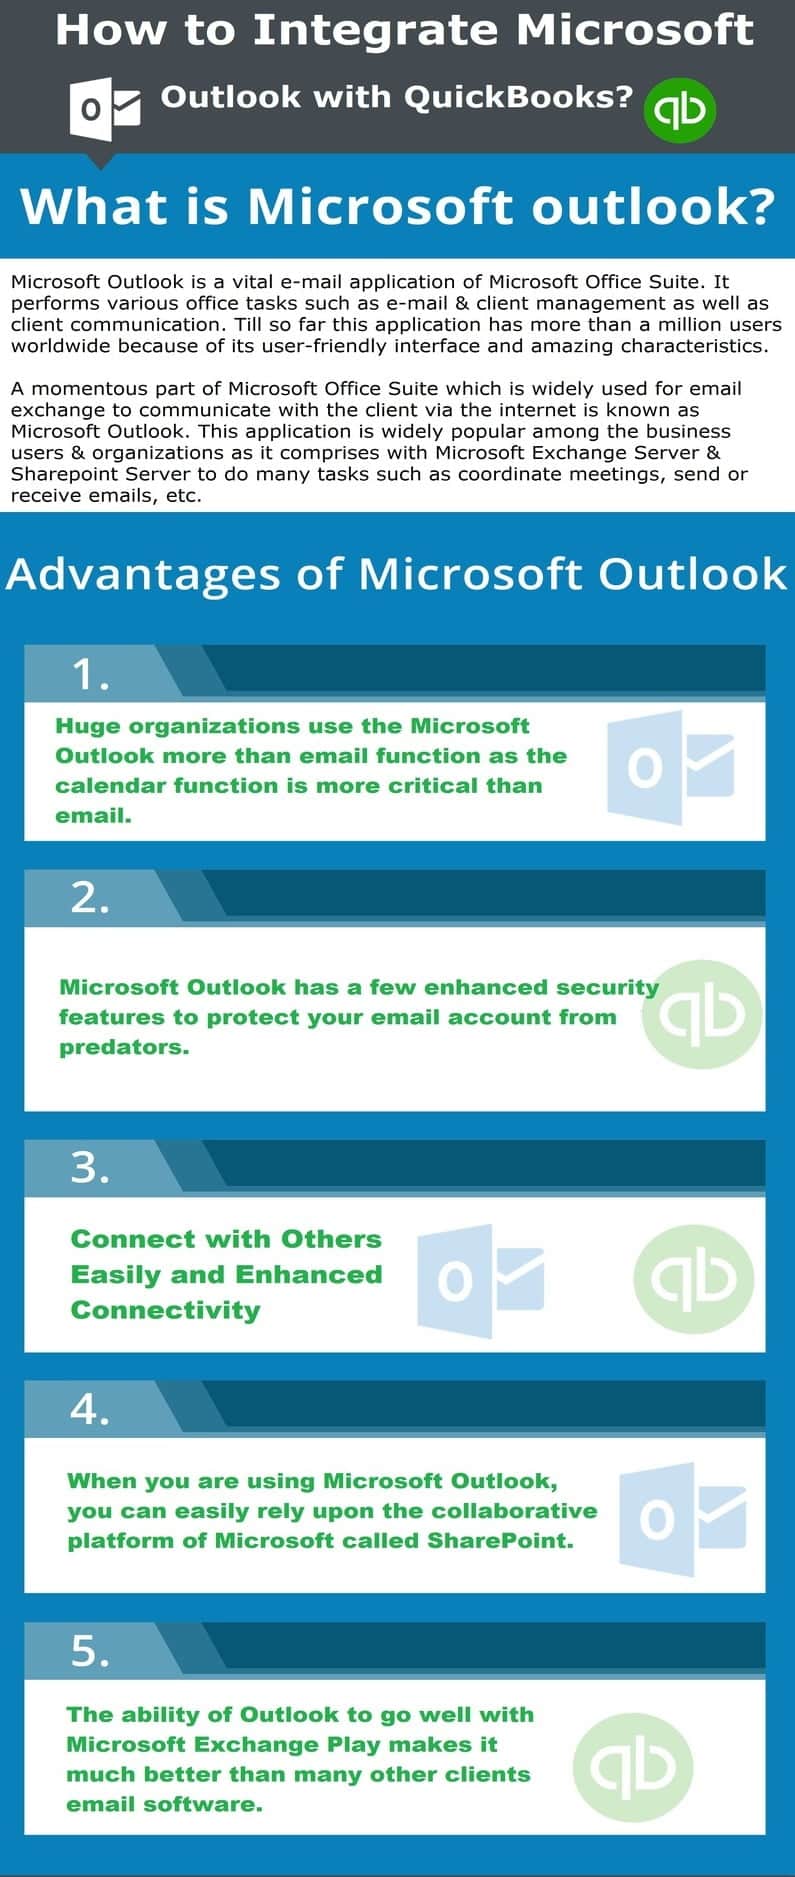
A momentous part of Microsoft Office Suite which is widely used for email exchange to communicate with the client via the internet is known as Microsoft Outlook. This application is widely popular among the business users & organizations as it comprises with Microsoft Exchange Server & SharePoint Server to do many tasks such as coordinate meetings, send or receive emails, etc.
Microsoft Outlook Functions:
Email confirmation
Coordinate & Communicate
Co-operation
Co-ordination and constitution
Significance of Microsoft Outlook Integration in QuickBooks
Microsoft Outlook is a vital e-mail application of Microsoft Office Suite. It performs various office tasks such as e-mail & client management as well as client communication. Till so far this application has more than a million users worldwide because of its user-friendly interface and amazing characteristics.
Check out the list of characteristics which makes Microsoft Outlook different from other email client applications.
Work Offline
Ribbons & Navigation Bar
Inter-Communication
Inbox Clean Up Tool
Customized Calendar
Support Microsoft Exchange Server
Altered Contacts
Tracking Feature
Social Connectivity
Faster Email Processing
Manage Rules and Alerts
Free Import & Export Facility
Shortcut Keys
Email Attachment Reminder
To know more insight about the Microsoft Outlook Integration in QuickBooks, contact the QuickBooks Integration Support. Our Intuit Certified ProAdvisors are highly knowledgeable and has decades of experience in accounting field.
Pros:
Huge organizations use the Microsoft Outlook more than email function as the calendar function is more critical than email.
Cons:
The task management job is quite basic but still cumbersome to use.
No special support for the vacation in calendar feature.
No customization in the dashboard so that the user can fuse the elements such as email, calendar or task to bring the desired outcome.
Booking meetings with the client on the calendar is not possible. There is no support to book a meeting on the calendar.
Tips to Integrate Outlook Email Integration in QuickBooks
There are too many users who are encountering problem in QuickBooks Outlook 2016 and 2015, if you are also facing the same issue, follow listed below action as well as integrate your Outlook with QuickBooks very easily.
Download and Install QuickBooks Desktop Contact Sync for Outlook from official website
Here’s how
Type the correct email address for QuickBooks registration
Choose the “Continue” tab to Download
Save the “QuickBooksContactSync.exe” file in the computer
Perform double – click on the “QuickBooksContactSync.exe” file
Hit the “Next” tab to start the installation
Once the download is completed, choose the desired company file you want to sync with Outlook
Choose “Accept” in the agreement form
Next, Click on to the “Next” tab
Hit the “Get Started” tab, once the sync is complete.
Hit the “Finish” tab
QuickBooks Integration with Microsoft Outlook For Mac
The QuickBooks integration with Outlook for Mac is quite simple. Follow the steps below to integrate the Outlook with QuickBooks:
Navigate to Edit => Preferences => Send Forms
A webmail, email, or outlook option will appear. However, if the option does not appear then follow the below steps
Go to the C:\Windows\win.ini
Select & open the C:\Windows\win.ini Add the line at the bottom of the file i.e.
[MAIL], MAPI=1, MAPIX=1
Open the Registry Editor & key. [HKEY_LOCAL_MACHINE\SOFTWARE\Microsoft\WindowsNT\CurrentVersion\MAIL] String Value: “MAPIX”=”1]
Frequently Asked Questions Related to Outlook Email Integration in QuickBooks
Query- What is the procedure to import excel into QuickBooks?
Ans: Excel can be imported into QuickBooks by following simple steps enlisted below:
The first step is to visit the file menu, after that select Utilities
After that, choose the import option, followed by selecting the excel files option
In case the user gets the Add/Edit Multiple List Entries Window, then he/she is required to click on No
Lastly, follow the wizard in importing the files:
First, select the type of data.
Then, the QuickBooks software will open a formatted excel spreadsheet. Once the user has entered the necessary information, he/she is required to save and close the file.
Also, the user will be given the option to Add My Data Now.
Now, review the results and then view the data in the QuickBooks.
Once done with the procedure, the user is required to click on Close.
Query- How can I send invoice from QuickBooks to Outlook?
Ans: Well,
sending invoice from QuickBooks to Outlook is not as difficult as it seems to
be to many of the QuickBooks users. All they need to do is follow some simple
steps:
First of all, mark the invoice as “Email Later”.
Now, click on “Save & Close” or “Save
& New”.
After that, visit the “File”.
Select the “Send
Forms” option.
Lastly, select the invoice, send the mail and
you are good to go.
A quick solution can be getting in touch with our consulting team.
Query- Is there any difference between sales order and invoice in QuickBooks?
Ans: Majority of the times, QuickBooks users think sales order and invoices can be used interchangeably, but in actual they differ from each other. Sales order generally originates with the customer, at the time when they are making a purchase. Whereas, an invoice acts as a bill that is provided to the customer, when the product is delivered or a task is completed. They both widely differ from each other, but both serve as accounting documents post-completion.
Query- Why the error occurs in QuickBooks while sending emails to Outlook?
Ans: Sending mails directly from QuickBooks to Outlook is one of the most convenient features, also it saves time and efforts. But at times, QuickBooks is unable to send the emails to Outlook and this error might occur due to various reasons:
Maybe the user might have set up incorrect email.
Or the user might have updated the QuickBooks .
The file that the user is sending is damaged MAP132.dll file.
Also, it can happen in case the QuickBooks is running as administrator.
Damaged outlook may also be a reason for such error.
Also, in case if the Outlook is open in the background while sending the email.
Conclusion!
It might be possible that you would experience in following the steps accurately or might be missing any step while integrating QuickBooks with Outlook. In that instance, you can simply dial our QuickBooks online support number .i.e. +1-844-499-6700.
QuickBooks is a leading accounting software that has helped many small and medium-sized companies in all around the world. If you are using QuickBooks then, you probably familiar with the QuickBooks Print Issues. Sometime, these issues put the users in so much stress that it starts to annoy & frustrate them. In this post we will discuss about QuickBooks Unable to Print Invoices Issues.
We know that QB Online can be accessed from anywhere and print commands can be given from the software itself, but sometimes you may face unable to print problem in QuickBooks. In this informative article, we will provide you whole insight of the Unable to Print problem along with its causes & solution. With us, you will get the knowledge & better understanding of ‘How to resolve it like a pro’.
QuickBooks Unable to Print Invoices Issues may compel you to stop your work and some of your essential works might be delayed due to this problem. Another problem with printers may be printing in small font size. Below are some quick fixes that you can try and resolve the printer issues by yourself. Furthermore, if you have any queries or need additional help you can reach out to our certified QuickBooks support team right now by dialing toll-free +1-844-499-6700.
There are few printing issues you can face in your QuickBooks software at the time printing your necessary documents files. Below we have mentioned few of them.
QuickBook Enterprise failed to print
If you are a QuickBooks Enterprise user, you may sometimes face printing errors. In such situations QuickBooks enterprise support team should be contacted immediately for this issue may lead to a more significant problem and may also damage or corrupt previous data.
QuickBooks Printing issues with Invoices
If you are not able to print invoices for your clients, you can try to fix the error using the above mentioned troubleshooting steps. You can also read our article about QuickBooks invoice printing problem and troubleshooting.
QuickBook 1099 Printing issues
You may face an issue in printing 1099 forms. In a situation of 1099 printing problems you can go with the given article about it.
If you face issues in printing checks from QuickBooks, it means that your software needs to be updated.
QuickBooks Printing Problems with Mac
If you are using MAC systems and facing trouble in printing through QuickBooks software, you can take assistance from Mac technical support team to resolve this issue.
QuickBooks W2 Printing Errors
At the time of tax filing if you are not able to print W2 form through QuickBooks, you can follow the steps mentioned in this article.
How to Fix QuickBooks Unable to Print Invoices Problem?
Before you continue with the troubleshooting steps, make sure that the printer is having the issue with QuickBooks and not with your computer.
Step 1: Verify the functioning of the Printer
Use the Notepad to check if the printer is functional outside the QuickBooks application.
Choose the “Start” icon & search for the ‘Notepad’.
Type-in some text onto the ‘Notepad’. Later, select the “File” option and then, “Print” option.
Choose the right printer, and then click on the “Print” tab.
Step 2: If everything doesn’t go well, then try this step….
In case, the printer test doesn’t go well, and then restart the computer with instructions given below. If it goes well then simply jump on the step 3 given below:-
Turn-off or shut-down the printer and restart the associated system. Later, turn-on the printer back again.
Ensure that the paper loaded correctly in the printer.
Go to the “Windows” or “Start” button, go to the “Control Panel” tab and hit onto the “Printers and Faxes” tab.
In case, the printer is offline – then, press the ‘printer’ icon & choose the “Use Printer Online” option.
Press the ‘Printer’ option & if you find any job appear in the queue..!
Select the “Printer” tab and then, hit onto the “Cancel All Documents” tab.
Shut-down the windows.
Perform right-click on the printer, select the “Properties” tab and then, hit onto the “Print Test Page” tab.
Note: In case, the printer is assume as a network printer & the test page doesn’t print..! This can lead to the network issues.
If the problem persists and the printer still not working, you must try the steps below:-
Confirm that you are using the latest printer driver. To do so, you have to navigate to the manufacturer’s official website to download & install the latest version of printer drivers.
Make sure that there is no error lights appear on the printer.
For any kind of printer information, you must refer to the printer documents provided by the manufacturer. The information could be related with the following:
Printer Error Indications.
Test Page Print Issues.
Printing Issues from Notepad.
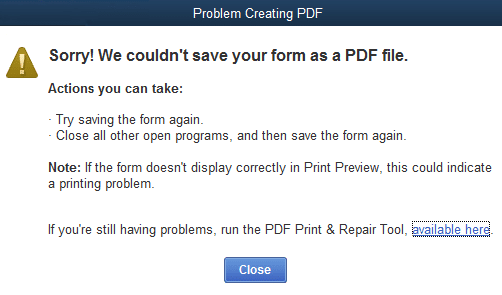
Step 3: Run the PDF Repair tool and Rename the QuickBooks File
Run the Repair Tool:
In case, you are able to print via notepad..! You must run the QB Print and PDF Repair Tool. It resolves the entire common printing problems and then, again tries to print.
Download the QuickBooks PDF Repair tool from here:
Rename the QuickBooks file:
In case, you encounter that the QB Repair Tool isn’t working..! You should manually change the name of the QBPrint.QBP file.
Search for the location of the QBPrint.qbp file.
For Windows 10, 8.1, 8, 7 and Vista: Go to the folder => C:\ProgramData\Intuit\QuickBooks 20xx (20xx represents the QuickBooks version).
Server 2008 & Server 2012: Go to the folder => C:\Program Data\Intuit\QuickBooks YEAR and C:\Users\**remote user**\AppData\Roaming\Intuit\ YEAR VERSION\TSPrinterSettings
Note: In some situations, you need to find particular hidden file(s) & folder(s)..! In such cases, you should search these files & folders in the ‘Windows’ option.
Perform right-click on the QBprint.qbp file. Later, choose the “Rename” option.
Use the word ‘old’ as a file name suffix example: QBPrint.qbp.old
Open/access the QuickBooks.
In the “File” menu, go to the “Printer Setup” tab & choose it.
In the ‘Form Name’ list, choose any of the transaction and hit onto the “OK” icon. This complete process will assist to create a new QBprint.qbp file.
It might be possible that you choose a wrong printer. Thus to make sure that you select the right or correct printer..! Simply follow the steps shown below:-
In the QuickBooks application, select the “File” tab & then “Printer Setup” tab.
Select the desired form and then try to print it.
Make sure that the printer name matches with the one you are using currently. If it doesn’t match, then you have to go to the “Printer Setup” option in computer and make it correct.
Go to the “Help” section for more details about the settings.
Choose different printer from the Printer Setup.
Go to the “File” menu => “Printer Setup” tab.
Choose the desired form you wish to print.
Later, choose a different printer from the drop-down menu.
Go to the “Help” section for more details about the settings.
Attempt printing a different form or, if you are using customized forms or memorized reports, attempt a standard form or report.
If you were printing a batch of forms in QuickBooks, effort to print a single form. If it gets successful, try printing smaller sized batches.
Open one of the QuickBooks sample company files and try to print the same type of form or report. If it functions, make use of fix data damage on your company file to deal with any data damage in your file and then attempt to print again.
If your printer is Local after that perhaps the trouble is in your computer/printer configuration itself. Make sure that there is a link between the computer and the printer. If still unable to solve this issue the get in touch with to the printer manufacturer’s for fixing the problem.
If your printer is over a network then make sure that your network setups are correct.
Use the steps shown above if the printing issues are arising time to time. But, if the issue still exists and you are QuickBooks unable to print invoices, you can contact the QuickBooks certified professionals at +1-844-499-6700. Since we have the most updated tools and a committed team of certified QB expert’s that strives to endow the best solutions for QuickBooks problems.
If anytime you face issues in printing through QuickBooks and you are unable to fix the problem even after trying the troubleshooting steps, you can contact our experienced QuickBooks online support team. We are available round the clock to offer you quick and reliable Solutions.
Some FAQs Related to QuickBooks unable to print Invoices
What can cause QuickBooks to be unable to print invoices?
There are several reasons that could result in QuickBooks being unable to print invoices. This could be due to issues with the printer, incorrect printer setup, outdated printer drivers, or even problems with the QuickBooks software itself.
How do I troubleshoot QuickBooks printing issues with invoices?
If you are experiencing QuickBooks printing issues with invoices, the first step is to check your printer setup and ensure it is properly configured. If the issue persists, try updating your printer drivers or reinstalling QuickBooks. If you are still unable to resolve the issue, our team of experts is available 24/7 to help. Simply call our toll-free number +1-844-499-6700 for quick assistance.
What should I do if my printer is not compatible with QuickBooks?
If your printer is not compatible with QuickBooks, you may need to purchase a new printer that is compatible with the software. Alternatively, you can try printing invoices as PDF files, which can then be printed on any printer.
What are some common printer issues that can cause QuickBooks to be unable to print invoices?
Common printer issues that can cause QuickBooks to be unable to print invoices include a lack of paper, low ink levels, paper jams, and other physical problems with the printer. If you are experiencing any of these issues, try resolving them before attempting to print invoices again.
How can I get help with QuickBooks printing issues if I am unable to resolve them on my own?
If you are unable to resolve QuickBooks printing issues on your own, our team of experts is available 24/7 to help. Simply call our toll-free number +1-844-499-6700 for quick assistance. Our knowledgeable technicians will work with you to resolve any printing issues you may be experiencing with QuickBooks.
QuickBooks Payroll is an eminent tool to manage and maintain the financial transactions. In the past few years, QB Payroll productivity has immensely increased due to its great demand in the market. This software enables you to create your employees’ payroll, salary, and insurance while deducting the holidays & leaves accurately. In this post we will demonstrate how to fix payroll service server error.
But it has been reported that QuickBooks Payroll users encounter a problem while sending data or direct deposit paychecks. These errors usually appear with an error message:
Payroll service server error. Please try again later. If this problem persists, please contact Intuit Technical Support.
Payroll Connection Error
Error: QuickBooks Desktop has encountered a problem sending your usage data.
In this article today we are going to explain you about these payroll server error/connection error also we have provided quick fixation methods for these payroll service error.
What Causes QuickBooks Payroll Server Error?
This payroll server error can be caused due to one or more reasons that are given below:
Invalid security certificate.
While sending data in multi-user aptitude.
Common Internet Connection issues.
When the system date & time properties are incorrect.
When the Internet security & firewall setting configuration is not correct.
Quick Fixation Steps to Resolve Payroll Service Server Error
Important Note: If the Be Safe application is installed into your computer, it will make you unable to send the information. This application will block the entire financial details/info that is sent or received by the computer.
Reboot the computer & retry.
In the Internet options window of the Internet Explorer, ensure that the Use TLS 1.0 is checked where the Use TLS 1.1 & Use TLS 1.2 are unchecked. Finally, restore the Internet Explorer Advanced Settings.
Ensure the single-user mode while transmitting the payroll data.
Ensure that nobody else except you logged into the QuickBooks Desktop.
If anyone else logged in to it, you need to ask them to sign out.
In the QuickBooks File menu, hit the Switch to Single-user Mode.
Follow the command prompt to continue to switch & log in again.
Try an attempt to resend the payroll. If in any case, it doesn’t work then proceed with the steps given below.
Update the payroll.
First of all, Select the Employees > Get Payroll Updates.
After that, Hit the Update
Once the update is completed, restart the QuickBooks Desktop.
Again, try an attempt to resend the payroll information. If it’s still unsuccessful, follow the next step given below.
Verify the system date & time properties.
In the Microsoft Windows taskbar, double-click the time display.
Make sure that the date, time, year, and time zone in the Date and Time properties are correct. If it’s not, then correct them and press OK.
Now, restart the computer.
Finally, resend the payroll information. If it doesn’t, proceed with the following steps.
Ensure that the Internet Explorer is set as the default browser.
Once you set the Internet Explorer as a default web browser, try to resend the payroll information again. If it doesn’t, then proceed with the following steps.
Ensure that you can access the secure web pages or websites .i.e. your personal banking institution’s website. Again, resend the payroll details/info and if it sent unsuccessfully – proceed with the next step given below.
Make sure that you have downloaded the latest QuickBooks & tax table released updates. Later, resend the payroll information. If it doesn’t send, follow the steps mentioned below.
Hit the Options Select the Yes or No for Shared Download.
Later, try to resend the payroll information.
Re-validate the payroll subscription.
Verify the QuickBooks Internet Connection.
Firstly, go to the Help menu, select the Internet Connection Setup.
Now Choose the Use my computer’s Internet connection settings to establish a connection when this application accesses the Internet.
Now Select the Next
Select the “Advanced Connection Settings”.
Choose the LAN Settings. Ensure that the Automatically Detect Settings box is chosen but not the Proxy Server checkbox.
Select the OK tab twice. Hit the Done
Again, try to resend the payroll information.
Ensure that the personal firewall & internet security software is configured correctly.
Winding Up
If you are facing any trouble related to QuickBooks Payroll Server or Error associated with it, you can immediately contact the QuickBooks Payroll Customer Service team.
We are one of a well-renowned and top globe QuickBooks software, services and technical help provider from last 7 years. Also, we have an efficient and certified expert team of QB accounting experts to solve the entire QuickBooks issues such as QuickBooks Installation, QuickBooks Updates, QuickBooks Integration, and QuickBooks Error Codes. In case you need an urgent support, you can call on our toll-free support number i.e. +1-844-499-6700 with no hesitation.
Frequently Asked Questions!
What is QuickBooks payroll service?
Talking about QuickBooks Payroll Service, it is basically a subscription that you can activate to enable the payroll features in your QuickBooks Desktop Software. Depending on the features you need, you can choose from Basic, Enhanced, or Assisted Payroll. However, it should be noted that the QuickBooks Payroll service does not work with QuickBooks Mac
How do I fix QuickBooks payroll errors?
QuickBooks payroll errors can be experienced due to a bunch of factors such as insufficient permissions or file corruption. One can try to rectify these issues by simply accessing the software using admin access or can edit the windows permissions.
How to update QuickBooks desktop?
Intuit the developer of QuickBooks releases the latest version of QuickBooks software from time to time. QuickBooks users are always recommended to update their QuickBooks software to the latest release, in order to access the new features and functionalities. One can easily update the QuickBooks software by heading to the help menu and checking for available updates.
How to deal with firewall issues in QuickBooks?
At times, QuickBooks users might face firewall configuration issues, or the firewall might be blocking the communication of the software with the server, in that case, one can take the assistance of the QuickBooks file doctor tool. Other than the file doctor tool, firewall issues can be eliminated by creating firewall port exceptions.