If you’re a small business owner trying to decide which version of QuickBooks Desktop actually fits your needs, QuickBooks Pro is usually the first one worth looking at. It’s the entry-level desktop option in the QuickBooks lineup, but don’t let “entry-level” fool you it still packs in invoicing, payroll, bank reconciliation, payment tracking, and over 15 integrated business tools into one platform. For a lot of small businesses, it’s genuinely all they need.
In this blog, we’ll break down everything about QuickBooks Pro what it actually does, its key features, the pros and cons you should know before buying, current pricing across different versions, system requirements, and the full download and installation process. By the end, you’ll have a clear picture of whether QB Pro is the right fit for your business.
Got questions along the way, or want help deciding between Pro and other QuickBooks versions? Call our certified QuickBooks ProAdvisors at +1-888-510-9198 available 24/7.
QuickBooks Pro helps automate the billing and invoicing process and work order management from a single reconciliation window. Moreover, the bank reconciliation feature helps users link their bank accounts and further define workflows for accounting activities. QuickBooks Desktop Pro further lets the users make automated payments and deposits from their linked bank account and manage the employee payroll within a few clicks. You can expect this comprehensive accounting solution to offer robust functionalities.
QuickBooks Desktop Pro Features and Functionalities
As we mentioned earlier, QuickBooks Pro is loaded with various features and functionalities. Here is a detailed list of newly added as well as existing helpful features. Let us explore further:
Get Paid Faster- QuickBooks Pro 2024 lets the users get paid faster by automatically reminding the customers when payments are due.
Create a consistent, professional look: This software is designed in a way to lets you present your business more professionally by simply leveraging style and design templates for your customer communications.
Faster and Smoother: The latest version of the pro software comes with 64-bit processing power that will let you run reports, create invoices, and further reconcile accounts at a faster speed saving a lot of time and effort.
Automatic backup of data and recovery: In QB desktop Pro, Intuit data protect takes local backup of the company file on its own regularly. It further diminishes computer crashes, corruption of data, and power failures. Not only that, but you can also revert to a previous file from the past 45 days from daily backup if needed. In order to restore the file you can get assistance from the helpdesk team.
Inventory tracking: Depending upon the business type, you might need to keep track of your inventory. And QuickBooks Pro can help you with that. You can avoid overbuying and backorders with this accounting software and it will further let you set up reorder points that will automatically alert you as to when you should schedule a reorder.
Payroll: You can now manage your staff with QB Pro and further process payroll with appropriate tax deductions. You make payments through direct deposits to employees. Moreover, the software can automatically create and print 1099s for independent contractors.
Time Tracking: The time tracking feature lets you track your employees’ time to avoid under-billing your customers. It further alerts you when creating an invoice, if there are any outstanding time or expenses for that customer. The software further lets you track time by employee, service, and customer using timesheets. In case you are creating an invoice, then QB will alert you about any unbilled time and expenses.
Create purchase order: In the QuickBooks Pro version, you can create a purchase order by selecting the appropriate vendor from the list and picking the inventory item to order. Once the inventory is received, QuickBooks will identify the products and tally them to the appropriate PO. This simply means that when you enter the inventory items, the correct corresponding PO is reconciled on its own.
General Ledger: The general ledger feature lets you stay ahead in your business and further provides you with a consolidated view of who owes you money, and who will owe money to, important reminders, and income/expense performance. Moreover, QuickBooks Pro makes use of the transactional history established in the general ledger to provide you with pre-designed reports.
Get access to a large network of independent QuickBooks ProAdvisors.
Doesn’t let you manage fixed assets
Track employee time and bill customers easily with QB Desktop Pro
Limited to three users only.
Easily compare budgeted costs to actual costs
No industry-specific editions like premier and enterprise.
When to use QuickBooks Desktop Pro?
Still not sure whether you should use QuickBooks Desktop Pro or not? Well, here is when to opt for QuickBooks Pro. In case you fall in any of the below categories, get QuickBooks Pro for your business right away!
Managing Multiple Companies: Note that a single subscription lets you manage the books of an unlimited number of companies, which makes QuickBooks Desktop the best multi-company accounting software.
Businesses that prefer desktop software: With QB pro, you do not need an internet connection to run. Thus, it is a great choice for businesses that have issues with internet connectivity and speed.
Companies having in-house bookkeepers: When you have an in-house accountant working on a single computer, you can physically work with them to check the books right from their computer, this software works as an ideal solution.
If you have minimal inventory: Businesses requiring only basic tracking of stock on hand and inventory costs without dealing with inventory in multiple locations, then QuickBooks Desktop Pro tends to be more than enough.
QuickBooks Pro is affordable software available at different prices, according to the number of users and a few other aspects. Let us evaluate the pricing for QB Desktop Pro in detail:
Create professional invoices Track sales and expenses Manage accounts payable Single click sales and tax reports
QuickBooks Desktop Pro + Payroll 2024
1 User
$87/month
Create professional invoices Track sales and expenses Manage accounts payable Single click sales and tax reports Quickly make payments to employees Easily remit payroll taxes Automatically stay updated and worry-free.
QuickBooks Desktop Pro + Payroll 2024
3 Users
$130/month
Create professional invoices Track sales and expenses Manage accounts payable Single click sales and tax reportsQuickly make payments to employees Easily remit payroll taxes Automatically stay updated and worry-free.
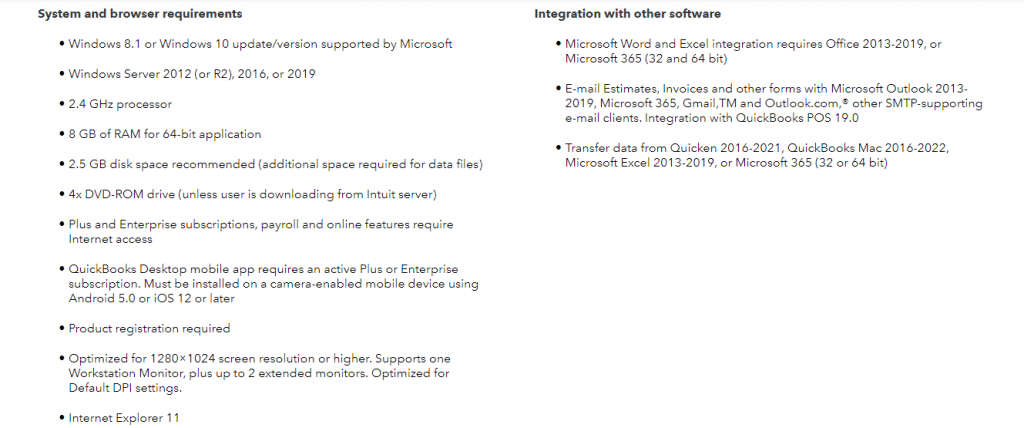
Before you get QuickBooks Pro for your business, it is crucial to check if your system is ready to work with the software or not. Here is a list of system requirements for the latest version of QB Desktop Pro i.e., QB 2024.
Windows 8.1 or Windows 10 update/version supported by Microsoft.
Windows Server 2012 (or R2), 2016 or 2019.
2.4 GHz processor
4 GB of RAM (8 GB suggested)
2.5 GB disk space suggested (additional space needed for data files)
4x DVD-ROM drive
Other Requirements:
Payroll and online features need internet access (1 Mbps suggested speed)
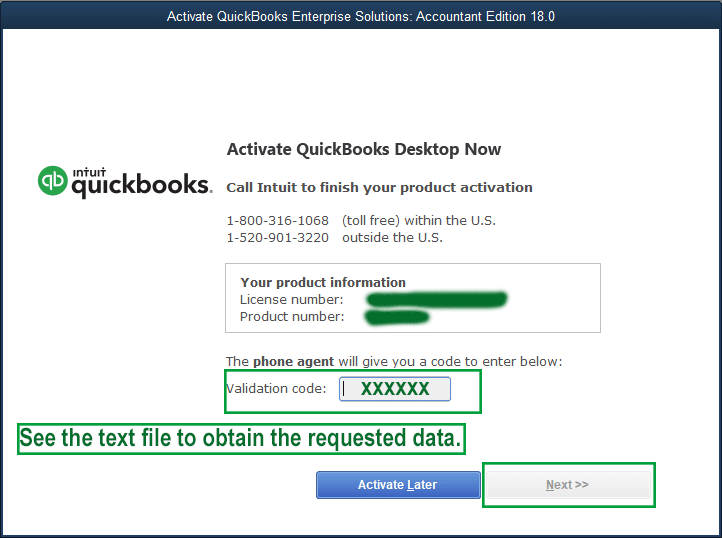
Product registration needed
Optimized for 1280x 1024 screen resolution or greater
Supports one workstation monitor, and in addition to that 2 extended monitors can work.
You will be asked a question: Will you be using QuickBooks Desktop on multiple computers at once (multi-user mode)?
Choose one of the available options for this.
No matter whether you choose yes or unsure, you will have to follow the entire process. However, if you opt for no, this will direct you to express setup.
Also, instead of responding to the question, you can click on the standard setup link under the question box. Here, you must follow the steps to download and install the process.
The next three choices that you would see are
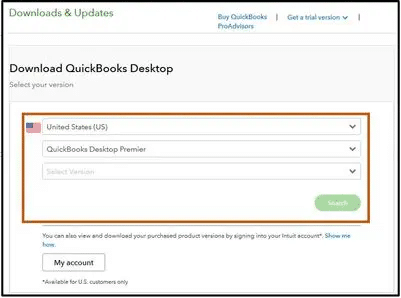
Choose the country in which you are using the QuickBooks desktop application.
Choose the QuickBooks desktop version you wish to install on your desktop.
Choose the year for the version of QuickBooks you wish to download and use for your company.
After clicking on the above tabs, you will be able to see the search tab.
Further, you need to click on the search tab.
This might take you to the software page from where you can download the software to the version and also the version you opted for.
Click on the download tab.
This will initiate the download process, where you will be asked the location to save the downloaded file or if it won’t ask, then it will save the file in the default location set.
Move to the folder where you have saved the file and proceed with the installation steps.
Now that you have made the payment and downloaded QuickBooks, it is time to perform the installation steps for different QuickBooks desktop 2023 or other versions. Let us check that out:
Head to the Quickbooks.exe file downloaded using the steps above.
After that, click on yes, only for permission.
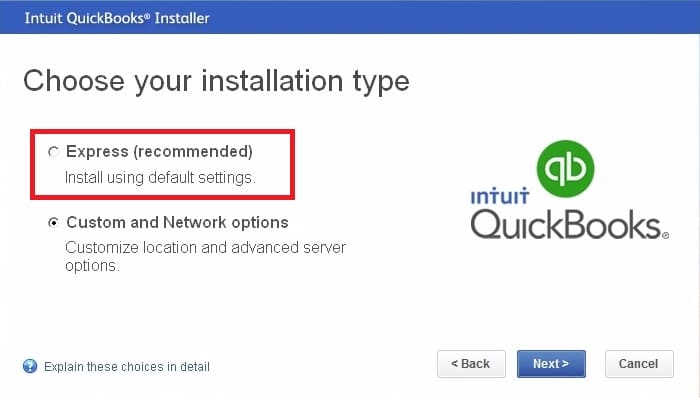
Choose the installation type.
Express Install – This is ideal if you have never used QuickBooks before. Or if you are again reinstalling QuickBooks. You can also opt for express installation if QuickBooks is used on a single computer and not on a network of computers.
Custom and network install – If you have opted for multi-user mode, then you have to go for this install type. Moreover, if you want to install QuickBooks somewhere other than the default location, then opt for this installation type. If you use a server to store files, then this install type is ideal.
Moving ahead, perform the onscreen instructions.
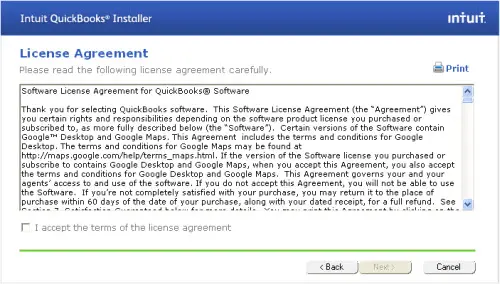
Also, agree to the license agreement and hit next.
QuickBooks Pro strikes a solid balance for small businesses that want comprehensive accounting features without the complexity or cost of Premier or Enterprise. It handles invoicing, payroll, bank reconciliation, inventory basics, and reporting well all from a desktop installation that doesn’t depend on a constant internet connection. If you’re still unsure whether Pro fits your business, or you’d like guidance comparing it against Premier or Enterprise before you buy, our certified QuickBooks ProAdvisors are available 24/7 at +1-888-510-9198. We can also assist with downloading, installing, and activating the software once you’ve made your decision reach out anytime.
Frequently Asked Questions (FAQs)
What is the difference between QuickBooks Pro and QuickBooks Premier?
QuickBooks Premier includes everything in Pro, plus industry-specific versions (for contractors, manufacturing, nonprofits, retail, and professional services) and the ability to track inventory assemblies. If your business doesn’t need industry-specific reporting or assembly tracking, Pro covers most core accounting needs at a lower price.
How many users can use QuickBooks Pro at the same time?
QuickBooks Pro supports up to 3 simultaneous users in multi-user mode. If your business needs more than 3 users working in the company file at once, you’ll need to upgrade to QuickBooks Premier or Enterprise.
Does QuickBooks Pro require an internet connection to work?
No, QuickBooks Pro is a desktop application and works fully offline for core accounting tasks. An internet connection is only needed for specific features like payroll processing, online banking, software updates, and product registration.
Can I upgrade from QuickBooks Pro to QuickBooks Premier or Enterprise later?
Yes, you can upgrade from Pro to Premier or Enterprise at any time. Your company file data carries over during the upgrade, so you won’t lose any of your existing records, transactions, or settings in the process.
Is QuickBooks Pro a one-time purchase or a subscription?
As of recent versions, QuickBooks Desktop Pro is sold as an annual subscription rather than a one-time purchase. This includes ongoing updates, support, and access as long as the subscription is active. Older perpetual-license versions are no longer sold for new purchases.
What happens if I don’t renew my QuickBooks Pro subscription?
If your subscription lapses, you’ll lose access to live support, software updates, security patches, and any connected services like payroll or online banking. You can typically still view your data in read-only mode, but you won’t be able to add new transactions until the subscription is renewed.
Is QuickBooks Pro suitable for businesses with inventory?
Yes, for basic inventory needs. QuickBooks Pro lets you track stock levels, set reorder points, and avoid overbuying or backorders. However, it doesn’t support tracking inventory assemblies (combining multiple items into one finished product) for that, you’d need QuickBooks Premier or Enterprise.
Cutting paper checks every payday isn’t just tedious, it’s also one of the easiest things to automate in QuickBooks. The Direct Deposit Form is what makes that automation possible, letting you pay employees and contractors directly into their bank accounts instead of handing out or mailing physical checks. It also doubles as the document that collects the employee banking details and authorization your payroll process needs to stay compliant. If you’d rather not manually enter your employees’ banking information yourself, turning on employee self-setup lets them enter their own personal, tax, and banking details directly QuickBooks Workforce automatically sends them an invite to do so.
This blog covers everything what the direct deposit form actually is, how to set up direct deposit for your employees, and how to get the authorization form whether you’re on QuickBooks Online or Desktop Payroll. For direct assistance, our team is available at +1-888-510-9198.
The direct deposit form gives authority to a third party i.e., often the employer for payroll to send money to a bank account by simply making use of the account details. An employer might require a canceled check to verify the accounting information. After the form is completed by the account holder, it must be signed and returned to the employer.
Note that, in order to make payments to your employees and contractors through direct deposit, you will be required to have a U.S. bank account that’s set up for ACH transactions. Also, there are fees to use direct deposit. You can check your payroll subscription for further related information.
Steps to set up direct deposit for employees
You can try performing the below set of steps to set up direct deposit for employees. Let us explore the steps one by one:
Step 1: Setting up company payroll for direct deposit
Identify and get access to your business, bank, and principal officer info
Connect your bank account
Verify your bank account
Set up your employee’s direct deposit
Step 2: Get a direct deposit authorization form
If your employees have filled out, signed, and dated a Direct Deposit Authorization Formand attached a voided check from the employee’s bank account, then choose your payroll for the next steps.
QuickBooks Online Payroll
You need to first head to taxes and further choose payroll tax.
Once done with that, choose filings and further opt for employee setup.
Heading forward, you need to choose bank verification next to authorization for direct deposit.
The last step is to choose the view option.
QuickBooks Desktop Payroll
You need to obtain a completed direct deposit authorization form and a voided check from the employee’s bank account. It should be noted that there is no need to submit the authorization form and void check to QuickBooks, as they are just for recording purposes.
In case the employee’s bank shows that the account should be tagged as money market, then inform the employee that QuickBooks desktop only accepts checking or savings accounts, so they should choose the checking option.
Here, you need to first choose employees and then opt for the employee center to open your employee list.
Once done with that, choose the employee’s name.
And further, opt for the payroll info tab.
You now need to choose the direct deposit tab.
In the direct deposit window, choose use direct deposit for the employee’s name.
Moving ahead, choose whether to deposit a paycheck into one or two accounts.
Followed by entering the employee’s financial institution information such as bank name, routing no., account no., and account type.
Now, if you are opting to deposit to two accounts, then you need to simply enter the amount or percentage that the employee wants to deposit to the first account in the amount to deposit field.
The remaining goes to the second account.
Further, you need to choose the OK tab to save the information.
And lastly, enter the direct deposit PIN when asked to.
Steps to get employee direct deposit authorization form
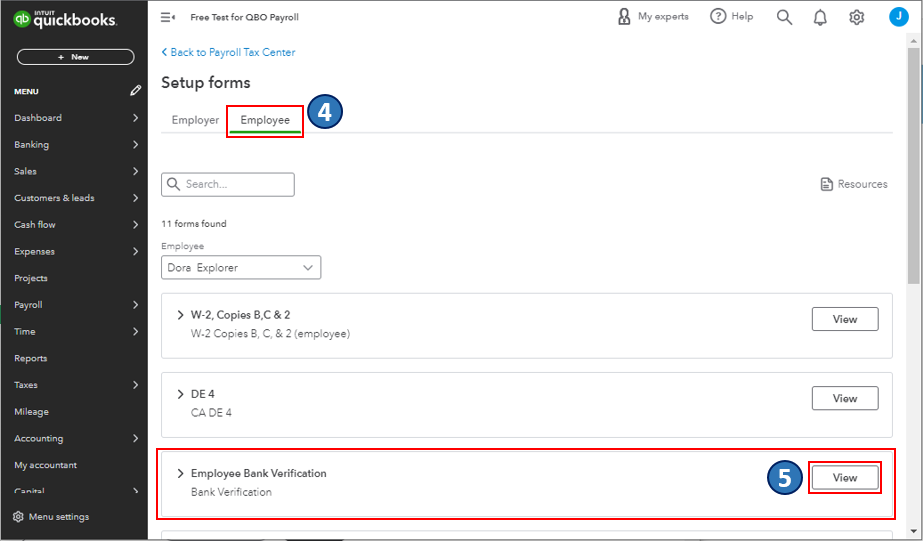
In order to get to the employee direct deposit authorization form in QuickBooks online, you need to first navigate to the filing resources window and further set up employees’ direct deposits in payroll. Note that the employees or contractors who will be paid by direct deposit should complete the employee direct deposit authorization form. To get this, you need to continue with the steps below:
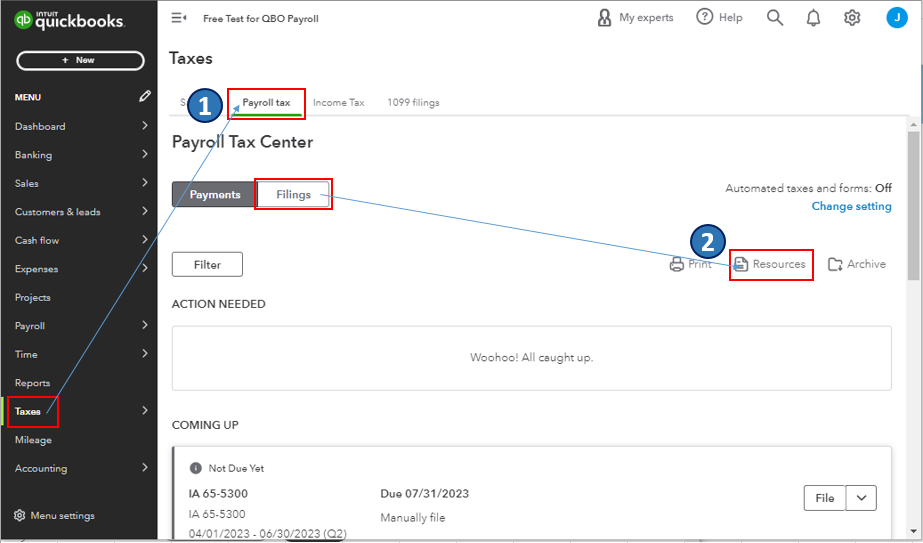
Initially, head to the taxes menu.
Further, opt for payroll tax.
You now have to choose the filings tab, and also click on resources
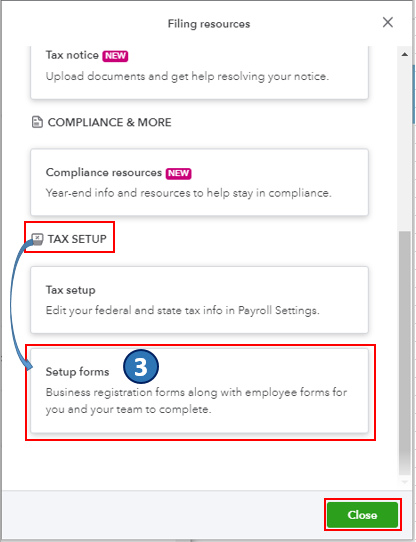
Heading forward, in the filing resources window, you need to scroll down to the tax setup section.
And later on, choose setup forms.
Now, navigate to the employees tab.
Also, find the employee bank verification section and hit the view tab.
Now, you will be routed to the form’s PDF file.
From there, download and print the employee direct deposit authorization form.
After you are done with this, carry out the necessary steps to set up and manage employee direct deposit in the payroll listed above. Moreover, there are a variety of payroll reports that you can make use of to view information about the business finances and employees.
What makes QuickBooks Online Payroll particularly flexible here is that you’re not locked into one approach you can enter some employee information yourself and invite them to fill in the rest, or hand off the entire self-onboarding process to them. And if your business still prefers having a printed paper trail, the authorization form remains available to download and print at any time.
Setting up direct deposit correctly the first time saves you from chasing down corrected paperwork later, so it’s worth double-checking the routing and account numbers against the voided check before finalizing. If you get stuck at any step whether it’s bank verification, the authorization form, or adding direct deposit to a specific employee our technical support team is available at +1-888-510-9198 to walk you through it.
FAQs Related to QuickBooks direct deposit form
Does QuickBooks have a direct deposit form?
Yes, QuickBooks offers a direct deposit form that helps employers collect relevant information related to the employee and further manage payroll.
Where is the direct deposit form in QuickBooks?
You can find the direct deposit form in QuickBooks using the steps below: 1. Navigate to the payroll tab. 2. Further, choose employees. 3. Now, from the payment method, select Start or Edit. 4. Heading forward, from the payment method dropdown ▼, choose direct deposit.
How do I verify direct deposit in QuickBooks?
You can verify direct deposit in QuickBooks using the set of steps below: 1. Sign in using your Intuit Account login. 2. Now, move to the payroll info section under the direct deposit bank account. 3. After that choose verify. 4. Enter the payroll PIN and confirm. 5. Lastly hit submit to complete the procedure.
What is a direct deposit form?
A direct deposit authorization form is a form that employees fill out, in order to authorize the employer to deposit money straight into the bank account. Many businesses pay their employees using the direct deposit option.
How long does it take for a direct deposit to process after setting it up in QuickBooks?
Once direct deposit is fully set up and verified for an employee, the actual transfer typically takes 1-2 business days to reach their bank account after you process payroll. This is why most businesses build in a lead time when running payroll submitting it a couple of days before the actual payday ensures the funds land on time. If your bank account verification is still pending, the first payroll run may take slightly longer.
Can I switch an employee from direct deposit back to paper checks if needed?
Yes, you can switch an employee’s payment method back to paper check at any time. In QuickBooks Online Payroll, simply go to Payroll > Employees, select the employee, and under the payment method dropdown, choose “Paper Check” instead of “Direct Deposit.” In QuickBooks Desktop Payroll, you’d navigate to the same Direct Deposit tab in the employee’s payroll info and uncheck the “Use Direct Deposit” option. Keep in mind this change applies going forward it won’t affect any direct deposits already in process.
Is there a difference between setting up direct deposit for employees versus contractors in QuickBooks?
The core process is similar both require bank account details and authorization but contractors are typically set up through a separate workflow since they’re paid via 1099 rather than W-2 payroll. In QuickBooks Online, contractor direct deposit is generally managed under the Contractors or Payments section rather than the Employees tab used in this guide. If you’re specifically setting up direct deposit for a 1099 contractor and aren’t sure where to start, our support team at +1-888-510-9198 can point you to the right setup flow.
Invoices are the backbone of your accounts receivable workflow in QuickBooks desktop every time a customer owes you money for a product or service, an invoice is how you record it, track it, and eventually collect on it. QuickBooks makes creating them straightforward, but the path you take depends on where in your workflow the invoice is coming from.
If you’re starting fresh with no prior estimate or sales order, you create the invoice from scratch. If you’ve already created a sales order or estimate that the customer has agreed to, QuickBooks lets you convert that directly into an invoice rather than re-entering everything. This article covers all three paths. If you need help at any point, our team is available at +1-888-510-9198.
Note: Creating an invoice is part of your usual A/R workflow in QuickBooks.
Steps to create an invoice in QuickBooks Desktop from scratch
An important point to note here is that if your business doesn’t need creating sales orders or estimates, then the A/R workflow starts with creating the invoice. The steps involved in this procedure are as follows:
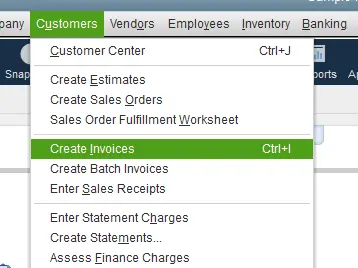
Initially, you need to head to the home screen or the customers menu and choose the create invoices option.
Further, from the customer: Job drop-down, you need to pick a customer or customer job.
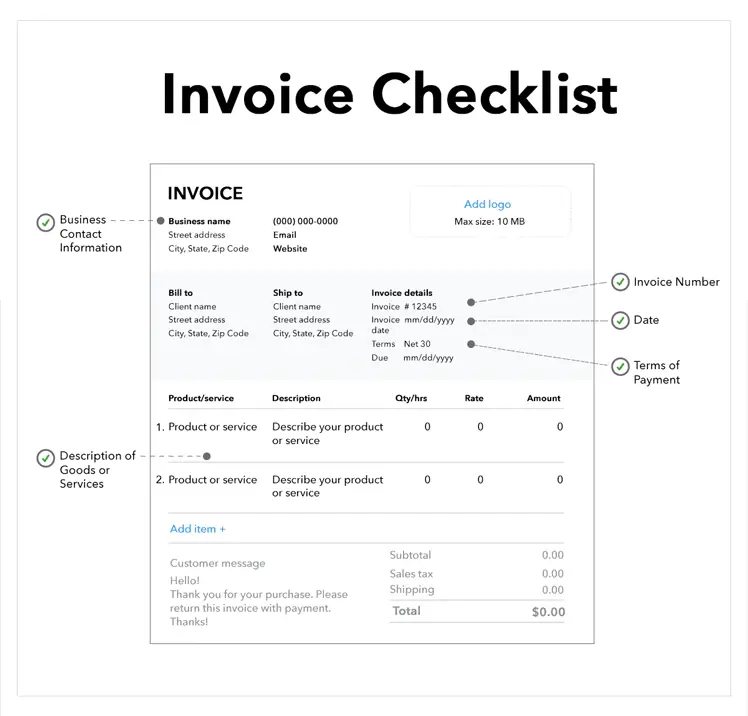
Heading forward, fill in the relevant information at the top of the form like the date invoice #, bill to/sold to, and terms.
Now, in the detail area, choose the item/s. Further, when you choose or add an item, the description and the amount are populated automatically depending upon the description and unit cost entered when it was set up.
Moreover, you can delete or modify this when creating invoices.
In case you wish to apply for a discount, you need to create a discount item. (This step is not mandatory).
For this, you need to scroll the lists menu from the home screen.
Further choose item list.
Also, right click anywhere and choose new.
You now have to choose the type drop down and select discount.
Once done with that, enter an item name/number and a brief description.
In the amount or % field, you need to enter the discount amount or percentage.
Just in case the discount amounts vary, then you might want to leave the amount or % field blank and further enter the amount directly on the sales forms.
From the account drop down, you need to choose the income account you want to use to track discounts you give to customers.
Further, choose the right tax code for the item.
Hit ok tab.
End the procedure by selecting save and close tabs respectively.
Just in case you have created a sales order and filled it, then you might have to create an invoice. This can be done in two ways. Let us evaluate each of the ways one by one:
From the sales orders window
If you’re already looking at the sales order you want to invoice:
The very first step is to choose create invoice tab on the sales orders main tab.
Now, select any of the two options from the prompt that shows up on the screen:
Choose create invoice for all of the sales order(s) to add all the items from the sales order to the invoice.
Go for Create invoice selected item, in case you want to put only some of the items on the invoice.
Perform necessary changes to the invoice.
Also, note that in the list of items, you need to enter a quantity in the To invoice (or invoiced) column for each item. In case you don’t want to invoice any of the listed item, enter the quantity as Zero
The last step is to choose save and close.
From the invoice window
Alternatively, start from the invoice side and pull in the sales order:
Here you need to head to the QuickBooks home screen or the customer menu and choose create invoices.
Furthermore, on the customer: job drop-down, choose a customer or customer job.
The available sales order window will show up on the screen.
You now have to choose one or more sales orders having items that you are planning to include in the invoice.
Perform necessary changes. Also, in the items list, enter the quantity in the To invoice (or invoiced) column for each item.
Just in case you don’t wish to invoice any of the listed items, add quantity as zero.
In situations where the customer accepts the estimate and agrees to pay a fixed amount (instead of the actual time and costs), then you can simply turn that entire estimate into an actual invoice. This can be done in any of the two ways enumerated below. Let us explore the steps in both the cases one by one:
From the estimate window
Start by opening the correct estimate.
After that, choose create invoice at the top of the estimate form.
In case you have progress invoicing turned on, then there are chances that you get a prompt that would ask for the items and quantities to put on the invoices.
You will have to specify the required information.
And after the invoice appears, edit the information as required.
At the end, choose save and close, and you are good to go.
From the invoice window
Under this procedure, you need to navigate to the QuickBooks home screen or the customer menu and further opt for create invoices.
Once done with that, on the customer: job dropdown, you need to choose a customer or customer job. The available estimates window show up.
Now, pick the estimate you wish to include in the invoice.
Further note that QuickBooks only allow you to choose one estimate to invoice.
Also, if you have progress invoicing turned on, then you might get a prompt asking what you want to have on the invoice.
Specify whatever asked to.
And after the invoice appears, edit the information required.
Once you know which starting point applies to your situation from scratch, from a sales order, or from an estimate the invoicing process in QuickBooks Desktop is genuinely quick. The key decision is always at the beginning: if you’ve already created a sales order or estimate, converting it to an invoice (rather than starting fresh) saves time and keeps your records consistent throughout the A/R workflow.
If you run into any issues during the process like a customer not appearing in the dropdown, discount items not calculating correctly, or progress invoicing behaving unexpectedly our certified QuickBooks ProAdvisors are available at +1-888-510-9198 to help you get it sorted quickly.
FAQs Related to Create invoice in QuickBooks Desktop
Can you create your own invoice in QuickBooks?
For this, you need to perform the steps below: 1. Move to the sales tab. 2. After that, choose invoices or estimates. 3. Once done with that choose create invoice or estimate to create a new form. 4. Or to edit the existing form, choose an invoice or estimate from the list and choose view/edit.
How do I send an invoice from QuickBooks desktop?
You can send an invoice from QuickBooks desktop using the set of steps below: 1. Move to the sales tab. 2. After that, choose invoices. 3. You now have to find the invoice you wish to email in the action column. 4. Now, select the drop-down arrow and hit send.
How do I Create a bill in QuickBooks?
To create a new bill in QuickBooks, you need to: 1. Choose + new 2. Select bill 3. From the vendor ▼ dropdown, choose a vendor 4. After that, from the terms ▼ dropdown, choose bill’s terms. 5. Furthermore, enter the bill details in the category details section. 6. And also enter the amount and tax.
What’s the difference between an estimate and an invoice in QuickBooks Desktop?
An estimate in QuickBooks is a non-posting document it gives the customer a cost preview of a job or project but doesn’t affect your accounts receivable or financial reports. An invoice, on the other hand, is a posting document that records the sale, adds to your A/R balance, and affects your income reports. When a customer approves an estimate and is ready to be billed, you convert it to an invoice using the steps in the third section of this guide.
Can I email an invoice directly from QuickBooks Desktop after creating it?
Yes, once you’ve saved the invoice, you can email it directly to the customer from within QuickBooks. Click the Email button at the top of the invoice (or go to File > Send Forms), confirm the customer’s email address, and send. QuickBooks uses either Outlook or Webmail depending on how your email is configured in Preferences. If you haven’t set up email in QuickBooks yet, the steps to do so are covered in our QuickBooks email setup guide.
The W-3 form officially the Transmittal of Wage and Tax Statements is the summary document that accompanies W-2s when they’re submitted to the Social Security Administration. It totals up all the W-2 wage and tax information across your employees, giving the SSA a complete picture of what your business reported for the year.
Whether you need to print it is determined by how you file your W-2s. If Intuit files them on your behalf, the W-3 is handled automatically. If you file electronically or manually, you’ll need to print it yourself. This blog covers the printing steps for both scenarios in QuickBooks Online, plus the automatic and manual methods for QuickBooks Desktop. For any help with Intuit forms, our team is available at +1-888-510-9198.
What is w3 form?
W3 form is a tax form that is used by the employers to report an employee’s total income to the Social Security Administration and to the Internal Revenue Services (IRS). Employees who get more than one W-2 Form from their employers need to be addressed to the IRS and Social Security Administration about their total salary payments and withholding amounts. This is done by filling W3 form by the employers and sending it to the respective authority.
As a business, you might need to print various forms in QuickBooks. Below we have stated the steps to print W-3 form in QuickBooks online payroll. Note that in QuickBooks online, printing W-3 forms depends upon how you pay and file the form.
Condition 1: When Intuit pay and file w-3 form for you.
In such a scenario, the form will be emailed to your employees starting January 16-31. In case you need to, you can reprint them on plain paper on January 13. The current year’s or any previous year’s form can be printed from when you started using QBO payroll.
Also, opt for print both employer and employee copies of your w-3 form.
The next step is to choose view on the transmittal wage and tax statements (W-3)
In case you are printing employee copies, then you will see those who want a paper copy and those who want to opt for paperless.
A printed copy won’t be provided to the ones chosen paperless.
You will now have to click on the view tab.
In case you come across a question asking if you or your employees contributed to a retirement plan outside of QuickBooks online, you will have to select yes or no, and carry out the steps above to get back to the W-3 form.
The last step is to click on the print tab on the Adobe Reader toolbar.
For this, you need to first head to the taxes menu.
Further click on payroll tax.
And also choose filings and opt for resources.
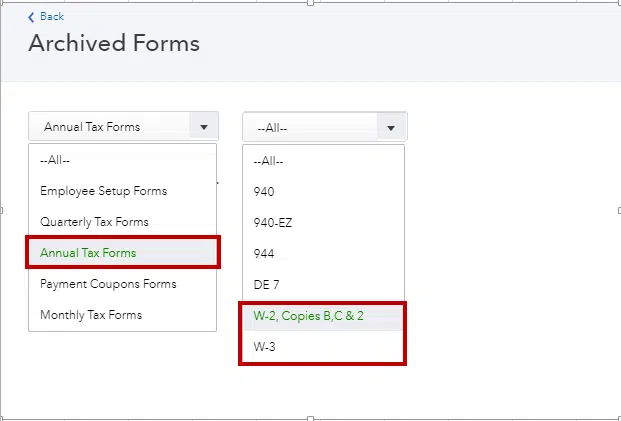
Once done with that, click on Archived forms and filings and also set the date range you need, or search the QuickBooks forms you need.
The next step is to choose the view on the w-3 form that you want to print.
Also, click on the print icon on the reader toolbar.
After that, choose print again.
Condition 2: In case you pay and file electronically or manually
In case you pay and file your W-3 form electronically or manually. You can print the W-3 form starting January 1. And can print the current year or any previous form from when you started using QBO payroll.
Printing the current year or a year prior
For printing the current year or a year prior W-3 form, you need to perform the set of steps below:
Navigate to the taxes menu.
Followed by clicking on the payroll tax.
And further choose filings.
From there, you can further choose to print both employer and employee copies of W-3.
Once done with that, choose archive or view on transmittal of wage and tax statement.
In case you are printing employee copies, you will see the following:
For W-2 Print setting: 4-part or 3-party perforated paper. Opt for the change setting, in case you need to change your paper type.
Employees who need a printed W-2 and those who want a paperless W-2. Note that, the employees who need paperless won’t be selected and won’t get a printed copy. You will then have to click on view.
A question might appear asking if you or your employees contributed to a retirement plan outside of QBO. Choose yes or no accordingly and further perform the steps above to get back to your W-3 form.
The last step is to choose the print icon on the Adobe Reader toolbar. Also, click on print again.
Between QuickBooks Online and Desktop, the steps are straightforward once you’ve identified which filing method applies to your setup. The key distinction in QBO is whether Intuit files on your behalf (which limits you to reprinting already-filed forms) versus managing filings yourself (which gives you direct access to print from January 1). In QuickBooks Desktop, the automatic method is generally quicker, while the manual process gives you more control when filing paper returns.
If you run into any trouble during the printing process whether the W-3 isn’t showing up in the expected location, Adobe Reader isn’t loading it correctly, or you need help with a prior year’s form our QuickBooks Support team is available at +1-888-510-9198 to walk you through it.
FAQs Related to W-3 forms in QuickBooks
What is w3 form?
W-3 in QuickBooks payroll is Transmittal wage and tax statements that summarize W-2 employee information about: Total w-2 earnings, etc.
How do I print tax forms in QuickBooks desktop?
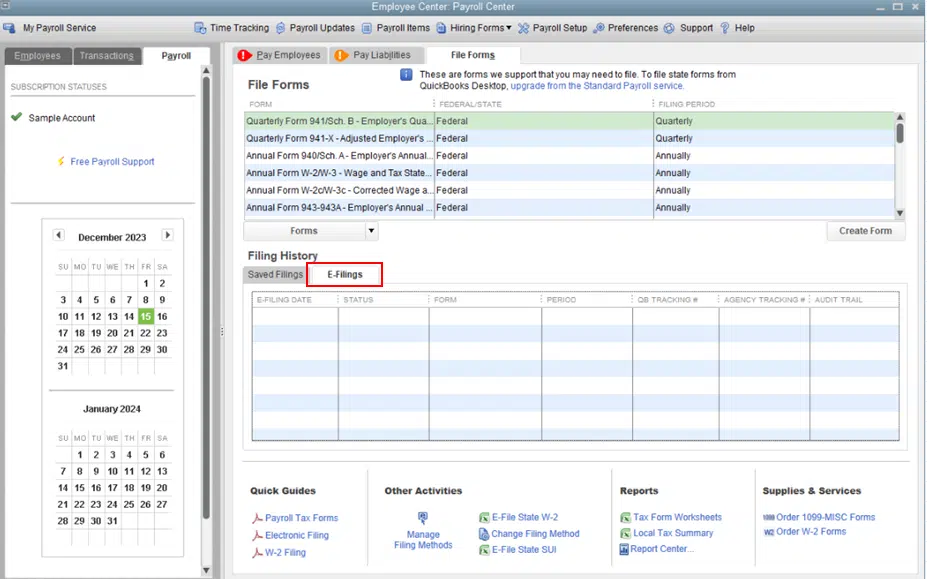
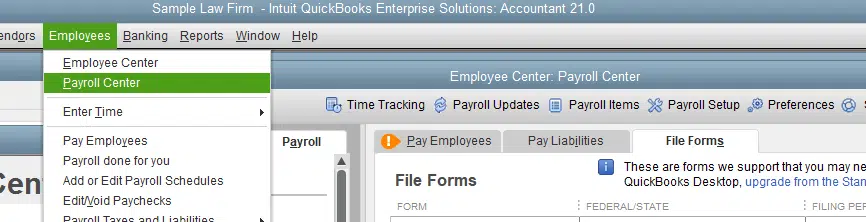
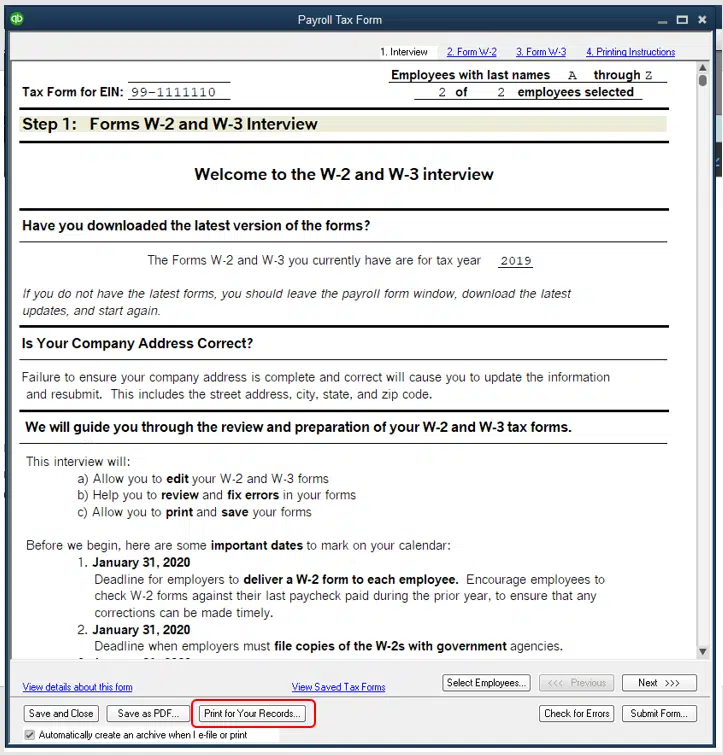
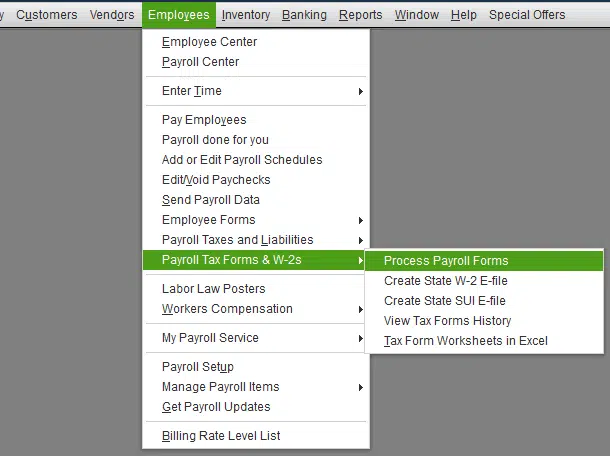
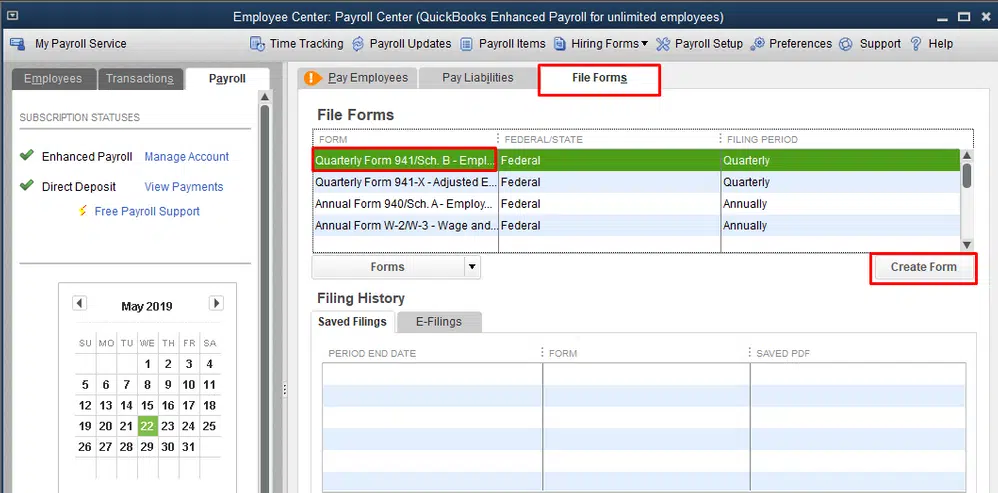
In order to print tax forms in QuickBooks, you can perform the steps below: 1. Move to the employees menu. 2. Choose the payroll center. 3. After that, select the file forms tab. 4. Now, select view/print forms and W-2s
Can I print w2 from QuickBooks desktop on plain paper?
You can print W2 on plain paper by clicking on W-2 printing settings. Under how do you want to print form W-2? you need to click on employee W-2 forms on plain paper. After that click on ok tab and this will print it for you successfully.
Where is W3 in QuickBooks Desktop?
You can find W-3 and print it using the steps below: 1. The very first step is to choose taxes. 2. After that, opt for payroll tax. 3. Now, choose filings. 4. You will see your W-2s and W-3 listed, but you can only file them from here. 5. Choose resources, and further click on W-2s or W-3s. 6. Once done with that, perform the steps to print it successfully.
Do I need to file a W-3 if I only have one employee?
Yes, if you’re required to file W-2 forms with the SSA (which applies when you have any employees, regardless of how many), you must also submit a W-3 to accompany them. The W-3 is required any time W-2s are filed on paper with the SSA. If you file W-2s electronically through the SSA’s Business Services Online portal, the SSA typically generates the W-3 data automatically, so a separate paper W-3 submission isn’t needed.
When is the deadline to file the W-3 form with the SSA?
The W-3 must be filed with the Social Security Administration by January 31 of the year following the tax year the same deadline as W-2s. This applies whether you’re filing on paper or electronically. Filing late can result in penalties, so it’s worth printing and reviewing your W-3 well in advance of the January 31 deadline to confirm all totals are accurate before submission.
Why does QuickBooks Online ask about retirement plan contributions when I try to print the W-3?
This prompt appears because Box 12 of the W-2 (and the corresponding section of the W-3) requires information about retirement plan contributions. QuickBooks Online asks whether you or your employees contributed to a retirement plan outside of the QBO system so it can accurately populate those fields on the form. If contributions were tracked inside QBO payroll, the system already knows the question is specifically about any external contributions that weren’t recorded in QuickBooks.
A recently reported error by QuickBooks users is: QuickBooks crashes when sending emails. This error is experienced when you try to send invoices or transactions over emails through QuickBooks. Often when QuickBooks crashing error occurs, it can risk the crucial company file data. Moreover, any unsaved data can also be lost due to such an issue in QuickBooks. Thus, it is essential to rectify the error as soon as possible. Thus, to make it easier for you to tackle such an error, we have designed this piece of writing sharing the complete details to eliminate error QuickBooks crashes when sending email.
For more details, stick around to this piece of writing, or you can ask our technical support team for assistance. Give us a call at +1-888-510-9198, and we will help you with all your QuickBooks related queries.
When does QuickBooks crashes when sending emails?
There are two basic situations where the possibility of experiencing the QuickBooks crashes when sending emails issue is high.
When you attach a company file to your email.
Or when you try to use send forms function in QuickBooks
In both these situations, it is possible to come across this error.
Did you know QuickBooks Desktop 2024 is already available to download? Check what it has got for you!!
What causes QuickBooks crashing issue while emailing invoices?
A few factors can trigger this error in QuickBooks. These factors include:
Another possible factor can be if the Microsoft windows components are damaged.
You can further experience this issue when some third-party program is hindering the connection between QuickBooks and the email server.
Be prepared for similar issue if the firewall or antivirus in the background is creating connection issue.
Steps to eliminate QuickBooks crashing issue when emailing invoices
You can try fixing the QuickBooks freezes when sending email error by performing the below methods one by one:
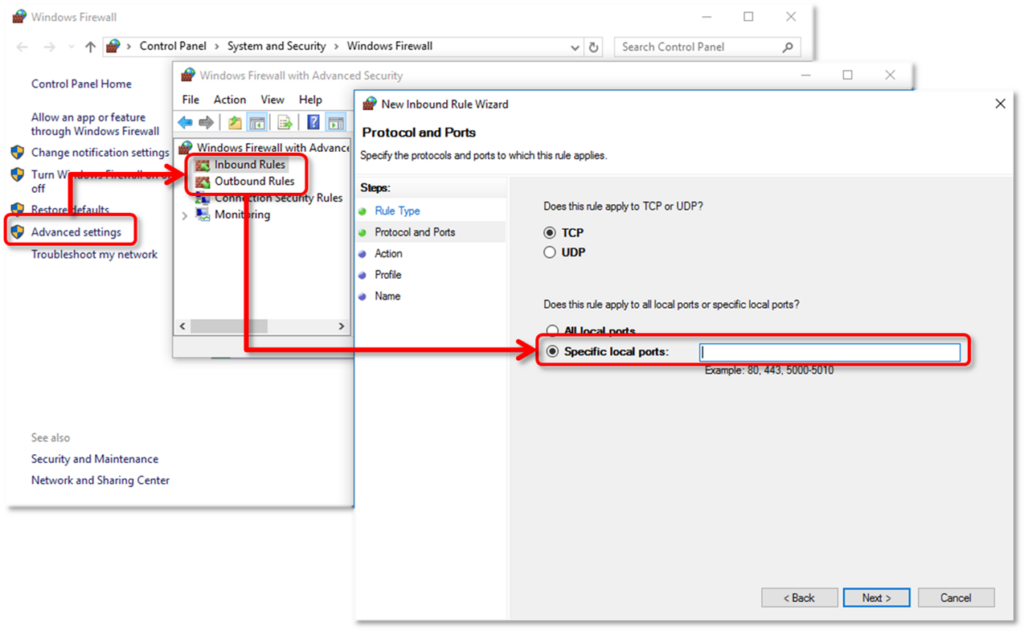
Method 1: Change firewall settings
A common factor causing this error can be if the firewall is hindering the connection. You can try to configure the firewall to ensure that it doesn’t crash your QuickBooks when sending emails. The steps involved here are as follows:
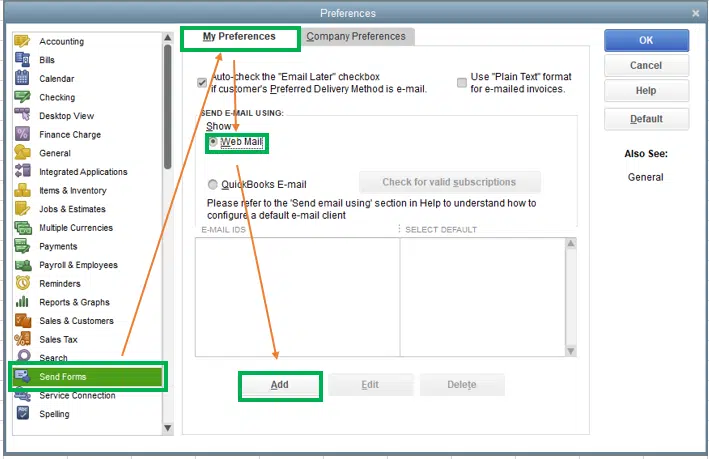
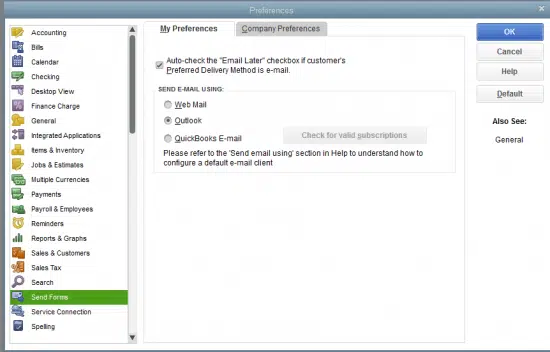
Note that at times, misconfigured webmail preferences might trigger QuickBooks crashing. In such a scenario, we suggest you reconfigure settings related to the webmail preferences. The steps involved in this procedure are as follows:
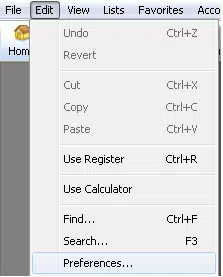
You need to first launch QuickBooks and also click on edit menu.
Furthermore, you need to click on preferences.
And within preferences, you need to click on the send forms option.
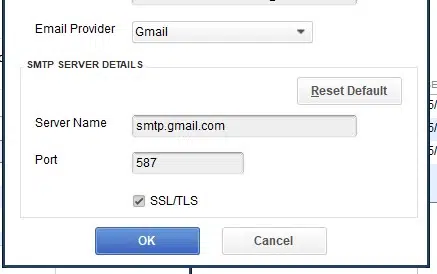
Opt for the email account in the My Preferences section, click on edit tab.
You will further have to mark the SSL box.
And also, match the name of the server with the server name field.
Also, if the outgoing mail is set as SMTP.mail.gmail.com, you need to alter the name to intuit.SMTP.mail.gmail.com.
The next step is to click on the ok tab.
And further relaunch QuickBooks program and try sending a test mail to yourself. In case the crash continues, click on the next tab.
Method 4: Update QuickBooks to the latest release
If none of the above methods helped you in eliminating the error, try updating the software to the latest release. The steps to update QuickBooks to the latest release are as follows:
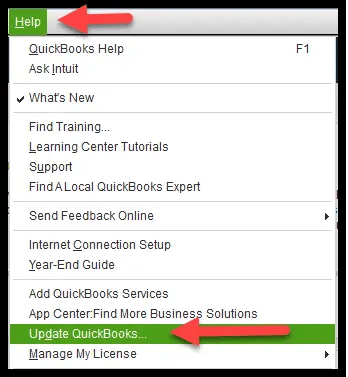
Begin the procedure by opening QuickBooks.
Further, click on the help tab.
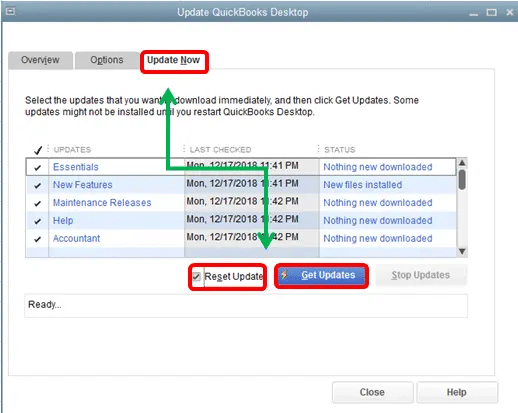
You now have to pick the option to update QuickBooks and also click on update now tab.
The next step is to click on the reset update tab.
Now, click on get updates to complete the procedure.
No matter what the situation is, QuickBooks crashing can be one of the most annoying snags. However, we believe that the steps enumerated above might help in some way to get rid of QuickBooks crash issue when sending emails. On the other hand, if you are unable to rectify the issue even after performing the set of steps listed above, then in that case, feel free to connect with our technical support team at +1-888-510-9198, and they will ensure to answer all your queries related to QuickBooks immediately.
FAQs Related to QuickBooks crashing issue when sending emails
Why does QuickBooks crash when I send an email?
QuickBooks can crash when sending an email, if the software is not updated to the latest release. You will have to further check if your software is compatible with your system. In simple words, make sure you meet the system requirements to run that particular version of QuickBooks.
How do I fix QuickBooks not sending emails?
You can try fixing the issue QuickBooks not sending emails using the steps below: 1. Start by signing in to QuickBooks online account. 2. Further, navigate to the settings tab ⚙. 3. And also, choose account and settings. 4. The next step is to move to the company section. 5. Also, opt for edit ✎ option in the contact info. 6. Review each email address and make changes. 7. The last step is to choose save and done tabs.
How do I allow QuickBooks to send emails?
You can do this by performing the steps below: 1. Move to the edit menu. 2. Further, choose preferences. 3. Also, choose send forms. 4. The next step is to select and add web mail. 5. Enter the email info and click on ok tab.



![QuickBooks Crashes When Sending Emails – [FIXED]](https://www.hostdocket.com/wp-content/uploads/2023/10/QuickBooks-crashes-when-sending-emails.png)