Ever been in the middle of your QuickBooks payroll update, and suddenly the software throw an error code 12152 disrupting the entire process? Well, if you find this relatable, then you are not only the one. The QuickBooks error 12152 has been bothering a lot of QuickBooks users lately. The error pops up on the screen out of nowhere and makes it not so easy for the QuickBooks user to connect to the server. You might be bothered by such error when you either update QuickBooks payroll or when opening the software. In order to deal with this error, it is crucial to keep a check on the internet connection, as it can be one of the core reasons behind the occurrence of such an error.
To help you understand this particular error better and to help you deal with this issue, we have come up with this segment sharing the complete information related to QuickBooks payroll update error 12152 in detail. If you are looking for Instant help then you can speak with one of our experts to quickly resolve to your QuickBooks Problems. Our QuickBooks Live experts are available at Toll-Free +1-888-510-9198. Feel free to discuss your queries with us and we will help you with all sorts of QuickBooks errors.
QuickBooks Error 12152 typically stands out when you have problems with the Internet Connection setups that make it difficult for the software to connect to the servers and give concerns with the updates. Before continuing to the solution of QuickBooks payroll error 12152 make sure your Internet connection is established as well as permits you to connect to verified websites.
Symptoms of Payroll update error 12152
Identifying QuickBooks payroll update error 12152 becomes easy with the signs listed below. Let us check it out:
This error 12152 appears when a program crashes the dynamic windows
When similar programs running on your system, the device crashes along with having error 12152
Error 12152 displays on a screen & this react when gradually to a mouse
As occasionally a user find their device gets freezes for a couple of a moment
Causes of QuickBooks Update Error 12152
A bunch of factors can drag you into such an error. These factors include:
Some new windows have API keys but are not working as legally
A few quite common reasons that incorporated wrong or fizzled installation in QB software
An un-installation of programming that may have left invalid sections in your registry windows
Any consequences of an infection or malware assault
Improper framework shutdown it is just because of a power disappointment or have some another factor for this error code
Deleting an important framework document or registry section, and in addition various different causes
The prompt reason for this error in QuickBooks software that mistake is an inability which effects to run all typical operations by a framework or a part of an applications.
Check out the solutions for QuickBooks Error Code 12152 as:
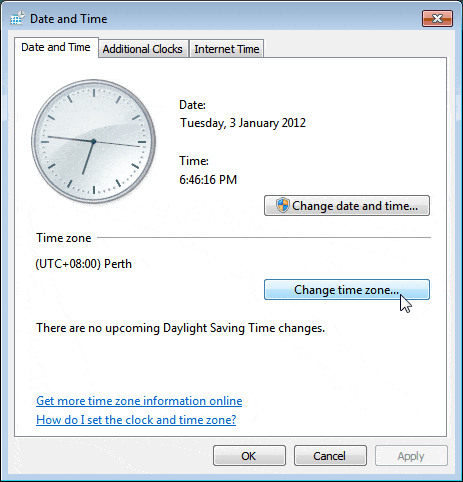
Solution 1:Check Date and Time
At times, incorrect date and time can trigger a lot of errors in QuickBooks. One such error can be QuickBooks error 12152. Thus, it is recommended to check the date and time of the system. The steps involved here are:
First of all, check its date as well as time on your system
On the clock, give one right-click on it
Now let us adjust your date & time
After this restart your QB desktop software & check for all error codes
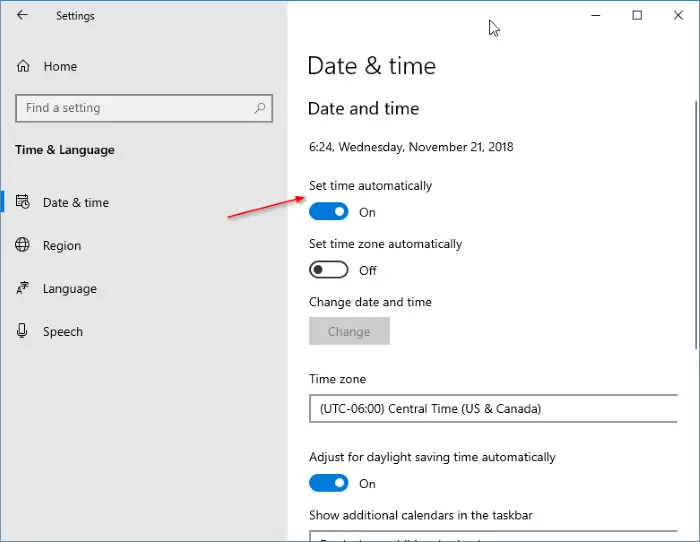
In case you are Windows 10 user, then perform the steps below:
You need to first head to settings and click on time and language.
Furthermore, move to date and time option.
Also, to set the current time, select the set time automatically option.
Now in the time zone section, enter the correct time zone.
In case the daylight saving time applies to your time zone, then enable the adjust for daylight saving time automatically.
In case the software isn’t accessed using the admin credentials, then facing this issue is possible.
Start your Computer
Then login as administrator tab
Click on the start key button
Then click on all programs > accessories > system tools & after this finally, click to the system as to restore
Under the new window, choose to restore my PC as earlier time option tab
Now click to the next heading
In the given list, just click on to ‘restore the point’ list. Select the latest system to restore that point from a displayed screen. After this just press to the next tab.
Into a confirmation window, give a single click on the next key button
When restoration process is completed, then restart your PC system
Solution 5:Fix registry entries
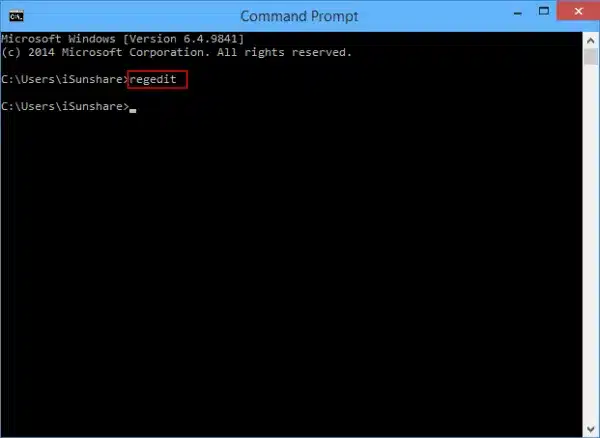
Select or click on the Start key button
Enter or type as Command in the given dialog search box. Remember don’t hit the enter key yet!
On a system keyboard, hold the Ctrl+ shift keys instantly & then press or hit the enter key
With the help of a permission dialog box, it will asks as prompted
Then click to the yes option
If the cursor of your mouse blinks, this opens the black box
Now type or enter as regedit. After doing so, hit the enter key
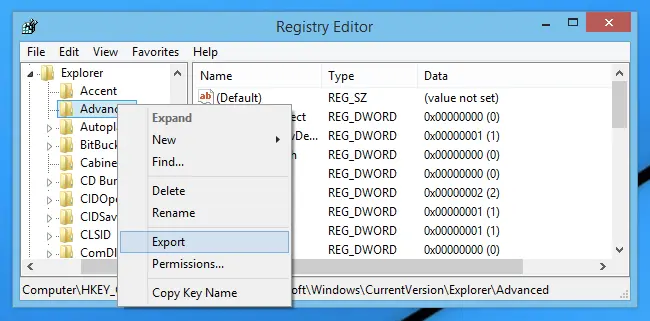
If want to take back up then choose the error 12152 related keys as instructed
Now select export from the main file menu
Then select the folder type and save into the list as where the client wants to save their IE backup keys
Under the File Name box, now type a name for a backup file for instance, IE backup. If need any technical assistance, ask expert guidance
Make sure that under the Export range box just type as selected branch is chosen by the user
Apply to save all changes that you have been made recently
Along with a .reg file extension. This file has been saved now
For a related registry entries, Take now a back up into your Internet Explorer web browser
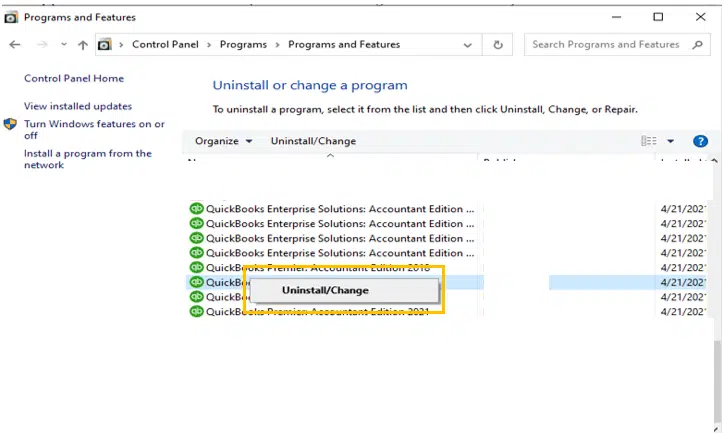
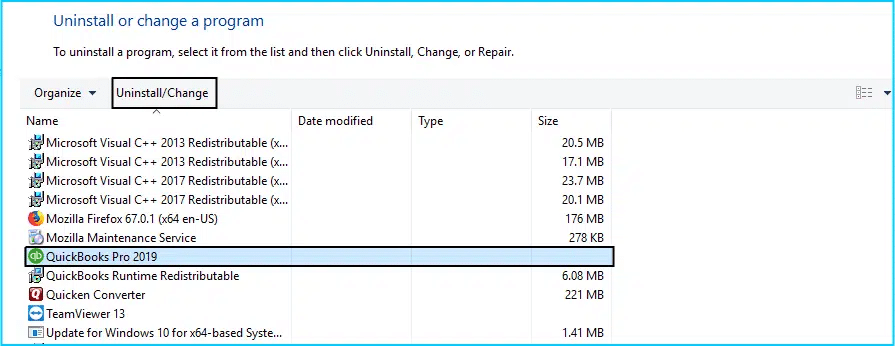
Solution 6:Uninstall and Reinstall QuickBooks
The very first step is to move to uninstall and download QuickBooks
After the software is established on the system, and then open it
Now, find the scan option and run it
The user will then see a list of issues or errors
The last step is to click on repair all option to eliminate them
Solution 7:Head through Microsoft Windows Framework along with time displayed
The user will have to verify the framework of the system is authentic and the time displayed is correct
The user is suggested to repeat the steps and also verify the framework through the settings tab.
The last step is to reboot the software and access it again.
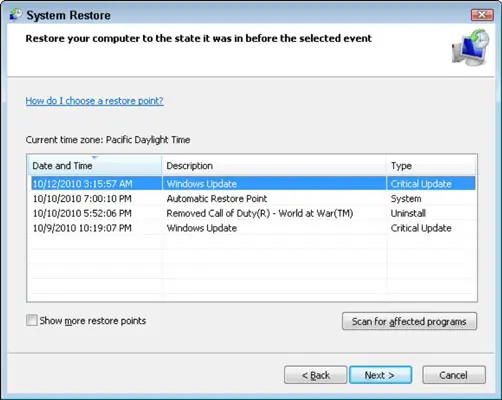
Solution 8: Use System Restore
If none of the above solutions helped you in fixing QuickBooks error 12152 successfully, then simply use system restore feature. The steps involved in here are:
Begin with rebooting the system.
After that, log in to the system using Windows admin credentials.
You now have to search for the option that shows Restore computer to a previous time and date.
Once done with that, select the above option and head to the next tab and click on it.
The next step is to head to the latest one from the list of restore points.
The next step is to confirm the choice by again clicking on next tab.
Towards the end, wait for the restoration process to complete and also reboot the system.
Solution 9: Clean Installation of QuickBooks
Another effective solution is to clean install using QuickBooks clean install tool. This process is an advanced version of rebooting and reinstalling that can fix the issue up to a certain extent. You will have to perform the following steps:
You need to first uninstall QuickBooks.
Download QuickBooks clean install tool from QuickBooks tool hub.
Run the clean install tool and let it perform the necessary steps.
Furthermore, download the same from official Intuit site.
The next step is to install QuickBooks and launch.
Fixing QuickBooks error code 12152 becomes easy, once you implement the right set of steps enumerated above. Hopefully, you will now be able to get rid of this particular error in QuickBooks without much hassle. If still you are facing the same error then get in touch with our QuickBooks Error Support team by dialing toll-free +1-888-510-9198. Our certified ProAdvisors will ensure to provide you with immediate assistance for all your QuickBooks related queries.
FAQs Related to QuickBooks error 12152
What is payroll error 12152?
This issue belongs to the 12xxx family of error codes that are related to the installation issues in QuickBooks. This error typically appears when updating QuickBooks to newer versions.
What are the causes behind such payroll errors?
This installation error may be encountered for several reasons, including: 1. Erroneous internet settings. 2. Using an older version of QuickBooks. 3. License data not identified by QuickBooks. 4. Technical issue with API keys in Windows. 5. Virus intrusion in the system.
How do I fix payroll error codes in QuickBooks?
These errors can be resolved with the help of following steps: 1. Configuring the internet settings. 2. Also, Correcting system date and time. 3. Restoring the system. 4. Attempt updating QuickBooks in the Safe mode. 5. Clean install QuickBooks desktop
Intuit QuickBooks is a widely used accounting solution for various businesses. Right from sending invoices to its customers, managing business expenses, and accessing information about the company, QuickBooks Online (QBO) does it all very swiftly. This QuickBooks online edition features high-speed functioning. If we talk about Google Chrome and QuickBooks Online, both are widely used. But when using QBO Login Online, a user sometimes faces to fix QuickBooks Online Login Errors On Google Chrome. There may be different types of errors responsible for this.
If you are also facing qb online not working error, then make sure to read this article till the end. This article will brief you on the factors responsible for QuickBooks Online Login Errors on Chrome and also the ways to get rid of this problem. However, if the user continues to face the same error, then in that case, it is recommended to consult our QuickBooks online support team. You can ring up at our toll-free number i.e. +1-888-510-9198, and our certified professionals will resolve the issue for you in the least possible time.
What are QuickBooks Online Login Errors on Chrome?
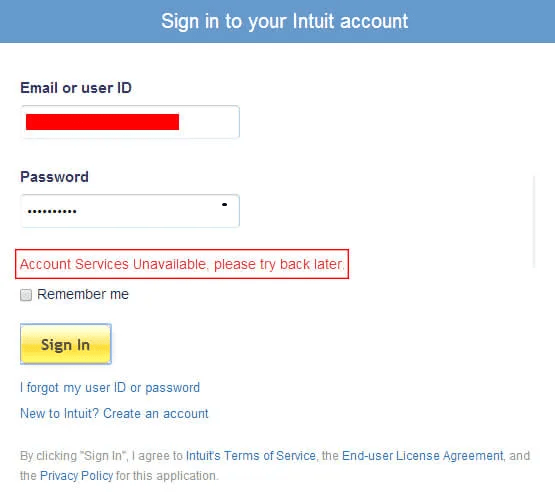
At times, QBO users face QuickBooks Online Login Errors on Chrome, which can be very much frustrating. This error can be often encountered due to security issues. In case this account is encountered, the user will have to update to a new Intuit account with enhanced security. Quick book log in error comes up on the QuickBooks online login page with an error message stating “Account services unavailable, please try back later“.
When you login to QuickBooks Online on Chrome, you can face the following QuickBooks login problems:
You get the loading message on your screen but nothing actually loads.
You may also receive a message of qbologin services not available
The Chrome gets confused sometimes, and takes you on a tour moving from the sign-in screen, to choosing a company and then back to the sign-in screen.
Google Chrome is one of the widely used browsers, and also it is a perfect match for accounting software. However, a wide number of factors might be responsible for the login issue to occur, which will be discussed later in this article.
What triggers QuickBooks Online Login Error on Chrome?
As stated before, there can be plenty of factors that might lead to QuickBooks Online Login Errors on Chrome. A few of the most common factors responsible for QBO log in errors are listed below:
In case the user forgets to sign out appropriately from the previous QuickBooks online session, then this kind of issue is most likely to happen.
If someone logged into the QuickBooks online on Chrome or any other system using the same credentials.
The issue can also be seen if the firewall or antivirus program blocks access to the software causing QuickBooks login issues.
Solutions to fix QuickBooks Online (QBO) Login Errors for Chrome
You need to follow the given steps in order to resolve your Chrome Login problems.
Step 1: Make use of any other web browser
There are chances that the user is facing login problems only with Google Chrome, whereas the other browsers do not show any error in logging in. Thus, in that case, the user can also use Internet Explorer to export your data to QBO Desktop.
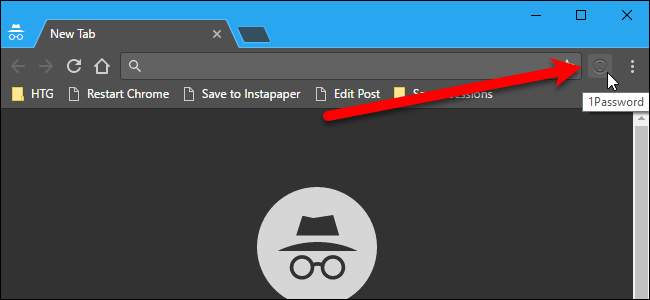
Step 2: Use Chrome Browser in the Incognito Window
Another option for the users can be to try logging in to the website using the incognito mode of Google Chrome. As it does not record the browsing history and has no cookies saved, the user will be able to log in to the website.
Follow the exact steps mentioned below:
For this, the user needs to open the Chrome browser :
First of all, the user will have to click the customize and control icon in the upper right.
And then, choose the New incognito window (Use shortcut key Ctrl+Shift+N).
Once done with that, the user will see a separate window in “incognito mode” You can note the icon in the upper left corner.
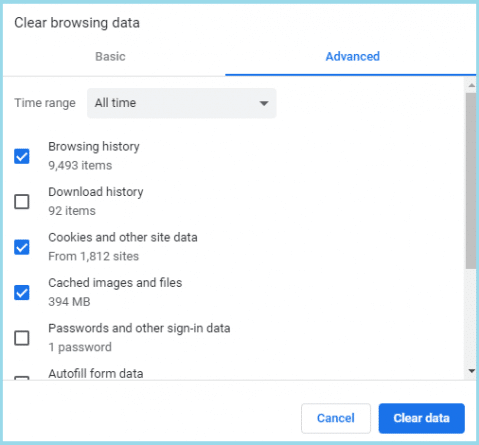
Old history and cache can be responsible for the slow performance of the Google Chrome browser you are using. Just clean the cache or delete the history!
In this method, the user will have to click on the ‘Customize and control icon’ to the right side and select the ‘Settings’ option.
After that, the user will have to click on the history tab and then, click on the Clear Browsing data button.
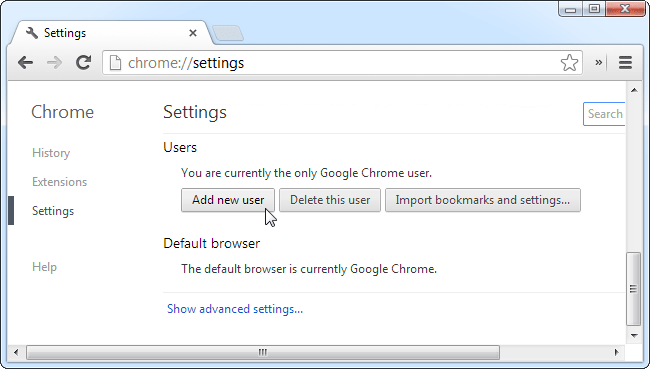
Step 4: Create an Additional Chrome User
Since you have to work on QBO, you can create another/ additional Chrome user in order to work with QBO Login. This will help you lessen your working hours.
You can create an additional Chrome user in the following ways:
In this method, the user will first have to open Chrome Browser and select Settings tab on the left
And then, the user will find a users section near the bottom section of the page
After that click on the ‘Add New user’ button
Followed by selecting the icon, enter name, and click the Create button.
Now, you will see that a new user icon appears on the top left corner of your browser which means that you can now switch between two users.
Whenever you are facing QuickBooks Online Login Errors on chrome with any of the websites you are trying to access, then, there is a problematic circumstance. When such problem arises, you can examine the web browser’s settings and make sure that there is no such problem linked to the chrome. After this, also check whether both JavaScript and Cookies are enabled or not. If you find difficulty in accessing the website, then you can take help from our 24/7 QuickBooks error support team by simply dialing our toll-free number .i.e. +1-888-510-9198. We will be happy to help you out in your all accounting related problems.
FAQs Related to QuickBooks Online Login Problem
Why am I having trouble logging into QuickBooks Online?
This can be because of your browser cache. Thus, we suggest you to clear your browser’s cache. Certain unexpected browsing issues like quick books online log in can be simply rectified by deleting the browser’s temporary internet files. For steps to clear the cache, you simply need to choose the browser below: Microsoft edge, Mozilla FireFox, etc.
How do I reset QuickBooks Online?
You can simply delete your company data to reset QuickBooks online.
Simply sign in to your QuickBooks online account.
You will have to sign in as admin
Confirm that you want to delete the company data and click on yes tab
Choose the industry from the dropdown
Go for create accounts based on the industry
Opt for wipe data
Why is QuickBooks Online not working with Chrome?
There could be a bunch of reasons including, browser cache and cookies, compatibility issues, poor network connection, or use of an outdated version of Chrome.
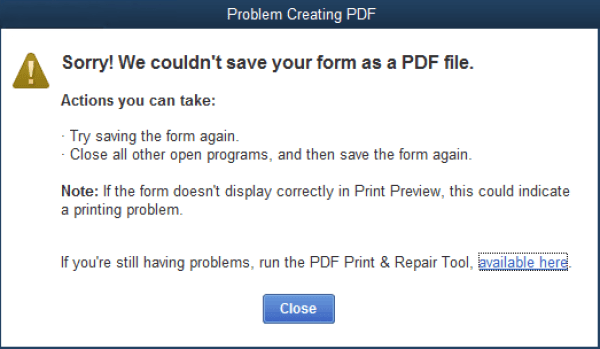
Effective ways to troubleshoot PDF and Print problems with QuickBooks Desktop
QuickBooks is a feature-packed software, preferred by entrepreneurs all across the globe. One of its features is QuickBooks Print and PDF. While using this feature, like at the time of printing PDFs, invoices, and checks, QuickBooks users might encounter certain issues. Sometimes, fixing the PDF and Print problems might be tricky for the users.
Considering this, we have come up with this article, where we will be discussing some of the helpful for QuickBooks pdf and print problems.
A more natural way to resolve this problem can be to consult our QuickBooks error support team by dialing our toll-free number i.e. +1-888-510-9198, and they will rescue you from this article in no time.
QuickBooks PDF and Repair Tool is a tool designed to discover and repair errors that occur while using the PDF and Print feature of QuickBooks. This tool has been specially introduced and designed in a way to fix the issues in Microsoft components, ultimately resolving the main issues. This tool can work wonders to resolve all sorts of printing and PDF errors.
What are some of the common QuickBooks pdf and print problems Tool?
QuickBooks accounting tool can fix many of the common errors and glitches with QuickBooks. Sometimes the errors appear due to incorrect settings of QuickBooks Desktop or due to failure of any Microsoft component. A few other errors that can be resolved by using this tool are listed below:
Issue associated with currently selected printer, Microsoft XPS Document writer on XPS port.
There can be a plenty of factors that might cause QuickBooks PDF and Print issues, a few of which are mentioned below:
PDF record part is missing
Or in case the PDF converter is disconnected
Another factor causing the issue can be, if the framework is unable to communicate with the printer
Similar issue can be faced, when an arranged network is unavailable
The user can also encounter PDF and print issues, if the printer programming isn’t introduced adequately
If a non-working print driver host is present, the issue is probable to occur
Another reason can be outdated QuickBooks software
Points to remember
Before opting for the major solutions, it is essential to have a look at some pointers that are required to be considered. Let us check out those points:
The very first thing is that the user will have to check whether the printer is turned on properly or not.
After that, the user can check whether the printer is able to print from some other program or not. In case it does it work properly, then the problem might not be with QuickBooks.
The user should also try restarting the system, as it can resolve the issue.
The user might also see Windows Error dialog or QuickBooks error dialog, along with printer error dialog.
At times, the user might encounter a scenario, where the user can print reports, but will not be able to print transactions. In order to fix this, the user can try changing the template of the form. It should be noted that the corrupted templates can’t get repaired, which makes it important to try other templates.
Procedures to Fix QuickBooks PDF and Print Problems with QuickBooks Desktop
There can be numerous procedures to tackle the QuickBooks PDF and Print error. Therefore, we will be exploring each of the methods one by one. Let us begin:
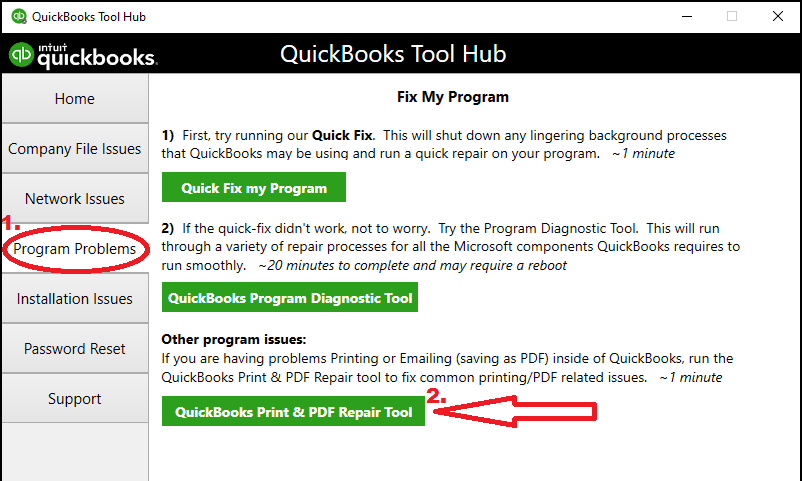
Method 1: Run the QuickBooks PDF & Print Problems Tool from the QuickBooks Tool Hub
Step 1: Download and install the QuickBooks Tool Hub
The first step is to download the QuickBooks Tools Hub. Now, save the file somewhere that you can easily find it, just like the Windows Desktop or downloads folder
Moving ahead, agree to the terms of service
Once the download is complete, open the file
To install the same, follow the onscreen instructions
Step 2: Use QuickBooks PDF & Print Problems tool, from the Tool Hub
To begin with, the user is required to tap on to the ‘Program Problems‘ option that will be shown in the ‘QuickBooks Tools Hub’.
Moving ahead, choose the ‘QuickBooks PDF & Print Problems Tool‘, which might take a minute or two to run.
Once done with the steps above, the user should make an attempt to send an email, print or save the file as a PDF.
Hopefully, this might work in your favor. However, if the glitch persists, the user should move on to the other solutions that we have listed below.
Method 2: Another method is to reset your temp folder permissions
This solution majorly consists of two steps and a few sub-steps. The steps include:
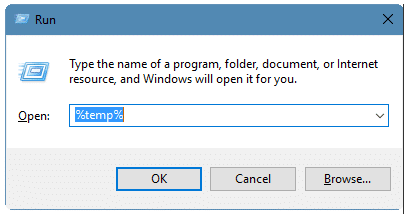
Step 1: The first step is to reset the temp folder permissions
In case the error persists, the user is required to reboot the computer and once again try for the same. However, if the user faces a failure again, then he/she can try resetting the temp folder permissions.
To start with, the user is required to tap on the ‘Windows key + R‘ keys simultaneously, in order to open the ‘RUN‘ command.
The next step is to write and enter ‘%TEMP%‘, followed by hitting ‘Enter‘ key.
Now, right-click the empty area of the temp folder, and then select the option of ‘Properties‘.
Click on the ‘Security‘ tab.
Make sure that all the usernames and groups displayed on the Security tab have the Full Control.
When the permissions have been set to ‘Full Control‘, then try to ‘Save as PDF‘.
Step 2: Give your confirmation that you can print to your XPS
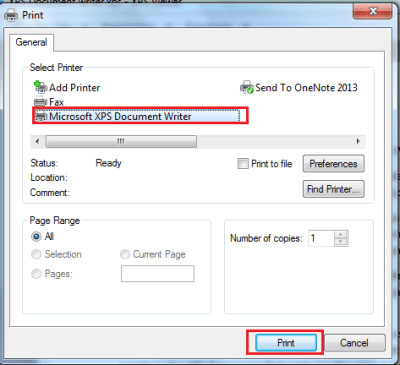
In this step, the user is required to confirm if they can print to their ‘XPS Document Writer‘. The steps to do the same are as follows:
First of all, the user is required to ‘Open the Notepad‘.
Moving forward, write anything for testing purpose.
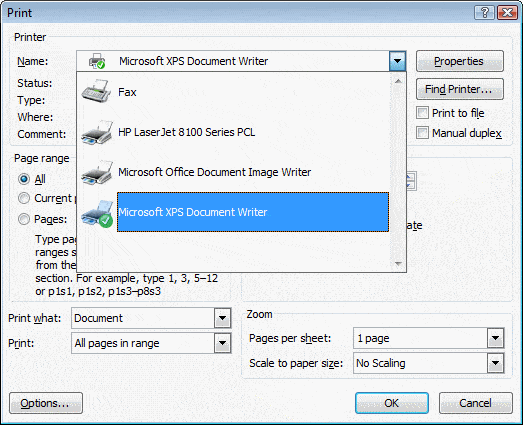
Now, visit the ‘file‘ and then click on the ‘Print‘ option.
The user needs to then choose the ‘XPS Document Writer‘ option, and choose the ‘Print‘.
Now, pick the option of Desktop, from the save as dialog box.
Lastly, navigate to the desktop and find out whether you are able to view the XPS document that you have printed from your notepad or not.
Method 3: Find out whether the reconcile window is off of the screen or not
In case the QuickBooks desktop software appears to lockup after picking reconcile from the Banking menu, however, if the PDF functions are operational, then the reconcile window might display off of the screen.
In such case, select the ‘Window menu‘ and check if the reconcile window is listed or not.
Method 4: Test, reinstall, and alter permissions for XPS Document Writer
Note:
There are certain points that the user is required to consider before beginning with this procedure. You might be thinking what those points are, to make it easy for you, we have listed those points below:
Intuit doesn’t support the Microsoft applications and is also not responsible for running all of these tools.
If the user is uncomfortable in performing these tasks, then it is suggested that they should look for an IT professional to perform the same task for them, in order to avoid any mess.
Now comes the procedure:
Step 1: The first step is to test the XPS document writer, by simply printing outside QuickBooks
To begin with, the user is required to select the ‘Print‘ option from the ‘file menu‘.
After that, choose the ‘Microsoft XPS Document Writer‘ from the list of printers in the print window.
Now, save the ‘.xps file‘.
Lastly, visit the desktop and find out the .xps file:
There can be certain situations encountered, one of which is that if the file is not there and the user didn’t encounter an error while saving the same. A security setting might be stopping the user from printing to the XPS Document Writer.
In case the .xps file is present, the user is required to open it. In case he/she encounters any sort of error in opening the file, or also if the file doesn’t show up in a proper manner, then the user is required to reinstall the XPS Document Writer.
Lastly, if QuickBooks desktop bumps into a problem while the user tries to print, then also there is a need to reinstall the same.
Now comes the step 2, which has two parts, namely A and B.
Step 2: Reinstalling the Microsoft XPS Document Writer
Part A: In the first part, the user is required to ‘Verify‘ whether the XPS Services are enabled or not.
Part B: In the second part, the user should reinstall the XPS Document Writer.
Let us explore, each of the steps one by one.
Part A: By following simple steps, the user can Verify whether the XPS Services Are Enabled or not
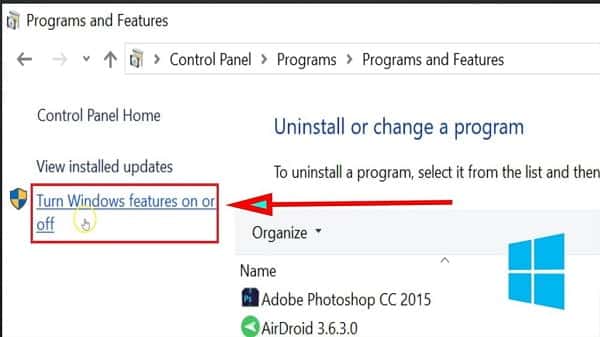
Tap on the ‘Windows key‘ along with pressing ‘E key‘, in order to open the window explorer.
In the upper left, pick the ‘Computer tab‘.
Choose the uninstall option or change a program under the System group.
Now, the user has to opt for the ‘Turn Windows Features‘ on or off over on the left.
Lastly, scroll down and make sure that both the XPS Services and XPS Viewer are enabled.
Part B: Reinstalling the XPS Document Writer in Windows 8 and Windows 7/Windows Vista
For Windows 7/Windows Vista:
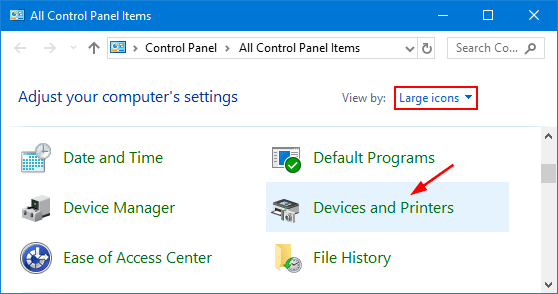
To start with, the user is required to select the ‘Devices and Printer’ options from the ‘Windows Start‘ menu.
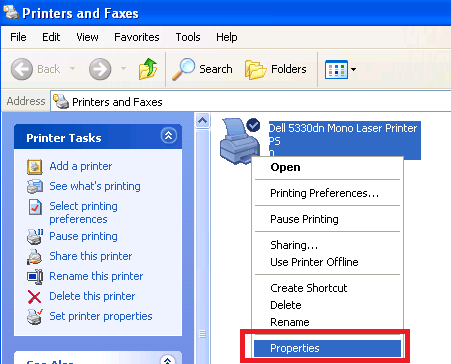
Now, choose the ‘Microsoft XPS Document Writer icon‘, followed by selecting the ‘Remove device‘.
To continue and confirm, choose ‘Yes‘.
Choose ‘Add a printer‘ and select ‘Add a local printer‘ option respectively from the toolbar.
After that, choose the option ‘Use an existing port‘.
Also, choose ‘XPSPort: (Local Port)‘, and then hit ‘Next‘.
Now, the user is required to select ‘Microsoftt‘ and then ‘Microsoft XPS Document Writer v4‘, from the manufacturer list.
After that tap on to ‘Next‘.
The final step is to pick the ‘Replace the current driver‘ option and tap onto the ‘Next‘ option.
For Windows 8:
To begin with, the user is required to hover the mouse in the lower or upper right-hand corner, in order to display the ‘Start Screen‘.
Now the user has to choose the ‘settings > Control Panel > Devices and Printers‘.
Moving ahead, the ‘Microsoft XPS Document Writer‘ icon is to be selected, followed by choosing the ‘Remove device‘.
The user is now required to select the option ‘YES‘ to give the confirmation.
From the toolbar, select the option of ‘Add a printer‘, followed by picking the ‘Add a local printer or network print‘ with manual settings option.
The next step is to select the ‘PORTPROMPT‘ i.e. local port, in the use an existing port option.
Tap on to the ‘Next‘ option to move ahead.
The user is required to hit the ‘Microsoft‘ option, and then ‘Microsoft XPS Document Writer v4‘ from the manufacturer list.
Again tap on to the ‘Next‘ option.
Now, select the ‘Replace the current driver‘ option and then tap on to ‘Next‘.
Take out the v4 in the Printer Name field, thus, the name is ‘Microsoft XPS Document Writer‘.
The final step is to hit the ‘finish‘ tab and you are good to go.
Step 3: In this step, the user is required to adjust Windows user permissions for the XPS Document Writer
If by any chance, the Windows user is not having the permission to print to the XPS document writer, then in that case the QuickBooks software will not be able to create the .xps file. Also, the user is required to be logged in with Admin Rights to change these permissions.
The very first step is to open the ‘Printers Control Panel in Windows‘
And then, Right-click the ‘Microsoft XPS Document Writer‘, followed by selecting the ‘Printer properties (Windows 7 & 8) or Properties (Windows Vista)‘
Now, tap on the ‘Security‘ option.
Choose the ‘Everyone user group‘.
This step is optional. In case the Everyone group is not seen in the list, the user can take necessary actions, which include:
a) Hitting the ‘Add button’.
b) Entering the ‘term Everyone’ in the field and lastly
c) Tap on to ‘Check Names’ and hit ‘OK‘.
Moving ahead, the user is required to select ‘Print‘ and hit ‘OK‘ tab, in the Allow column.
Now, the user is required to navigate to ‘C:\Windows\System32\spool in Windows Explorer.‘
In this step, the user is required to choose the ‘Printers‘ option and select ‘Properties‘.
After that hit the ‘Security‘ tab.
Now click on the ‘Edit‘ option.
Moving ahead, tap on the ‘Add‘ option.
Type ‘Local Service‘ and select ‘Enter‘.
Make sure Local Service has ‘Full Control’, then select ‘OK‘.
Open QuickBooks and try to ‘create a .pdf file‘.
Step 4: In this step, the user is required to edit the security software settings
At times the creation of .xps files can also be blocked by the settings of the security software such as, Norton Antivirus or McAfee firewall. Thus, the user is required to check those setting on their security software and ensure that the .xps files aren’t blocked.
Step 5: Installing or Repairing MSXML 6.0
Basically, MSXML 6.0 is a Microsoft Windows component and is also a part of the system requirements for the XPS Doc Writer. The steps for Windows 8 and Windows 7 might differ. Let us have a look at the steps one by one:
For Windows 8:
In Windows 8, system file checker is in-built, which is a utility provided by Microsoft to repair the Windows system files. Thus, the user is required to run this system file checker.
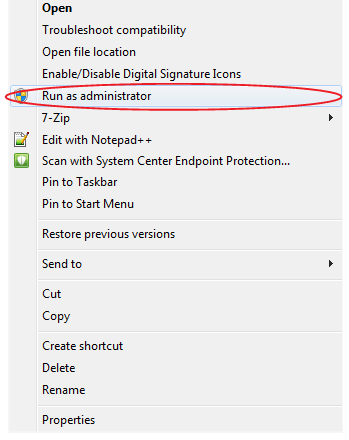
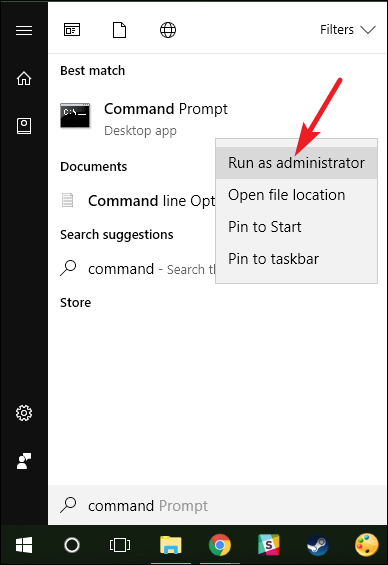
First of all, hover the mouse in the upper or lower right-hand corner and then click on the ‘magnifying glass‘.
Moving to the next step, the user is required to type ‘Command‘ and then select the ‘Command prompt‘.
Now, choose the option on the bottom bar which says ‘Run as Administrator‘.
If in case, the user is prompted for admin password, then simply enter the password or hit the allow option.
Lastly, type in ‘sfc/scannow‘.
For Windows 7 and Windows Vista:
In case of Windows 7 also, the user is required to run the in-built System file checker, in order to repair the MSXML 6.0.
To start with, the user is required to select the ‘Windows Start‘ button.
After that, select ‘All Programs‘ option, followed by selecting ‘Accessories‘.
Now select the ‘Command Prompt‘ and also select ‘Run as Administrator‘.
In this case also, if the user is prompted to enter the ‘Admin password‘, then simply enter the password or click ‘Allow‘.
Step 6: Moving ahead, the user is required to create a new template for the form
In case the template for the user’s form is damaged, they might encounter this issue. Thus, in such cases, the user is required to create a new template for their form.
The first step is to create a new template for the form.
After that change the template on the transaction.
And lastly, create the .pdf file.
Step 7: The last step, is to bypass the print spooler
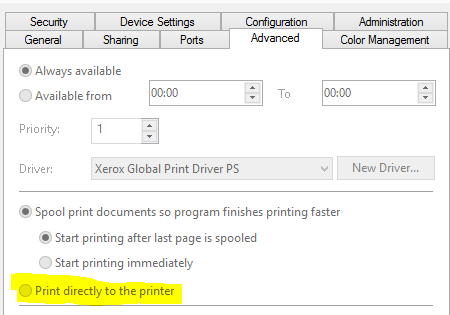
Once the user has completed the preceding steps, it is time to set the XPS document Writer to bypass the print spooler.
To begin with, the user is required to open the ‘Printer Control Panel’ in Windows.
After that, right-click on the ‘Microsoft XPS Document Writer’, followed by selecting the ‘Printer Properties or Properties‘, as the case may be depending upon the Windows of the user.
Now, select the ‘Advanced tab‘ option and later select ‘Print Directly to Printer‘.
The last step is to tap on ‘OK‘, in order to save the changes and close the ‘Printer Properties‘.
Method 5: Renaming or Removing the Printer file
In case the above methods failed to fix the issue, then in that case the user can delete the damaged file and create new ones. The steps involved in this process are as follows:
The user is first required to search and spot the files.
After that, instead of deleting them, try renaming the files to something such as ‘qbprint.old’ & ‘wpr.old‘.
The next step in the process is torun QuickBooksand open the company file.
Once done with that, the user needs toselect file and then click onprinter setup.
And then, the user needs to pick any transaction in the Form Nameand then hit OK.
Carrying out the above step will make the user reset the printer settings in the software.
So, with this, we come to the end of this article. We believe that after reading this article, it would be much easier for the QuickBooks users to tackle QuickBooks pdf and print problems in QuickBooks Desktop. However, if you find this procedure lengthy, time consuming, or if even after following the steps, you are unable to deal with such error, then it would be a better option to get in touch with QuickBooks enterprise support team by dialing our toll-free number i.e. +1-888-510-9198.
QuickBooks users might find dealing with these errors a difficult task, but our professionals have much deeper knowledge, which makes it easy for them to handle such issues. Thus, without thinking much, you can simply get in touch with our team of experts and they will clear all your clouds of confusion.
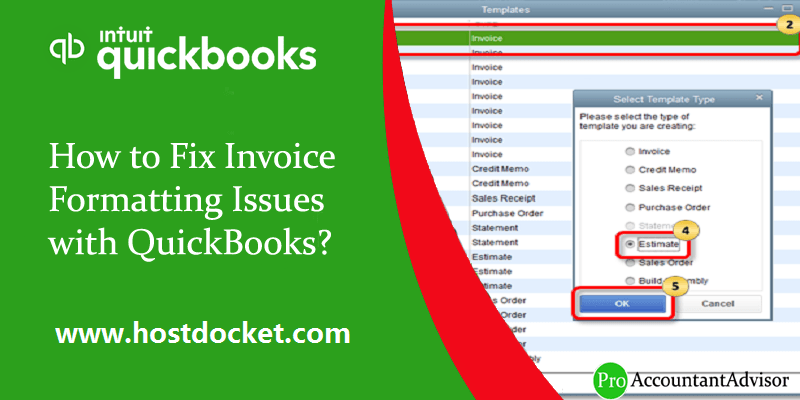
Startups and small- and medium-sized businesses all around the globe are picking QuickBooks for their bookkeeping and accounting needs. The software helps their users save time and increase productivity without a lot of staff members or a diligent finance team. It also comes with a wide selection of templates to be used in invoices and receipts. But from time to time, like any other accounting software, QuickBooks too faces unavoidable errors and glitches. In this blog post, we will discuss the ways to fix invoice formatting issues with QuickBooks. To learn further about this error in QuickBooks, stick around to this piece of writing till the end. Or you can further connect with our technical support team at +1-888-510-9198, and our technically sound professionals will surely help you with all your QuickBooks related queries.
Steps to Fix the Invoice Formatting Issues with QuickBooks
As already mentioned above in this article, QuickBooks comes with a wide selection of templates to be used in invoices and receipts. And sometimes you may face issues while using these templates, mostly related to formatting. To fix this invoice formatting issue with QuickBooks, you can follow the methods below. However, you can take help from our QuickBooks error support team in order to resolve the problem swiftly.
The above steps prove highly useful in fixing this issue. You can easily fix invoice formatting issues with QuickBooks through these methods. In case, the steps do not help you resolve this issue, you can contact our representatives at our toll-free QuickBooks online support number i.e. +1-888-510-9198. Our QuickBooks experts are available round the clock to help you.
FAQs Related to QuickBooks Invoice Formatting issues
How do I change the format of an invoice in QuickBooks?
You can customize invoices, estimates, and sales receipts in QuickBooks using the steps below: 1. At first, move to the go get paid and pay or sales, then choose invoices. 2. After that, choose to create an invoice to create a new invoice. 3. Or, to edit an existing one, find the invoice from the list and choose view/edit from the dropdown ▼ under the action column.
Does QuickBooks have invoice templates?
You need to first choose a downloadable invoice template in the file format and style that suits your business requirements. Select a standard invoice template or choose one specific to your industry and business.
What format does QuickBooks send invoices?
The recipients of files sent through QuickBooks receive an attachment called Winmail.dat, instead of a .pdf file.
How do I fix an invoice in QuickBooks?
To edit an invoice, you need to head to the get paid and pay option. You are then required to scroll to the invoice you wish to edit and click on it to open it up. Also, make the required changes and click on save and close.
Did you just receive QuickBooks Error 16638 85757? It’s a common error especially if you are using an older version of QuickBooks. This error mostly pops up when you try to open a company file that has been corrupt or damaged. You may also receive this unexpected error while login to online banking. It’s easy to spot this error as Error 16638 85757 shows up on your screen. If you are wondering how, you can get read of this error, read on this blog post. However, you can get help from our QuickBooks error support team to save your previous time and efforts. You can read this article carefully to fix the QuickBooks unexpected error 16638 85757. Or if you need any sort of professional assistance at some point in time, then feel free to connect with our tech support professionals at +1-888-510-9198, our technically sound professionals will answer all your queries immediately.
One or more of the following reasons may trigger QuickBooks Error 16638 85757:
QuickBooks company file is corrupt or damaged
You are trying to access the company file on a network instead of a local drive on your computer
QuickBooks Desktop is unable to access the company file while using online banking
Troubleshooting QuickBooks Error 16638 85757
The QuickBooks Error 16638 85757 only appears in older versions of QuickBooks thus, if possible, you can switch to the latest versions of QuickBooks and avoid this unexpected error for good. If upgrading to the latest version of QuickBooks isn’t possible immediately, you can try the following troubleshooting steps:
Try reopening the company file (.qbw), on which the error is generated, again
Go back and check the path of the company file
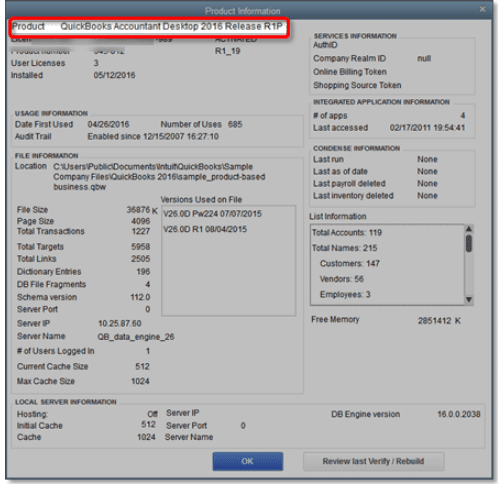
Verify if QuickBooks file path is the same as the company file location provided on the Product Information Screen
To open the Product Information Screen, open QuickBooks and press F2 key on your keyboard
Open and review Production Information and verify the path of the QuickBooks company file
Important: In case your company file is stored on a network drive of your system, follow the given steps:
The user is required to open the folder where your company file is located on the network drive
Now, copy (Ctrl + V) keys your company file
And paste (Ctrl + V) keys the file on any local drive
After that repair your online banking function that may have generated the error before
If you receive the same error again, it denotes that your company file (.qbw) is damaged
Why and how do you verify QuickBooks company file on QuickBooks?
The verify and rebuild utility in QuickBooks can help you identify and fix damages in QuickBooks company files. You should verify your company files frequently to keep from receiving errors related to QuickBooks files. The following are the steps to verify QuickBooks files:
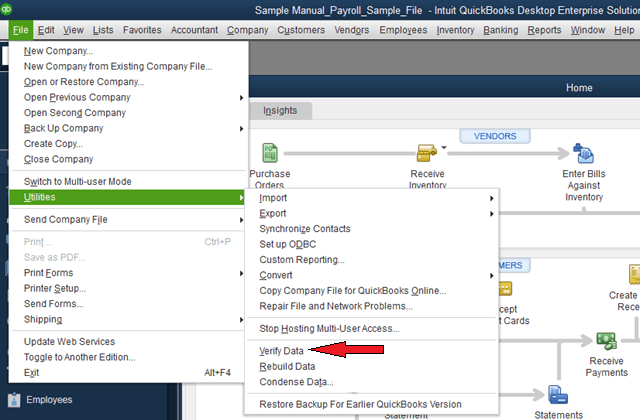
The very first step is to open your QuickBooks desktop
After that head to the main menu and click File > Utilities > Verify Data
After that choose verify option and the verification process will start
In case the process shows no issues then the current window will itself get closed
Now, click on any message that you receive
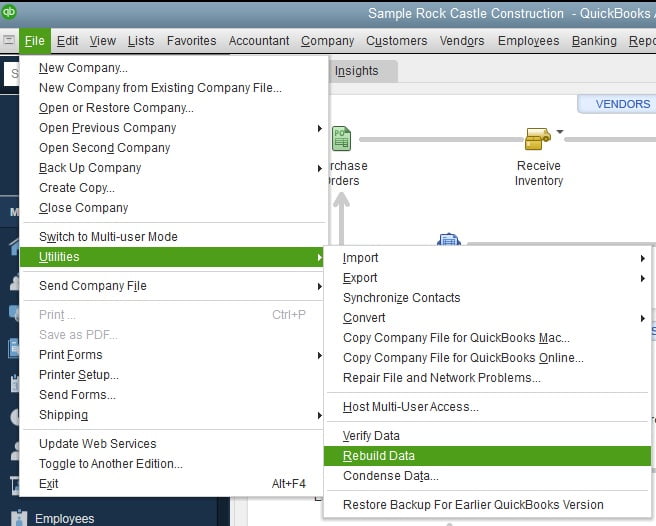
In case the process finds some issues, you will receive a warning message which will elaborate on the issue and offer steps to fix the issue
Now perform the Rebuild Data feature for resolving the issue found in the process. Let’s assume the error still persists then chances are that your entire database has got corrupted
The above discussed set of steps are said to be enough to fix this particular error in QuickBooks. However, in case you have any queries or if you require any sort of professional guidance, you can call our 24×7 QuickBooks premier support number at +1-888-510-9198 and seek an expert’s advice.
FAQs related to Error code 16638 85757
What is QuickBooks unexpected error 16638 85757
This error mostly pops up when you try to open a company file that has been corrupt or damaged. You may also receive this unexpected error while login to online banking.
What is error code 800070057 in QuickBooks?
QuickBooks error 80070057 typically occurs when a user tries to open a company file without the appropriate permissions or when there is an issue with the file path
Can I fix error 16638 85757 by updating QuickBooks?
Yes, updating QuickBooks to the latest version can help in fixing this particular error in QuickBooks. As QuickBooks update fixes the majority of the errors that occur.
What is QuickBooks tool hub?
QuickBooks tool hub is one stop destination for all your QuickBooks related tools. You can access multiple tools using tool hub and fix various errors in QuickBooks successfully.