Did you see a warning message: This company file is on another computer and QuickBooks needs some help connecting? Or you were trying to access your company file in multi-user mode and failed to do so? Well, this can be a common problem with QuickBooks, especially when you switch from single-user mode to multi-user mode. As a result of QuickBooks multi user mode not working error, either you might not be able to use QuickBooks at all, or you might come across a few errors here and there including QuickBooks error H202, 6000 series error, etc. The mess doesn’t end here, these issues can further be escalated to the server system without appearing on the system and this could lead you to QBDBMgrN not running on this system error.
Multi-user mode not working error can be extremely devastating, as multiple users get interrupted in the middle of their activity at times. Thus, it becomes essential to find a quick fix for the same. To understand this error better, here we are with this segment sharing not just the details about the error, but also some effective fixes for the same. However, if you need any sort of technical assistance at any point in time, then in that scenario, get in touch with us at +1-888-510-9198 and we will provide you with answers to all your queries.
What is QuickBooks multi user mode not working issue?
Multi-user feature in QuickBooks lets multiple users make use of company files at the same time. Whereas, any sort of issue with multi-user mode can slow down productivity. Using QuickBooks in multi-user mode requires a separate license on every workstation. You can come across this particular error, especially when you try to open a company file that is present on a server.
Factors causing QuickBooks multi user mode not working error
There can be a bunch of factors causing QuickBooks multi user mode not working error. Let us evaluate each of the reasons one by one:
One of the basic reasons can be improper configuration of hosting settings
Or if the system firewall or antivirus software is causing issues in connecting to QuickBooks
Improper Windows file permissions.
You can further come across such an error if the software installation is not on the server
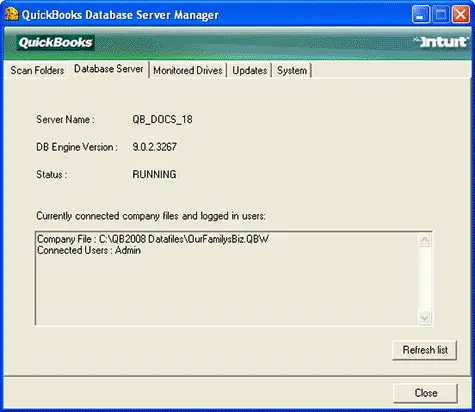
Be prepared for a similar issue if the QuickBooks database server manager is not installed on the server system or cannot open QuickBooks company file.
In case you have a corrupted .ND file in your database
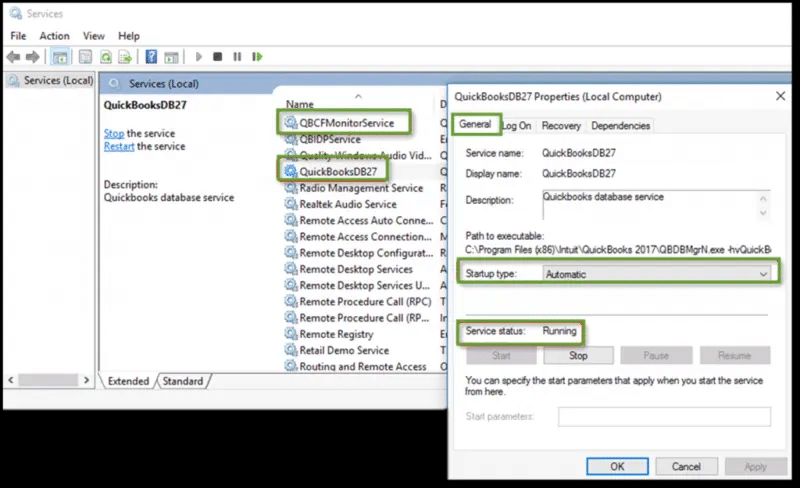
If your QuickBooksDBXX services have not started already, then you can experience this issue in QuickBooks
Essential Tips to consider before performing the solution steps
Before you head to the solution steps enumerated below, it is essential to go through the following prerequisites:
Well, it is crucial to install QuickBooks database server manager before you begin with the fixation steps.
Furthermore, ascertain that the version of server manager that has been installed by you on the system matches your current QuickBooks version in use.
Effective Methods to fix QuickBooks multi-user mode not working issue
Now that you know enough about QuickBooks Mult-user mode, it is the right time to explore the set of steps and procedures that can be implemented to eliminate it. There are a handful of methods that you can try and incorporate in QuickBooks. Let us explore each of the methods one by one:
Method 1: Reinstall QuickBooks
Often many errors can be easily eliminated by simply uninstalling and reinstalling QuickBooks. Reinstallation eliminates a bunch of bugs. Here are the steps that can be performed to reinstall QuickBooks successfully:
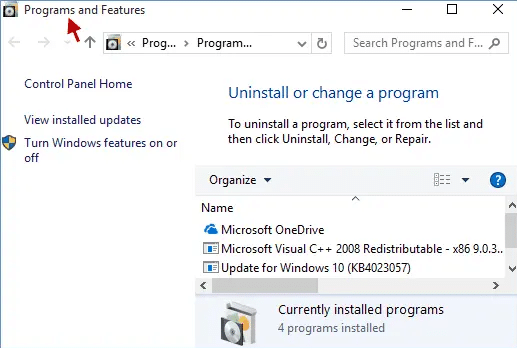
Start by clicking on the start tab
Once done with that, navigate to the control panel
Furthermore, you need to search for QuickBooks under the programs and features.
There you will then have to click on QuickBooks and perform the uninstallation procedure.
Heading forward, you need to move to the official website of Intuit and then head to downloads, and then opt for the version you are looking for.
Towards the end, click on the multi-user mode hosting and further switch to it.
Method 2: Configure Default Setting
Have you checked the configuration of the default settings? There is a probability that the default settings are misconfigured. And fixing these settings will fix the issue up to a great extent. You can implement the following steps and try optimizing the default settings.
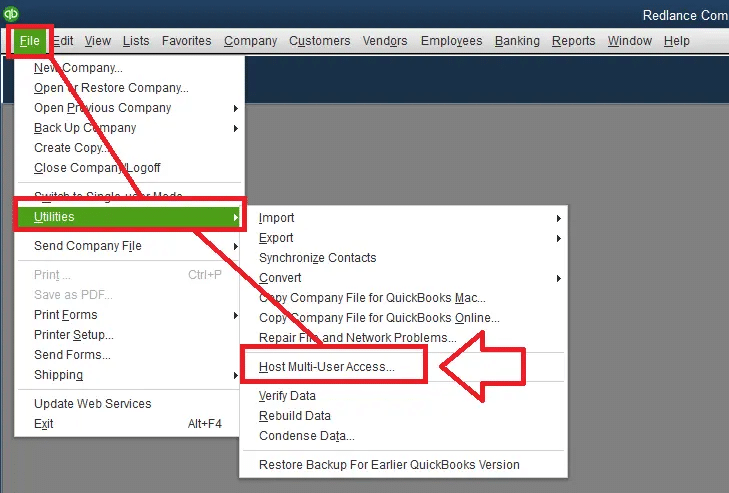
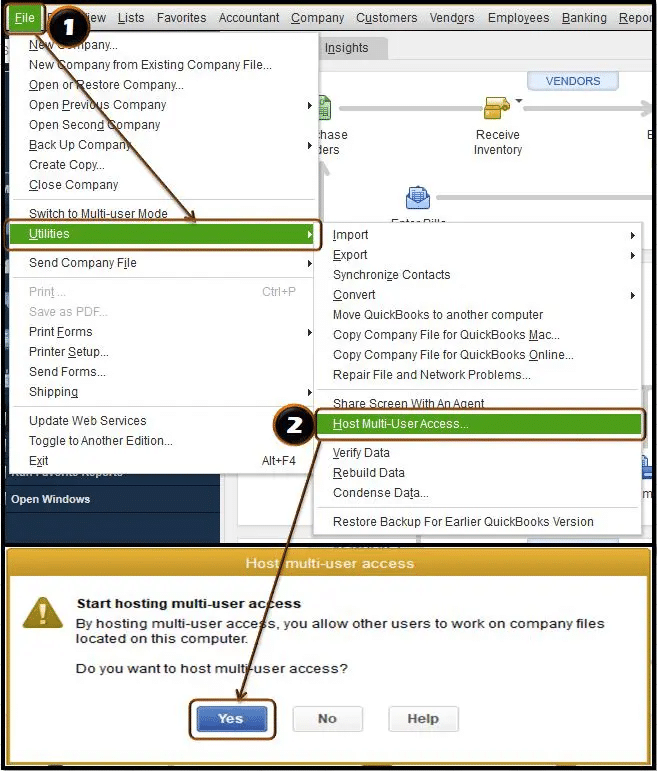
Begin with opening QuickBooks and you have to then click on the file tab.
After that, go for the utilities tab.
Followed by opting for the host multi-user access option.
The next step is to add the number of users that you want to the company file.
You will further have to then click on the cancel tab.
And if the multi-user mode is already enabled, then you simply have to disable it.
The last step in the process is to create different login credentials and this concludes the process,
Method 3: Switch to multi-user Hosting to fix QuickBooks multi user mode not working
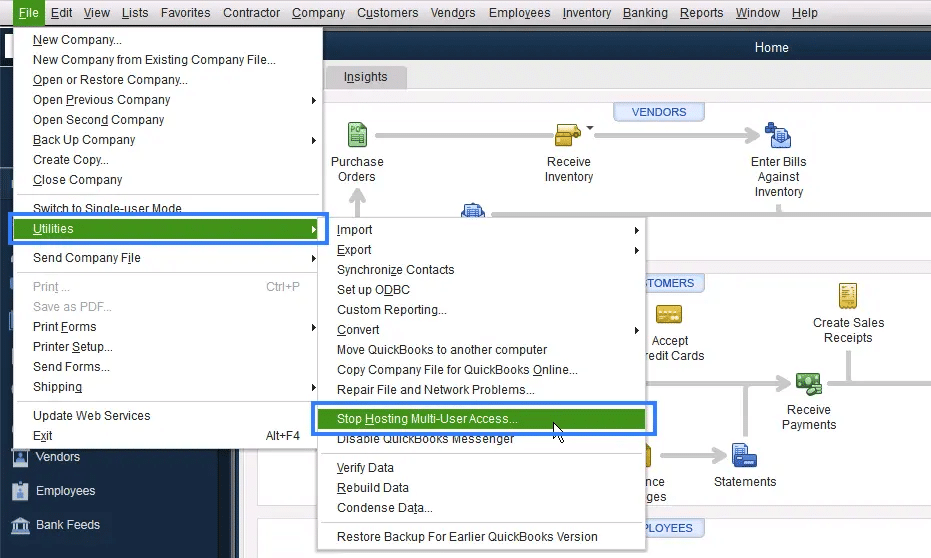
This method requires you to simply open QuickBooks and further update the company file to the latest version.
You will further have to opt for the file menu and then navigate to the utility tab,.
The next step is to select host multi-user access
Conclude the process by performing the onscreen steps in case the previously hosted multi-user setup is present.
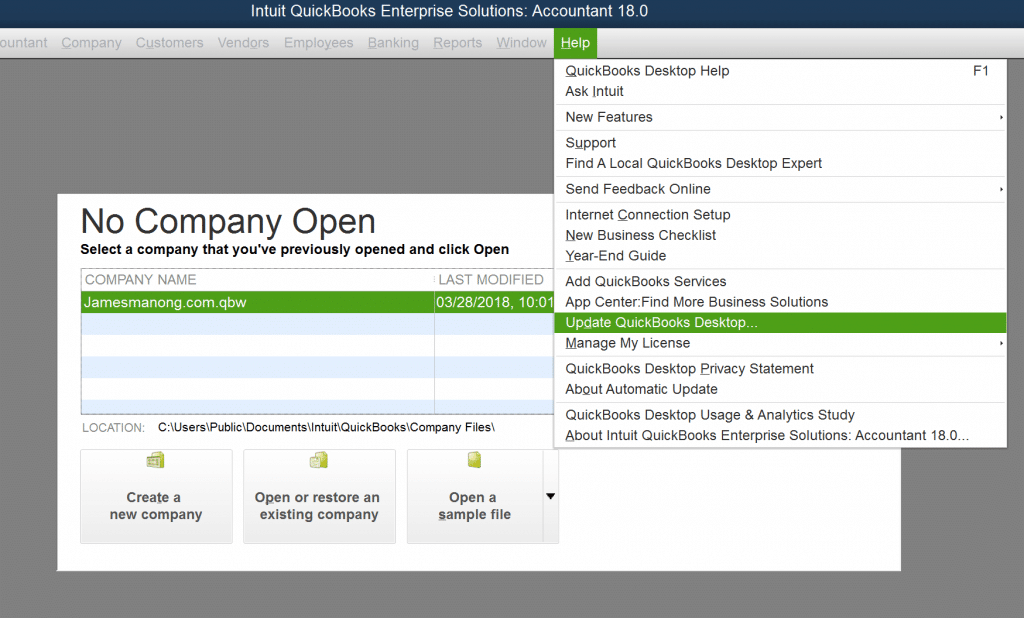
Method 4: Update QuickBooks to fix QuickBooks multi user mode not working
Using an outdated version of QuickBooks can always drag you in some or the other issue. Thus, we advise you to update QuickBooks to the latest release. This involves the following steps:
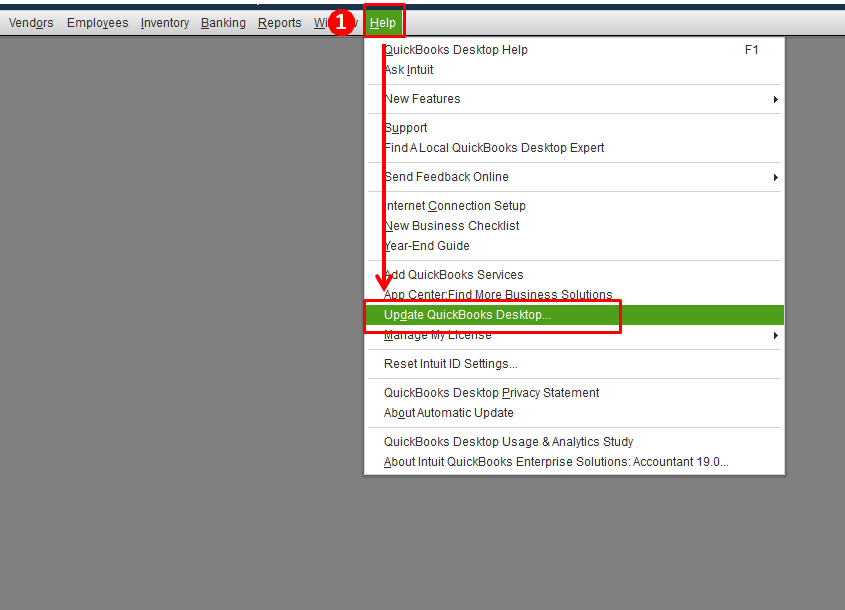
Initiate the process by opening QuickBooks and further make sure that Windows is running as an admin
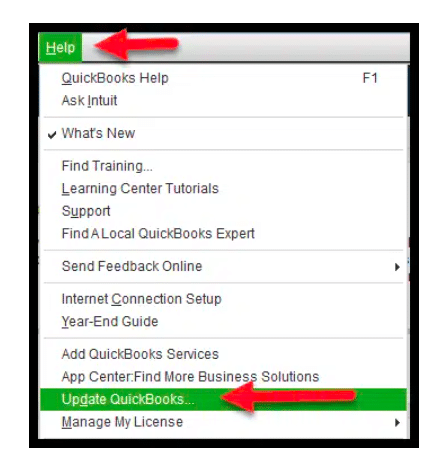
You will then have to choose the update QuickBooks desktop option under the help tab
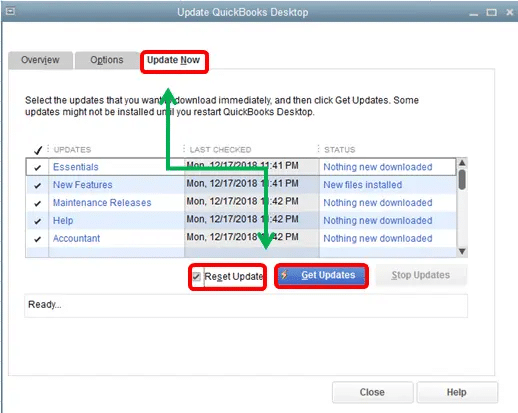
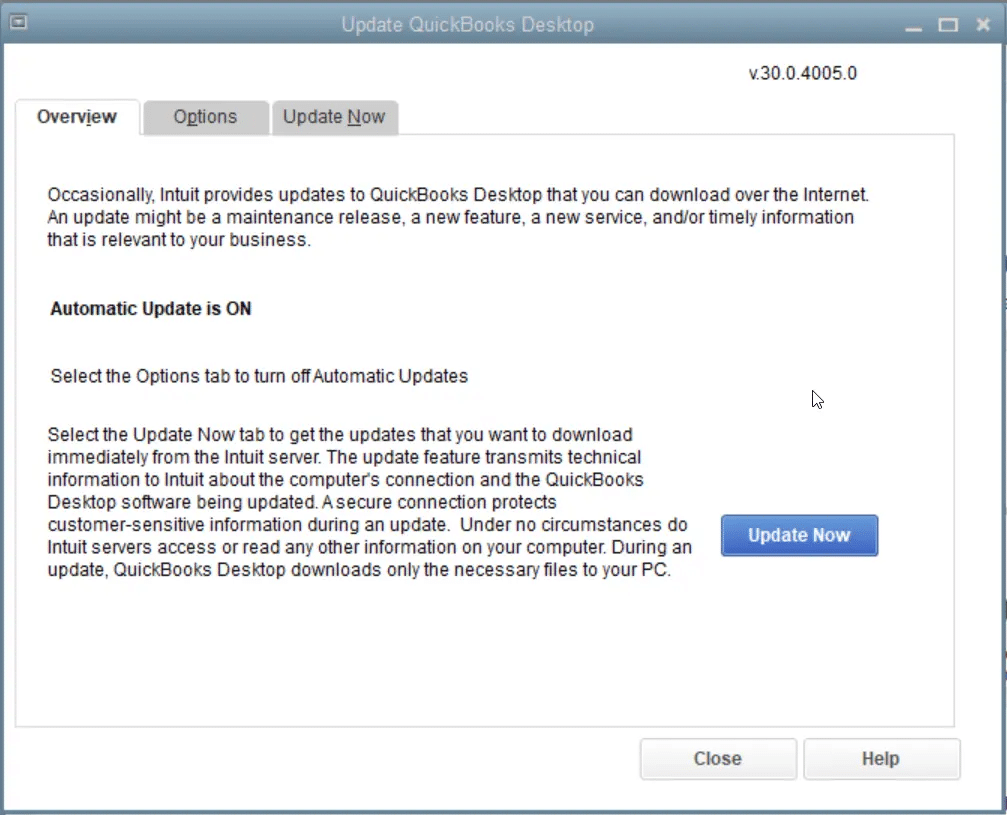
Once done with that, you will have to select the Update Now tab on the update window.
And further go for the get updates tab.
Restart QuickBooks after downloading updates and then it will ask you to install the updates.
After that click on install now and this will update your QuickBooks.
Now try to open the QuickBooks company file and check if the error continues to trouble you.
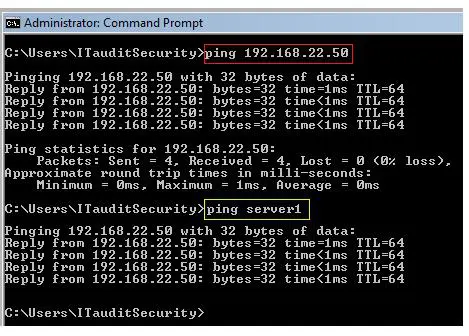
Method 5: Ping your server from a workstation to fix multi user not working error
Makes sure to turn on network discover before starting the process. The steps involved in this particular process to ping the server from a workstation are as follows:
Head to the start menu on the server and workstations where QuickBooks is stuck in single-user mode.
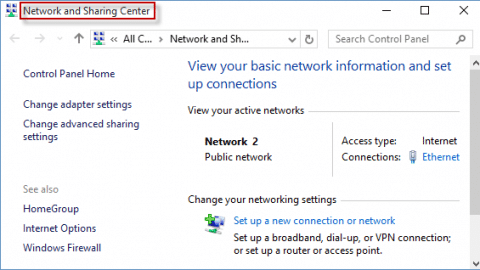
After that, enter the network into the search bar to launch the Network and sharing center.
You will then have to change advanced sharing settings by clicking on it. Followed by turning on file and printer sharing and network discovery after that.
You now have to get the name of the server.
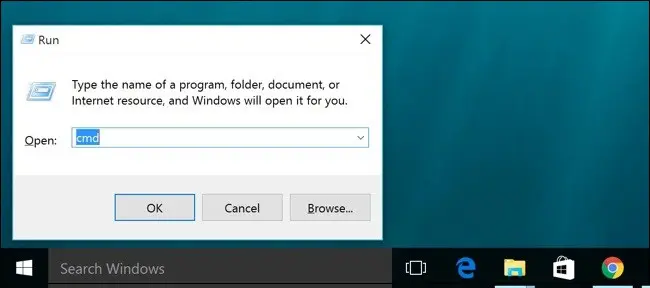
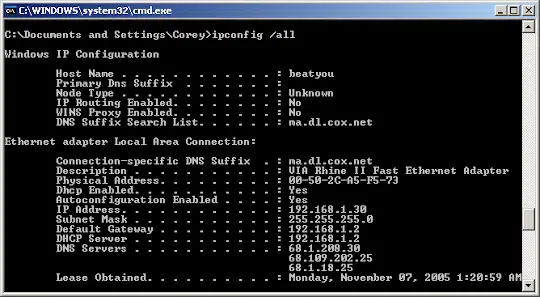
Followed by entering CMD into the run window from the search bar and then try to hit enter tab.
Type in the line ipconfig/all in CMD window and then hit enter tab.
After that, right next to the hostname on the screen is the server name.
You will have to note down the hostname.
Followed by heading to the workstation so that you can test the server.
Now, launch the run command window.
And the enter CMD.
Towards the end, enter the command ping_[your server name].
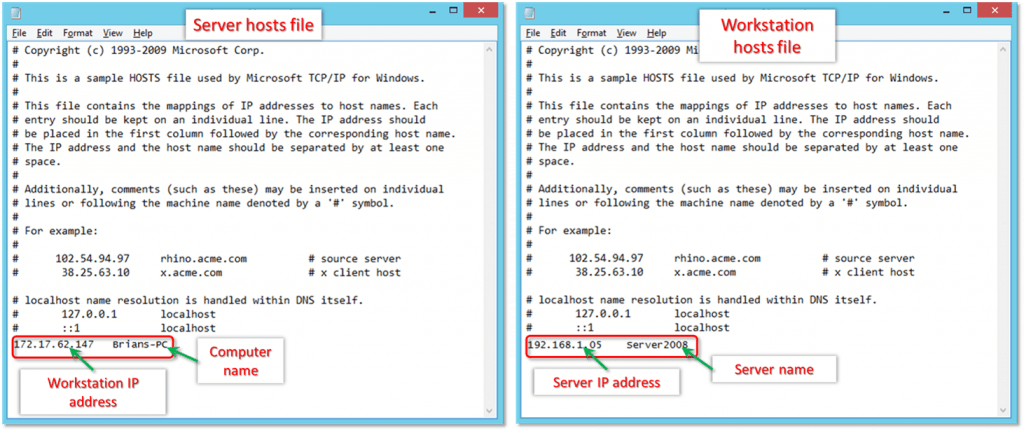
It is easy for Windows to identify and connect with the server system that has company file saved on it. Thus, we advise you to add sever to the Windows host file. The stepsto perform are:
Start by accessing the Windows host file on the system having the issue using notepad.
After that, if required, open the notepad as admin.
You will then have to type Server’s IP address after the last IP address.
And furthermore, enter the server name when holding the tab key.
Once done with that, head to the file menu and opt for save tab.
Hit exit tab.
And towards the end, you need to check if the error with multi-user mode continues.
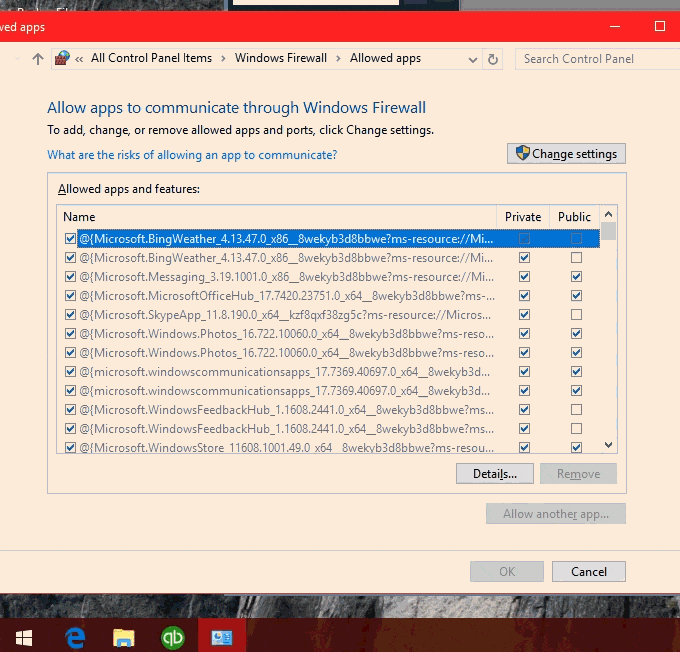
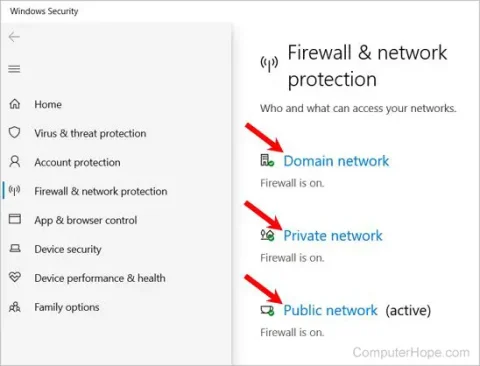
Method 7: Work on Firewall Configuration
There can be a situation, where the firewall configuration is not proper. In such a scenario, what we recommend is to configure the firewall settings using a few basic steps enumerated below:
The very first step here is to use the Windows start menu and then access the control panel
Once done with that, search for Windows Firewall and then click on the enter tab.
Now, click on Allow an app through the Windows firewall tab.
Choose the public list checkbox for QuickBooks by clicking on the change settings
You need to then choose public for the application after clicking on the ok tab.
Later on, check if the issue continues.
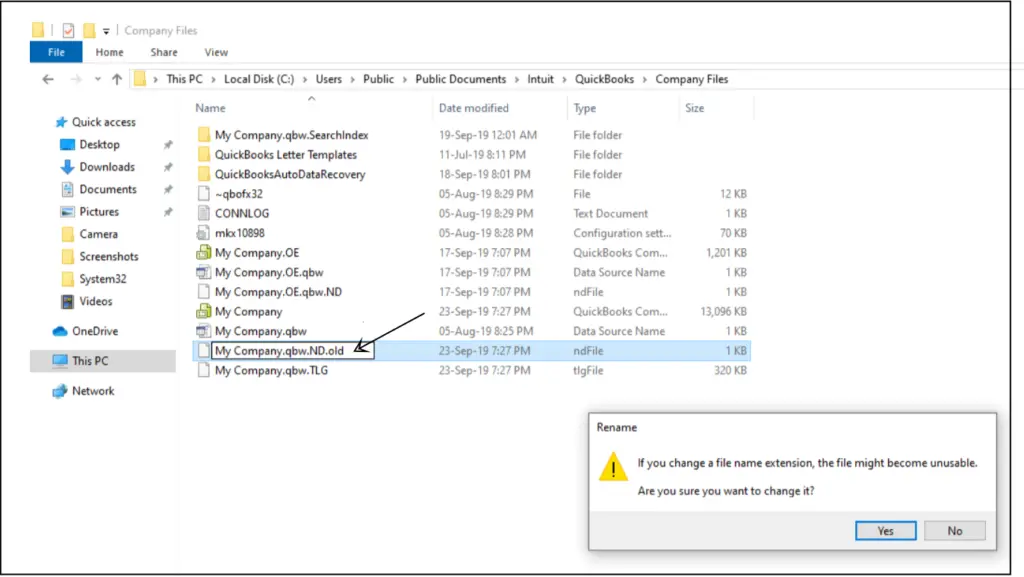
Method 8: Rename tlg and ND files
The network data and transaction log files can at times get damaged or corrupted due to some reasons. Fixing this is possible by renaming them. You can try to rename the tlg and nd files using the below steps:
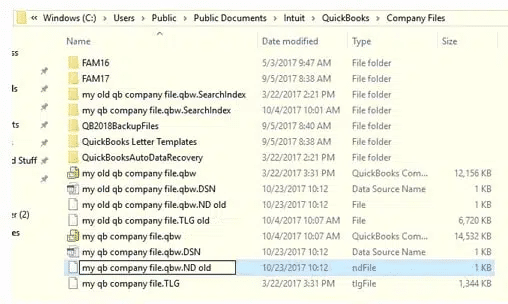
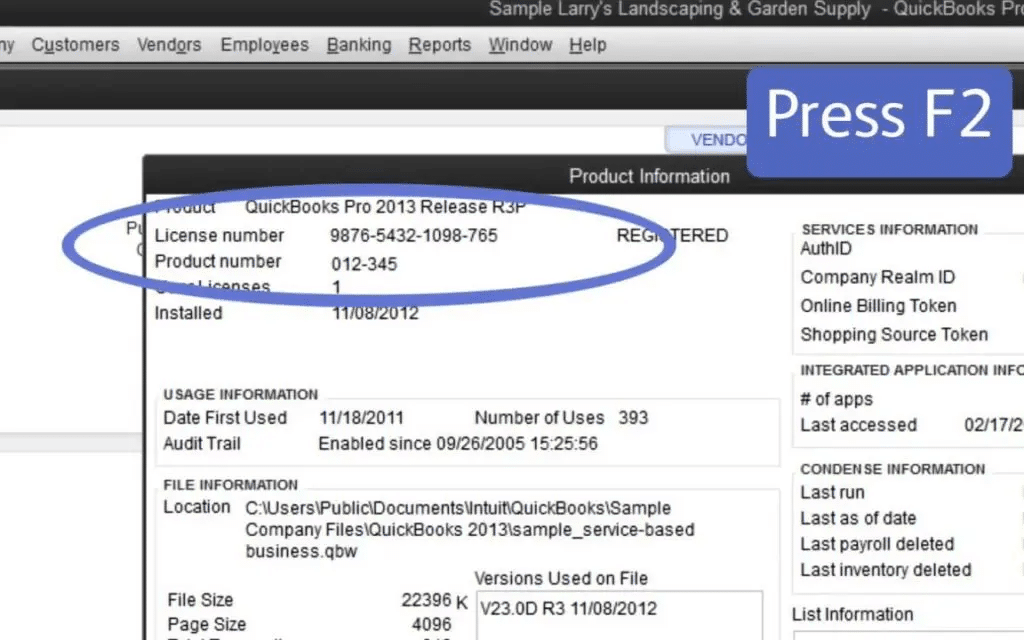
Open QuickBooks and press F2 this will open a product information window.
You will then have to go through the file information and there you will find the tlg and nd files.
Rename the files by adding OLD at the end.
And then, check if the error still persists.
Method 9: Create a company file folder
Create a new company file and make sure you perform the steps on the host computer
Set up folder and permit windows to access permissions for the new folder.
This will help to share the company file across systems.
Copy the qbw file to the new folder and check if the company file in multi user mode is opening. In case it opens uyp, then this indicates that the issue has been resolved.
Method 10: Check if QuickBooks is able to send data
This particular process of checking if QuickBooks is able to send data involves a few set of steps. Let us explore them one by one:
Step 1: Change the settings of firewall and antivirus
One of the major causes of this issue can be if the firewall or antivirus program is hindering the connection. Thus, we suggest you to create firewall exceptions to let QuickBooks transfer the required data. Perform the steps below:
You will first have to press the Windows key and click on the control panel
After that find and select the Windows firewall option.
Choose the option to approve an app through the Windows firewall option.
Now, click on the checkbox next to the public list for the QuickBooks application.
After that, click on Change Settings.
You will then have to click on ok tab and then click on the public for the application.
Towards the end, you need to run QuickBooks in multi-user mode and check if the error still persists.
Step 2: Test-Path and make sure Quickbooks can communicate with the server
You will now have to turn on network discovery to fix QuickBooks multi user mode not working error. The steps that can be performed here are:
In order to launch the run command, press the windows tab and then press the Windows + R tab.
Now, type the ping server name and then hit the enter tab.
Make use of UNC on the system to access the server’s shared folder.
By the end of this post, you need to use UNC path to return to the QuickBooks business file.
Step 3: Head to the company file following the UNC path
Step 4: Create a new company file folder
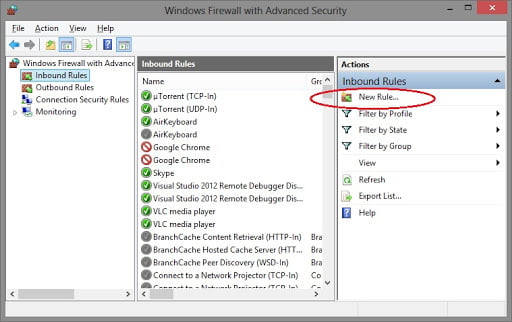
Step 5: Configure firewall exception for QuickBooks program and port
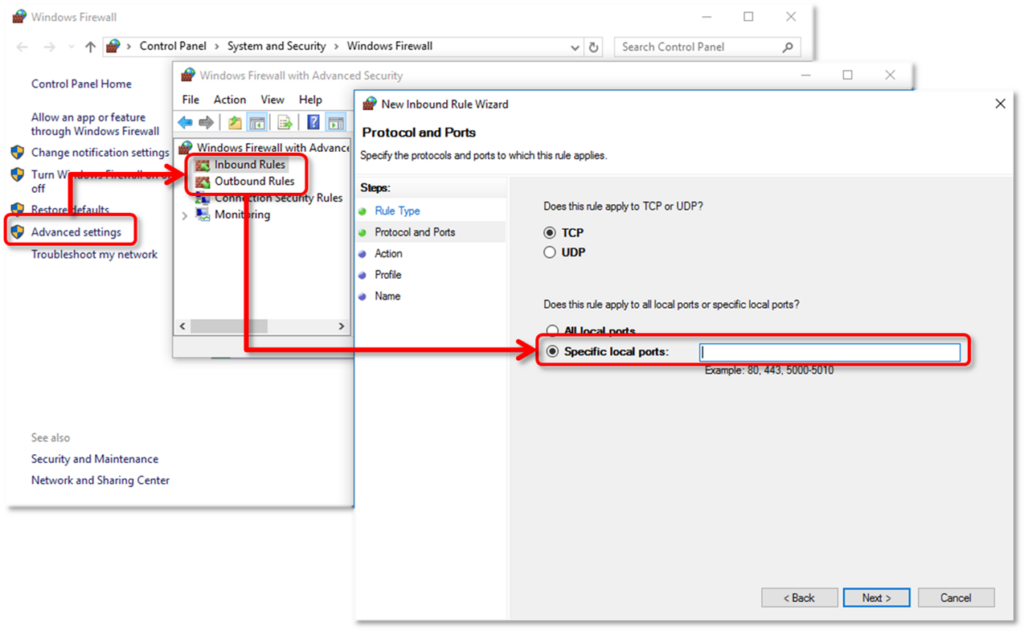
Start by clicking on the Windows tab
You will then have to access the Windows firewall setting and then type Windows firewall into the search box.
After that, select the firewall advanced option that is in the left sidebar.
The inbound and outbound rules are located on the advanced settings tab.
Select inbound rules and this will prompt you to choose new rules.
Select the port in the new rule windows and then choose TCP.
Add the port based on the version of QuickBooks.
Perform the same steps for outbound rules.
For QuickBooks desktop 2019, enter 8019, XXXX
For QuickBooks Desktop 2020, enter 8019, XXXX
Type port numbers 8019, 56728, and 55378-55382 for QuickBooks Desktop 2018
Type port number 8019, 56727, and 55373-55377 for QuickBooks Desktop 2017
The next step is to add QuickBooks to the firewall.
Instead of selecting a port, add QuickBooks program to our inbound and outbound firewall rules.
Select new rule under advanced firewall configuration.
You will now have to select the application and then head to the directory that contains the executable file for the program.
Once done with that, select QuickBooks database server manager.
Now, enter QBDBM in the start menu.
And if you are unable to locate it, you need to browse for the same.
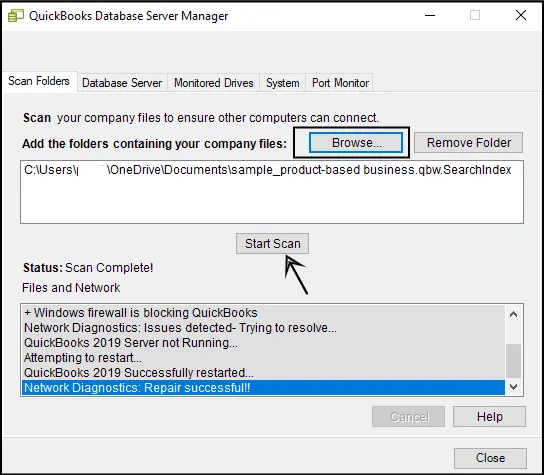
Click on ok tab and also click on start scan to let the database server manager perform the necessary steps.
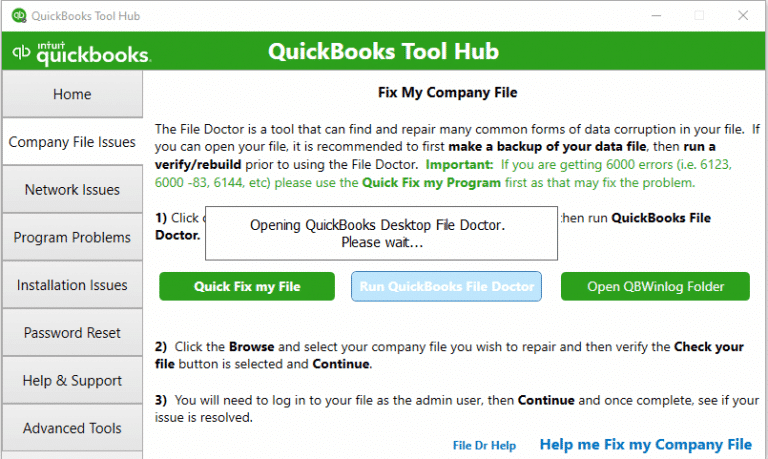
A quick alternate method
Using the QuickBooks file doctor tool can also work in certain cases. You can try performing the steps related to accessing the QuickBooks file doctor tool using QB tool hub and let the tool perform a necessary scan and fix. This might fix your error up to a certain extent.
This segment has tried to unveil a lot of fixation measures for QuickBooks multi user mode not working. Hopefully, implementing any of these methods might help you in successfully eliminating the error. Just in case you are unable to tackle through the issue even after performing the steps above, then feel free to reach out to our technical support professionals at +1-888-510-9198, and we will provide you with answers to all your queries.
FAQs Related to QuickBooks Multi-User Mode Not Working Error
Why is my QuickBooks multi-user mode not working?
QuickBooks might not be installed on the server. The host settings might not be configured in proper manner. Another reason can be if the firewall or antivirus might not be allowing communication between the systems.
How do I force QuickBooks to open in multiuser mode?
You can click on the multi-user mode checkbox, before opening QuickBooks. The next time you login, your QuickBooks file should always open in multi-user mode.
Why is QuickBooks opening in Single-user Mode?
This can be due to network setup. One can download and run QuickBooks file doctor to fix company files and network issues in QuickBooks desktop.
QuickBooks error 195 can be an undesired result of misconfigured operating system files. It is a direct impact of damage to program files and Windows registry files. You can also come across similar issues in case of outdated or corrupted Windows registry files. Errors in QuickBooks can be a bit troublesome, especially when those errors freeze QuickBooks. These errors can be a bit difficult to manage, and the same goes with the QB error code 195.
However, the QuickBooks error code 195 can be eliminated by using the repair tool, as it would help in repairing any damaged files for QuickBooks desktop. Not only that, you would have to rebuild and verify the accounting data. There are a bunch of other solutions that you can implement to get rid of this particular error from QuickBooks, which we will try to elaborate on later in this piece of writing. Thus, make sure that you stick around till the end. Moreover, you can also get on a call with our technical professionals at +1-888-510-9198 for any sort of QuickBooks support service.
Every error is triggered by some or the other factor and same goes with the QuickBooks error code 195. It generally occurs when a user tries to verify and rebuild data in QuickBooks company file. This error can also be triggered due to a handful of factors which include the following:
Another possible trigger can be if the Windows registry keys related to the QuickBooks software are corrupted.
You can also experience this issue if there is any sort of virus or malware attack
Expect the same error if the software is shut abruptly due to power failure.
Effective Procedure to tackle QuickBooks error 195
You can try to perform the following procedures to get rid of the QuickBooks error 195. Let us explore each of the procedures one by one:
Procedure 1: Using the Verify and Rebuild Utility
At times the files can be corrupted leading to such an error. In that scenario, performing a verify and rebuild data procedure can eliminate the corruption and fix such error. The steps involved in this process are as follows:
Start off by simply running QuickBooks
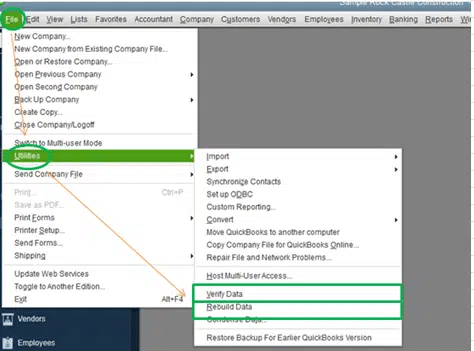
Furthermore, you need to click on the file and utilities tab
Once done with that, select the verify data option
Moreover, click on the ok tab to begin the scan process
In case the tool diagnoses any issue, then it will show up an error message that would state that the data failed the integrity check and if the message shows up, head to the rebuild the file tab.
Now, head to the utilities tab and click on the verify data option
Furthermore, in case there is any issue diagnosed upon data verification, then use the rebuild data option again and get the error fixed.
Procedure 2: Updating QuickBooks to latest release
Outdated QuickBooks software can lead to bunch of technical snags and one of them is QuickBooks error code 195. Thus, performing the steps to update the software to the latest release is something we suggest. The steps involved in this procedure are as follows:
Begin the process by running QuickBooks as Admin
Later on, you need to proceed to the help section within QuickBooks
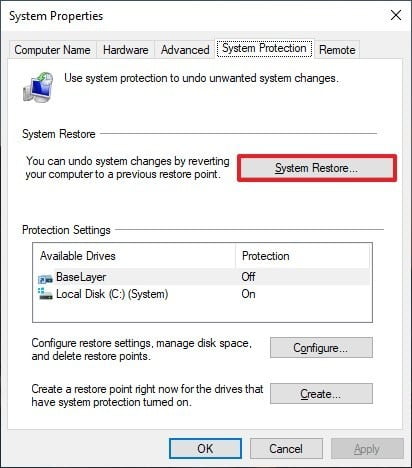
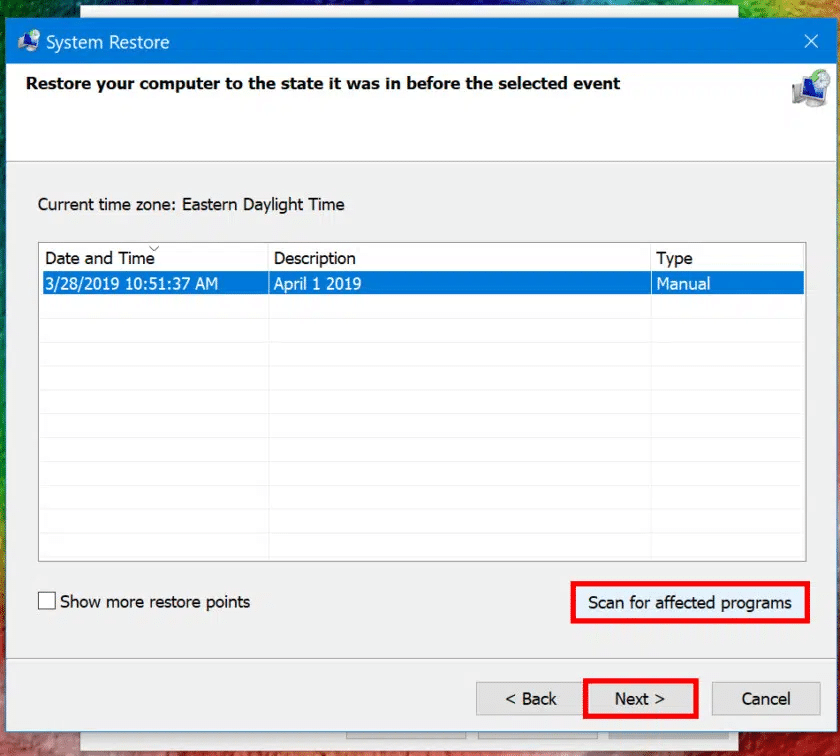
In case none of the above procedures help you in relieving the stress of this error, then in that case perform the steps to restore your system.
Begin the process by clicking on the start menu
Followed by searching for the restore tab
You are then supposed to right-click the system restore icon and select run as admin
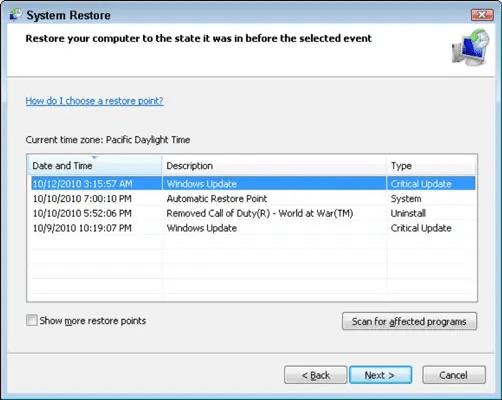
When the system restore window opens, select a suitable restore point and select the most recent restore point
Furthermore, click on the next tab and perform the onscreen directions to restore the system to the previous state successfully
Towards the end, make sure to restart the system and open the software again. By the end this error would be eliminated and you can make use of the software as usual.
At times, certain errors in QuickBooks can be a bit too tricky to handle without the guidance of professionals. Thus, in that scenario getting professional guidance is essential to avoid any sort of mishaps or further mess. Similarly, if you are unable to deal with the QuickBooks error code 195, feel free to seek professional assistance. You can give us a call at +1-888-510-9198 and our QuickBooks support professionals will ensure that all your queries are answered immediately.
Frequently Asked Questions- QuickBooks Error 195
What is error code 195 in QuickBooks desktop?
The QuickBooks error code 195 is a technical error that can be experienced due to misconfigured operating system files. This error can be easily eliminated by performing steps related to verify and rebuild data.
How do I repair a QuickBooks backup file?
In order to repair a backup file in QuickBooks, you can try performing the below set of steps:
1. You need to first head to the file menu 2. Then hover over the utilities tab and choose rebuild data 3. Once done with that, click on ok tab 4. Let the tool repair your file 5. Head to the file menu 6. And let the tool check your file for the data issue
How do I fix an overflow error in QuickBooks?
To fix such errors, you need to export your lists to the desktop. This involves the following steps:
1. The very first step is to export the lists to the desktop 2. After that, minimize the QuickBooks software 3. Once done with that, right click the export file and select open with Microsoft excel 4. Now, find all transactions with overflow value 5. And also, switch back to QuickBooks and correct the data for the field in the account, name, or item that contains it.
QuickBooks error 12038, belongs to the 12xxx series error and typically occurs when you download the latest update to the software. You can come across a warning message on your desktop screen stating “QuickBooks error 12038: Failed to download the update”. As this error occurs in the middle of the downloading the software, it can abruptly freeze the software or might end up in software malfunctioning. To help you fix the error, before the situation worsens, we are here with this piece of writing, sharing the nitty-gritties of QuickBooks error code 12038.
You scroll through this piece of writing, to unveil the entire information related to the QuickBooks error code 12038, or you can also seek assistance from our technically sound QuickBooks personnel, who can guide you through such errors easily. Give us a call at +1-888-510-9198 and get answers to all your queries.
There are bunch of factors driving such errors in QuickBooks, which we have tried to list below. Let us together have a look:
When your system has incorrect date or time, then you might come across such issues in QuickBooks.
Another prominent reason behind the occurrence of such issue can be if your internet browser settings are not configured properly or if there is any sort of internet issue prevailing.
You can also land into a similar issue if the security or firewall software is blocking the QuickBooks services.
Important Pointers to Consider Before Troubleshooting
There are a bunch of factors that you must keep in mind, before you start fixing the error.
A few devices make use of the download accelerator to speed up the download process. However, these third-party accelerators can corrupt the entire download process. Thus, make sure to disable it before download the updates.
Ensuring that the internet connection is proper and speed is not less than 28.8 KB/s is important factor.
Furthermore, you need to check if the parent controls are enabled in the browser for safety concerns. If yes, then make sure to disable them before you update the software.
Another important task is to create a company file backup before performing any solution steps.
Troubleshooting Methods to fix QuickBooks error 12038 (When Installing the Updates)
Now that you have learnt major information about the error code 12038, it is time to unleash the methods that can help you with the fixation of the error permanently. Let us explore each method one by one:
Procedure 1: Uninstall any duplicate/Multiple versions of QuickBooks
As we mentioned earlier, setting up multiple versions of QuickBooks in one system can hindering the update process. Thus, to fix this, you can perform the below steps:
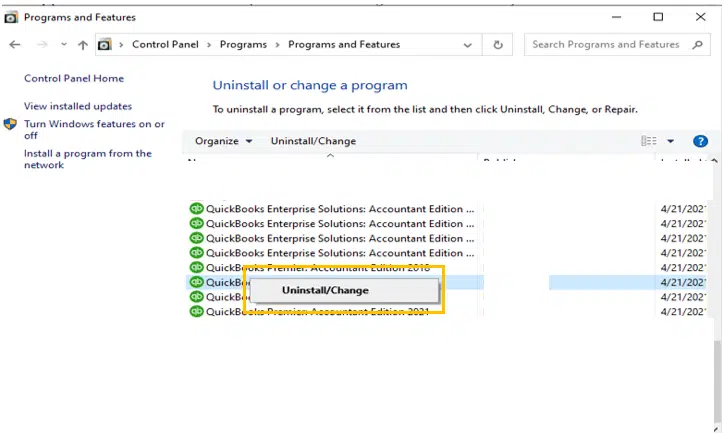
You need to first open the control panel from the start menu
Furthermore, head to the programs and features section
You can also check for any duplicate versions of QuickBooks programs from the list
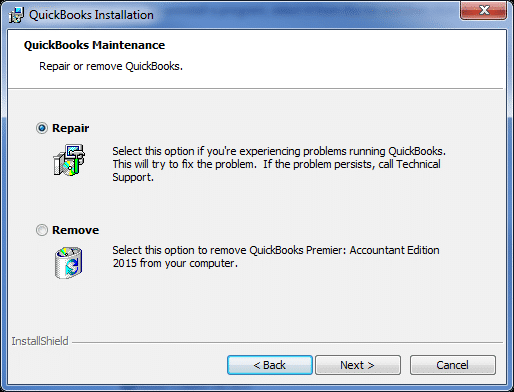
In case you spot any duplicate copy, then make sure to uninstall them by selecting the icon and also clicking on the uninstall/change option.
Now, click on the uninstall tab and get the copy of QuickBooks removed from the system
Open QuickBooks and move to the help menu
Click on the option to update QuickBooks desktop and check if the issue is eliminated or not.
Procedure 2: Creating a new rule for QuickBooks.exe files
When firewall hinders the process of updating, it is suggested to create a new rule for the QuickBooks. exe file. This involves the following steps:
Start off the process by searching for firewall and pressing the windows key
You are then required to open windows firewall and head to the advanced settings
Later on, move to the inbound rules option
And rightclick the inbound rules
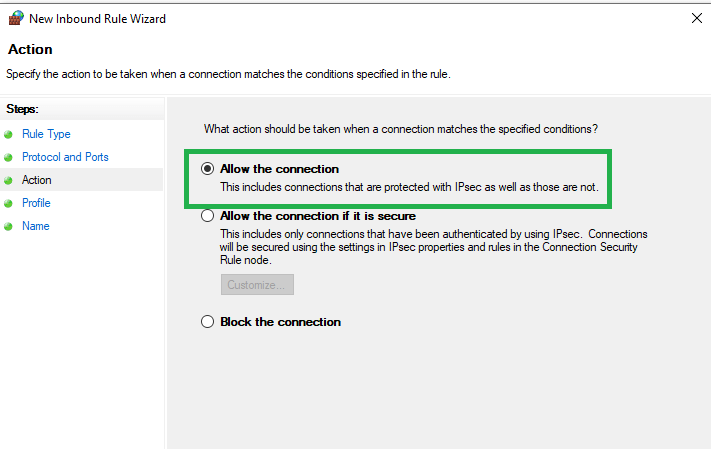
You will see an option that states create a new rule, click on the same
Choose the program and click on next
Hit the browse tab and go for the files associated with the QuickBooks software.
AutoBackupExe.exe, Dbmlsync.exe, DBManagerExe.exe, FileManagement.exe, IntuitSyncManager.exe, QBCFMonitorService.exe, QBDBMgr.exe, QBLaunch.exe, including all other .exe files corresponding to QuickBooks.
Also, click on the allow the connection option
Followed by clicking on next tab
You are then supposed to head to creating a new rule by providing a name to the same
Perform the steps to create outbound rules as well.
You are later required to click on the update now tab
Followed by ensuring that the reset update tab is selected
You are then supposed to click on the get updates tab
Now, check if the error is fixed or not, if not, proceed to the next procedure.
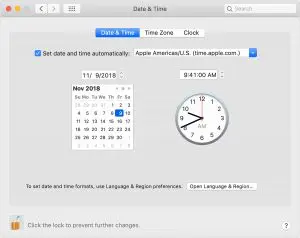
Procedure 4: Configuring System Date/ Time
As we discussed above, if your system date and time is set incorrect, then there are chances that you land into this sort of issue. An incorrectly set date or time can directly end up in such an error. The steps involved in this procedure are as follows:
Just in case the user experiences that the date and time is not set properly, then right clicking on the date option is suggested.
Followed by, clicking on the adjust date/time tab.
You are further required to set the correct time zone and also make any corrections required.
In case an error appears, try changing the internet settings.
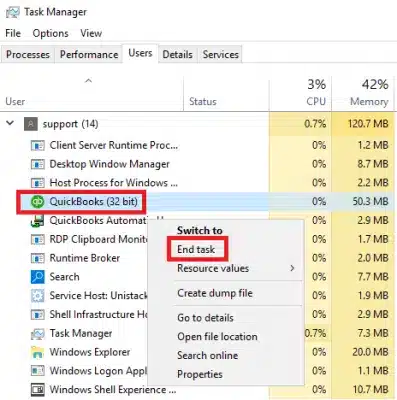
Procedure 5: Close all QuickBooks processes and services
Sometimes, the background processes related to QuickBooks can trigger this sort of issues in QuickBooks. The steps involved in this process are as follows:
Start by opening the task manager
You can also use a shortcut for the same i.e., Ctrl + Alt + Delete
Furthermore, click on the processes tab and end all the QuickBooks related processes
Once done with that, click on the services tab
And after all the QuickBooks services and processes are terminated, try to update the QuickBooks again.
Procedure 6: Configuring internet connection settings
Simply launch the QuickBooks software and click on the help section
Once done with that, click on the internet connection setup option
Followed by selecting the option to allow QuickBooks to get access to the internet connection
You are then supposed to head to the advanced connection settings
And then click on the advanced tab
Now, you need to click on the option to restore advanced settings
And towards the end of the process, click on apply tab and try to update QuickBooks again
Bugs and technical snags like Error code 12038 in QuickBooks can be a little bit exasperating. Nevertheless, if you perform the set of procedures elaborated above, you can try getting rid of these errors easily. Just in case you are stuck at some point in time, or if you feel the need of professional guidance, then in that scenario, do not hesitate in connecting with our technical team of certified QuickBooks professionals, who have the right knowledge and experience to deal with any sort of QuickBooks related errors. You just need to ring us at +1-888-510-9198, and we will make sure that all your queries are well-answered.
FAQs – QuickBooks error 12038
What is QuickBooks error code 12038?
QuickBooks error code 12038 is basically an update error that can be experienced when you try to update your QuickBooks software. You can experience this sort of issue when the date and time isn’t set properly on your system. There can be a bunch of other factors as well triggering such an error in QuickBooks.
Are there any specific network settings to fix Error 12038 in QuickBooks?
Yes, it is important to keep a check on certain network settings to eliminate this issue in QuickBooks. This includes:
1. Ensuring that the network proxy settings aren’t configured properly 2. Verifying that no network restrictions block the connection of the software 3. You also need to confirm that the ISP hasn’t put any limitations.
What causes QuickBooks error code 12038?
The following factors can trigger such an error in QuickBooks:
1. Incorrect date and time 2. Internet settings misconfigured 3. Antivirus or firewall blocking the software 4. User having multiple versions of QuickBooks set up
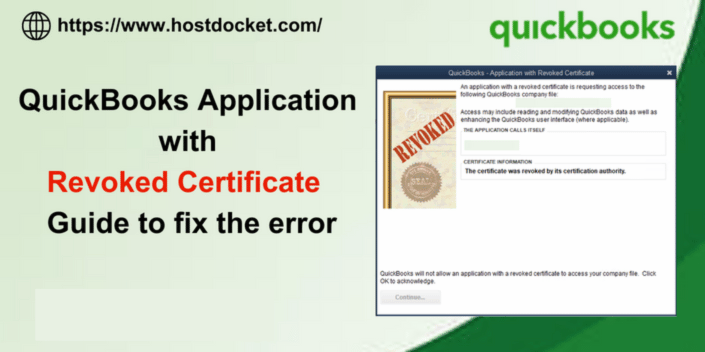
While you try to sync QuickBooks with Intuit apps such as field service management or statement writer or with any third-party app using web connector, a digital certificate indicates that the connection is secure. However, at times, these certificates might expire and eventually drag you in QuickBooks Application with Revoked certificate error. As this error sounds a bit technical and different from usual errors occurring in QuickBooks, you might find it devastating to deal with. As a result of this error, you might not be able to create invoices successfully.
To help you deal with the QuickBooks – Application with Revoked Certificate error, here we are with this piece of writing sharing the in-depth analysis of the error, along with its triggers, and of course the fixes. Thus, scroll through this segment to unleash further information about this particular error. In case you aren’t a QuickBooks professional or seeking for professional guidance to help you deal with application with revoked certificate error, do not hesitate in contacting our QuickBooks technical support at +1-888-510-9198, and they will answer all your queries.
Quick Update about the Application with revoked certificate error
This particular error can also be experienced due to Symantec root certificate, which is used in the development of the applications being revoked. It can further result in many certificates to be considered invalid. In order to maintain the highest security, QuickBooks is designed to only let applications with valid certificates access the company file data. This might appear to be QuickBooks bug, but Intuit is going through a process to detect invalid certificates and is further blocking access to the company file data. This error can be completely fixed once the developer using expired/invalid certificates updates the apps accordingly with a new valid certificate.
Intuit released patches for supported versions of QuickBooks. These patches deliver the newly updated web connector. These patches only update the web connector app, thus, if a customer is using a third-party app that doesn’t use web connector to sync data with QuickBooks, this update won’t fix the issue. Note that Microsoft agreed to re-enable the certificates on a temporary basis, so one can simply sync the data or open the file. This might take some time to change and take effect on your computer.
Causes of Revoked Certificate Error in QuickBooks
Every error in QuickBooks is triggered by some set of factors and the same applies to the revoked certificate error. It can be seen due to the below enumerated triggers:
Syncing QuickBooks with a third-party application without using Web Connector
Using Web Connector to sync QuickBooks with a third-party application.
An outdated digital signature certificate for QuickBooks can drag you into this error.
You can come across a similar issue if the QuickBooks web connector is not updated in a timely manner.
Expect such an error if the QuickBooks software itself is not updated to the latest release.
A quick fix to QuickBooks Application with revoked certificate error
Before performing the below stated measures, you can try this basic fix to get rid of the revoke certificate error. These steps are a temporary workaround for exchanging data QB POS v18 data with older versions of Desktop Pro.
You need to first backup both files.
Now, change the system date of the computer to the day before the POS data was last successfully exchanged.
Open both programs and then run End of Day/ Exchange Data with QB.
Your POS data will be transferred to QB desktop with the correct dates.
You will now have to change the computer date back to teh correct day and enable auto sync and the exchange function will still be working.
Effective Steps to Fix QuickBooks Application Revoked Certificate Error
You can try performing the below steps to successfully end the revoked certificate error and create invoice without any issue.
Solution 1: Set up Digital Signature Certificate for QuickBooks and Third-party application
An outdated digital signature certificate can trigger this error. Thus, perform the below steps to set up the latest digital signature certificate for QuickBooks.
Move to QuickBooks folder
If you are unable to find the folder, right click the desktop icon of QuickBooks and head to the properties tab.
Go for open file location option.
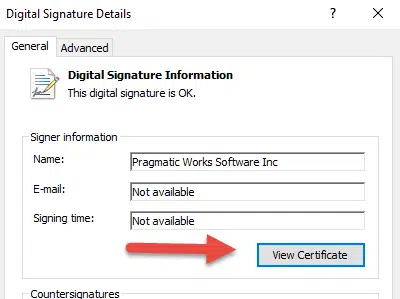
Right click the QuickBooks.exe file and click on properties tab.
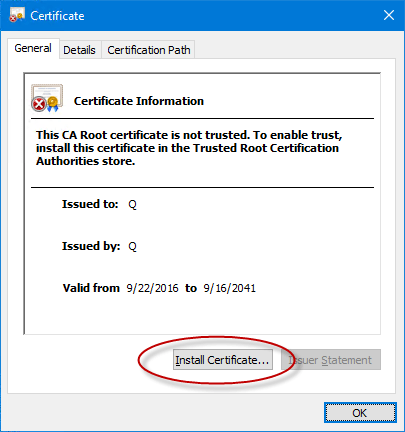
Here, you need to click on digital signature option.
Select the details tab.
Click on view certificate option.
Move to general tab.
Click on the option to install the certificate.
Click on finish and ok tabs respectively.
Set up digital signature certificate for third party application
The steps shared above were related to setting up digital signature certificate for QuickBooks. Now comes the steps to set up certificate for third party application to which you are trying to sync QuickBooks with.
Move to installation directory of the application.
Right click the .exe icon.
Select properties tab.
Click on digital signature tab.
Click on name of thesigner.
Hit details tab.
Go for view certificate option.
End the process, by clicking on ok tab.
Solution 2: Intuit Field Service Management
Note that IFSM doesn’t use web connector for connecting to QuickBooks desktop. In case you see an issue with the setting up IFSM, the steps below can be performed:
Replace the downloaded file in C:\Program Files (x86)\Intuit Field Svc. Integration or C:\Program Files (x86)\Corrigo Integration folder
And lastly, open QuickBooks and start using the Intuit field service management normally.
Solution 3: Update QuickBooks to latest release if error occurs with QSW
It is possible witness the QuickBooks – Application with revoked certificate error with QSW, in case your QuickBooks is not updated to the latest release. You can update QuickBooks desktop to the latest release using the steps below:
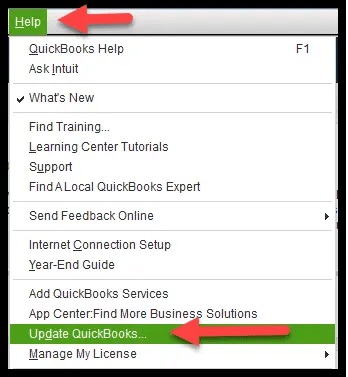
Open QuickBooks
Click on Help tab
Click on Update QuickBooks Desktop
Go for Update now tab
Select Get updates
ExitQuickBooks after the updates are downloaded
Reboot QuickBooks
Click on yes on the automatic prompt for installing the downloaded updates
Try to sync QuickBooks with the third-party application again
Solution 4: Close all version of QuickBooks
By heading to the task manager, you can try closing all the versions of QuickBooks and processes opened in background.
This can be done by pressing Ctrl + Alt + Delete simultaneously
Choose Task Manager
Head to the processes tab
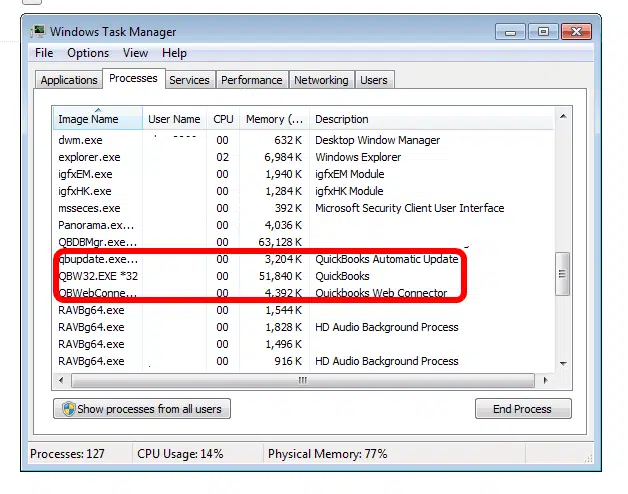
Ascertain QBW.exe, QBW32.exe, and QBWebconnector.exe aren’t running
End all of them one by one.
Run QuickBooks to check if the issue is fixed.
Solution 5: Rename the QBWebConnector.exe
In some situations, QBWebConnector can trigger such an error. Thus, you can try to rename this using the steps below:
You can press Windows + R
For 64 bit Windows – Enter C:\Program Files (x86)\Common Files\Intuit\QuickBooks\QBWebConnector\.
32 bit Windows – C:\Program Files\Common Files\Intuit\QuickBooks\QBWebConnector\QBWebConnector.exe.
This will open the folder having the exe file of QuickBooks web connector.
Right click the file and press rename tab
Change the current name to OLD_QBQWebConnector.exe.
Head to the file menu and click on open new window
Download QBWebConnector.exe freshly from the Intuit website.
Relocate the downloaded QBWebConnector.exe to the following path: “C:\Program Files (x86)\Common Files\Intuit\QuickBooks\QBWebConnector\”
Lastly, open QuickBooks and check if the issue is fixed.
In case you come across an error when you try to sync QuickBooks with a third-party app without using web connector, then try updating the third party app and sync with QuickBooks. You can perform the below steps:
The QuickBooks – Application with Revoked Certificate error might sound a bit different from the rest of the errors in QuickBooks. However, we believe that carrying out the set of steps discussed in this piece of writing might be of some assistance in eliminating the issue in QuickBooks. On the contrary, if you continue to experience the same error or if you get stuck at any point in time, in that case you are backed by our QuickBooks support professionals. You can ring us up at +1-888-510-9198, and discuss your queries with our tech geeks and get round the clock assistance from certified ProAdvisors.
FAQs related to Application with Revoked Certificate
QuickBooks Application with revoked certificate preventing from doing invoicing. What to do?
In case of Application with revoked certificate, you can perform the steps below: 1. Update QuickBooks to latest release 2. Update Web connector to latest release 3. Also, update third party application and then try to sync QuickBooks
I tried re-loading the application (inside web connector) and it shows a non-expired certificate, but then gets that revoked error?
To fix this issue, try performing the steps below: 1. First, close QuickBooks. 2. Copy the address: http://qbinstall.corrigo.com/6.13/6.13.132/QbEventsShim.exe into your browser to download a new QbEventsShim.exe file. 3. Replace the downloaded file in C:\Program Files (x86)\Intuit Field Svc. Integration or C:\Program Files (x86)\Corrigo Integration folder 4. Open QuickBooks and start using the Intuit field service management normally.
QuickBooks Desktop Statement Writer Stopped launching and began throwing an error message. What to do?
To fix this issue with the QuickBooks statement writer, try updating QuickBooks to the latest releasing using the steps below: 1. Open QuickBooks and help tab 2. Click on Update QuickBooks Desktop 3. Go for Update now tab 4. Select Get updates 5. Exit QuickBooks after the update 6. Reboot QuickBooks 7. Try to sync QuickBooks with the third-party application again
You can abruptly bump into QuickBooks error code 6210, 0, and it is potent enough to disrupt your smooth working experience. Be prepared for such an error when trying to either update your software or when cleaning the junk files. If you are devastated with the thought of getting such an error, we are here to help you. We have drafted this segment in a way to let you culminate this particular snag from its root cause by simply performing some basic set of procedures.
Dicey about implementing the procedures on your own? We have a solution for that as well. Just grab your phone and give us a call at +1-888-510-9198, and our certified QuickBooks ProAdvisors will cater you with tailor-made solutions. Having said that, let us together explore the QuickBooks error code 6210, 0 in detail!
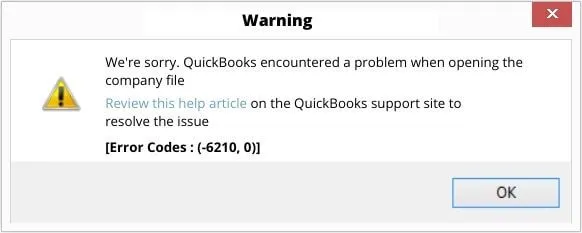
To eliminate the error permanently, it is crucial to understand what it is all about. Talking about, QuickBooks error code 6210, 0 is basically a 6000 series error, which related to the core element of QuickBooks i.e., the company file. You can see a warning message on your screen that states:
“We are sorry. QuickBooks encountered a problem when opening the company file. Review this helpful article on the QuickBooks support site to resolve the issue. Error codes: (-6210, 0)”
Upon checking out the article provided on the error notice, one can conclude that the error falls under a group that arises due to the same thing i.e. “A computer that is not the server is hosting the company file”
You may happen upon this particular glitch when performing tasks in multi user mode in QuickBooks. Moreover, this particular error can be expected when the download process of the QuickBooks software is corrupted. There are possible reasons that can drag you into this glitch in QuickBooks. To explore what reasons can be behind the occurrence of this issue, stay hooked to this segment carefully.
What operating systems can expect QuickBooks error code 6210, 0?
You can bump into such an error, if you are using any of the below operating systems:
Windows 7
MS Windows 8
Windows 10
MS Windows XP
Windows ME
Windows Vista
What can trigger QuickBooks error code 6210?
You can expect this particular error in QuickBooks due to a bunch of factors. One of the basic triggers can be corrupted download of QuickBooks accounting software. There are a couple of other errors as well, which include:
Be prepared to come across this issue when any alteration is done in QuickBooks.
Expect to experience such an error if the windows registry is corrupted.
You can also come across a similar issue if there is any sort of malware infection.
If you have mistakenly deleted any QuickBooks related file, then be prepared to bump into this error.
Signs and Symptoms of QuickBooks error code 6210 0
Identifying such an error in QuickBooks becomes easy, once you have a basic knowledge about the signs and symptoms of the same. Let us find it out:
If your system is freezing repeatedly for a couple of seconds, then this particular error might appear on your screen out of nowhere.
Not just that, if your system crashes again and again when running the same program, then it is a hint that you might land into this particular error.
The error code itself popping up on the screen is one of the clearest identifiers.
Be ready for this issue, if your system is running sluggishly when opening the same window.
Points to remember
Before you get onto the procedures to eliminate the error code 6210, 0 in QuickBooks, don’t forget to check out the QuickBooks error code 6210.
Check if the hosting is turned on. This can be done by pressing F2 and then searching for the local server information. Ascertain that the hosting is turned off before you jump onto the fixation procedures.
Try renaming the .ND and .TLG files and then proceed to run the QuickBooks database server manager from the QuickBooks tools hub.
Troubleshooting Procedures to Eliminate QuickBooks error 6210, 0
Getting rid of various errors is easy in QuickBooks, as you have some basic fixes for every error associated to QuickBooks and the same applies with QuickBooks error code 6210. Let us evaluate each of the procedures that you can try implementing, in order to culminate this company file error easily.
Technique 1: End conflicting programs
Often some background procedures can hinder the smooth running of the software and also trigger such errors. Thus, it is a quick solution to end those unwanted processes that turn out to be conflicting by following the below stated guidelines. Before heading forward, it is important to keep in mind that programs with mismatched APIs usually generate runtime errors.
Start off by pressing Ctrl + Alt + Del together and this would open up the task manager.
You will now see a list of programs that are running in the background.
There, you will have to proceed to the processes tab and terminate each of the programs one by one and click on the end process option.
And this would turn down the error to a certain extent. Check if the error gets eliminated or not, or else proceed to the procedure ahead.
Technique 2: Configure .ND and .TLG files (Single user mode)
In some situations, renaming the .ND and .TLG files in single user mode can help in eliminating the error up to certain extent. The steps you need to implement in this process are as follows:
You need to first move to the folder having the QuickBooks installation directory and open it.
Followed by locating the corresponding network data and transaction log file.
Right click the .nd file and select the rename tab.
You now have to add .old at the end of the extensions.
Perform the same steps for the .tlg file and rename it.
Create a new folder on the desktop and then move QuickBooks file to the newly created location.
Towards the end, open the QuickBooks and company file from a newly created folder on the system’s desktop.
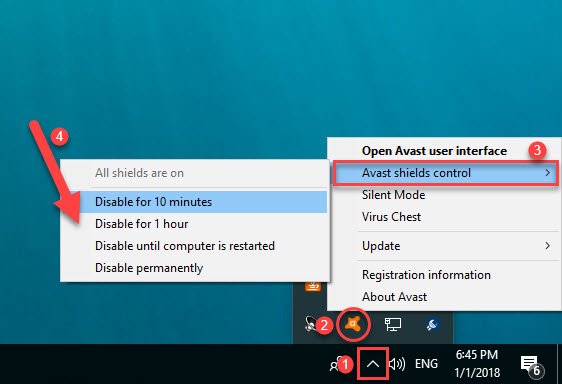
Technique 3: Disabling the antivirus and antimalware software
Have you ever experienced errors due to antivirus and antimalware software? Well, often this third-party software can trigger unexpected errors, which include the error code 6210, 0 as well. You can try to disable the antivirus and antimalware software by performing the essential steps. This software might pose a threat to the company files and might not let you access the financial data. It is suggested to check the virus vault to get a grip about the files that are quarantined and then terminate them.
Technique 4: Download and Launch QuickBooks database server manager
You can try performing the below set of steps to download and set up the database server manager, as it might help you culminate such an error in QuickBooks with much ease. The steps to be performed in this particular process are as follows:
Begin the process by simply downloading the QuickBooks tools hub from the website of Intuit, and further navigate to the downloads by pressing Ctrl + J.
You are then required to click on the QuickBooksToolshub.exe under the downloads list.
Once done with that, click on the yes tab and allow this app to make changes.
Moreover, click on next to install it and further click on yes to accept the license agreement.
You now have to tap on to the finish tab.
Followed by opening the tools hub program.
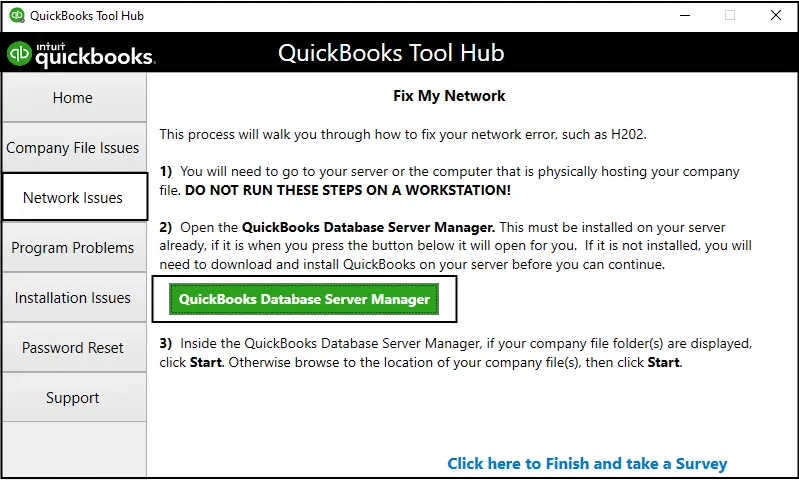
Heading forward, click on QuickBooks database server manager under the network issues.
Scan the company file location
Under this process, you need to move to the scan folders tab.
You now have to tap on browse and go for the folder that stores the company file.
To conclude, click on the ok tab and also click on the start scan option.
There can be situations when your company file location can be a reason behind the occurrence of some issue. In that scenario, you can try copying the company files to desktop by carrying out the set of steps enumerated below:
Right click the desktop screen and navigate to the new tab and folder option respectively.
Once done with that, click on the current company file location.
You are then required to right click the company file and go for the copy tab.
Open the new folder and right click and choose paste tab.
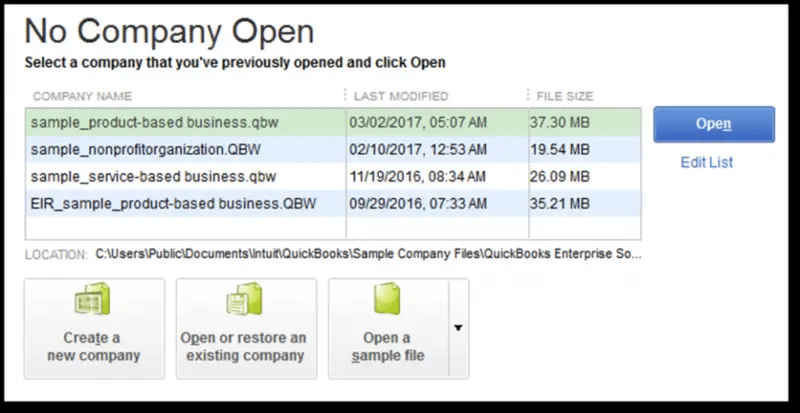
You now have to press ctrl key and ensure to now leave the ctrl key till the no company open window opens up.
Pick the open a company file option and click on the next tab.
You are then required to browse to the desktop file copied in a new folder.
The last step is to click on the open tab and check if the file is opening or not.
Technique 6: Update QuickBooks desktop
Using an outdated QuickBooks version can land you into some sort of technical glitch for sure. Thus, never miss any update of QuickBooks to avoid any such errors in QuickBooks. The steps to be continued for the process to update QuickBooks desktop are:
Open the QuickBooks desktop first.
Followed by navigating to the help menu and selecting the update QuickBooks desktop option.
You now have to click on the update now tab present in the top right corner.
Heading forward, check on reset updates tab and click on get updates.
To conclude, try closing QuickBooks once the update is complete.
Many errors in QuickBooks are associated with the company files and other QuickBooks related files. Thus, to help in eliminating these errors, you are backed by the QuickBooks file doctor tool. This tool is designed in a way to culminate all the files related errors and get QuickBooks back on track. The steps involved in this procedure are as follows:
To begin with, you need to download QuickBooks tool hub first.
Later on, navigate to the downloads folder by pressing ctrl + J.
Once done with that, head to the downloads list and click on QuickBooksToolsHub.exe.
You now have to click on the yes tab to allow the app to make changes.
Followed by selecting the next tab and also installing it.
Click on yes for accepting the license agreement.
And furthermore, click on the finish tab after the installation is complete.
You now have to open the QuickBooks tool hub and head to the company file issues tab.
There you will find the QuickBooks file doctor, from where you can run it.
Let the tool diagnose the errors and perform the necessary set of procedures to uproot the error.
Technique 8: Restoring the backup files
Trying to restore the backup files is a proven method to culminate the error in QuickBooks. However, it is important to ensure that you restore the most recent backup. The steps you can perform in this procedure are as follows:
Begin the procedure by closing QuickBooks.
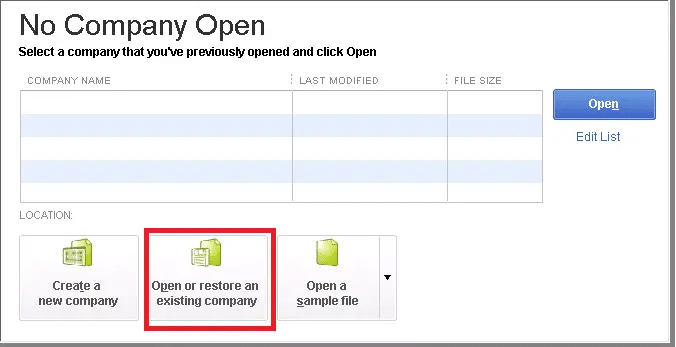
You now have to press ctrl key when waiting for the no company open window.
Another step is to click on the open or restore an existing company tab.
And furthermore, click on the next tab after picking the option to restore a backup copy.
Followed by restoring the most recent backup by performing the necessary steps appearing on the screen.
Try opening the software and accessing the file to check if the error has culminated or not.
Technique 9: Install and use QuickBooks clean install tool
Reinstallation of QuickBooks using the clean install tool eliminates all sorts of errors and bugs prevailing. The steps to be performed in this process are as follows:
Step 1: Uninstall the QuickBooks software
To uninstall the QuickBooks software, you can perform the set of steps enumerated below:
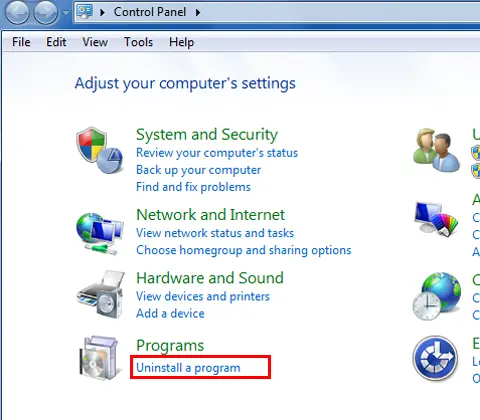
Click on the win + R keys to open the run command box, type control panel in search bar and also click on ok tab.
Go to the programs and features option and select uninstall a program option.
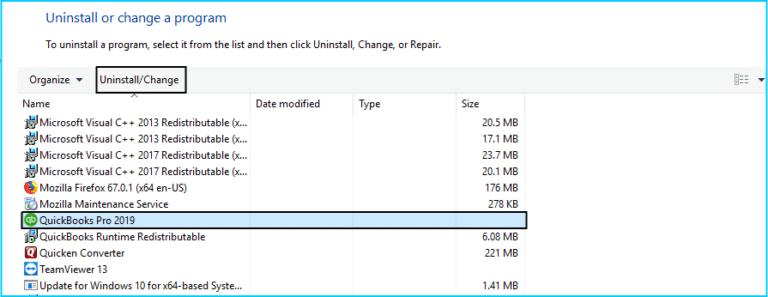
From the list of all the software, click on QuickBooks desktop and press uninstall, follow the prompts on the screen to complete this step.
Step 2: Use QuickBooks clean install tool for windows
Download the QuickBooks tool hub from the official website of intuit.
Furthermore, head to the location of the file where the download is saved and perform the onscreen prompts.
Click “I accept” tab to complete the installation process and you are ready to open the QuickBooks tool hub from the desktop.
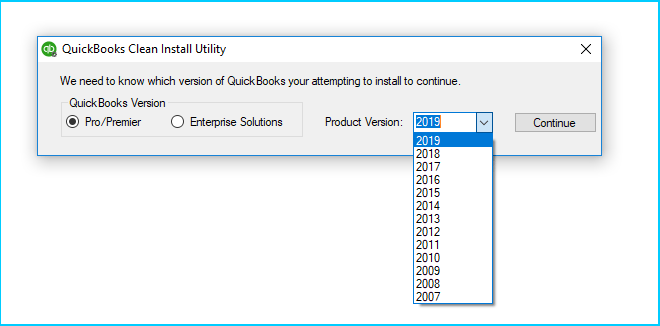
You now have to click on the clean install tool after selecting installation issues.
Select the QB desktop version which was installed previously on the system and further click on continue tab.
Wait to receive the message please install your copy of QuickBooks to the default location on the screen and press ok tab to complete this step.
Step 3: Re-install the QuickBooks software in the system
Insert the QuickBooks installation CD on the CD drive and perform the onscreen instructions.
Dumping off errors in QuickBooks is crucial to let it work smoothly and perform the accounting and bookkeeping activities without any interruption. On a conclusive note, we believe that the steps and procedures enumerated in this piece of writing will be of some help in culminating the error code 6210, 0 from its root cause. On the contrary, if you come across similar issue even after performing the same set of steps, then in that case, feel free to connect with our QuickBooks tech support team at +1-888-510-9198, and they will get back to you with the strongest and most effective solutions to make your software error-free.
QuickBooks Error code 6210, 0 belongs to the 6000 series error and is also known as multi-user mode error. You can experience this issue in case of Incomplete or corrupt installation, malware infection, data damage, corrupt Windows registry files, etc.
Does damaged file extension cause QuickBooks error 6210 0?
Files like .ND and .TLG files in QuickBooks if get damaged for some reason can trigger such an error in QuickBooks.
Why does QuickBooks error code 6210 0 happen?
You can experience this issue if the installation of QuickBooks gets corrupted, or if the network data file and transaction log file get damaged. Also, be ready to face the issue if there is any sort of malware infection in QuickBooks.
When I launch QuickBooks I get Error 6210 0. What to do?
This error is QuickBooks falls under the group of several others where “A computer that is not the server is hosting the company file”. You can try renaming the .Nd and .TLG files, or can use the database server manager. Or in case you are unable to rectify it, reach out to our QuickBooks Technical Support Team.
![QuickBooks Multi-User Mode Not Working – [FIXED]](https://www.hostdocket.com/wp-content/uploads/2024/01/QuickBooks-Multi-User-Mode-Not-Working.png)