QuickBooks is robust accounting & bookkeeping software that comprises of a wide variety of features which help business owner and accountants in completing many necessary business-related activities such as making payments, creating and sending invoices for future payments, and recording financial transactions etc. One of the basic pitfalls of QuickBooks is that it is prone to certain errors. In this piece of writing, we are going to discuss about the QuickBooks error code 9997. To learn further, continue reading this segment carefully.
You can also connect with our tech support team for any further technical assistance. Give us a call at +1-888-510-9198, and our team will provide you with immediate technical support services.
What is QuickBooks error 9997 and why it occurs?
When QuickBooks Error code 9997 appears, QuickBooks Online fails to connect with your bank to display the latest transactions. It is a common scripting error and can sometimes be fixed by just clearing cache and cookies from the internet browsing history. This error code can also be fixed by updating bank feeds manually, by clicking on the Update while logging-in using a Private or Incognito window in your preferred browser. It can further be eliminated by deleing the browser cache and removing any temporary files. You can continue reading this piece for further information related to this error.
What triggers QuickBooks error code 9997?
There are a bunch of factors triggering such an error, which we have tried to elaborate below. Let us have a look:
Poor internet connectivity or frequent disruptions in the internet connection can trigger such an error.
Another possible trigger can be accumulation of excessive junk and temporary files.
One might come across similar issue if the software might be unable to get access to the financial institution.
Any sort of virus intrusion in the computer system can trigger this issue.
Signs of QuickBooks error code 9997
QuickBooks users can identify such an error using the below signs of QuickBooks error code 9997:
One of basic signs can be the error warning message itself
Another symptom can be if the user is unable to access the transactions via QuickBooks online
The system responds extremely slowly than its normal speed
Repeated freezing and crashing of QuickBooks software
The first step to fix this error is to ensure if the Windows OS in your system is updated or not! If all the components are not updated, then this arrangement can cause QuickBooks issues
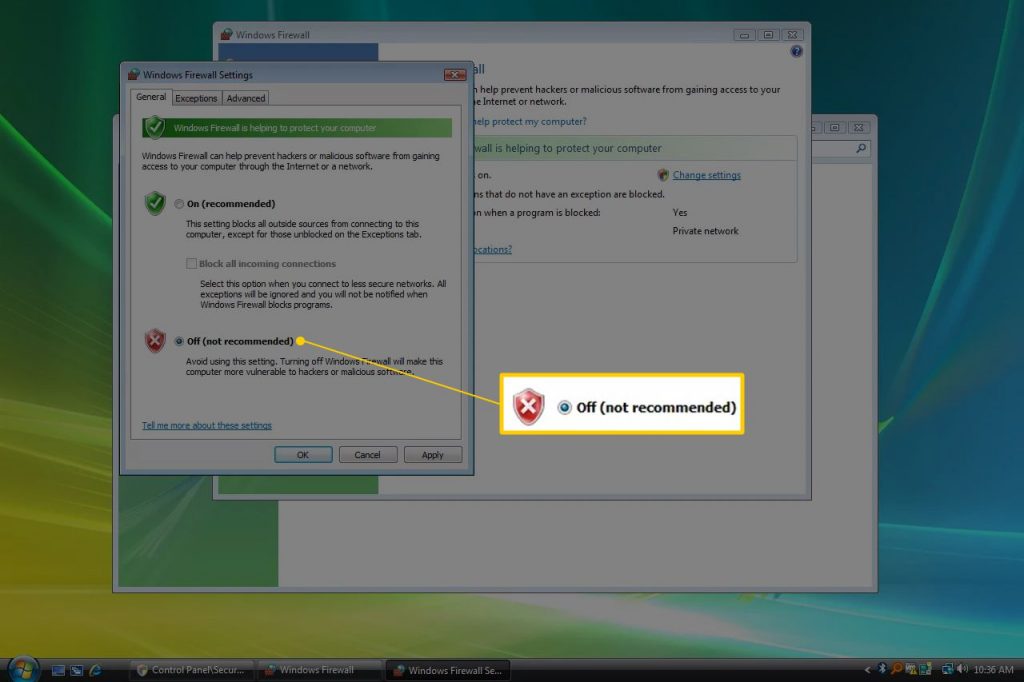
Remove the system security software (if you installed any security software recently)
Turn the firewall “OFF” if it’s “ON”
When the troubleshooting process is in progress, ensure that multiple applications are not running
In case, the application was working previously with the security, check if the security is updated
Remove all the recently installed programs from “Programs” > “Uninstall a Program”
Solution 3: Change QB file extension
If the error message is associated with file extension of QuickBooks Company file, then change the QB file extension and save as the company file and see if that fixes the issue
Check if you are able to open the QuickBooks Company Files on other systems
If the company file is not updated, then Re-install the QuickBooks software
Save the “QuickBooks for Macintosh” in Mac and not the Windows Operating System or vice versa
Before opening the QuickBooks Company file, run an updated antivirus update
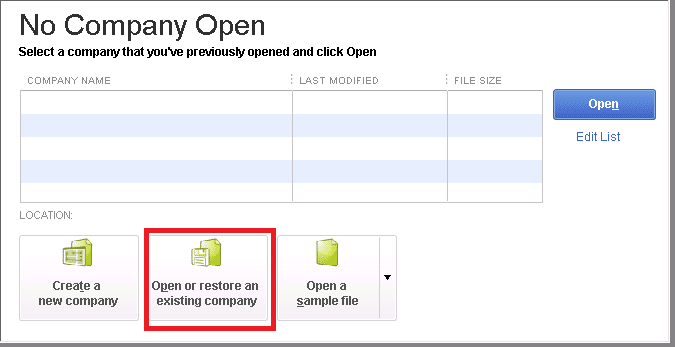
After that click on the “Open or Restore Company” tab
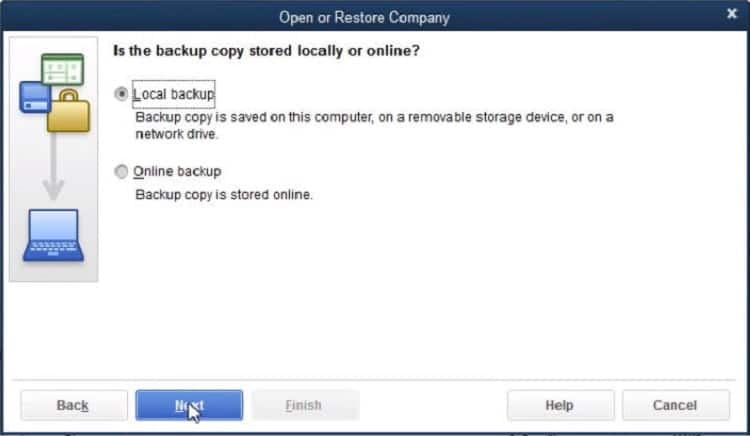
Choose the “Restore a backup copy” icon and then hit on the “Next” button
Select the “Local Backup” icon & then hit onto the “Next” button
In the drop-down menu, choose the location of Company file backup
Choose the backup file in the .qbb extension
Tap the “Open” tab followed by the “Next” button
In the drop-down menu, go to the “Save-in” option and then browse your preferred location to restore the Backup QuickBooks file.
In the “File-name” field, type the new Company File name and ensure the “Save as” filed automatically saves the restored file in .qbw format.
Click “Yes”
To confirm the overwrite process, Type the “YES” and hit the “Enter” button
Solution 5: Configure Transaction log file
Use the current Transaction Log file to recreate the lost transactions and the copy of the QuickBooks Company File.
With the help of the QuickBooks Company file and Transaction Log File, Recreate the complete data except for the last few hours of transactions.
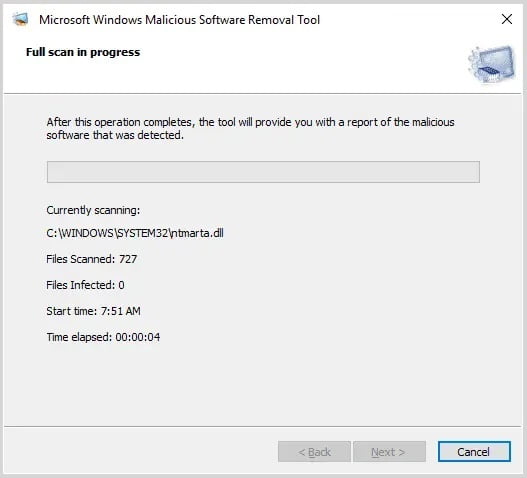
Solution 6: Check System for viruses
It is important to check the system for any viruses within the system and remove at the earliest. You can re-access your file after you have removed the viruses to check if the error is fixed or not.
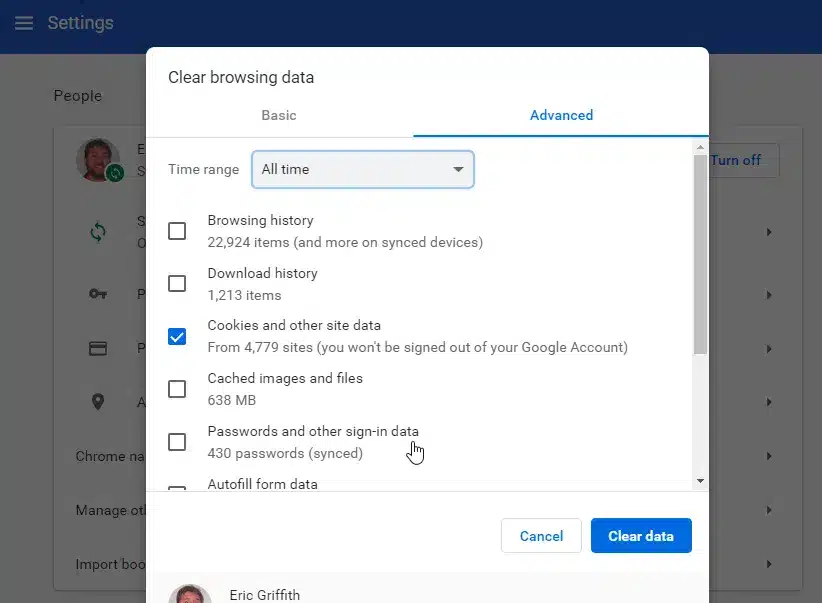
Solution 7: Clear cache and delete any temporary files
Under this process, you need to launch your internet browser.
And then, head to the more tools and select clear browsing data
After that, place checkmarks beside browsing history, cookies, and other site data and cached images and files.
We hope that the above-mentioned solutions offer you enough details about the QuickBooks Error Code 9997. However, if you still have any queries or looking for help with a QuickBooks error – please contact the certified QuickBooks Payroll Support team by dialing 24*7 toll-free helpline number i.e. +1-888-510-9198.
Frequently Asked Questions!
What is error code in QuickBooks?
Error codes or notifications happen when the QuickBooks data is damaged or the company file can’t be read correctly by QuickBooks. To fix these errors, you can start by installing the QuickBooks Tool Hub and fix the file from there.
What is QuickBooks error code 80070057?
QuickBooks error 80070057 usually occurs when a user tries to open a company file without the appropriate permissions. It can also be seen when there is an issue with the file path. To resolve this issue, ensure you have the correct permissions, update QuickBooks to the latest version, and check the file path for any discrepancies.
What is QuickBooks error code 9997?
When QuickBooks Error code 9997 appears, QuickBooks Online fails to connect with your bank to display the latest transactions. It is a common scripting error and can sometimes be fixed by just clearing cache and cookies from the internet browsing history.
As a QuickBooks user, there is a high probability of experiencing certain abnormalities in the accounting software. These abnormalities are often termed as errors and are assigned certain error code by Intuit for easy identification and rectification. One such error that we are going to highlight in this segment is QuickBooks Error -6000, -82 or -6000, -106. For a QuickBooks user, bumping into errors is quite common. Out of these errors, a few are associated with the company file, whereas the others are either a result of human intervention or due to improper permissions, etc. Coming to the error code 6000 82 or 6000 106, it usually occurs when you try to open or access a company file in QuickBooks Desktop. Be prepared to receive these errors even when opening or creating a company file in QuickBooks Desktop.
As this particular is associated with the company file, subsiding them immediately is the only option to avoid any sort of hindrances in future. Thus, to help you in the fixation process, we have curated this piece of writing, sharing the in-depth analysis of the error, the factors driving this glitch in QuickBooks, and of course the measures and strategies you can implement to shun off the error permanently. Note: If you are trying to resolve these errors, ensure that QuickBooks is updated to the latest released version.
In addition to this, also download, install and run QuickBooks File Doctor Tool on your system. You can continue reading this writing for a better insight into this article, or if you don’t have a sound knowledge to implement these solutions, you can ask our QuickBooks ProAdvisors for further technical assistance by getting on a call at +1-888-510-9198. Or look for QuickBooks Error Support for any type of problem resolution. Having said that, let us together
What is QuickBooks error code 6000 82 or 6000 106?
If you are using QuickBooks for a while now, you might have surely heard about the QuickBooks 6000 error series at least once. These error codes are often associated with the company file and might prevent you from accessing the company file on any other system. The QuickBooks error code 6000 82 or 6000 106 belongs to the 6000-error series and is often experienced when you try to open the company file or when you try to access the company file data stats that the application can’t reach. This particular error appears on the screen with a warning message that states:
An error occurred when QuickBooks tried to access the company file. Please try again. If the problem persists, contact Quicken Technical Support and provide them with the following error codes: (-6000, -82).
When you bump into this issue, it might not let you access the company file on any other system. Often when you use a multi-user mode, it is probable to experience this issue. There are a couple of factors triggering such error in QuickBooks, let us explore together.
What may cause QuickBooks Error 6000, 82 or 6000, 106?
There are different 6000 series errors and error code -6000, -82 and -6000, -106 are among the rarest. But don’t worry, these are fixable and this article will explain all the possible solutions to get rid of these two codes. First, let’s learn about the most possible causes that may lead to this error.
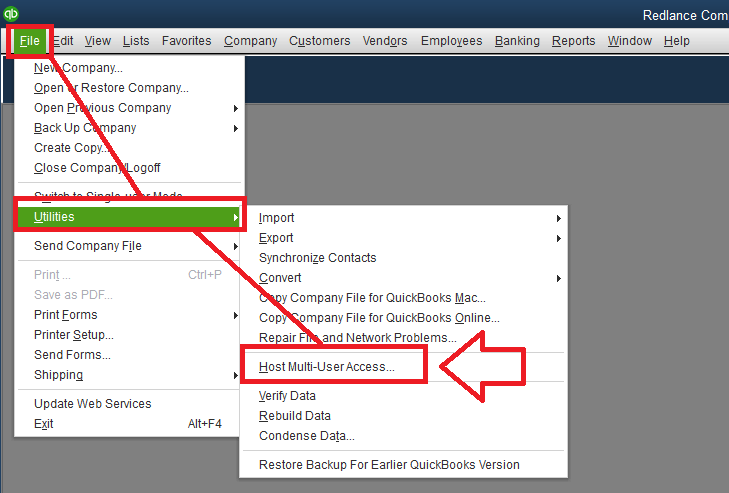
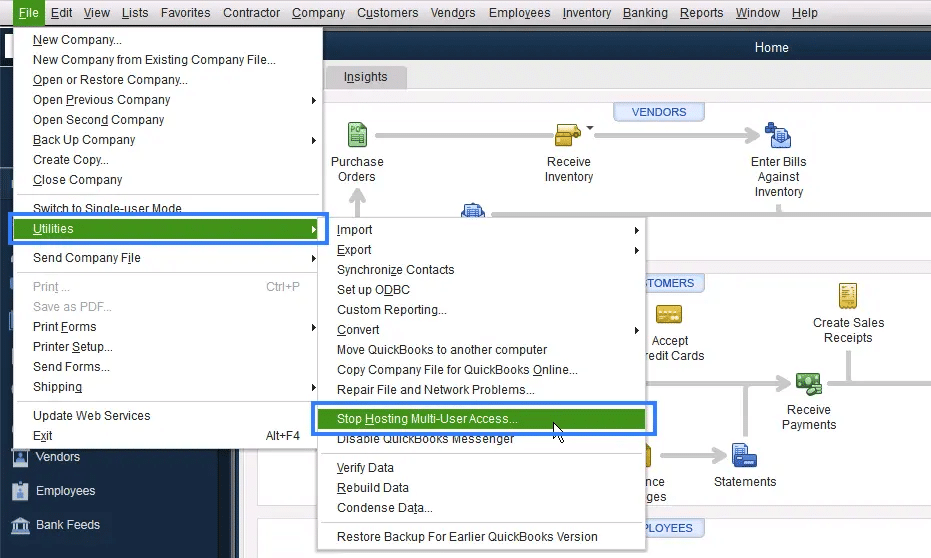
STEP 2: Turn off hosting with all the computers with QuickBooks installed:
For Single User: Turning off hosting mode disables multi-user access
Click on Utilities in the File menu and click on Stop Hosting Multi-User Access.
As you do this, a message will pop up on the screen. Click on Yes.
A Message appears on the screen when the company file has to be closed. Click ‘Yes’.
Multi-User:
Note: If this error occurs, this means that more than one computer has been set up incorrectly to host multi-user access.
You will be able to see this error on each and every computer with incorrect hosting settings
In the No Company Open Window, Select File and then click on Utilities.
Confirm that the menu option of host multi-user access is visible. Here, note that more than one client computer can display menu options and prevent hosting multi-user access.
After this, choose the option of Stop Hosting Multi-user access on any client computer; display the Stop Hosting Multi-user access.
Follow the steps to stop hosting
Open the problem file and ensure that the log-in window appears.
If the problem still persists, follow Step 3.
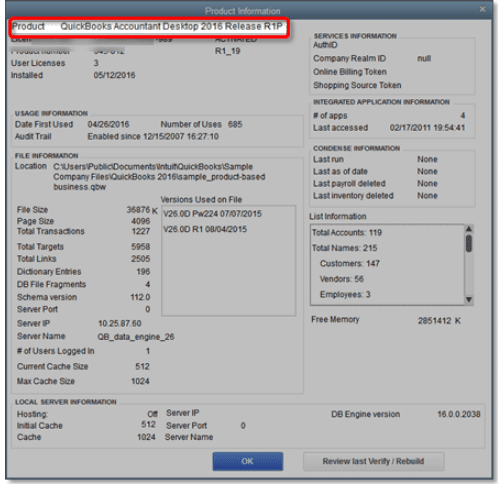
STEP 3: Move to Hosting Local and Remote File Mode:
To open the detail of the window, click F2 key in QuickBooks
Set the hosting to local files only. (Check this at the bottom of the window under the section of local server information.)
Select File Menu and change it to multi-user mode.
Open the Company files. If you are seeking more details, then you can look for QuickBooks in-product Help. You can also set up multi-user mode for QuickBooks Desktop resource page.
To check the product detail tab, open the company file and press F2 key.
Now again confirm that the hosting is set to local files only.
If the problem persists, follow Step 4.
Point to Note: If you are trying to provide consistent access to company file to the users, then you shall leave the computer that is hosting multi-user access, and the users who set up the QuickBooks should be logged in. However, you are not required to open the QuickBooks.
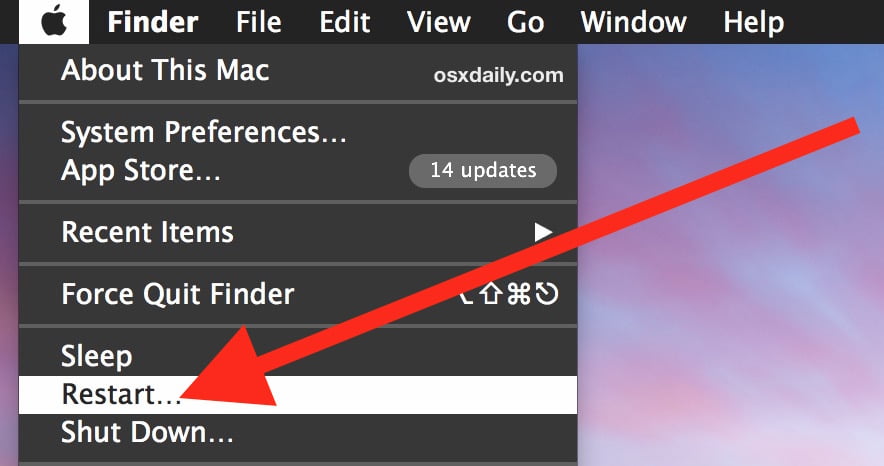
After restarting the computer, you will observe that all the system settings will be brought from scratch and all the current settings and state of the software will be eliminated.
STEP 5: Use the standard data troubleshooting solution to resolve this error
While troubleshooting, there are chances that there may be damages to your company file data. In that case, you can follow the steps given on our website to resolve all the data damage issues.
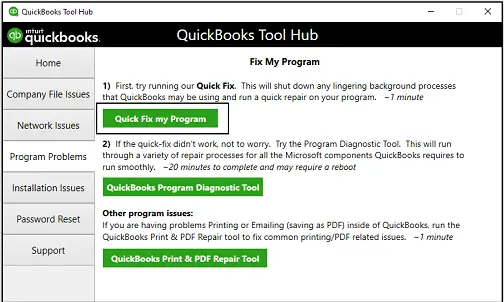
STEP 6: Run Quick Fix My Program feature on the client computer
If the above steps didn’t help, try running quick fix my program feature on the client system using the steps listed below:
Pick the Quick Fix My Program option from the list.
Choose QuickBooks desktop and further open the data file.
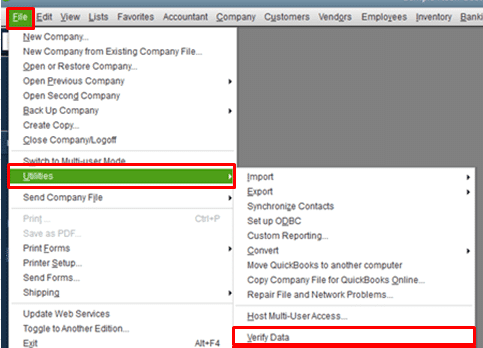
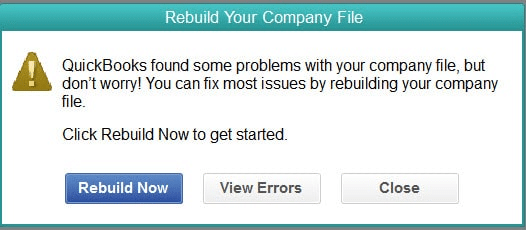
STEP 7: Use Verify and Rebuild Tool
At times damaged data can also trigger such errors in QuickBooks. Try fixing the damaged company file data that requires in-depth knowledge of the software. Run the rebuild utility and then verify utility to fix the data damage. Follow the steps listed below:
Start off by clicking on the Utilities tab from the file menu.
Further, click on the Verify Data.
After the error message appears on the screen stating “QuickBooks detected no problem with the data”, click on the ok tab.
Continue using the company file.
If the verify tool finds an issue with the data, you should rebuild now or view errors.
Click on Close.
Or perform the steps below:
Spot the QBWin.log or QuickBooks.log files.
From the tech help window, if you are working with a support agent, click on the Send log files to intuit support.
This will send the file to the repository, which will enable the support agent to view the log files.
If you are working with a support agent, then you will have to locate the most recent file for Begin Verify.
In case you are a Mac user, you need to scroll all the way to the bottom for the most recent verified information.
Look for the line that contains the LVL_ERROR;
Search for it on QuickBooks learn and support.
You might also see the data damage Top LVL errors library.
Errors can be extremely devastating for QuickBooks users, and errors that are related to the company file need to be tackled as soon as possible. We believe that the steps illustrated above might be of some assistance for you in tackling this particular error code 6000 82 in QuickBooks. On the contrary, if you feel the need for a team of professionals, who can guide you through the right procedure to eliminate the error from its root cause, then do not hesitate in connecting with our QuickBooks Support team on our helpline number i.e. +1-888-510-9198 toll-free.
What is QuickBooks Error 6000 82 or 6000 106, and why does it occur?
QuickBooks Error 6000 82 or 6000 106 is an error code that appears when users try to open, restore, or backup a QuickBooks company file. It usually indicates a problem with the company file itself, such as a damaged file or an incorrect file extension. QuickBooks Error 6000 82 can also occur due to network issues or when the user is not logged in as an administrator.
How can I fix QuickBooks Error 6000 82 or 6000 106?
The solutions for QuickBooks Error 6000 82 or 6000 106 can vary depending on the underlying cause of the error. Some common troubleshooting steps include running the QuickBooks File Doctor tool, verifying file permissions and network connectivity, restoring a backup of the company file, checking for special characters or spaces in the file name, and ensuring that the user is logged in as an administrator. Additionally, some causes of the error may require advanced technical knowledge or assistance from a QuickBooks expert.
Can QuickBooks Error 6000 82 or 6000 106 be prevented in the future?
While there is no guaranteed way to prevent QuickBooks Error 6000 82 or 6000 106 from occurring, there are some best practices that can minimize the risk of encountering the error. These include regularly backing up QuickBooks company files, avoiding special characters or spaces in file names, ensuring that all network connections are stable and secure, and keeping QuickBooks and antivirus software up to date. Additionally, it’s important to maintain good communication with your IT team or QuickBooks support provider to promptly address any issues that may arise.
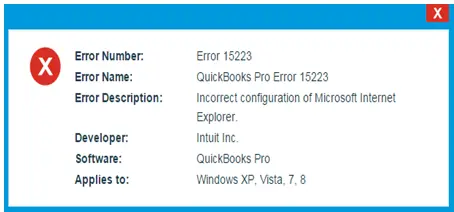
Did you just come across QuickBooks Error Code 15223? Not sure what to do? Well, QuickBooks error code 15223 appears while updating QuickBooks desktop or downloading QuickBooks tax table updates. A wide range of causes may lead you to this error, however, issues with Internet settings and corrupt Windows files are among the most common reasons behind the occurrence of QuickBooks Error 15223. This article shares the complete information related to QuickBooks error code 15223, from causes to fixes and more. However, in case of any queries, you can consult our technical support team at +1-888-510-9198, and we will clear all your clouds of confusion.
What is QuickBooks error code 15223?
QuickBooks error code 15223 is basically a 15xxx series error that can be seen when updating company file or when downloading a payroll update. You may have received either of these two errors:
Error 15223: The QuickBooks Desktop update did not complete successfully.
Error 15223: Cannot connect to QuickBooks Desktop Payroll.
This error is commonly seen with the windows registry. There can be a few reasons behind the occurrence of this issue, which we have tried to elaborate later.
Reasons which trigger to QuickBooks Error 15223
A bunch of reasons can land you into QuickBooks error 15223. These reasons include:
In case QuickBooks-related files are deleted mistakenly by any of the programs
Or if there are any damaged windows registry files
You can further come across similar issue if the windows or QuickBooks desktop files are damaged.
If the internet configuration isn’t done properly, then such an error can be experienced.
Also, if the internet explorer digital signature needs an update, then be prepared for such an error.
You can further end up in this issue if the QuickBooks desktop installation is unsuccessful.
Above we have discussed the reasons behind QuickBooks Error code 15223 and now it’s time to discuss how we can resolve this error. However, you can contact our customer service team for QuickBooks Payroll to get instant help from our experts. Below we have mentioned steps to resolve this error, just implement the points mentioned below in sequence:
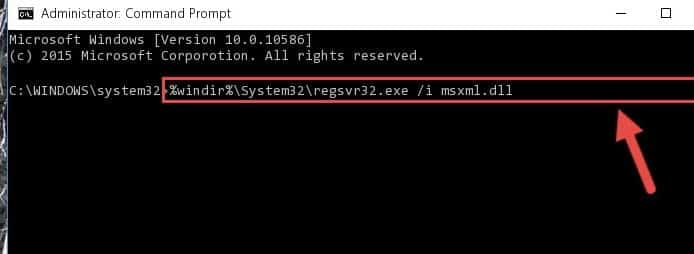
Solution 1: Manually Registering .dll Files
Registering the First File:
From your keyboard click on the ‘Windows button‘ and then open ‘Run’.
Copy and paste this text: “regsvr32 /s %SystemRoot%\system32\softpub.dll” in the text field.
Click on the ‘OK‘ tab.
If the file has been already registered then you won’t get any message.
You will receive a message, confirm that the copied registry file is exactly the same as appeared on the screen.
You need to press Windows + R to open run command and then copy the following code: regsvr32/s %SystemRoot%\system32\WinTrust.dll
You will not get any messages.
At the end, you need to verify and ensure to copy the register file the same way.
Registering the second file
You need to simply register the second file by pressing Windows
After that, copy the regsvr32/s% systemroot/system32/wintrust.dll
Now, paste in the open field and then click on ok tab
And then, clear IE SSL state.
Open the internet explorer again.
Select the tools and then internet option and click on content
You now have to press clear SSL
Restart the system and open QuickBooks to download the tax table update
The last step is to end the process by configuring the firewall.
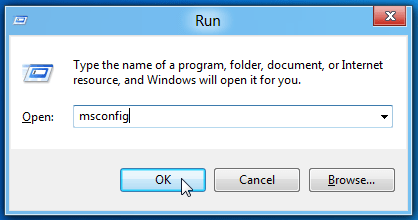
Open ‘Run ‘window by pressing Windows and R keys on the keyboard.
Type ‘msconfig’ in the open box and hit Enter.
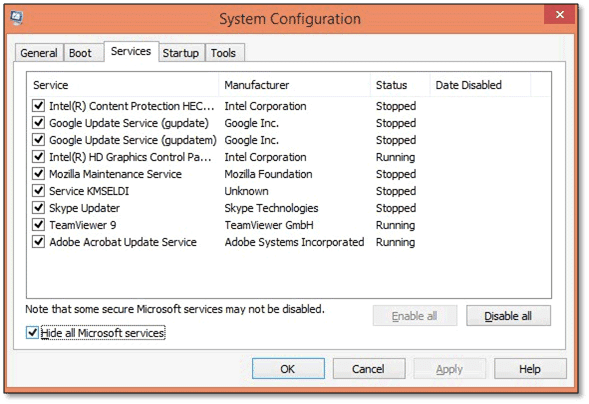
Go to General tab and click ‘Load System Services & Selective Startup’.
Check the ‘Hide all Microsoft Services’ check box on the Services tab.
Click the Disable all option and uncheck Hide all Microsoft Services checkbox.
Leave the Windows Installer service marked since it’s required for installing QuickBooks updates.
Click ‘Apply‘ and then ‘OK‘.
‘Restart‘ your computer when prompted. After your system is back on, try installing the available updates and see ‘QuickBooks update error 15223‘.
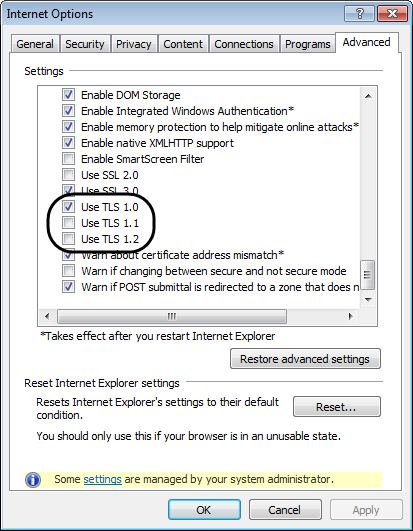
Solution 3: Verify Use TLS 1.1 and Use TLS 1.2 are unchecked and Use TLS 1.0 is checked in the Internet Options window of Internet Explorer
Follow the steps stated below-
Firstly, open ‘Internet Explorer‘.
Choose ‘Tools‘ and then select ‘Internet option‘.
Click on ‘Advanced window‘.
Go to ‘Settings panel‘ scroll down and then find the use of ‘TLS 1.0, 1.1‘ and use ‘TLS 1.2‘ option.
Confirm the use ‘TLS 1.1‘ and use ‘TLS 1.2‘ is unchecked or use ‘TLS 1.0‘ is checked.
Click on ‘Apply‘ and then press ‘OK‘ button.
Now, try once more to download the update.
If the error is still irritating then clean uninstall/restore in a selective startup and don’t forget to rename “C: \ Program Files \ Common Files \ Intuit \ QuickBooks” manually.
Try to download and update the QuickBooks Desktop once you successfully re-installed the QB Desktop to the selected startup.
If the error still persists then follow the ‘Next‘ solution.
Solution 4: Manually Configure Your Firewall and Antivirus settings
Some QuickBooks programs need an active internet connection and you might be facing issues as the Firewall restricts Internet access. So to solve this just download and install the latest version of the firewall and the problem will be resolved.
At first, you need to click on the start menu and further move to the windows firewall.
The next step is to pick the advanced tab from the right side.
Once done with that, right click on the inbound rules and select new rule.
The user will then have to choose program and click on next.
After that, click on the program path and click on browse.
Also, choose any of the path and click on next tab.
The user should now choose allow the connection option and also click on next.
The next step is to click on finish tab and name the rule.
Repeat the steps for outbound rules.
Lastly, open QuickBooks in multi user mode.
Solution 5: Delete the IE SSL state
Firstly, Open your ‘Internet Explorer‘ browser.
After that choose the ‘gear icon‘ and then select ‘Internet Options‘.
Now navigate to the ‘Content tab‘
Choose ‘Clear SSL state‘.
Finally reboot your system once.
Once the system restarted open your QuickBooks Desktop and retry the update.
We hope that the steps mentioned above really did help you a lot and if there is any doubts or issue regarding QuickBooks payroll error code 15223 or any other QuickBooks related issue then do not hesitate to call on our QuickBooks enterprise technical support team at ++1-888-510-9198. We are Intuit certified QuickBooks ProAdvisor and we provide services around the clock.
FAQs Related to QuickBooks error code 15223
What is QuickBooks Payroll Error Code 15223?
QuickBooks error code 15223 is a payroll error that can be seen when downloading a payroll update or when updating QuickBooks. It further indicates an issue with the digital signature certificate.
Why does QuickBooks payroll error 15223 occurs?
You can experience this issue in case of damaged windows files or in case of incorrect configuration of internet explorer. Also, if the internet explorer digital signatures need to be updated.
How do I fix error code 15223 in QuickBooks?
To fix this issue in QuickBooks, perform the steps below: 1. Open internet explorer 2. Choose gear icon and the internet options 3. Move to the advanced tab 4. Under the security, locate USE TLS 1.0, TLS 1.1, USE TLS 1.2 5. Ensure that USE TLS 1.0 is unchecked while USE TLS 1.1 and USE TLS 1.2 are checked. 6. Now, choose apply tab and also click on ok tab.
If you have ever used QuickBooks, you very well know how much time related to sending invoices, payment receipts, and transactions can be saved by using email account directly through QuickBooks. However, at the time due to some blocked sign-in attempts, one might come across incorrect password error while performing these activities. QuickBooks company file incorrect password error is a frequently occurring error that many QuickBooks users have reported. Due to this error, the software doesn’t accept the password when using email services like Gmail, outlook, or yahoo mail. As a result of this issue, you might not be able to connect to the online email services and send transactions directly from the QuickBooks desktop.
There are a bunch of factors triggering this issue in QuickBooks, if you want to learn what those factors are and how you can deal with them, simply scroll through this segment. You can also get on a call with our QuickBooks support professionals directly at +1-888-510-9198, and they will get back to you with immediate support services. Our technically sound QuickBooks professionals will help you with all sorts of QuickBooks support and assistance.
Before you dig in deep, it is important to understand what this error is all about. The incorrect password error is basically seen with a warning message “Incorrect email or password”. As we mentioned earlier, as a result of this error might not be able to connect to the online email services and send transactions directly from QuickBooks desktop. Factors like invalid password or mistype can trigger such an error in QuickBooks. Continue reading this to explore the causes and fixes for the same.
What causes QuickBooks company file incorrect password error?
One or more of the following reasons may lead to the Company File incorrect password error:
Sometimes, passwords are case sensitive
There might be some missing or incorrect accessibility settings
Open ‘Control Panel‘ > select ‘Accessibility‘ options and make sure that no box on any of tabs is checked
Spaces are also been considered as part of the password
Sometimes, when we generate the password, unknowingly, the spaces are recorded while submission of the password
Incorrect keyboard Function
You can submit in the notepad to check whether your password is properly working
The appearance of an incorrect login screen
When the login screen appears in some cases without the username on the admin login screen then, you need to reopen it
The perfect password hacks while creating a password, you are required to make complex password instructions as per it need to have minimum seven characters (consisted of at least one number, letters, special character, and one upper case letter).
How to Troubleshoot QuickBooks Company File Incorrect Password error?
You can perform the following steps to fix the QuickBooks Company File incorrect password error. You can also go with QuickBooks customer service helpline if you want an expert guidance.
Step 1: Use Password Reset Tool
Password reset tool is an automated tool for the QuickBooks Desktop that’s primarily used to reset the QuickBooks admin password. If a user forgets the password, this tool comes handy. Users will have to enter 15 digit license number, full name, phone number, and postcode. These details are validated as per the registration information saved in a database. If in case any of information mismatches when a product is registered then it leads to failure of the request.
How to Use an Automated Password Reset tool for QuickBooks Desktop?
Start by selecting the tool depending on the version of desktop you use as per US-version, UK- Version or Canadian Version:
Step 1: Find out the version of a desktop
You are required to have knowledge of the product version and then release number and then the select product from the list and learn how to identify the version, release the data and follow some instructions. To know How to check the product version & release of your QuickBooks click on the given here.
For the statement writer: In QB select reports and then statement writer, when a program is up, choose ‘Option > help > about QuickBooks statement writers‘
Merchant service: QuickBooks uses merchant services, thus there is no release or version.
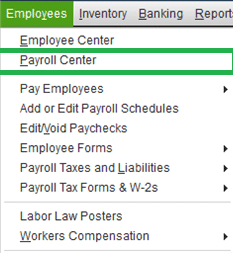
Basic or advanced QuickBooks Payroll: Select “Employees” > “Payroll Centers” and then choose the Payroll tab.
For QuickBooks Mac and POS: Choose “Help > product information“. Here entire version release information can be seen.
Step 2: Select QuickBooks Version that was updated formerly to your QuickBooks Company File
Select version section, type in your license number and other business details during registration of the accounting software and then click on submit
Now, accept accepting license agreement and download
Type in token number sent in your email and choose the version in the drop-down menu of QuickBooks products
Submit new password, confirm and click reset password
If you’re changing a user password
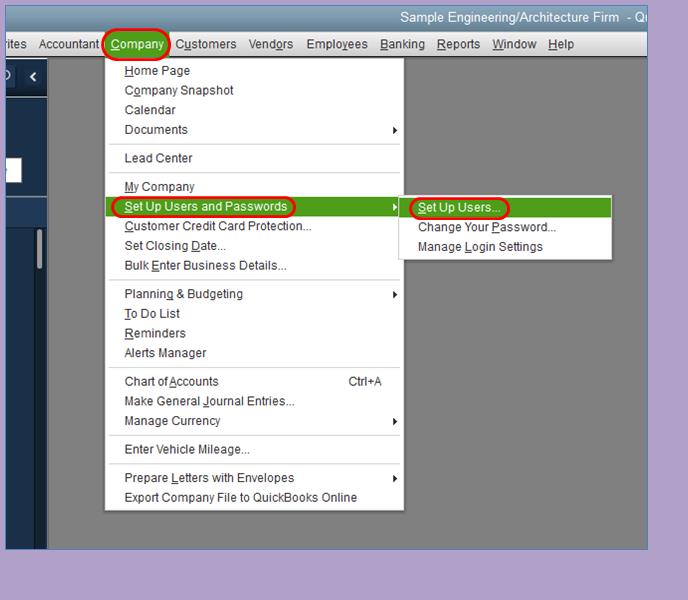
Sign in using the credentials of admin. If you aren’t an admin and don’t have access to admin credentials, contact the person who has the access
Go to Company and choose Set Up Users and Passwords
Select Set Up Users
After being prompted, enter the admin password again
Once you see the User List, select the user that requires a password change
Next, select Edit User
Enter a new password
Select Next twice and press Finish. If you (or the user) need to sign in on this computer, access the File menu and select Close Company/Logoff. You should be able to sign in with your user name and the new password.
As a security step, you would need to confirm/provide some information.
Open QuickBooks Desktop (QBDT)
Click I forgot my password link at the login window
Fill in the details on the form that appears
Click OK button
If you enter correct information, you would receive a code at your registered (primary) email address
Copy the code from your email and enter that in QuickBooks Desktop
You would be guided through the steps for creating a new admin password
If the password reset fails
Check the details you entered. Check for types and spelling errors and make sure the information matches what you have in CAMPS.
Alternate Procedures
Other than the above stated set of steps, you can try performing the below set of steps to get rid of the password issue. Let us have a look:
Step 1: Updating QuickBooks desktop to latest release
In case you have not updated your software already, then we suggest you to first update the software. Email a test transaction to check if the error is fixed after that. The steps involved in this process are as follows:
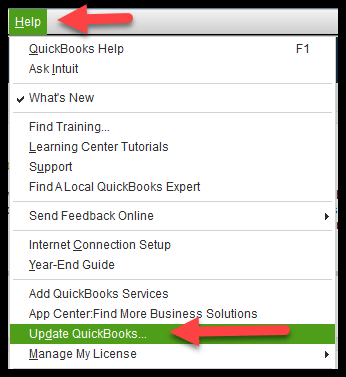
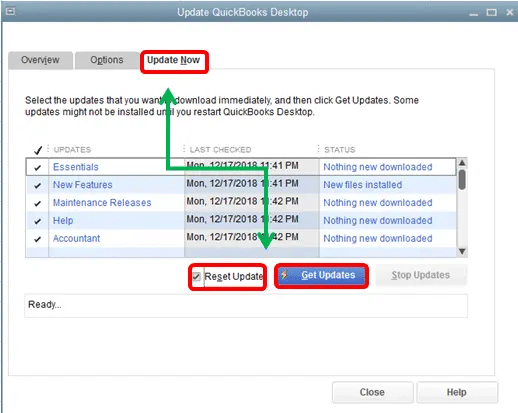
You need to first move to the help menu and choose the update QuickBooks desktop option
Furthermore, you need to head to the update now tab and select the reset update checkbox to clear all previous update downloads.
You now have to select the get updates to begin the download process.
And also reboot the QuickBooks software after the download finishes
And then, accept the option to install the new release, when asked.
Step 2: Check settings for your antivirus
At times, antivirus might block the internet connection to QuickBooks and end up in obstructing the seamless functioning. To lookup for the antivirus provider’s website and look for the steps to allow the port exceptions. The steps involved are:
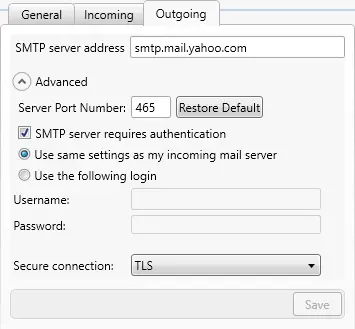
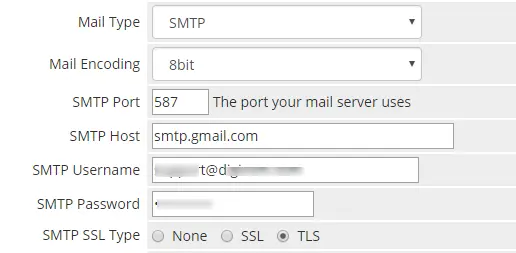
You need to make port 465 open for Yahoo mail
Also, make port 587 open for gmail and all other email services
If you are a McAfee user, then open the antivirus program and search for excluded processes list. Add the below names to the list so that they can run freely.
We hope that you find this article informative. In case you have any query or need assistance of an expert, call us at +1-888-510-9198. Our QuickBooks error support team will help you in such type of accounting problems.
Frequently Asked Questions
Why is QuickBooks not accepting my password?
There can be a bunch of factors causing such an error. You can try updating the QuickBooks desktop to try fixing the error. You can also check if the automatic updates are turned on. If you haven’t enabled automatic update feature, then you need to upgrade QuickBooks manually.
How do I unlock a company file in QuickBooks?
This can be done by performing the steps below. Just keep a check on the system, as it should be the system that normally hosts the company files. 1. The very first step is to open QuickBooks on the server system 2. After that, open the file and then utilities. 3. Switch the multi user setting off 4. Try to open the company file again
How do I repair a company file in QuickBooks desktop?
You can try repairing a company file using the steps below: 1. At first, head to the file menu, and then hover over the utilities tab and choose the rebuild data 2. Now, on the QuickBooks information window, choose ok tab 3. Let the tool finish and choose ok tab 4. Head to the file menu 5. Let the tool check your file for data issues
Errors in QuickBooks is quite common, just for the reason that the software involves a bunch of algorithms. One such error that we are going to discuss in this particular segment is QuickBooks Error 121. The QuickBooks POS Error 121 is also known as “Permission denied error”. This QuickBooks Point of Sale error generally occurs when you don’t sign in to QuickBooks as an admin. This error may appear during any activities that require admin right. As this error is an uncommon error, and can be seen when there are not enough permission from the end user.
This segment is going to brief you with the factors triggering the issue along with the fixes for the same. Thus, make sure to read this segment with much care. You can also speak to our tech support professionals using our customer-support number i.e., +1-888-510-9198.
What is QuickBooks Point of Sale update error code 121?
Before you dig in deep and implement the steps to eliminate the error, it is important to get a brief into the QuickBooks error code 121. This error basically signifies that you have to sign in the POS to another system rather than the system admin in which you encountered this error. You can face the QuickBooks error with a pop-up warning error message: Error Message: “QuickBooks POS Error 121 denied you do not have permission to select from timeouts” This error simply indicates that the software denied to make any changes as a guest user. There can be a bunch of steps that can be performed to eliminate the error code 121. Let us check out!
Steps to Fix QuickBooks POS Error 121
To fix the QuickBooks POS Error 121, you have to delete all the data in the Entitlement Client folder & remove the WSActivity.xml file. Before attempting the resolution steps ensure that all the Point of Sale process & services is blocked or stopped.
Step 1: Close all the POS Process & services
Firstly, Select the “Task Manager” tab
After that Choose the required Processes
Locate & close all the processes
Shut-down the Task Manager process
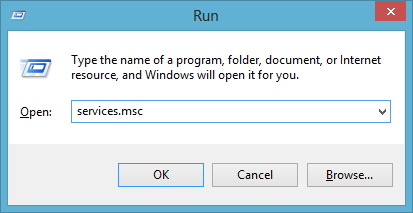
In the Windows search option, enter the “services.msc”
Go to the Services window; look for “QBPOS Database Manager XX” (“XX” means QuickBooks version)
Stop all the services & turn off the services windows
In case, the problem associated with “QuickBooks POS update: Error 121” still exists within the QuickBooks software then we propose you to follow the steps mentioned below:
Hopefully, the above-prescribed troubleshooting steps are enough to endow you complete insight about the QuickBooks POS Error 121. However, if you still have some query or technical problem with the QuickBooks – you can take help from the certified QuickBooks ProAdvisors at toll-free support number i.e. ++1-888-510-9198. Our technical support team is always ready there to help you out in every possible manner.
FAQs– QuickBooks Error 121
How do I fix bank errors in QuickBooks online?
To get rid of the bank errors, you can perform the steps listed below: 1. The first step is to choose transactions and choose bank transactions in bookkeeping 2. After that, choose the tile for the bank account 3. Now, choose the edit tab 4. Also, choose edit sign-in info 5. The user is then required to update info as needed
What is QuickBooks error code 12, 0?
QuickBooks error code (12, 0) is often experienced when you do not have sufficient administrative permissions to conduct certain operations on your QuickBooks. This error code often troubles you when system settings are incorrectly configured or when there is some variation in the Windows registry.
How do I fix QuickBooks Point of Sale error?
The user can try to fix the point of sale error using the set of steps below: 1. The very first step is to close QuickBooks point of sale 2. Now, open the windows start menu 3. After that, enter control panel into the search and also press enter tab 4. The next step is to choose the version of QuickBooks desktop point of sale 5. Now, perform the onscreen instructions to repair the program