Ever been in the middle of your QuickBooks payroll update, and suddenly the software throw an error code 12152 disrupting the entire process? Well, if you find this relatable, then you are not only the one. The QuickBooks error 12152 has been bothering a lot of QuickBooks users lately. The error pops up on the screen out of nowhere and makes it not so easy for the QuickBooks user to connect to the server. You might be bothered by such error when you either update QuickBooks payroll or when opening the software. In order to deal with this error, it is crucial to keep a check on the internet connection, as it can be one of the core reasons behind the occurrence of such an error.
To help you understand this particular error better and to help you deal with this issue, we have come up with this segment sharing the complete information related to QuickBooks payroll update error 12152 in detail. If you are looking for Instant help then you can speak with one of our experts to quickly resolve to your QuickBooks Problems. Our QuickBooks Live experts are available at Toll-Free +1-888-510-9198. Feel free to discuss your queries with us and we will help you with all sorts of QuickBooks errors.
QuickBooks Error 12152 typically stands out when you have problems with the Internet Connection setups that make it difficult for the software to connect to the servers and give concerns with the updates. Before continuing to the solution of QuickBooks payroll error 12152 make sure your Internet connection is established as well as permits you to connect to verified websites.
Symptoms of Payroll update error 12152
Identifying QuickBooks payroll update error 12152 becomes easy with the signs listed below. Let us check it out:
This error 12152 appears when a program crashes the dynamic windows
When similar programs running on your system, the device crashes along with having error 12152
Error 12152 displays on a screen & this react when gradually to a mouse
As occasionally a user find their device gets freezes for a couple of a moment
Causes of QuickBooks Update Error 12152
A bunch of factors can drag you into such an error. These factors include:
Some new windows have API keys but are not working as legally
A few quite common reasons that incorporated wrong or fizzled installation in QB software
An un-installation of programming that may have left invalid sections in your registry windows
Any consequences of an infection or malware assault
Improper framework shutdown it is just because of a power disappointment or have some another factor for this error code
Deleting an important framework document or registry section, and in addition various different causes
The prompt reason for this error in QuickBooks software that mistake is an inability which effects to run all typical operations by a framework or a part of an applications.
Check out the solutions for QuickBooks Error Code 12152 as:
Solution 1:Check Date and Time
At times, incorrect date and time can trigger a lot of errors in QuickBooks. One such error can be QuickBooks error 12152. Thus, it is recommended to check the date and time of the system. The steps involved here are:
First of all, check its date as well as time on your system
On the clock, give one right-click on it
Now let us adjust your date & time
After this restart your QB desktop software & check for all error codes
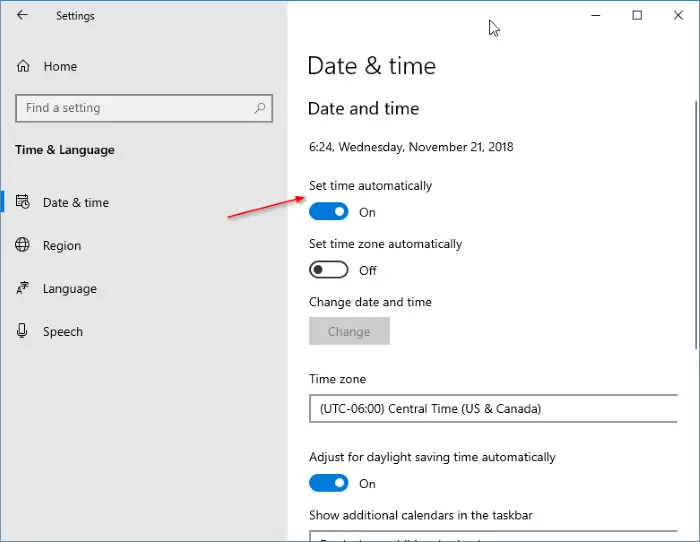
In case you are Windows 10 user, then perform the steps below:
You need to first head to settings and click on time and language.
Furthermore, move to date and time option.
Also, to set the current time, select the set time automatically option.
Now in the time zone section, enter the correct time zone.
In case the daylight saving time applies to your time zone, then enable the adjust for daylight saving time automatically.
In case the software isn’t accessed using the admin credentials, then facing this issue is possible.
Start your Computer
Then login as administrator tab
Click on the start key button
Then click on all programs > accessories > system tools & after this finally, click to the system as to restore
Under the new window, choose to restore my PC as earlier time option tab
Now click to the next heading
In the given list, just click on to ‘restore the point’ list. Select the latest system to restore that point from a displayed screen. After this just press to the next tab.
Into a confirmation window, give a single click on the next key button
When restoration process is completed, then restart your PC system
Solution 5:Fix registry entries
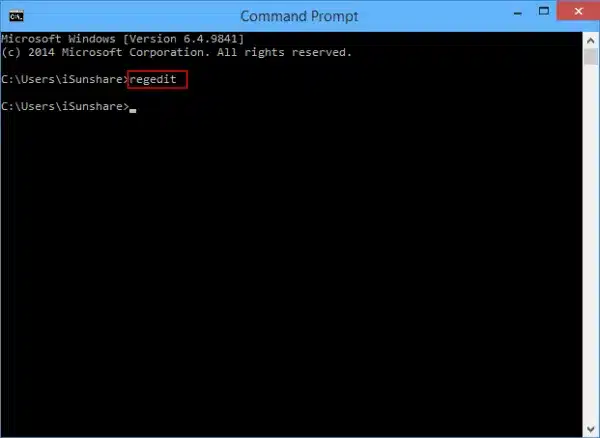
Select or click on the Start key button
Enter or type as Command in the given dialog search box. Remember don’t hit the enter key yet!
On a system keyboard, hold the Ctrl+ shift keys instantly & then press or hit the enter key
With the help of a permission dialog box, it will asks as prompted
Then click to the yes option
If the cursor of your mouse blinks, this opens the black box
Now type or enter as regedit. After doing so, hit the enter key
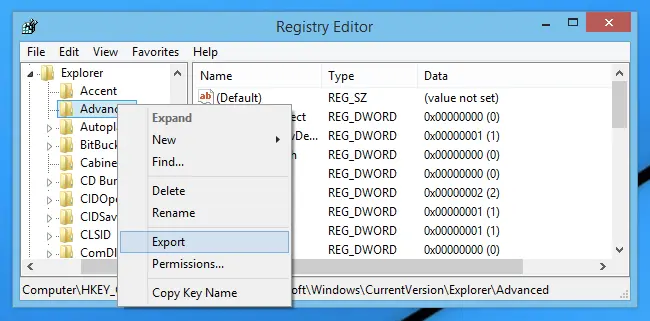
If want to take back up then choose the error 12152 related keys as instructed
Now select export from the main file menu
Then select the folder type and save into the list as where the client wants to save their IE backup keys
Under the File Name box, now type a name for a backup file for instance, IE backup. If need any technical assistance, ask expert guidance
Make sure that under the Export range box just type as selected branch is chosen by the user
Apply to save all changes that you have been made recently
Along with a .reg file extension. This file has been saved now
For a related registry entries, Take now a back up into your Internet Explorer web browser
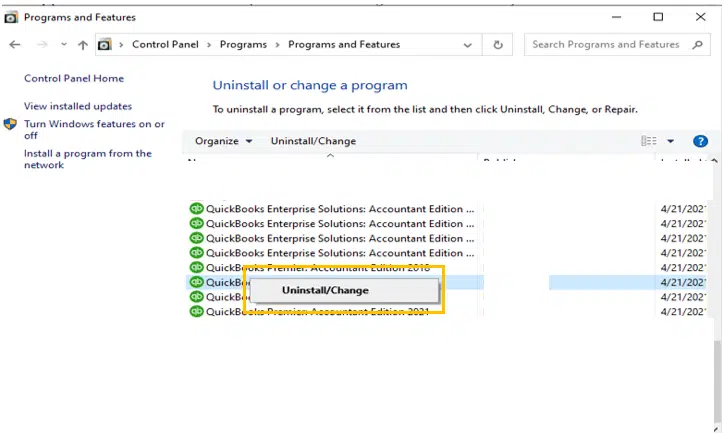
Solution 6:Uninstall and Reinstall QuickBooks
The very first step is to move to uninstall and download QuickBooks
After the software is established on the system, and then open it
Now, find the scan option and run it
The user will then see a list of issues or errors
The last step is to click on repair all option to eliminate them
Solution 7:Head through Microsoft Windows Framework along with time displayed
The user will have to verify the framework of the system is authentic and the time displayed is correct
The user is suggested to repeat the steps and also verify the framework through the settings tab.
The last step is to reboot the software and access it again.
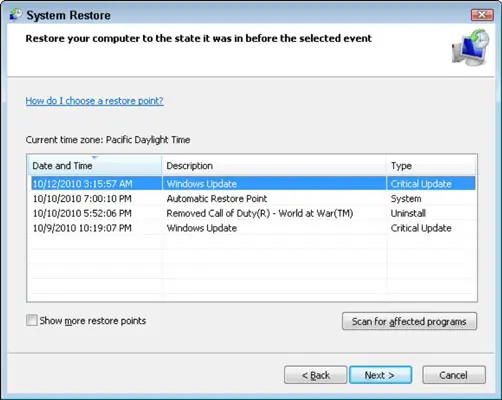
Solution 8: Use System Restore
If none of the above solutions helped you in fixing QuickBooks error 12152 successfully, then simply use system restore feature. The steps involved in here are:
Begin with rebooting the system.
After that, log in to the system using Windows admin credentials.
You now have to search for the option that shows Restore computer to a previous time and date.
Once done with that, select the above option and head to the next tab and click on it.
The next step is to head to the latest one from the list of restore points.
The next step is to confirm the choice by again clicking on next tab.
Towards the end, wait for the restoration process to complete and also reboot the system.
Solution 9: Clean Installation of QuickBooks
Another effective solution is to clean install using QuickBooks clean install tool. This process is an advanced version of rebooting and reinstalling that can fix the issue up to a certain extent. You will have to perform the following steps:
You need to first uninstall QuickBooks.
Download QuickBooks clean install tool from QuickBooks tool hub.
Run the clean install tool and let it perform the necessary steps.
Furthermore, download the same from official Intuit site.
The next step is to install QuickBooks and launch.
Fixing QuickBooks error code 12152 becomes easy, once you implement the right set of steps enumerated above. Hopefully, you will now be able to get rid of this particular error in QuickBooks without much hassle. If still you are facing the same error then get in touch with our QuickBooks Error Support team by dialing toll-free +1-888-510-9198. Our certified ProAdvisors will ensure to provide you with immediate assistance for all your QuickBooks related queries.
FAQs Related to QuickBooks error 12152
What is payroll error 12152?
This issue belongs to the 12xxx family of error codes that are related to the installation issues in QuickBooks. This error typically appears when updating QuickBooks to newer versions.
What are the causes behind such payroll errors?
This installation error may be encountered for several reasons, including: 1. Erroneous internet settings. 2. Using an older version of QuickBooks. 3. License data not identified by QuickBooks. 4. Technical issue with API keys in Windows. 5. Virus intrusion in the system.
How do I fix payroll error codes in QuickBooks?
These errors can be resolved with the help of following steps: 1. Configuring the internet settings. 2. Also, Correcting system date and time. 3. Restoring the system. 4. Attempt updating QuickBooks in the Safe mode. 5. Clean install QuickBooks desktop
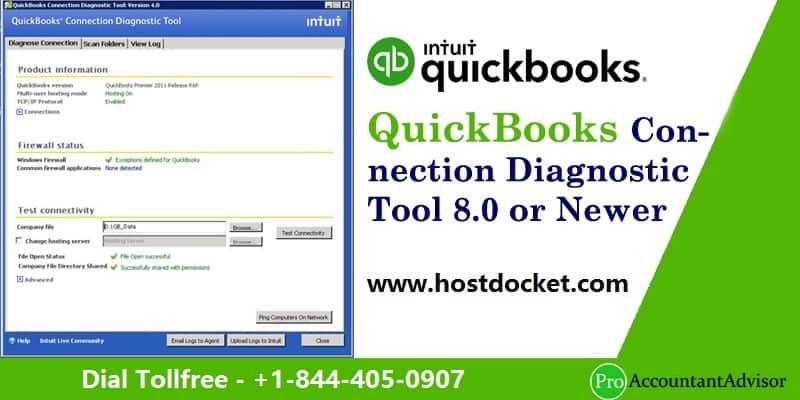
QuickBooks Connection Diagnostic Tool is helps fixing a wide variety of errors in QuickBooks Pro, Payroll, and Premier with data file, data recovery, download, update, upgrade, and more. It helps in fixing multiple errors, especially 6000 series errors. In this article, we will discuss in detail the features, benefits, installation process and ways to use QuickBooks Connection Diagnostic Tool. You can simply ring up at our toll-free number i.e. +1-888-510-9198. Our QuickBooks support team will ensure to answer all your queries in the least possible time.
This tool can troubleshoot the multi-user & networking errors while accessing the company file. The QuickBooks Connection Diagnostic Tool is a specially designed tool to fix the H series Errors & 6000 series errors such as 6000 304, 6000 77, 6000 80, 6000 83. With this feature, the users are able to develop an appropriate & sufficient connection with the other application such as QuickBooks database manager (QBDM) and QuickBooks company records. The devices with the Microsoft Windows 7, Windows XP, or Windows Vista are only compatible with the Connection Diagnostic Tool. Moreover, it supports only QuickBooks 2008 and newer or QuickBooks Enterprise Solutions 8.0 or newer.
The users can download, install and run the QuickBooks connection diagnostic tool to resolve the warning messages or error messages that might appear in front of you while installing the QuickBooks Desktop software. Also, this tool or feature is also widely known as QBNetDiagTool.exe, QBServerUtilityMgr.exe etc. However, The version 4.0 software is the most famous tool as it has an inbuilt antivirus tool to keep it free from the viruses.
List of issues that are encountered
Unable to connect QuickBooks to the database
QuickBooks Database connecting issues
Firewall post issues
Perks of using QuickBooks connection diagnostic tool
The benefits of using connection diagnostic tool are many. Here is a quick list.
The tool assists in resolving countless errors faced by the users.
You can fix issues where employees make certain entries that do not get updated on QuickBooks.
Using the tool saves a lot of time and effort and simplifies the process of resolving errors.
You can identify and resolve errors that appear when installing the software
It further assists in rectifying unexpected errors and multi-user errors in QuickBooks desktop.
Important points to consider
Before heading forward, note that in case you are using QuickBooks desktop 2016, then it is probable that you might receive reminders and prompts to use QuickBooks File Doctor. In that case follow what this article says and choose the version mentioned here.
File Doctor tool works for QuickBooks Desktop for Windows, but QuickBooks Connection Diagnostic Tool works for QuickBooks for Mac as well.
This tool offers proper connections between QuickBooks database server manager and the Company File for both H series errors (H202 and H505) and 6000 errors (6000 83, 6000 77, 6000 80, 6000 304) making the fixation process easier
It is suggested to use QuickBooks 2008 or a later version on MS Windows 7, Vista or XP for the connection diagnostic tool to avoid any mess
Also, note that the tool can be downloaded from Intuit’s official website to fix error texts that show up while installing QB Desktop. However, 4.0 is the most commonly used version.
What issues QuickBooks connection diagnostic tool fix?
There are certain issues that can be fixed using a connection diagnostic tool. These errors include:
QuickBooks database access denied
Another error can be inappropriate configured windows firewall
Blank vendor and customer list in the accounting software can also be eliminated using the connection diagnostic tool.
Corrupted or damaged company can also be fixed using this tool.
Missing company files
When to run QuickBooks connection diagnostic tool?
The following situations might call for using this tool.
In case of unexpected errors in QuickBooks like those in the 6000 series.
If there is any virus affecting the QuickBooks functions.
Or issues related to the QuickBooks database
Errors associated with Windows firewall.
Damaged or corrupted QuickBooks files.
To fix multi-user errors, which usually fall in the category of H series errors in QuickBooks.
Steps to download QuickBooks connection diagnostic tool
The steps below can be performed to download the connection diagnostic tool successfully.
Start the process by clicking on the Official download link of the QuickBooks connection diagnostic tool.
The next step is to Save the file in the system.
The user should then open the installer name as QBInstall_tool_vs.exe.
And also shut down the running programs in the background.
After that restart the program
Avoid any kind of further issues and ascertain to have a good Internet connection.
The user should then clear all the applications in the background.
End the process by performing the steps related to installation.
Steps to Install the QuickBooks Connection Diagnostic Tool
After the download process, the below steps can be performed for installation.
The user is first required to check the system to ensure there isn’t a version of the QuickBooks Connection Diagnostic Tool already installed.
After that download the tool from the OEM website and click on the icon twice after it appears on your desktop.
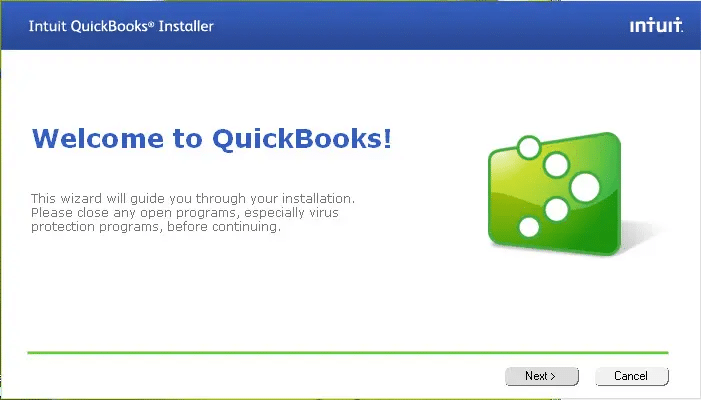
Perform the prompts that show up on your computer screen for installation:
Also, hit the Next tab when screen displays: “Welcome to the QuickBooks connection diagnostic tool setup wizard“.
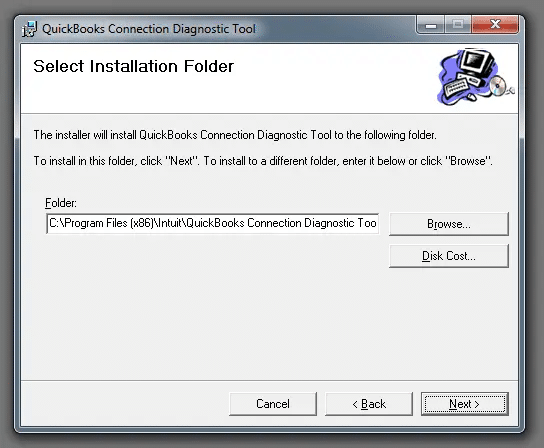
Now click on Next to choose Installation folder.
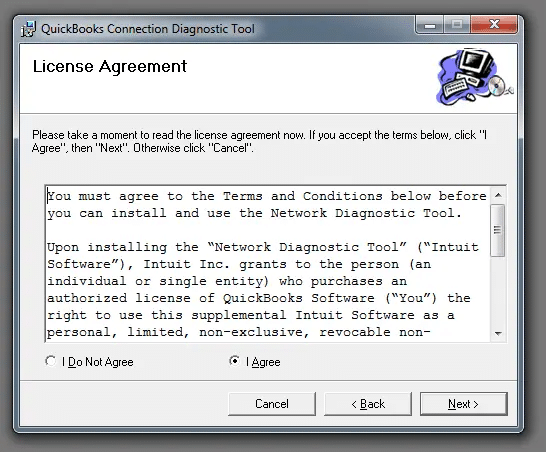
Tap on the I agree circle to accept the license agreement of the software.
The .NET framework must be configured properly, especially for Windows 10.
Wait for the application to open
Click on the icon
Head to the directory that contains the company file which is to be diagnosed.
Do not use the Network connectivity option, if you are using Single user mode.
Type in the Admin and password, after the message box appears on the screen.
Click on ok tab
Select whether you are using the host system or a Workstation PC.
The process might take some time, wait for it to complete
Steps to Employ QuickBooks connection diagnostic tool
After the installation comes employing process. The steps below can help the user in employing the tool.
At first, click on the QuickBooks icon.
Avoid opening the corrupted file.
Also, tap on the Utilities tab and then Repair the file option.
Hit the Network problems tab.
Click on Yes to collect the personal information related to QuickBooks and it’s data.
Head to the folder that has the company files and search and open the one that is corrupted
Click on the Show advanced settings
After that a list of items in a drop-down will appear on the screen.
Go for the issue that relates with the current issue.
First of all, Download, install and run the QuickBooks connection diagnostic tool as instructed in the download device tab. After that just Perform double-click on the connection diagnostic tool to run on the device. Once this procedure completed, follow the troubleshooting steps mentioned below:
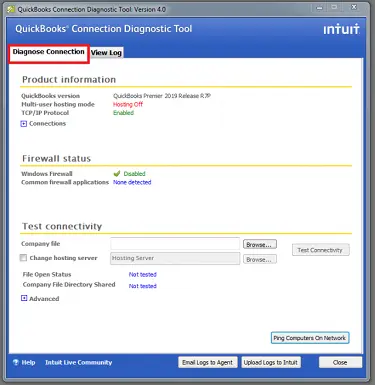
1. Diagnose Connection tab
The Diagnose Connection tab enables the users to make sure that you are able to access the company data file from the computer, no matter if its single-user or multi-user. The error code appears again & again if the permissions are not set accurately, or if it has blocked ports or firewall.
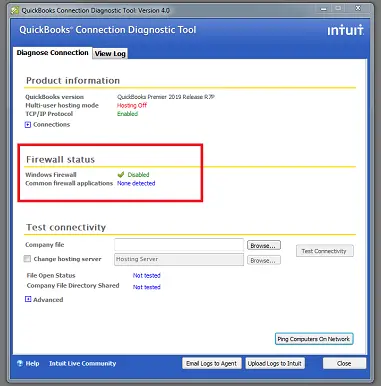
2. Firewall Status
The Firewall Status feature shows the basic instruction about the firewall on the display.
3. Test Connectivity
This feature will enable you to check the workstation or computer connectivity.
Procedure to test the computer’s connectivity
In the initial step of the process, the user will see a tab to locate the company file, next to the Company File field.
Select the “Change Hosting Server” If the network is set up in the Linux systems & it is in the Alternate mode.
Note: All statuses suppose to appear as “Not Applicable” in blue before the users run the connectivity test.
Once you run the connectivity test, either you will see all the statuses in Green or Red in color. The Green color signifies that there is no problem and the Red color signifies that some problem has been detected.
After that the user will have to select the “Test Connectivity” tab
There can be a situation, when the connectivity test might fail if the File Open Status appears as Red. In this case, the user will witness the “Advanced” section where all the checked areas are mentioned. Click on “What do these mean?”
The user is then required to resolve the relevant status to run the tool again. And then, check if there any problem still exists or not.
In case the problem exists now and you open the “File Open Status”. You will see the Successful message pop-up on your display.
Important Note: The 4.0 variation software is the most suggested version which is available on some site. Couple of year later on Intuit launched QuickBooks File Doctor tool which have a more powerful tool as well as advanced attributes.
How you can test your workstation’s connectivity?
You can test the workstation’s connectivity using the set of steps listed below:
The very first step is to click on the tab near the company file field to search the company file.
Also, ensure that you are using Linux system when the network setup is available in alternate mode.
One can choose to pick the change hosting server checkbox.
Every status must appear on not applicable in blue before you instigate the connectivity test.
After the test is run, status should appear in green which denotes that no threats are found or red denoting threats found.
Press the test connectivity
In case the file open status appeared in red, then the test has failed and you would see the advanced section showing section that was checked
Click on what do these mean?
After the relevant status is fixed, rerun the diagnostic tool to find out if there are any more issues.
Once you receive a message denoting the success of the process, repeat the steps mentioned above on all systems that have QuickBooks.
Wait for the tool to run and the error might be fixed. This process largely depends upon the company file size and network speed.
I hope the above given information related to QuickBooks connection diagnostic tool are helpful to you. In case you have any queries related to this tool then you can get in touch with our experts. We, Host Docket have a specialized team of efficient and certified professionals who can resolve all the issues related to your accounting software.
We provide support for all the QuickBooks versions – QuickBooks Pro, QuickBooks Premier, & QuickBooks Enterprise. In the meanwhile, if you are encountering any discrepancy with the QB software, it could be any QuickBooks Error, Installation issue, QuickBooks Data loss, or other. In such scenario, all you recommended to do is to make a call on their toll-free helpline number with no hesitation i.e. +1-888-510-9198.
Frequently Asked Questions!
What errors QuickBooks connection diagnostic tool can fix?
The QuickBooks connection diagnostic tool can fix the errors such as H202, H505, or 6000 series errors. It can fix the issues with firewall settings, network configuration, and other network-related errors.
Where can I get Program Diagnostic Tool option in QuickBooks?
You can simply download the connection diagnostic tool from the official Intuit website or from the tool hub program.
How do I fix a connection error in QuickBooks?
You can fix a connection error in QuickBooks using the steps below: 1. The very first step is to run connection diagnostic tool to identify and fix network related issues 2. Verify that your network setup is correct and also that all computers are connected to the same network. 3. Check the firewall and antivirus settings to ensure that they are not blocking QuickBooks. 4. Make sure that QuickBooks is updated 5. Also, ensure to contact QuickBooks technical support professionals
Intuit QuickBooks is a widely used accounting solution for various businesses. Right from sending invoices to its customers, managing business expenses, and accessing information about the company, QuickBooks Online (QBO) does it all very swiftly. This QuickBooks online edition features high-speed functioning. If we talk about Google Chrome and QuickBooks Online, both are widely used. But when using QBO Login Online, a user sometimes faces to fix QuickBooks Online Login Errors On Google Chrome. There may be different types of errors responsible for this.
If you are also facing qb online not working error, then make sure to read this article till the end. This article will brief you on the factors responsible for QuickBooks Online Login Errors on Chrome and also the ways to get rid of this problem. However, if the user continues to face the same error, then in that case, it is recommended to consult our QuickBooks online support team. You can ring up at our toll-free number i.e. +1-888-510-9198, and our certified professionals will resolve the issue for you in the least possible time.
What are QuickBooks Online Login Errors on Chrome?
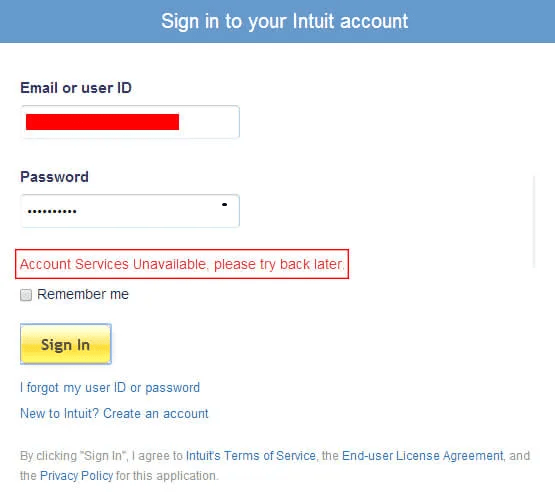
At times, QBO users face QuickBooks Online Login Errors on Chrome, which can be very much frustrating. This error can be often encountered due to security issues. In case this account is encountered, the user will have to update to a new Intuit account with enhanced security. Quick book log in error comes up on the QuickBooks online login page with an error message stating “Account services unavailable, please try back later“.
When you login to QuickBooks Online on Chrome, you can face the following QuickBooks login problems:
You get the loading message on your screen but nothing actually loads.
You may also receive a message of qbologin services not available
The Chrome gets confused sometimes, and takes you on a tour moving from the sign-in screen, to choosing a company and then back to the sign-in screen.
Google Chrome is one of the widely used browsers, and also it is a perfect match for accounting software. However, a wide number of factors might be responsible for the login issue to occur, which will be discussed later in this article.
What triggers QuickBooks Online Login Error on Chrome?
As stated before, there can be plenty of factors that might lead to QuickBooks Online Login Errors on Chrome. A few of the most common factors responsible for QBO log in errors are listed below:
In case the user forgets to sign out appropriately from the previous QuickBooks online session, then this kind of issue is most likely to happen.
If someone logged into the QuickBooks online on Chrome or any other system using the same credentials.
The issue can also be seen if the firewall or antivirus program blocks access to the software causing QuickBooks login issues.
Solutions to fix QuickBooks Online (QBO) Login Errors for Chrome
You need to follow the given steps in order to resolve your Chrome Login problems.
Step 1: Make use of any other web browser
There are chances that the user is facing login problems only with Google Chrome, whereas the other browsers do not show any error in logging in. Thus, in that case, the user can also use Internet Explorer to export your data to QBO Desktop.
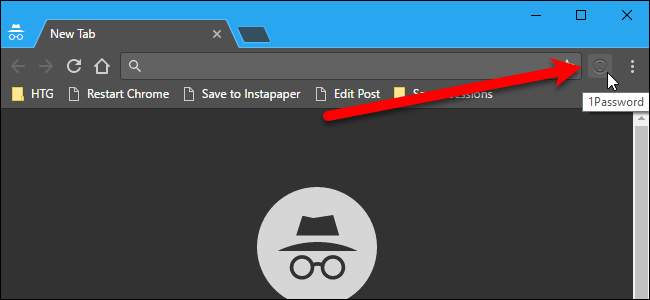
Step 2: Use Chrome Browser in the Incognito Window
Another option for the users can be to try logging in to the website using the incognito mode of Google Chrome. As it does not record the browsing history and has no cookies saved, the user will be able to log in to the website.
Follow the exact steps mentioned below:
For this, the user needs to open the Chrome browser :
First of all, the user will have to click the customize and control icon in the upper right.
And then, choose the New incognito window (Use shortcut key Ctrl+Shift+N).
Once done with that, the user will see a separate window in “incognito mode” You can note the icon in the upper left corner.
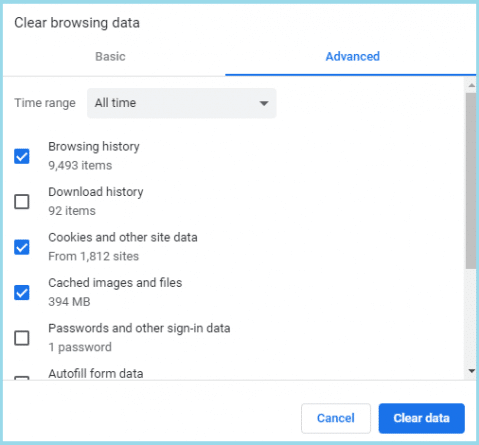
Old history and cache can be responsible for the slow performance of the Google Chrome browser you are using. Just clean the cache or delete the history!
In this method, the user will have to click on the ‘Customize and control icon’ to the right side and select the ‘Settings’ option.
After that, the user will have to click on the history tab and then, click on the Clear Browsing data button.
Step 4: Create an Additional Chrome User
Since you have to work on QBO, you can create another/ additional Chrome user in order to work with QBO Login. This will help you lessen your working hours.
You can create an additional Chrome user in the following ways:
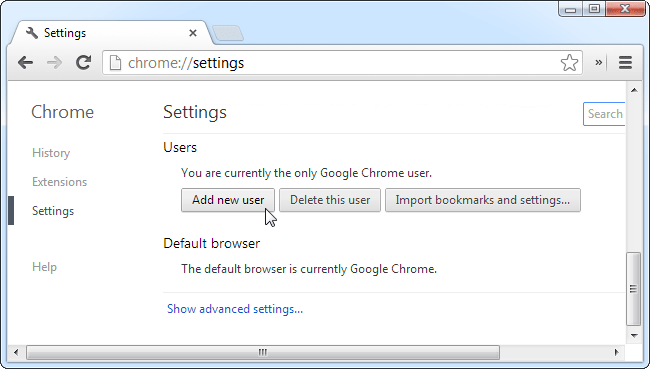
In this method, the user will first have to open Chrome Browser and select Settings tab on the left
And then, the user will find a users section near the bottom section of the page
After that click on the ‘Add New user’ button
Followed by selecting the icon, enter name, and click the Create button.
Now, you will see that a new user icon appears on the top left corner of your browser which means that you can now switch between two users.
Whenever you are facing QuickBooks Online Login Errors on chrome with any of the websites you are trying to access, then, there is a problematic circumstance. When such problem arises, you can examine the web browser’s settings and make sure that there is no such problem linked to the chrome. After this, also check whether both JavaScript and Cookies are enabled or not. If you find difficulty in accessing the website, then you can take help from our 24/7 QuickBooks error support team by simply dialing our toll-free number .i.e. +1-888-510-9198. We will be happy to help you out in your all accounting related problems.
FAQs Related to QuickBooks Online Login Problem
Why am I having trouble logging into QuickBooks Online?
This can be because of your browser cache. Thus, we suggest you to clear your browser’s cache. Certain unexpected browsing issues like quick books online log in can be simply rectified by deleting the browser’s temporary internet files. For steps to clear the cache, you simply need to choose the browser below: Microsoft edge, Mozilla FireFox, etc.
How do I reset QuickBooks Online?
You can simply delete your company data to reset QuickBooks online.
Simply sign in to your QuickBooks online account.
You will have to sign in as admin
Confirm that you want to delete the company data and click on yes tab
Choose the industry from the dropdown
Go for create accounts based on the industry
Opt for wipe data
Why is QuickBooks Online not working with Chrome?
There could be a bunch of reasons including, browser cache and cookies, compatibility issues, poor network connection, or use of an outdated version of Chrome.
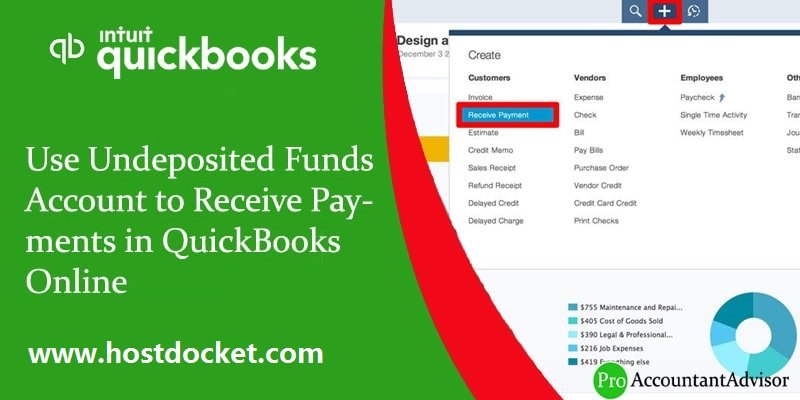
Learn the best ways to use the undeposited funds account to receive payments in QuickBooks Online (QBO)
No doubt, QuickBooks is the world’s best accounting and bookkeeping software made by Intuit. Talking about the undeposited funds account in QuickBooks online, it serves a special function, as it is a special temporary account that is used by the QuickBooks accounting software for holding the payments that are received from invoices before the user deposits them into the bank account. If you are one of the users who import payments data from external processing services, and do not process transactions via QuickBooks payments, then this workflow is essential for you.
In today’s article, we are going to discuss the use of the undeposited funds account, in order to receive payments in QuickBooks Online. Thus, if you are looking for the entire process to use the undeposited funds account to receive payments in QuickBooks online, then your search ends with our article.
Go through the article till the end, to learn the process. However, for expert assistance, you can make a call at our toll-free number i.e. +1-888-510-9198, and discuss your issue with our QuickBooks support team of experts and certified professionals.
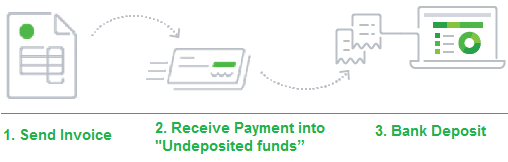
As stated above, undeposited funds is an account in QuickBooks accounting software that holds funds from the payments until they are deposited in the bank account. As per the experts, the user can’t deposit the fund directly to undeposited funds. The reason behind this is that it is just a temporary account that means that the user can deposit the funds in a single transaction only after he/she takes the deposits to the respective bank account.
Making a lump sum payment is beneficial in a way that the transactions remain itemized in the account register, but all that user is supposed to do is to check the lump sum deposits when reconciling transactions with the statements of bank.
Reason behind using Undeposited Funds Account
Many QuickBooks users ask this question very often that why they should make use of the undeposited funds account. The undeposited funds account is an internal “other current asset account” crafted by QuickBooks. For instance, if the Undeposited funds account is a lockbox or safe, where the user keeps the payments till the time, they are not deposited in the bank account. This account in actual serves as a default “deposit to” account and is designed in a way to work with the receive payments and bank deposit features, in order to complete the invoicing process. The user can make use of this account for single or group payments.
Steps to enter transactions with Undeposited Funds
If you want to enter the transactions with undeposited funds, you need to follow a step by step process. The steps involved are as follows:
The very first step is to click on the ‘Lists‘ menu, followed by selecting the ‘Items‘ option.
The next step in the process is to select the option of payment from the ‘Type drop-down list‘ and then add any additional information for the transaction, if needed.
Lastly, the user is supposed to tap on ‘Account drop-down list‘ and also select the “UndepositedFunds“, followed by hitting “OK“.
How to Deposit Undeposited Funds in QuickBooks?
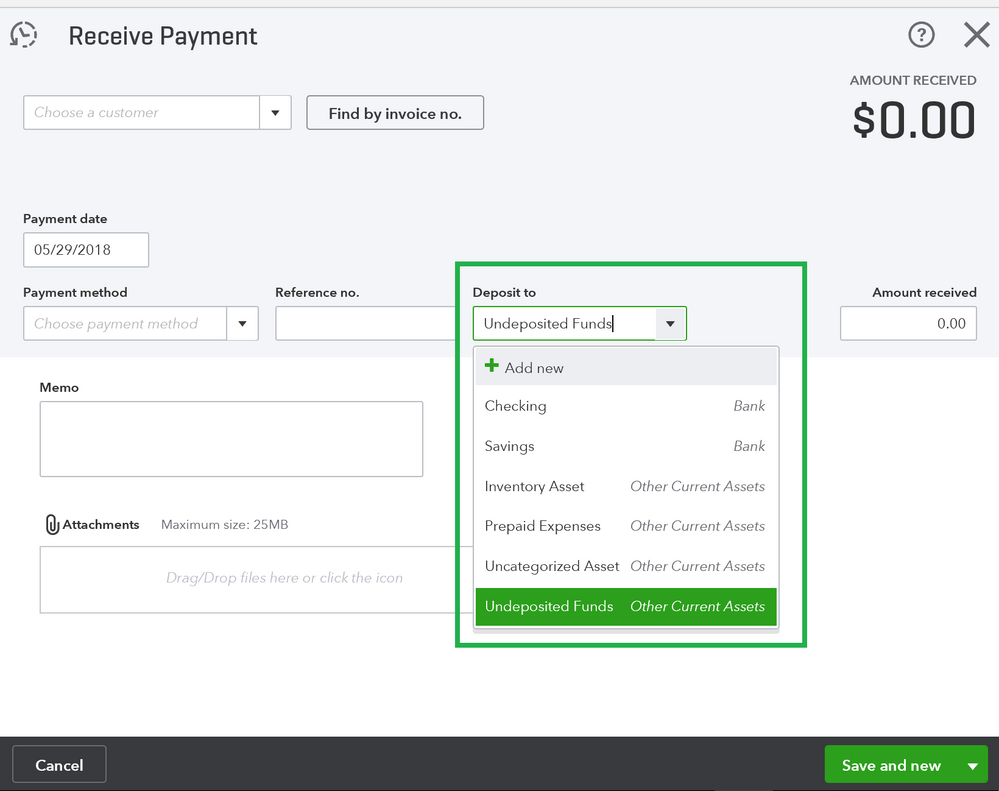
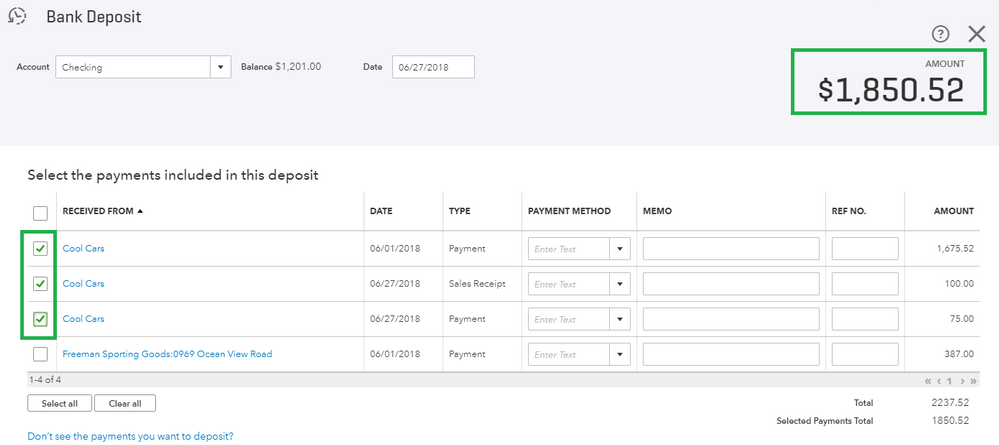
The user can implement the steps below for depositing Undeposited Funds Account to Receive Payments in QuickBooks Online–
To begin with, the user is required to hit ‘Banking‘ tab and then select the “MakeDeposits“ option.
The next step in the process is to select the payments from Undeposited Funds that the user wishes to deposit. In case the “Payment to Deposit” window does not open on its own, then in that case the user is required to select “Payments” on the “MakeDeposits” window.
Now, the user should hit ‘OK‘ button.
Moving ahead, click on the ‘Deposit To list‘and then opt for the bank account for the deposit purpose.
Once done with that, the user is required to type in the date in the ‘Date field‘ and then if permitted enter any additional payments to deposit.
The next step to be performed by the user is to click on ‘Print‘ option so that the user can have a hard copy of deposit slip.
The last and final step is to hit ‘OK‘ so that the transaction can be saved and after that take the slip to the bank and deposit the funds into the account.
The user can make the best use of the Un-deposited Funds account, in case the company accepts the transactions all day by cheque or cash and later on deposit them in the bank in a single trip. Companies that accept only credit cards as payment option, they deposit one transaction at a time straightforward to the bank account, and other online payments basically do not use the Undeposited Funds account.
If you are not using an undeposited funds account just because of unawareness of the procedure to use it, then reading this article will help you to make the best out of it. However, if any of your queries remain unanswered regarding undeposited funds account, then do not hesitate in discussing it with our QuickBooks Online Support team.
Simply make a call at our toll-free number i.e. +1-888-510-9198, and our experts and certified QuickBooks professionals will be there to provide you with proper support in a single call. Hope this article will be helpful for you. Thanks for your visit. Love to see you soon here again.
FAQs Related to Undeposited funds Account in QuickBooks
What type of account is undeposited funds?
Undeposited funds is simply a holding account that usually tracks payments received from customers that have not been deposited to the bank account.
How do I resolve undeposited funds in QuickBooks?
You can correct the undeposited funds in QuickBooks using the steps below: 1. Click on the +New tab 2. After that, choose Bank deposit 3. From account ▼dropdown, select the account you wish to put the money into. 4. Enter a checkmark on the boxes for each transaction. 5. Further click on save and close.
Is undeposited funds debit or credit?
Well, it can have both debit as well as credit balance. When you get the payment, the balance will be debited to the undeposited fund account, and when you make the deposit entry, the account will be credited with the amount of the deposit in the QuickBooks.
Get to know all about the Enhanced Inventory Receiving on Transactions
QuickBooks enterprise application has brought a revolutionary change in accounting and bookkeeping industry. Not only does it save a lot of time but also effectively maintains the finances of the company. In this article we will discuss QuickBooks Enhanced Inventory Receiving and various other aspects associated with the same. To learn further about enhanced inventory receiving on transactions in QuickBooks enterprise, make sure to read this post till the end, or you can also connect with us at +1-888-510-9198, for further technical guidance.
What is QuickBooks Enhanced Inventory Receiving (EIR)?
EIR is considered to be one of the best features in the QuickBooks Desktop Enterprise solutions and it is known to manage the complete new procedures of paying and receiving items. QuickBooks Enhanced Inventory Receiving (EIR) is the finest feature accessible by QuickBooks Desktop Enterprise V12.0. It changes past transactions when started. This feature manages the complete new process for receiving and paying the items.
However, one needs to answer the below given questions in order to understand that this feature is valuable or not. If your given answer is ‘Yes‘ to any of these, it might just work for your business.
These Questions are as:
Have you ever received a bill that covers multiple item receipts?
Did you pay for the items before to receiving them and do not want to increase your inventory quantities?
Do you grab multiple bills for one item receipt?
Do you require 2 different receipts from accounts payable?
Want to different items receipts from accounts payable?
Important Points to Remember:
Create a backup of your company file before go to the following steps in this article (Recommended).
Don’t forget it that Enhanced Inventory Receiving (EIR) is only the feature, that you can’t switch off once it gets turn on.
Compress your company file if it is too large or heavy.
We recommend you to conduct a test using a copy of your company file and analyse if it works with your business.
What happens after turn on EIR (Enhanced Inventory Receiving)?
When the user turns on the EIR feature, the Bills do not increase the inventory items, and also the bills that are generated from the items receipts are no longer exchange items receipts.
Also, the Account Payable doesn’t get affected by the Item receipts anymore, only if you receive a bill for an open item receipt.
If the user gets a bill with different costs equated to the connected item receipt, then the program spontaneously changes the item cost on the available item receipt.
When a new item is entered, the QuickBooks Desktop calculates the inventory average cost. Each day the item receipts makes changes in the order of the inventory transactions that ends up in the average cost.
Once the user turns on the EIR, the process generates receipts for each bill in the company file that carries items and thereby there is a growth in the number of the transactions.
Also, it should be noted that the third party applications that affects the inventory may not be able work along with the EIR.
Limitations when using EIR:
The very first negative point is that the user can not add any negative item to Item Receipts or Bills.
Also, the user is restricted to add expenses to the receipts of items.
In case the user has generated any purchase order for non-inventory items, then the user has to receive them with an item receipt so as to close that purchase order.
In EIR the user will not be able to assign the items as ‘billable on the item receipts.
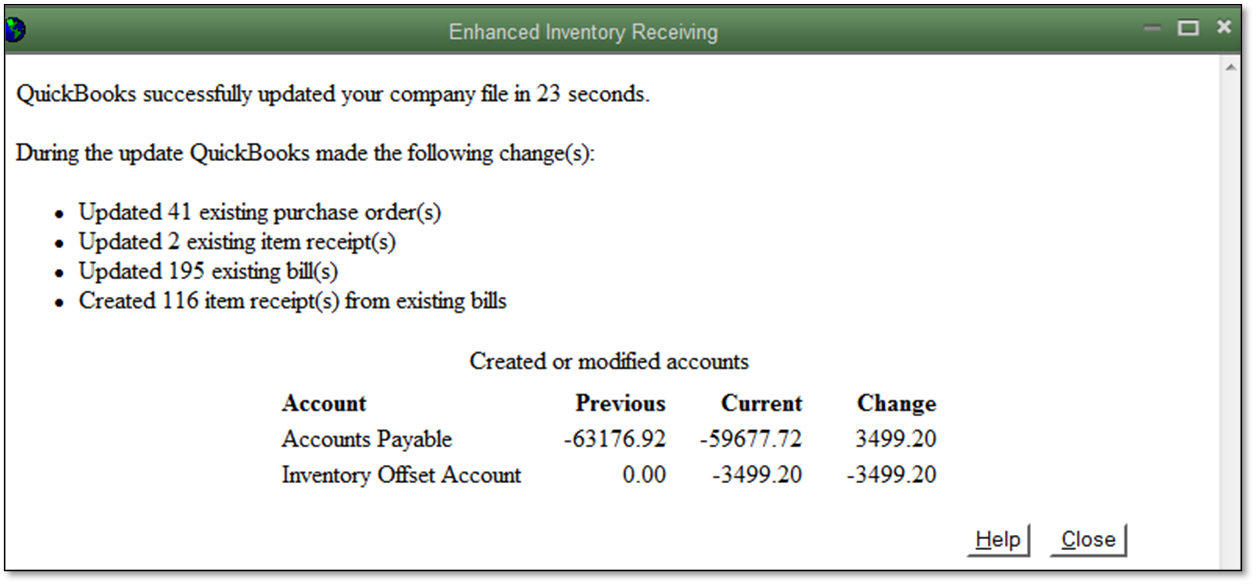
Once EIR is turned on by the user, and the user tries to get a separate receipt of an item from the bill for which the user is supposed to find the account for the value of the item received. The EIR QuickBooks Desktop developed an Inventory Offset Account that works as an opening account in between the item receipts and bills. As the user enters the bill for an item receipt, the transaction amount that has been cleared from the Inventory Offset Account and credit to the payable account.
At the time the user entered an item receipt QuickBooks desktop generates the below journal entry:
Item ReceiptItem Receipt
Debit
Inventory Asset Account
Credit
Inventory Asset Account
At the time when the user enters an item Bill QuickBooks desktop generates the following journal entry.
BillBill
Debit
Inventory Offset Account
Credit
Accounts Payable
After Enhanced Inventory Receiving is turned on, the QuickBooks Desktop produces these transactions unlike the common reports in QuickBooks used to look like.
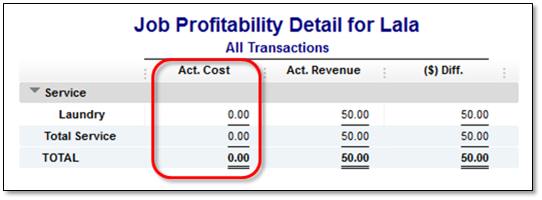
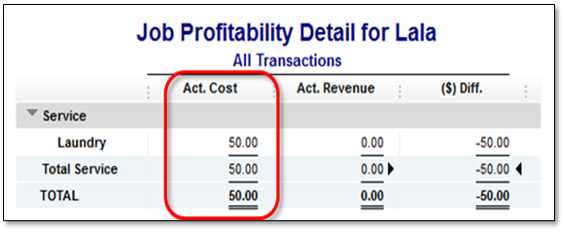
For example: After turning on the Enhanced Inventory Receiving (EIR), Act. Cost shows 0.00 in job profitability detail report in a company file.
As EIR is turned on, the item used in generating bill is often related to the Inventory Offset Account rather than the account that was used at the initial setup of the item.
The default filter of job profitability detail report is Account: All income/expense and Name.
Therefore, add or change the filter in “Account” to Inventory Offset Account gives you the actual amount of Act. Cost column.
Latest process for receiving and paying for items:
To pay and receive inventory, the user will have to follow two processes:
When EIR is turned off:
Single transaction: Enter the bill that makes the inventory at hand larger
Multi-transaction: In order to enlarge your inventory adds an item receipt and list a bill that is opposed to the item receipt.
After EIR is turned on
Two transactions must be recorded, the user can list them in order either:-
An item receipt to make the inventory close by larger.
Or A Bill to pay the items. In order to check the exact value of your payable account you have to enter a bill opposed to an open item receipt. You must enter a bill as opposed to an open item receipt in order to see the exact value of your payable account.
Important: This procedure claims only to bills. Using Checks and Credit Card, you can still enlarge your inventory Amounts and pay for the items in one step.
After discussing various aspects of EIR, we conclude that after reading the above information, the user can make the best use of EIR. In case the user has any query regarding QuickBooks Enhanced Inventory Receiving (EIR), or in case of doubt, you can speak to our experts executives.
FAQs Related to advanced inventory in QuickBooks Enterprise?
How do I use advanced inventory in QuickBooks Enterprise?
You can turn on advanced inventory in QuickBooks using the steps below: 1. At first, go to the edit menu and further click on preferences. 2. You now need to choose items and inventory and select the company preferences tab. 3. After that, find the inventory and purchase orders are active box and check it. 4. Once done with that, click on advanced inventory settings.
What is advanced inventory in QuickBooks Enterprise?
QuickBooks Advanced Inventory is an add on Enterprise feature that allows a business to maintain, track, and virtually move inventory. Using QuickBooks Advanced Inventory, a business can: Manage your inventory process from a single dashboard. Track bin, lot or by serial number. Use mobile or standard bar code scanning.
Does QuickBooks Enterprise have inventory management?
QuickBooks® Enterprise includes a number of features that support this kind of robust inventory management. Amongst those features, the software’s tools enable you to easily: Track products by bin location, serial numbers, or lot numbers. Manage your end-to-end workflow from a single dashboard.