In the modern world of global businesses & technology, accounting and bookkeeping solution has become a primary necessity. Therefore, the benefit & rapid growth of companies with no hassle, Intuit Inc. developed an accounting software that is – QuickBooks. This software has garnered an immense reputation in the business market of the United States & Canada. But in the last few years, it has been observed by the few users that this it frequently get affected by the QuickBooks Error Code 3100.
Here in this post, we are going to endow the best information from our understanding of this issue. We will provide a complete overview of the symptoms, causes, and solution of the QuickBooks error code 3100. However, you can take guidance from our QuickBooks error support services in case you have any queries or looking for help.
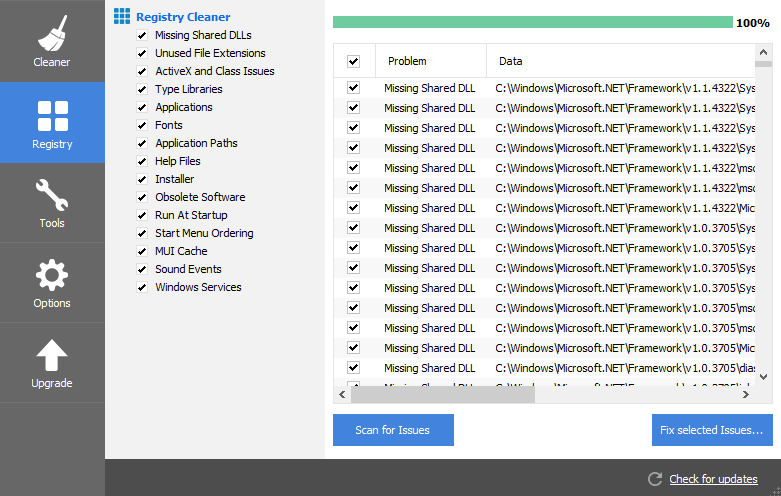
QuickBooks Error Code 3100 generally occurs when you try to add a new customer to QuickBooks. The Customer, Vendor or Employee name or record you are trying to enter may already exist in the create Customer request. The accounting software always takes unique Full Names in Customer, Vendor or Employee data and that includes both active and inactive records. You should check the names for the three entity types if this error appears and then rename that if necessary.
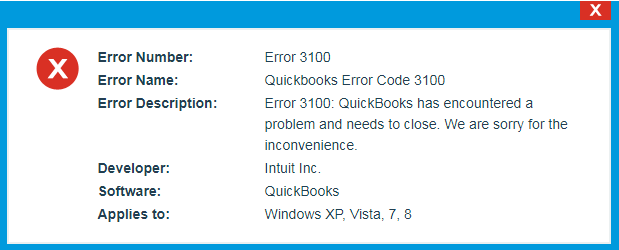
When this error occurs you will see the following error message on your screen:
Customer Insert/Update Error – [CustomerName] – 3100 – The name “[CustomerName]” of the list element is already in use.
QuickBooks Error 3100 Symptoms
Check out the signs and symptoms of QuickBooks error code 3100 given below:
Check out the systematic troubleshooting steps to resolve the QuickBooks Error 3100:
Step 1: Use Unique Customer, Vendor or Employee Names
Use appropriate credentials and login into your Salesforce account.
Click on the Accounts tab.
Select Merge Accounts at the bottom right side of the window.
Type in the name of duplicate account in the text field and proceed to validating for merging them. Remember to not remove the Customer List ID value.
You should now be able to add a new customer, vendor or employee.
In QuickBooks POS
Just in case you are a QuickBooks POS user, then you simply need to move to the Customer Menu and then, click on the Customer List.
After that, you need to head to the Search field and then insert the name shown in the error and search for any duplicates.
You are then required to go for I want to drop down menu and then click on Merge
Once done with that, a merge window will appear on the screen, where the user needs to select the customer vendor that he/she needs to keep and discard.
The last step in the process is to go for the merge customers/vendors
It should be noted that the transactions made on both names will be named after the name you will keep.
If the issue persists, perform the below-mentions solutions.
As we use our system daily, the system accumulates dozens of junk files & programs. It may slow down your system or cause the error code 3100..! Hence, use the antivirus software to eliminate the gibberish files, folders, and programs out from the computer. Use the below given steps to remove junk files through Disk Cleanup (cleanmgr).
Hit the “Start” or “Windows” button.
Enter the “command” in the search box… DO NOT hit the Enter yet..!
Press the Ctrl+Shift & hit the Enter tab.
Furthermore, you will be redirected to a permission dialog box.
Moreover, click the “Yes” icon.
The command prompt will appear.
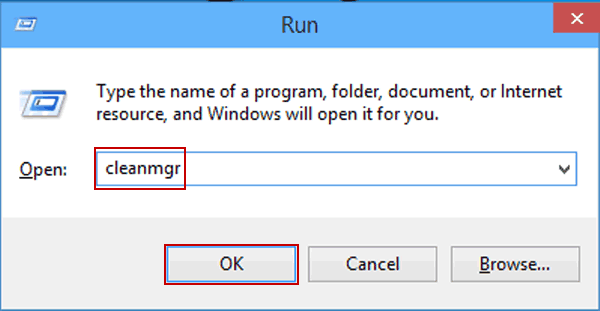
Type the “cleanmgr” & hit the Enter tab.
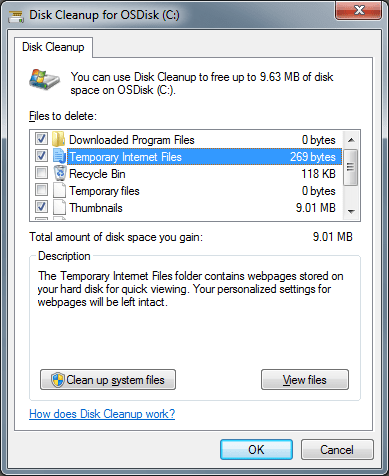
Disk Cleanup will estimate the occupied disk space.
Check the boxes & hit the OK icon.
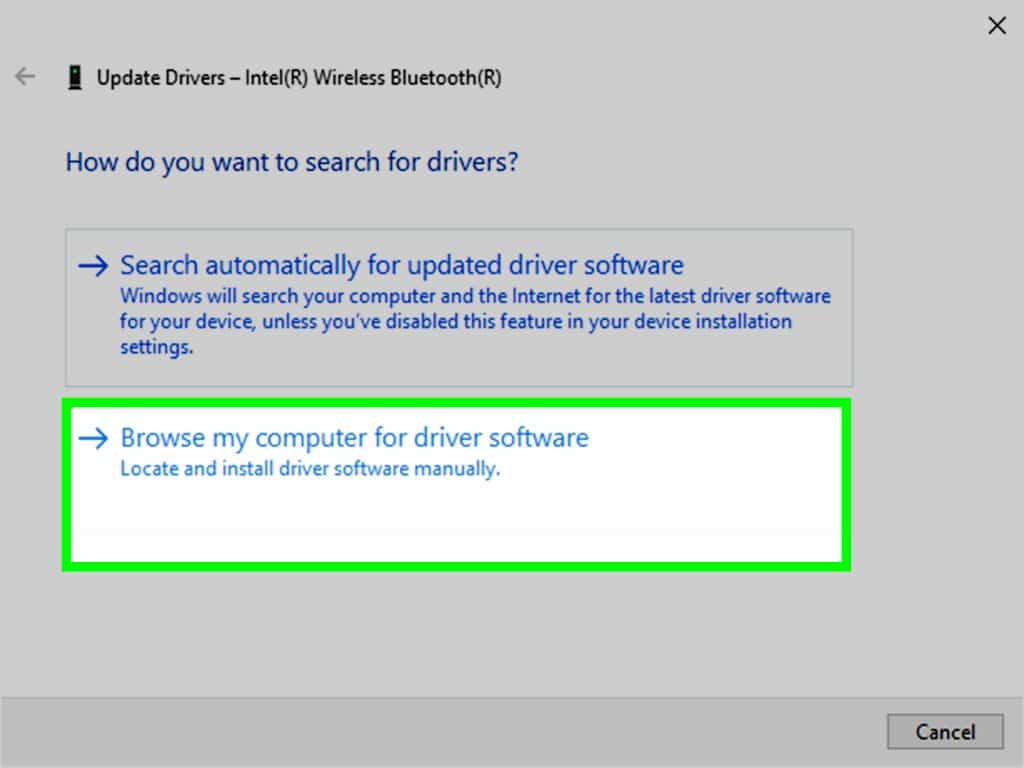
Step 5: Update the System Drivers
Go to Programs and Features.
Find NETGEAR Adapter and right click to select Uninstall.
Restart you computer and reinstall the software drivers again using the CD or the website.
When prompted, plug in or insert the adopter in order to keep from countering any conflicts with existing devices.
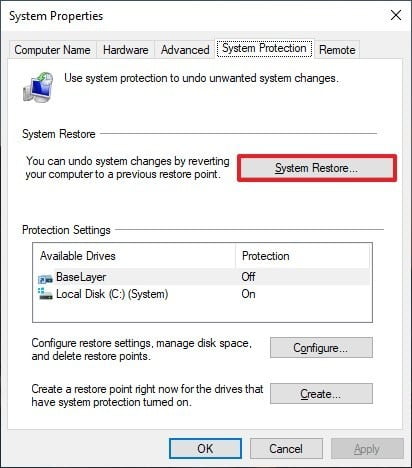
Step 6: “Undo” the Recent System Changes by Using Windows System Restore
Hit the “Start” or “Windows” button.
Type “System Restore” in the search box & hit the “Enter”.
Hit the System Restore.
If prompted, enter the administrator password.
Finally, restore the system.
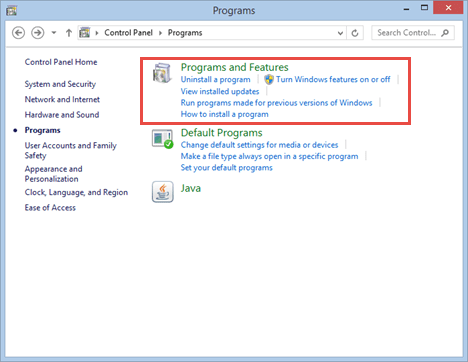
Step 7: Uninstall & Reinstall the QuickBooks Program (Windows 7, Windows Vista, XP, 8)
First of all you need to Hit the “Start” button to open the Programs and Features.
After that, Click the “Control Panel”.
Click the “Programs”.
Furthermore, click the “Programs and Features”.
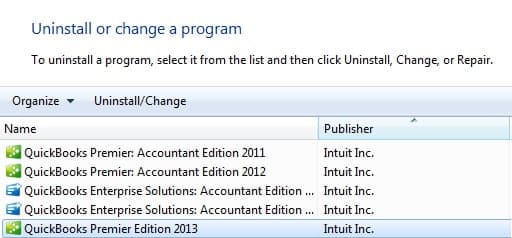
Trace the QB programs associated with the “QuickBooks Error Code 3100″.
Moreover, select the QuickBooks associated entry.
Hit the Uninstall button.
Finally, reinstall the QuickBooks software.
Step 8: Fix damaged customer names
Create a new customer
The very first step is to head to the customers menu and select the customer center.
After that, the user needs to pick the new customer and job tab and click on new customer from th drop down list.
The last step is to insert the test customer from the name, ignore the other given fields blank, and click on the ok tab.
Steps to merge names
At first, the user needs to search for customer name and right click on it and click on the edit customer
Also note that if there is a job below the customer and opt for the job and a blank cross will show. You need to drag cross and adjust it below the new customer’s name.
You will further have to displace the customer’s name, type customer, and then hit a click on the ok tab.
You will see the merge window will display on the screen and choose the ok tab.
After that the user needs to edit the customer’s name by setting in back the original name and click on ok tab.
The last step is to quit the QuickBooks desktop and also again open it.
It might be possible that the above manual steps might not help out in order to troubleshoot the QuickBooks error code 3100. Or possibly you couldn’t perform the above steps accurately..! Well, you can contact the Intuit certified professionals immediately for the support.
Learn how to troubleshoot printing issues in QuickBooks desktop:
QuickBooks software is the most famous & reputed accounting tool developed by Intuit for a wide range of small to medium-sized businesses. There are numerous advanced utilities available in the QuickBooks for the reason that Intuit has upgraded this software almost every year. It’s quite evident to you that you can take remote access to QuickBooks Online from anywhere. And also, that you can give the print commands from the tool itself with no efforts.!
But sometimes we encounter some issues related to printing, so, do not get anxious about it. In this blog, I am going to talk about few simpler ways to fix many of the printing issues that can occur in the Windows desktop version of QuickBooks.
Sometimes, QuickBooks Printing problems can be very frustrating and may be difficult to resolve for the users. There are thousands of users who are searching for the solution of QuickBooks printing problems. This technical blog describes how to verify if printing problems is occurring in the Windows version of QuickBooks desktop.
Also, this blog endows the troubleshooting steps for these frequent QuickBooks printing issues. However, in case you have any further queries or need any type of help you can connect with our QuickBooks error support team anytime.
Types of QuickBooks Printing Problems
If you are facing printing issues on your QuickBooks desktop then this blog might be helpful for you. Generally, these printing errors caused by a variety of reasons. Below are few printing issues you may face while using QuickBooks:
QuickBooks Enterprise Unable to Print
If you are a QuickBooks Enterprise user and encounter QuickBooks unable to print error, don’t get troubled about that time.! In such situations, Our Certified ProAdvisors team supposes to be contacted straight away because this may end-up to further significant problems.
Unable to Print QuickBooks Invoice and Checks
We already endow the best solution above to troubleshoot the invoices related problems. You can check the steps below and solve the problem.
If you encounter this issue that purely means that the software needs to be updated.
QuickBooks Printing Problems in MAC
If QuickBooks software is not capable of printing by MAC, you suppose to get in touch with the QuickBooks for Mac support. They will troubleshoot sort of printing issues for your better experience.
Important points before you start troubleshooting
You need to check the following points before you start troubleshooting for the printing issues.
Troubleshooting QuickBooks Printing Issues like a Pro
You need to follow the below given steps in order to resolve the printing issues on your QuickBooks. We recommend you to take a backup of your computer and company file before proceeding ahead.
Step 1: Print Outside QuickBooks is Possible or Not?
First of all, turn off the printer, restart the computer, and later switch on the printer again.
Ensure the printer paper loaded appropriately.
Hit the “Windows” or “Start” button.
Choose the Control Panel.
Perform double-click on the “PrintersandFaxes”.
Right-click the printer.
Choose the “Use Printer Online” (If the printer appears Offline).
Perform Double-click on the Printer.
Choose the Printer=>Cancel All Documents.
Now, Close the window.
Perform the right-click the printer.
Choose the Properties.
Select the Print Test Page.
If in case, the test page prints…!! Ensure by testing the printer using WordPad file:
Go to the “Start” => “Run”.
Type-in “WordPad” in the search dialogue box.
Hit the OK icon
Type-in texts in the WordPad.
Select the “File” => “Print”.
Choose the right printer.
Hit the Print icon.
Ensure that no error lights appear on the printer.
Mention to the printer manufacturer’s documentation for any of the following:
The printer shows the error signal.
Unable print the test page.
Not able to print from WordPad.
Confirm these things also!
You need to rename QuickBooks Qbprint.qbp file & attempt to print again.
If you are unable to print then attempt to print different file/files of the same format or similar type of the file to check that the problem is with the file itself or the software.
Now attempt to print, the prior file is damaged if you are successful in printing.
Now, attempt to alter the batch printing to single printing. It may take some more time, but it will solve the error.
Make sure that the latest version printer drivers are in use.
Step 2: Verify Printer Detail of Printer Setup in QuickBooks
Firstly, check that the default printer setup is selected or not:
Select the File => Printer Setup (From the menu bar in QuickBooks Desktop)
Check and choose the correct printer for each particular Form Name.
Step 5: Do you have another driver installed on the computer?
Use different drivers to attempt to print.
If you need assistance to know how to use other drivers, contact the printer manufacturer.
Step 6: Verify that the printer is the correct one
Open QuickBooks and choose the File option and then click on Print setup.
After that select the form you are trying to print.
Ensure that your printer’s name match the exact name of the printer you are trying to use. If not then you need to correct the setup within your computer’s Printer Setup first.
Now hit a click on Help in this area for more detailed instructions on these settings.
I hope with the help of this article now you are able to resolve the printing problems in QuickBooks desktop. However, if still the issues persist there, you can dial our QuickBooks support number i.e., +1-888-510-9198. Feel free to contact our experts and get instant solution for your QuickBooks related problems. Our certified QB experts are always ready there to solve your all problems.
Why is QuickBooks not printing my checks correctly?
Sometimes QuickBooks does not print checks as it should due to the formatting issues. Make sure to check template and printer settings are matching, and align the checks in a proper way in your printer tray.
Why are QuickBooks invoices printing with missing information?
QuickBooks can sometimes print incomplete invoices it can be a result of data entry errors. Double-check your invoices for accuracy and review the print preview to ensure all required information is included.
How to troubleshoot QuickBooks PDF printing problems?
To fix QuickBooks PDF printing issues, try to reinstall the QuickBooks PDF Converter, make sure it is set as the default printer for printing, or use the QuickBooks Print and PDF Repair Tool for a quick fix.
Intuit, the makers of QuickBooks, boasts of multiple features and tools that are instrumental for business owners in performing an assortment of tasks. One such tool is the GoPayment feature that can be used with QuickBooks Point of Sale (POS). This tool basically helps the users to take a debit card and get a credit card from the cell phone and other smart devices, including iPhone, Android, and iPad. With the help of this you can plug the credit card and it would make payment processing incredibly simple for the user. The latest Intuit GoPayment readers are also EMV compliant that puts the user into a position where one can charge with chip card, as well as non chip card.
If you want to know more about using GoPayment with QuickBooks Point of sale, then we suggest you to go through the article till the end. This article will cater users with detailed information on how to use GoPayment with QuickBooks Point of Sale. However, if you want to speak to QuickBooks professionals, then in that case you can make a call at our toll free number i.e. +1-888-510-9198.
Before you unleash the procedure to use GoPayment with QuickBooks point of sale, it is sensible to first learn a little about GoPayment. Well, Intuit GoPayment lets you hold your credit cards from the mobile application using devices like iPad, Android, etc. It is by far one of the most affordable mobile payment solutions available to small and medium sized businesses. Moreover, this payment management system allow vendors to process credit card transactions via mobile app.
Make Payment from anywhere with QuickBooks point of sale
The combination of QB POS and GoPayment enables the users to keep a track of stocks and mobile income real-time. This feature isn’t a secret, but many professionals are yet to discover it and make the best out of it. And thus, it’s an opportunity to make the most of this tool, simply payment. The user can also sync the lists with GoPayment and along with QB Point of Sale, he/she can also edit and update the lists with much ease.
Facts to Know!
QuickBooks Point of Sale Mobile Sync feature allow the user to record and update credit score card sales from office, home, or anywhere else.
With GoPayment feature, the user can select all types of payment that also involve coins, test, experiment, key, or swipe card.
Another fact related to this can be that QuickBooks payment consists of an unwanted GoPayment account.
Also, Swipe charge fits well with the low QuickBooks Payment Fee.
GoPayment works well on both iPhone and Android devices.
QuickBooks Point of Sale syncs all sales and listing information.
In this tool, new payments are recorded in the form of QB Point of sale sales invoices.
Never miss out on a sale, even at the time of traveling, are at a conference, or work at a conference.
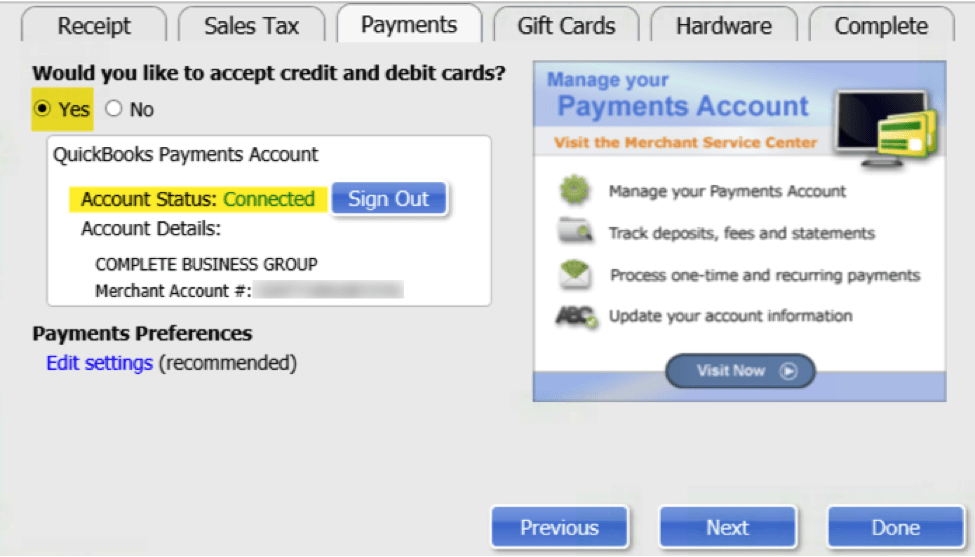
The very first step is to click Sign In for your Intuit Payments account in the QuickBooks POS.
Now, hit File and setup interview options.
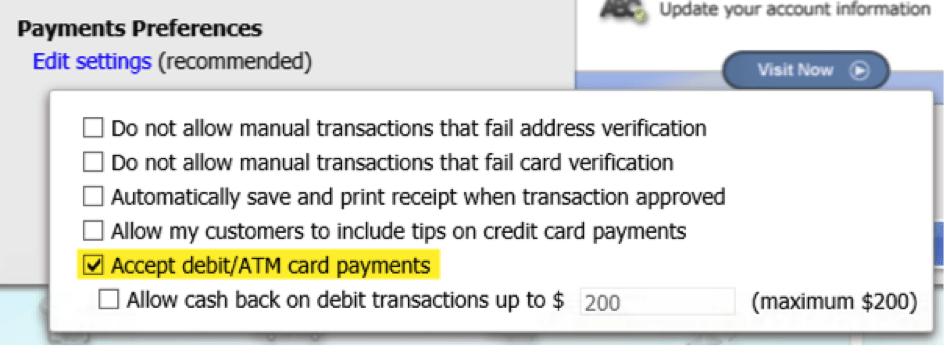
The next step is to visit the Edit Settings tab and then select what is appropriate for the business. Suggestions will not require to be chosen manually as they are automatically decided, “we have un-selected and submitted for accepting debit cards.”
Now, opt for QuickBooks File, Preferences, Company Preferences, and turn on mobile sync.
Also, the mobile sync can be turned on or off, the user can increase or decrease the sync frequency.
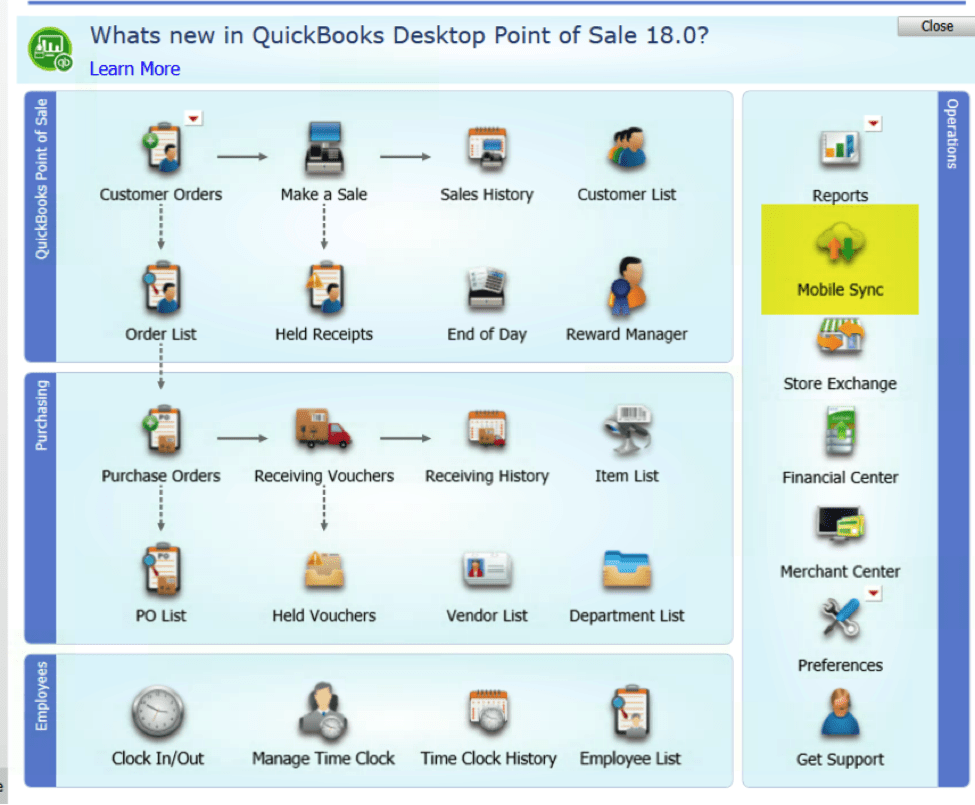
Select Mobile Sync:
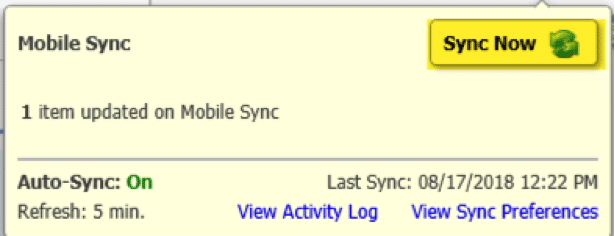
You also have option to manually Mobile Sync by clicking the cloud icon on top right hand corner on your QuickBooks POS. It has the ability to transport multiple items/receipts at any time. The process, however, can’t be started from the mobile.
Important: You can also have the option to manually sync, which moves more items or invoices, by clicking the Cloud icon in the top right-hand edge of your Point of Sale software at any time. The sync process can not be initiated from the mobile devices.
Steps to Set Up Inventory to Sync to GoPayment
First of all, Go to the item list and select the item you wish to sell in GoPayment.
Click Edit in the more information widget, and then tap on Sync to Mobile checkbox.
The QuickBooks Desktop POS feature enables you to make income usage of your inventory in your mobile device. Currently, only QuickBooks Desktop Point of Sale 12.0 and 18.0 are equipped with this feature.
Reasons to connect your phone and tablet
QuickBooks POS Mobile Sync feature allows you to ring sales of credit cards everywhere the interior as well as your store.
You can pay anywhere using the Intuit Payments Account and GoPayment app.
You will be able to accept payment immediately. All you have to do is, activate your payment account and that’s it, no additional application needed.
Your sales software is synchronized with all revenue and inventory information, so that your numbers are always correct and updated.
This feature by default records new payments in the form of QuickBooks POS Sale receipts.
With this we come to the end of the article, and also hope that you find all the necessary details about the use of GoPayment with QuickBooks Point of Sale.
In case you have any query or you need assistance in regards to any other QuickBooks related issue, you can contact our 24×7 QuickBooks point of sale support number .I.E. +1-888-510-9198. Our intuit certified experts will be more happy to help you out in every possible manner.
FAQs related to using GoPayment with QuickBooks Point of Sale
How do I use GoPayment with QuickBooks?
The GoPayment app usually syncs the payment with invoice in QuickBooks online on its own. The steps involved in using GoPayments are: 1. Open GoPayment app. 2. After that, click on Plus and choose invoice payment. 3. Once done with that, look for the customer or use the search field. 4. Opt for the existing invoice and tap on charge and go for a payment method.
Can I link POS to QuickBooks?
You can easily integrate point of sale with QuickBooks account. It further minimizes the double entry and ascertains that the sales are accurately reflected in the books. Built-in integrations is something that we recommend.
Is GoPayment free with QuickBooks payments?
Note that QuickBooks GoPayment is a free feature that can be downloaded, bu one might require QuickBooks payments to process the transaction. The QuickBooks payments service has a pricing structure depending upon the edition being used.
How do I link payments account with QuickBooks point of sale?
In order to connect your payments account with QuickBooks online, perform the steps below: 1. At first, sign in QuickBooks online using admin credentials 2. You now have to move to the settings ⚙ tab, and choose account and settings. 3. Opt for payments option. 4. Furthermore, select connect or link merchant service in the existing account section. 5. Now pick the payment account you would like to connect to and complete the onscreen instructions.
Steps to fix Error “The File you specified cannot be opened” in QuickBooks
Does an unwanted error disturb your smooth working of QuickBooks accounting software? Well, technical glitches in QuickBooks are something that you cannot skip but rectify. One such error can be “The file you specified cannot be opened”. This is a very commonly reported error that you might bump into when downloading payroll, paying scheduled liabilities, and also when opening a federal or state form. Did you find this error a bit intimidating? If yes, then we are here to help you with that. This piece of writing is drafted by professionals with an aim to eliminate the error File you specified cannot be opened. So, if you are annoyed by any such error, then reading this piece of information will surely help.
This article is going to cover all the information related to this particular error. So, make sure you scroll through this piece of writing with much concentration or you can also seek assistance from our technically sound QuickBooks professionals and let them help you with the fixation of the issue. Give us a call at +1-888-510-9198, and let our technical experts brief you on the right measures to be taken.
What is “The file you specified cannot be opened” error?
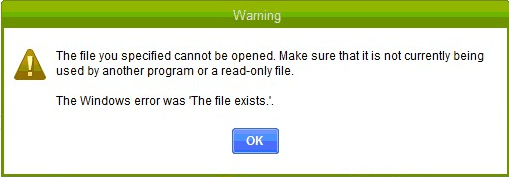
Digging in deep would make sense only if you have a basic knowledge about what this error is all about. You can bump into such an error when working on various accounting operations like paying scheduled liabilities, opening a state/federal form, and also at the time of downloading payroll update. This error appears on the screen stating:
Payroll Error:
“The file you specified cannot be opened” It must not be already in use by another program or a read-only file.
Error:
“The Windows Error was The File Exists.”
You can land upon such an error when working on various accounting operations like paying scheduled liabilities, opening a state/federal form, and also at the time of downloading the payroll update. There can be a bunch of factors triggering such an error in QuickBooks.
What causes “The file you specified can’t be opened “?
There are a couple of triggers for the payroll errors. Let us explore each of factors one by one:
You can bump into such an error if the internet connectivity is poor/inactive.
Be prepared for a similar issue if the firewall is improper or outdated.
You can also come across such an error if the internet security settings are misconfigured.
The probability of experiencing this issue increases in the case of outdated QuickBooks application file.
If the software is being interrupted by windows user account control, then this error is sure to happen.
If you have not provided enough permission, make sure to do it or else you will land upon his particular error.
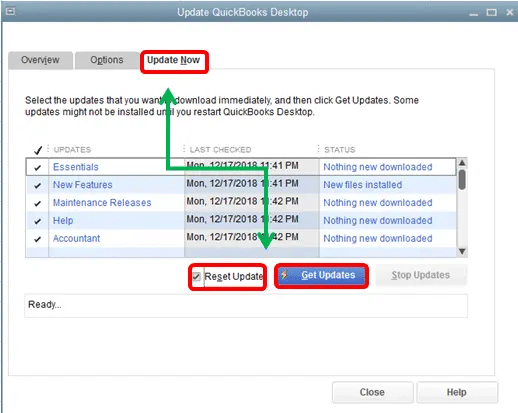
Close QuickBooks software and restart your desktop.
After restarting QB Desktop, right-click on QuickBooks and choose ‘Run as administrator‘.
If the error does not get fixed then:
Make use of the internet through data cable when you retrieve the updates. Utilizing the WI-FI connection for the updates may lead to unexpected results.
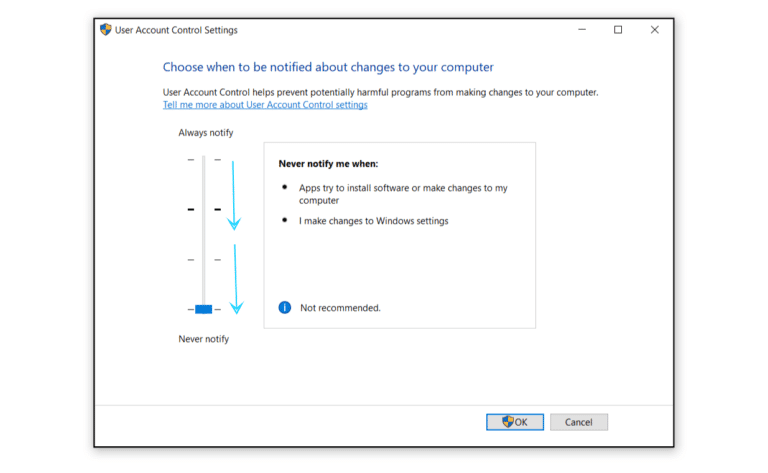
Now open user account control settings
Go to ‘Control panel‘
If you use Windows 7, tap on the ‘Windows‘ button and then click on ‘control panel‘.
If you are using Windows 8 then press ‘Start‘ menu, and type to search ‘Control panel‘. Now click on the control panel.
If you are accessing Windows 10 then select ‘Search icon‘ on the task-bar and type ‘Control Panel‘. After finding it tap on it to open.
Now after opening the control panel, on the search bar enter ‘Change User Account Control‘ settings.
Now do either of the following things:
Turn off UAC: You can move the slider to the “Never notify” and then choose ‘OK‘. If asked then enter the password to provide confirmation. Now restart your device to ‘Allow‘ the changes.
Turn on UAC: You can move the slider to choose when you need to get notified and tap ‘OK‘. If you receive a prompt, type in the password or give confirmation.
How to Fix “the file you specified cannot be opened” errors?
Below we have mentioned few easy steps to troubleshoot the on-going problem:
Procedure 1: Ensure QuickBooks is updated
Many QuickBooks users are unaware of the fact that the updates many times become fixes to many QuickBooks glitches, ultimately enhancing the performance of the software. Thus, it is often suggested to update your QuickBooks frequently and enjoy stable and secure QuickBooks performance. The steps involved in updating QuickBooks to the latest release are as follows:
Launch the QuickBooks desktop and press F2 key to open the product information window.
Choose correct QuickBooks version.
Select the option stating Get the latest updates.
Make a new folder and save the file.
Double-click the installation file to begin the update process.
Restart the system now and check if the issue is fixed or not.
Procedure 2: Configure the internet and firewall security settings
You can try configuring the internet/firewall settings needed for the addition of new inbound and outbound rules related to the QuickBooks windows firewall.
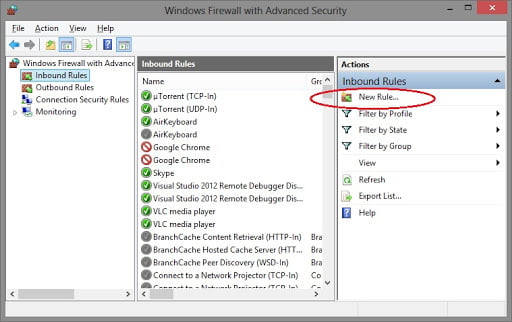
Click the Control Panel link in the start menu.
Furthermore, you need to choose Windows Firewall and click on the Advanced Settings.
Once done with that, select the Inbound tab.
You are then required to head to the New Rule to create a new inbound rule.
Choose the port tab.
Furthermore, pick the next tab.
The number of ports should now be entered.
You will now have to click on the next tab.
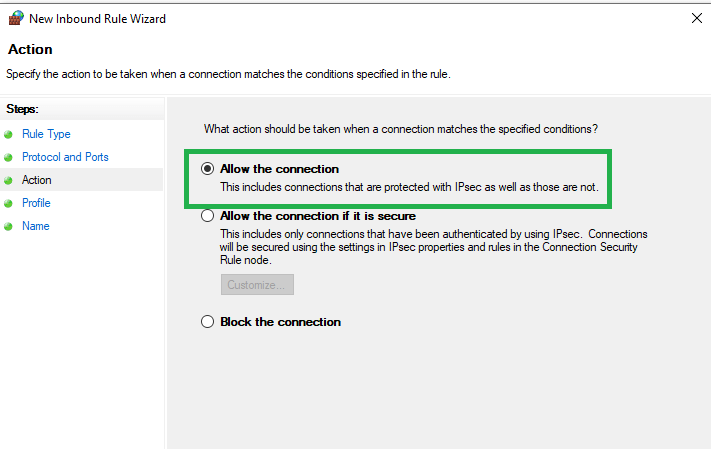
Also, click on the next tab and navigate to the allow connection option.
Assign a rule name to the firewall and click on the Finish tab.
Procedure 3: Appropriate Windows permissions for QuickBooks
Relevant permissions are a basic need to make sure that the software works smoothly with windows. You can try configuring the permissions listed below to assign the required permissions.
To begin with, right-click the ‘QuickBooks Desktop icon‘, followed by selecting the ‘Properties option‘. Also, choose the ‘Security‘ tab along with selecting ‘Edit‘
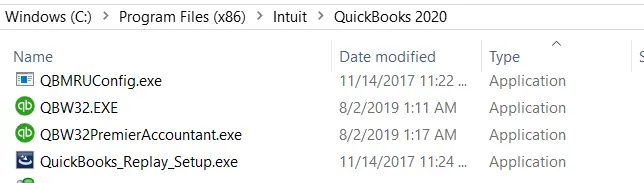
Processor Type
File Path for QBW32.EXE
32-bit
C:\program files\intuit\quickbooks (year)
64-bit
C:\program files x86\intuit\quickbooks (year)
In the next step, the user is required to tap on to the ‘Add‘ option, followed by entering ‘Everyone‘.
Once done with that, the user is required to hit ‘OK‘, and then select the ‘Full Control‘ option.
Now, repeat Step 2 and 3 respectively, but then make sure you enter ‘Users‘ in place of Everyone. Move ahead, by selecting ‘Apply‘.
Lastly, hit ‘OK‘ and you are good to go.
Note: To fix the issue altogether, it is recommended to right-click the QuickBooks icon, followed by selecting the Run as Administrator option. In case it doesn’t work, the user can carry out the following steps.
Method 4: Altering the User Account Control Settings
Perform the task that you were doing earlier, but only after temporarily turning off the ‘User Account Control‘. If the error is removed, then this actually means that the current security setting is not compatible with QuickBooks. The steps you need to carry out are as follows:
Press Windows + R keys and enter the control panel.
Identify the user accounts from the search bar.
Click on the change user account control settings.
Click on the yes tab and mov the slider down to never notify and then turn off UAC.
Method 5: Configuring the Internet and Firewall security settings
In certain cases, firewall and internet security settings block access of QuickBooks Desktop. Therefore, trying to configure the firewall and internet settings might work in your favor.
You need to click on the control panel link in the start menu.
Choose Windows Firewall, then Advanced Settings.
You now have to select the Inbound tab.
Navigate to the New Rule to create a new inbound rule.
Select port tab.
Go for the next tab.
The number of ports must now be entered.
When finished, choose the next tab.
Choose the next option after navigating to the Allow Connection option.
Assign this firewall rule a name, and click on the finish tab.
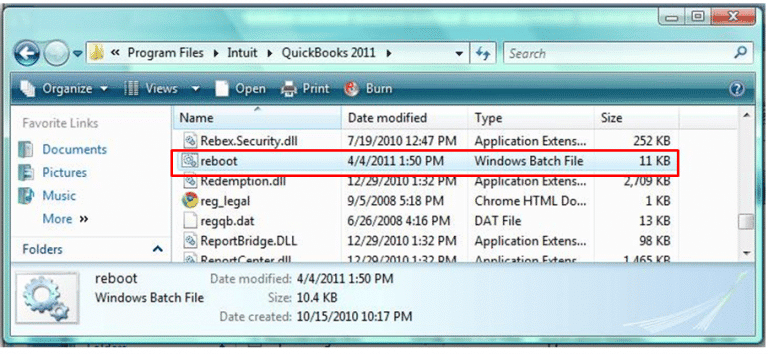
Method 6: Run Reboot.bat
At times a restart can be a perfect solution, when the QuickBooks Desktop processes get stuck. Thus, to give it a fresh start, you can run reboot.bat.
You need to make an exit from QuickBooks desktop.
Further, right click the QuickBooks icon on the desktop and click on the properties tab.
Go to the open file location and search for the reboot.bat file.
Right click on the reboot.bat file and then select run as admin option.
Wait for a few minutes until the command prompt scroll all the files.
Reboot the windows and check if the error the file you specified cannot be opened persists.
To check whether the folder and files of QuickBooks require some maintenance, running a QuickBooks repair might be helpful.
Method 8: Reinstalling QuickBooks Desktop with the help of a clean install
To replace the old files with new ones, QuickBooks users can prefer a clean install. This might work, as freshly installed software generally doesn’t bring in any such issue. The steps involved in this process are as follows:
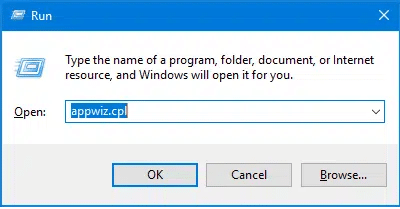
Start off by pressing windows + R and open the run tab.
Enter the text appwiz.cpl, click on the enter tab.
Once dine with that click on the QuickBooks software and click on uninstall tab.
If the issue still persists, you can contact our QuickBooks Customer Support team at +1-888-510-9198. We are available 24×7 and feature best-in-class services. We fix an all sorts of QuickBooks issues.
QuickBooks is leading accounting software that used by various businesses of a wide range. It is the most famous software for accounting & bookkeeping purpose as anyone can use this software even a non-accountant or non-technical person. The user-friendly interface allows the users to perform tasks on it swiftly. In this technical blog post, we will aware our readers about one of a common QuickBooks error code that is – QuickBooks Error Code 6130, 0.
In this article, we have discussed about this error and it’s causes. However, you can save your time and efforts by calling our QuickBooks error support team at +1-888-510-9198.
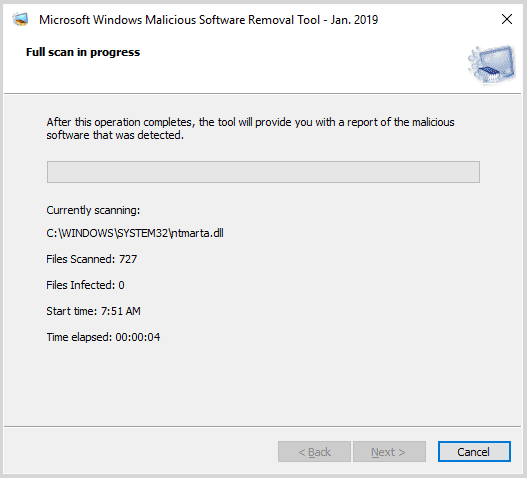
The malware is the threat to the system as well as to the programs that are running on that. These malicious threats can damage, delete, or corrupt the error related files. Thus, we recommend you to conduct a full system scan to detect & eliminate the harmful malware from the system.
Method 3: Use the Disk Cleanup to Clean Out the System Junk
Our personal computer accumulates junk files while web surfing & regular computer use. The overtime use creates a cluster of junk files that makes the system slow & sluggish in response. It may also cause the error 6130, 0..! Thus, it is essential to use the Disk Cleanup to remove such junk to improve the performance of the computer.
Procedure to Run the Disk Cleanup tool:
The first step you need to perform is Hit the Start button
In the search box, type the “command”…. Do Not hit Enter
Hold the Ctrl+Shift keys on the keyboard.
Click the Enter button
You will be prompt with a permission dialog box.
Hit the Yes button
In the search bar, type the “cleanmgr” and choose the Enter
Disk Cleanup will evaluate the space occupied by the temporary file & allows you to remove it.
At last, Select the boxes of the categories you want to clean & click OK.
Method 4: Use the Windows System Restore to “Undo” the Recent System Changes
Windows system restore allows the system user to go back in time to return your system files & programs. Check out the steps to use the System Restore tool:
Hit the Start Button
Now Type “System Restore” in the search box & click the Enter tab
Click the System Restore
If prompted, enter any administration passwords
Follow the steps in the Wizard to choose a restore point
Restore your computer
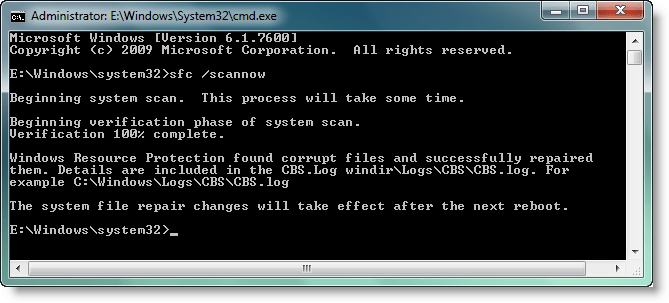
Method 5: Run the Windows System File Checker (“sfc/scannow”)
System File Checker is one of an efficient & easy tool that allows the QuickBooks user to scan & restore corruptions in the Windows System Files.
Procedure to Run the System File Checker (Windows XP, 7, 8, 10, and Vista)
Hit the Start button
Type “command” in the search box… DO NOT hit the Enter button
Hold the Ctrl+Shift on the keyboard & hit the Enter
You will be prompt with a permission dialog box
Hit the Yes button
A black screen will open with the name on the top as “Command Prompt.”
Type the “sfc/scannow” and click the Enter
The scanning process will get started by the System File Checker to remove the Error 6130, 0
Method 6: Uninstall & Reinstall the QB Programs Related with Error 6130, 0
In case, the QuickBooks error code 6130, 0 associated with a specific QB program – just reinstall the QuickBooks software.
To Reinstall, just follow the steps given below:
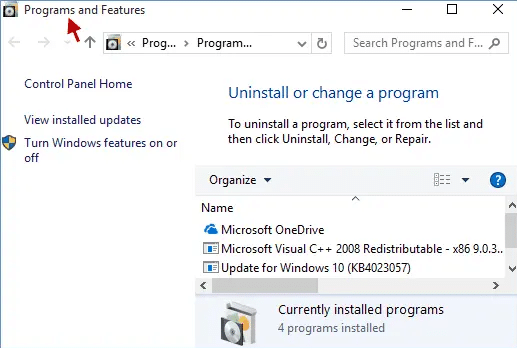
Hit the Start button to open the Programs and Features
Choose the ControlPanel on the menu’s right side
Click on the Programs
Hit the Programs and Features
Locate the Error 6130,0 associated program
Click on the QB associated entry
Finally, Select the Uninstall button on the top menu
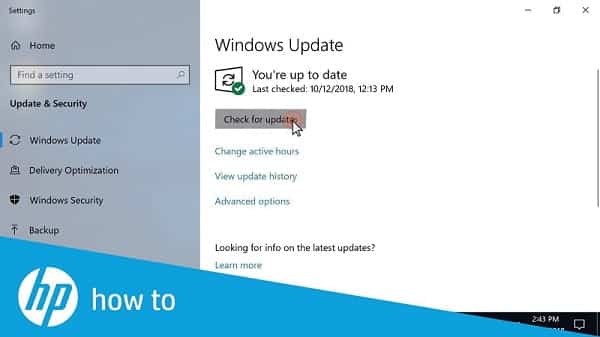
Method 7: Install All the Available Windows Updates
This error code potentially occurs due to uninstalled available Windows updates. But, time-to-time Microsoft launch updates & improvement in the Windows System files that could associate with the QuickBooks code 6130, 0.
Steps to check of the Windows updates (Windows XP, 7, 8, 10, and Vista)
Hit the Start button
In the search box, type “update” and click the Enter
The Windows Update dialogue box will appear
In case, the updates are available – hit the Install Updates icon
Operating System
The QuickBooks Error Code 6130, 0 can occur in any of the following Microsoft Windows operating systems:
QuickBooks files such as .ND and .TLG are configuration files that allow you to access the company files. Corruption to these files may cause error 6130. Renaming these files can help you fix it.
Find files with .ND and .TLG extensions.
Right-click on files with .ND and .TLG extensions and click rename.
Rename the files by adding “OLD” towards the end of the filename.
Open QuickBooks and try to access the files. If the error persists, follow the next steps.
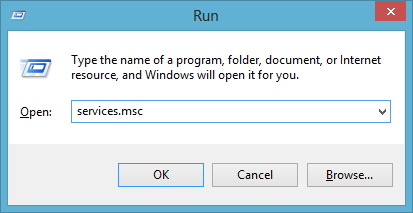
Method 9: Restart Database Service for QuickBooks on the Server
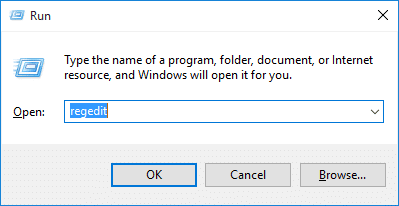
Open Run window on your server computer by pressing Windows and R keys simultaneously.
Type “services.msc” in the open box and press Enter.
Look for “QuickBooksDBXX” service, (XX represents the version of your QB Desktop software).
Click on the service and then press Start from the left side panel.
Now, open the company file and see if the issue has been fixed.
If the error persists, follow the next troubleshooting step.
The solution mentioned in this technical blog related QuickBooks Error code 6130, 0 is enough to fix the issue..! In a scenario where the error code persists, we recommend you to contact the QuickBooks premier support team. You can contact us also to get technical help for your QuickBooks software.
We are world’s leading QuickBooks help and support service provider having a strong & efficient certified technician. For an instant and simplified solution, you can dial our toll-free helpline number i.e. +1-888-510-9198. Help is provided 24/7 by our experts.
FAQs
What is QuickBooks Error 6130 0?
The company file forms the nucleus of all operations conducted on QuickBooks. However, it may differ from variegated technical issues. QuickBooks Error 6130 0 can occur when users try to get access to their company file through QuickBooks. They instead get obstructed by an error message stating “QuickBooks Error 6130 0 : QuickBooks has encountered a problem and needs to close”.
What causes Error 6130 0 in QuickBooks?
The below can be the factors triggering this issue 1: The company file is corrupted. 2: The company file got moved from its original location. 3: Windows Registry might be corrupted. 4: QuickBooks was incorrectly installed on the computer, or the installation was partially completed due to a power failure. 5: Excess of system junk can also invoke QuickBooks Error 6130 0.
What are DIT steps to fix Error 6XXX errors?
QuickBooks Error 6XXX can be resolved pretty easily by performing the methods mentioned below: Method 1: Run System File Checker. Method 2: Restore the system. Method3: Change the filename of the Company file. Method 4: Restart the QuickBooks Database Server.


