Here is what you should do when QuickBooks has stopped working, won’t open or QuickBooks is not responding
QuickBooks users sometimes face an error while opening QuickBooks Desktop or the screen may just freeze and not respond to any command. QuickBooks has stopped working or not responding, not opening error messages display on screen when user try to open QuickBooks Desktop. You can bump into such an error due to a bunch of instigating factors, which we will be elaborating later in this segment.
Make sure to stick around this piece of writing, or you can further connect with our technical support team at +1-888-510-9198, and we will provide you with immediate support services. Now that you know whom to reach out to in case of any technical assistance, let us explore this segment carefully to understand further about QuickBooks stopped working error.
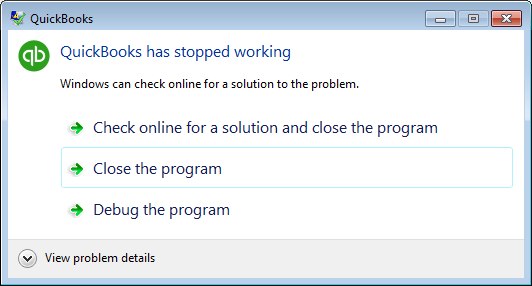
QuickBooks 2010 stopped working error can suddenly appear on your desktop with a warning message that states:
Error
Description
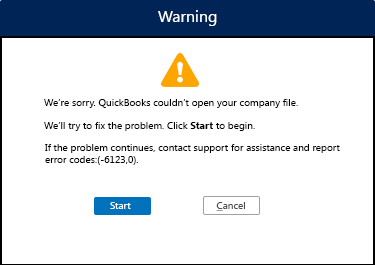
Warning
A problem caused the program to stop working windows 10 correctly or windows is checking for a solution to the problem.
This type of error can be very annoying to handle, but can be fixed, once the reason behind the occurrence is identified. So, let us explore some quick reasons that might trigger such an error in QuickBooks.
Your company name may be longer than required
QBWUSER.INI file might be damaged, corrupt or missing
How to fix QuickBooks Not Working or Not Responding Error?
QuickBooks not responding after login/not working are the most common issues that occur in QB. You can perform the below-mentioned troubleshooting steps to resolve issues that don’t let QuickBooks open or freeze the software.
Ensure that these errors are Windows OS specific and you should only try to fix it at your own risk. If you are comfortable performing the actions follow the given technical methods below. Otherwise, consulting a professional or the manufacturer is recommended.
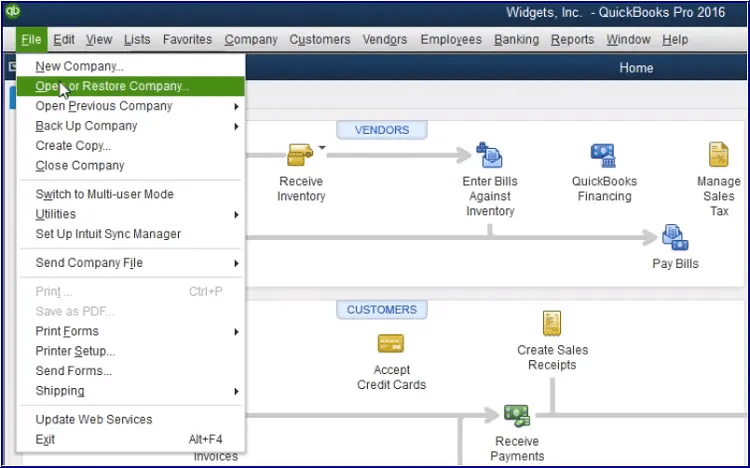
Before proceeding ahead perform these initial steps:
Firstly Restart your PC
Now Open QuickBooks Software
Click on Start > All Programs > Right Click on QuickBooks
Press Ctrl key and open QuickBooks
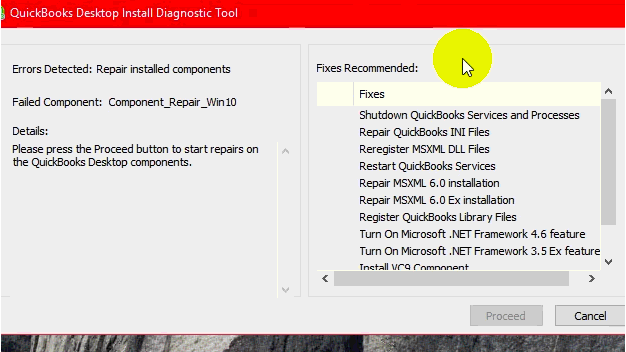
Solution 1: Download and use QuickBooks Install Diagnostic Tool (QBinstall Tool)
Restart your system after running the tool to make sure that the windows components are updated
You can now check whether QuickBooks has stopped working 2015 error continues to appear.
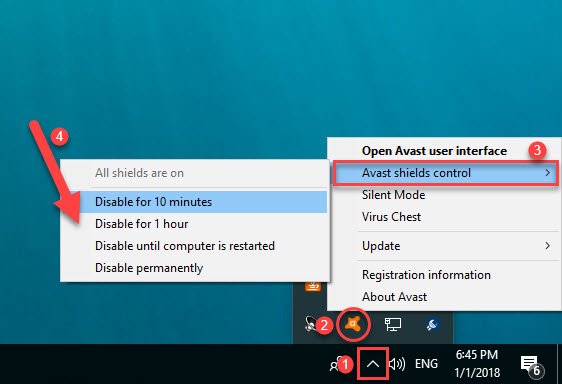
Solution 2: Reboot your PC and Temporarily Disable your Anti-virus Software
Reboot your system
After rebooting, open your QuickBooks Desktop.
Temporarily disable your antivirus if the issue persists
Note: In case QuickBooks has stopped working 2010 error still persists, just try disabling your antivirus software temporarily. You can get help from your IT professional at this time.
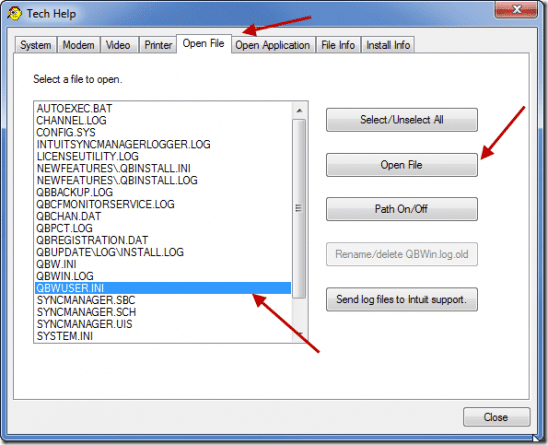
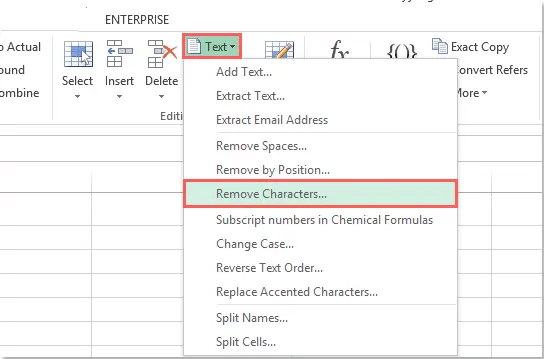
Rename the QBWUSER.INI File (changing the name of the file would erase the list of company files that were opened previously and this step would require you to open your company file manually). This would fix QuickBooks not responding when opening error up to a certain extent.
Find and open the folder where the QBWUSER.ini is stored (If you are unable to find the folder, enable all the hidden files and folders to find it)
Follow this path: Location: \Users\[Your user name]\AppData\Local\Intuit\QuickBooks [year]
Rename the QBWUSER.ini (do a right-click and select rename)
Put .old at the end of the file name (e.g.QBWUSER.ini.old)
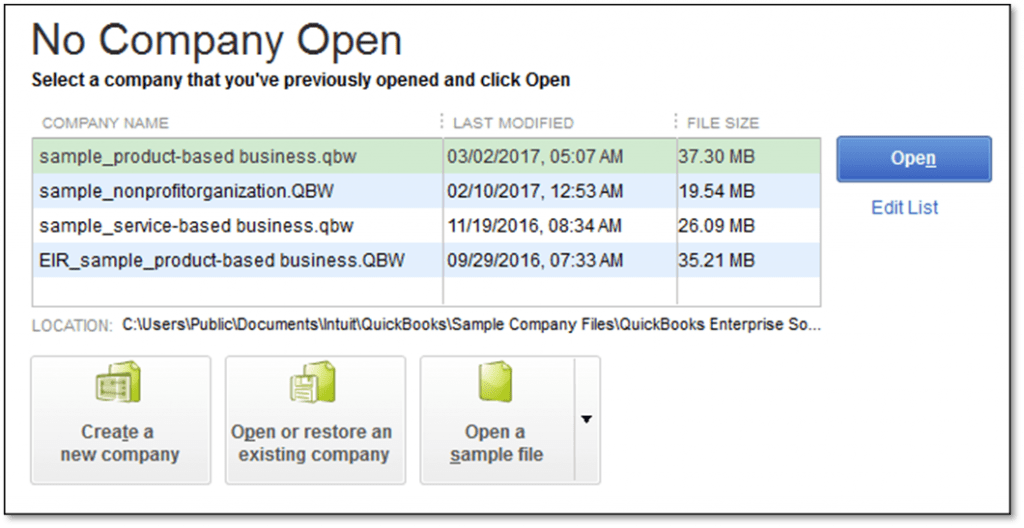
In case the program opens post renaming QBWUSER.ini or EntitlementDataStore.ecml, see if you can open a sample company file.
In case you are able to open sample file and your own company file is still not opening, then copy the file to a different folder or location and open it from the new location (copy the file to a local folder than a network location)
If the company file opens from the new location, the issue might be originated from a damaged folder or folder permissions
If you still fail to sign into your company file, then check if your company file is damaged
Try restoring an earlier backup of that file instead In case of damaged file
If you are unable to open the sample company file or QuickBooks not responding when opening company file, the issue might be with the QuickBooks installation
Note: QuickBooks Automatically creates a new QBWUSER.INI file.
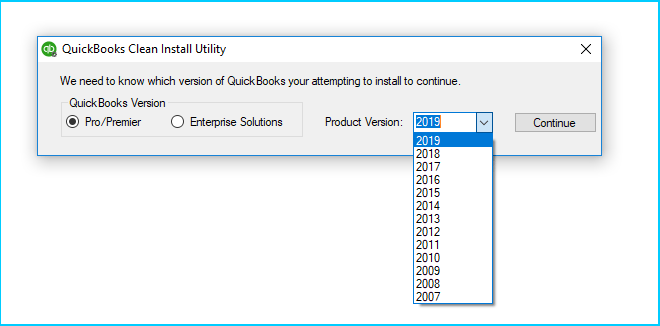
Solution 4: Reinstall QuickBooks using Clean Install
Uninstall QuickBooks Desktop and reinstall it using the clean install tool. This process will get you the most recent QuickBooks Update which can resolve all your issues.
Towards the end, we believe readers might be able to understand what it takes to fix QuickBooks is not responding error. However, if you have queries related to it or are getting the same problem again and again feel free to contact our QuickBooks enterprise support team at +1-888-510-9198. We are available 24*7 to help QuickBooks users.
Some FAQs regarding QuickBooks Won’t Open or Not Responding:
Why won’t my QuickBooks open, and what can I do to fix it?
If your QuickBooks won’t open, it could be due to several reasons, such as damaged program files, outdated software, or interference from other applications. To fix this issue, try restarting your computer, updating QuickBooks to the latest version, or running the QuickBooks Install Diagnostic Tool. For more detailed steps and additional solutions, please refer to our blog post.
What should I do if QuickBooks is not opening after a recent update?
If QuickBooks is not opening after you’ve installed a recent update, there might be an issue with the update installation or compatibility. First, make sure that your computer meets the system requirements for the new version of QuickBooks. Next, try running the QuickBooks Install Diagnostic Tool to identify and fix any installation errors. If the problem persists, consider uninstalling and reinstalling QuickBooks, or reach out to QuickBooks support for further assistance.
How can I troubleshoot QuickBooks not working or not responding issues?
When QuickBooks is not working or not responding, you can try a few different troubleshooting steps to resolve the issue. Start by closing other open applications to free up system resources. If the problem continues, try restarting your computer, updating QuickBooks, and running the QuickBooks Install Diagnostic Tool. For more in-depth troubleshooting tips, check out our blog post on resolving common QuickBooks issues.
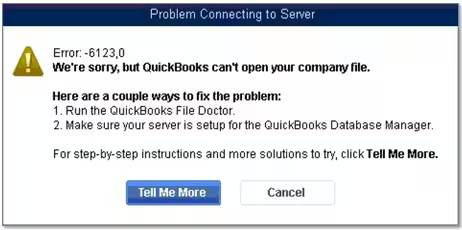
QuickBooks error code 6123, 0 can be experienced in QuickBooks when working in a multi-user environment. It usually appears with a message stating “Connection to QuickBooks company file has been lost”. The error is often related to the company file, so it is essential to eliminate it as soon as possible.
In case you are interested in exploring further about the QuickBooks error code 6123, 0, here we are with this piece of writing sharing the complete information. To learn further, stick around this piece of writing, or you can further connect with our technical support professionals at +1-888-510-9198, and our certified team will help you with immediate assistance related to all sorts of QuickBooks queries.
What is QuickBooks error code 6123, 0?
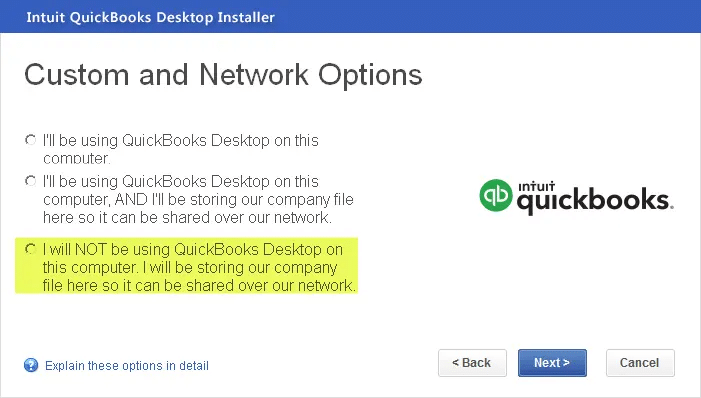
As it is visible, QuickBooks error code 6123 is a 6000 series error that can be seen when you try to open the company file. You can further come across such errors in QuickBooks, when trying to restore a backup company file or when opening company file in multi user mode. When you open the file directly from the network. When establishing or when the use of a QuickBooks company report over a network, you see one or more of the following errors:
The image as shown below is similar which appears on your desktop.
It should be noted that if you are using McAfee security, then you can experience such an error. In case you already know that McAfee security software doesn’t belong to intuit, and Intuit can’t help you if the McAfee causing the issue, then consult with McAfee support.
Your system has multiple QuickBooks database services are running.
Same company file is open in a new version of QuickBooks.
You are restoring a backup from a flash drive or from a removable storage device.
Damaged Window user.
Methods to eliminate the error code 6123, 0 in QuickBooks Desktop
The steps involved in fixing QuickBooks error code 6123, 0 differ depending upon the condition when such an error is experienced. So, make sure to perform the steps according to the situation.
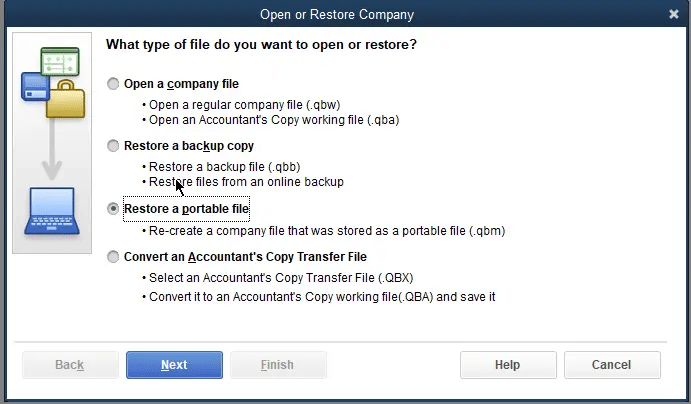
Condition 1: If the error 6123 is experienced while restoring a backup (.qbb) on a new system
Just in case you experience this issue while restoring a previously backed up company file, then the processes stated below might be of some assistance to you.
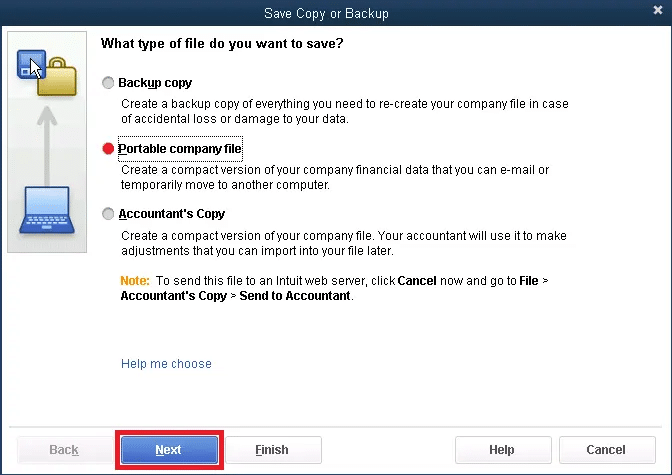
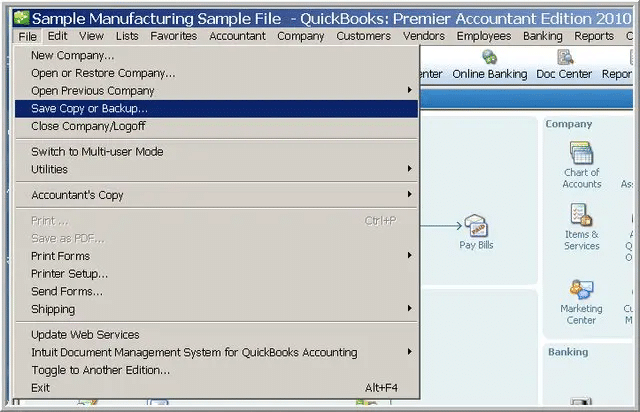
Process 1: Making a portable company file (.qbm) to restore your company file
The very first step is to open the QuickBooks desktop on the same system which was used to create the backup company file.
Now, open the original company file.
The user is now supposed to create a portable file of the company file.
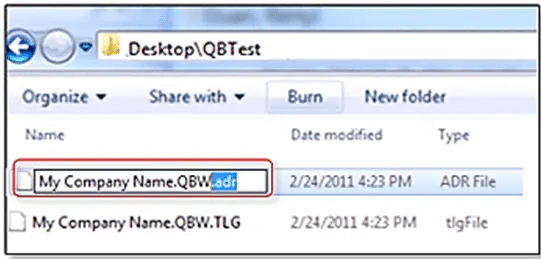
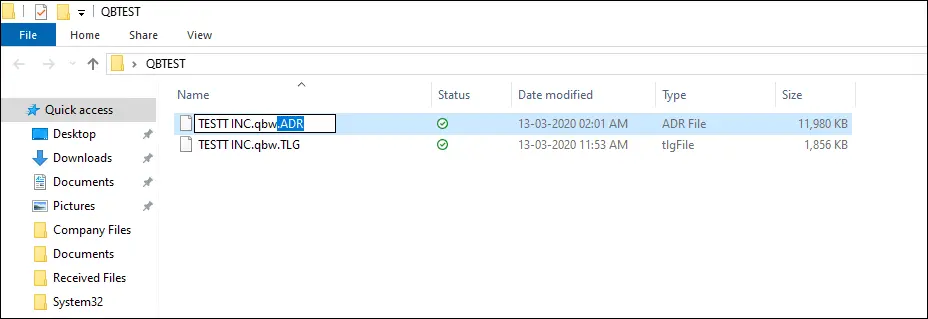
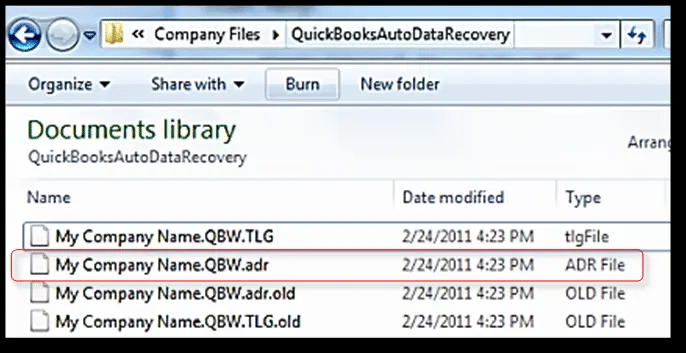
Process 2: Make use of the QuickBooks auto data recovery (ADR)
Often auto data recovery tool can help the user in eliminating errors like this. The user can restore the adr copy of the file and check if it works or not. You can simply perform the steps to use the QuickBooks auto data recovery tool and try eliminating the error permanently.
Condition 2: Manually configure the multi-user setup
Another condition can be when you are using a multi-user in QuickBooks and experiencing the issue. In such scenario, you can simply configure its settings using the steps listed below:
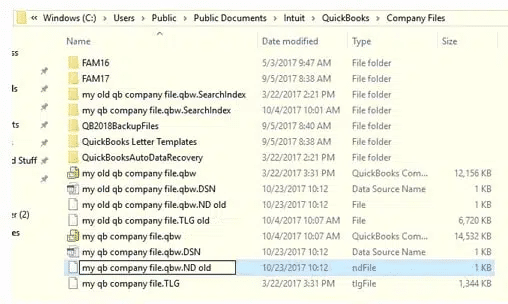
Step 1: Change the name of the .ND and .TLG files
At times, changing the name of the network and transaction log file can fix the issue up to a certain extent. The steps involved in this process are as follows:
Start the process by opening the folder that harbors the company file.
Now, choose the .ND file of the company file.
Right-click on .ND file and then click on the Rename option.
Later on, add .old at the end of the file name.
Repeat the same process for .TLG file.
Also, open the QuickBooks desktop company file through QuickBooks.
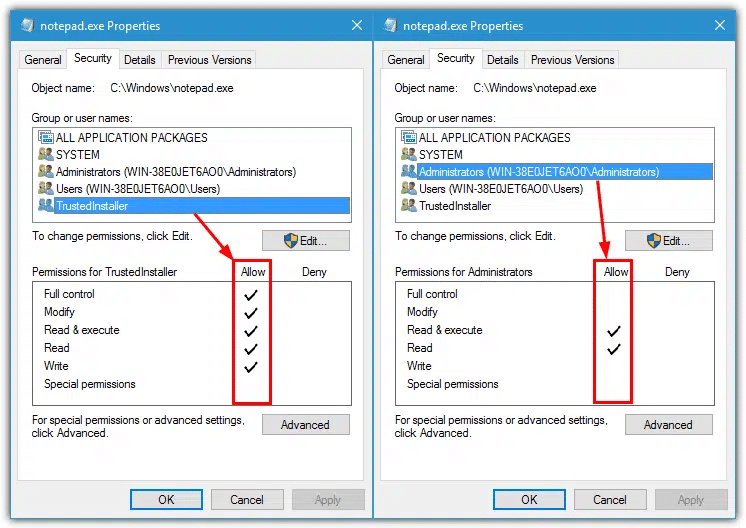
At times improper folder permissions can trigger such an error. Moreover, the folder containing the QuickBooks desktop company file is present on the host system. Thus, make sure to provide Full Control the required folder permissions.
Step 3: Move the company file to a different location
You can verify whether the issue is with the file path, by moving the file to a different location, then opening it from that location to check if it works.
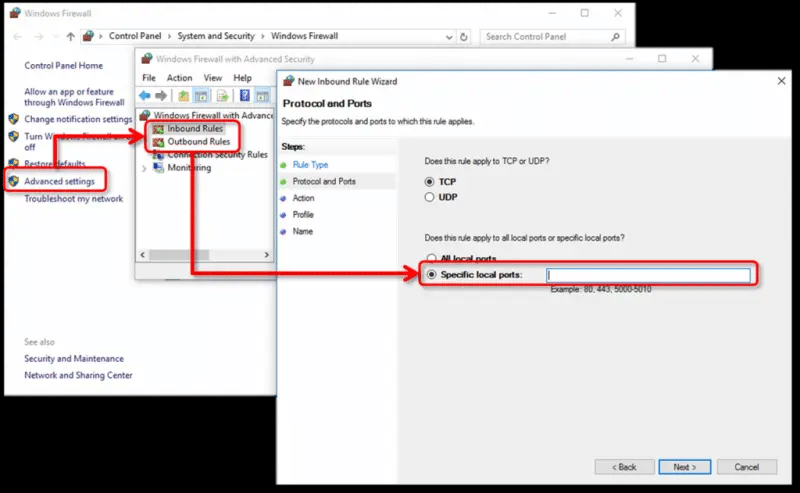
Step 4: Check Firewall & Antivirus Ports
Step 5: Toggle Hosting settings in QuickBooks
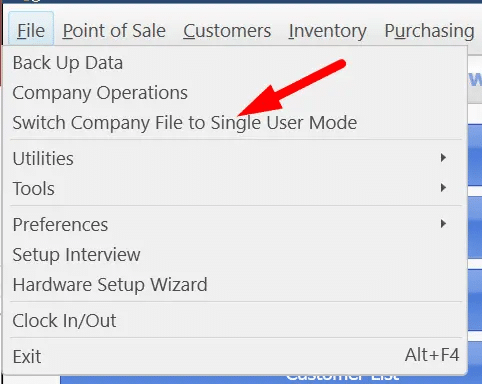
Under this step, you first have to open the company file.
Later on, select the File
Now, choose the option to Switch to single-user mode.
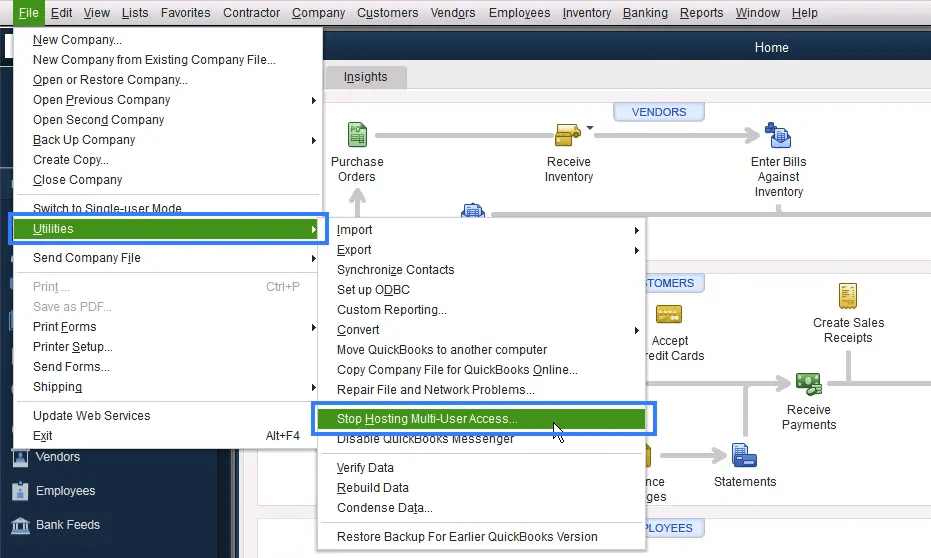
Go for the File >Utilities and also select Stop hosting multi-user access.
Process 2: Use QuickBooks tool hub program to fix this error
If you experience this issue when opening the company file, then it is recommended to use the QuickBooks tool Hub. The steps to set up and use the tool are given as follows:
Save the file somewhere you can easily find it out.
Perform the on-screen prompts to Install and agree to the terms and conditions.
Furthermore, double-click the icon on the Windows desktop to open the tool hub.
Note that if you are unable to spot the icon, then search Windows for QuickBooks Tool hub and then choose the program.
Step 2: Use QuickBooks File Doctor Tool
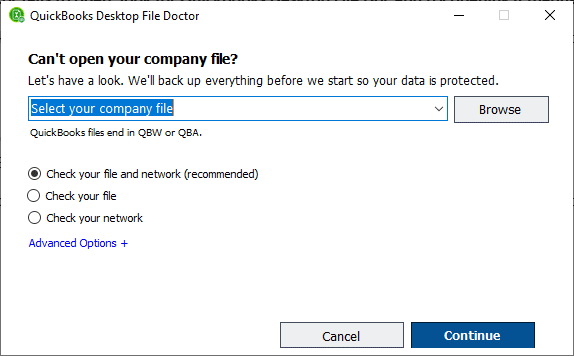
The QuickBooks file doctor tool can help you in automatic scanning, diagnosis, and rectification of the issues. The user can try performing the below steps to use the file doctor tool from tool hub.
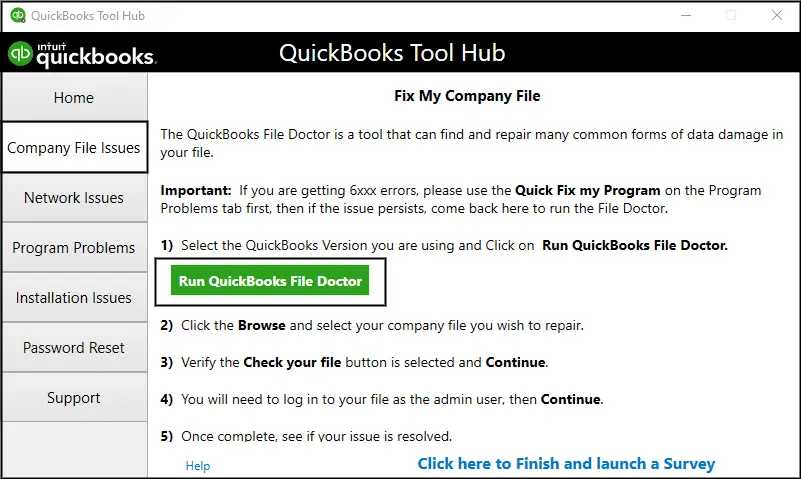
The first step is to choose the Company file issues option in the QuickBooks Tools Hub.
And then, click on the option to Run QuickBooks File Doctor tool.
After the File doctor tool opens up, choose the Company file from the drop down list.
If you are unable to find it, then make sure to click on browse option to search the system for the file i.e. [your company name].qbw.
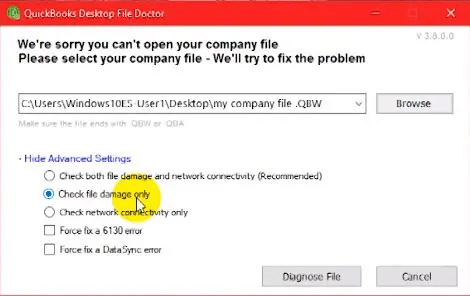
The next step is to choose the option to check your file only and then hit continue to diagnose the file.
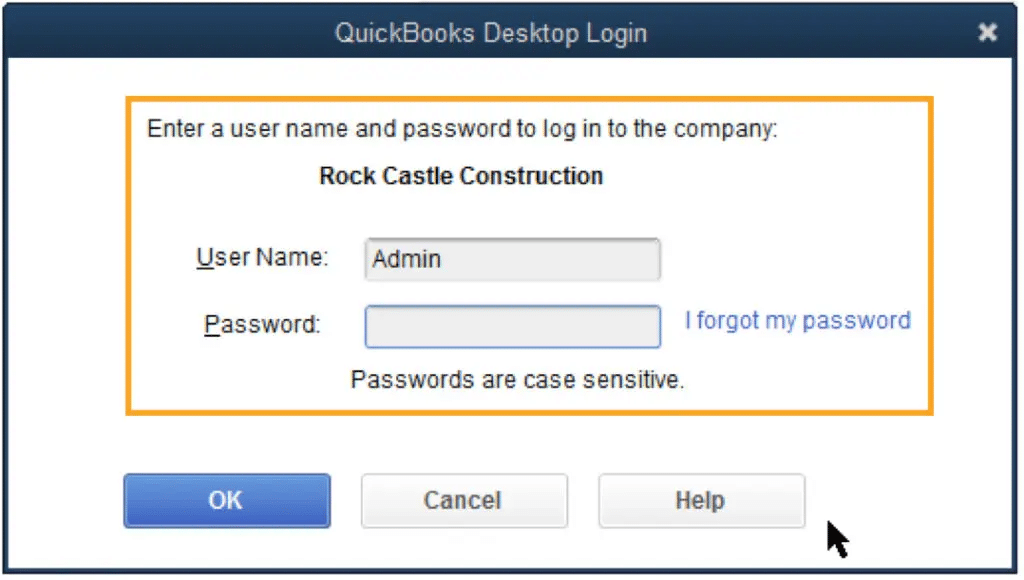
After that enter the QuickBooks admin password, followed by hitting continue.
The QuickBooks file doctor tool will begin with the repairing process on its own, which might take some time.
Lastly, move to the company file from the list and then click on the Open QuickBooks option.
Note that if the file can be opened up without any issue, then the error is resolved. But make sure to backup the company file, after you have opened it up.
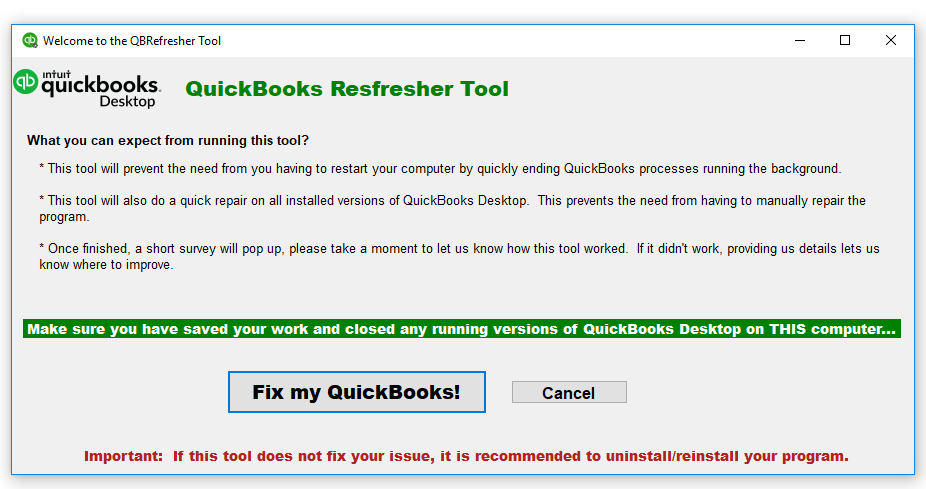
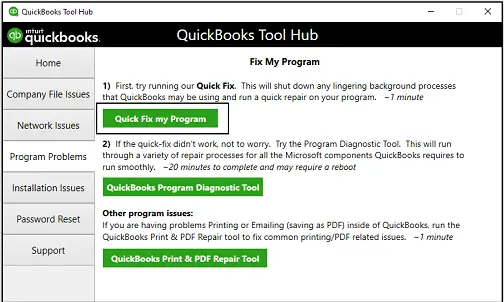
Step 3: Run Quick Fix my program from tool hub program
The user can also make use of the quick fix my program tool to fix the issue successfully. The steps involved in this process are as follows:
The first step is to click on the Programs Problems option in the Tool Hub.
And then choose the Quick Fix my Program tab.
This might take a minute to run. In case you are having multiple versions of QuickBooks installed on the system, then it might take more than a minute to open up.
Open QuickBooks and then verify the issue is fixed.
Procedure 3: Change the name of the .ND and .TLG file
Sometimes, simply changing the name of the nd and tlg files can help in getting rid of the issue from its root cause.
Star the process by opening the folder that contains the company file.
Now, go for the corresponding .ND file.
Once done with that right-click on the Company file and then hit on Rename option.
Rename the .ND file to .ND.OLD
And further choose the .TLG file and rename it in the same way as you renamed the Network (.ND) file.
Also, change the name to .TLG.OLD.
Ensure to open the QuickBooks company file.
Furthermore, set proper folder permissions.
As may be the folder settings require to be set to full access. It depends on the Windows settings and Windows user login.
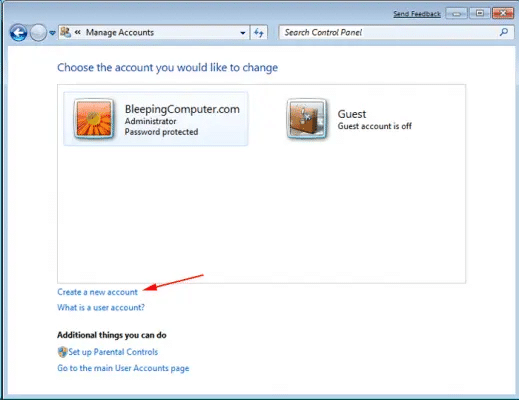
Procedure 4: Make a new Window User
Under this process, one needs to first open control panel and then click on create new user option in the user icon
After that, choose the Administrator for user type.
Log out of the existing.
The next step is to reboot the system, and then log in using the New user credentials.
Head to the company file to the desktop.
End the process by opening QuickBooks and accessing the company file.
Procedure 5: Restart your system in Safe Mode
Restart and use the system in safe mode. This would stop the third party application to restrict the software from running. The user can also temporarily disable the security program in safe mode. And then open the software and try opening the company file in safe mode. This would eliminate the issue to a certain extent.
Procedure 6: Disable the system security programs
If the user is having an antivirus installed on the system, then it is important to consider turning it off before opening QuickBooks again and accessing the company file. However, if the user is using McAfee security software, then it can also trigger such an error. In such scenarios, temporarily disabling the security software is recommended.
Procedure 7: Re-installation of QuickBooks application
Here, the user needs to first click on the Windows start button and from there, visit the Control panel.
After that uninstall the current QuickBooks from the Control panel tab.
Also, download the QuickBooks variant that you wish to utilize on the system or use the QuickBooks installation CD.
The next step is to install QuickBooks in Normal mode.
After that, enter the product ID and license number there.
QuickBooks will be registered and activated to use.
We hope that this article will assist you with everything you should know about QuickBooks Error Code -6123, 0. You can try the solutions mentioned on this page and fix the error if it pops up on your screen.
In case you come across an error when opening, upgrading, or restoring a company file, continue with the steps below: 1. Close QuickBooks 2. Download the most recent version of QuickBooks Tool Hub 3. Open the file downloaded 4. Perform the onscreen steps to install and agree to the terms and conditions.
What is error code 6123 0 in Intuit?
QB company file connection is lost. This error message can interrupt your smooth working indicating QuickBooks error code 6123. It shows when you try to open a company file over a network in multi-user mode.
How do I fix Error 6000 in QuickBooks desktop?
The 6000 series error indicates that you have opened the company file saved on the server or another computer. To fix this: 1: Check if Hosting is on for all workstations. 2: Open a sample company file from a workstation. 3: Copy the QuickBooks file to the Desktop.
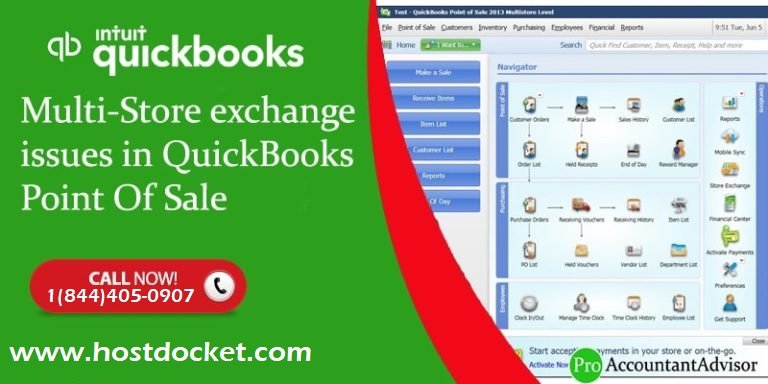
QuickBooks is accounting software which faces a lot of errors and problems and one such problem is Multi Store Exchange Issue in POS [QuickBooks Point of Sale]. This error causes delay or non-delivery of the mailbags that are pending. Due to this problem, a series of errors can occur with QuickBooks while one tries to run multi store exchange issue in pos. The following are the errors that can occur:
Error Code 175135: When you find yourself unable to store exchange file.
Error Code 193: When the primary key for dept keywords is not unique.
Error Code 175305: You encounter errors, click on ‘VIEW LOG’ to get the details about the error.
Error Code 175411: When you mistakenly enter the number that has been used by any other store
Error Code 175414: When you try to copy a file and detect this error.
File s0X#####.qbt (Error Code:2):The store exchange password you enter does not match the password in preferences.
When you find that no files are to be processed, choose to exit the software.
To learn further about multi store exchange issues in POS, make sure to read this article till the end. Or you can give us a call at +1-888-510-9198, and we will provide you with immediate support and guidance.
Causes of Multi Store Exchange Issue in POS
The common causes of these errors in store exchange:
As a user, you won’t be able to receive the mailbags during a store exchange in QuickBooks POS and this may be because of any of the following reasons:
There is not proper set-up of the Multi-store preferences.
The .QBT has been damaged.
The Windows you are using is facing compatibility issues.
You are not logged into Microsoft Windows as an administrator.
The store exchange password available in the Remote Store is not matching the password at Headquarters.
You attempt to process in a mailbag from one Headquarters file to another file.
There is some another store configured using the license number.
Now, it’s time to resolve the errors that you face during multi-store exchange issues in QuickBooks POS.
Steps to resolve Multi Store exchange issue in POS
If the file is received through an email attachment, open the file with the .qbt extension and save it to the desktop.
Fixing QuickBooks Error Code 175135
Click on ‘Stores‘ and then, choose ‘Receive Files‘.
Hit a click on ‘Browse for Files‘, find and open the mailbag.
Click on ‘Close‘.
Follow all the general troubleshooting steps for store exchange.
Solving Error Code 175414
When you face this error, you can follow the below steps to resolve it:
Firstly close the ‘Point of sale POS‘ system.
Right click on ‘POS icon‘ and select the ‘Run as administrator‘.
Run the ‘store exchange‘.
You also need to ensure that if you are facing this error in the remote store, then you can follow different steps for different versions of Windows which are as below:
Version 10:
Make sure that your internet connection is working properly.
Click to open the web browser outside of POS and trying to access a web page.
If you find that there is no connection, then reboot the routers and retry to access the web page.
Now, you can try to send the mailbag again.
Version 9 & Older:
Ensure that internet is working properly.
Choose File> Preferences > Company.
After that, chose Communication Setup in the left pane.
Click to setup the internet connection.
Hit a click to use computer’s internet connection settings.
When you find this error, you can follow the below steps:
Select Customers > Customer List.
Click on any one of the computers at a time.
Click on Delete until the list is empty.
Note: Send a mailbag to Headquarters and then receive it.
When you have more customers to click:
Version 10 and 2013: Click on the first customer in the list, and press Shift. After that, click on the last customer in the list.
Version 9: Press the Ctrl + A keys in order to select the entire thing.
When you see this error in Headquarters, you can follow the below steps:
Select File > Utilities > Resend Files.
Click to resend.
Receive the resend mailbag at the remote store.
When you follow all the above steps, then you can try and if you find the same error, then you need to create a new Remote store file and resend the mailbag from the Headquarters to the Remote store.
When you configure the other store using the license number, this error may occur and you can follow the below steps to fix this:
Reset to default.
Select File > Company > Preference
On the top of the window, there will be button. Click on ‘I Want to’ and reset to default setting.
Select Store Exchange preference and enter a unique license code for each remote store.
Then, click save.
Check each preference to ensure that the resetting preferences reflect all your needs. You can change them as required and save your changes.
QuickBooks Error Code 175305 & Troubleshooting
This error is displayed in the Sending Files dialog and when a processing error occurs:
Make sure that you have logged into Windows as an ‘System Administrator‘.
Click ‘OK‘ on the error dialog window.
Click ‘View Log‘ and identify all the errors listed.
Search QuickBooks for the additional errors and if you find that no one is listed, then you can continue to the ‘Next step‘.
Verify whether the file ‘qbpos.exe‘ has been added.
Fix Error – Store Exchange password does not match password in preferences. File s0X#####.qbt (Error code:2)
It occurs when the store exchange password in the exchange file and the password entered in the store exchange preferences do not match.
Enter the same password in the store exchange preferences for all stores to fix it. After this run the Store Exchange again.
Fix Error – “No files waiting to be processed, select close to exit”
Firstly you need to verify that the mailbag you are trying to receive is from a remote store or not. From the activity log, please ensure that the mailbag you are trying to process in does not start with the letter HQ.
If it does, then follow these steps as below:
From the Remote Store company file, select ‘Edit‘ option
Go to ‘Preferences‘ tab
Then go to ‘Company‘.
Choose the ‘Multi-store preference‘.
Click on ‘Change to Remote Store‘.
Resend the mailbag from the remote store and try to process in again at Headquarters.
If any of these errors still occurs, follow the general troubleshooting steps for multi store exchange issue in pos. If you are not good in technical aspects or looking for instant support then you can contact QuickBooks error support team directly.
FAQs Related to QuickBooks point of sale store exchange issues
What is store exchange QuickBooks point of sale?
Well, store exchange is the transfer of data between your headquarters and remote stores. The data is sent between stores in a compressed file referred to as a mailbag.
How to do an exchange on POS?
You need to perform the below steps to do an exchange on POS: 1. From the shopify POS app, you need to tap orders. 2. Now, click on order for which you want to create an exchange 3. Click on exchange 4. On the select items to run screen 5. Hit next 6. On the select new items screen, choose the new product from the products list to exchange the returned item for 7. After everything has been added, hit next
How do I verify data in QuickBooks point of sale?
For this: 1. You need to select help and further select point-of-sale 2. Now, the QuickBooks point-of-sale information window appears. 3. The verify utility is hidden on a special debug menu, to access the menu you must depress the left CTRL, left ALT, D, and B keys simultaneously.
QuickBooks is world’s leading accounting software that consists of a wide range of features and services for small and medium-sized business owners. The software is created taking into consideration the financial aspects of industries of all sorts and sizes.
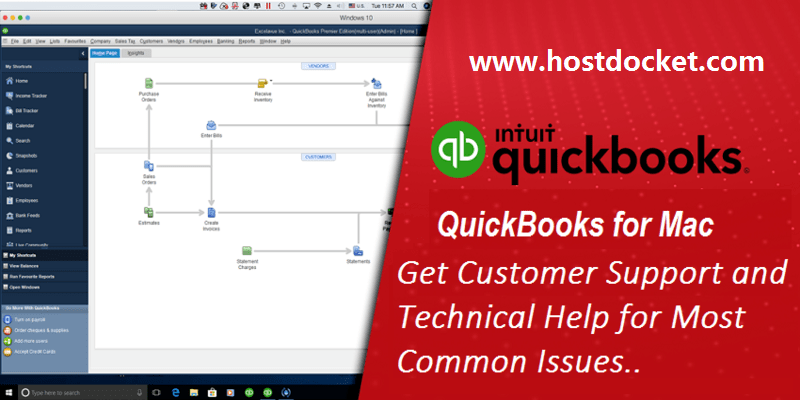
There are different editions of this versatile software namely QuickBooks Pro, QuickBooks Professional, QuickBooks Enterprise, and QuickBooks Online. Business owners can take the QuickBooks edition suitable for their business requirements. However, QuickBooks application supports Mac OS. Thousands of business owners who use Mac systems to manage their business have been benefited with QuickBooks Mac. Go through this segment to understand further about QuickBooks for Mac. However, in case you need our assistance at any point in time, feel free to give us a call at +1-888-510-9198, and we will provide you with immediate support services.
QuickBooks Mac edition is developed by Intuit dedicatedly for Mac users. It is available in three different editions that are QuickBooks Pro, QuickBooks Enterprise, and QuickBooks Premier. QuickBooks Pro and Enterprise for Mac and very much similar to the same editions for Windows, however, the system requirements for both the operating systems are different.
QuickBooks Desktop Mac Feature
Intuit QuickBooks Mac consists of various rich features that help Mac users to meet their business goals.
Payroll and tax management.
Easy access to company finances, sales, and taxes.
Consolidated view of your company.
Customizable centres for quick access to vendor and customer details.
Direct prints on envelopes.
Time-saving batch-importing invoices, bills, payments and more.
Mac users with the help of the exclusive features of QuickBooks Mac can manage multiple accounting, bookkeeping and other tasks with ease. The Mac version of QuickBooks also consists of advanced accounting features and is programmed to defend itself against a selection of threats and issues.
However, all the QuickBooks Mac editions are highly innovative, they sometimes receive some errors that may interrupt the work and cause serious issue if not fixed immediately.
QuickBooks for Mac Related Errors & Issues
Here we have listed some equally important errors that QuickBooks for Mac user have reported:
Installation Errors:
One should be very careful while installing QuickBooks on Mac OS. If the installations process isn’t completed appropriately, it may further cause serious issues and may result in damaged company file, obstacles in accessing company file or QB software, QuickBooks being stuck or frozen, etc.
Upgrade Errors:
Mac users at times face issues while upgrading to the latest version of QuickBooks. The Access may be restricted to the software or company file. The problem is caused because the system requirements for the latest version may be different.
Functionality Errors:
If QuickBooks is not installed appropriately or it is not upgraded systematically, it may further restrict you to access a few vital features of the accounting software.
If you receive any error while using QuickBooks on your Mac or while installing or upgrading it, report immediately to the support team of QuickBooks Errors. QB Support team is equipped with innovative tools and technology to fix errors occurring on QuickBooks for Mac user as soon as possible and before the pose any serious threat.
The support team mostly offers first call resolution and also educates you on secure ways of using the software and assist you to make most of it. The QuickBooks Support team can be accessed on toll-free customer support number +1-888-510-9198.
FAQs Related to QuickBooks For Mac
Where can I download the NEW QuickBooks Online App for Mac?
Intuit has stopped updating QuickBooks online app for Mac after April 20, 2021. You can still use the app as long your browser supports it. However, even if the QuickBooks online mac app continues to work, it is suggested to switch to web browser.
Is there a QuickBooks Tool hub for Mac computers?
Well, QuickBooks tool hub isn’t available on MAC. Moreover, you can fix issues related to the company file by using the verify and rebuild utility.
Can QuickBooks be used on a Mac?
Yes QuickBooks Desktop is available for Mac. And you can also take QuickBooks online subscription to access it on MAC.
Is QuickBooks same on Mac as Windows?
Well, QuickBooks for Mac has fewer features than the windows version. Furthermore, a majority of CPAs and bookkeepers do not support QuickBooks for MAC
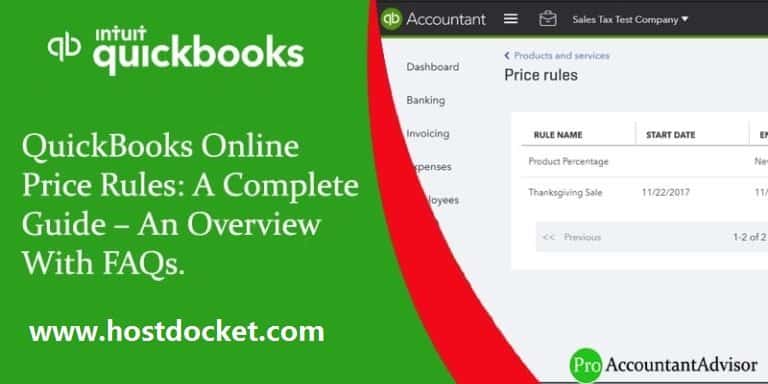
A Complete Guide for QuickBooks Online Price Rules
QuickBooks is an advanced accounting software, helping millions across the globe in meeting their business goals. It’s is a highly use friendly software and doesn’t require you to be an expert. However, a little knowledge of a few functions can be very helpful. If you wish to set your product price with QuickBooks Online, you will have a choice, based on factors, to establish an optional price on an invoice. This can be applied to a specific date range, client type, product type, service type, as well as to particular items and customers. To learn further about QuickBooks online price rules, make sure to stick around till the end, or you can further connect with us at +1-888-510-9198, and our certified QuickBooks ProAdvisors will ensure to answer all your queries.
Here we can explain two main aspects of price rules:
Two notable aspects of price rules
How to alter the price.
Indicating which customers/items the rule applies to.
1. How to Alter the Price?
You can ‘Edit/change‘ the sales price of a product or service. You can start by putting in the base price of a product while creating it.
A price rule will then change the base sales price upon being applied in a sales transaction. The base price/rate will be modified by a percent (up or down) by the rule. You can choose the field to alter that show up in the price rule window.
While selecting a percentage, you can explain if the rule will increase or decrease the base price/rate, simplify the type of rounding to use, and the portion to be used. In the process of selecting fixed amount, the base price/rate will be altered by the amount provided by you.
How useful is this feature?
This feature presents you a significant selection of rounding options:
No rounding
The next increment of (.05, .10, and so forth up to 1.00)
Price that end with a clear amount/value (.49, .79, .88, .89, .98, .99)
If you decide to select ‘Custom price‘ per item, the ‘Products and Services‘ button of the price rule will display the item records, and you can put in an exclusive price for every item that is visible, at the right.
The current sales price for an item will display in the Adjustable Price column if you create and set a new rule using this option.
Important: Please note that you will still have the option to override the calculated price for a specific item within this price rule if an adjusted price column for the items is available with you (no matter if you stipulate the percentage or fixed amount).
Please remember that if you are not entering an adjusted price for a product, the price that was calculated for any of such rules will at all times display the current sales price/rate found in the product/service item record. Thus, you will be required to enter an adjusted price if you wish to fix the price and don’t want to change it.
2. Indicating which customers/items the rule applies to?
The price rule will be, by default, applicable to all items in sales transactions and for all the customers. In case you wish to set a limited number the customers, and/or the product/service items the rule will applies to, you will be able to do it as per your choice. Furthermore, you can set up a time-sensitive price rule with the date of your choice (either or both the Start and End date). This feature is available to create something like a special holiday price.
Furthermore, the “Select customers” options enable you to select all customers, individual customers, or customers by type.
Select add customer in order to add the customer to the list. The display will change at the bottom of the price rule if you click on Select individually. It will not list all customers, but only the customers that the rule of price applies to.
“Select products or services” will enable you to select all products and services, items of a specific item type, or to select individually.
In Select individually, you have a display similar to what you had with customers. You can click the ‘Product or service‘ button and prepare your list.
Ans: Price rules enable you to control the products’ price. You will be able to offer discounts or increase the price of an item for a particular amount of time as per your wish.
How to turn on price rules?
Go to Gear.
Select Account and Settings.
Furthermore, choose the Sales tab.
Tap on pencil icon under Products and services.
Click “Turn on price rules – Beta” and Save.
How to create a price rule?
Go to Gear
Also, select All Lists and select “price rules”.
Select “new price rule” on the price rules page.
Que: How to create “X” type of rule (select specific items or customers, percentage, round down)?
Ans: Go to the ‘Price rule edit page‘. This section will enable you to choose the date range and the rule will be active. The qualified customer type, customers, product category, product type, and price adjustment will complete. We encourage the feature to increase or decrease the sales price by a percentage, fixed amount or a particular price. You can also choose to round the amount.
This section will enable you to choose the date range and the rule will be active. The qualified customer type, customers, product category, product type, and price adjustment can be done. We encourage the feature to increase or decrease the sales price by a percentage, fixed amount or a particular price. You can also choose to round the amount.
Que: How to create a Customer type?
Ans: You can add Customer type by clicking on ‘Customer Types‘ from Customers.
Que: How to assign customer type to some particular customers?
Ans: Choose the ‘Customer‘ and click on ‘Edit‘ and then additional info.
Que: How to assign a customer type to multiple customers at the same time?
Ans: Assigning a customer type to more than one customer at the same time is possible with QuickBooks Online. Select the ‘Customers‘, uncheck all the customers you wish to include in that customer type and tap on the batch actions drop down in order to select the ‘customer type‘. Click “apply”.
Que: How to run a report for price rules or customer type?
Ans: You can run a report for price rules or customer type. Customize the ‘Customer Contact List report‘ to add a ‘Customer Type‘ column.
Que: How to apply price rules to an invoice or transaction?
Ans: The price rule gets itself applied as you add items while creating an invoice. The price rule can also be overruled by clicking the rate and seeing all existing price rules.
Que: What if the selected customer/item combination is entitled for more than one price rule in a transaction?
Ans: In such a case, that item’s default sales rate will show up with an indicator beside the rate field. It will read ‘There are multiple price rules that apply to this product or customer”. To fix this, you can use the drop-down list in the rate field. Next, select the rule you wish to use or put in a different rate.
Que: Can we use QuickBooks Online price rules for services to charge different amounts based on the employee who did the work?
Ans: Yes, we can use price rules for that.
Que: Does QuickBooks Online take command to record the discount to COGS – Discounts?
Ans: QuickBooks Online Price rules feature is similar to QuickBooks Desktop price rules, as the price change is not available as a discount. This feature is pretty much similar to overriding the sale price.
Que: How to use price rules on inventory bundles?
Ans: Bundles do not have price of their own as they are just a grouping of items. Thus, you can’t add a bundle to a QuickBooks Online price rule. But, if you add the bundled items with a price rule, and add them to an invoice, it will display the price recommended by the price rule.
Que: How to use price rules on recurring sales transactions?
Ans: Recurring sales transactions keeps the same rate of the item as it was at the time when the recurring transaction was created. Thus, if you happened to use a price rule while generating the recurring transaction, it will keep on using that same rate until the rate is edited or changed on the recurring transaction. In case a price rule expires, or the rates are edited or changed, the recurring transaction that was set up with that particular item will not be affected.
This article should assist you understanding QuickBooks Online Price Rules. And we hope that above-mentioned FAQs have answers to all your doubts and queries related to QuickBooks online price rules. In case you have any more questions, you can contact our 24*7 QuickBooks Support team and, we will be glad to offer you a personalized solution. Also, you can contact us if you have any other QuickBooks related issue. Our toll-free number for QuickBooks help is +1-888-510-9198. Thanks for visit here in this blog.