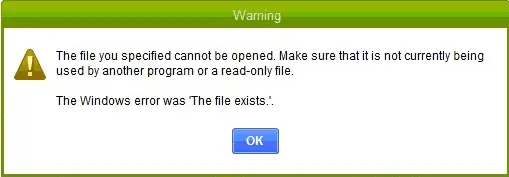
Did you just hit upon QuickBooks file exists error? Well, we can help you with it. QuickBooks file exists error is often witnessed with a warning message that abruptly states “The file you specified cannot be opened. It must already be in use by another program or a read-only file“. Other than this, you can also see an error message that states “The Windows error was the file exists“.
You might be disturbed by this error when you try to download payroll, or when you are paying scheduled liabilities, and also when opening a federal or state form. This can be tricky error to deal with for you, but once you go through the right set of steps to eliminate the error permanently, it would be easy to get rid of it. You can simply scroll through this segment for further information. Meanwhile, if you feel the need to speak to QuickBooks professionals for any sort of expert guidance, then in that scenario, you can get on a call with the team at +1-888-510-9198.
Brief into the file exists error in QuickBooks
The file already exists or the file you specified doesn’t cannot be opened error is often seen when working on various accounting operations like paying scheduled liabilities, opening a state/federal form, and also when downloading a payroll update. This error is directly related with the company file, and so you might find it difficult to work on QuickBooks. Thus, it is recommended to perform the set of steps suggested to deal with the error as soon as possible.
Effective measures to fix the QuickBooks file exists error
You do have a bunch of solutions to deal with the QuickBooks file exists error. Below we have tried to elaborate the most effective solutions. Let us check it out together:
Method 1: Reinstalling QuickBooks
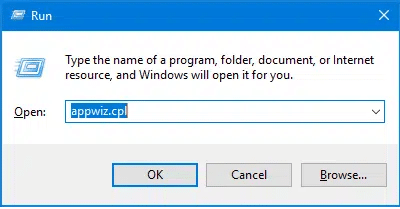
The very first step is to press windows + R and open run box
After that, enter appwiz.cpl
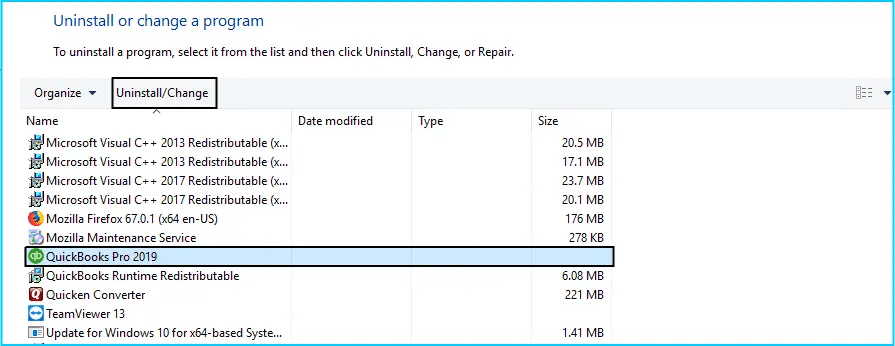
The next step is to click on the QuickBooks software twice and also choose uninstall
The user should follow onscreen prompts to eliminate QuickBooks from windows
Once done with that, the user should download a clean install tool from the authorized website and save it on PC
The last step is to use it for installing QuickBooks
Method 2: Check for QuickBooks updates
The user should first open QuickBooks and click on the product information option
After that, select the correct QuickBooks version
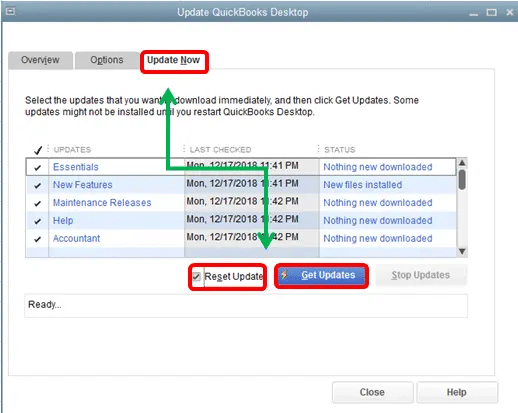
The user should then press search and also click on get latest updates
Once done with that make a folder and save the file
Now, double click the installation file so that the update process can be initiated
Now, select properties by clicking on the right tab
The user should then press edit tab and also select add
After that select everyone and also click on ok tab
The user should then choose full control option
And then click on apply tab
The last step is to ensure that everyone option is opted and also select the user
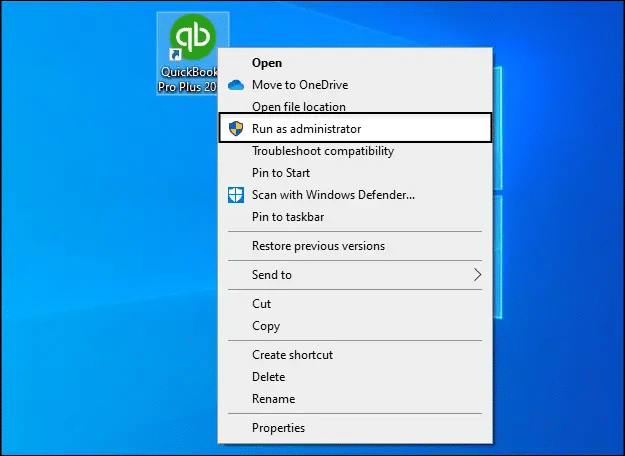
Method 5: Run QuickBooks as a system administrator
At times, launching QuickBooks as an admin can work great in tackling unwanted errors. Therefore, it is suggested to try launching the software with admin controls and check if the error gets eliminated or not. The steps you need to perform in this process are as follows:
Initially, you need to hover your mouse over the Windows Start icon and then click on the same to open it
Later on type in QuickBooks within the Search bar
Moreover, look for the results that show up in the search window
You are then required to follow it up by clicking on the right click option on QuickBooks version that you want to open
Later on, pick the Run as Admin option from the drop-down menu
Run the Payroll Updates
And perform your usual QuickBooks operations and check if the error related to the payroll are rectified or not
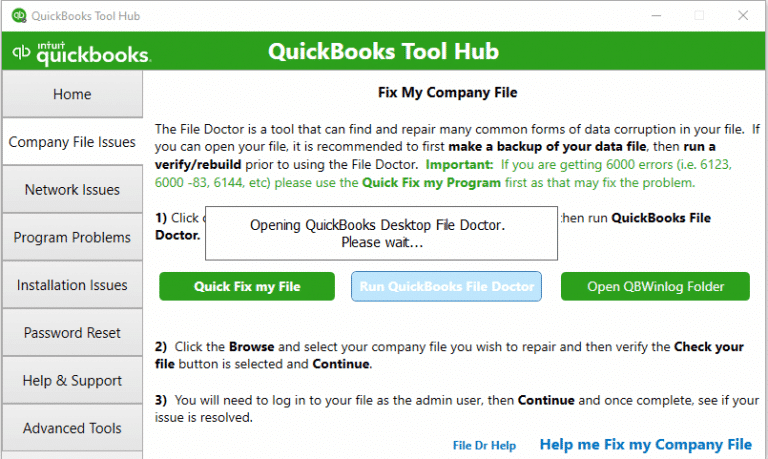
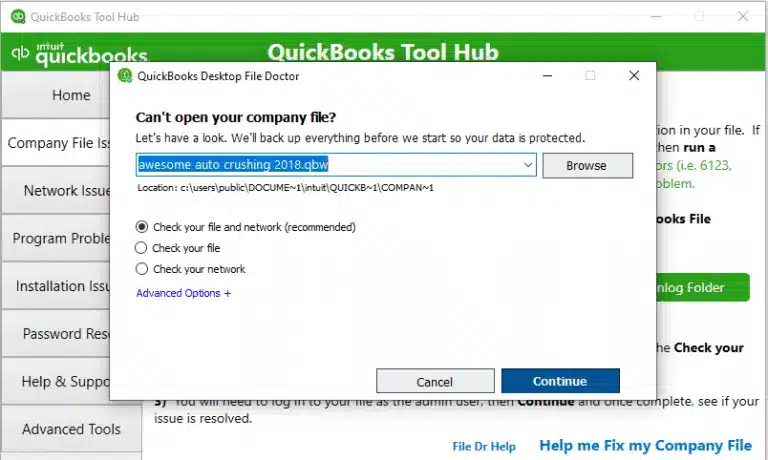
Method 6: Run file doctor from QuickBooks tool hub
With this, we come to the end of this article, where we hope that the information shared in above might help in fixing QuickBooks error the file exists. However, if the error persists for some reason, or the user needs any of our assistance, then calling our QuickBooks support team will work. We are a team of experts who work round the clock to provide the best possible QuickBooks assistance to all QuickBooks users. Just dial the toll-free QuickBooks support number i.e. +1-888-510-9198. Our experts will be get in touch with you shortly.
Frequently Asked Questions
How do I fix a corrupted QuickBooks file?
To fix the corrupted QuickBooks file, you can use the rebuild data tool which is built-in t QuickBooks and this would fix the issues related to the company file. The steps involved are: 1. Head to the file menu and move to the utilities tab and choose rebuild data 2. Select ok on the QuickBooks information window 3. Let the tool repair the file 4. When the tool finishes its process, make sure to click on ok tab 5. Head to the file menu, and hover over the utilities tab and choose verify data 6. Let the tool check your file for any sort of data issues
How to fix QuickBooks failed to open files error?
If you are unable to open the company file in QuickBooks, then the steps below might help. 1. Make sure to update QuickBooks and also check your file type 2. Don’t save the desktop when you close QuickBooks 3. Turn off hosting on workstations 4. Open a sample company file 5. Or move a company file to another location
How does a QuickBooks file get corrupted?
Often a QuickBooks data file can get corrupted due to several reasons. These include hardware or software issues, abrupt system shutdown, network connection errors, large file size, virus/malware attack, etc.
The demands of the industry have taken a great leap with advancement in the technology. This advancement has caused various updating in accounting process as well. Thus, for an organization, it is essential to use accounting software in order to bring accurate and quick results. Used by small as well as medium sized businesses, QuickBooks is a widely used and popular software that has many features like payroll, accounting, restoring and many more. But it is prone to many errors and this kind of errors can be easily cope up with QuickBooks file doctor. This file doctor tool helps to heal and repair the damages that happen to QuickBooks and its company file. In this blog we will discuss about QuickBooks File Doctor is not working Problem.
QB file doctor tool (QBFD) is an application that is offered in integration with QuickBooks. Taking care of all the data repairs, this doctor diagnoses files and repairs all the issues that your system is facing. This is a very useful application but the disaster is on its way if your QuickBooks file doctor is also not working.
Error of ‘File Doctor Not Working Appears’
If your application is hanging due to some repair procedure, then QB file doctor may stop. This stoppage depends on the size of your and its location. This simply indicates that the file has been corrupted and to resolve this error, we need to fix the QBW file.
Steps to Fix QuickBooks File Doctor is Not Working Error
Considering the application looks after QuickBooks errors, it can be a life saver in many situations. Just what would an user do if the file doctor application itself stops functioning? Think of a situation where your QuickBooks file is dealing with errors, you try to introduce QuickBooks file doctor however it does not start. Just how should you tackle such a circumstance? In that case, there are few steps as given below.
Solution 1: Manually launch QuickBooks file doctor
This can be done by following the steps below
Launch QuickBooks file doctor and wait until the screen shows a pop-up of ‘No Company Open’
Then go to Files> Utilities> Click on Repair File and Network Problems. This will lead to the opening of a dialog box.
Click OK. After this, the application is started by QuickBooks file doctor with the rights of an administrator. In the dialog box, click on Yes.
There will be a wrench icon to open the QuickBooks file doctor application. Click on Continue.
Enter your credentials and log into your file. This will start the QuickBooks file doctor to work on repairing your file.
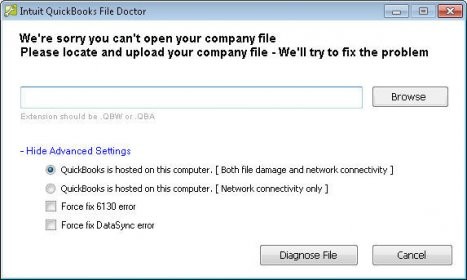
Choose ‘File Diagnosis Only’ from the option of Advanced Settings.
Click on Next.
Once the system prompts, open the file and check if any issue still persists.
Solution 2: Restore the Backup of the damaged Files
Follow the 2 quick steps in order to solve the file doctor not working error.
Restore all the backup of the damaged file: This will help you replace the damaged file with the one that has backup.
Here’s how:
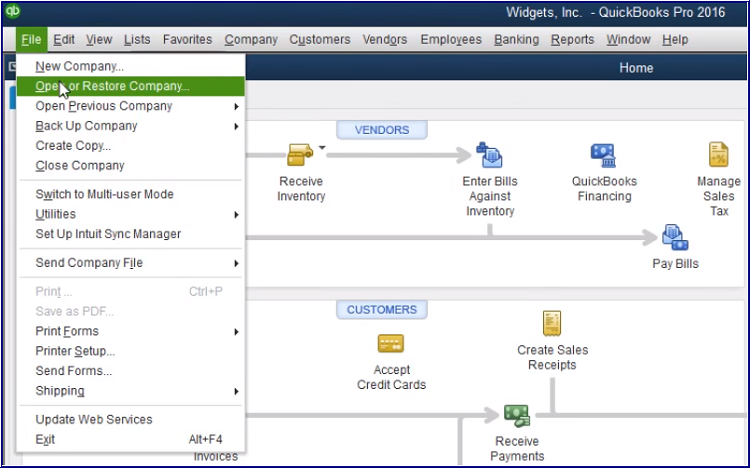
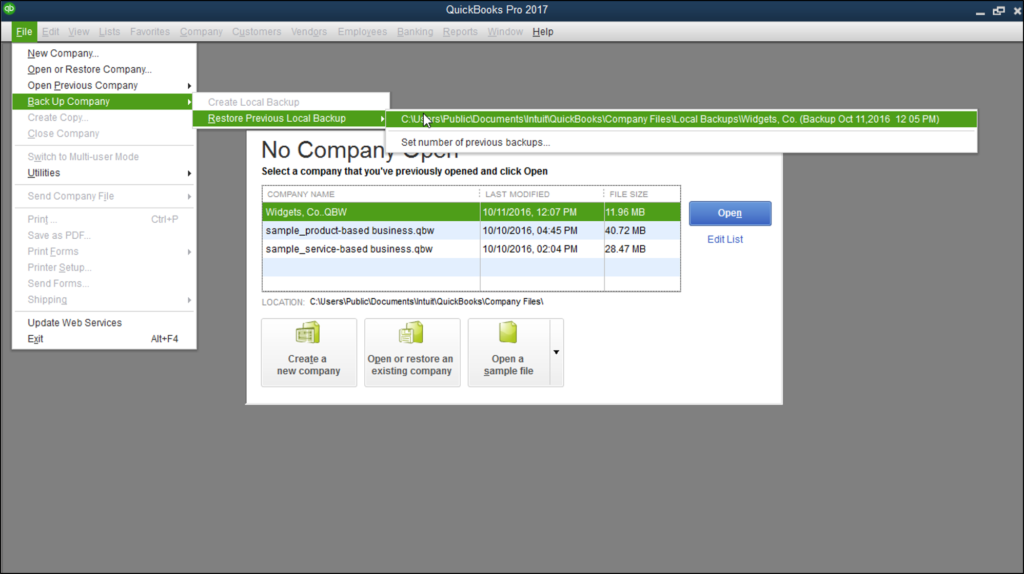
Launch QuickBooks, go to File and click on Open or Restore Company.
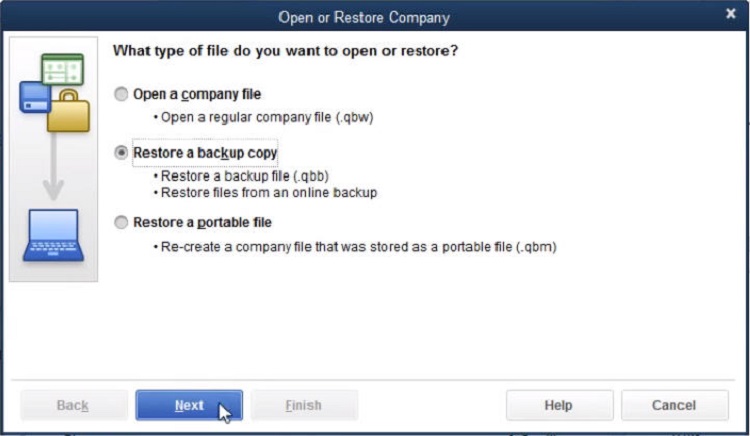
Click on Next.
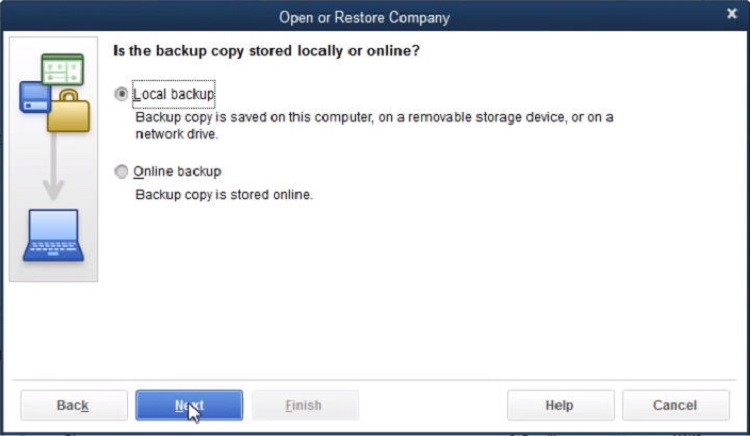
Now click on Local Backup and then, click on Next.
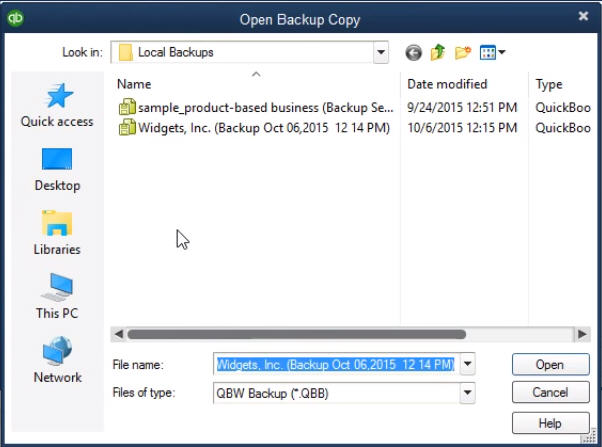
In the ‘Look In’ drop-down menu box, go to the location of backup file.
Choose the backup file with .QBB extension and then click Open.
After this, click on Next.
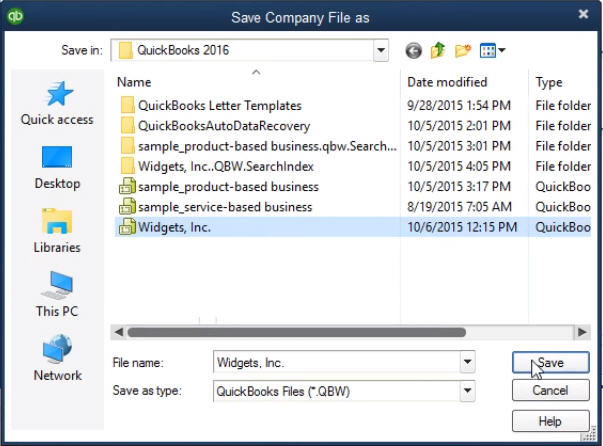
There will be a Save In drop down menu, in that, go to the place where you want to restore the file.
Then save the file with the name as desired. It will automatically take as *.QBW
In case you find that the above method does not work, then you can switch to the next option:
Auto Data Recovery Option: As soon as your file is created, QuickBooks Auto Data Recovery (ADR) will start examining and analyzing your file. Once ADR is ensured that the file has no errors, it will save a copy as a backup in ADR folder. And this will continue. After every 12 hours, ADR will take a backup of your file.
Common File Doctor Not Working Error Messages You might see:
You May See One of the Error Message on Your Computer Screen When QuickBooks File Doctor Not Works for you or shows errors. If you are facing Similar Questions mentioned below, you can try the steps mentioned above to fix your problem.
QuickBooks File Doctor wont Open
QuickBooks File Doctor Not Working
QuickBooks File Doctor Hangs
QuickBooks File Doctor Hosting Mode Is Off
QuickBooks File Doctor Blank
QuickBooks File Doctor .net Framework
QuickBooks File Doctor Not Responding
QBFD.msi error in QuickBooks
QuickBooks File Doctor File In Use
QuickBooks File Doctor Fails
QuickBooks File Doctor Has Stopped Working
QB File Doctor Not Opening
What Are The Areas That QuickBooks File Doctor Can Fix
QuickBooks File Doctor Network Connectivity Greyed Out
QB File Doctor Check Network Connectivity Grayed Out
QuickBooks File Doctor Repairing Company File Login
QuickBooks File Doctor Stuck On Checking Connectivity
I hope you find this article about file doctor not working helpful. The above given tips & tricks will keep your QuickBooks data and program safe while the QuickBooks file doctor isn’t working or hanging up periodically. As we all know that the prevention is better than cure. Above given all the procedure is quite easy to understand!
What is QuickBooks File Doctor, and how does it work?
QuickBooks File Doctor is a tool that helps fix common QuickBooks errors related to company files, network connectivity, and multi-user access. It diagnoses and resolves issues automatically, making it easier for users to get their QuickBooks running smoothly again.
I am having trouble using QuickBooks File Doctor. What can I do?
If you’re having trouble using QuickBooks File Doctor, there are several things you can try. First, make sure you have the latest version of the tool installed. You can also try restarting your computer or running the tool as an administrator. If none of these solutions work, you can contact QuickBooks support for further assistance. Our toll-free number is +1-888-510-9198.
Can QuickBooks File Doctor help me recover lost data? Keywords: recover, lost data
QuickBooks File Doctor can help you recover lost data in some cases. However, it is not a guaranteed solution, and it may not be able to recover all of your data. To increase your chances of recovering lost data, it’s a good idea to back up your QuickBooks company file regularly.
Why is QuickBooks File Doctor not working on my computer? Keywords: not working, computer
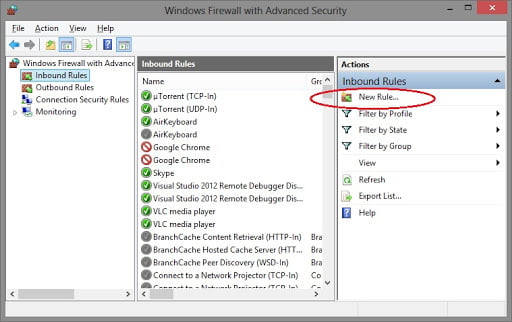
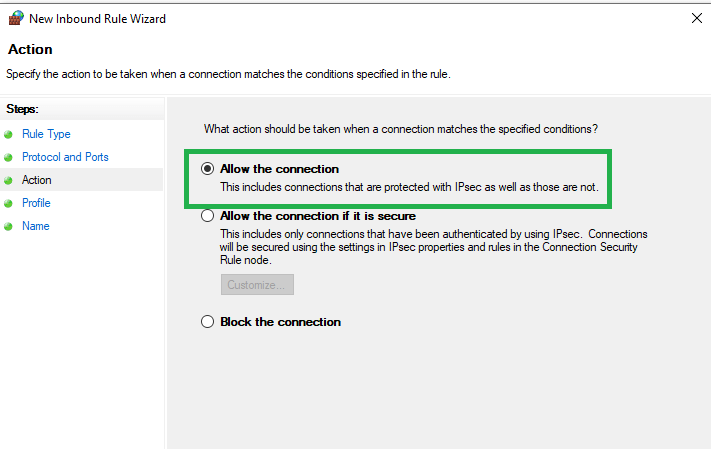
There are several reasons why QuickBooks File Doctor may not be working on your computer. One common issue is a firewall or antivirus program blocking the tool from running. You can try disabling your firewall or antivirus temporarily and see if that resolves the issue. You can also try reinstalling the tool or contacting QuickBooks support for further assistance. Our toll-free number is +1-888-510-9198.
Can QuickBooks File Doctor fix all QuickBooks errors?
QuickBooks File Doctor can fix many common QuickBooks errors related to company files, network connectivity, and multi-user access. However, it may not be able to fix every issue you encounter. If you’re still having trouble after running the tool, you may need to contact QuickBooks support for further assistance. Our toll-free number is +1-888-510-9198.
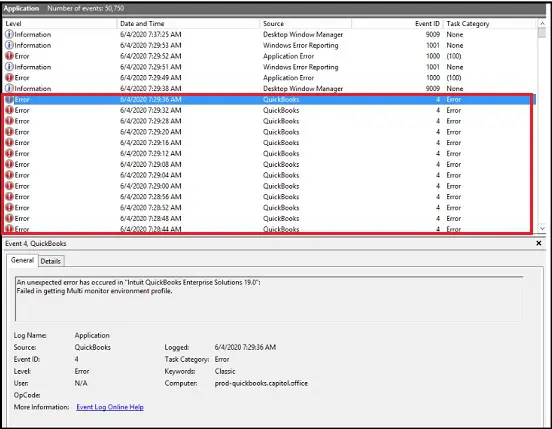
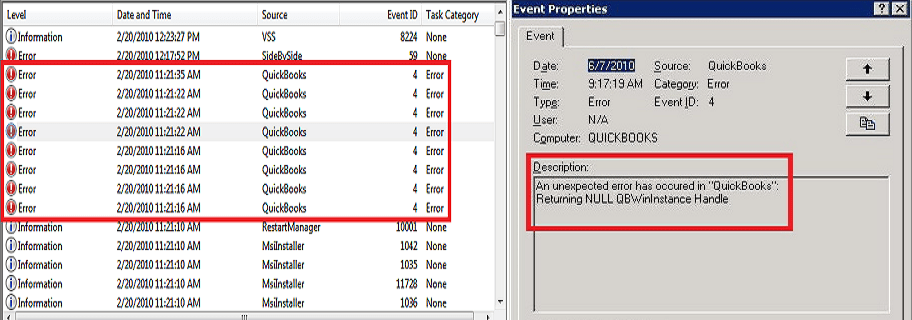
Learn how to fix QuickBooks EventID 4 – An Unexpected Error has Occurred in QuickBooks: Returning NULL QBWinInstance Handle
This article is related to troubleshooting of QuickBooks error “EventID 4 – An Unexpected Error has Occurred in QuickBooks: Returning NULL QBWinInstance Handle”. As we know QuickBooks is the best accounting software program that is widely used for small or large business entrepreneurs. This software has many advanced features in QuickBooks which help entrepreneurs to manage their accounting with ease.
However, a few QB users deal with some error messages sometimes. In this blog, we are going to discuss about one of the most common errors i.e. ‘QuickBooks EventID 4‘. Let’s review this error and know the possible steps to solve this error.
QuickBooks Event ID 4:
An unexpected error has occurred in QuickBooks: Returning NULL QBWinInstance Handle.
Description
Event ID 4: An unexpected error has occurred in QuickBooks WPR: calling ABORT_CLOSE
Description
Returning NULL QBWinInstance handle
Problem
An unexpected error has occurred in QuickBooks WPR: OpenPrinter call failed
Description
Integration Manager couldn’t connect to QuickBooks. Please make sure that it is open: when it takes place.
Description
An unexpected error has occurred in QuickBooks WPR: SetNameDriverAndPort call failed
Event ID 4:
An unexpected error has occurred in QuickBooks WPR: validation failed
To learn further about QuickBooks Event log Error 4, make sure to read this segment carefully, or you can further get in touch with our tech support team at +1-888-510-9198, and we will provide you with the required assistance immediately.
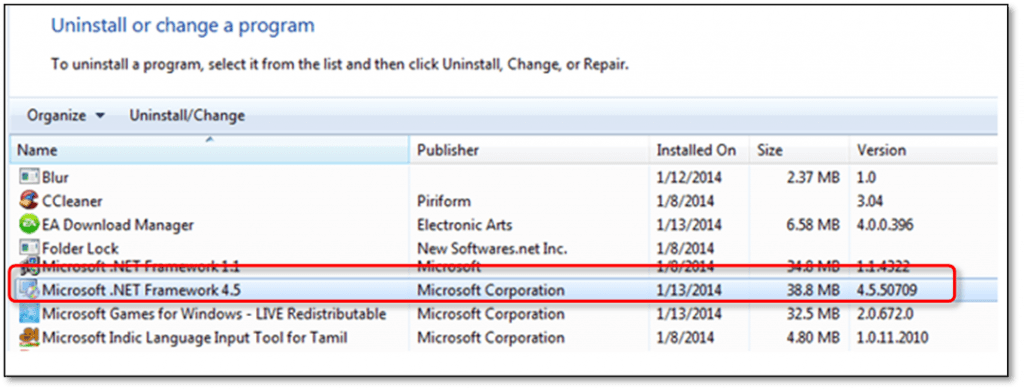
First of all, you need to Press the Windows + R keys together at the same time. This will open the Run window on your system.
After that type appwiz.cpl in the Run dialog box.
Now Press Enter key, on your keyboard.
There is an option to Add/Remove all programs, under the programs and featured list.
Locate and click on the Microsoft.NET Framework 3.5 or later versions.
Choose the Uninstall option. (Note: This will take 1-2 minutes to uninstall the program).
Once the uninstall process is completed restart your system once.
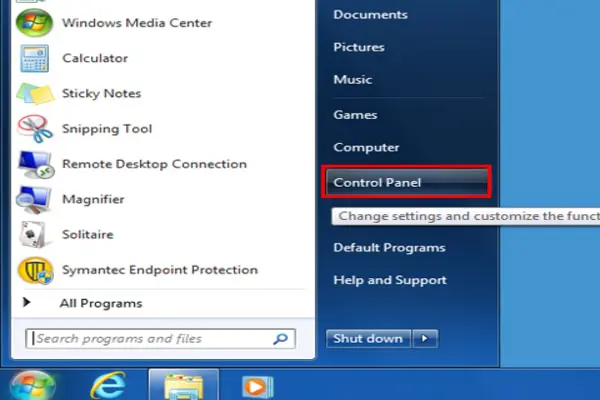
When restarts are completed you have to repeat the step 1 to open the Run windows on your system.
Type Control Panel to open the control panel.
Now you will see the Add/Remove programs or Programs & Features window.
There is an option to Add or Remove Windows Features that is located on the left-hand side of the windows.
Now click on the Add or Remove Windows Features option.
From the list of programs click on Microsoft .NET Framework to expand.
Check-mark the first and second boxes.
Press OK.
(Note: Microsoft .NET Framework installation will start after clicking on the OK button)
Click on the finish button once and the whole task is over.
Once the installation is successfully complete for Microsoft .Net Framework 3.5, just restart your system and open QuickBooks Integration Manager once again.
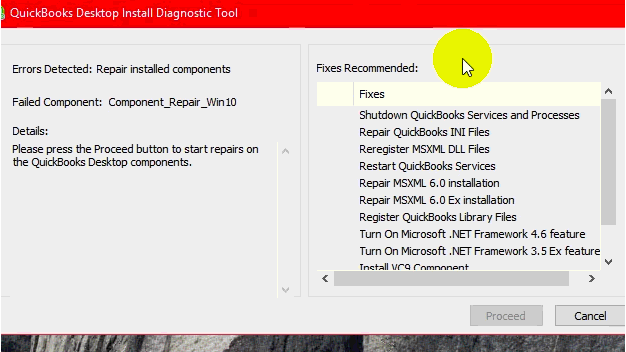
Solution 2: Run QuickBooks Install Diagnostic Tool
quickbooks event log error 4 is a unique error that isn’t experienced commonly. However, we believe that reading the above segment might have helped you in some way to get rid of the event log ID error 4 successfully. However, if you have any issues or queries, you can reach out to our team of certified ProAdvisors using our QuickBooks error support number i.e. +1-888-510-9198. We are always ready to provide flawless services that suit your business.
Frequently Asked Questions!
What is QuickBooks Event Log Error 4?
QuickBooks Log 4 error is a technical error in QuickBooks that appears due to a corrupted .NET Framework.
In which QuickBooks desktop versions, the Event id 4 error occurs?
The Event ID 4 error typically occurs in the following versions of QuickBooks: QuickBooks Desktop 2018, QuickBooks Desktop 2017, QB Desktop 2016
What error messages appears when QuickBooks Event Log ID error happens?
When a QuickBooks Event Log ID 4 error occurs, you may see one of the following error messages: 1. “An unexpected error has occurred in “QuickBooks”: Returning NULL QBWinInstance Handle” 2. “Unhandled Exception Caught! Exiting application…” 3. “QuickBooks has encountered a problem and needs to close.” 4. “Exception in the file [path and filename]” 5. “Application has generated an exception that could not be handled”
How can I fix Error 4 in QuickBooks?
This error can be fixed by performing the below-given methods: 1: Repair/Reinstall.NET Framework. 2: Run QuickBooks Install diagnostic tool. 3: Run the Quick Fix My Program feature. 4: Clean Install QuickBooks.
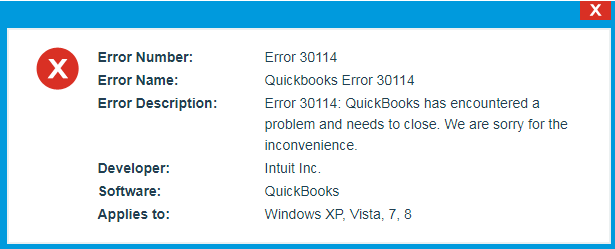
QuickBooks is highly renowned accounting software used by both small and middle sized organizations. But sometimes, it faces some technical issues and errors so through this blog post we are going to explain you about one of the most common error code that is ‘QuickBooks Payroll Error 30114‘. When this error occurs, a message pop ups on your screen in the middle of the program installation and this can happen while shutting down of Windows, or amid the operation system of windows installation.
The Error Code 30114 appears during the download or installation process. Once you know the reason, you can follow the below steps to fix QuickBooks Payroll Error 30114. You can also take instant help from our QuickBooks Error Support team to save your valuable time and efforts.
It has been suggested that the steps given below should be followed in ascending order as to avoid the steps being more troublesome and tedious.
Method 1: Create a backup file of the QuickBooks related registry section
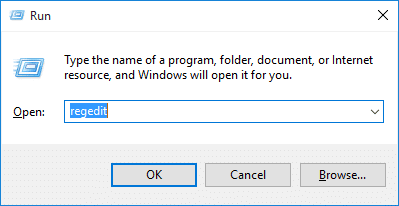
Click on the ‘Start‘ menu.
Enter command in the ‘Search‘ button
Hold the ‘Ctrl + Shift‘ and press ‘Enter‘ now.
Furthermore, You will see a permission window dialog box.
Also, click ‘Yes‘
A black window with squinting cursor will appear
Enter ‘regedit’ and press ‘Enter‘ button
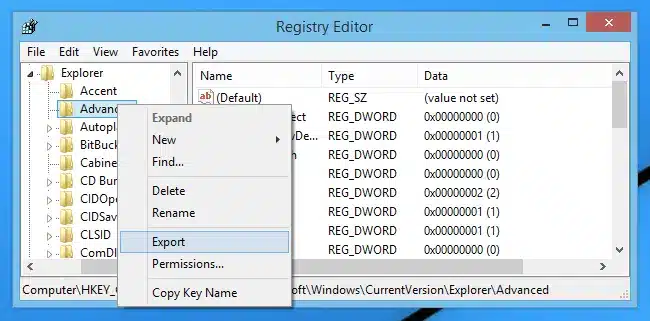
Choose the Error 30114 – associated key (you need to back up) into the ‘Registry Editor‘ window
From the ‘file menu‘, choose the ‘Export‘ button
Now choose the desired folder in order to save the backup key of QB
Now, enter the name for the backup file in the file name window
Ensure that ‘Selected Branch’ is marked into the ‘Export Range‘ window.
Click on ‘Save‘.
The file will be saved with a ‘.reg file‘
Now you will get the backup of the QB-related registry section.
Method 2: Perform a Clean Malware Scan of your system
Following this, do a complete malware scan of the computer. If you find that there is a malware infection on the computer, then you shall do a quick scan.
Later that, follow these steps:
Clean the ‘System Junk files‘
Update the ‘System Device Drivers‘
Use ‘Windows System Restore‘ and ‘Undo the Recent changes‘ of the system
Moreover, uninstall the QB and install the Program related to the ‘Payroll Error 30114‘
Also, run the ‘file checker‘
Install all the ‘Windows updates‘ that are available in web.
Finally, Perform a Fresh Windows Installation.
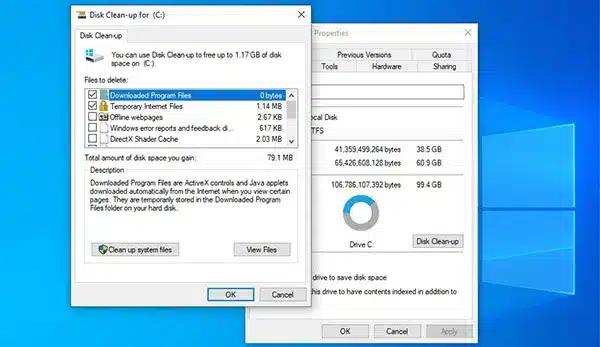
Method 3: Delete Junk files
At times junk files can trigger some sort of issues in QuickBooks. The steps involved in eliminating the junk files are as follows:
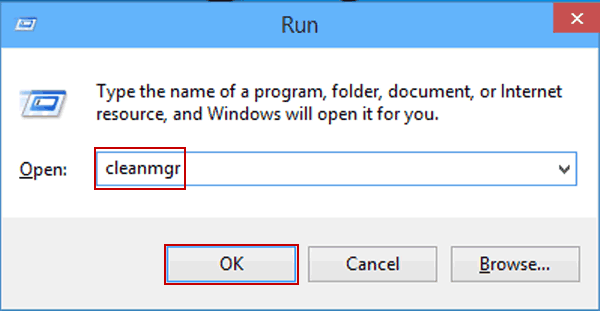
The very first step is to press win + E to open file explorer
Now, when the explorer window is displayed, then move to my computer
Also, right click the C drive and head to properties
Inspect the free space
Check if the space available is a minimum of 2.5 GB as it is mandatory for QuickBooks
Also, move to the disc cleanup using the directions
Press windows + R to show the run window
Now, write cleanmgr in the run window and click on enter tab
Sometimes a mere reinstall doesn’t work, so it is suggested to clean install QuickBooks. The below set of steps can be performed in clean installing QuickBooks. Let us have a look:
The very first step is to move to the control pane and then head to the programs and features
Once done with that, look for the QuickBooks desktop and click on uninstall tab
Re-install the QuickBooks application and see if the error vanished.
Install the software either through the installation disc or through the .exe file, downloaded from the Intuit website.
Winding Up!
We hope you find this article helpful. If you find any issue while following the above steps, you can connect with us through our QuickBooks payroll technical support team or you can call our experts on our toll-free i.e. +1-888-510-9198. Our Intuit Certified ProAdvisors will look forward to your concern and provide you feasible solution for your concerns.
FAQs -QuickBooks Payroll Error 30114
How do I fix payroll error in QuickBooks desktop?
The steps to fix the payroll error in QuickBooks desktop. 1. Click the Help menu. 2. Furthermore, choose About QuickBooks . 3. Press Ctrl + Alt +Y on your keyboard, then click on Next. 4. In the Employee Summary Information window, select the employee that was underpaid. 5. Also, Double-click on the employee’s name. 6. Review the YTD Adjustment details. Click Ok.
How do I fix error 1304 in QuickBooks?
The problem can be fixed by copying the installation folders from CD to hard drive. Now, install QuickBooks from files copied from CD to hard drive. This would aid in resolving the error.
How do I fix QuickBooks payroll error 30114?
The user can try fixing the error using the below steps: Solution 1: Create a Backup file for the QuickBooks. Solution 2: Go for a System file check. Solution 3: Utilize the Disk Clean-up Tool to delete all the junk files. Solution 4: Update the System Device Drivers.
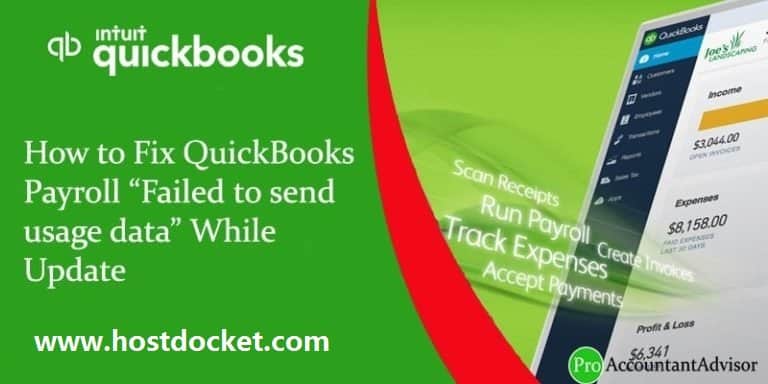
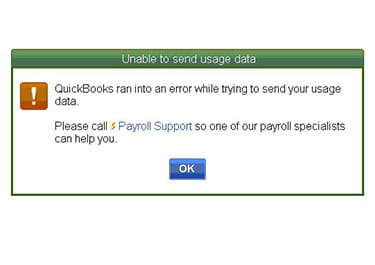
QuickBooks is financial software that is installed into the system and customizes all the accounts in a systematic schedule. However, a few QB users have reported certain technical glitches at the time of updating the payroll. Today’s article is going to be all about QuickBooks Payroll Error: ‘Failed to send usage data’ at the time of updating QuickBooks desktop. We will be discussing the causes and troubleshooting steps to the error.
This error occurs due to the incorrect time zone of desktop or you have created Accountant’s copy. Here we are going to share some easy and quick methods to fix this error. Once you follow these steps you can easily fix this typical error code by your own.
Steps to Fix Error ‘Failed to send usage data’ while update
Follow the below methods to resolve error: failed to send usage data in QuickBooks. However, if you are looking for instant help then contact our QuickBooks payroll customer service team that will look forward to your concern and provide you a feasible solution. Our U.S based technical advisors are available 24/7 to provided you perfect solution for your problems.
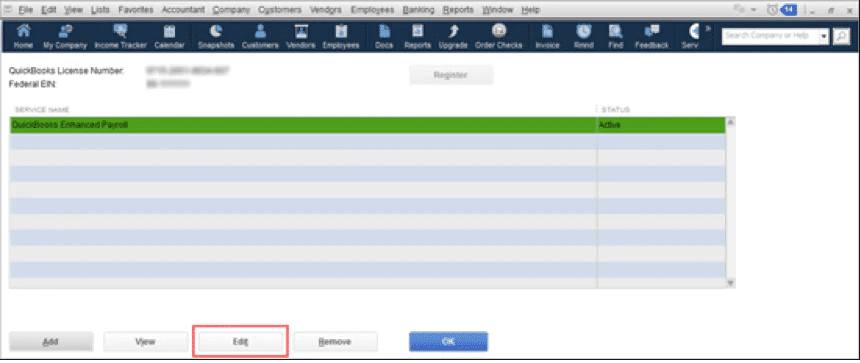
Solution 1: Edit Your Payroll Service Key
First Method that Resolves this issue as promptly:
Go to the employees section and then select My Payroll service option. After that, select manage your Service Key.
Now click to the edit option, then go to next step and check your dialog box on as Open Payroll Setup and hit the finish tab. This will send your service key button and make it as to activate.
After that go back to main setting page.
To do so this, select to go employees and then click on My payroll service option. Then click on send usage data tab. If above method fail to fix this pitfall, then try second method & ready to perform it in as professionally.
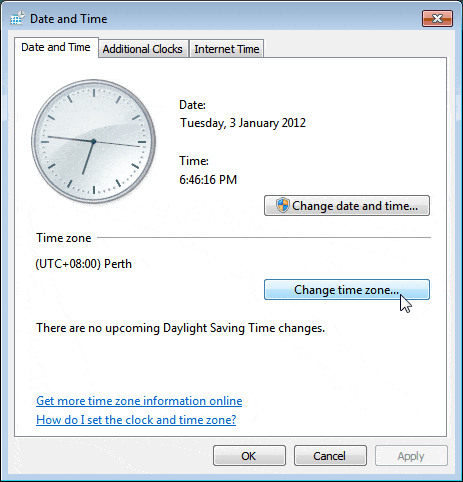
Solution 2: Check the date & time of the file location in your System
In Windows 7:
If you are a Windows 7 user, you need follow the below points as described here:
First of all, open your computer system and double-click on the date and time icon and change the date and time. (Note: You can see the date and time option on the bottom of the screen)
If you are unable to change the date and time from your system, then go to Start option and click on control panel.
Here you need to select the clock, language or region option to change the date and time. (Note: Here you can see two more option date and time settings and region and language)
Now click on the option to change date and time settings.
After that on the Date and Time button, the user is required to click on the Change date and time button.
Followed by selecting the current date and time, and hit OK key button.
If you want to change the order of a time zone then you can easily click on the change time zone button as shown on the screen.
Give a click on the time zone as scroll down in the drop-down arrow keys by using the system keyboard.
Then the user is supposed to choose it as the correct time zone.
If the user is present in a daylight-saving time zone, then hit the Automatically modify clock for Daylight Saving Time tick-box.
After this, you need to click on the OK key button and then click to the OK option as it again.
After that, verify the time and date are correct in the system or not. If not, ask expert advice by connecting to our techies that have great skills in deploying extreme services.
In Windows 8:
If you are a Windows 8 user, you need follow the below points as described here:
First of all, open the Control panel option.
And then hit Clock, language, Region heading.
The next step is to click on the set date & time, that is present under the heading date & time settings tab.
Moving ahead, the user is required to click on to change the date & time button, in a new date or time tab.
After that, the user is supposed to correct date as well as time and hit OK.
The last and final step is to verify the correctness of date and time.
Solution 3: Ensure if there exists an Accountant’s copy
In case the Date and time are absolutely correct, then it is recommended to toggle the time zone (correct, wrong, correct) by following the simple steps listed below:
Coming to the third solution, in case an Accountant’s copy exists, the user is supposed to remove the restrictions manually, or he/she can wait until the accountant’s copy is returned. But still do not forget that when the user is removing accountant’s copy, he/she needs to verify with the accountant.
After that, the user is required to send the data to Intuit.
The next step is to delete all the online transactions, if the error continues to grow.
Now the user is supposed to click on Edit option from top menu bar
And then the user should press CTRL+F key
Moving ahead, click on the Advanced tab.
And then in the Filter box, the user is required to carry out the following steps:
Visit the drop-down menu, and select the filter Detail Level and then select the Summary only.
After that the user is supposed to move to the drop-down menu and then choose the filter Online Status also choose Online to send.
The next step is to move to the drop-down menu and then select the filter Posting Status also select Filter option.
Coming to the end, the user is required to hit Find button from Find screen.
Followed by, reviewing the results:
If the user detects any non-payroll transaction, then he/she needs to complete the processing.
And if the user finds the paychecks, then removing them the very next moment and then making an attempt to send to Intuit again is the only option that the user should follow. If it is done successfully, then the user needs to recreate the paychecks.
Solution 4: Download Payroll Updates in Safe Mode
The very first step is to shut down your computer.
And then, start the system in the Safe mode.
Press F8 key repeatedly. This will show the Advanced Boot Options.
After that download the QuickBooks Desktop Payroll updates.
Now, reboot your computer in Normal mode.
Download updates now
Solution 5: Reset the settings of the Internet Explorer Browser
The user needs to first open the Internet Explorer browser.
Go for Tools menu that is 3 dots on the right side of the window.
The next step is to click on the Internet Options.
Hit the Advanced tab.
Pick the Restore Defaults or Reset option.
Click on the Apply button to apply all changes.
Hit ok and close tabs respectively
Solution 6: Repair QuickBooks Desktop Software
The first step is to open the Control Panel.
Click on the Programs or Programs and Features option.
A list of programs will appear on the screen
Go for QuickBooks.
And then, right-click on it to choose Uninstall/Change option.
Click on repair tab
Open the QuickBooks software and check if the issue is resolved or not
Solution 7: Install Digital Signature Certificate
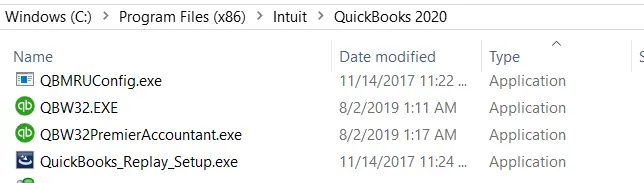
Start with opening C: Drive and move to Program Files/Intuit in Windows Explorer.
Go for QuickBooks from the list of options.
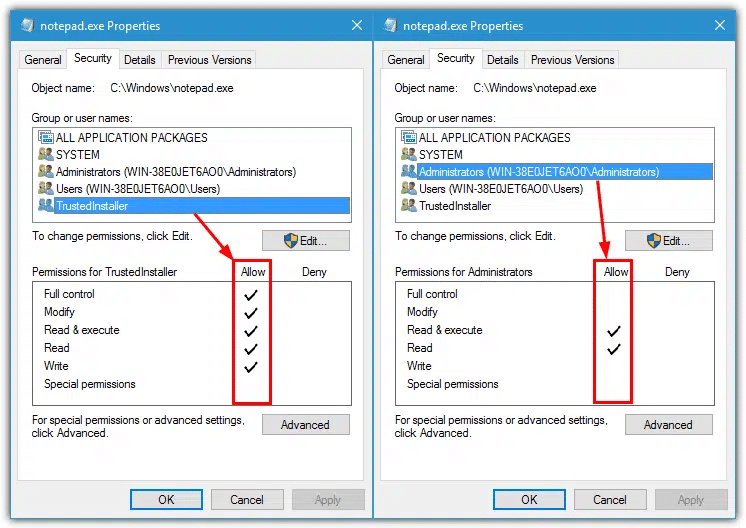
Choose Properties by right-clicking the QBW32.exe file.
Select the Digital Signature tab from the menu
Check to see if intuit is selected in the list of signatures.
Now, select the Details option.
Go for the View Certificate option.
Under the certificate box, select the Install Certificate option.
Click on next tab again and again till the final page shows up on your window desktop.
Now, go for the finish tab.
Reboot the system and open QuickBooks and also update the payroll software
With this we conclude our article, and also hope that the above stated information will help the users to fix Error – QuickBooks Payroll “Failed to send usage data” while update.
However, if the problem still persists then the user can seek for technical guidance and help from accounting experts. You can dial our toll-free i.e. +1-888-510-9198. Feel free to connect with our QuickBooks support technicians that are available 24/7.