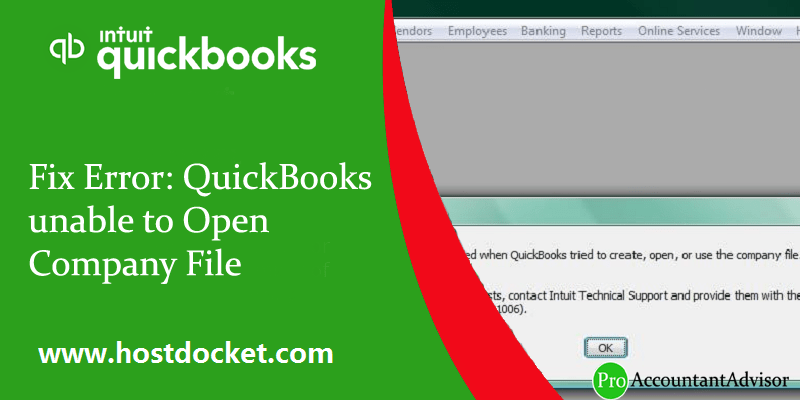
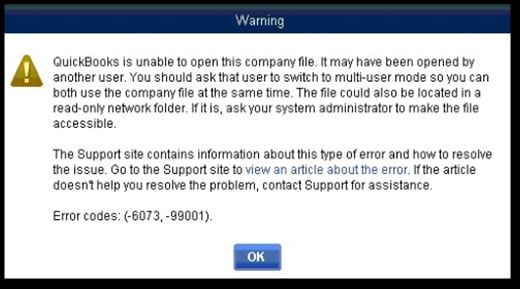
QuickBooks is an extraordinary software that allows entrepreneurs to manage their accounting activities and other business tasks. At times, this amazing software might come up with certain glitches as well. One such error is QuickBooks unable to open company file. Well, it is very much frustrating when the QuickBooks user is unable open the company file. If you are also facing similar issue, then there is no need to panic, as this article is there to rescue you. In this article, we will be discussing the facts related to this error just like, the triggers, symptoms, rectification, etc. A quick fix to this error can be consulting our 24X7 QuickBooks Support team at our toll-free number, .i.e. +1-888-510-9198.
Why does QuickBooks Company file can’t open error occurs?
The error QuickBooks unable to open company file can be caused due to several factors. Before exploring the troubleshooting steps, it is very much important to first find out the actual reason behind it. The reasons include:
The very first reason can be issue with the file location and extension.
Another reason can be corrupt hard disk.
In case the same file is opened on a shared network, the user might encounter this type of error.
If the user applies incorrect methods to open certain files.
Issue with reports in the file might end up in such errors.
Damaged QuickBooks Company files can be another factor that triggers such errors.
Troubleshooting Error: QuickBooks unable to Open Company File the error
Now as you have explored the causes, symptoms, error messages, as well as the safety measures, it is time to find out the ways to get rid of the error QuickBooks unable to open company file. In order to rectify this glitch, the user has a few available options. We will be discussing each of the solution and the steps to be followed in each of the solution. So, without wasting much time, let us begin:
Process 1: Open the file directly from the QuickBooks
To begin with, press and hold the ‘Ctrl key’, at the time of double-clicking in the QuickBooks icon.
The next step is, until no window QuickBooks file open, the user should not let go the hold key.
Moving to the next step, once the QuickBooks program opens up, the user is required to ensure that only a single computer is hosting the company file. In case more than one system is hosting the company file, then close down the other servers that open the company file.
Now, the QuickBooks user has to turn off the hosting in other computers by following the steps enumerated below:
For single-user:
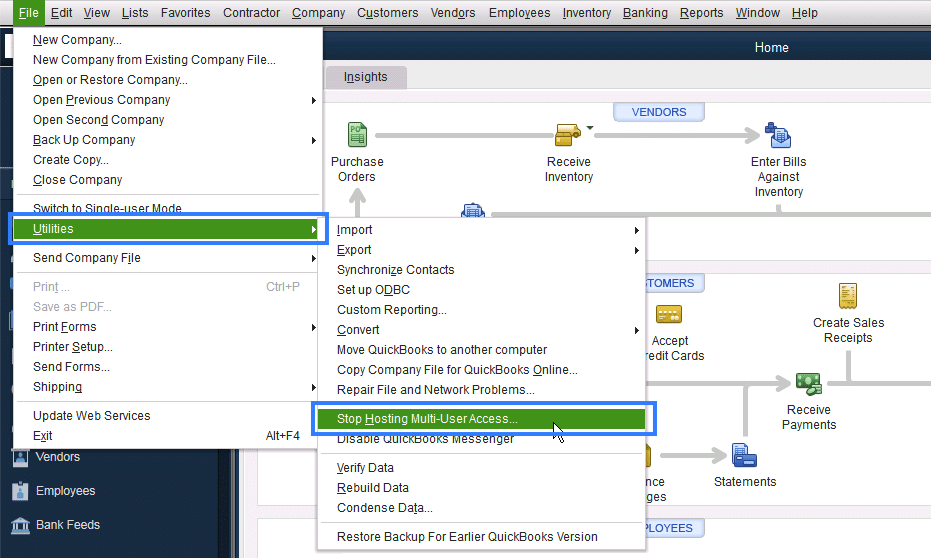
The first step is to go to the ‘File‘ and then click on the ‘Utilities‘ and then click on the ‘Stop hosting multi-user access‘.
At the time when the user follow the above step and stop hosting the multi-user access, a message will appear on the screen, and on that the user is required to select ‘Yes‘.
Once the company file is closed, a message will appear on the screen, on which you have to choose for ‘Yes‘ and you are good to go.
For Multi-user:
This error message generally displays on every client computer.
Now, the user is required to visit the ‘No Company‘ window, and then select the file, followed by selecting the ‘Utilities‘ option.
Once done with the above step, the user can confirm that the menu option of the host multi-user access is displayed. It should be noted that one or more than one client computers can display the menu options on the screen. The client computers prevent hosting multi-user access, that indicates that they are already hosting multi-user access.
Now, choose the ‘Option‘ to stop multi-user access hosted on any client computer, display hosting of ‘Stop multi-user access‘, and then the user is required to follow the prompts to stop the hosting.
The last step is to try to open the problem file again, after which the log-in window would appear on the screen.
Process 6: Preventing the automatic opening of QuickBooks Windows
The very first step is to go to the ‘No Company Open Window‘.
After that, ‘Find the company file‘.
The next step is to press and hold the ‘ALT‘ key.
Once done with that, tap on ‘Open‘,
Once you have opened the company file, then carry out the steps below:
First of all, go to the ‘Edit‘ menu.
After that, click the ‘Preferences‘ option.
The next step is to select the ‘Desktop view‘.
And then, click on the ‘Don’t save‘ the desktop option.
The last step is to click on ‘OK‘, and you are good to go.
Process 7: Troubleshooting the Installation
The user should move the company file to a different system, and then try to open it there, and if the file works on that system, then the issues lies in your system or QuickBooks desktop original installation. In such cases, you can do the following:
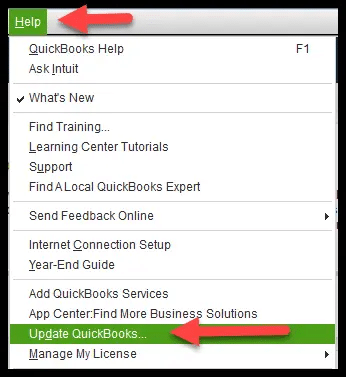
Here, the user needs to download the most recent version of QuickBooks tool hub
And then, save the file where it is easily accessible.
Open the previous file
Now, perform the onscreen steps to install and agree to the terms and conditions
Now, double click the icon on the windows desktop for the purpose of opening the tool hub
Select company file issues tab from QuickBooks tool hub
Run QuickBooks file doctor tab
This might take some time, then launch the file manually
Choose the company file option from the drop-down menu in the tool
In case you are unable to find it, choose the browse option
Choose check your file option and click on continue tab
Enter the admin password and hit next tab
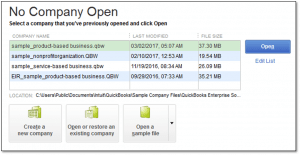
Process 9: Open a sample company file
The very first step is to head to the windows start menu
And then, type in file explorer and open the same
After that, find the QuickBooks.exe file and you can find this file in the QuickBooks folder
Find the file then hold the ctrl tab and double click on the QuickBooks.exe file
Don’t release the ctrl tab until the QuickBooks software doesn’t open completely
Choose QuickBooks from the desktop and click on the ctrl until QuickBooks opens
The last step is to choose to open the sample file
In case the sample file opens normally, then this indicates that there are issues with the company file. Fix the issue through the QuickBooks tool hub and then run the Quick fix my program.
Process 10 : Turning off the hosting on workstations
In case you are using the QuickBooks application in single user mode or the company file is not hosted on any network, then this step can be skipped. The user can try performing the steps below:
The user needs to first open QuickBooks on any one of the workstations
And then, open the company file and head to the files from the top menu bar and then choose the utility tab
The next step is to check if host multi user access is available in the options. If yes, then head to the next workstation
Or if you see stop hosting multi user access, then click on it
And perform the same steps on all workstations
Now move to the server computer
Open the QuickBooks application on the server system
And then click on the file menu and choose the utility tab
If you see the host multi user access option and choose it
Head to the file menu and choose utlities and choose stop hosting multi user access
Click on the file menu and head to utility tab and choose host multi user access option
Process 11: Turn off the save when closing feature
The user needs to first open QuickBooks desktop
After that, move to the no company open window and select the company file
Press the alt tab and choose the open option
Don’t release the alt tab and wait till the company file is not open
After the company file is opened, turn off the save when closing feature. This can be done by performing the steps below:
The first step is to choose on edit tab and also select the preferences tab
The next step is to click on desktop view tab
Choose the don’t save the desktop and save it
Lastly, close the QuickBooks and open it and try opening the company file
Winding Up
With this we come to the end of this article, and also we hope that these methods will help in tackling it.
However, if you are a new user and unable to get rid of the error even after following the above steps, then you can consult our QuickBooks enterprise support team by dialing our toll-free number .i.e. +1-888-510-9198.
FAQs-QuickBooks unable to open company file
How do I restore company file in QuickBooks?
To restore company file in QuickBooks, one simply needs to right-click the file or folder, and then choose Restore previous versions. A list of available previous versions of the file or folder will appear. It will also include files saved on a backup as well as restore points, if both types are available.
How to fix company file in QuickBooks?
Fix the company file issues or the company file in QuickBooks using the steps below: 1. Move to the File menu 2. Hover over Utilities and choose Rebuild Data. 3. On the QuickBooks Information window, choose OK tab. 4. Let the tool repair your file. 5. After the tool finishes, choose OK. 6. Head to the File menu. 7. And let the tool check your file for data issues.
How to open QuickBooks without opening company file?
To open QuickBooks without opening company file, you need to press and hold the Ctrl key. After that, double click your QuickBooks program icon. And, hold the Ctrl key until you have the no Company Open window.
QuickBooks Error 108 is a banking error that can be seen when there are some technical issues or due to banking problems. If you are also facing such error, then this article might be helpful to get rid of this error. It is simply a banking error that shows up when any particular user checks online banking in QuickBooks self-employed and QuickBooks online versions. This particular error notification states that there is an intimation from the credit card or bank’s website. This information is basically in regard to the update or connection issue with QuickBooks.
We have come up with this article, with an aim to troubleshoot this error and also find out the real causes behind the same. Thus, if you want to explore the troubleshooting steps, then stay tuned to the article until the end. However, you can contact our QuickBooks online support team anytime to save you time and effort. Give us a call at +1-888-510-9198, and we will provide you with instant support and guidance.
Well, after exploring the symptoms and causes, it is now time to learn the quick fixes to Error 108. Let us have a look at the methods one by one:
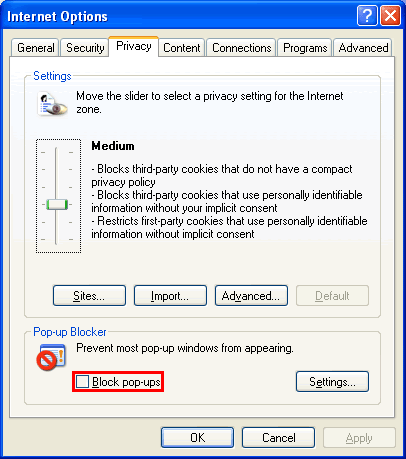
Solution 1- Disable the Pop-up blockers
The first step is to ‘login into the website‘ of the bank or financial institution.
Now, go through all the notifications or messages. In case the user is unable to read the messages, then the pop-up blocker might be the reason. Thus, disable it and then also check the messages.
The next step is to act on the messages or dismiss them.
Once done with the above steps, the user is required to ‘visit QuickBooks Online‘.
Moving ahead, the user should visit the menu on the left side and then select the ‘Banking‘ option.
Now, the user is required to tap on ‘Update‘ on the Banking page.
Lastly, the user is required to check if Error 108 QuickBooks is appearing.
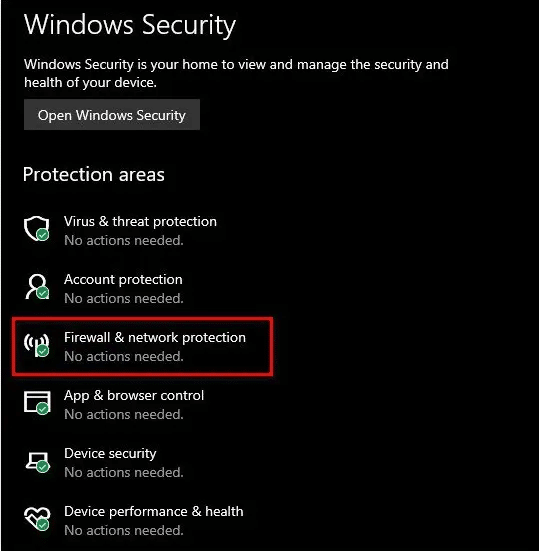
Solution 2- Checking the Firewall settings
To begin with, login to the computer as an administrator.
The user is required to ensure that he/she is using the latest version of QuickBooks and also make sure it is up to date.
The next step is to verify the Firewall settings, to ensure that it doesn’t block access to QuickBooks company file.
Now moving forward, check the internet security settings.
The above-discussed are the five of the solutions that can be used to do away with the QuickBooks Error code 108. The QuickBooks user can prefer any of the methods and resolve the error. However, in case any problem arises, or if the user is unable to tackle the error even after following the above-enumerated methods, then he/she can consult with our QuickBooks error support technical experts. You can simply dial our toll-free number .i.e. +1-888-510-9198, and our QuickBooks Support team will be there to assist you in a single call.
QuickBooks error code 108 often indicates that there’s a message from your bank or credit card on their website. Messages, especially ones about updates, can block the connection to QuickBooks. You can experience this issue if the system files are corrupt.
How do I fix error 108 in QuickBooks?
Try fixing the QuickBooks error code 108 using the steps below: · Check for known issues. · You can also verify the bank or credit card’s website status · Review the messages on your bank or credit card’s website. · Another step you can perform is to clear the browser cache
How do I fix a reconciliation error in QuickBooks?
To fix the reconciliation discrepancy, try performing the steps below: · Start by backing up the QuickBooks company file. · After that, head to the banking menu and select reconcile. · You now have to choose undo last reconciliation. · When asked to, choose continue tab and click on ok. · Lastly, close reconciliation and open it again to check if it resolves the issue or not.
QuickBooks Error code 61686 is one of the most uncommon error at the time of installation of QuickBooks. In general, this error is generated due to a damaged Framework.xml file. If you are also facing this type of error and are unable to get out of it, then this article might help you in dealing with such error. The QuickBooks error 61686 shows up on the screen with a warning message:
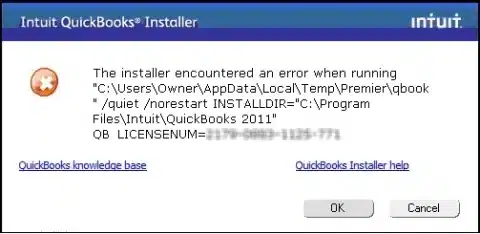
Warning 1 :‘’ The installer encountered an error when running “Drive:\Users\Owner\AppData\Local\Temp\Premier\QBooks” /quiet /norestart INSTALLDIR=”C:\Program Files\Intuit\QuickBooks 2011″ QB LICENSENUM=####-####-####-###’’
Warning 2: Location: “C:\Users\Owner\AppData\Local\Temp\Premier\QBooks\windowsinstaller-kb93803.exe ” EXEAdapter Error: InstallExe method received the system error from CreateProCess , command – “C:\Users\Owner\AppData\Local\Temp\Premier\QBooks\windowsinstaller-kb93803.exe” /quiet /norestart INSTALLDIR=”C:\Program Files\Intuit\QuickBooks 2011″ QB LICENSENUM=####-####-####-###
If you are experiencing similar sort of error, then you probably need to go through the segment, and learn further about the QuickBooks error 61686.
What are the signs & symptoms of QuickBooks Error 61686?
Every error comes with certain warning signs and identifying those signs, might help the user to rectify the error at its early stage and avoid any further mess. The warning signs might include the following:
When the Mistake 61686 appears on the screen, and also it burns the dynamic program window.
Also in the case when the PC freezes for some moment repeatedly at the time when the program is in use.
Another symptom can be when the system sluggishly responds to the mouse and keyboard inputs.
A pop-up message stating Windows Installation Error Code 61686 appears on the screen.
What Causes Error 61686?
There can be numerous factors causing the QuickBooks Error
Code 61686, some of which are jotted down:
In case when any other program roughly erases the windows installer related documents
When the no speed download or break down of the Windows Installer Programming happens
Also, in case of any misconduct in Windows registry from a recent Windows Installer associated programming change.
Another cause can be when there is an infection or malware corruption that might damage the Windows Framework files.
Once the installation process is complete, and the user has detected the cause of the error, it is time to implement the quick fixes to the error. In order to shun off this error, the user is required to follow certain steps:
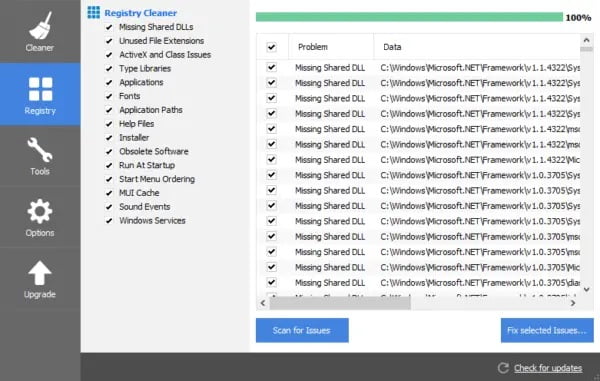
Solution 1: Repair the registry entries associated with the error
You can try out repairing your registry entries that are related to your error, so as to get through the error successfully.
The next step is to tap on the ‘Start‘ button.
The description Notification will be there in the inquiry box, but the user should make sure that he doesn’t press ‘Enter‘ yet.
Moving forward, press ‘Ctrl‘ and ‘Shift‘ tab simultaneously, followed by pressing ‘Enter‘.
The user will be encouraged with an understanding discussion box on the screen.
The ‘Yes‘ option available on the screen is to be selected by the user.
After that, a black box will open with an uncertain device there.
Moving forward, sort ‘re-edit‘, followed by hitting ‘Enter‘.
The user is required to select the error 61686 related key, in registry editor.
Choose the ‘Export here‘ option after scrolling down the ‘File Menu‘.
The next step is to save it in the list.
Now, the user is required to choose the ‘Organizer‘ where they need to unoccupied the Windows Installer file key.
Moving ahead, pick the name for the file in the name box. The user can choose the names like the ‘Windows Installer Backup‘.
The user is required to ensure that the ‘Chose Branch‘ option available in the ‘Export Range‘ box is selected.
Now to save the edits made, hit the ‘Save‘ option.
After that, the record will be unoccupied with a ‘.reg document‘ enlargement.
The user now has a relative of the Windows Installer related registry section.
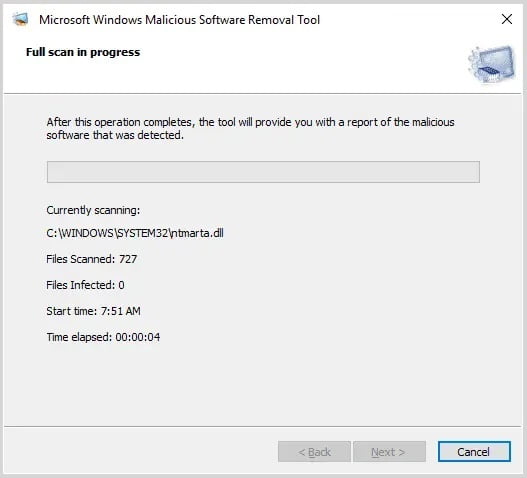
Solution 2: Conducting Full Malware Scan
In certain cases, there can be any sort of malware diseases on the PC, and in order to identify those malware diseases, a full malware scan of the computer might work in a majority of the cases. This process should not be ignored by the user, as any kind of malware can be extremely harmful, and it might vanish Runtime Error related records.
Cleaning the system junk may cause the Windows Installer to react gradually or give a 61686 Error code, due to an overburden hard drive or misunderstanding the document.
Tap on to the ‘Start‘ option and then refresh into the existing box and followed by hitting ‘Enter‘.
After performing the above step, the user will encounter the Windows Update discourse box.
Moving ahead, the user is required to tap on ‘Install Updates‘.
Solution 4: Update the PC Device Drivers
It should be noted that the QuickBooks Error Code 61686 can be identified with decayed or gadget drivers. At times the drivers all of a sudden stop working due to various reasons, but in such cases, the user can frequently refresh the gadget driver to settle this kind of error.
Solution 5: Performing a Clean Installation of the Windows
The last choice while determining the error code 61686 is the process of clean installation. It should be noted that reinstalling the Windows would eliminate the data from the hard drive, which means the user will be able to begin again with a fresh framework.
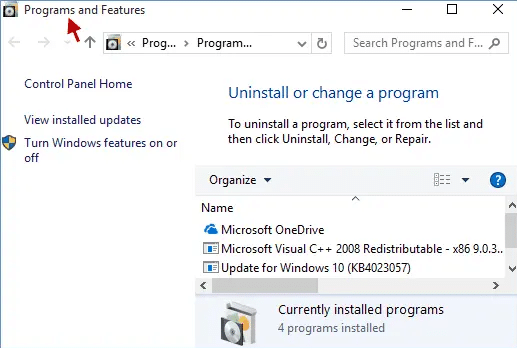
Solution 6: Uninstall and Reinstall the Windows Installer Programs
To begin with, open the ‘Programs and Features‘ tab by selecting the ‘Start‘ option.
After that, tap on ‘Control Panel‘ option visible on the right side menu.
Moving ahead, the user is required pick the option ‘Programs‘.
And after that, mark the ‘Features and Programs‘ option.
In order to find the ‘Windows Installer Error Code 61686‘ related program, the user is required to visit the name segment.
Next step is to select the ‘Windows Installer‘ related section.
Nowon the best menu strip, hit the ‘Uninstall catch‘ option.
Complete the uninstallation of the error 61686 related program.
With this, we come to the end of this article, and also hope that this article might be of any help to the reader. After going through this article, the user might be able to identify and fix the QuickBooks Error Code 61686. However, if in case the error persists, the user can feel free to consult our team of experts by dialing our toll-free number .i.e. +1-888-510-9198. Our 24X7 QuickBooks error support team will provide you with the best possible assistance in a single call.
Frequently Asked Questions
How do I fix printer settings in QuickBooks?
Reset the default printer in Windows. 1. From Start button, select Settings 2. Also, choose Printers and Faxes. 3. From the Printers and Faxes dialog window, right click on a working printer. 4. Select Set as Default Printer. 5. Open QuickBooks and open the Printer Setup window to verify changes.
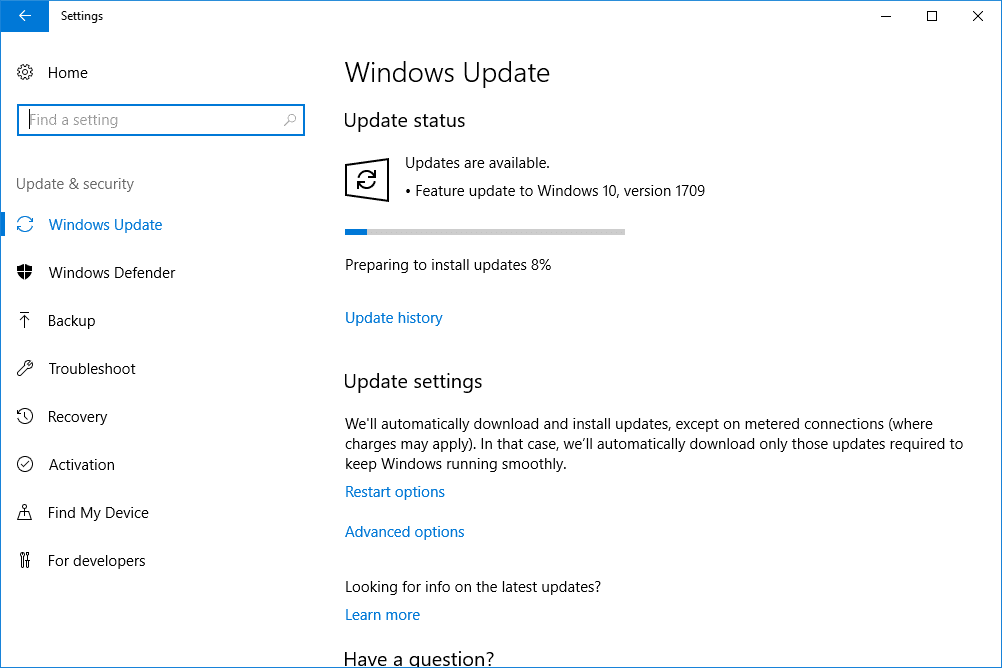
What is error code 16026 in QuickBooks desktop?
The QuickBooks error code 16026 often occurs when you are trying to download or install the updates. You can come across this error when the company file is corrupted. Sometimes using an older version of the application can also lead to the issue.
QuickBooks is the largest accounting software working for the various business owners and serving them with the best facilities for bookkeeping and maintaining accounts. For years, QuickBooks has always proved to be a notable tool for all users. QuickBooks has always been a trustworthy software that ensures full safety to the transactions in the accounts. Not only this, but it also has highly advanced and new features for making the work simpler. In this article, we will learn how to record vendor refund in QuickBooks desktop.
You can learn the various processes to record the refund in QuickBooks appropriately just by following the procedures given in this article. For more details, you can reach out to our technical support team at +1-888-510-9198, and they will provide you with immediate support and assistance.
These are the best solutions and procedures to record vendor refund in QuickBooks Desktop. We assure you that following these steps according to your needs will definitely make the process easier. We recommend you to talk to our professionals for any other query that you face during the procedures. However, you can anytime contact us at +1-888-510-9198 and make the use of our QuickBooks enterprise support expert’s knowledge and get the relevant solutions for all types of issues related to QuickBooks.
FAQs Related to Record Vendor Refunds in QuickBooks Desktop
How do I record a vendor refund in QuickBooks Desktop?
You can record a vendor refund by creating a bill for the amount of the deposit and further apply it to the deposit. The steps involved here are: 1. At first, head to the vendors menu, and further choose enter bills. 2. You now have to select the vendor who sent the refund in the vendor field. 3. The next step is to enter the amount of the refund in the amount due field. 4. Choose the expense tab. 5. And also, choose a wash account in the account field.
How do I handle a refund in QuickBooks desktop?
In QuickBooks, you need to perform the below steps: 1. The very first step is to choose the customers menu and further select credit memos/refunds. 2. The next step is to choose the customer you need to refund in the customer job dropdown. 3. Once done with that, enter the product and services you need to refund. 4. And also choose save and close tabs.
How do I enter a vendor credit invoice in QuickBooks?
You can perform the below steps to apply vendor credit in QuickBooks online. 1. Start with entering the vendor credit. 2. After that move to the + new option and under vendors choose vendor credit. 3. The next step is to further choose the vendor’s name from the dropdown menu. 4. Further, identify the invoices and sales receipts for which you received credit.
Insight into QuickBooks Online and its Pros & Cons
We live in a tech-driven era, where every industry is exploring and incorporating technical advancements, and the accounting industry is not an exception. One of the recent technological advancements is QuickBooks. Though this technology has ruled for decades, it has gained popularity recently. From hundreds of users to millions of subscriptions, QuickBooks has marked its presence in this hi-tech world. Not only this, this software has witnessed some significant changes and advancements, one of which is QuickBooks Online. Regardless of the fact that whether you have a small business or your business is scaling up, it is very important to understand which accounting software is best for you and your business. To make you familiar with the pros and cons of QuickBooks Online, we have come up with this comprehensive guide.
In other words, it can be said that businesses all over the world have understood the value of incorporating QuickBooks. No doubt, the progression of QuickBooks programs has been growing at an exceptional rate. This software has completely transformed the way entrepreneurs conducted their business operations earlier. QuickBooks has now become synonymous with better and simpler accounting. In this article, we will be dealing with notable features that separate QBO from top performers, such as ease of access, limited features, and many more.
QuickBooks Online usually differs from the standard PC version, where the users pay for the program once, and it is good to go for a few years. Also, with this, the users pay a monthly subscription. This is like a pay-as-you-go program. However, users can add additional features to the basic services, just like tax filing, payroll, and credit card acceptance.
QuickBooks Online offers three different programs to the users, and each program offers a different set of features. Let us have a look:
Simple Start
Talking about the Price of this pack, this pack is of $20 per month (but in this case they run promotions for introductory periods). This plan basically works well for freelancers and also for the ones running small businesses online or in-person. This pack includes a certain set of features such as:
Create and send estimates
Create, send, and track invoices
Track sales and connect with your favorite POS
20+ built-in reports
Import income transactions right from your payment processors, such as Square, PayPal, and your bank
Integration with your bank account and third-party apps.
This is the second pack offered by QuickBooks Online. The price of this pack is $40 per month (but they run promotions for introductory periods). This pack is suitable for small businesses that are looking for a few more capabilities, as it offers numerous features including the features offered in the pack discussed above.
Create checks from any device and then save to print later
Pay and keep track of bills and also set up recurring payments
40+ built-in reports
Track employee time or billable hours with clients
Set up auto-syncing so that everyone is on the same page.
Plus
The third and the last pack is the Plus pack (but they often run promotions for introductory periods). This pack is favorable for businesses with contractors or freelancers working for businesses. The features in the plus plan include all of the above features and in addition to that, the features listed below:
65+ built-in reports
Inventory tracking, along with alerts when stock is low
Also, keeping track of 1099 contractors, including payments made to them.
QuickBooks Online is the choice of numerous entrepreneurs all across the globe, and the reason behind this is the perquisites of QuickBooks Online. We have jotted down the pros of QBO, let us have a look:
1. Shared Access
The very first plus point of QuickBooks
Online is that it allows users to work or access a single file at the same
time. QBO collaboration feature permits multiple users to read and write into
the company file at the same time.
2. Easy to set up
QuickBooks Online is just like a plugin and
go setup. The users can easily configure the account and use the available
templates for a basic account. Not only this, it is easy to use the software.
3. Remote Access
Remote accessing basically means that you can access your account from anywhere. The users can log in to the account and work from home or while traveling via PC or Smartphone.
4. Automatic interface with the bank
QuickBooks Online gives the option to the users to accept credit card details or any electronic payment form and automatically update bank transactions, ultimately minimizing the entry time.
5. Payroll integration
QuickBooks Online can be integrated with a third-party app, in order to carry out online payroll transactions.
QuickBooks Online allows easy access to
more than one admin preferences, and the users can set the rights of each user
in the employee online details.
7. Secure data
The confidential data of QuickBooks users is securely saved in the Intuit served in the cloud. They don’t have to do the manual data backup of the company files, along with that, it gives the users access to comprehensive storage services.
8. No software upgrades
The users need not worry about the software updates and upgrades, as there is no local data or software to manage, unlike QuickBooks desktop which needs to update the software version.
9. Real-time information
Any transaction that is carried out is
automatically updated to the QuickBooks account, providing the users with real-time
access to the employees.
Users can automatically send invoices, statements, as well as reports among other documents to customers and suppliers. They can also generate online reports and send them to other users online.
Though
it is a rarely encountered concern, with the growing number of cyber-attacks,
hackers can hack the network and tap some confidential information, such as
customer bank details over the transmission medium.
2. Limited internet access
Another
issue that may arise is that QBO requires high-speed internet access, and many
users might have limited internet speed, ultimately slowing down access to
online QuickBooks.
Another thing that might seem a con to many QuickBooks users is that it has a monthly licensing fee for a single company file. If the client has multiple businesses, he is required to pay a monthly fee for each of these company files, and this adds to the cost of using QBO.
4. Software bugs
Software bug is another con of QuickBooks Online that might annoy the users at times, but each of the issues that the users might face can be resolved easily. There can be a few annoying software bugs from the upgraded version you have to deal with when dealing with QuickBooks Online.
Everything has its pros and cons and talking about QuickBooks, it comes with a wide breadth of features and has complex accounting capabilities. Though it also has certain cons, tackling them is not a big issue. This software offers an impressive number of integrations and is working on improving customer support. Recently, QuickBooks Online added a much-needed project management feature along with other new features, along with other new features, just as progress invoicing.
Answer – QuickBooks
Online was launched in the year 2004, and this software offers a robust feature
set, strong accounting, unique lending feature, and 500+ integrations. This
software is also pretty easier to learn and use, as compared to other software.
QuickBooks Online is supported on Chrome, Firefox, Internet Explorer 10, etc.
In a nutshell, it is one of the finest accounting software preferred by a
majority of entrepreneurs worldwide.
Question – How secure is QuickBooks Online?
Answer – In order to ensure that your data is secured, Intuit has put many features for security purpose. QuickBooks Online is one of the safest and secured accounting software that the majority of entrepreneurs prefer these days. QuickBooks Online protects the data and transactions with multiple layers of securities so that the confidentiality of the data of the users is not hampered in any case.
Question – QuickBooks Desktop vs QuickBooks Online, which one is better?
Answer – QuickBooks Desktop VS QuickBooks Online is one of the most common debate topics among entrepreneurs. The business owners generally get confused with the two options. Both QuickBooks Desktop and QuickBooks Online have their pros and cons. The biggest difference between the two is that QuickBooks Online requires no installation on a computer or Desktop. Also, the choice between the two depends on the type and requirement of the business. Thus, it is recommended to consult an expert before jumping onto any conclusion.
Question – How much time would it take to learn to operate QuickBooks Online?
Answer – QuickBooks Online is an easy program to learn. Majority of the times what the user sees on the screen is simple to figure out. It is not important to be an expert in accounting, to operate QuickBooks Online, but the person should possess the basic knowledge of accounting transactions or activities. QuickBooks Online doesn’t include any rocket science, as it can be easily operated with basic accounting awareness. Thus, learning QuickBooks Online is not as difficult as many people consider it to be.
We end this blog here, with the hope that it would help you in any way. However, if you seek for expert guidance, then feel free to dial our toll-free +1-888-510-9198, and find out solutions to all your queries.