Do you know any possible way or process to combine the QuickBooks Reports? Imagine if it’s exciting & obliging to combine QuickBooks reports. Here we are discussing that this is the mode to amalgamate reports of manifold data files of the diverse company. It is much trustworthy to combine reports via Multiple companies features that make you able to generate reports for combining manifold balance sheets-all these processes you can transport to a Microsoft Excel spreadsheets file.
Various fundamental parts for basic details about the reports in QuickBooks are:
An understanding between two or more account:
One of the key tasks is combining the QuickBooks reports is comprehensible. However, If you have adequate awareness about this topic or you are able to know the different data then you can effortlessly scrutinize the essential details to complete the task.
Arrange QuickBooks report for orientation:
Once you visualize the information, the next step is to organize the data as per required.
Modify QuickBooks reports:
If you want to compose some alterations in their details/information according to the necessity then it’s a compulsory part.
Mark the Comment:
You can also comment on the alteration after making the details/information effectual & favorite.
Organize & built the customary QB reports:
One of the most significant tasks to do so is classifying the QB data & must be planned.
To combine QB reports just consider these points:
The QuickBooks reports must be uncomplicated and easy in reading & build a profile in the different QB company files that suppose to be identical.
QB reports should be combining if they have approximately proper data in alike pattern as type, gradable level and also same name. (Not necessitate case sensitive)
One of the imperative points – accounts will not be amalgamated/combine if:
If it has diverse properties.
In case, it differs in the Alphabetic character.
When the Account numbers don’t match.
Assume one user posses different QB report & the other one is having different data.
Reports demonstrated type wise. Every detail/ information have to be chosen in the pattern of what suppose to be done in the first preferred company file. If the account added by the other account in the progression they are encountered.
If the choice logged into the QB files & desire to change them to numerous users to accommodate the combination routine.
What data is not allowed to be merged?
There are certain data that you cannot merge even after performing the steps. Let us have a look at what data falls under this category.
Payroll Checks: Payroll checks are combined as regular checks and so do not display in payroll reports.
Memorized Transactions: Memorized Transactions cannot be transferred from the secondary files.
Bank Reconciliations: Bank Reconciliations are unsupported on QuickBooks.
Negative Inventory Data Files: The QuickBooks data files that contain negative inventory and assembly builds are difficult to merge.
Sales Tax Data Files: The data files that have sales tax groups and items cannot be merged due to certain modifications.
Customer Notes and To-Do Lists: Customer Notes and To-Do Lists cannot be merged.
Customer Fields: Customer Fields that are fetched from transactions cannot be merged
Some Useful features – Built-in Combined reports in QuickBooks Enterprise
As you know, if you have built-in features in any sphere then you can execute the various multifaceted task in a trouble-free approach. Similarly, QuickBooks Enterprise solutions also endows a Built-in functionality to combine many QB company files.
Record the standard.
The result of the Balance Sheet.
Margin & financial amount loss.
Profit & loss by the category.
Comments on the cash flow.
Attempt on the balance.
To Merge the QuickBooks reports:
First of all, go to the QuickBooks “Report” menu.
In the “multiple company” tab, hit onto the combine reports.
Now Choose the “add files” icon & identify the other corporate investor.
In the reports for combining section, click on the information/details for which you desire to see combined data.
Finish the form & to date range fields to set the data date view.
Selection procedure of the details/information depends upon the reports.
Click on the “Combine reports” tab in Excel format.
Option 1. If you desire to use a 3rd Party software, you can point out many applications that work along with QuickBooks software. In these, some deliver valuable details/information to create the supplementary data from numerous corporate data files.
Option 2. You can effortlessly transport the reports from each other by following several directions & can merge using Microsoft Excel.
Hopefully, this technical blog helped you out in the method for how to combine QuickBooks reports. In case, you still find any hassle related to this or any other problem associated with the QuickBooks – you can take help and support from our QuickBooks certified experts.
Dial toll-free helpline number right now .i.e. ++1-888-510-9198. We will be more happy to help you out for all your troubles.
FAQs
What reports can be merged in QuickBooks Built-in Feature?
With QuickBooks built-in feature, one can merge the following types of reports: · Balance Sheet Standard · Balance Sheet Summary · Profit & Loss Standard · Profit & Loss by Class · Statement of Cash Flows · Trial Balance
Does the built-in file Merge Feature available on QuickBooks Desktop Enterprise?
The merging company files feature is pre-loaded on QuickBooks Desktop Enterprise. One can try performing some basic steps to merge in QuickBooks enterprise. However, it should be noted that the steps might vary for the enterprise version of QuickBooks.
What third-party Software is recommended for method 2 of Merging Company Files?
QuickBooks Pro or Premier are excellent choices for method 2 of merging company files. The reason being it comes with many other additional features.
What is QuickBooks company file?
A company file in QuickBooks is basically a core file that contains all the necessary information and also the sensitive data of the company. It is always recommended to keep a backup of the company file to ensure that the data is not lost in case of any discrepancy.
If you have ever used QuickBooks, you very well know how much time related to sending invoices, payment receipts, and transactions can be saved by using email account directly through QuickBooks. However, at the time due to some blocked sign-in attempts, one might come across incorrect password error while performing these activities. QuickBooks company file incorrect password error is a frequently occurring error that many QuickBooks users have reported. Due to this error, the software doesn’t accept the password when using email services like Gmail, outlook, or yahoo mail. As a result of this issue, you might not be able to connect to the online email services and send transactions directly from the QuickBooks desktop.
There are a bunch of factors triggering this issue in QuickBooks, if you want to learn what those factors are and how you can deal with them, simply scroll through this segment. You can also get on a call with our QuickBooks support professionals directly at +1-888-510-9198, and they will get back to you with immediate support services. Our technically sound QuickBooks professionals will help you with all sorts of QuickBooks support and assistance.
Before you dig in deep, it is important to understand what this error is all about. The incorrect password error is basically seen with a warning message “Incorrect email or password”. As we mentioned earlier, as a result of this error might not be able to connect to the online email services and send transactions directly from QuickBooks desktop. Factors like invalid password or mistype can trigger such an error in QuickBooks. Continue reading this to explore the causes and fixes for the same.
What causes QuickBooks company file incorrect password error?
One or more of the following reasons may lead to the Company File incorrect password error:
Sometimes, passwords are case sensitive
There might be some missing or incorrect accessibility settings
Open ‘Control Panel‘ > select ‘Accessibility‘ options and make sure that no box on any of tabs is checked
Spaces are also been considered as part of the password
Sometimes, when we generate the password, unknowingly, the spaces are recorded while submission of the password
Incorrect keyboard Function
You can submit in the notepad to check whether your password is properly working
The appearance of an incorrect login screen
When the login screen appears in some cases without the username on the admin login screen then, you need to reopen it
The perfect password hacks while creating a password, you are required to make complex password instructions as per it need to have minimum seven characters (consisted of at least one number, letters, special character, and one upper case letter).
How to Troubleshoot QuickBooks Company File Incorrect Password error?
You can perform the following steps to fix the QuickBooks Company File incorrect password error. You can also go with QuickBooks customer service helpline if you want an expert guidance.
Step 1: Use Password Reset Tool
Password reset tool is an automated tool for the QuickBooks Desktop that’s primarily used to reset the QuickBooks admin password. If a user forgets the password, this tool comes handy. Users will have to enter 15 digit license number, full name, phone number, and postcode. These details are validated as per the registration information saved in a database. If in case any of information mismatches when a product is registered then it leads to failure of the request.
How to Use an Automated Password Reset tool for QuickBooks Desktop?
Start by selecting the tool depending on the version of desktop you use as per US-version, UK- Version or Canadian Version:
Step 1: Find out the version of a desktop
You are required to have knowledge of the product version and then release number and then the select product from the list and learn how to identify the version, release the data and follow some instructions. To know How to check the product version & release of your QuickBooks click on the given here.
For the statement writer: In QB select reports and then statement writer, when a program is up, choose ‘Option > help > about QuickBooks statement writers‘
Merchant service: QuickBooks uses merchant services, thus there is no release or version.
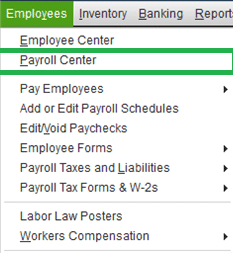
Basic or advanced QuickBooks Payroll: Select “Employees” > “Payroll Centers” and then choose the Payroll tab.
For QuickBooks Mac and POS: Choose “Help > product information“. Here entire version release information can be seen.
Step 2: Select QuickBooks Version that was updated formerly to your QuickBooks Company File
Select version section, type in your license number and other business details during registration of the accounting software and then click on submit
Now, accept accepting license agreement and download
Type in token number sent in your email and choose the version in the drop-down menu of QuickBooks products
Submit new password, confirm and click reset password
If you’re changing a user password
Sign in using the credentials of admin. If you aren’t an admin and don’t have access to admin credentials, contact the person who has the access
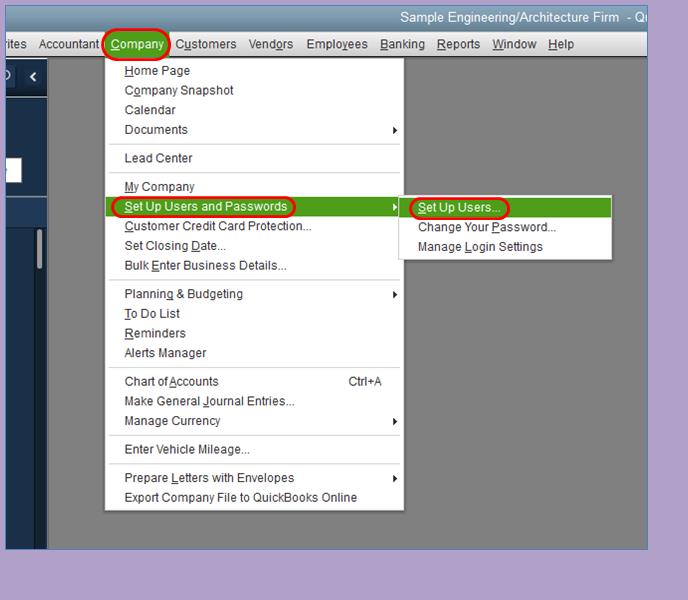
Go to Company and choose Set Up Users and Passwords
Select Set Up Users
After being prompted, enter the admin password again
Once you see the User List, select the user that requires a password change
Next, select Edit User
Enter a new password
Select Next twice and press Finish. If you (or the user) need to sign in on this computer, access the File menu and select Close Company/Logoff. You should be able to sign in with your user name and the new password.
As a security step, you would need to confirm/provide some information.
Open QuickBooks Desktop (QBDT)
Click I forgot my password link at the login window
Fill in the details on the form that appears
Click OK button
If you enter correct information, you would receive a code at your registered (primary) email address
Copy the code from your email and enter that in QuickBooks Desktop
You would be guided through the steps for creating a new admin password
If the password reset fails
Check the details you entered. Check for types and spelling errors and make sure the information matches what you have in CAMPS.
Alternate Procedures
Other than the above stated set of steps, you can try performing the below set of steps to get rid of the password issue. Let us have a look:
Step 1: Updating QuickBooks desktop to latest release
In case you have not updated your software already, then we suggest you to first update the software. Email a test transaction to check if the error is fixed after that. The steps involved in this process are as follows:
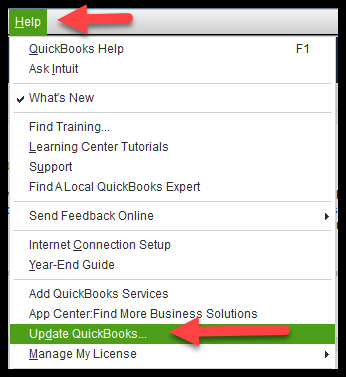
You need to first move to the help menu and choose the update QuickBooks desktop option
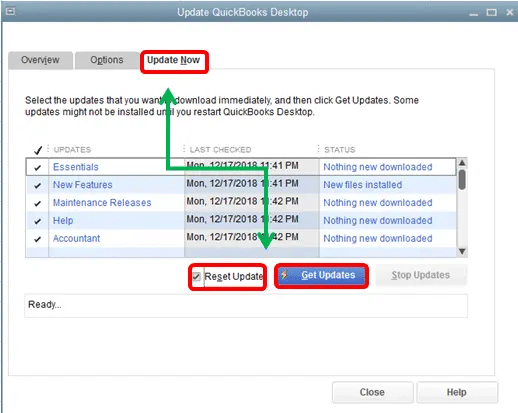
Furthermore, you need to head to the update now tab and select the reset update checkbox to clear all previous update downloads.
You now have to select the get updates to begin the download process.
And also reboot the QuickBooks software after the download finishes
And then, accept the option to install the new release, when asked.
Step 2: Check settings for your antivirus
At times, antivirus might block the internet connection to QuickBooks and end up in obstructing the seamless functioning. To lookup for the antivirus provider’s website and look for the steps to allow the port exceptions. The steps involved are:
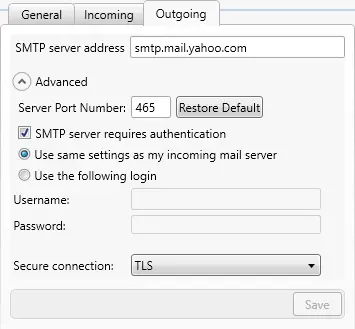
You need to make port 465 open for Yahoo mail
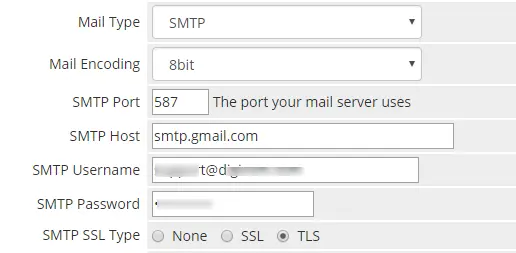
Also, make port 587 open for gmail and all other email services
If you are a McAfee user, then open the antivirus program and search for excluded processes list. Add the below names to the list so that they can run freely.
We hope that you find this article informative. In case you have any query or need assistance of an expert, call us at +1-888-510-9198. Our QuickBooks error support team will help you in such type of accounting problems.
Frequently Asked Questions
Why is QuickBooks not accepting my password?
There can be a bunch of factors causing such an error. You can try updating the QuickBooks desktop to try fixing the error. You can also check if the automatic updates are turned on. If you haven’t enabled automatic update feature, then you need to upgrade QuickBooks manually.
How do I unlock a company file in QuickBooks?
This can be done by performing the steps below. Just keep a check on the system, as it should be the system that normally hosts the company files. 1. The very first step is to open QuickBooks on the server system 2. After that, open the file and then utilities. 3. Switch the multi user setting off 4. Try to open the company file again
How do I repair a company file in QuickBooks desktop?
You can try repairing a company file using the steps below: 1. At first, head to the file menu, and then hover over the utilities tab and choose the rebuild data 2. Now, on the QuickBooks information window, choose ok tab 3. Let the tool finish and choose ok tab 4. Head to the file menu 5. Let the tool check your file for data issues
Errors in QuickBooks is quite common, just for the reason that the software involves a bunch of algorithms. One such error that we are going to discuss in this particular segment is QuickBooks Error 121. The QuickBooks POS Error 121 is also known as “Permission denied error”. This QuickBooks Point of Sale error generally occurs when you don’t sign in to QuickBooks as an admin. This error may appear during any activities that require admin right. As this error is an uncommon error, and can be seen when there are not enough permission from the end user.
This segment is going to brief you with the factors triggering the issue along with the fixes for the same. Thus, make sure to read this segment with much care. You can also speak to our tech support professionals using our customer-support number i.e., +1-888-510-9198.
What is QuickBooks Point of Sale update error code 121?
Before you dig in deep and implement the steps to eliminate the error, it is important to get a brief into the QuickBooks error code 121. This error basically signifies that you have to sign in the POS to another system rather than the system admin in which you encountered this error. You can face the QuickBooks error with a pop-up warning error message: Error Message: “QuickBooks POS Error 121 denied you do not have permission to select from timeouts” This error simply indicates that the software denied to make any changes as a guest user. There can be a bunch of steps that can be performed to eliminate the error code 121. Let us check out!
Steps to Fix QuickBooks POS Error 121
To fix the QuickBooks POS Error 121, you have to delete all the data in the Entitlement Client folder & remove the WSActivity.xml file. Before attempting the resolution steps ensure that all the Point of Sale process & services is blocked or stopped.
Step 1: Close all the POS Process & services
Firstly, Select the “Task Manager” tab
After that Choose the required Processes
Locate & close all the processes
Shut-down the Task Manager process
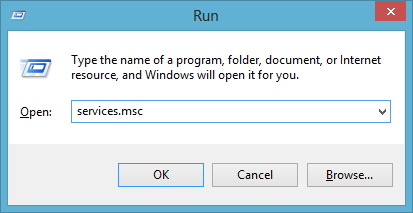
In the Windows search option, enter the “services.msc”
Go to the Services window; look for “QBPOS Database Manager XX” (“XX” means QuickBooks version)
Stop all the services & turn off the services windows
In case, the problem associated with “QuickBooks POS update: Error 121” still exists within the QuickBooks software then we propose you to follow the steps mentioned below:
Hopefully, the above-prescribed troubleshooting steps are enough to endow you complete insight about the QuickBooks POS Error 121. However, if you still have some query or technical problem with the QuickBooks – you can take help from the certified QuickBooks ProAdvisors at toll-free support number i.e. ++1-888-510-9198. Our technical support team is always ready there to help you out in every possible manner.
FAQs– QuickBooks Error 121
How do I fix bank errors in QuickBooks online?
To get rid of the bank errors, you can perform the steps listed below: 1. The first step is to choose transactions and choose bank transactions in bookkeeping 2. After that, choose the tile for the bank account 3. Now, choose the edit tab 4. Also, choose edit sign-in info 5. The user is then required to update info as needed
What is QuickBooks error code 12, 0?
QuickBooks error code (12, 0) is often experienced when you do not have sufficient administrative permissions to conduct certain operations on your QuickBooks. This error code often troubles you when system settings are incorrectly configured or when there is some variation in the Windows registry.
How do I fix QuickBooks Point of Sale error?
The user can try to fix the point of sale error using the set of steps below: 1. The very first step is to close QuickBooks point of sale 2. Now, open the windows start menu 3. After that, enter control panel into the search and also press enter tab 4. The next step is to choose the version of QuickBooks desktop point of sale 5. Now, perform the onscreen instructions to repair the program
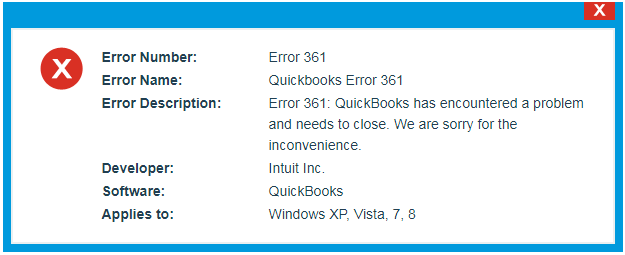
QuickBooks error code 361 is an online session error that may restrict you from performing various financial operations. This error can prohibit you from using some of the more advanced & enhanced advanced & enhanced features QuickBooks features such as such as online payment scheduling, accounting, tax filing, and others. If you have received this error, then further in this article you will learn all the troubleshooting steps to fix it. This error is basically a runtime error that can be experienced when the software crashes while running. This error can be experienced due to a couple of factors, which we have tried to mention later in this segment. We will also discuss the signs and fixes of error 361 so that you can easily identify it and perform the right steps to fix it.
To know more, make sure to stick around till the end or you can also consider talking to our professionals using our support number i.e., ++1-888-510-9198 and we will provide you with immediate support and assistance.
Below is a list of solution steps to fix the QuickBooks Error 361 problems. These fixation steps get gradually more difficult & time-consuming. Hence, we robustly suggest you attempt the ascending order to avoid unnecessary time & effort.
Step 1: Repair Registry entries associated with QB Error 361
Manually editing the Windows registry to remove invalid Error 361 keys is not recommended unless you are PC service professional. Incorrectly editing your registry can stop your PC from functioning and create irreversible damage to your operating system. In fact, one misplaced comma can prevent your PC from booting entirely!
To manually repair your Windows registry, first you need to create a backup by exporting a portion of the registry related to Error 361 (e.g. QuickBooks):
First of all press the “Start” button.
Type-in the “command” in the search box… DO NOT hit the “Enter” yet!
While holding the “CTRL+Shift” on the keyboard. Hit the “Enter” tab.
A permission dialogue box will appear.
Hit the “Yes” icon.
The command prompt page will pop-up on the screen.
Type-in the “regedit”. Hit the “Enter” tab.
In the “Registry Editor” tab, choose the Error 361-related key (e.g., QuickBooks) you wish to back up.
Select the “Export” icon in the “Export Range” tab.
In the “Save In” list, choose the folder where you desire to save the QuickBooks backup key.
Now type a name for the backup file, In the “File Name” box, such as “QuickBooks Backup”.
In the “Export Range” box, ensure that the “Selected branch” is chosen.
Click the “Save” icon.
Save the file in .reg file extension.
You now have a backup of the QuickBooks-related registry entry.
There is a possibility that the QuickBooks error 361 could be associated to the spyware & malware infection on the computer. These malicious intruders can delete, corrupt, or even damage the Run-time Errors-related files. Moreover, there’s a possibility that the QB error 361 that you have experienced is connected to a component of the malicious applications itself. Hence, it is important to conduct the full malware scan of the computer.
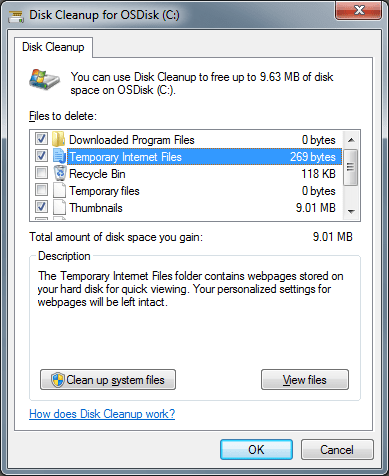
Step 3: Clean the System Junk (Temporary Files & Folders) With Disk Cleanup (cleanmgr)
With the overtime usage of the computer without any system clean, there is a great chance that the computer accumulates numerous junk files via normal web surfing & system use. If these junk files & folders don’t clean regularly then, this condition may lead to slow QuickBooks responding while showing QB error code 361. It may possibly occur due to file conflicts or an overloaded hard drive. Perhaps, cleaning up the temporary files/folders with the Disk Cleanup will not resolve the QuickBooks error 361, but it can also considerably speed up the system performance.
How to Run the Disk Cleanup (cleanmgr) (Windows XP, Vista, 7, 8, and 10)
Here are the quick steps to run the disk cleanup the windows:
Cleaning system junk with Disk Cleanup – Screenshot
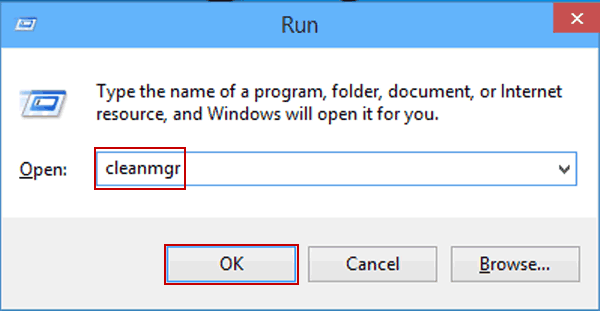
Firstly, Click the “Start” button.
Type-in the “command” in the search box… DO NOT hit “Enter” yet!
Press the “Ctrl+Shift” on the keyboard.
Hit the “Enter” tab.
A permission dialogue box will appear.
Click on the “Yes” icon.
The command prompt page will pop-up on the screen.
Type-in the “cleanmgr” in the prompt page.
Later, press the “Enter” key.
Disk Cleanup will estimate the occupied disk space and let you know how much free space you can reclaim.
Once you open the Disk Cleanup dialog box, it will appear with a series of check-boxes that you can choose. In majority cases, the “Temporary Files” category will absorb the most disk space.
Choose the boxes of the categories that you wish to clean & hit the “OK” icon.
The Error code 361 can be associated with the corrupt and outdated device drivers. Due to many reasons, it may be possible that driver’s work well on one day but abruptly stop running on the next day. The good news is that now you can often update the device driver to resolve the QB Error 361 issue.
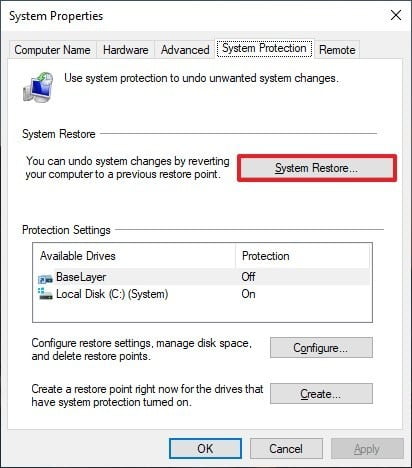
Step 5: “Undo” the Recent System Changes by using the Windows System Restore
Windows System Restore enables you to “go back in time” to resolve the QuickBooks Error 361 issues. System Restore can return the computer system files & programs back to a time when everything was working fine.
This can potentially help the user to avoid hours of error fixation headaches related to QB error 361.
Use the System Restore (Windows XP, Vista, 7, 8, and 10):
Click the “Start” button.
In the search box, type in the “System Restore” & later, hit the “Enter” key.
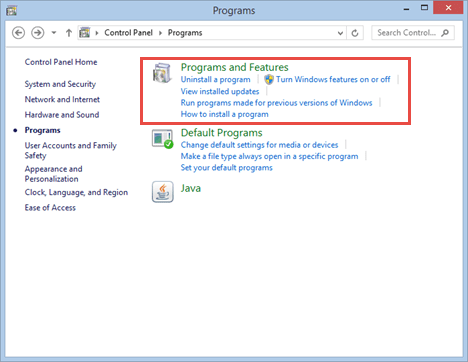
Step 6: Uninstall & Reinstall the QuickBooks Program Associated with Error 361
In case, QuickBooks error 361 is associated with any specific program/application…! You can simply reinstall the QuickBooks software to resolve the QB error code 361.
Instructions for Windows 7 and Windows Vista:
Click the “Start” or “Windows” button on the left bottom of the keyboard.
Hit the “Programs and Features” tab.
Go to the “Click Control Panel” tab.
Click onto the “Programs” icon.
Select the “Programs and Features” icon.
Search for the QuickBooks Error Code related program (e.g., QuickBooks) in the Name column.
Select the QuickBooks-related entries.
Choose the “Uninstall” button.
Follow the on-screen instructions to complete the uninstallation of QuickBooks software.
Finally, reinstall the QuickBooks software via CD or simply download it from the official website of Intuit Inc.
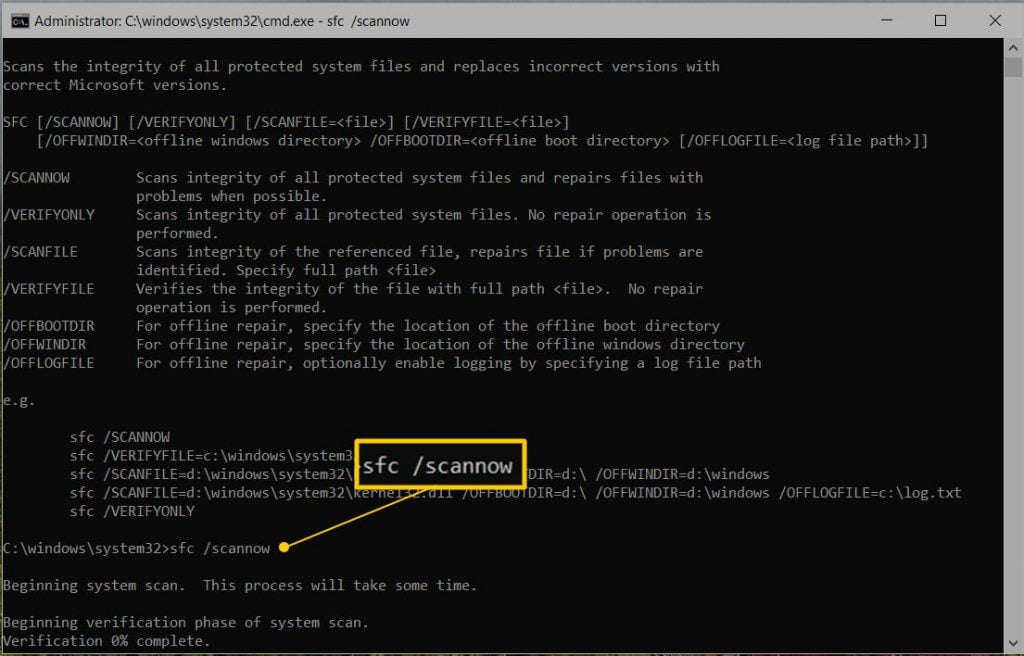
Step 7: Run the Windows System File Checker (“sfc /scannow”)
System File Checker is a versatile tool incorporated with Windows that enables the user to scan and restore corruptions present in the Windows system files.
Run the System File Checker (Windows XP, Vista, 7, 8, and 10):
Select the “Start” or “Windows” key on the left bottom of the keyboard.
Type-in the “command” in the dialogue box… DO NOT hit “Enter” yet!
Press the “Ctrl+Shift” on the keyboard.
Later, press the “Enter” key.
A permission dialogue box will appear.
Select the “Yes” icon.
The command prompt page will pop-up on the screen.
Type-in the “sfc /scannow” and later, hit the “Enter” key.
System File Checker will begin scanning for Error 361 and other system file problems (be patient – the system scan may take a while).
Here are the steps to install all the available Windows updates: –
Verify the Windows Updates (Windows XP, Vista, 7, 8, and 10):
Select the “Start”
or “Windows” key on the left bottom of the keyboard.
Type-in the “update”
into the dialogue box & hit the “Enter”
tab.
The Windows Update dialog box will appear.
If updates are available, choose the “Install Updates” icon.
Step 9: Repair Registry
If none of the above-mentioned solutions work, then you should consider repairing your computer’s “Registry“. Perform this step only if you are an expert for deleting some specific files from Windows or Program may mess up Registry. Also, damage to Registry can stop your computer from functioning.
Step 10: Close conflicting applications
Sometimes, applications opened up in the background can trigger certain errors in QuickBooks. One can use the steps below to close the conflicting applications:
The user needs to use ctrl + alt + del to open the task manager
Now, you will see the task manager window, which will display the list of programs running on the system
After that, click on the processes tab
You must now highlight the programs you want to close
Click on end process tab
And also, you might see a program causing an error message when trying to close it
This will help you identify the program leading to the error in QuickBooks. And towards the end you must reinstall it on the system
Step 11: Reinstall runtime libraries
At times this error can be seen due to issue in the installation of the MS visual C++ package. The steps involved in reinstalling runtime libraries are as follows:
The user will have to first move to the programs and features option
Look for Microsoft visual C++ redistributable package under the list of installed applications on the system
Select uninstall
Reboot the system
Lastly, use the web browser to open Microsoft’s website and download and install the latest redistributable package.
Hopefully, this article helped you in finding the apt solution for the QuickBooks error 361. In case, you still see this error code and you unable to resolve it – then you can take instant support for QuickBooks Errors from our Intuit Certified ProAdvisors team. Just dial the toll-free QuickBooks helpdesk number i.e. ++1-888-510-9198.
Frequently Asked Questions!
What is QuickBooks error 361?
Incomplete QuickBooks installation. Corrupt Windows registries due to recent QuickBooks changes (install or uninstall). Virus or malware infection corrupts the Windows system files. Another program or application maliciously or mistakenly deleted QuickBooks-related files.
How do I reset my QuickBooks license file?
In order to reset the QuickBooks license file: Go to Help, Manage my license, then Change my license number. Enter the license number as all 0s and select next. Don’t enter a validation code and then select Finish. Go to Help, Manage my license and then Change my license number.
What causes QuickBooks error code 361?
One primary reason for encountering run time error 361 in QuickBooks is the running of conflicting applications along with QuickBooks. Hence, we suggest closing these incompatible programs to solve the run time error, and here are the steps for the same. Use Ctrl + Alt + Del keys to open the Task Manager.
The mobile app of QuickBooks Online is a surprise and a relief for many of the QB users as they can now manage their work on the phone. QuickBooks Online Mobile App comes with great features to help the users and comes free when one subscribes to QBO. Very few are aware of the exclusive and amazing features of this mobile app and it is worth knowing that this app comes with an incomparable amount of functionality. “When hard work takes the place of Smart Work!!” To learn further about QuickBooks online, read this post till the end, or you can also consult our technical support team at +1-888-510-9198, and we will provide you with immediate support and assistance.
Business people have an opportunity to run their business through this app using its features. The app is available on both Android and iOS versions. It provides remote access to all the features that you may have used on the desktop.
To use this app, download the QB online mobile app, create your account, and sign in with your username. Once you do this, you will be on the homepage that will be divided into vertical sections. Go to the ‘dashboard‘ that shows current account balances with a graph presenting an abbreviated version of the ‘Profit‘ and ‘Loss report‘. It also shows up the summary of both paid and unpaid invoices through graphs.
Now, you are all set to work on QuickBooks Online Mobile App! Click on the three horizontal lines to the left in mobile app and you will get access to the navigation tool and other images. All your work that has been browser based will show up when you click on entry here.
If you want to add more items such as the customer, invoice or something else, just click on ‘+’ sign.
You also have the privilege to enter new transactions from each individual list screen.
Salient Features of the QuickBooks Online Mobile App (QBO):
It can send invoices and estimates.
It can capture the signatures of your customers on invoices and estimates.
It can click a picture of the receipt for future references.
With smart matching and categorization, you can add bank and credit card transactions in it.
It provides you with real-time reports so that you stay updated on how your business is doing.
Adding Transactions in the App:
It is known to everyone that the full version of an application appears differently on the mobile and in the browser. But when it comes to QBO, users have opined that the app is easier to use than the browser based QBO. The app works on an internet connection.
There is a new Expense screen to which the app goes and clicks the photo of the receipt by clicking the icon available on the top of the page. The three buttons present represent credit, check and other, and indicate how you have paid for the purchase. You can also describe your expense: whom did you pay, the type of expense, and the reason. This will give you all the information as you click on one. As you click on ‘Type of Expense’ and it will open the complete list.
In the list, you can add new ones and separate items if you wish. Once you are done, you can Save it in the main QuickBooks Online file.
View the Existing Information:
When you are using QBO app, you can also view the records and transactions that you had entered in the browser-based version. Be it invoices, list of expenses and estimates, you can check them in browser. If you want to edit something, you can do that with the help of pencil icon on the upper right side of the page.
The discussion above will be quite helpful to you when you start using the QuickBooks Online Mobile App. In case you need any support while using the app, you can get in touch with our QuickBooks online customer support team at our toll-free number .i.e. +1-888-510-9198.
FAQs related to QuickBooks online
Is QuickBooks online free?
QuickBooks online free 30-day trial offer terms include first thirty days of subscription to QuickBooks products, starting from the enrollment date is free.
Can I get QuickBooks without a subscription?
You can purchase QuickBooks Desktop for Mac without a subscription. You can get a license for QuickBooks desktop for Mac at a fixed cost.
Why should I get QuickBooks Online?
QuickBooks allows the user to keep track of the financial functions like income and expenses, employee expenses, and inventory in real time and fulfill tax obligations hassle-free.
What are the benefits of using QuickBooks online?
QuickBooks online benefits include: Better shared access to data with employees and your accountant, no local data to manage, no upgrades or release updates, robust assistance center with online chat.