Learn how to improve QuickBooks desktop performance issues in multi-user mode:
Is your QuickBooks running slow in multi-user mode? If yes, read this article till the end because we are going to discuss most of the most common causes and effective solutions to improve QuickBooks desktop performance issues in Multi-User Mode.
While opening a big company file or just using the QuickBooks Desktop on the web, QuickBooks at times runs slow in the Multi-User Mode. You may come across hurdles like slow speed, QuickBooks taking too long to respond, network error or others. And to solve the error of improve QuickBooks desktop performance issues in Multi-User Mode, it is very important to recognize the different performance errors which can lead to the same.
It can be really annoying for you if the software runs slowly, especially in multi-user mode. Thus, it is essential to spot the cause and rectify the bug as soon as possible. Thus, we recommend you read this post till the end and find out the various factors that lead to QuickBooks running slow error. For more details, you can also get in touch with our QuickBooks enterprise support team via our toll-free number i.e. +1-888-510-9198, and our experts will ensure to provide the best possible support services in fixing the issue.
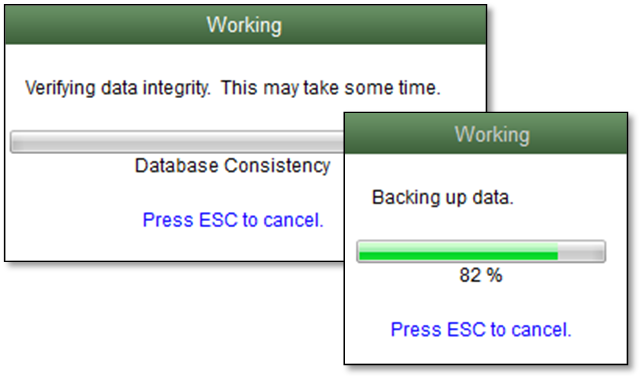
If the QB company file is slow for all the users, check the file for integrity issues. While checking the QuickBooks speed, make sure that no more than one person is logged out of the company file.
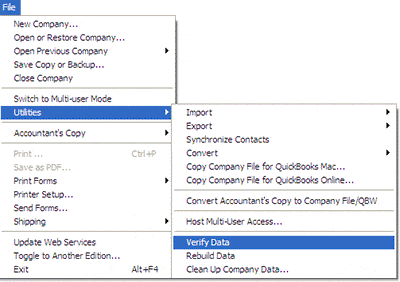
Go to the File Menu, select Utilities, and then Verify Data within your company file.
Start the verification process by pressing OK.
In case of any integrity issues, you will receive a run a repair on the data prompt.
If errors are discovered, run a rebuild and also examine QBWin.log file for errors.
Solution 6: If QuickBooks is slow for some users
If QuickBooks is not slow for every user, you should consider changing some QuickBooks preferences.
You can also maximize performance by adding some company as well as user-friendly preferences. In case QuickBooks slows down only when you or other users try saving invoices, bills and other transactions, you can do the following:
Open List menu and choose Templates.
Use a new Template for your transaction.
Click on the Template tab at the bottom and press New.
Select the Template type you want to create and press OK.
Close the window by pressing OK again.
Use the new Template to save the transaction and see if the issue has been fixed.
In case the problem still persists, follow the additional steps:
Type “Performance” in the Search Tab.
Click on the “Green Arrow“.
Choose the “Help Menu” from QuickBooks and click on “Search” option.
In multi-user mode select the “Improve Performance” Option.
In case the issue persists, press F2 key on the keyboard while you are on the same page where you are trying to save a transaction.
Now, check the size of the file, if that exceeds 500 MB, then condense the data included in the file or delete the unnecessary data occupying the space.
This is a Short Example to make You Understand that “How we can improve QuickBooks Desktop performance in multi-user mode“
In case the same company file is accessed by multiple users at the same time, it leads to a slight decrease in the performance of QuickBooks. The given steps above can help to understand the reasons that cause slow performance of QuickBooks. To ensure the best performance, make sure to save the QuickBooks file and the QuickBooks server on the same computer if possible.
We hope this article will help you to improve QuickBooks desktop performance Issues in Multi-User mode. If you want more information and help relate to this, Please contact our QuickBooks support team at +1-888-510-9198 for the best result.
FAQs related to QuickBooks multi user mode issue
Why is QuickBooks so slow in multi-user mode?
In case the company file is slow for all users, then it is suggested to check for integrity issues. Make sure that no more than one person is logged out of the company file.
How do I fix multi-user issues in QuickBooks desktop?
You can try fixing the multi user issue in QuickBooks using the steps below: 1. Use database server manager 2. Check the host mode on each of the user computers 3. Check whether QuickBooks services are running 4. Ensure that QuickBooks can send data
Can multiple users use QuickBooks at the same time?
A multi-user license allows different people with a QuickBooks license (single-user license) to work with a single QuickBooks company file simultaneously. – QuickBooks Premier Edition – five users. – QuickBooks Enterprise – Up to thirty users.
Get all the information of about the best Inventory Management tools that help with Inventory Management for small business
Inventory management can be simply put as a record of stocked goods of a company. So, this is the pure management of all the products and inventory. Inventory management comes with a number of benefits right from managing goods to streamlining the process of stocking and giving companies a good control of their business.
Best 25 tools designed to streamline Inventory Management for small Businesses.
Here are some of the best 25 tools specially designed for small business and will help you manage your inventory in a better way:
1. Unleashed:
Virtual inventory management is no longer a dream with Unleashed. With this software you can take control of inventory health and scale your business. Unleashed provides you with a Cloud-based dashboard. Its starting price is $60 a month.
2. AdvancePro:
With an advantage to integrate all the QuickBooks records into the AdvancePro system, AdvancePro comes with a series of high-performing inventory and warehouse management tools. These tools can be customized to the needs of a small business.
3. InFlow:
InFlow is an online inventory management system providing business from different industries. The software makes it easy for the business to receive orders and reorder stock. The good news is that it offers a free package for the new small businesses.
4. Ordoro:
Popular in the industry as the smartest shipping app, Ordoro is a cost-effective solution for business to goods inventory for shipping operations. The pricing plan of this software starts from $25 a month.
5. Lettuce:
With the use of Lettuce inventory app, one can integrate the systems which include payment processing, shopping, CRM among many others. The starting price of this app is $59 a month.
Providing a highly effective inventory management system, Infoplus is a web-base system that is highly suitable for retail, beverages and electronics business. Its pricing plan start from $379
7. Retail Inventory:
Starting from a Basic package of $20 per month, Retail Inventory is considered as a comprehensive inventory management system and includes an option to scan barcodes as well.
8. Inventory Now:
Making inventory tracking quite easier, Inventory Now provides business the complete overview of their inventory. Moreover, you also have an option to check about a particular inventory item number any time, and is considered suitable for small and medium sized business. It’s starting cost is $4.99.
9. Cin7:
Offering real-time tracking of inventory and sales, Cin7 is a point of sale and inventory management system. Its price starts at $249 a month.
10. Stitch Labs:
A retail business has a benefit of this tool as they can take control of their inventory from anywhere and anytime. In addition to the Stitch Labs inventory management, it also allows them to go for order processing. It also syncs availability across all sales channels and warehouses. It’s starting price is $499 a month.
Popular as the all-in-one inventory management software, SalesBinder has all the basic tools relevant for a small business. A business cannot just manage their inventory but also manage their invoices, customers, suppliers and purchase orders. You can also find a free platform on this management tool. Its Bronze package is available at $19.
12. TradeGecko:
TradeGecko allows business to manage their sales and stock. It also allows them to create inventory reports and automate shipping. Its plan starts from $79 a month.
13. RedRock Warehouse Manager:
It is an efficient inventory management tool which is suitable for the small business dealing in retail, manufacturing and e-commerce fulfillment. It is integrated with the QuickBooks’ records.
14. Wasp Inventory Control:
Wasp Inventory Control provides businesses the real-time approach to the inventory and includes a printer, supplies and a mobile device.
15. JumpStock:
An all-inclusive inventory management system, JumpStock lets businesses to take care of their full inventory requirements. Its price starts at $99 a month.
SOL Inventory management software integrates with QuickBooks and allows businesses to manage their inventory at multiple places. Its plans range from $25-$200 per month.
17. TRXio:
TRXio integrates with QuickBooks and allows businesses to manage their inventory at multiple places. Its plans range from $25-$200 per month.
18. Fishbowl:
Fishbowl integrates with QuickBooks very easily and I highly flexible for small businesses. It also includes a 14-day free trial.
19. OrderBot:
Right from automating time-consuming orders, OrderBot is famous for its quick automation in shipment process as well. This system is capable of creating customization packing slips. Owing to its customizable features, businesses are required to use a quote based request for few of their requirements.
20. Clearly Inventory:
Featuring a simple interface, Clearly Inventory is ideal for those firms that are involved in investing so much of their time in understanding the new software. The software allows the businesses to pay for what they need as and when they expand.
A free software solution for the businesses, LoSoftware operates in e-commerce, service-based industries and retail. This is easy-to-use software which provides a good control over stock to the businesses.
22. Stockpile:
Delivered by Canvas applications, Stockpile saves a lot of time and money on the inventory tasks. You can add inventory, record sales, and take returns.
23. Zoho Inventory:
Allowing small businesses to manage their inventory and orders with great efficiency, Zoho Inventory provides a multi-channel selling and inventory control. Its basic package costs $29 a month and $249 per month for a professional package.
24. NCR Counterpoint:
A business dealing in retail, mail-order or wholesale can use this cloud-hosted point of sale software. NCR Counterpoint comes with a range of features to automate purchase orders and a host of other payment processing features.
25. Goldenseal Accounting:
Goldenseal Accounting has been designed for small business and offers a complete set of accounting and inventory management services. This accounting system is considered suitable for construction firms and other such business. The basic version of this system is available at $495.
The above mentioned software has its own role and function. These software are important management tools for small business and are easily available. You can also avail the trial facility for these. Just download the tools and enhance your multi-channel inventory management strategy.
What is the best inventory method for a small business?
The most common inventory accounting method is FIFO because it typically provides the most accurate view of costs and profitability. However, because there isn’t a one-size-fits-all solution, it’s a good idea to talk with your accountant or tax expert to determine what will work best for your business.
What are the 4 types of inventory management system?
Inventory management tries to efficiently streamline inventories to avoid both gluts and shortages. The four major inventory management methods include just-in-time management (JIT), materials requirement planning (MRP), economic order quantity (EOQ) , and days sales of inventory (DSI).
What are the 3 key measures of inventory?
Crucial metrics that you should keep a close eye on over the course of the year are: inventory turnover, average days to sell, return on investment, and inventory carrying costs.
Reconciling is simply the process to arrange matching financial transaction available on the bank statement so as to ensure that it matches the records. It’s important to understand the significance of the QuickBooks bank reconciliation with the help of cash flow analysis of the business. The need for QuickBooks bank reconciliation might arise due to various possible reasons. In this article, we will discussing the need as well as other aspects associated with Bank Reconciliation via QuickBooks. So, the users can go through the article carefully, to understand the concept in a better way. However, for more details, the user can also get in touch with our QuickBooks online support team via our toll-free number i.e. +1-888-510-9198.
Undoubtedly, it is significant to reconcile business bank accounts on a monthly basis, in order to avoid any kind of inaccuracy. Reconciling the bank accounts on a regular basis ensures the user about the following points:
This process allows the user to analyze the discrepancies between the records & the banks and ensure that they are fixed in an apt manner.
Well-timed notification of any fraudulent transactions that may occur is another benefit of reconciliation.
Significant Notes for QuickBooks Bank Reconciliation
Before the user begins with the reconciliation process, make certain to have:
In case the beginning in the start Reconciliation window doesn’t match the beginning balance in your bank or debit card statement, then the user shouldn’t wage bank Reconciliation in QuickBooks.
Setting up the bank or credit card account in QuickBooks with the correct beginning balance is also an essential factor.
The user should not edit any type of transaction that has been currently resolved. As it will certainly trigger a discrepancy in the account and the user will end up in different beginning balance.
Another factor that the user should ensure is to receive a duplicate of the bank or credit card statement.
One of the best methods is to always reconcile the account as he/she receives his/her bank or credit card statement to ensure that the QuickBooks account is always in balance with the paper statement.
Lastly, the user is required to ensure that he/she has entered all un-cleared transactions for the statement period.
Significance of QuickBooks Reconciliation with Bank Account
Basically, the Bank Reconciliation is a financial accounting technique that uses two sets of records to make certain that there are authentic figures in concurrence. Reconciling bank accounts with QuickBooks can be used to conclude whether the funds move an account event & the total sum spent. The user is supposed to make secure the two values equalized at the end of the recording period.
Reconciling a bank or credit card declaration evidently implies to observe in contrast the accounting records, accounts receivable, and accounts payable & identical them up to the equivalent transaction as recorded on the bank statement. At the end of each financial month & quarter, it’s a fine idea to reconcile an account. When reconciling an account, businesses, and singular person prove that each transaction sums to the correct ending account balance.
The very first benefit of QuickBooks Reconciliation with Bank account is that the entire financial transactions and bank statements get recorded in QuickBooks software.
Also the entire reconciled transactions are marked as cleared in the QuickBooks.
This makes the user competent to run the bank reconciliation reports that will endow the information of the items that have cleared the bank & those that remain outstanding (uncleared).
The financial report such as balance sheet and profit & loss statements and balance sheet is advanced.
The entire reconciled financial transactions are apparent in QuickBooks as emptied.
The user is able to run the bank reconciliation address that will provide the information of the items that have emptied the bank & those that stay exceptional.
All transactions of the bank statement get listed in QuickBooks.
Before the user pursue the steps to reconcile QuickBooks with bank account, it is important to ensure to have the bank statement available for the bank account to be reconciled.
The user is required to arrange the bank or credit card account in QuickBooks with the accurate beginning balance.
Also, back up the QuickBooks company file.
A pencil for designating the selected items on your statement may also be nearby. Taken a copy of your bank or credit card statement.
Filed all uncleared transactions for the statement period.
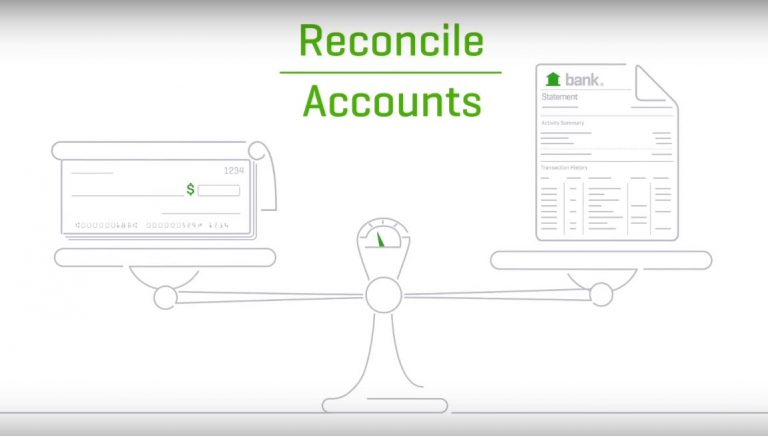
This video will assist the user to Reconcile the accounts in QuickBooks,
Facts associated with QuickBooks Reconciliation with Bank Account
It is significant to reconcile the bank account as an everyday review of the bank accounts can assist the user in identifying problems before it become a brain teasing hassle. This is mainly important for businesses, accounts, & individuals to inspect wrong activity and to continuing financial statement errors.
Catch Hoax:
One of the major things to look for is any sort of indication of hoax.
Were reliable analyses that the trouble creates a replica or alteration, leading to more money leaving the analysis account?
Were checks troubles without permission?
Are there unapproved transfers out of the bank account, or has anyone made unapproved withdrawals?
Pay Employees:
QuickBooks has time-tracking and integrated payroll features. Employees log their hours, the employer can assess as well as approve them, whereas QuickBooks does the rest.
With the help of QuickBooks the user can Cut the checks or pay staff members by means of direct deposit, issue W2s at tax time, as well as file taxes online.
Avoid Troubles:
Reconciling the bank account also facilitates the users to recognize issues that might entail attention. For instance, the user might probably desire to re-examine how he/she handles or manage the cash flow & accounts receivable, or possibly wish to modify the activity performed by someone that has been recorded in the system or the accounting processes the user generally applies.
The user must know the availability in accounts.
Stop bank charge for not sufficient funds or going into lines of credit when the user doesn’t really want to.
Refrain from bouncing analysis or failed computerized payments to coworkers & suppliers.
Familiarize with the bounced or unsuccessful customer payments and also if any action required.
Track the outstanding checks.
Ensure that entirety is going into the accounting system appropriately.
Enable the user to see the bank errors.
Receive Payments:
The user can easily accept payments with QuickBooks. Simply giving the customers an option to pay through credit card, debit card, PayPal, or bank transfer, will work in this case.
QuickBooks refines the repayment and also transfers the money directly to the bank account.
The user can swipe or dip the card from the phone or tablet if there is even a mobile card reader.
Reconciliation Time:
It’s logical to analyze the bank accounts at least every month. For high-volume businesses or positions where hoax is jeopardy, more often is better. Some businesses reconcile their bank accounts every day.
The user can also build care into the bank accounts – ask the bank for ideas. One of such solution is – Positive Pay, which various banks propose, continuing the bank from accept payments unless the user has beforehand notified them about the payment.
If the Accounts don’t get reconcile:
At times, it is might be happen that the user might not be able to reconcile the bank accounts. No need to be anxious if the difference among the two statements is tiny. As most of the reconciliation module authorize to label it as an error. Most possibly, the user will be capable to resolve the missing transaction during next month’s reconciliation.
This brings us to the end of the article, where we hope that the information stated in the article might help the user to understand the QuickBooks Reconciliation in a better manner. For further information or assistance for any issue associated with QuickBooks – directly make a call to our QuickBooks Enterprise support team by dialing toll-free +1-888-510-9198. Our experts will be more happy to help you.
What is QuickBooks bank reconciliation, and why is it important?
Bank reconciliation is the process of matching the transactions in your bank statement with those in your QuickBooks account. QuickBooks bank reconciliation ensures that your accounting records match your bank statement, which helps you identify discrepancies, prevent overdrafts, and maintain accurate financial records.
How do I reconcile my bank account in QuickBooks?
To reconcile your bank account in QuickBooks, first, navigate to the Banking menu and select the account you want to reconcile. Then, click the Gear icon and select “Reconcile.” Follow the prompts to enter the statement date, ending balance, and any service charges or interest earned. Next, compare the transactions on your bank statement with those in QuickBooks and mark them as cleared. Once all transactions match, click “Finish Now” to complete the reconciliation.
What if my bank reconciliation doesn’t balance in QuickBooks?
If your bank reconciliation in QuickBooks doesn’t balance, you may have missed a transaction or entered an incorrect amount. Double-check your entries and compare them to your bank statement. You can also try reconciling again from the beginning or reaching out to QuickBooks support at +1-888-510-9198 for assistance.
Can I reconcile multiple bank accounts in QuickBooks?
Yes, QuickBooks allows you to reconcile multiple bank accounts at once. Simply select each account you want to reconcile from the Banking menu and follow the same steps as you would for a single account.
How often should I reconcile my bank accounts in QuickBooks?
It’s best to reconcile your bank accounts in QuickBooks at least once a month to ensure accuracy and catch any discrepancies early. However, the frequency may depend on the volume of transactions and the size of your business. For more information on the ideal reconciliation schedule for your business, call our toll-free number +1-888-510-9198 to speak with a QuickBooks expert.
If you’re trying to switch QuickBooks to multi-user mode and keep running into Error H202, you’re not alone, this is one of the most common multi-user errors QuickBooks Desktop users face. It basically means that the workstation you’re working on is having trouble communicating with the server where the company file is stored. And until that connection is established, QuickBooks simply won’t let you switch to multi-user mode.
The error usually shows up with a message like: “You are trying to work with a company file that is located on another computer, and this copy of QuickBooks cannot reach the server on that computer.” It can affect one workstation or multiple workstations at the same time and in some cases, it can even prevent you from opening the company file altogether.
In this article, we’ve covered everything what causes Error H202, how to identify it, and 14 updated methods to fix it permanently. Just go through the solutions one by one and you should have it resolved without too much trouble. And if you’d rather have a professional handle it, our QuickBooks support professionals team is available 24/7 at +1-888-510-9198, just call us and we’ll get your multi-user setup working again right away.
What is QuickBooks Error H202? (Multi-User Switching Issue)
QuickBooks error H202 basically falls under the H series error category, which is majorly related to multi-user mode. QB users have reported this error often when either switching from single-user mode to multi-user mode or when opening a company file in multi-user mode. As mentioned earlier, you can experience this issue when trying to access a company file stored on another system.
You can come across the following warning messages when QuickBooks error H202 occurs:
Error
Description
Problem
You are trying to work with a company file that is located on another computer, and this copy of QuickBooks cannot reach the server on that computer. (H202)
Problem with multi-user hosting setup
QuickBooks could not open the file in multi-user mode. (H202)
Fixing QuickBooks error code H202 becomes easy, once you understand what factors can lead to this issue. This article will help you understand the causes, signs and symptoms, as well as the effective ways that can be implemented to fix the issue. Thus, keep reading!
Majorly any sort of communication issue between QuickBooks desktop and the server can cause this error in QuickBooks. Below discussed are the core reasons why you can come across QuickBooks H202 error. Let us have a look:
The Hosting configuration setting is incorrect. If that is the case, then you can experience this error.
Or in case the QB file setting option blocks access to the company file. Thus, it blocks incoming or outgoing communication.
In case there is any damage or inappropriate .ND files configuration that allows the database file through QuickBooks, then you can see this error.
If the QuickBooks software is unable to search the main IP address of the host system or by using some other IP address.
A company data file is not communicating easily to the server.
If the setting of DNS is improper or incomplete.
The QuickBooks service like QuickBooksDBXX/QBCF is not started.
Firewall or a security software is blocking the communication to the company file, in such a situation also error H202 is most likely to occur.
When a user tries to work with a company file & it is located in a multi–user mode & this replicates the QuickBooks that is unable to reach the server on your system.
What are the Signs and symptoms of error H202 in QuickBooks?
You can identify the QuickBooks error H202 easily, considering the following signs and symptoms. Let us evaluate:
Unable to switch to multi-user mode in QuickBooks.
If after trying a lot of times, you are unable to open a company file located on another computer.
If the system or the QuickBooks software freezes again and again for a couple of seconds.
Before you start, make sure you’re logged into QuickBooks as an admin, some of these methods require admin-level access to work properly. We’ve listed 14 methods below, starting from the easiest and most effective ones. In most cases, Methods 1 through 3 are enough to fix the issue so start there before moving on to the more advanced steps.
Method 1: Run QuickBooks Tool Hub on Server
Step 1: From Tool Hub Program, run QuickBooks File Doctor Tool
QuickBooks File Doctor Tool is basically a tool designed to diagnose and troubleshoot different errors like QuickBooks errors H101, H202, H303, or H505. To use this tool, you will first have to download QBFD from official Intuit site or you can also make use of QuickBooks Tool hub to access this tool. The steps involved in this process are listed below:
Now, install and run the QuickBooks tool hub program using the onscreen steps.
The next step is to open QuickBooks Tool hub and head to the company file issues tab.
Also, click on Run QuickBooks File Doctor option.
Now, in QuickBooks file doctor, you need to go for Company file from the dropdown menu. If you are unable to identify the file, then click on browse and search to find the file.
After that, you need to click on Check your file and Network checkbox and then click on Continue tab.
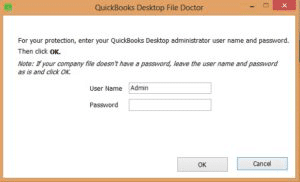
Towards the end, you need to enter your QuickBooks Admin Password and then click on next tab.
Note that the scan time usually depends on the file size and in most cases, it usually takes around 5 minutes. After the scan ends, you need to open the QuickBooks software and the company file.
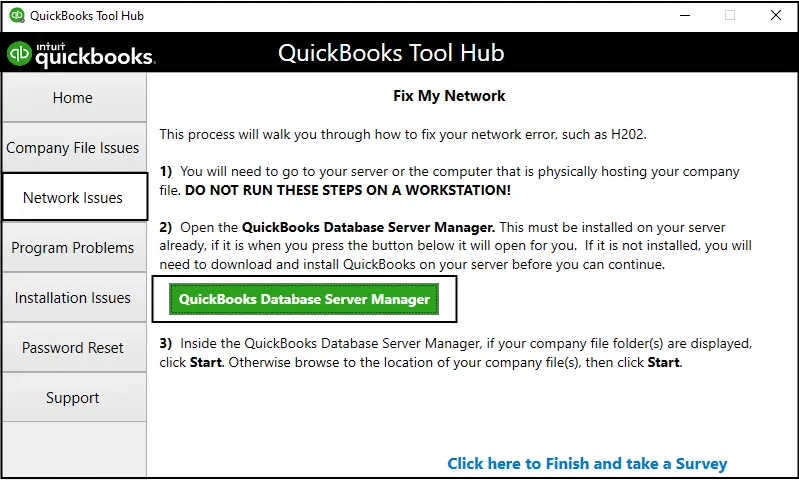
Step 2: Install and run QuickBooks database server manager on your server
Initially, you need to open QuickBooks Tool hub and select network issues tab.
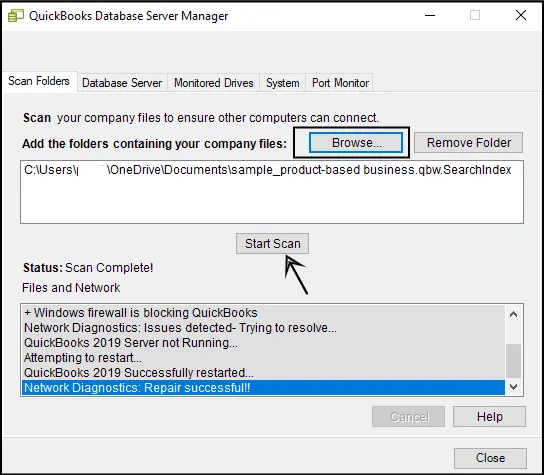
After you are done within the QuickBooks database server manager, look for the folder that has company files stored. You can further use the Browse feature to find this folder.
The user will then have to click on Start Scan tab.
QBDBSM will now repair your firewall permissions on its own.
After the scan process ends, you are supposed to click on close tab.
On each of the workstations where the error shows up, you need to launch QuickBooks.
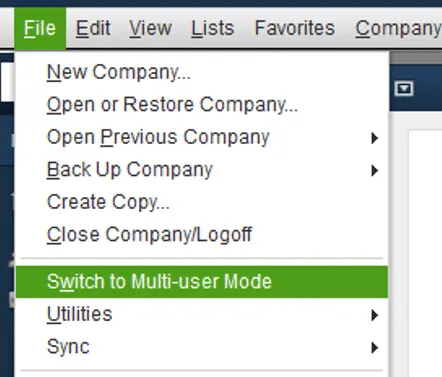
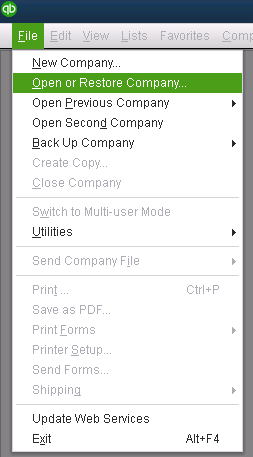
Furthermore, click on File menu.
And then, head to Switch to multi user mode.
In case you now use QuickBooks in multi user mode, the error won’t show up. In case the error still occurs, then proceed to the steps below.
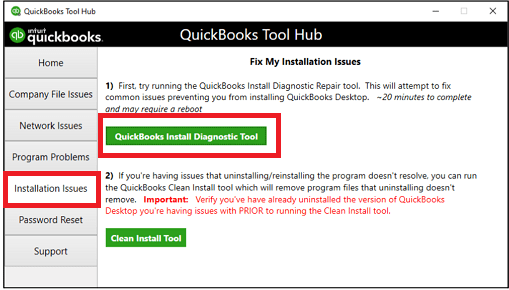
Step 3: QuickBooks Install Diagnostic Tool
You need to first open QuickBooks tool hub on the server system.
Further, head to Installation issues tab from the tool hub.
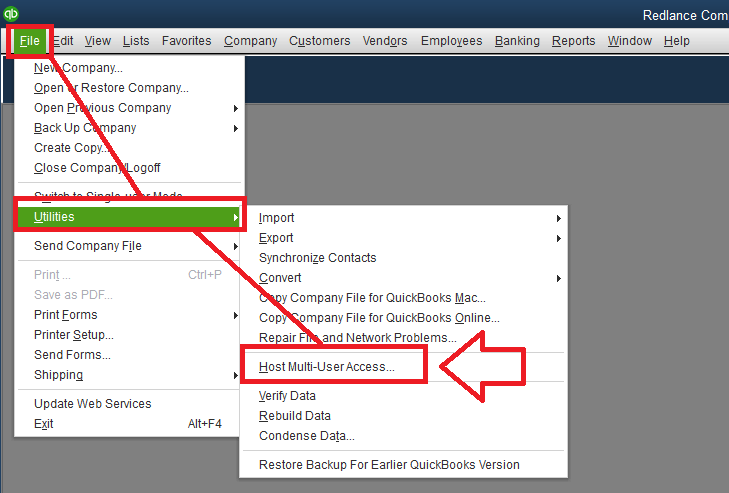
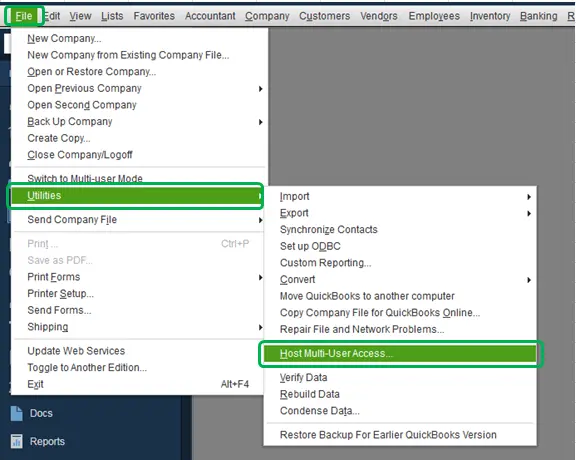
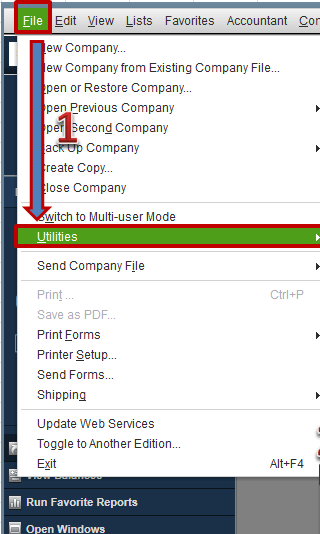
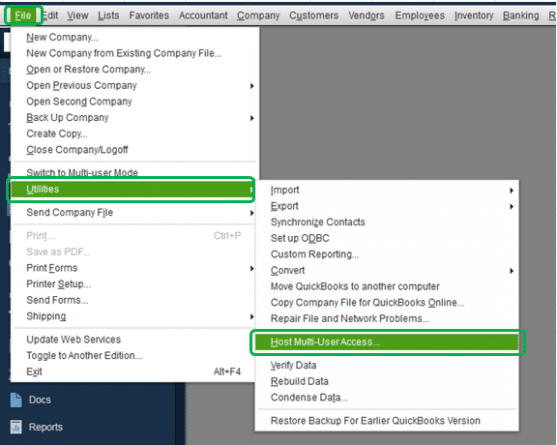
The initial step is to open QuickBooks on the hosting system and then select “File” & click on “Utilities“.
And then, see the list of “Host Multi-User” to Access it, this computer is not hosting the file. Move to the next system. Note one thing don’t change anything on your workstation.
If you see “Stop Hosting Multi-User Access“, select it.
Ensure that company file must be closed, click to “Yes” option.
Method 3: Verify the QuickBooks Services
In case the server is running in a full version of QuickBooks, then you can perform the following steps to start multi-user hosting mode.
When on the server, open QuickBooks Desktop.
After that, head to the File and then the Utilities tab.
Now, select Host Multi-User access option from the list.
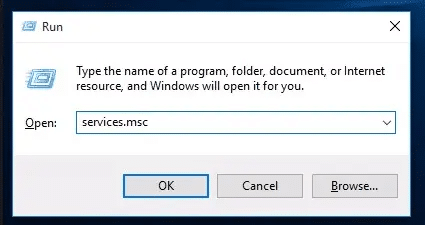
To verify the running status of QuickBooksDBXX and QBCFMonitorService on the server, you can continue with the below steps:
Click on the Windows “Start” button.
And then press the keys as “Windows + R” keys to run the program.
In that running dialog box, type as “MSC” and hit “Enter” key.
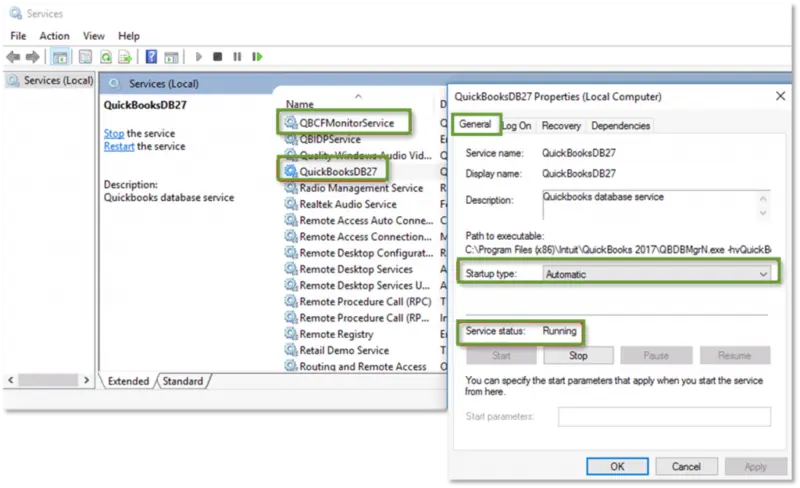
You now have to select QuickBooksDBXX
After that, choose Startup type, in case it is Automatic or not.
If the startup type is not set as Automatic, then make sure to do it immediately.
Now, check the Service Status and ensure it shows Running.
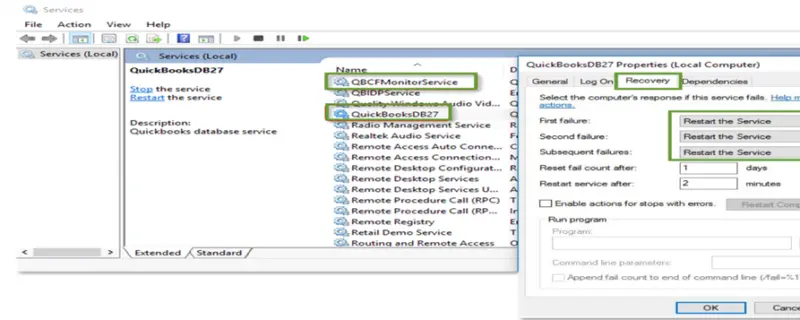
Now move to the Recover Tab and go for it.
Head to the drop-down menus for first, second, and subsequent failures and select Restart the Service of all these.
You are now required to click on Apply and ok tab to confirm the changes respectively.
Once done with that, you need to carry out all of the above steps for QBCFMonitorService.
Method 4: Ping your server from a workstation to check for network issues
There might be a firewall issue if you see QuickBooks Error Code H202 on one or more of your workstations. To fix the issue Ping your server from each workstation where you are getting Error H202.
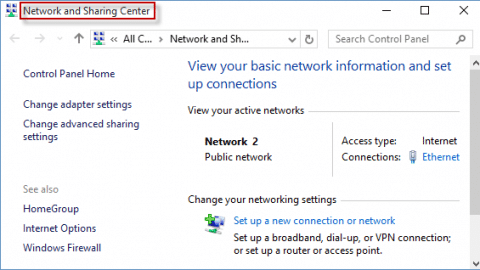
Step 1: Turn on Network Discovery on your server computer
On your server computer and workstations, Open the “Windows Start Menu“.
After that type Network into the search and then open Network and sharing center.
After that choose change advanced sharing settings.
Ensure that you have selected Turn on network discovery in the Network Discovery and File and Printer sharing sections.
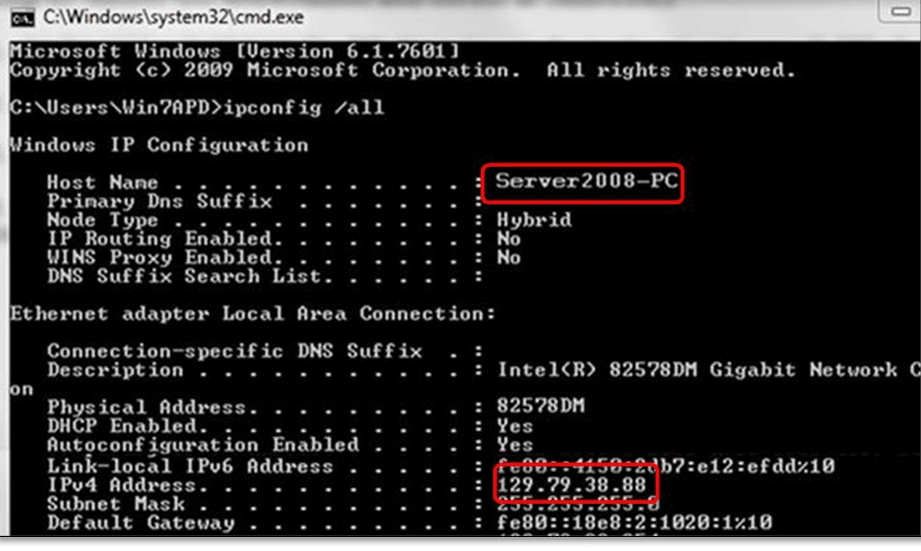
Step 2: Get your server name from your server
First of all, you need to open the Windows Start menu on your server computer.
After that type “Run” into the search and then open Run box.
After that type “CMD” into the Run window, and then hit on Enter key.
Now type “ipconfig/all” into the command window, and then press Enter key.
After that search the Host Name in the Windows IP Configuration section. You will find your server’s name is on the right.
Now you have to note down the hostname and copy it to a word file so that you can access it quickly.
Step 3: Test Network Connectivity
Under this step, you need to head back to the workstation to test the server. You might find these steps a bit tricky to perform. Thus, it is suggested to consult an IT professional for help.
The very first step is to open Run window by clicking on the Windows + R in the system where you get the error code H202
After that, type CMD in the box, and click on the ok tab
Once done with that, you need to ping the server
Type ping_server name and click on the enter tab.
You can perform the steps mentioned above on all systems that receive the same error.
Just in case the response you receive is slow, then there might be some issue with the network and a repair is required.
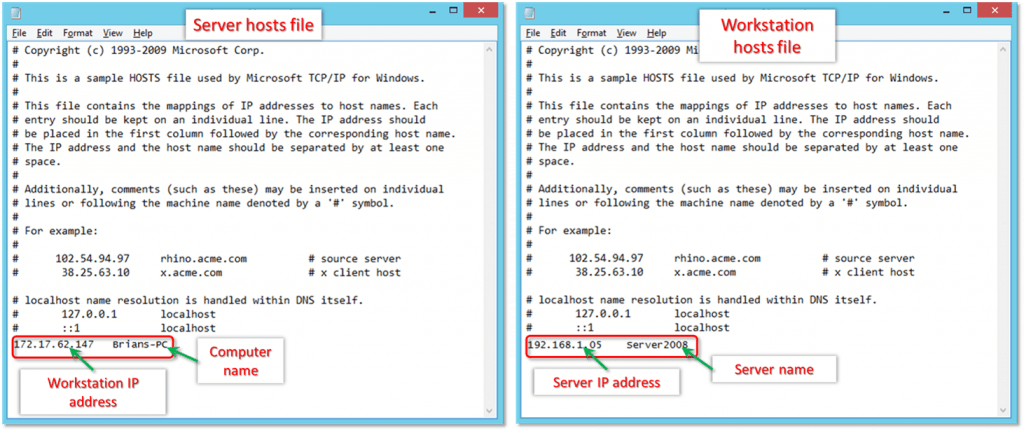
Method 5: Go to Windows Host File and Add Server
You need to first close all Windows open on the system.
After that, head to C:\Windows\System32\Drivers\Etc or C:\Windows\System64\Drivers\Etc on the server.
The next step is to double-click the hosts file and choose Notepad on being prompted for a program.
You now have to enter in the IP address and then the name of the system. For the server, you need to enter IP and the name of the system. For computer, you will have to enter IP of the server and the computer name.
To separate the computer name and IP address, click on Tab key rather than the Space bar.
Try opening Quickbooks in multi-user mode and check if the issue is resolved or not.
Method 6: Add Services QuickBooksDBXX and QBCFMonitor to the admin group
Offer QuickBooksDBXX and QBCFMonitorService Windows admin permission on the server. In case these services do not already have admin permission, then ensure that they get it as this may fix the issue. See if you can use the software in multi-user mode.
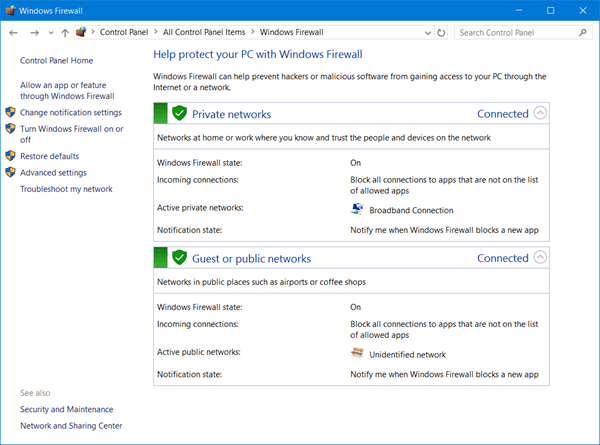
Method 7: Configure system firewall settings
At times, your system firewall might block the data exchange between QuickBooks and the server. In that scenario, you need to perform the steps to configure QuickBooks firewall settings, to ascertain uninterrupted communication between QB and the server.
Create exceptions in the settings of the System Firewall
Make changes to system firewall permissions and then open QuickBooks on all the systems.
Within QuickBooks, opt for switch to multi-user mode under the file menu.
It is essential that no other client system is trying to host the same company file. This can be ensured using the set of steps below:
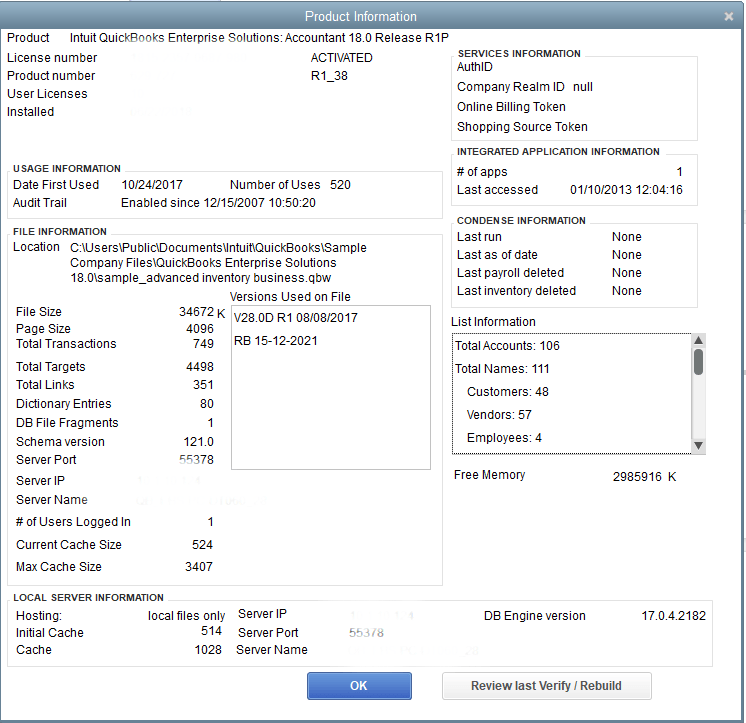
Start by launching QuickBooks.
Press F2 key to reveal the product information window.
You are now required to select hosting to reflect local files only under the local server information.
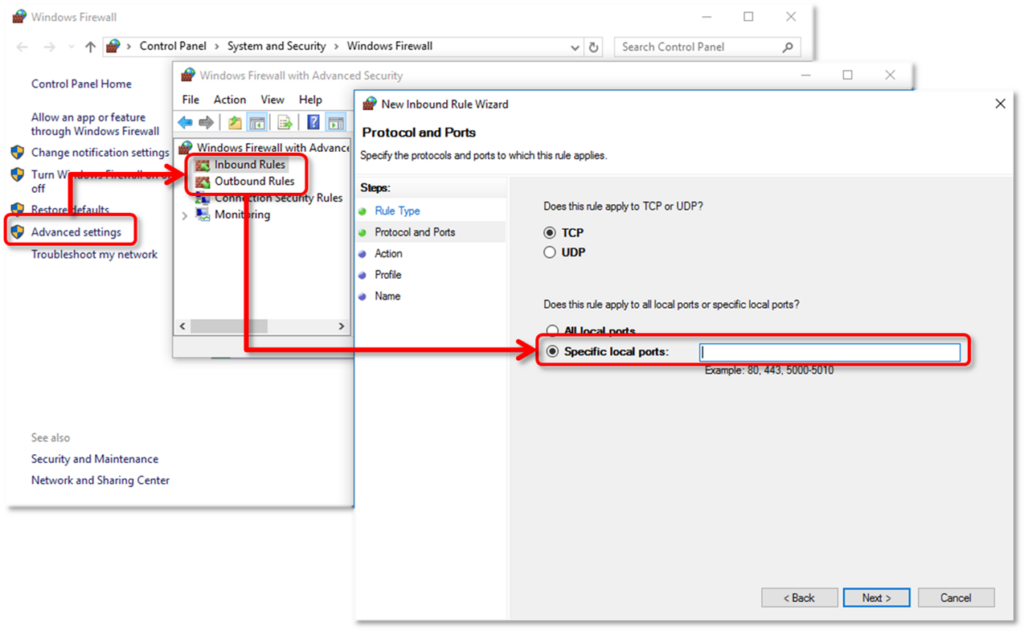
Method 11: Include QuickBooks ports in firewall
In order to ensure that the firewall doesn’t obstruct the multiuser mode, you need to make sure that the firewall includes the QuickBooks ports. Here is a quick list that you can use to configure firewall ports for QuickBooks.
QuickBooks 2019 doesn’t have any static Firewall Ports: The ports are automatically renewed once you can run the company file in the Database server manager.
Method 12: Alter QBGlobalAppConfig.ini file on the Fedora Linux Server
You need to open Linux Terminal Window and also access QBGlobalAppConfig.ini
After that check the default range for ports and further delete the spaces before and after the = equal sign.
QuickBooks version
…from
to…
QuickBooks Desktop Enterprise 22.0
55398 = 5
55398 = 5
QuickBooks Desktop Enterprise 21.0
55393 = 5
55393 = 5
QuickBooks Desktop Enterprise 20.0
55388 = 5
55388 = 5
QuickBooks Desktop Enterprise 19.0
55383 = 5
55383 = 5
QuickBooks Desktop Enterprise 18.0
55378 = 5
55378 = 5
QuickBooks Desktop Enterprise 17.0
55373 = 5
55373 = 5
You can find the complete list of ports in Install Linux Database Server Manager
Ensure to save the QBGlobalAppConfig.ini file.
The last step is to stop and reboot the QBDBFILEMON and QBDBMGRN services.
We hope one of the 14 methods above helped you fix QuickBooks Error H202 and get your multi-user setup working again. In most cases, running the QuickBooks Tool Hub on the server or verifying the hosting settings takes care of the issue so always start with those before trying the more advanced solutions like firewall configuration or Linux server settings.
If you’ve gone through all the methods and the error is still showing up, it likely points to a deeper network or server configuration issue that needs a professional eye. Don’t keep troubleshooting on your own and risk disrupting your entire multi-user setup. Call our certified QuickBooks ProAdvisors at QuickBooks support phone number i.e. +1-888-510-9198. We’re available 24/7 and will diagnose the exact cause and get your QuickBooks multi-user environment running smoothly again.
Frequently Asked Questions!
What does QuickBooks error H202 mean?
This is a common error code that can occur in QuickBooks when you are trying to access a company file in multi-user mode.
What error message QuickBooks displays on screen when QuickBooks Error H202 occurs?
“Error H202: QuickBooks could not reach the server. This error can be caused by a variety of reasons, including network connectivity, firewall issues, or incorrect hosting configuration settings.”
How do I fix Windows firewall is blocking QuickBooks?
In case you are experiencing an issue where Windows Firewall is blocking QuickBooks, you can try the following steps to resolve the issue: 1: Add QuickBooks to the Windows Firewall exception list 2: Create a new Inbound Rule 3: Disable the Windows Firewall temporarily
Can QuickBooks Error H202 affect only some workstations and not others?
Yes, it’s very common for Error H202 to show up on some workstations but not all. This usually happens when a specific workstation has incorrect hosting settings turned on, or when the firewall configuration on that particular machine is blocking communication with the server. Method 2 (Verifying QuickBooks Hosting) and Method 7 (Configuring Firewall Settings) in this guide are specifically designed to fix workstation-specific H202 issues. If only one workstation is affected, start with those two methods first.
Does QuickBooks Error H202 only occur in QuickBooks Desktop, or can it happen in QuickBooks Online too?
QuickBooks Error H202 is specific to QuickBooks Desktop and its multi-user mode it does not occur in QuickBooks Online. This is because QuickBooks Online is entirely cloud-based and doesn’t rely on a local network or server to share company files between users. If you’re experiencing multi-user access issues in QuickBooks Online, those would be handled differently through your Intuit account settings and user permissions
Will fixing QuickBooks Error H202 affect my company file data?
No, all the methods in this guide are focused on fixing the network connection and hosting configuration between QuickBooks and your server. None of them delete, modify, or affect your actual company file data. Your financial records, transactions, and reports remain completely safe throughout the troubleshooting process. However, as a general best practice, it’s always a good idea to have a recent backup of your company file before making any changes to your QuickBooks setup or server configuration.
Get to know all about the Enhanced Inventory Receiving on Transactions
QuickBooks enterprise application has brought a revolutionary change in accounting and bookkeeping industry. Not only does it save a lot of time but also effectively maintains the finances of the company. In this article we will discuss QuickBooks Enhanced Inventory Receiving and various other aspects associated with the same. To learn further about enhanced inventory receiving on transactions in QuickBooks enterprise, make sure to read this post till the end, or you can also connect with us at +1-888-510-9198, for further technical guidance.
What is QuickBooks Enhanced Inventory Receiving (EIR)?
EIR is considered to be one of the best features in the QuickBooks Desktop Enterprise solutions and it is known to manage the complete new procedures of paying and receiving items. QuickBooks Enhanced Inventory Receiving (EIR) is the finest feature accessible by QuickBooks Desktop Enterprise V12.0. It changes past transactions when started. This feature manages the complete new process for receiving and paying the items.
However, one needs to answer the below given questions in order to understand that this feature is valuable or not. If your given answer is ‘Yes‘ to any of these, it might just work for your business.
These Questions are as:
Have you ever received a bill that covers multiple item receipts?
Did you pay for the items before to receiving them and do not want to increase your inventory quantities?
Do you grab multiple bills for one item receipt?
Do you require 2 different receipts from accounts payable?
Want to different items receipts from accounts payable?
Important Points to Remember:
Create a backup of your company file before go to the following steps in this article (Recommended).
Don’t forget it that Enhanced Inventory Receiving (EIR) is only the feature, that you can’t switch off once it gets turn on.
Compress your company file if it is too large or heavy.
We recommend you to conduct a test using a copy of your company file and analyse if it works with your business.
What happens after turn on EIR (Enhanced Inventory Receiving)?
When the user turns on the EIR feature, the Bills do not increase the inventory items, and also the bills that are generated from the items receipts are no longer exchange items receipts.
Also, the Account Payable doesn’t get affected by the Item receipts anymore, only if you receive a bill for an open item receipt.
If the user gets a bill with different costs equated to the connected item receipt, then the program spontaneously changes the item cost on the available item receipt.
When a new item is entered, the QuickBooks Desktop calculates the inventory average cost. Each day the item receipts makes changes in the order of the inventory transactions that ends up in the average cost.
Once the user turns on the EIR, the process generates receipts for each bill in the company file that carries items and thereby there is a growth in the number of the transactions.
Also, it should be noted that the third party applications that affects the inventory may not be able work along with the EIR.
Limitations when using EIR:
The very first negative point is that the user can not add any negative item to Item Receipts or Bills.
Also, the user is restricted to add expenses to the receipts of items.
In case the user has generated any purchase order for non-inventory items, then the user has to receive them with an item receipt so as to close that purchase order.
In EIR the user will not be able to assign the items as ‘billable on the item receipts.
Once EIR is turned on by the user, and the user tries to get a separate receipt of an item from the bill for which the user is supposed to find the account for the value of the item received. The EIR QuickBooks Desktop developed an Inventory Offset Account that works as an opening account in between the item receipts and bills. As the user enters the bill for an item receipt, the transaction amount that has been cleared from the Inventory Offset Account and credit to the payable account.
At the time the user entered an item receipt QuickBooks desktop generates the below journal entry:
Item ReceiptItem Receipt
Debit
Inventory Asset Account
Credit
Inventory Asset Account
At the time when the user enters an item Bill QuickBooks desktop generates the following journal entry.
BillBill
Debit
Inventory Offset Account
Credit
Accounts Payable
After Enhanced Inventory Receiving is turned on, the QuickBooks Desktop produces these transactions unlike the common reports in QuickBooks used to look like.
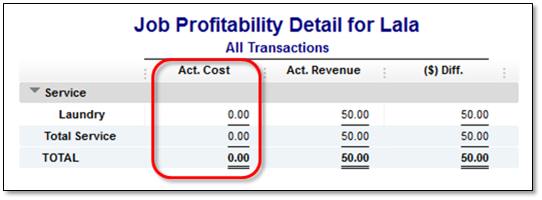
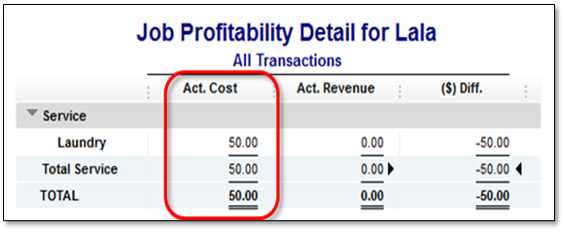
For example: After turning on the Enhanced Inventory Receiving (EIR), Act. Cost shows 0.00 in job profitability detail report in a company file.
As EIR is turned on, the item used in generating bill is often related to the Inventory Offset Account rather than the account that was used at the initial setup of the item.
The default filter of job profitability detail report is Account: All income/expense and Name.
Therefore, add or change the filter in “Account” to Inventory Offset Account gives you the actual amount of Act. Cost column.
Latest process for receiving and paying for items:
To pay and receive inventory, the user will have to follow two processes:
When EIR is turned off:
Single transaction: Enter the bill that makes the inventory at hand larger
Multi-transaction: In order to enlarge your inventory adds an item receipt and list a bill that is opposed to the item receipt.
After EIR is turned on
Two transactions must be recorded, the user can list them in order either:-
An item receipt to make the inventory close by larger.
Or A Bill to pay the items. In order to check the exact value of your payable account you have to enter a bill opposed to an open item receipt. You must enter a bill as opposed to an open item receipt in order to see the exact value of your payable account.
Important: This procedure claims only to bills. Using Checks and Credit Card, you can still enlarge your inventory Amounts and pay for the items in one step.
After discussing various aspects of EIR, we conclude that after reading the above information, the user can make the best use of EIR. In case the user has any query regarding QuickBooks Enhanced Inventory Receiving (EIR), or in case of doubt, you can speak to our experts executives.
FAQs Related to advanced inventory in QuickBooks Enterprise?
How do I use advanced inventory in QuickBooks Enterprise?
You can turn on advanced inventory in QuickBooks using the steps below: 1. At first, go to the edit menu and further click on preferences. 2. You now need to choose items and inventory and select the company preferences tab. 3. After that, find the inventory and purchase orders are active box and check it. 4. Once done with that, click on advanced inventory settings.
What is advanced inventory in QuickBooks Enterprise?
QuickBooks Advanced Inventory is an add on Enterprise feature that allows a business to maintain, track, and virtually move inventory. Using QuickBooks Advanced Inventory, a business can: Manage your inventory process from a single dashboard. Track bin, lot or by serial number. Use mobile or standard bar code scanning.
Does QuickBooks Enterprise have inventory management?
QuickBooks® Enterprise includes a number of features that support this kind of robust inventory management. Amongst those features, the software’s tools enable you to easily: Track products by bin location, serial numbers, or lot numbers. Manage your end-to-end workflow from a single dashboard.


![How to Fix QuickBooks Error H202? [Updated Fixation Methods]](https://www.hostdocket.com/wp-content/uploads/2020/02/QuickBooks-error-H202.png)