QuickBooks payroll has made payroll and other activities much easier for businesses with its powerful features. Features like automatic tax calculations, e-payment, free transactions, and many more make daily activities quick and smooth. However, there are certain errors and technical glitches that might show up when working on this software. There can be a handful of common QuickBooks payroll errors that you can experience and to help you out in dealing with such errors, we have curated this piece of writing. This segment shares the complete information about different QuickBooks Payroll errors & their solution.
Most of the QuickBooks Payroll errors happen when customers try to update the payroll software or the tax table, or try to set an employee up for a child support deduction, try to pay employees and more. To learn further about QuickBooks payroll update errors, make sure to stick around this piece of writing, or you can further connect with us at +1-888-510-9198, and we will help you with the complete information.
When you run a business, it is essential to ensure that your payroll is in order. However, even if you are careful, certain mistakes can happen unknowingly, which can further land you into various payroll errors. You can come across various payroll errors due to corruption of existing registry files or missing files of the windows system. Incorrect installation of the software is another common factor. You can also expect to face some payroll update errors when a few discarded files are left behind when uninstalling the software.
If the first step doesn’t work for you the Uninstall and Reinstall the QuickBooks:
First of all, click on the Microsoft Windows “Start” button and then choose the “Control Panel“.
After that you have to manually remove the following QuickBooks installation folders.
C:\Program Files\Intuit
C:\Program Files\Common Files\Intuit
C:\Documents and Settings\All Users\Application Data\Intuit
C:\Documents and Settings\All Users\Application Data\Common Files\Intuit
C:\Documents and Settings\All Users\Documents (Shared Documents)\Intuit
That’s all from our behalf. We hope that above given both solution methods works for you and now you are capable to solve Intuit Payroll related most common errors.
Solution 3: Rename CPS Folder in the System
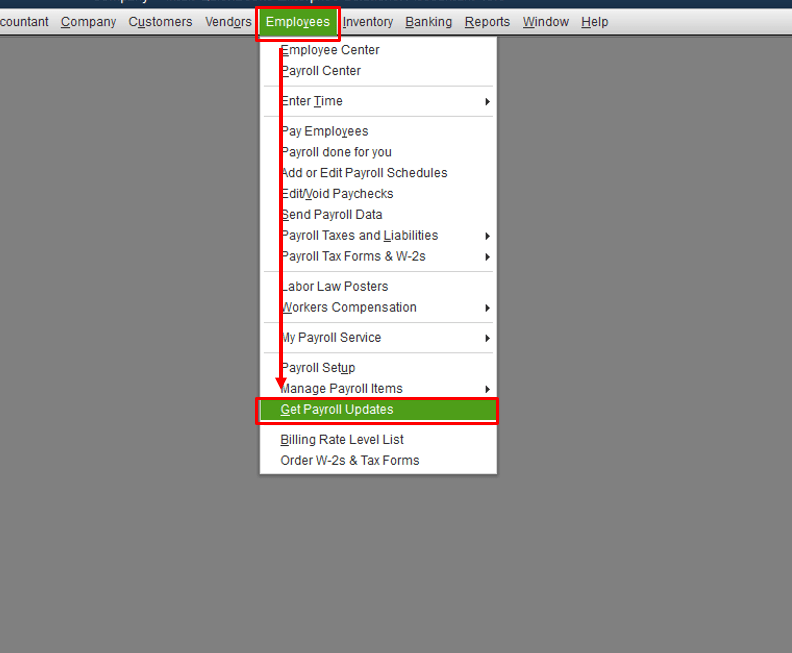
The user will first have to update QuickBooks payroll tax table
And then, open My computer and move to the local drive C:\Program Files\Intuit\QuickBooks 20XX\Components\Payroll\CPS
In this, XX denotes the year of the QuickBooks version like QuickBooks 2019, QuickBooks 2018, etc.
After that, the user will have to rename the CPS folder to CPSOLD and then check if the issue is resolved
Now, again update QuickBooks payroll tax table and check if the error is resolved or not
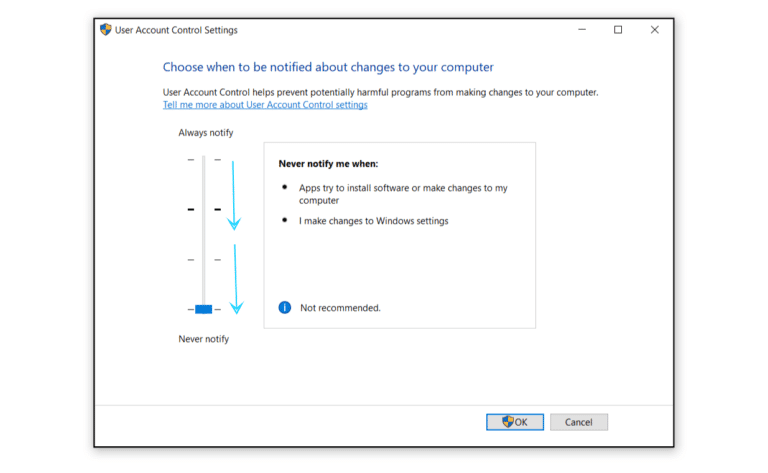
Follow the steps below to change UAC settings in Windows 10, 8.1, 8, and 7.
At first, the user is supposed to press hold Windows + R on the keyboard. This will open the windows Run program
Now, type in control panel and also click ok tab
The next step is to click on the user accounts and then choose the user account (Classic view) option
The last step is to move back to the change user account control settings tab and then choose never notify option
Solution 5: Run Reboot.bat
Well, running the reboot.bat file can help in fixing common payroll errors. This batch is present in the QuickBooks folder. The steps for this process are as follows:
Under this process, you need to first close QuickBooks desktop/ payroll.
Followed by opening the folder where the reboot.bat file is present.
You now have to run the file as admin.
Note that, a DOS command window will appear.
Let the process complete, and the window will close on its own.
Avoid closing the window manually.
Now, reboot the system
In addition to that, launch the QuickBooks Desktop and check if the issue occurs again.
Solution 6: Verify Internet Explorer Settings
In case your system is connected to an internet connection but doesn’t allow you to update the software, then try configuring internet explorer in your system.
Here, you need to simply set Internet Explorer as your default browser.
Furthermore, check if the date and time on your computer are correctly set.
In addition to that, verify the Cipher Speed.
You are supposed to visit the Tools tab.
Navigate to Internet Options to update settings and this ends the process.
Solution 7: Close all the QuickBooks processes
At times, simply closing processes in the task manager can eliminate the issues. Thus, perform the steps below and close all the background process hindering the smooth working of the software.
You need to initially ensure that you have an active subscription.
Later on, reset the QuickBooks desktop update.
Furthermore, check the accuracy of the payroll service key.
In addition to that, restart your system.
You are now required to head to Task manager by hitting the Ctrl + Alt + Delete keys.
Move to the Processes tab.
Go for Qbwebconnector.exe.
Click on the End process option and this ends the process.
Solution 8: Configure firewall and Internet security settings
You can simply configure the internet security settings to work seamlessly with QuickBooks software. However, if you aren’t much aware about this, then feel free to seek professional assistance and speak to your IT team and ask them to configure the security settings for you.
Solution 9: Uninstall and reinstall QuickBooks Desktop in Selective Startup
Often uninstalling and reinstalling in selective startup mode can rectify the issue in QuickBooks. The steps involved in this process are as follows:
Under this process, you need to open the Run command (by pressing the Windows and R keys together).
Furthermore, under the Run command, enter MSConfig.
Click on the Ok button.
Head to the General tab.
Navigate to the selective startup and Load system services.
You are now required to open the Services tab.
Go for hiding all Microsoft Services.
Furthermore, Disable all.
Also, uncheck the Hide all Microsoft Services checkbox.
In addition to that, verify the Windows Installer checkbox is clicked.
Click on the OK button.
Go for Restart on the System Configuration window.
Now, install, uninstall, or reinstall QuickBooks Desktop through clean install.
Solution 10: Install a digital signature certificate
Initiate the process by navigating to C:\Program Files\Intuit\QuickBooks.
Within the QuickBooks folder, search for the QBW32.exe file.
Right-click on the file.
From the drop-down options, choose Properties.
Head to the Digital Signature tab.
Make sure that Intuit is selected in the signature list.
Choose the Details option.
Go for the option to View Certificate option in the Digital Signature Details window.
Head to the option to Install Certificate.
Click on Next until the Finish message is displayed on your computer screen.
Go for the Finish button.
Lastly, reboot your computer.
Once the system reboots successfully, open QuickBooks Desktop and re-download the payroll/QuickBooks update.
Solution 11: Download the updates in Safe Mode can fix common QuickBooks payroll errors
In certain situations, some conflicting programs can cause these issues. Try updating the accounting application after opening Windows in Safe Mode to check this. Steps involved here are:
Open your computer in Safe Mode by restarting the computer and pressing the F8 key.
Go for Safe mode with Networking.
Hit the Enter key.
Re-download the update.
The significant difference between running windows in the safe mode and the Normal mode is that the safe mode obstructs any background programs from working.
After the QuickBooks download process ends successfully, reboot your computer in Normal Mode.
Lastly, try to re-download the update in normal mode.
If still you are troubling with these errors then connect with one of our 24/7 QuickBooks Payroll support agent and get the U.S based best technical support for your QuickBooks issues. Our dedicated helpline number is +1-888-510-9198. We feel more happy to help you out in this. Call us today.!
A Complete Guide to Setting up the QuickBooks Email Service in QuickBooks desktop
QuickBooks allows users to set up email service on QuickBooks Desktop. If you have already set up its email service, you can use it to send invoice to your clients, send and receive reports, and perform other transaction as well from your QB Desktop through your outlook or webmail id. This added feature makes QuickBooks accounting software even more useful for small and mid-sized business owners.
If you are yet to use this QuickBooks feature or you are facing any issue in setting up QuickBooks email service, this article is for you. We have created this article to inform you how to set up email service and fix some common email service errors. Reading this article will help you out in setting up QuickBooks email service in QuickBooks desktop. Moreover, you can also call us at our toll-free number i.e. +1-888-510-9198, and our QuickBooks customer support team will be there to assist you or will set up email service.
Benefits of setting up QuickBooks email services
QuickBooks is loaded with features and these features make it efficient for businesses to perform their daily activities. And the email service feature can be of a lot of benefits to the users. It can help the users in the following ways:
One can easily email invoices whenever the customer requires it directly from the software.
Another plus point of this feature is that it allows the user to send payment reminders to customers by emailing them invoices.
It further helps in importing data from spreadsheets.
This feature serves both as a storage and tracking device for clients’ and vendors’ contact details.
Using this feature, one can make a list of the products and send them to the vendors in a more efficient manner.
Overall, this feature adds to the efficiency and smooth working of the business.
What do you need to set up email in QuickBooks?
In case you are planning to setup Outlook 2007 or Outlook 2003, then you might require the following information:
Username
Password
Outgoing email server address
Incoming email server address
Incoming email server type
Available Email options in QuickBooks
QuickBooks allows the use of limited email services. There can be situations where you might be unable to spot the options for a particular email at QuickBooks desktop setup, due to some or the other reason. One of the reasons can be a different version other than the ones listed below. The common three options available are as follows:
Outlook: In case you have Microsoft Outlook installed already, then simply avail outlook support. Also, note that outlook is a preferred email client and offers more effective hold with much ease.
QuickBooks Email: The second option is the QuickBooks email option. This is not so common option among QuickBooks users.
Webmail: Another option available is the webmail feature, which was launched in 2011 to bridge with Gmail, Yahoo, or any other email platforms.
Steps to Set-up QuickBooks Email Service on QuickBooks Desktop
Before proceeding, you need to prepare and setup your Microsoft Outlook profile.
You can use your existing Outlook profile or create a new one to set up your QuickBooks email service. You will also require Outlook username, password, incoming mail server address, outgoing mail server address and incoming email server type. In case you don’t have these details, you can contact your ISP (Internet Service Provider).
Procedure to set up QuickBooks email invoices in Outlook and web mail
To continue this process you need to create an outlook profile first.
Your webmail password will not be accepted on QuickBooks Desktop
If you are logged in to your QB desktop and trying to send email, you may receive a message that your password is incorrect and you would have to set up your password for your webmail account.
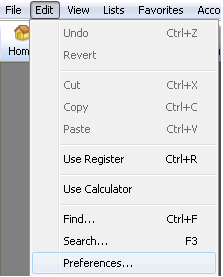
Quick tip: If QuickBooks Desktop doesn’t have outlook:
Go to ‘QuickBooks Edit‘ menu
Click on ‘Preferences‘
Select ‘Forms‘
Choose Outlook and click ‘OK‘
QB 2018: Provides for Gmail and Hotmail/ Lives user in the UK, USA, and Canada.
QuickBooks 2017 R5 and newer versions: Provides for Gmail users for the USA only.
QuickBooks 2017, older and R4 version: No Secure Webmail available.
Important Note: If you wish to add Secure Webmail to your QB company file, you should set up a strong password for your file.
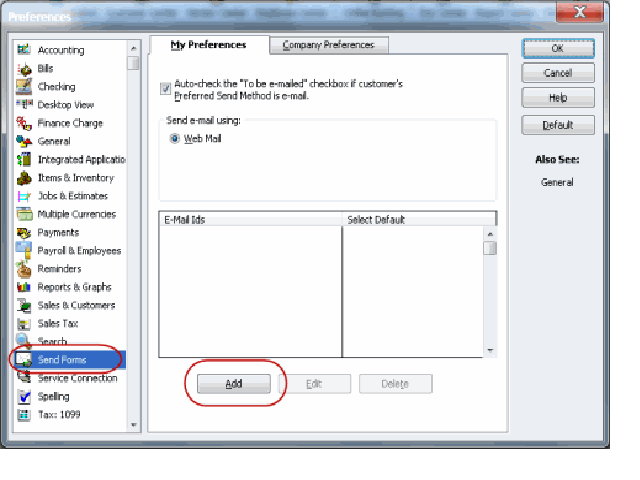
Go to QuickBooks Edit menu and select Preferences and then Send Forms.
Choose WebMail and Click Add.
Type in your email address.
Click “enhance the security” check box.
Click OK.
Sign in after the Login Page appears.
Allow Intuit access.
Important: In hosted environments like right network, you may have to sign into your webmail account to send emails through QuickBooks software.
Your internet service provider determines the Webmail servers and port settings. QB can automatically furnish details for Gmail, Yahoo and other common providers.
You can choose your email service provider in different emails if you use a different email. However, make sure you verify this with your ISP prior to setting up webmail in QB Desktop.
Go to ‘QuickBooks Edit menu‘ and select ‘Preferences‘ and Send Forms.
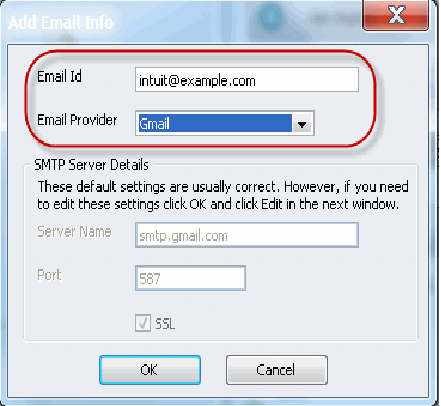
Select ‘Webmail‘ and click ‘Add‘.
Provide Login credentials.
QuickBooks email service set up- screenshot 3
Click ‘OK‘ to save the changes.
Important: QuickBooks Desktop, unlike the Secure Webmail, prompts you to provide your password the first time you use regular webmail to send an email.
In case QB Desktop still doesn’t take your password, please know that web mail providers (Gmail, Yahoo, etc.) practice two-step verification and want users to check the account setting for the same.
If you are a Cox user: Cox’s standard SMTP setting is not to use SSL or login credentials when sending emails. QB Desktop prefers SSL connections and wants you to provide login information. Thus, using port 25 and no SSL connection with SMTP doesn’t function with QuickBooks Desktop. A different trick is to use SSL with port 587 or 465.
If you are a CableOne users: Please use the following information since CableOne uses Google servers.
Email Address: Your Email ID
Email Provider: Gmail
Port: 587 or 465
SSL: Yes
Set up Email service in QuickBooks
This process requires you to choose the QuickBooks email settings.
Followed by opting for the QuickBooks email option.
Later on, enter the needed information like the email address, password, username, etc.
You are also required to enter in any other information asked to and this would successfully link the email service to your QuickBooks.
Set up regular webmail
Before setting up the regular webmail, make sure to perform the steps related to verifying the server and port information with ISP. The steps involved in setting up web mail are as follows:
Note that, the webmail servers and the port settings are governed by ISP.
Enter the information for some of the most common providers like the Gmail, Yahoo, and Hotmail.
Search for the server and port information.
Perform the steps that appear on the screen until it shows set up successful.
Internet Service Provider (ISP) and Port Information
Below we have shared a table in which we have mentioned various internet service provider and port information. The users can check out the below table to find out the exact codes and information.
SP (Internet Service Provider)
SMTP Server
SMTP Port
1AND1.com
smtp.1and1.com
587 (SSL enabled, with password)
ADELPHIA
mail.adelphia.net
110
AOL
smtp.aol.com
465 or 587 (see Note) (SSL enabled for incoming and outgoing mail server)
We hope that you find this blog post helpful and at the end of this post you might be able to Set up Email Service In QuickBooks Desktop. In case you have any further query we are available 24×7 at your service. However our QuickBooks online support team is always there to assist you in your problems.
You can call us at our toll-free number i.e. +1-888-510-9198, and our certified professionals will be happy to help you!
An unusual error hindered your QuickBooks update? Well, while updating your QuickBooks payroll software, you might land on the most common QuickBooks errors i.e. QuickBooks Error PS077 and PS032. These Payroll errors often show up when users try to download updates of QuickBooks Payroll. If you too come across this error while downloading the payroll updates, here is everything you should know about the QuickBooks Error PS077 and PS032.
However, for any further information or if you are seeking expert assistance, then the user can feel free to call us at our toll-free number i.e. +1-888-510-9198. Our QuickBooks error support team will help the users in getting rid of the QuickBooks payroll error PS077 or PS032.
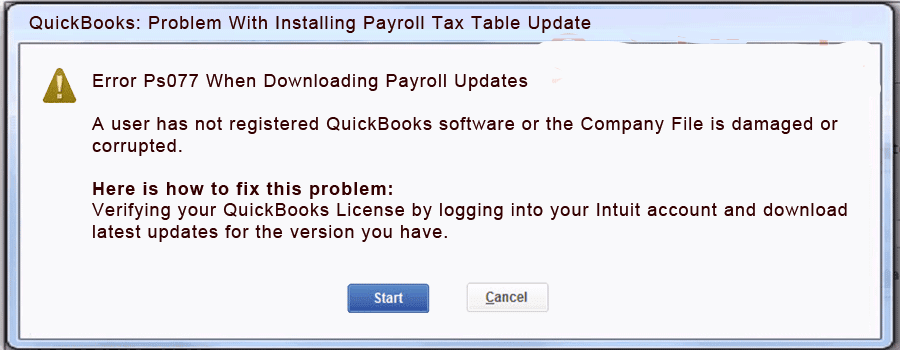
Before you learn the causes and fixes of the QuickBooks error PS077 or PS032, it is important to learn about these errors. This error code is often seen when the user tries to download payroll updates. It comes up with an error message stating:
Payroll Update
[PS032] QuickBooks can not read your payroll setup files, Note the message number at the beginning of this message, and click Help for troubleshooting tips to resolve this problem.
QuickBooks: Problem having trouble installation payroll tax table update.
Error PS077 When Downloading Payroll Updates
A user has not registered QuickBooks software or the Company file is damaged or corrupted.
It should be noted that the prefix PS indicates a QuickBooks payroll error. These errors can hamper the progress of QuickBooks activities. As a result of such an error, the tax table might fail to update or might get stuck in the middle of the process. It can further lead to freezing your system. There can be various factors causing this issue, the user can check them out below.
What May Lead to QuickBooks Errors PS077 or PS032?
Here are a few factors causing QuickBooks payroll error PS077 or PS032:
When QuickBooks failed to read the information registered for the software
When your Billing Information may be incorrect
QB Payroll or some of its components may have damaged tax table files
Your billing information is outdated or incorrect
QuickBooks Company files may be damaged or corrupted
You might not have registered your QuickBooks software
We hope that the above-mentioned troubleshooting steps will fix the QuickBooks Error PS077 and PS032. If the issue still prevails, you can contact our experienced QuickBooks Payroll customer help team which is equipped with modern tools and technology to fix any QuickBooks-related issue.
Call us at +1-888-510-9198 early in the morning or late in the night, we are available round the clock.
Some Common FAQs related to QuickBooks Error PS077 and PS032:
What is QuickBooks Error PS077 or PS032?
QuickBooks Error PS077 or PS032 occurs when the software is unable to download the payroll updates. Error PS077 usually indicates a problem with the tax table update, while PS032 indicates an issue with the QuickBooks payroll subscription. These errors prevent you from downloading the latest payroll updates, which can lead to incorrect payroll calculations and other issues.
What are the common causes of QuickBooks Error PS077 or PS032?
The common causes of QuickBooks Error PS077 or PS032 include: 1. Incorrect payroll subscription details or an expired subscription 2. Damaged or corrupt QuickBooks company file 3. Outdated or incorrect QuickBooks installation 4. Incorrect QuickBooks company file setup or configuration 5. Internet connectivity issues or firewall restrictions
How can I fix QuickBooks Error PS077 or PS032?
Here are some troubleshooting steps to fix QuickBooks Error PS077 or PS032: 1. Check and renew your QuickBooks payroll subscription if it has expired 2. Verify that you have an active internet connection and that your firewall is not blocking QuickBooks 3. Update your QuickBooks to the latest release 4. Verify your QuickBooks company file and ensure it’s not damaged or corrupt 5. Perform a clean installation of QuickBooks and then reinstall the latest payroll updates
Can I prevent QuickBooks Error PS077 or PS032 from occurring?
Yes, you can prevent QuickBooks Error PS077 or PS032 from occurring by: 1. Renewing your QuickBooks payroll subscription before it expires 2. Verifying your QuickBooks company file for errors regularly 3. Updating QuickBooks and the payroll tax table regularly 4. Ensuring that you have a stable internet connection and that your firewall is not blocking QuickBooks 5. Running regular virus scans to prevent damage to your QuickBooks company file.
Learn how to resolve data damage on your QuickBooks company file
Company file in QuickBooks is one of the core elements. It stores your crucial and sensitive data. However, at times, this crucial data file can get damaged or corrupted due to some reasons, which not just puts your data at risk, but also hinders the smooth working of the software. You can experience data damage in QuickBooks due to performance failures, disk failures, power surges, and much more. To help you out in dealing with such annoying errors, we have designed this piece of writing, sharing the complete details about data damage and data corruption issues.
Thus, stick around this piece of writing for further information or you can further connect with our QuickBooks enterprise support team at +1-888-510-9198, and get answers to all your queries from the professionals.
Data damage errors in QuickBooks company file often occur when the software is unable to read the company files properly. It can further be experienced due to various external and internal reasons. You might get an error message or see an unusual behavior in case any sort of data damage occurs. Data corruption or data damage can be a common yet annoying error experience for QuickBooks users. Thus, it is suggested to make regular backups of QuickBooks company files, to avoid any sort of data loss.
Identifying signs for data damage in QuickBooks company file
The signs and symptoms of data damage in QuickBooks company file. Let us have a look:
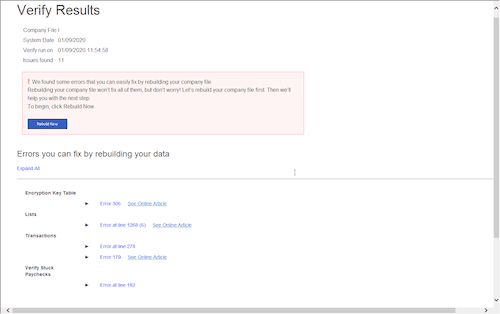
Issues like a data problem prevents QuickBooks from continuing, in the verify data utility or verify target: values in minor do not match the major on the screen.
Moreover, if there is a negative balance in the transaction history.
Another reason can be if any of the transaction and entry is missing from the lists.
One can also experience a similar issue if the bills paid or invoices are shown unpaid.
Also, if the software runs sluggishly.
In case there are any errors in the balance sheet.
If the user opens the send feedback online and while moving to the bug report window.
Fix data damage on your QuickBooks Desktop company file
Mainly there are two steps to resolve this problem. You can take help from your IT professional or contact our error support team in case you get stuck somewhere by following given steps.
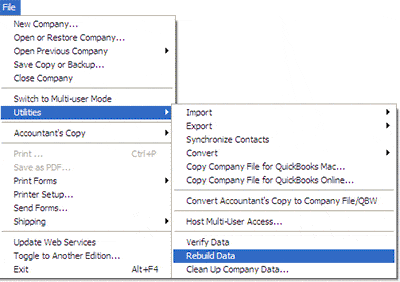
Step 1: Run the Rebuild Data Utility
Go to File menu, choose ‘Utilities > Rebuild Data‘
Select ‘OK‘ button in the backup of the data of QuickBooks company file.
(There are chances that your computer will show that QuickBooks is not responding.) But if the cursor is moving, it means that Rebuild is going on. Let it complete.
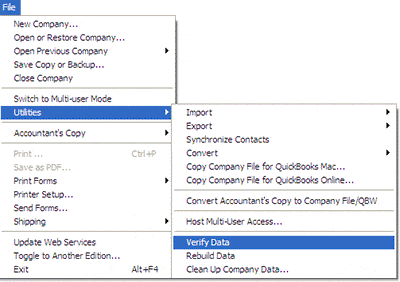
Go to ‘File menu‘ and choose ‘Utilities > Verify Data‘
Select ‘OK‘ if you get the message ‘QuickBooks detected no problem with your data‘.
If there is an issue with the data, you will get the prompt ‘Rebuild Now‘ or ‘View Errors‘.
Now, choose ‘Close‘ and perform the steps below:
Important Note: You can follow the steps below if you find yourself comfortable in reviewing the QBWin.log or QuickBooks.log file.
Find QBWin.log or QuickBooks.log files
Go to the ‘Tech Help‘ window if you are working with a support agent. Go to ‘Open File‘ tab, highlight the log file and select ‘Send log files‘ to Intuit Support. This will send the file as well as enable the agent to view the log files.
Now, check the log file
For Mac: Scroll down to the most recent verify information
For Windows: Search for start verify and locate the most recent file
In the opened file, you need to search by pressing ‘Ctrl+F keys’ for the start ‘Verify‘
Now, find the line which is LVL_ERROR, and look for it in check QuickBooks Learn & Support Site. Also you can see that there is a data damage top LVL errors library
Why should you use Verify and Rebuild features?
Encountering fatal errors while using QuickBooks Desktop
Discrepancies on invoices, bills and other reports that post negative values
Already deposited payment showing in the payment to deposit window
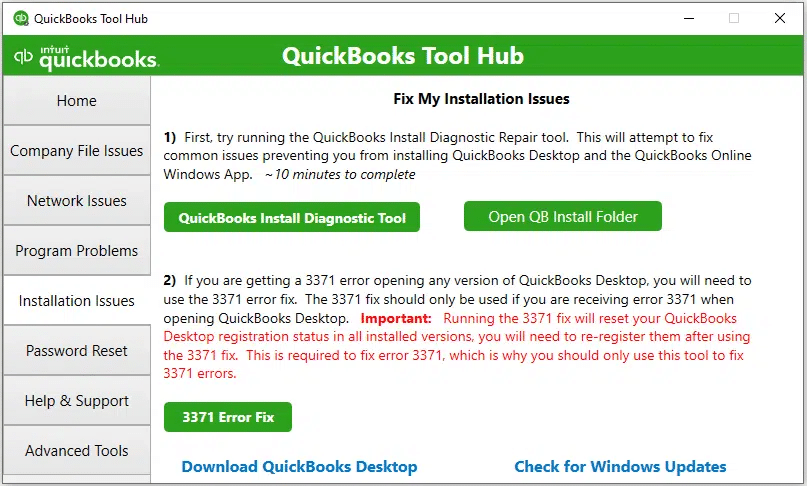
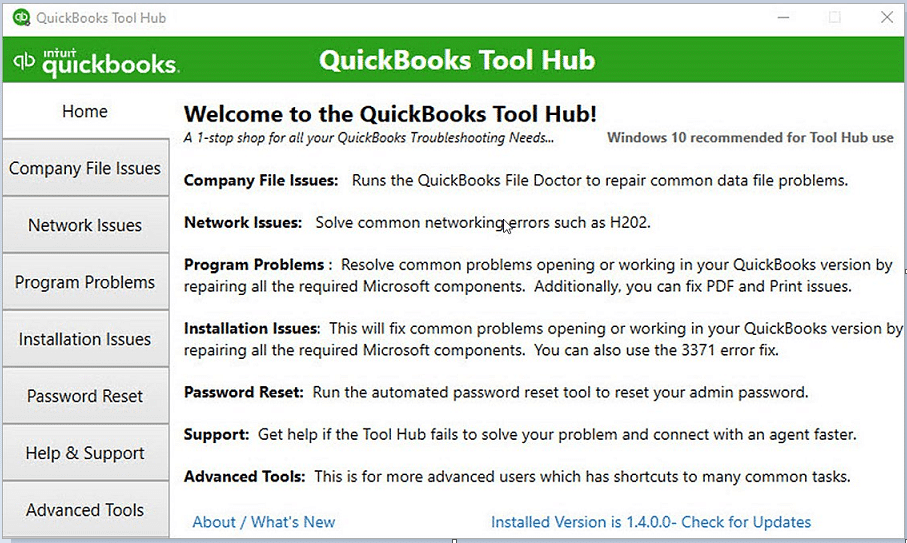
Step 3: Use QuickBooks file doctor from Tool Hub Program
If you are unable to fix the issue using the above rebuild and verify data utility related steps, then try performing the steps associated with file doctor tool to get rid of the issue successfully:
If the users haven’t downloaded it already, then download the QuickBooks tool hub.
After that, open the company file issues tab from there.
You now have to opt for run QuickBooks file doctor.
This might take a minute or so.
Now choose the company file from the drop-down menu and if the file is not identified, go to the browse and search tabs to find the file.
Once done with that, choose check the file option and click on continue tab.
You will then have to enter the admin password for QuickBooks and also click on next.
The scanning process might take some time, depending upon the file size. And once the scan ends, open QuickBooks and the company file.
Step 4: Deletion of Customer Reports and memorized transactions
Another method you can try out for QuickBooks Desktop data damage is deleting customer reports and memorized transactions.
To delete memorized transactions:
Move to the lists, where the user should move to memorized transaction.
After that, click on the edit tab and select deleting the memorized transactions option.
You now have to click on ok tab.
Delete customer reports
You need to click on the reports menu and further select the reports center.
Once done with that, select X.
Also click on ok tab.
Data damage troubleshooting for QuickBooks desktop Mac
If you are a QuickBooks Mac user then the below given steps will help you to resolve the data damage issues of QuickBooks:
Step 1: Re-Sort Files
Re-sorting the lists will help you put your records back in order. In case you have changed the order of a list, resorting will do the needful.
Go to ‘Reports menu‘, and select ‘Company & Financial‘ > ‘Balance Sheet Detail‘
Now, select ‘Options‘, choose ‘Accrual or Cash‘.
If you find that the total assets do not get equal with the liability and equity in all the reports, then you better determine the transaction which is causing the problem.
Take a backup of the company file, ‘Delete and re-enter‘ the transaction
After this, compare the Account report totals to the balances on Chart of Accounts:
Compare the open invoices to accounts receivable balance on the ‘Chart of Accounts‘.
Compare the total in ‘Unpaid Bills report‘ to the ‘Accounts Payable balance‘ on the ‘Chart of Accounts‘
To balance the transaction, rebuild will put out-of-balance transactions in this account. You may also see voided checks in this account
Other than voided checks, you will also find the transactions. Now, again delete and re-enter the transactions.
Undeposited Funds:
Go to ‘Activities‘, select ‘Make Deposits‘ and then, select all. Make sure that the total amount is equal to the balance shown for ‘Undeposited Funds‘ on ‘Chart of Accounts‘. Also, ensure that there are no deposits showing on the deposit.
Step 4: Merge the Damaged Accounts/Items/Names
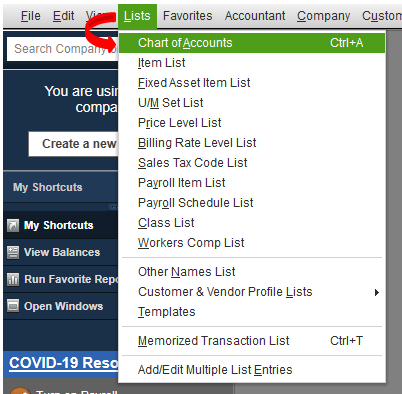
Go to ‘Lists‘ and select ‘Chart of Accounts‘.
In the control key, select the account that has been damaged. Click on ‘Edit Account‘
Make sure you put an asterisk (*) on the name of account
Then, click on ‘Cancel‘
While holding the ‘Control Key‘, select any account and click on ‘New Account‘
Choose the type and enter the original name of the account having problem
Click ‘OK‘
Hold the ‘Control key’ and select original account. Choose ‘Edit Account‘
Now remove the asterisk and select ‘OK‘ button
Click on ‘YES‘ as this will confirm that you desire to merge the accounts
To merge items and names, the same steps will be followed as the ones followed for merging accounts
We hope that the above-prescribed information is helpful for you to resolve data damage on your QuickBooks company file. In case, you are unable to perform the systematic steps of the solution or you seek expert assistance – dial our QuickBooks data recovery number i.e. +1-888-510-9198.
FAQs Related to Data Damage in QuickBooks Company file
How do I repair a QuickBooks desktop data file?
You can try fixing the data file in QuickBooks using the steps related to repair company file with rebuild data tool. 1. The first step is to move to the file menu. 2. Move to the utilities tab and choose rebuild data. 3. The next step is to let the tool repair the file. 4. Click on the ok tab and head to the file menu. 5. Also, let the tool check your file for data issues.
What causes data damage in QuickBooks desktop?
Data damage usually indicates that the company file can’t be read correctly by QuickBooks. This can be caused by factors within QuickBooks or some external factors, especially the ones where the file is located. The majority of data damage issues include LVL errors in the QBWin.
How do I quick fix my file in QuickBooks?
You can fix your file from the tool hub and choose the company file issues and also go for the quick fix my file option. Once done with that click on ok tab when it completes and launch your QuickBooks.
Did you see QuickBooks error 6073 99001? Well, this particular error is often experienced when multiple users try to open the company file at the same time. It further shows up if QuickBooks fails to read the company file. This error can be further experienced in case the company file is already in use by another application or if there are some network-related issues. As a result of QuickBooks error code 6073, you might fail to open the company file, and face issues in invoicing, payroll processing, and other financial tasks related to the company file. Due to this error the QB users are usually not able to open the company file. And get an error message on their display.
QuickBooks is unable to open this company file. It may have been opened by another user…
Error codes: (-6073, -99001)
To help you out in tackling this particular error in QuickBooks, here we are with this segment sharing the complete set of steps to get rid of the QuickBooks error 6073, 99001. However, if you need any sort of technical guidance in eliminating this particular issue in QuickBooks, then in that case, feel free to ring us at +1-888-510-9198, and we will provide you with the required guidance.
What are the possible causes of QuickBooks error 6073, 99001?
This error can occur due to any of the following:
When a user opens this file on another computer in a single-user mode.
The file is located as to read on another network folder.
All files are hosted via the Linux server & then use any more rather than one’s set as to login the credentials and sign into as shared folder.
The file is being accessed through remote access software technology (LogMeln, GoToMyPc, etc). We host the computer and still see that the client is already logged into it.
Comply below-mentioned point to troubleshoot the QuickBooks Error 6073, 99001 or contact to our QuickBooks enterprise customer support team to get instant help from our U.S based tech Advisors.
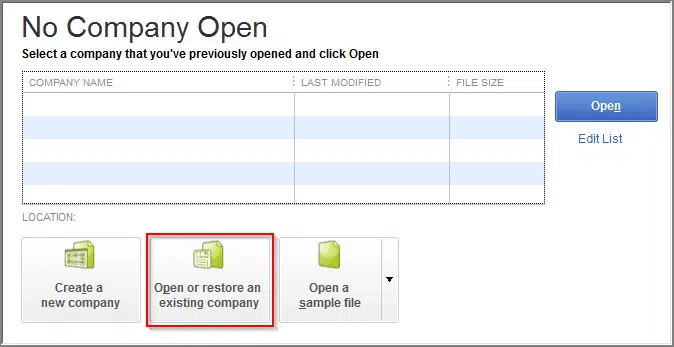
Solution 1: First download and run the QuickBooks File Doctor
The very first step in this process is to download the most recent version of QuickBooks tool hub and then save the file where it can be accessed easily
Open the file that is mention in the above step.
Perform the onscreen steps and install and agree to the terms and conditions
Now, double click the icon on the windows and open the tool hub
Choose the company file issues tab from the tool hub
However, if you are still not able to get rid of from this QuickBooks error code 6073 or facing any other issue related to QuickBooks then contact to QuickBooks support & help numberi.e., +1-888-510-9198 and talk with USA’s best accounting professionals that experienced and has excellent work knowledge in resolving countable hindrances avails for all-time.