Experiencing QuickBooks printer not activated error 20? And don’t know what can be done to eliminate such error? If yes, then reading this piece of writing will surely help. The QuickBooks printer not activated error 20 can be experienced when your operating system is not aligning with the QuickBooks existing version creating issues when printing. Just in case you are running your QuickBooks 2009 on windows 10, then it might show up automatic notifications of updates have stopped working like the QuickBooks doesn’t update on its own. Printer not activated Error Code -20 is just one of the most common error message encountered by QuickBooks users. This error generally takes place when a user try to install or upgrade to a newer Windows version. Usually, the major cause of this issue is the deleted KEY_CURRENT_CONFIG\Software key.
Because of this error, users are not able to publish or send the invoices and payslips which leads to the further inconvenience for business owners. This is a common error that may cause by lots of other applications besides QuickBooks, but its significance on QuickBooks is greater than any other software. There are a bunch of factors triggering such an error, which we will be elaborating later in this segment, along with the fixes for the same. To learn further, make sure to read this article carefully, or connect with our tech team at +1-888-510-9198, and we will help you with your queries right away.
What causes QuickBooks Error 20 -Printer not activated problem?
Here are some of the possible reasons are given below:-
This error code is usually appears due to elimination/deletion of the ‘HKey_current_config\software’ key. QuickBooks program works on the same registry key as well. This situation leads to the condition where the outdated key stops the application as well as printer to run properly. It has been experienced that many program/applications use that same registry key..! It tends to cause malfunctioning of the software and other software’s as well.
This error can also be occur when the multiple QuickBooks versions are installed in the computer. This arrangement doesn’t harm the system but it could be a possible reason. If the multiple versions of QuickBooks application installed in a system have different directory then there is no problem.
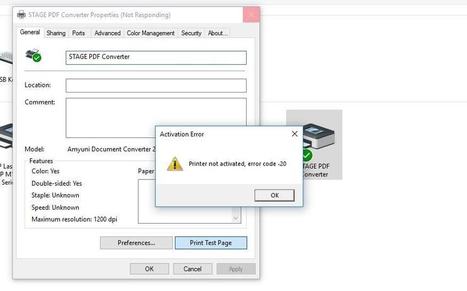
In case, the same error code or error message appears again and you are unable to save/download the invoice, bill, or payslip as PDF..! It simply means that the QuickBooks application isn’t compatible with the PDF driver & operating system.
How to Fix Printer Not Activated – Error Code -20 on Windows 7 or later versions?
If the problem is associated with the problem, “Printer not activated? Error – 20” on the Windows 7, Windows 8 or later versions. In such scenario, you need to perform the solution steps given below:-
1. At first, close the final draft:
For Windows 8 or later:
Click on the “Start” or “Windows” icon on the display.
Perform right-click on the ‘Final Draft9/8 tile’.
Choose the ‘Run as Administrator’ tab.
For Window 7/Vista:
In the Windows 7, go to the “Start” icon => “Programs” tab.
Select the ‘Final Draft 9/8’.
Choose the ‘Run as Administrator’ tab.
Try again to save the documents In PDF format. Now, you will able to save your script as PFD with no issues.
2. Change the Directory:
Note: you need to consider the following points before changing the directory.
Generate the Backup: Before you make any changes in the present registry make sure that you create a backup. Use the old registry if in case you are unable to solve the issues with the modified registry.
For any further complications, you must be prepared with a system recovery point.
3. Create the Backup Registry:
At first, hit onto the “Registry Editor” tab.
Go to the folder tree in the left bar and click on the ‘Computer’ icon.
Then, hit onto the “File” icon => “Export” tab => “Save” icon.
4. Create the System Restore Point:
At first, click on the “Start” or “Windows” icon.
Search for the ‘System Restore’ option, click on the ‘Create a New Restore Point’ option.
Go to the “System Properties” screen.
Enable the “Protection Setting”.
If the function is disabled, click “Configure” and set the protection.
Finish with clicking Apply and OK button.
These settings will automatically create a system restore point.
Note: Before you make modifications to the Registry, ensure you take a back-up of your computer registry files and create a system restore point in case something else fails whilst you’re doing the actions you should have the ability to restore the system.
Once the re-installation process gets complete, the program along with the printer will work again.
Restart your computer system to let the changes to take place.
Note: If the problem is with PDF converter only, then you are advised to uninstall the old driver and install a compatible driver with your operating system.
Solution 2: Manually Edit or Update the Registry key
This issue can be solved by upgrading your Windows 7 operating system. A clean installation of windows 7 wouldn’t cause such type of critical errors.
There are 2 ways of manually updating the registry key.
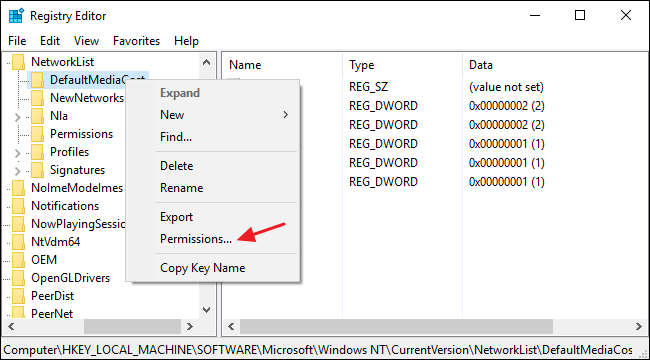
Method 1: Grant permission by using Registry Editor
Open your registry editor.
On your system keyboard, click Windows + R to open the Run dialog box.
Type regedit command.
Now right click on the regedit & then select the option to Run as Administrator
Search HKEY_CURRENT_CONFIG as now you have to get access the registry editor.
Choose the permission after right clicking the software folder name.
You need to verify that user has the full access control of the table.
Finally click on to the OK button and close the window & also registry editor option.
After performing the above steps QuickBooks has the access to all keys and printer that should work in fine condition.
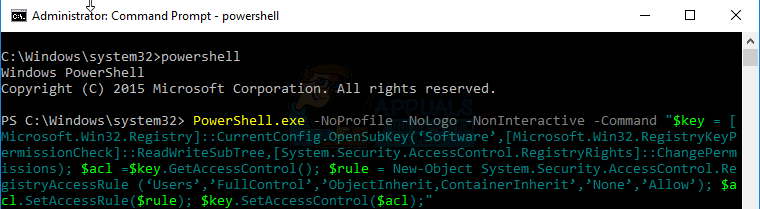
Method 2: Grant permission using Powershell script
This options described only for Windows 10 users. You can update your registry key editor manually by granting permission using Powershell script.
Note: The user account control who is looking for the permission should be logged in. A user account also has the access by using the command prompt.
Click on the Start button.
Now type cmd
After that select Run as an administrator by giving one right click cmd.
Type Power shell in the command prompt and also press Enter key.
Finally copy and paste the following code as it is showing on the command prompt.
If your error continues even after performing the set of steps discussed above, then in that case, we recommend you to perform the procedures discussed below.
Procedure 1: Use QuickBooks print and pdf repair tool
Initially, you need to download the PDF and print repair tool or use it from the QuickBooks tool hub
Followed by running the tool in admin mode
Once done with that, the application will run with a red background and will let you find the solution.
You now have to ensure that the QuickBooks software is updated to the latest version.
Ensure that the printer is printing out of your desktop
Restart the system after running the tool
Ascertain that all other applications running are closed.
Procedure 2: Fix Microsoft Document Writer
In this procedure, you need to right click the QuickBooks icon and then chose properties tab.
Once done with that, you need to click on the find target option
After that, you need to double click the install application or exe to install the pdf converter
Now, click on ok after the installation process finishes
You now have to click on windows start tab and then select run or search
You are then required to enter the control printers and pick the printers window and click on ok tab
The user will then have to right click the Document converter and click on the print properties if you are a windows 7 user.
Windows XP users can tap on the Document converter and click on rename tab
The last step is to check the version of QuickBooks and release installed, also enter the correct name and click on enter tab.
Procedure 3: Check the Microsoft document writer
The Microsoft Document Writer provides windows capabilities to support QuickBooks in saving information in any format like PDF. In case the window component is not found, then such error occurs when you want to print a document from the QuickBooks software installed on the desktop. The steps involved in this process are as follows:
You need to find the QuickBooks icon on your main window screen and right click it to choose open file location.
After that, get the temp folder and look out for the folder matching version of the current QuickBooks software.
You now have to browse the cursor along that folder to further open the third-party folder inside
Now, find the exe file and double click it for installation
Move back after the installation is done and head to the main QuickBooks software and open it to register the license.
The installation stops in the middle, you can start it again, there’s no issue with that.
Once everything said is done, try printing your desired documents from QuickBooks itself.
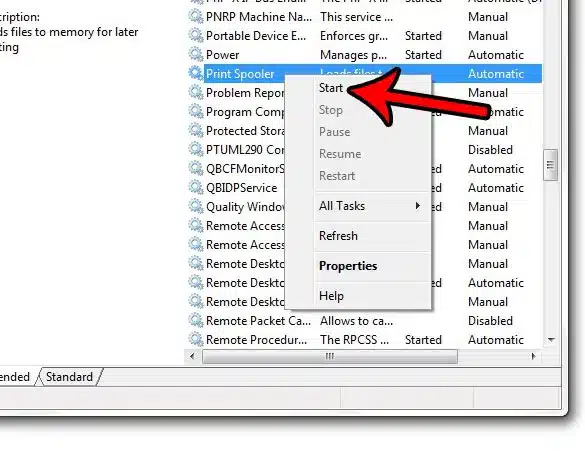
Procedure 4: Check and configure print spooler service
You need to first click on Windows + R at the same time and type MSC in the window that pops up named Run box.
Right click on the print spooler service from the list of services shown to choose the properties tab.
Click on the stop tab to stop the print spooler service.
Wait a few seconds and then pick the start tab to initiate the services again.
Close all the window pop-ups now and try printing a document or saving a PDF to print directly from QuickBooks.
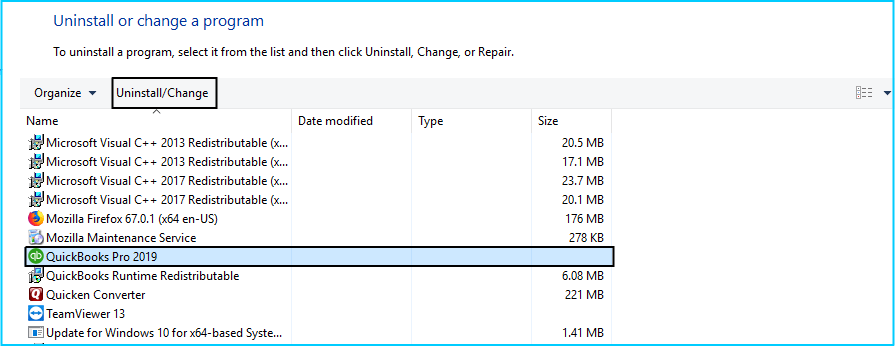
Procedure 5: Check QuickBooks pdf capabilities with QBprint.qbp file and repair it
Search the control panel from the windows search and head to the programs and features under it.
You now have to head to the list of the programs installed on the desktop and find QuickBooks.
Right click it to select change option and initiate the repairing only to follow the lead by the given set of instruction.
After the QuickBooks repair, restart the system and let the updates take place.
Try printing a document or save it as a PDF.
Winding Up!
We hopefully think the above given methods resolves your QuickBooks printer not activated error code 20 and now you are able to print your files using QuickBooks.
However, if you are still troubling with this error and want any help regarding this issue, you can dial our QuickBooks customer support number .I.E. +1-888-510-9198 to get immediate help from the experts. We provide extreme services and quality assistance with effective solutions.
QuickBooks software is the first choice of small and mid-sized business owners when it comes to accounting and bookkeeping. With the help of the advanced accounting software, business owners and accountants can handle and manage some of the most complicated tasks with utmost ease. But many a times they have to face some errors and issues that causes them obstruction of work. The software may malfunction, slow down, or temporarily stop responding to the user’s command. QuickBooks errors may show up anytime, for example, while downloading the software, updating or upgrading it, opening a file, during 1099 forms preparations, etc. To learn further about 1099 form preparation, make sure to read this segment carefully till the end, or you can also reach out to our technical support team at +1-888-510-9198, and we will provide you with immediate support and assistance.
Here are some of the most common issues with 1099 forms preparations and their solutions:
Issue: 1099 doesn’t show the correct amount
Solution: Here is what you can do if you face an issue where 1099 does not display the correct amount during preparations:
In all cases, the payments must either meet or exceed the threshold for the box. When you are on the Prepare 1099s screen, you can find the dollar amount parentheses under the Box number at the top of the column at the top of the Preview 1099 and 1096 Information section. Ensure that these sums exceed the thresholds for the box.
Check if the correct Tax Year is chosen in the Preview 1099 and 1096 Information section. Upon opening the Prepare 1099-MISC Forms screen, you will find a drop-down menu for Tax Year within Company Information box.
In case this is a bill payment, make sure that it is attached to the bill, otherwise, you can amend it by following the given steps:
Choose the Plus icon on the Toolbar.
Select Pay Bills under vendor.
Click the Filter drop-down.
Select All for Payee and Location and click on Apply.
Check the correct bill. In case the payment is outstanding, you will find the full payment amount displayed in the Credits column, leaving the rest of the amount in the Open Balance column. Adjust the sum, as required, in the Payment column – for example, if you want to apply the credit, you can change the Payment amount to 0.)
Choose Save (or Save and close).
Note: If you still see the incorrect information, re-certify that the payments were assigned correctly to a vendor and not to an employee.
In case vendor was paid by credit card – 1099K form will have their reports submitted by the payment processor.
Issue: 1099 reports show an amount that is lesser than what you’ve calculated
Solution: Your 1099 can at times display an amount less than given to your vendor if you recorded the vendor payments to income or equity accounts, for these two sorts of accounts have no flow to 1099 totals. It requires payments to record or edit to expense-type accounts, otherwise you can make use of an asset or liability account; though, if you want to keep an account other than an expense account, you must consult your accountant first.
The accounts shall also be assigned for your 1099-MISC forms. For more and detailed information, you can check Assign accounts to 1099-MISC categories for ways on assigning 1099 accounts.
Issue: 1099 vendor is not there on the list when preparing 1099s
Solution: Here, we have sorted a few things to track vendor payments right in the Prepare 1099s screen:
You’ve already chosen the vendor as a 1099 vendor.
You’re tracking these payments to the vendor in an account related with a box from the 1099-MISC form.
See 1099 E-File Service: QuickBooks Online setup, troubleshooting, & FAQs for setup steps.
If you’re uncertain what accounts to assign – you can run a Transaction List by Vendor report.
Select Reports from the left hand side menu.
In the search bar, type Transaction List and select Transaction List by Vendor.
Choose Customize option.
Now, set the Report period to Last Year/ Last Calendar Year.
Navigate to the Rows/Columns section and choose the Change columns link and put check the Split box.
Next, go to the Filter section.
Check the Vendor box and select 1099 vendors who are in question from the drop-down.
Click on Run report.
Find out what accounts the vendor’s transactions were tied to under the Splits column. In case the word -SPLIT- is there, select the transaction to see details on what accounts were affected.
If you come across a Bill Payment, check the Bill and find out the affected expense accounts.
1099 form is misaligned
If the bottom half of your 1099 form may be misaligned or if you have other issues with 1099 form alignment, see Set up printing alignment for 1099 Tax Forms.
Issue: Print 1099 for a vendor who doesn’t meet the threshold
Solution: You can manually print 1099 for a vendor who doesn’t to meet the threshold. That can be done by running reports as well as filling in the form by hand. You can’t override the system and have QuickBooks Online print a 1099 for a vendor not meeting the threshold.
To access and view the 1099 Detail Report:
Select Reports From the left menu.
Type 1099 in the search bar and hit enter.
Select 1099 Transaction Detail Report.
Now, set the report date range to Last (Calendar) Year.
Use filter to choose from lesser data on the report to a certain 1099 vendor or 1099 box.
This blog post consists of almost all the major 1099 forms preparationsand their solutions. If you need assistance in regards to 1099 or any other QuickBooks related issue, you can call +1-888-510-9198 and speak to our 24×7 QuickBooks Payroll Support experts.
FAQs Related to 1099 form Preparations in QuickBooks
How do I prepare a corrected 1099?
To correct type 1 errors, file the correct form with the correct amount, code, checkbox, name or address, and further check the CORRECTED box. You now have to submit the corrected 1099 form to the recipient and prepare the red Copy A to serve to the IRS with the form 1096 transmittal if paper filing.
How do I get a 1099 form?
In order to order official IRS information returns, which include a scannable Copy A for filing with the IRS and all other applicable copies of the form, you can visit the official website.
How do I fix a 1099 in QuickBooks?
You can do this by: 1. Move to the reports menu and further choose vendors and payables. 2. You now have to choose 1099 summary 3. Once done with that, choose all allowed accounts. 4. Followed by, finding the account and make it a 1099 account. 5. To show these transactions on 1099 reports and forms, select the right option. 6. Now, close the 1099 detail report.
Can I file 1099 through QuickBooks?
You can prepare your 1099s in QuickBooks at no extra charge. In case you choose 1099 E-file service, then Intuit will e-file your federal 1099 information with the IRS, and then print and mail a copy directly to the contractors.
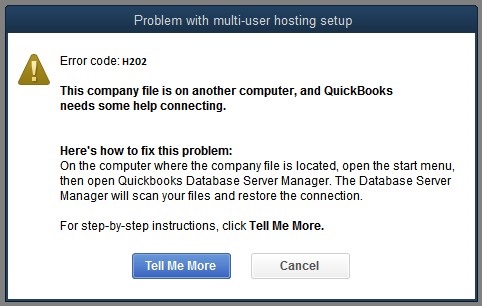
Trying to switch to multi-user mode in QuickBooks but are unable to due to QuickBooks error H202? Well, error code H202 in QuickBooks is often seen when you try to run QuickBooks in multi-user mode or when the software fails to open a company file that is stored on another system. Such an error shows up with a warning message indicating that the multi-user connection to the server is blocked.
Moreover, QuickBooks error H202 indicates that the QuickBooks company file is located on a different system and the software needs some help in connecting to it. This particular error is a multi-user mode error and might further prevent you from opening a company file that is stored on another computer.
To help you fix this issue, we have come up with this segment sharing the complete details so as to how you can get rid of QuickBooks error code H202 easily without hampering your company file data. Thus, keep reading this article and find out the ways to fix this H series error easily. However, you can also get in touch with our QuickBooks support professionals using our toll-free number i.e., +1-888-510-9198, and get your queries resolved by a certified professional.
What is QuickBooks Error H202? (Multi-User Switching Issue)
QuickBooks error H202 basically falls under the H series error category, which is majorly related to multi-user mode. QB users have reported this error often when either switching from single-user mode to multi-user mode or when opening a company file in multi-user mode. As mentioned earlier, you can experience this issue when trying to access a company file stored on another system.
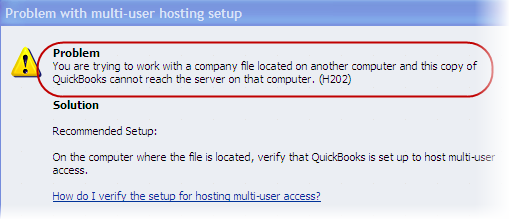
You can come across the following warning messages when QuickBooks error H202 occurs:
Error
Description
Problem
You are trying to work with a company file that is located on another computer, and this copy of QuickBooks cannot reach the server on that computer. (H202)
Problem with multi-user hosting setup
QuickBooks could not open the file in multi-user mode. (H202)
Fixing QuickBooks error code H202 becomes easy, once you understand what factors can lead to this issue. This article will help you understand the causes, signs and symptoms, as well as the effective ways that can be implemented to fix the issue. Thus, keep reading!
Majorly any sort of communication issue between QuickBooks desktop and the server can cause this error in QuickBooks. Below discussed are the core reasons why you can come across QuickBooks H202 error. Let us have a look:
The Hosting configuration setting is incorrect. If that is the case, then you can experience this error.
Or in case the QB file setting option blocks access to the company file. Thus, it blocks incoming or outgoing communication.
In case there is any damage or inappropriate .ND files configuration that allows the database file through QuickBooks, then you can see this error.
If the QuickBooks software is unable to search the main IP address of the host system or by using some other IP address.
A company data file is not communicating easily to the server.
If the setting of DNS is improper or incomplete.
The QuickBooks service like QuickBooksDBXX/QBCF is not started.
Firewall or a security software is blocking the communication to the company file, in such a situation also error H202 is most likely to occur.
When a user tries to work with a company file & it is located in a multi–user mode & this replicates the QuickBooks that is unable to reach the server on your system.
What are the Signs and symptoms of error H202 in QuickBooks?
You can identify the QuickBooks error H202 easily, considering the following signs and symptoms. Let us evaluate:
Unable to switch to multi-user mode in QuickBooks.
If after trying a lot of times, you are unable to open a company file located on another computer.
If the system or the QuickBooks software freezes again and again for a couple of seconds.
Before you start with the methods to fix QuickBooks error H202, make sure to log in QuickBooks as admin. You can perform a handful of methods to get rid of QuickBooks error H202. Let us have a look:
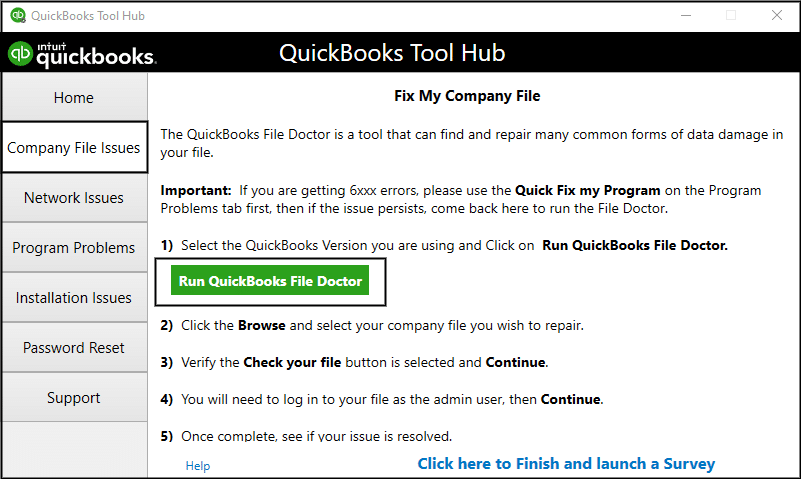
Method 1: Run QuickBooks Tool Hub on Server
Step 1: From Tool Hub Program, run QuickBooks File Doctor Tool
QuickBooks File Doctor Tool is basically a tool designed to diagnose and troubleshoot different errors like QuickBooks errors H101, H202, H303, or H505. To use this tool, you will first have to download QBFD from official Intuit site or you can also make use of QuickBooks Tool hub to access this tool. The steps involved in this process are listed below:
Now, install and run the QuickBooks tool hub program using the onscreen steps.
The next step is to open QuickBooks Tool hub and head to the company file issues tab.
Also, click on Run QuickBooks File Doctor option.
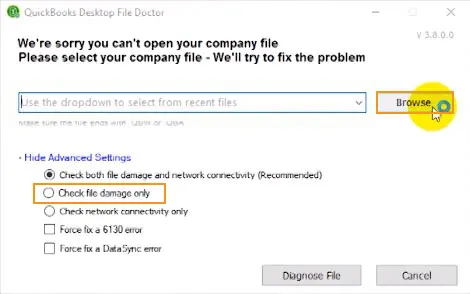
Now, in QuickBooks file doctor, you need to go for Company file from the dropdown menu. If you are unable to identify the file, then click on browse and search to find the file.
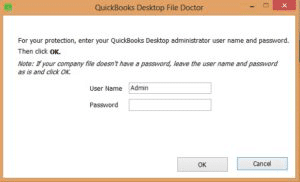
After that, you need to click on Check your file and Network checkbox and then click on Continue tab.
Towards the end, you need to enter your QuickBooks Admin Password and then click on next tab.
Note that the scan time usually depends on the file size and in most cases, it usually takes around 5 minutes. After the scan ends, you need to open the QuickBooks software and the company file.
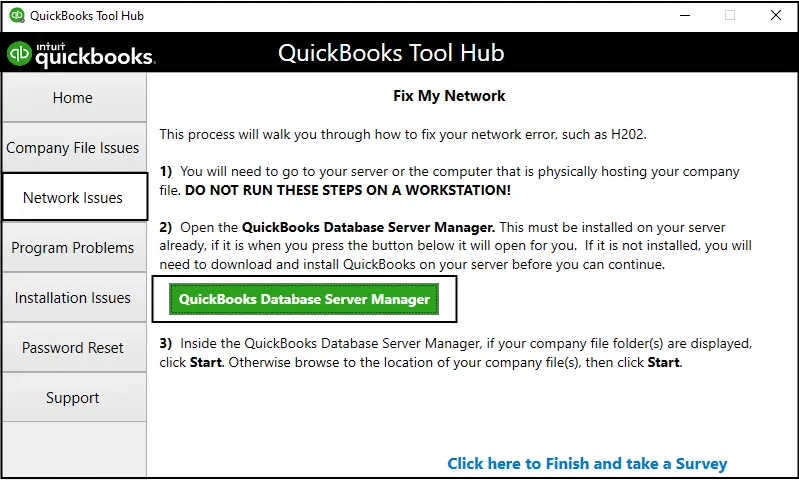
Step 2: Install and run QuickBooks database server manager on your server
Initially, you need to open QuickBooks Tool hub and select network issues tab.
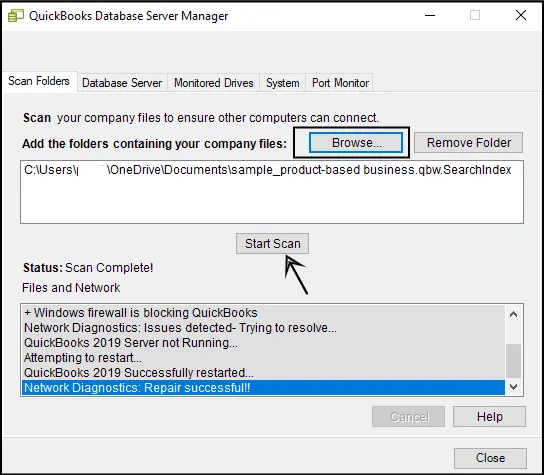
After you are done within the QuickBooks database server manager, look for the folder that has company files stored. You can further use the Browse feature to find this folder.
The user will then have to click on Start Scan tab.
QBDBSM will now repair your firewall permissions on its own.
After the scan process ends, you are supposed to click on close tab.
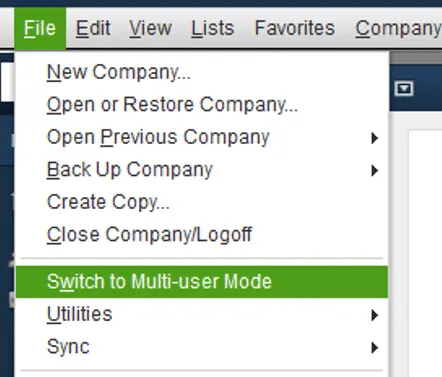
On each of the workstations where the error shows up, you need to launch QuickBooks.
Furthermore, click on File menu.
And then, head to Switch to multi user mode.
In case you now use QuickBooks in multi user mode, the error won’t show up. In case the error still occurs, then proceed to the steps below.
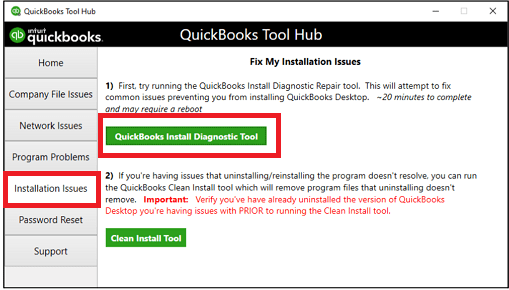
Step 3: QuickBooks Install Diagnostic Tool
You need to first open QuickBooks tool hub on the server system.
Further, head to Installation issues tab from the tool hub.
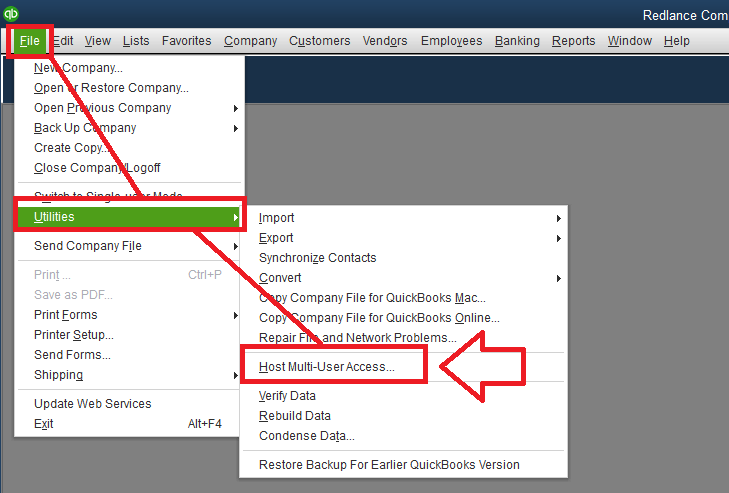
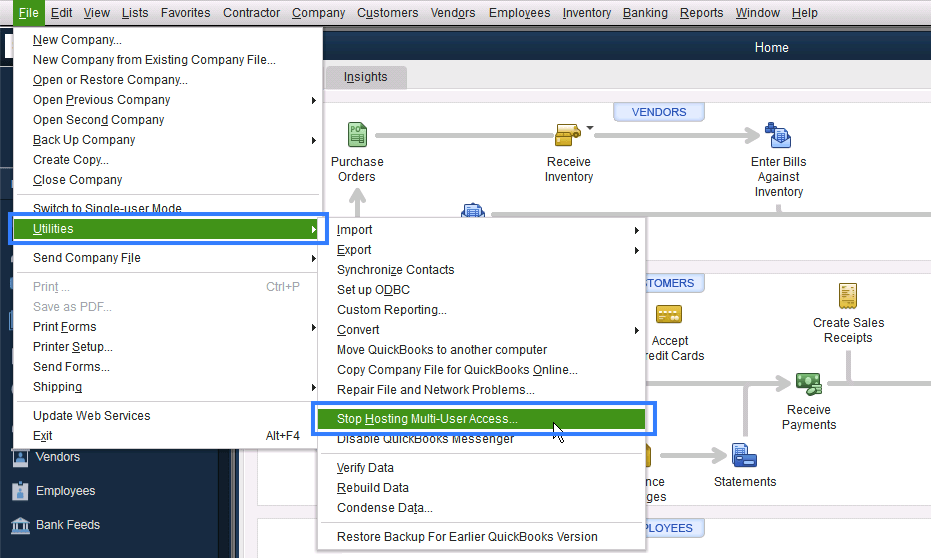
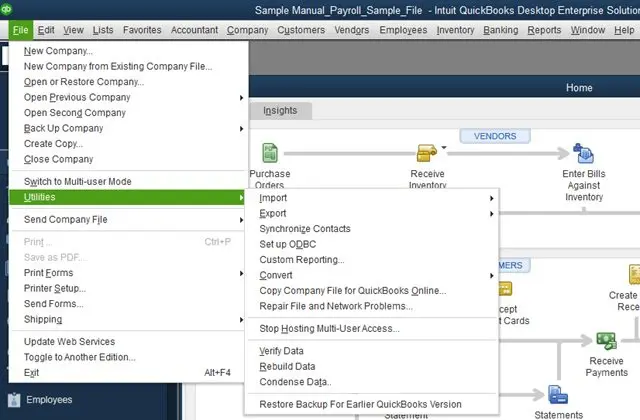
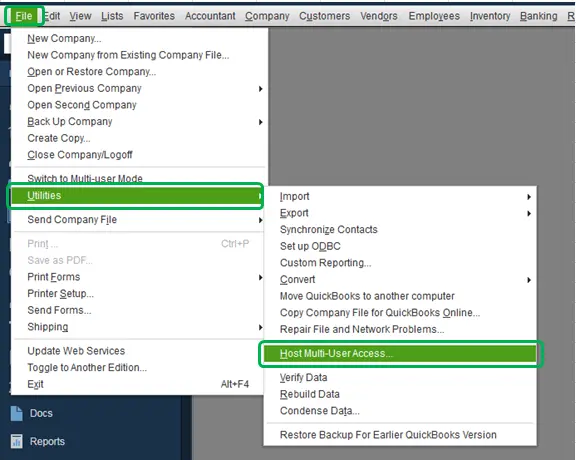
The initial step is to open QuickBooks on the hosting system and then select “File” & click on “Utilities“.
And then, see the list of “Host Multi-User” to Access it, this computer is not hosting the file. Move to the next system. Note one thing don’t change anything on your workstation.
If you see “Stop Hosting Multi-User Access“, select it.
Ensure that company file must be closed, click to “Yes” option.
Method 3: Verify the QuickBooks Services
In case the server is running in a full version of QuickBooks, then you can perform the following steps to start multi-user hosting mode.
When on the server, open QuickBooks Desktop.
After that, head to the File and then the Utilities tab.
Now, select Host Multi-User access option from the list.
To verify the running status of QuickBooksDBXX and QBCFMonitorService on the server, you can continue with the below steps:
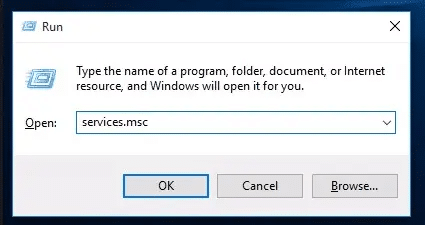
Click on the Windows “Start” button.
And then press the keys as “Windows + R” keys to run the program.
In that running dialog box, type as “MSC” and hit “Enter” key.
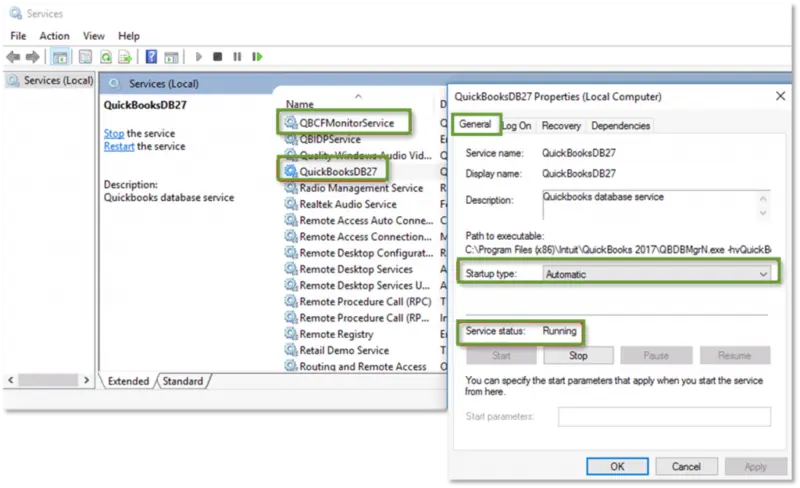
You now have to select QuickBooksDBXX
After that, choose Startup type, in case it is Automatic or not.
If the startup type is not set as Automatic, then make sure to do it immediately.
Now, check the Service Status and ensure it shows Running.
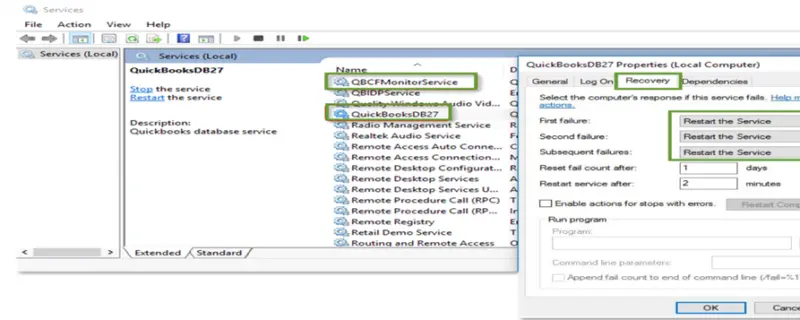
Now move to the Recover Tab and go for it.
Head to the drop-down menus for first, second, and subsequent failures and select Restart the Service of all these.
You are now required to click on Apply and ok tab to confirm the changes respectively.
Once done with that, you need to carry out all of the above steps for QBCFMonitorService.
Method 4: Ping your server from a workstation to check for network issues
There might be a firewall issue if you see QuickBooks Error Code H202 on one or more of your workstations. To fix the issue Ping your server from each workstation where you are getting Error H202.
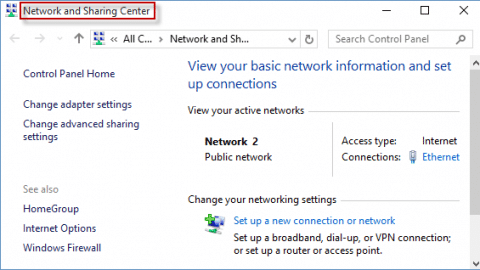
Step 1: Turn on Network Discovery on your server computer
On your server computer and workstations, Open the “Windows Start Menu“.
After that type Network into the search and then open Network and sharing center.
After that choose change advanced sharing settings.
Ensure that you have selected Turn on network discovery in the Network Discovery and File and Printer sharing sections.
Step 2: Get your server name from your server
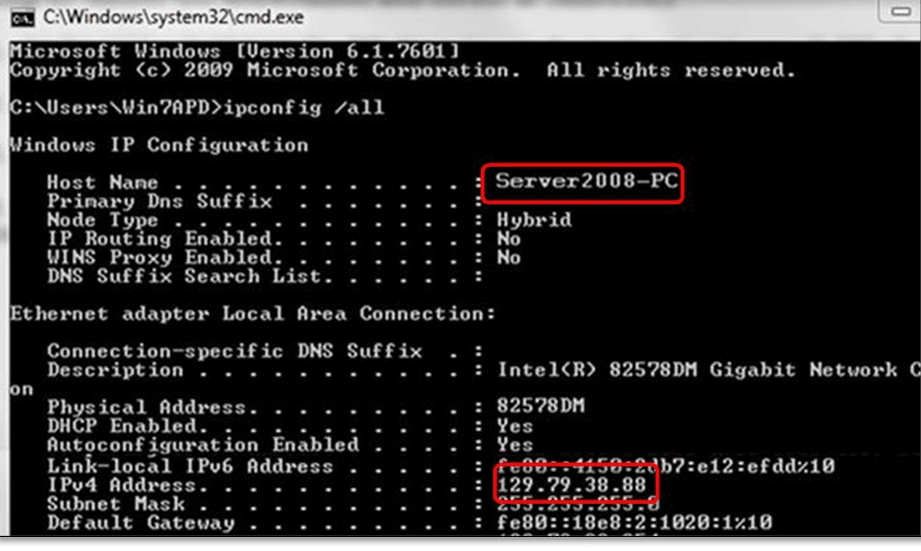
First of all, you need to open the Windows Start menu on your server computer.
After that type “Run” into the search and then open Run box.
After that type “CMD” into the Run window, and then hit on Enter key.
Now type “ipconfig/all” into the command window, and then press Enter key.
After that search the Host Name in the Windows IP Configuration section. You will find your server’s name is on the right.
Now you have to note down the hostname and copy it to a word file so that you can access it quickly.
Step 3: Test Network Connectivity
Under this step, you need to head back to the workstation to test the server. You might find these steps a bit tricky to perform. Thus, it is suggested to consult an IT professional for help.
The very first step is to open Run window by clicking on the Windows + R in the system where you get the error code H202
After that, type CMD in the box, and click on the ok tab
Once done with that, you need to ping the server
Type ping_server name and click on the enter tab.
You can perform the steps mentioned above on all systems that receive the same error.
Just in case the response you receive is slow, then there might be some issue with the network and a repair is required.
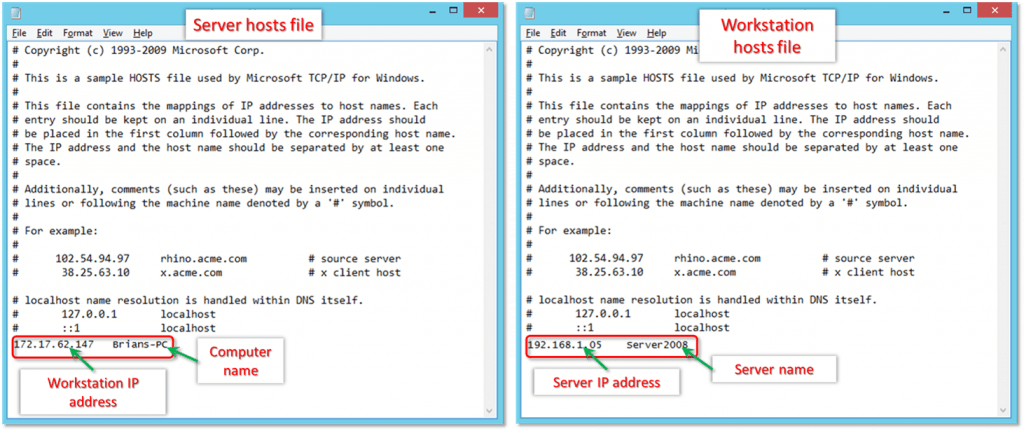
Method 5: Go to Windows Host File and Add Server
You need to first close all Windows open on the system.
After that, head to C:\Windows\System32\Drivers\Etc or C:\Windows\System64\Drivers\Etc on the server.
The next step is to double-click the hosts file and choose Notepad on being prompted for a program.
You now have to enter in the IP address and then the name of the system. For the server, you need to enter IP and the name of the system. For computer, you will have to enter IP of the server and the computer name.
To separate the computer name and IP address, click on Tab key rather than the Space bar.
Try opening Quickbooks in multi-user mode and check if the issue is resolved or not.
Method 6: Add Services QuickBooksDBXX and QBCFMonitor to the admin group
Offer QuickBooksDBXX and QBCFMonitorService Windows admin permission on the server. In case these services do not already have admin permission, then ensure that they get it as this may fix the issue. See if you can use the software in multi-user mode.
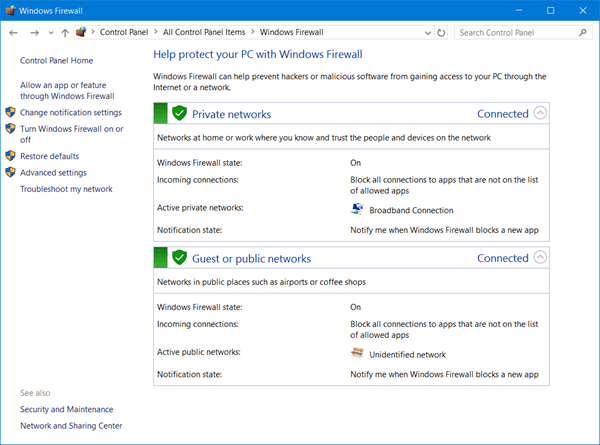
Method 7: Configure system firewall settings
At times, your system firewall might block the data exchange between QuickBooks and the server. In that scenario, you need to perform the steps to configure QuickBooks firewall settings, to ascertain uninterrupted communication between QB and the server.
Create exceptions in the settings of the System Firewall
Make changes to system firewall permissions and then open QuickBooks on all the systems.
Within QuickBooks, opt for switch to multi-user mode under the file menu.
It is essential that no other client system is trying to host the same company file. This can be ensured using the set of steps below:
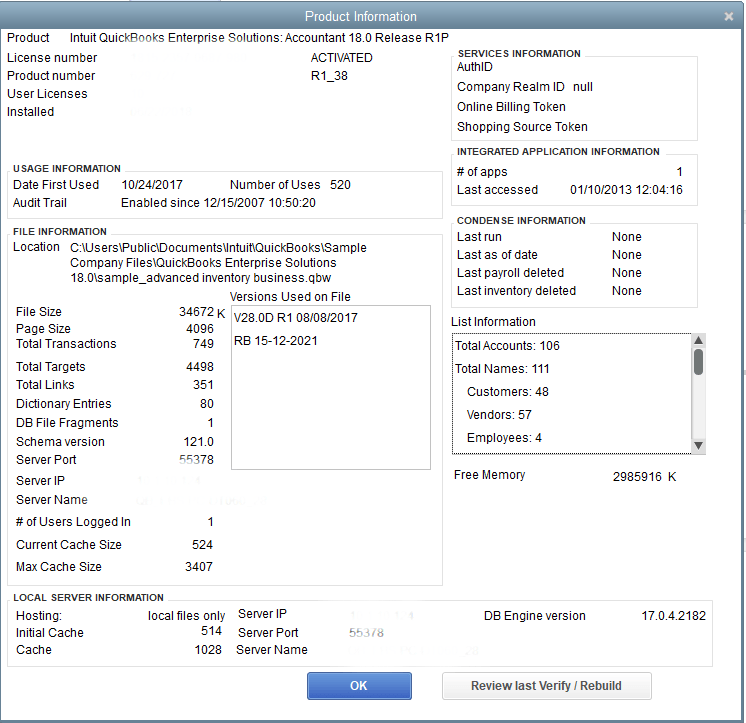
Start by launching QuickBooks.
Press F2 key to reveal the product information window.
You are now required to select hosting to reflect local files only under the local server information.
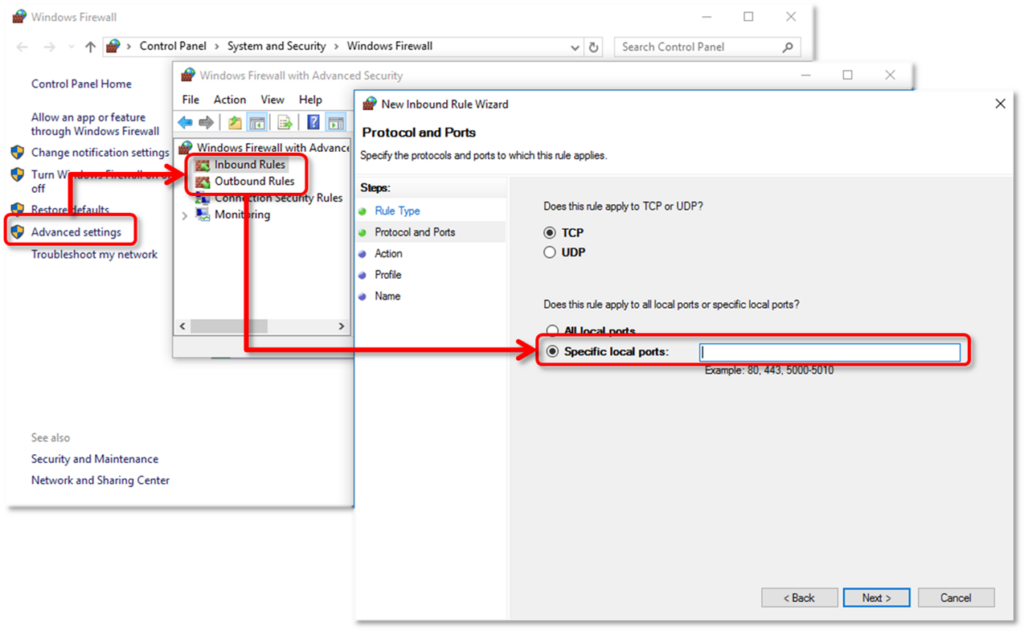
Method 11: Include QuickBooks ports in firewall
In order to ensure that the firewall doesn’t obstruct the multiuser mode, you need to make sure that the firewall includes the QuickBooks ports. Here is a quick list that you can use to configure firewall ports for QuickBooks.
QuickBooks 2019 doesn’t have any static Firewall Ports: The ports are automatically renewed once you can run the company file in the Database server manager.
Method 12: Alter QBGlobalAppConfig.ini file on the Fedora Linux Server
You need to open Linux Terminal Window and also access QBGlobalAppConfig.ini
After that check the default range for ports and further delete the spaces before and after the = equal sign.
QuickBooks version
…from
to…
QuickBooks Desktop Enterprise 22.0
55398 = 5
55398 = 5
QuickBooks Desktop Enterprise 21.0
55393 = 5
55393 = 5
QuickBooks Desktop Enterprise 20.0
55388 = 5
55388 = 5
QuickBooks Desktop Enterprise 19.0
55383 = 5
55383 = 5
QuickBooks Desktop Enterprise 18.0
55378 = 5
55378 = 5
QuickBooks Desktop Enterprise 17.0
55373 = 5
55373 = 5
You can find the complete list of ports in Install Linux Database Server Manager
Ensure to save the QBGlobalAppConfig.ini file.
The last step is to stop and reboot the QBDBFILEMON and QBDBMGRN services.
Getting rid of the QuickBooks error H202 isn’t a tough nut to crack. Using the above-discussed measures can successfully help you eliminate the error permanently. However, if the same error persists, then connect with our QuickBooks support phone number i.e. +1-888-510-9198. Our technical support team will ensure that your queries are addressed immediately and you are able to get rid of the errors in QuickBooks permanently.
Frequently Asked Questions!
What does QuickBooks error H202 mean?
This is a common error code that can occur in QuickBooks when you are trying to access a company file in multi-user mode.
What error message QuickBooks displays on screen when QuickBooks Error H202 occurs?
“Error H202: QuickBooks could not reach the server. This error can be caused by a variety of reasons, including network connectivity, firewall issues, or incorrect hosting configuration settings.”
How do I fix Windows firewall is blocking QuickBooks?
In case you are experiencing an issue where Windows Firewall is blocking QuickBooks, you can try the following steps to resolve the issue: 1: Add QuickBooks to the Windows Firewall exception list 2: Create a new Inbound Rule 3: Disable the Windows Firewall temporarily
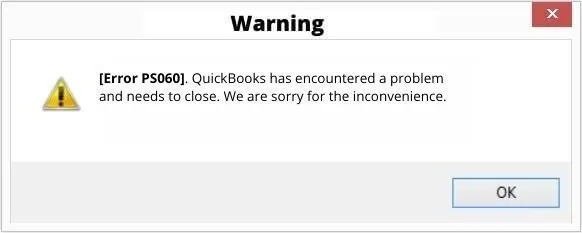
QuickBooks error PS060 is an error that shows up with a warning message: “Current Enhanced Payroll Service is Unavailable”, then the error code PS060 can be the reason. This error occurs often while using the payroll service in QuickBooks. If you are also facing QuickBooks payroll error PS060, then this article can be a savior for you. In today’s article, we will be discussing the relevant causes, as well as the quick fixes to the error code PS060. However, if you want an expert team to resolve the issue for you, then in that case, you can simply make a call at our toll-free number i.e. +1-888-510-9198, and our QuickBooks payroll support executives and certified professionals will help you in get rid of the issue in no time.
QuickBooks Error PS060 is a common error that accounting software users may receive. An error message “Current Enhanced Payroll Service is Unavailable” might pop up on the screen, disrupting the smooth working of payroll. Though this error is not very critical, it is not very easy to fix it either. Besides, you will not be able to access QuickBooks until you get this payroll error taken care of.
What leads to Payroll Error PS060
No single factor leads to this type of error, which means that there are more than one reasons that might end up causing QuickBooks error code PS060. In order to fix this error, it is necessary to know the root cause of this error. We have listed below the factors causing the error code PS060. Let us have a look:
Note: A major cause of this error is settings with the expiry date. QuickBooks Payroll periodically checks the expiration date of the subscription by connecting to QuickBooks. Your billing information should be updated to keep accessing QuickBooks accounting software without any hassle.
This error may show up on the screen if Intuit’s server is down
Intuit doesn’t offer support to old versions of QuickBooks. This payroll error might also be seen, in the case of an old version of the payroll
There can be situation, when the third-party security software might block QuickBooks
Malicious software such as Virus and Malware may also cause Payroll Error PS060
In case the error is caused due to a server issue of Intuit, then the user will be required to have some patience and wait until the website server of Intuit starts working once again.
Solution 3: Download and install the latest version of software
Solution 4: Check the settings of 3rd party software
If the reason behind the error is any sort of third party application interference or any kind of malware infection, then in that case, the user is supposed to get the entire ADPS scanned. The problem can also be resolved by the customer support.
Solution 5: Check for connectivity issues
Check if your computer is connected to the internet. Internet connectivity issue is one of the most common causes behind the occurrence of this error. Speak to your internet service provider if it can’t be fixed at your end. The steps to be performed here are as follows:
Start the process by opening the internet explorer and try to access a safe website
In case you access the website successfully then head to the steps below
In case the error occurs when accessing the website, then check the internet connection settings for any misconfiguratons
Ensure to set date and time correctly on the system
And now, open the internet explorer
Followed by selecting the tools tab
And also, choose the internet options
The user will then have to click on the option reset/restore default under the advanced menu
Implementing any of the above stated methods might help the users to fix QuickBooks Payroll Error PS060. However, if by any chance none of the methods work in your favor, then in that case, the user can get in touch with our experts, or speak to our 24×7 QuickBooks error support experts team at +1-888-510-9198 for quick and precise solutions.
Some FAQs Related to QuickBooks payroll error PS060
How to fix payroll errors in QuickBooks?
To fix the payroll errors, one needs to perform the steps below: 1. The very first step is to click on the help menu 2. After that, select about QuickBooks 3. Once done with that press Ctrl + Alt + Y and then click on next tab 4. Choose the employee that was underpaid in the employee summary information window 5. Now, double-click the employee’s name 6. And review the ytd adjustment details 7. The last step is to click on ok tab
How to reset payroll in QuickBooks?
You can reset the payroll which will undo the payroll data saved. The steps you need to perform are: 1. The first step is to head to the employee tab and then choose the pay employees 2. Now, choose scheduled payroll or unscheduled payroll 3. The next step is to choose resume scheduled payroll 4. After that right click the employee’s name that is highlighted in yellow 5. The last step is to choose revert paychecks
How to fix QuickBooks error PS036?
To resolve QuickBooks Error PS060, you can try updating the payroll tax tables manually. If the problem persists, you can contact our QuickBooks Payroll Support team at +1-888-510-9198 for assistance.
What is payroll error in QuickBooks online?
Payroll errors in QuickBooks online occur when you have recently made changes to your payroll, like if you add a new employee or create a new pension scheme. This can be fixed by deleting the new employees before deleting the pay run. Once you’ve made changes to the final period of the final tax year, you can add the employees back in QuickBooks.
What should I do if I receive QuickBooks Error PS060 while updating payroll tax tables?
If you receive QuickBooks Error PS060 while updating payroll tax tables, you should immediately contact our QuickBooks Payroll Support team at +1-888-510-9198 for assistance. Our team of experts will assist you in resolving the issue quickly and efficiently.
Checkout the supported versions of QuickBooks desktop in Windows 10:
Are you planning to upgrade QuickBooks? Have you checked whether your Windows 10 is supported with the software version you are planning to use? Well, every software has certain system requirements that are to be met, in order to avoid any sort of compatibility issues. Thus, to help you avoid any sort of compatibility issue with your Windows 10 version and QuickBooks version, here we are with the list of QuickBooks versions that are compatible with Windows 10 along with some of the momentous information related to Windows 10.
For more details, make sure to go through the article till the end. Or you can also get in touch with our QuickBooks support team for expert assistance. You can simply make a call at our toll-free number i.e. +1-888-510-9198, and let our experts and certified QuickBooks professionals fix the error for you.
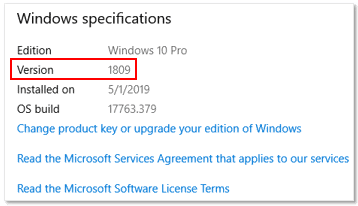
Windows 10 is not used by everyone on the same version. Thus, in order to check the version, along with other specifications, the below-listed steps can be carried out.
The very first step in the process is to click on the Start menu, and then type About your PC
After that the user is supposed to click on About your PC, followed by scrolling down to look for the version number
New updates included in Windows 10
The start menu in the latest version is the same as in Windows 7
Windows 10 comprises of a virtual desktop, called the task switcher
Microsoft Windows 10 boasts the latest version of .Net framework (4.6)
Windows 10 comes with a new browser named EDGE
The new versions bring more control over the optional updates
The cloud download for reinstalling Windows
You can rename the desktop
Disk type and GPU temperature in the task manager
The web browser Internet Explorer 11 is available in the latest version of Windows
It also includes a new browser named the Microsoft Edge Renaming Virtual Desktops
Disk type and GPU temperature in the task manager
WSL 2 with a Linux Kernel Bandwidth limits for Windows update
Supported Versions of QuickBooks desktop in Windows 10
After obtaining the version number, the user needs to look for the version that is certified to work with QuickBooks. Below we have mentioned the versions supported by QuickBooks Desktop.
Windows 10 version 1809:
QuickBooks Desktop 2020 is certified to work in a proper manner on version 1803 of Windows 10. However, QuickBooks Desktop 2017-2019 is not completely certified.
Windows 10 version 1803:
Coming to this version of Windows, QuickBooks Desktop 2017-2020 is entirely certified to work in the best possible way on this version of the Windows operating system.
Windows 10 version 1709:
Similar to the earlier one, on this version of Windows also QuickBooks Desktop 2017-2020 is certified to work without any hassle.
Windows 10 version 1507, 1511, 1607, and 1703:
For those who are using the Home or Pro versions of the mentioned Windows editions, then it is recommended to update them to the latest release of Windows 10. The reason is that Microsoft has already discontinued support for the mentioned versions.
Supported Version of QuickBooks Desktop supported with Windows 10
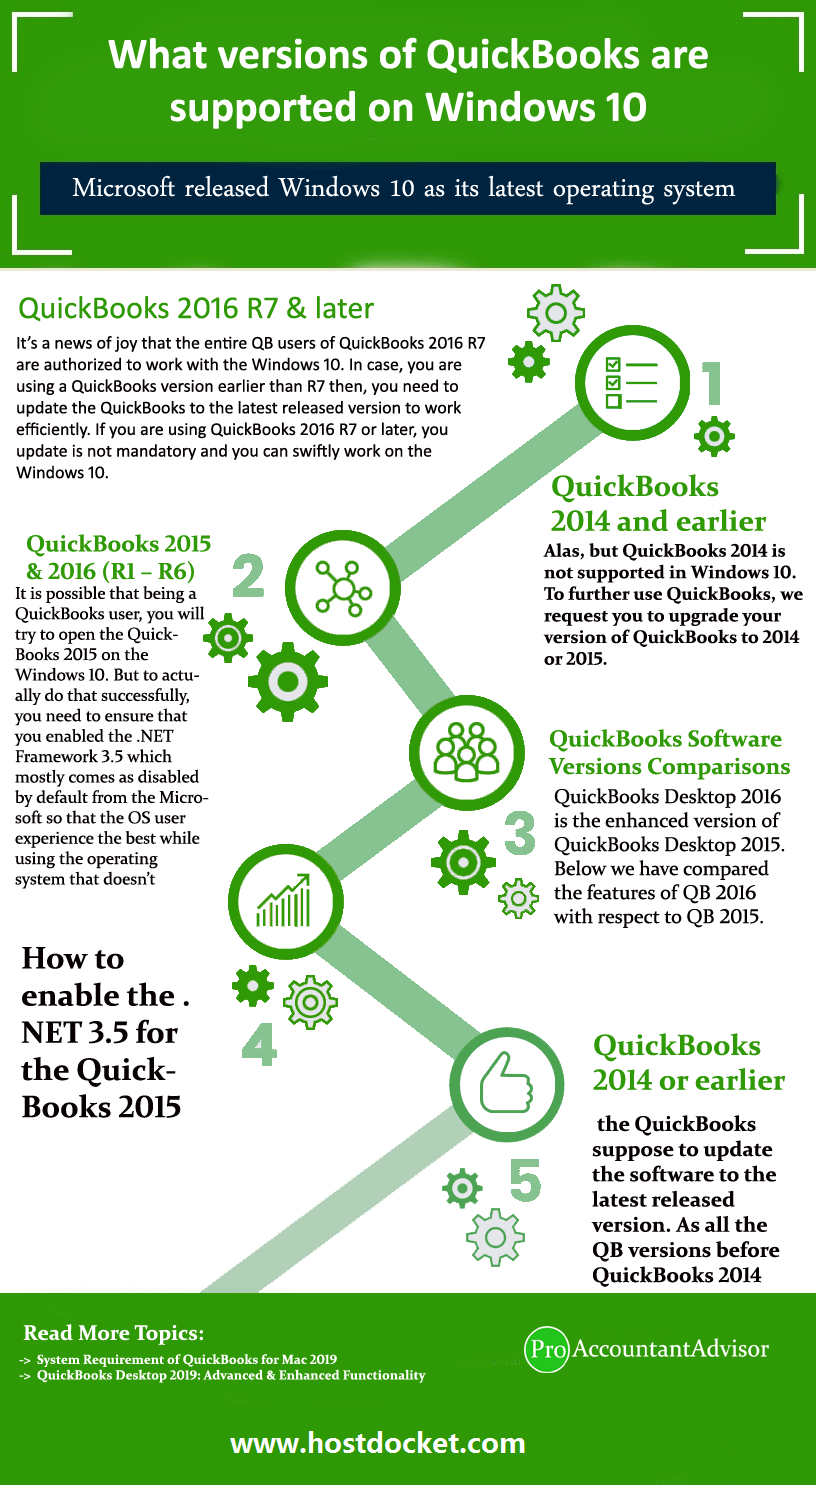
QuickBooks 2016 R7 & later
It’s a news of joy that the entire QB users of QuickBooks 2016 R7 are authorized to work with Windows 10. If the user is using a QuickBooks version earlier than R7, then in that case the user needs to update the QuickBooks to the latest released version, in order to work in efficient manner. However, for QuickBooks 2016 R7 or later users, updating is not mandatory and can swiftly work on Windows 10.
QuickBooks 2014 and earlier
It should be noted that QuickBooks 2014 is not supported in Windows 10 and using this version might create compatibility issues or can end up in a complete mess. Thus, to further use QuickBooks, we request the user to upgrade the version of QuickBooks to 2014 or 2015.
QuickBooks 2015 & QuickBooks 2016 (R1 – R6)
It is possible that being a QuickBooks user, you will try to open the QuickBooks 2015 on Windows 10. But to actually do that successfully, you need to ensure that you enabled the .NET Framework 3.5 which mostly comes as disabled by default from Microsoft so that the OS user experiences the best while using the operating system that doesn’t support the QuickBooks.
Windows 10 also supports QuickBooks 2015. Although you need to ensure that .NET 3.5 is enabled for QuickBooks 2015, for that you could use the steps mentioned below-
The very first step is to click on the “Start” button
And then, press “Windows + R” keys, in order to open “Run” Window
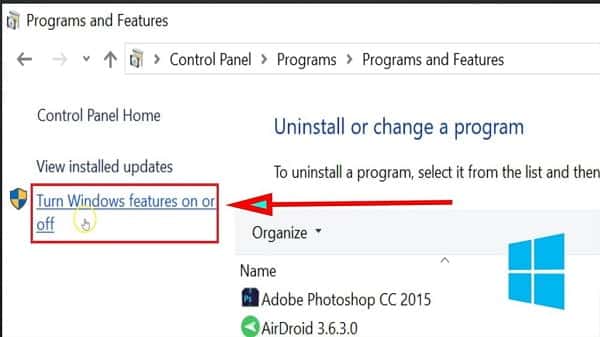
Once done with that, the user will have to type in “Control Panel” and hit “OK” button
After that select the “Turn Windows features ON or OFF” option, after clicking on the “Uninstall a Program” option
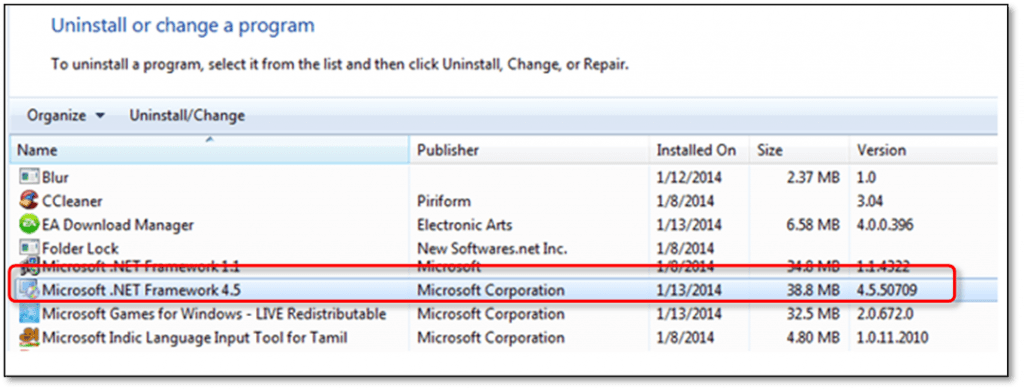
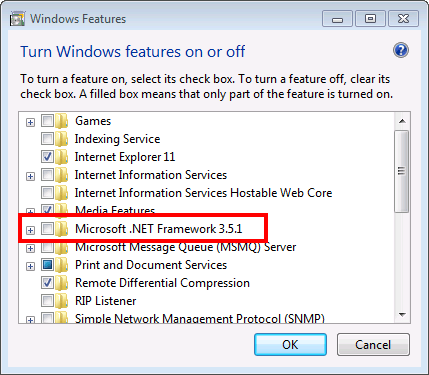
After clicking on the above one, the user will witness a dialogue box will appear saying “.NET Framework 3.5“, along with .NET Framework 4.5.
The user needs to ensure that the option is activated. If this option is off then enabled
And to end the process, the user is recommended to “Reboot” the system
QuickBooks Desktop 2016 is the enhanced version of QuickBooks Desktop 2015. Below we have compared the features of QB 2016 with respect to QB 2015.
QuickBooks 2015
QuickBooks 2016
Bill Tracker is not supported in Pro, Premium and Enterprise version.
This version supports bill tracker.
It does not support bulk clear send forms, to remove multiple transactions.
This version includes bulk clear send forms, in reason to eliminate multiple transactions.
It does not help in advanced reporting features.
It comes with Advanced Reporting features.
Although it provides facility to update company file for new version option.
This version too provides facility to update company file for new version option.
How to Enable the Microsoft .NET 3.5 for the QuickBooks 2015?
Windows 10 version sometimes may not have .NET Framework 3.5 enabled by default and the framework is essential for QuickBooks Desktop to functions properly with the latest series of operating system. You must enable (if not enabled already) the .NET Framework 3.5 for the smoothest experience possible on Windows 10. Here is how you can install it:
To begin with, the user is required to hit the “Start” or “Windows” button
After that, look for the option “Turn Windows features On or Off”
Once you find out the above option, press right-clicks on it
Moving ahead, the user will see a dialog box where you can see the option as “.NET Framework 3.5”
Also, make sure that the option is enabled. If you found it still disabled then, click the checkbox & enable it
Once this process is completed, reboot the computer
If you are encountering any issue with it, you can contact the consulting team to get the instant help.
QuickBooks 2014 or earlier
For all the QuickBooks versions before QuickBooks 2014, the QuickBooks suppose to update the software to the latest released version. As all the QB versions before QuickBooks 2014 requires an update as it does not support the Windows 10.
That’s all from our behalf..! However, if you need more information about supported versions of QuickBooks desktop in Windows 10 or have any questions related to your QuickBooks, you can contact our technical support team anytime.
It might be possible that you still face some hassles with the QuickBooks software and it could be related to anything such as QuickBooks installation, QuickBooks error codes, QuickBooks Updates, or QuickBooks data recovery. For any such problem, you can contact us by dialing our toll-free +1-888-510-9198. We are Intuit Certified ProAdvisors and capable to resolve all types of critical and major issues that is faced by users.
FAQs Related to Supported versions of QuickBooks desktop by Windows 10
Is the start menu in Windows 10 and Windows 7 the same?
Well, few features of windows 10 and windows 7 are same, and various features make them similar to each other
Are QuickBooks 2016 Release 7 and later QuickBooks Desktop 2015 and 2016 compatible with Windows 10?
Yes, both QuickBooks 2016 release 7 and later, and QuickBooks Desktop 2015 and 2016 are compatible with windows 10.
Does QuickBooks 2009 work with Windows 10?
Windows 10 isn’t compatible with QuickBooks 2009. It isn’t compatible with QuickBooks 2014 or prior versions. You simply have to upgrade QuickBooks to the QuickBooks 2022 version, if you want to explore the new features and want to enjoy QuickBooks.
What version of QuickBooks is compatible with Windows 10?
The answer to this common query is that not all versions are compatible with QuickBooks, especially versions prior to 2014.


![How to Fix QuickBooks Error H202? [Updated Fixation Methods]](https://www.hostdocket.com/wp-content/uploads/2020/02/QuickBooks-error-H202.png)