Tackle corrupted Company File with expert guidance
QuickBooks is undoubtedly the finest accounting software currently in demand. This software is used by entrepreneurs across the globe for payment, managing bills, tax related function and what not. Company file might not be a new word for you, if you are a QuickBooks user, and also you might be aware of the glitches and errors related to Company File that people generally encounter.
With this article, we will be trying to brief the readers with the ways to identify, prevent, and tackle this bug. However, if you are a newbie and don’t know much about the features and functionalities of this software, then we would recommend you to consult our QuickBooks customer support team and get expert guidance, in order to avoid any further mess. You can reach out to our team of professionals by dialing our toll-free number i.e. +1-888-510-9198.
Basically, QuickBooks Company file encompasses the financial records of the business. The entrepreneurs who are just starting with QuickBooks, the very basic thing they need to do is create a company file. This company file might encounter certain bugs, one of which is corrupted company file.
How to identify data corruption?
Well, before fixing the issue, it is important to identify the issue. The user can examine the transactions or items by a log, along with the indications and the problems of items and transactions. Once the examination process is complete, the user can go back and then delete the corrupted file. After doing that, continue down the log and then until the file verifies address each of the item. The catch here is that, this process begins when the user completes previous Verify Data and Rebuild Data steps. Also, the user is required to review the logs that the QuickBooks software created to verify the data.
Find out whether the Company File is corrupted or not?
In order to look for a solution to a problem, it is important to first look into that problem and identify it. Thus, before finding an ideal solution, the user is required to confirm whether the company file is corrupted or not. A question might strike your mind that how to find out whether the company file is corrupted or not. To help you out, we have come up with the symptoms of corrupted company file:
In case when a fault occurs on the balance sheet at the time of auditing
When the QB software shutdown suddenly, due to some human errors
Also, in the case when the transaction list is missing from the software
At times when the unpaid bill and invoice are displayed as paid in the balance sheet
When the transaction history displays a negative balance.
It should be noted that in order to detect the error, the user is required to keep a check on the software, and any unusual activity is more than enough to identify the actual issue.
Factors Causing the Company file corruption problem
Well, there can be numerous reasons behind the occurrence of this issue, and identifying those factors might help in the prevention and fixation process of the same. Let us have a look at some of the reasons for the data damage:
Working overtime on QuickBooks.
In case the RAM doesn’t automatically amend the issue and the RAM does not have enough memory.
Any kind of virus attack and unwanted users that might erase the database.
Problems associated with cable, internet, and hard disk
Also, any kind of improper shutdown of the PC, such as directly switching off the main switch. This might lead to data corruption.
How to Prevent Corruption of QuickBooks Files?
It should be noted that be it any stream, data saving is
always a good practice, as once the data is lost, it can be a very difficult
task to regain it. Thus, prevention is better than cure, but the data damage
can only be prevented up to a certain extent. To prevent the data loss up to a
certain extent, the user can follow certain preventive steps:
First of all, save the data backup in any other location and database.
Also, try to avoid from virus just as some malicious files and threats
Along with that, make sure you reduce the third-party users and the tools.
Reduce QuickBooks file size
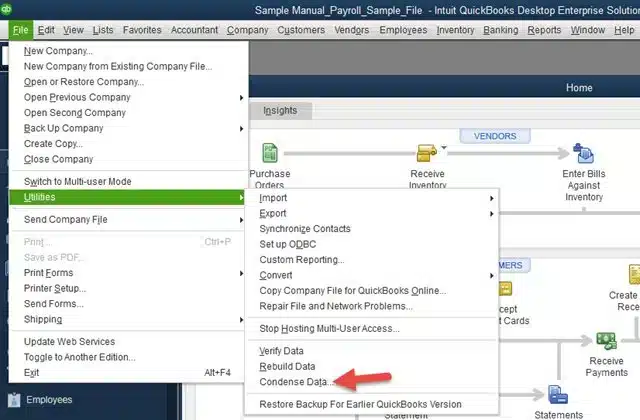
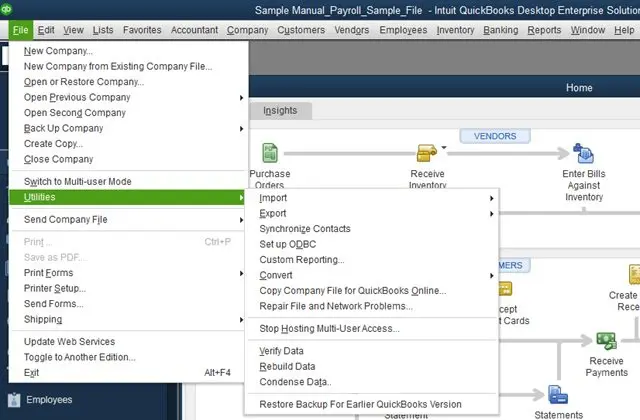
Condense the company file by heading to the file menu and choosing utilities.
After that select condense data option
Select the transactions you want to delete, such as the previous transactions date or transactions that exceed a specific size.
Click on the next tab.
And perform the onscreen instructions to finish the process
Removing the unnecessary list entries.
You need to choose the list from the menu
After that identify any entries that are no longer needed or are duplicates
Right click on the entry and choose delete option
Confirm the deletion once the screen prompted.
Avoid abrupt system shutdown by switching off the power supply. Users should always avoid the practice of shutting down the power supply to the system while the system is still running.
Once you have explored all the above information, just like the causes, symptoms, preventions, etc., it is now time to find out the ways to fix this glitch. There can be two ways to get rid of this error, either manually or with the help of the available tools. We will be discussing both of the processes one by one. So, without wasting time, let us begin:
#Manual method
The very first step is to open the data files, followed by logging in as administrator
Moving forward, the user is required to select a single user mode.
And then, tap on File, after that ‘Utilities‘ option, and lastly hit the ‘Verify Data‘ option
The above process might take time in certain cases. However, the user might move on to the below-stated steps in case the process is consuming much time.
The user is required to make a local copy of the data file, from the server.
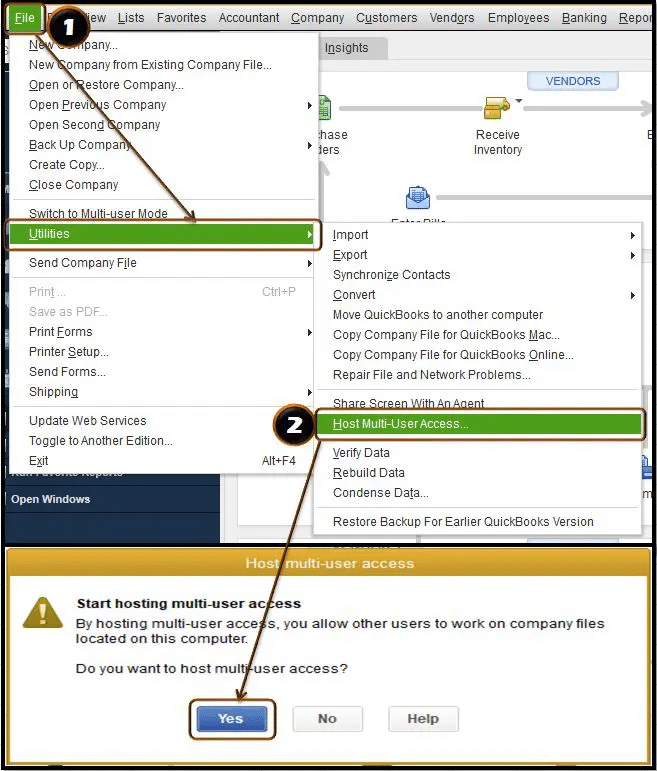
Now, only if needed, the user must enable the temporary hosting on the machine and open the file with admin login later on.
Now moving forward, tap on the ‘File option‘ and then select ‘Utilities‘ and then select ‘Rebuild Data‘
The last step is to copy and open the file, followed by logging in as an administrator.
#Free tools
available
Though the manual method is one of the simplest ways to work and also an easy process, it might consume much time. Thus, the user has an option to use free tools and repair the QuickBooks Company File. We have listed below some of the most commonly used and popular repair tools.
1. Reboot.bat
The very first tool is Reboot.bat, which re-registers several QuickBooks related components with Windows. This tool is generally used by QuickBooks users to get rid of this kind of glitch.
2. QuickBooks Component Repair tool
The next one is QuickBooks component repair tool. As the name suggests, this tool is used to fix the issues that might hinder the smooth running of QuickBooks.
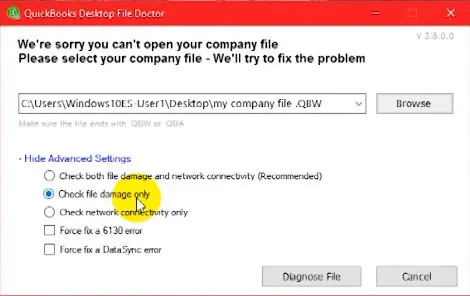
The last available tool is QuickBooks File Doctor tool. This tool helps to fix certain kinds of file and data corruption, along with Windows setup problems, and also network setup problems.
With this, we come to the end of this article. We expect that the reader is now well versed with the symptoms, causes, preventions, and rectifications for corrupted company files. However, if you are unable to tackle the problem even after going through this article, then it would be better to consult with our QuickBooks enterprise support team.
All you need to do is dial our toll-free number i.e. +1-888-510-9198, and we will assist you round the clock and help you to shun off any kind of error associated with QuickBooks.
Frequently Asked Questions!
How do I know if my QuickBooks file is corrupted?
You can find if the QuickBooks file is corrupted by performing the steps below: 1. Go to the File menu. 2. Then hover over Utilities and select Verify Data. 3. Let the tool check your file for data issues. 4. From the Verify Results screen, select Expand All to see the errors.
How do I prevent corrupted files?
To prevent corrupted files, you need to perform the below measures: Relocate Your Files Neatly. … Keep Your PC Safe From Malware. … Unmount External Storage Devices Properly. … Avoid Opening Files in Unsupported Apps. … Prevent Your Hard Drive Sectors From Going Bad.
What makes a file corrupted?
A file becomes corrupted when a piece or pieces of the data that form it are lost. As a result, when a user tries to open such a file, the storage media is unable to reconstruct it and reports an error. At other times, the data required to reconstruct the file is still present, but the media is unable to locate it.
Are you looking for missing transactions in QuickBooks desktop? If you are worried about any of your missing transactions, then QuickBooks can be of some help and in this blog we will discuss this issue. Often due to some or the other reasons, you might face an issue related to missing transactions in QuickBooks desktop. In order to help you in finding the missing transactions, we have tried to summarize the complete info in this segment. Also you can consult with QuickBooks ProAdvisors team for QuickBooks training or other services. Dial today +1-888-510-9198.
The first thing to do is check the audit report which will show all transaction reports as well as the deleted transactions. In QuickBooks the record manager can manipulate company information, the payroll system and the product information. But the best part is that it displays the deleted values of record by highlighting them and it shows that the data has been changed in a particular part. For instance the products value changes or any old product gets replaced by the new one. And QuickBooks highlights this change in a bold format.
In order to open an audit report the first thing to do is open the Reports menu and there you need to select Accountant & Taxes. After this go to the Audit Trail where reports can be customized by transaction date, type and name. This will help you in getting accurate and an easy way to store the large data in a specific format which will help you in modifying the records in the easiest way possible.
Find Company File
You need to look for the exact transaction file that is missing or has been changed from a multiple file collection. Since a company file has huge data in which changes are made on a regular basis it is not very easy to spot the modified part.
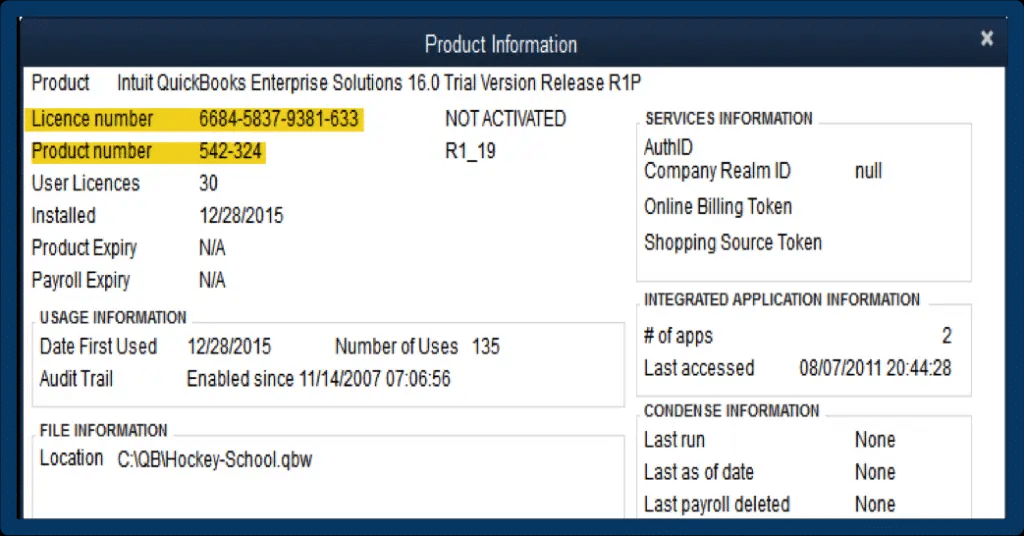
But it is QuickBooks that makes the whole process of opening and signing in to the company file much easier by pressing the F2 on the keyboard. Moroever, this action will pop up the Product Information window and it will display the file you are searching for. And now you can choose the details which are deleted or modified in the file.
In QuickBooks condense is the feature that assists in removing formal existing information to a cut off date. This is used for decreasing the size of the company file for various reasons.
This method or deleting unused and redundant data creates more space for new data insertion. It further compiles all the data as per your requirement and you can easily select the data range up to which you need data.
Re-entering your Missing Transaction
In case, you find missing details in any of the above steps, then you have to do is move ahead and re-enter your transaction. This is because some data may not be stored or entered in the reports. The above methods have efficiently done their work and that defines that the data was not entered into the company files
Usually, we aren’t sure that just how we could find the missing data from the large company files and also it is not easy to memorize or browse the precise data. To ensure that, QuickBooks introduces accounting application for speed-up your service without squandering time or loan.
QuickBooks today have sped up and made it easier to find missing data from large company files. And the best part is that users do not have to spend much money and time on this. However, still if you cannot locate the missing transaction then you can seek assistance from QuickBooks Support service providers by dialing +1-888-510-9198 to get a quick solution.
FAQs Related to locating missing transactions in QuickBooks
Why are some of my transactions missing in QuickBooks?
In case you do not categorize transactions into specific accounts, then QuickBooks puts them into the uncategorized income or uncategorized expense account.
How do I see all transactions in QuickBooks desktop?
You can access the transaction journal using the steps below: 1. Move to the transaction toolbar, and select reports and further go for the transaction journal. 2. Choose QuickBooks reports menu and further choose transaction journal. 3. For windows, press ctrl + Y 4. For Mac, press cmd + T
How do I find missing invoices in QuickBooks?
To access a deleted invoice: Run the Voided/Deleted Transactions Report by selecting “Reports” and then “Accountant“. From here, you should be able to see the detail of the invoice in question.
How do I restore a transaction in QuickBooks?
You can restore transaction in QuickBooks using the steps below: 1. Head to settings ⚙ 2. Also, choose Audit log 3. From the filter ▼ dropdown menu, choose the appropriate user, date and even 4. Moreover, go for apply tab. 5. And further locate the deleted transaction 6. Under the history column, choose view tab. 7. All the information required for the transaction can be found under the event column
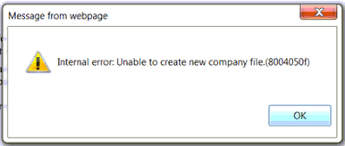
QuickBooks is accounting software that is used by small as well as big companies for their accounting requirements. But this software prone to few technical errors. In this blog today, I am going to discuss about An internal QuickBooks error that occurs when one tries to access the QuickBooks company record. You can follow the below given solutions to resolve this error from your QuickBooks desktop. You may get the following error message:
An internal QuickBooks error occurred while trying to access the QuickBooks company data file
The image as shown below is similar which appears on your desktop.
However, If you are looking for an instant help from the experts to resolve the error, please contact to our QuickBooks error support team. Our Intuit certified experts will surely to help you. You can get in touch with our technical support team at +1-888-510-9198, and we will provide you with immediate support and assistance.
When you cancel your subscription or when your trial period expires or your credit card gets cancel, then you can figure out what happens to your system and files:
All the automated invoices and recurring transactions stop automatically.
You will not be able to “edit” or “add” data but will be able to read data and run the reports.
The QuickBooks data of your company is read only for a period of time and after that will disappear. This time period depends on your situation which depends on following:
Your trial pack has expired for which the period is 90 days.
You have cancelled your trail and the period is 0 days. When you subscribe to another QuickBooks service and the period is 30 days.
If the problem is with your credit card, then you have a 14-day grace period in which there are no restrictions. Later that, you have 90-day read-only period.
Few Tips:
There are some tips that will help in such cases:
Before you cancel your subscription or trial plan, print all the QuickBooks forms that you may need.
When you cancel QuickBooks, the direct deposit automatically cancels.
When you terminate your business, you need to make sure that you provide forms W-2 to your employees for the calendar year of termination by the due date of the final form, i.e . 941.
Also ensure that you file forms W-2 with the Social Security Administration (SSA) by the last day of the month that follows the due date of the form 941.
When you face difficulty in filing Forms W-2 for the current year. You can visit our website or call us at +1-888-510-9198.
Error Message: If you’re getting the error “An internal QuickBooks error occurred whereas making an attempt to access the QuickBooks company information file” in their QBPOS adjust app. To resolve this error, you can follow the below steps:
First of all Close all the files and put your computer on restart.
Once the system is “ON“, you can open the “QBDT company file” associate disagreed “QBPOS” synchronize app and let it synchronize once more.
Check out the below other given solutions in order to get the best results.
Solution 1: Verify QuickBooks Desktop file’s data integrity
Firstly open your QuickBooks desktop.
After that Go to “file menu” and then choose the “Utilities” option and then click on “Verify data“.
Perform a “Rebuild of the file” once then verify the data process gets complete.
You need to take a note if you encounter any errors after rebuilding the file.
After that you need to perform a financial exchange again.
Move forward to the next steps if the issue still remains.
Solution 2: Delete/Remove POS from the Integrated Applications list
Open your QuickBooks and follow the steps:
Go to “Edit menu” and then click on “Preferences” tab, on your QuickBooks desktop.
From the left side you need to select “Integrated Applications“.
Now tab on “Company Preferences” tab.
After that choose “Point of Sale (POS)” from the list and then click on “Remove“.
Hit “OK” button at last.
In QuickBooks Point of Sale Application:
Go to “File menu” and then choose “Preferences tab“.
Now Hit a click on “Company“.
On Company Preferences window you need to click “Financial“
Once you click on company you will see a box that displays establishing QuickBooks connection. (Note: When the box disappears, the connection is successful.
After performing the steps if there are still issues, follow the onscreen instructions on the connection wizard.
Finally do a “financial exchange” and then “check for errors“.
Solution 3: Toggle Summarized Exchange the Preference in POS
In QuickBooks POS Desktop:
Navigate to the “File menu“.
Then choose the “Preferences” and then click on “Company“.
Now click on “Financial“, In the Company Preferences window
If send receipts and vouchers with is set to Detailed item descriptions, alter it to “Summarized item totals“.
If it is set to “Summarized“, alter it to “Detailed“.
After that go back to the “Preference” and then alter it back to the “Original setting“.
After that click “Save“.
Here after you need to perform a “financial exchange” and then “check the errors“.
If still you encounter any error, contact to technical support team of QuickBooks.
Error: “Please Start QB and open your company file before continuing”
You may face an error this time which would pop-up as ‘Please start QB and open your company file before continuing’.
If you are exploitation Microsoft prospect or seven, then make sure that you have “User Account management (UAC)” set to ‘ON‘ or you can always advise.
Also ensure that group action professional Importer/Exporter is login to the “QuickBooks file” at the Admin level.
Ensure that each QuickBooks and group professional are not started with crosscut security tab possibility- ‘Run as Administrator’.
Non-elevated Windows permissions are required for ‘QBSDK‘ and this box should not be checked.
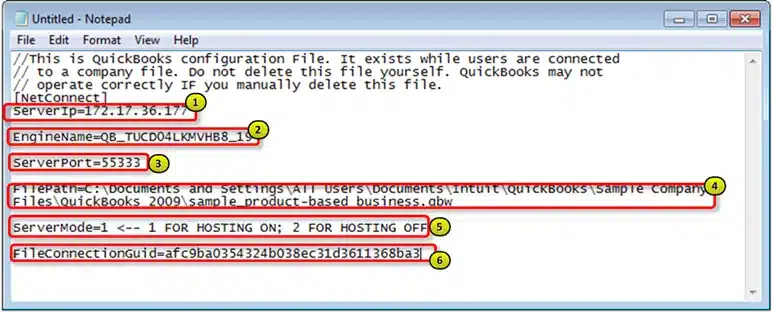
An Internal QuickBooks Error occurred while trying to access the QuickBooks company data file.
When you try to access the QuickBooks Company file, you face an internal error and description of the problem you face is:
When you use QuickBooks Premier 2007 Canadian Edition and “QODBC 7.0.0.214“, we try to connect you with QB database with “ADODB connect object“.
Connection string is ‘DSN=QB;DFQ=C:Sample.qbw’
But with above connection string, when the connection is unable to establish, QODBC gives the error message: ‘An internal QB error occurred when you try to access the QB company data file’.
Then, the connection is present for the same database in VB DEMO.
FAQs Related to Internal QuickBooks error when trying to access company file
What is the internal server error in QuickBooks?
The QuickBooks internal server error is basically an issue that occurs when syncing or in many other scenarios. The basic reason behind the occurrence of such an error can be damaged address field in QuickBooks, registry issue, incomplete installation, corrupted important windows system files, or damaged or missing essential files.
What is error code 6073 990001 in QuickBooks?
You can face such an error when the file is open on another computer in single user mode. Moreover, the file is located in a read-only network folder. And the files are hosted on a linux server and are using more than one set of login credentials to sign on to the shared folder.
Why internal QuickBooks error occurs?
You can experience internal QuickBooks errors when trying to access the company file, as there might be some issue with the company file.
Reportedly, errors like the QuickBooks error 6175, 0 have been witnessed way more than earlier in QuickBooks these days. As the error somehow relates to the company file, finding the fix for it immediately is a crucial step. This particular error usually shows up on the screen when you try to access the company file using QuickBooks. It generally occurs when the software is unable to read the database services. The error code can be something caused by a bunch of factors, which we are going to highlight in this segment, along with the measures that can be taken to culminate such an error. To learn further about this error, stick around to this piece of writing, or you can also get in touch with our technical support team at +1-888-510-9198, and let our technically sound QuickBooks professionals help you with all sorts of QuickBooks-related queries immediately.
QuickBooks Error Code 6175, 0: In general, this error code can be seen when a QuickBooks user tries to open/access the company file located in the local server. This happens when the QuickBooks database server manager does not respond or QuickBooks is unable to read the database services. Some services stop on their own, if they are not in use by other services.
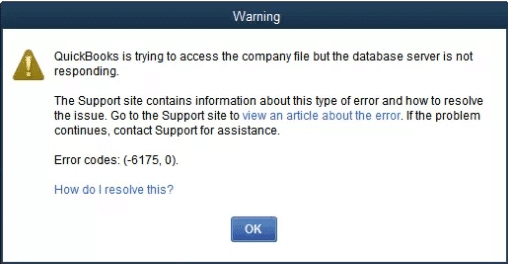
You might also see the following warning sign on your system screen when using QuickBooks:
Warning
QuickBooks is trying to access the company file but the database server is not responding Error Codes: (-6175, 0)
Problem with connection
Error: -6175, 0- We’re sorry, but QuickBooks can’t open your company file.
What causes QuickBooks error 6175, 0?
There can be various reasons due to which the user might stumble upon this kind of error. A few of the reasons that might cause QB error 6175 are listed below:
Also, when the server hosting company file (.qbw) is occupied to perform other tasks.
Another reason behind the occurrence of this error can be when firewall blocks communication between the computer generating the error and also the server where the company file (.qbw) is stored.
Lastly, the error -6175, 0 may occur at the time of company file communication.
Here are some quick signs and symptoms that can help you spot QB error 6175 successfully:
In case you are unable to access the company file, then it indicates such an error
Another sign can be if the screen stops responding
You can further come across such an error, if you experience QuickBooks crashing.
Or if the system hangs frequently.
Troubleshooting Steps for QuickBooks Error 6175,0
Before you start troubleshooting this error, you should turn hosting at the Host system where the company files are stored. After that, switch to Multi-User mode in QuickBooks. Once done, follow the below-given steps to fix error 6175.
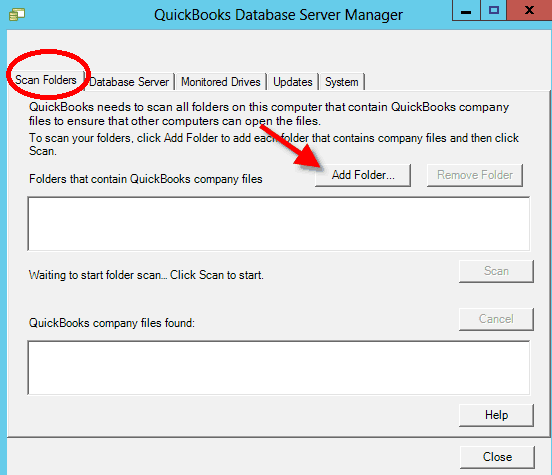
Solution 1: Make sure that the server computer has QBDSM Setup in an appropriate manner
Note that, one or more systems might be set as the server for QuickBooks, and the workstations can be in the multi-user mode. However, the server should be the only system that is set to host the mode.
You are supposed to check the windows user settings. Or further, Add QBDataServiceUser as a user with admin rights.
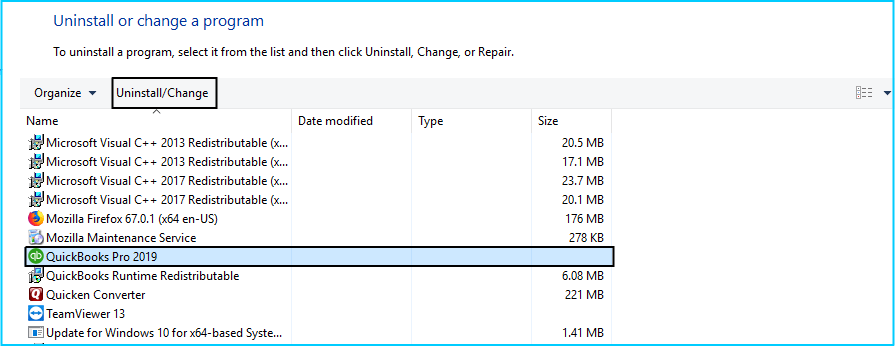
Solution 4: Uninstall and Reinstall QuickBooks on your server computer
Uninstalling and reinstalling QuickBooks can fix the issue up to a certain extent. You can perform a clean installation using the set of steps enumerated below:
After installed, reboot the system and verify if the ongoing error is fixed or not.
It should be noted that you can also download and install the QB tool hub program and directly run the clean install tool from there.
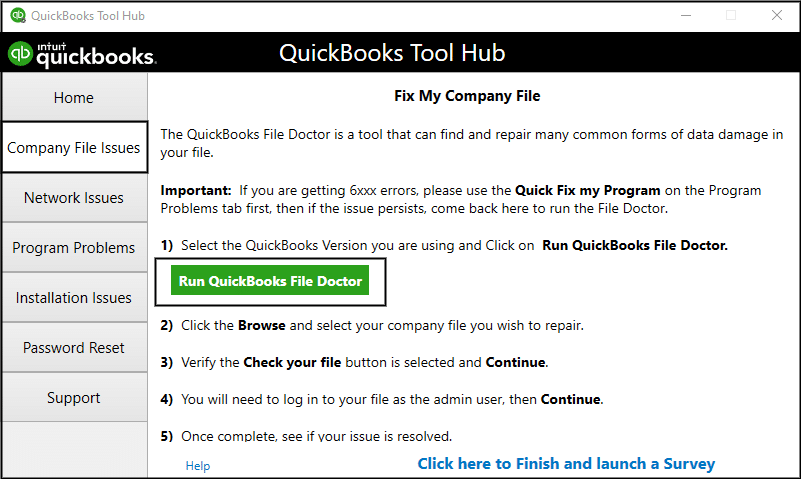
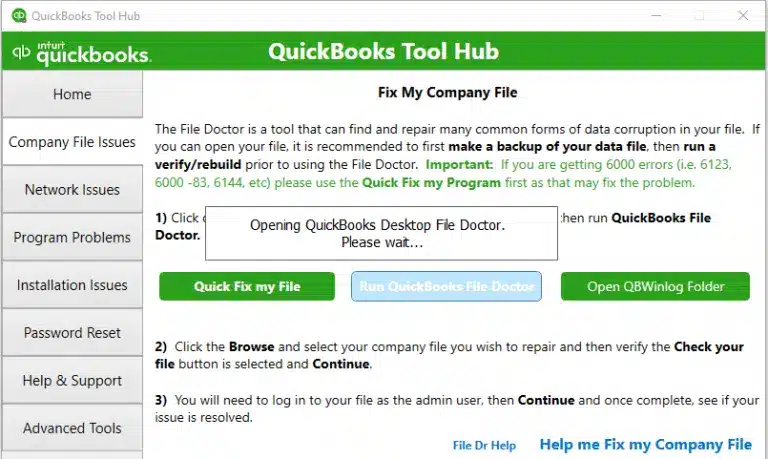
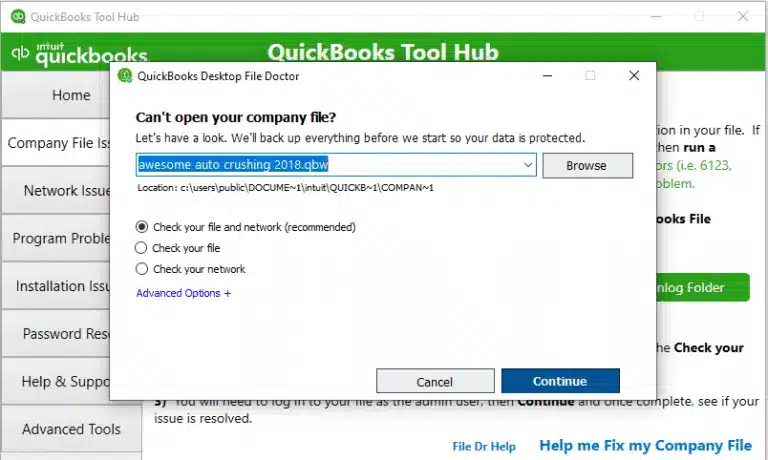
Solution 5: Use QuickBooks File doctor tool
QuickBooks file doctor tool is designed in a way to eliminate all sorts of QuickBooks file related errors. You can try accessing this tool using the below steps to fix the error 6175 successfully.
Start with closing QuickBooks.
You will then have to download QuickBooks Tool Hub file and save it where you can access it easily.
Now, you will have to open the downloaded file.
And further carry out the onscreen prompts to complete the installation process.
Do not forget to agree to the terms and conditions.
Select the check your file option and click continue.
The last step here is to enter the QuickBooks admin password and click on next tab.
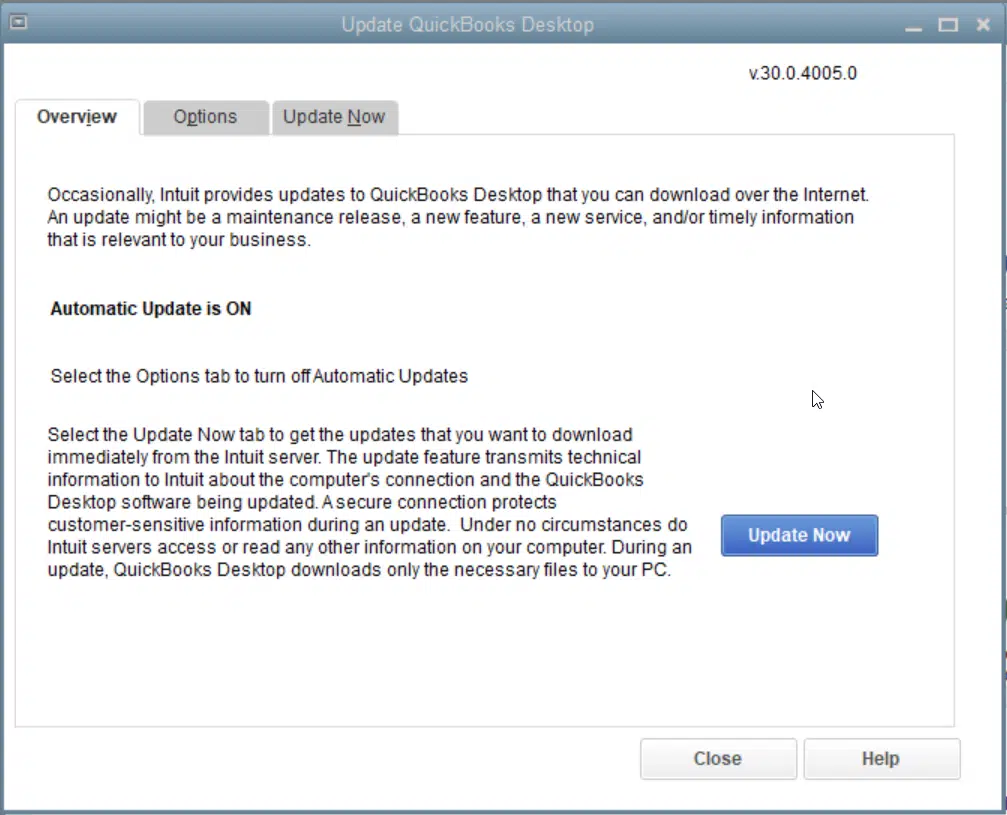
Solution 6: Update QuickBooks to latest release
Using outdated QuickBooks version can also land you into some or the other error. Thus, it is recommended to update QuickBooks to latest release. The steps involved in this procedure are as follows:
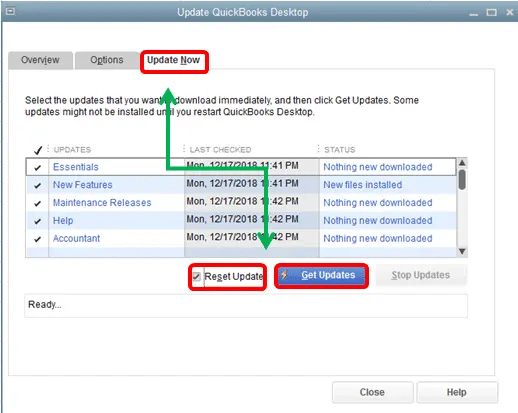
The first step is to launch the QuickBooks desktop software
Now, hover over and select the help tab and select the update QuickBooks desktop option
Click on update now tab
Now click on get updates
The update process may take some time to conclude, depending upon the internet connection and speed.
The last steps is to access QuickBooks software to inspect if the error is fixed
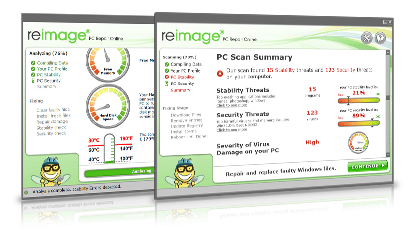
Solution 7: Reimage repair tool
Ensure that you have a seamless Internet connection.
Download the reimage repair tool and save it to the desktop.
Head to the File location and click on it Twice.
Initiate with the Install process and then hit on Yes to march ahead.
Now, a welcome screen might appear.
Leave the box un-ticked to Permit the repair tool.
Allow the Automatic scan to start.
Click on the Install option and Start the install process.
Scan will start automatically.
The tool will provide you with the Issue and repair.
Click on the Repair option.
Reboot the system and verify if the error got uprooted.
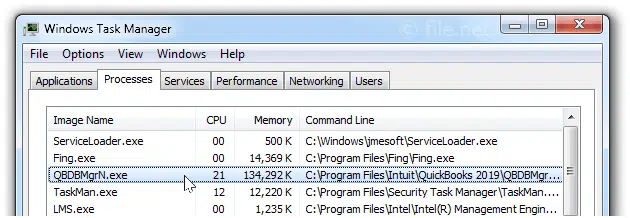
Solution 8: Stop all processes of QuickBooks database server manager
Make sure that no background processes related to QuickBooks database server manager are running on the computer. The steps that can be performed here are:
First of all, press ctrl + shift + esc to open the task manager.
After that, choose processes tab.
You are now required to end all tasks related to qbdbmgrn.exe process by clicking on the end task tab.
Hopefully, this blog assisted you in fixing QuickBooks error code 6175 and educated you about it causes and consequences. If you still receive this error code on your QuickBooks, you can contact our QuickBooks premier customer support team anytime by dialing +1-888-510-9198. All our experts have years of experience and cutting edge tools/technology to offer you the best solutions for QB related errors.
FAQs – QuickBooks Error Code 6175
What is QuickBooks Error Code 6175 0 ?
This error is a technical error that generally appears when opening the Company file in QuickBooks. This error belongs to the 6xxx family of codes that pertain to data damage related to the Company files.
How do I fix error code 6175 in QuickBooks?
The various methods to troubleshoot this company file error are: 1: Clean Install QuickBooks. 2: Set up the QB Server Manager on the system. 3: Use the Reimage Repair Tool. 4: Change QuickBooksDBXX Service to the local system. 5: Configure the hosting settings. 6: Run QB File Doctor. 7: Update QuickBooks.
What error message you may get when error 6175 generates?
This error is usually accompanied by an error message that reads something like: “Error -6175: An error occurred when QuickBooks tried to access the company file. Please try again. If the problem persists, contact QuickBooks technical support.”
No doubt, over the past few years QuickBooks have emerged as one of the best accounting software. It has gained so much popularity that it is being used by small and medium business all across the world. From accounting to finance management this new age software is packed with powerful features. Even though QuickBooks comes with many perks but at times it does show certain glitches. At times the errors can be easily fixed but the user might need some assistance especially from the QuickBooks technical support providers. In this article, we will be discussing about QuickBooks Error -6177, 0 that is encountered by many QB users in the recent times.
There might be too many possible causes behind the occurrence of this error, we will discuss about these causes with it’s solution methods. However, for an immediate assistance you can consult our QuickBooks error support team at +1-888-510-9198 and discuss your issues with the best accounting professional and experts.
According to Intuit, Error Code -6177, 0: “QuickBooks is attempting to open this Company file” indicates that QuickBooks accounting software is unable to use the path to the company file. This kind of error generally occurs while a user uses QuickBooks in multi-user mode. When the user tries to access company file, the QuickBooks error 6177 pops-up suddenly on desktop screen.
Error -6177, 0: QuickBooks is attempting to open this company file
A Few of the reasons behind the occurrence of these errors can be firewall problems, corrupted data files, networking troubles, usage of old version of the software, installation failure of the software and many more.
You may see the following error message on your desktop screen:
What Causes QuickBooks Error -6177, 0?
One of the reasons behind the error is QuickBooks desktop does not use the path to open the company file.
Or any kind of Virus or malware in QuickBooks files.
Incomplete installation or corrupted download might also end up in this kind of error.
System files mistakenly deleted that are related to QuickBooks, then this error could be seen.
Below are the steps to resolve Error Code -6177, 0 in QuickBooks desktop.
Solution 1: Ensure that QuickBooks is updated to the latest edition
For that, the user needs to firstly open the company file after moving a file on the local computer. In case of any error while opening the file then search for a portable company file.
Note: You can find the instructions for using the tool in Tool tab.
Now, the QB connection tool will automatically detect the problem and try to resolve it by its own.
Note: If you see File Open successful (all Advanced statuses have green check-marks,) your network connection is OK, and you should be able to open the file.
Solution 3: Try to manually resolve the file path
You need to use the following steps if the QuickBooks Connection Diagnostic Tool can’t run successfully on your computer.
Step 1: Locate the network file
The very first step is to open the file explorer on the server system and then search for the QuickBooks folder
Now, search for the company file name and search for the .nd extension
After that right click the nd file and click on delete tab.
Note that there is this particular step won’t affect the accounting data
Solution 4: Download and run File Doctor on your server
First of all you need to download and use the file doctor tool on your server. Once the file doctor tool successfully installed on your computer slick on Scan button. This process will scan and clean up your company file that is hosted on your server. Also this process refreshes the location.
Start the procedure by downloading the most recent version of the QuickBooks tool hub and then save the QuickBooksToolHub.exe file on the system
Once done with that perform the onscreen instructions to install the terms and conditions of the software
The very next step is to double click the icon and open the tool hub after installation
The user is then supposed to g for the company file issues from the tool hub
And run QuickBooks file doctor tool.
The file doctor might take up to one minute to open
Go for the company file from the drop-down menu in the file doctor.
To locate the file, click on browse to search
The user will then have to check the file and head to the further process.
Now, enter the password correctly for QuickBooks admin and click on next tab
Note that the file doctor might take around 5 minutes to diagnose the file. Furthermore, this process would not involve any additional charges and the file doctor tool is designed and developed to fix the issues automatically
Important: If this method fixes your error code 6177, 0 then be sure to backup your company file.
Solution 5: Reset the multi-user hosting
The user can try performing the below set of steps related to resetting the multi user hosting to get rid of the issue successfully.
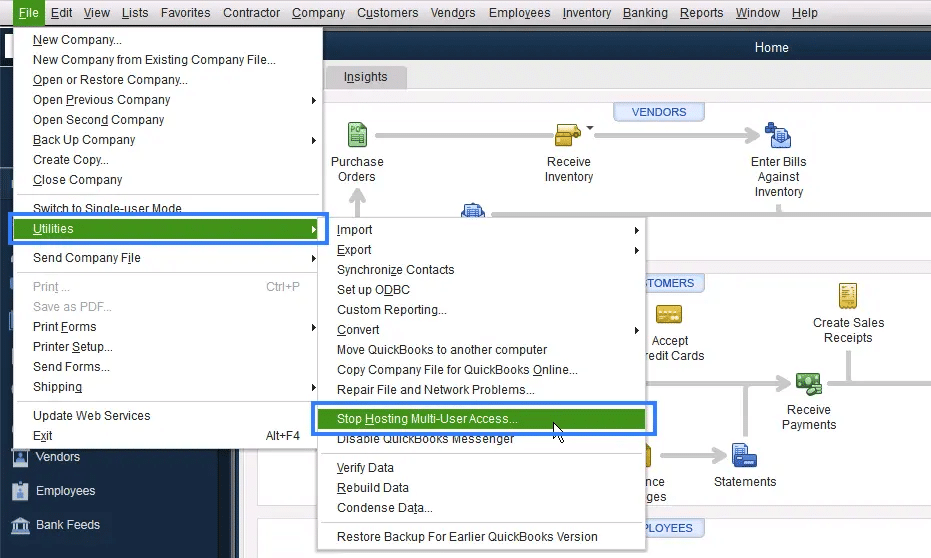
The very first step is to open QuickBooks desktop on the server system
Once done with that, go for the file menu and also head to the utilities tab
The user is then required to select the stop hosting multi user access and click on yes to confirm
The next step is to head to the file menu and select the close company
This will reset all the hosting settings
And also open the QuickBooks desktop again without opening the company file this time
The user should also go for the file menu and click on the utilities tab
Now, select the host multi user access and click on yes to confirm
The last step is to select the file menu and select the quick QuickBooks option
Solution 6: Reopening QuickBooks
It is important to try reopening QuickBooks and checking whether the error persists even after reopening or not. The steps involved in reopening are as follows:
The very first step is to open QuickBooks desktop
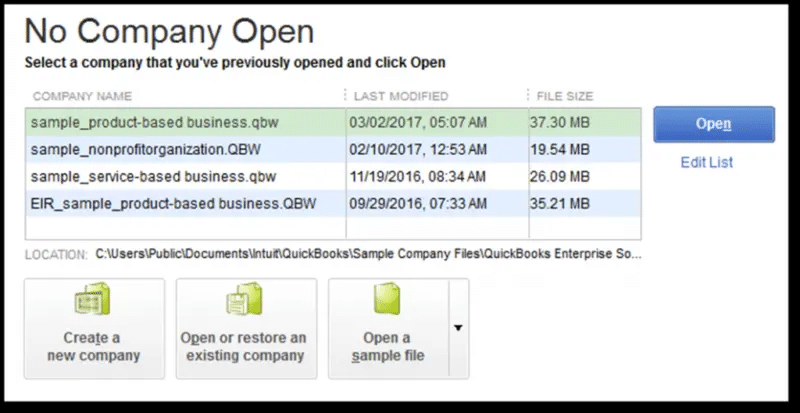
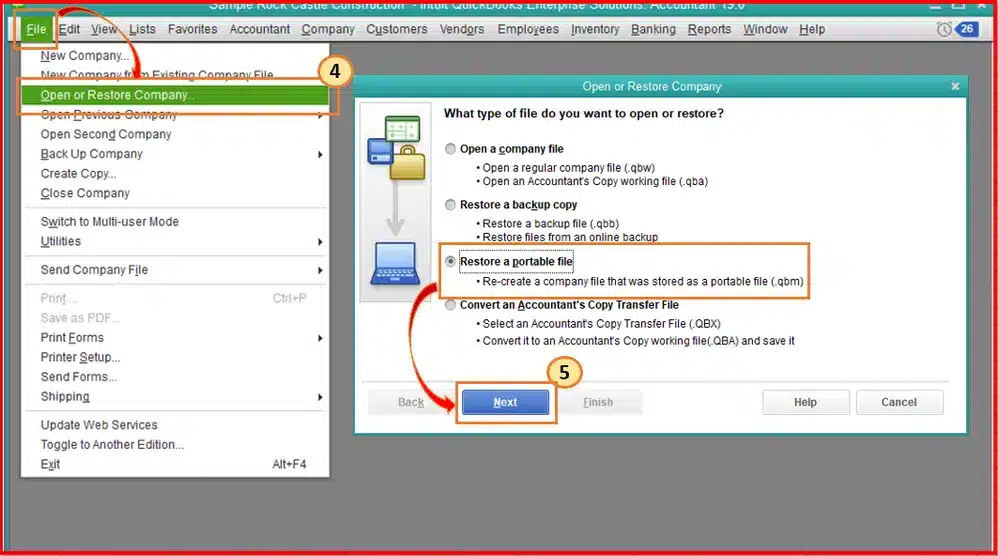
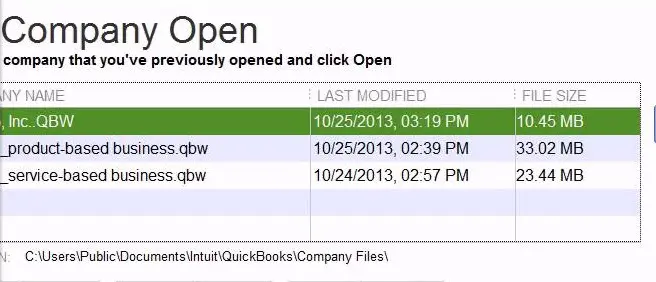
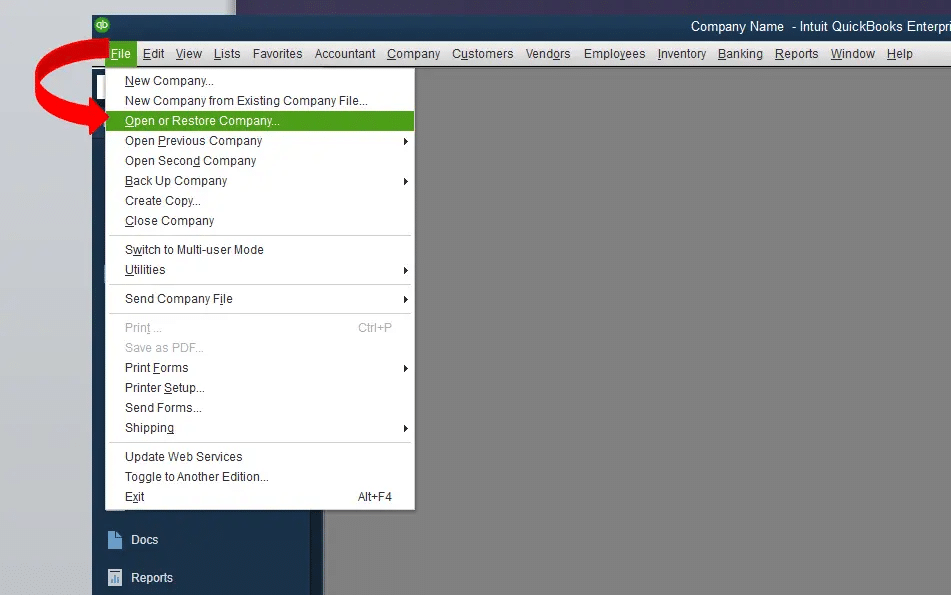
And also, go for the open or restore an existing company tab
Once done with that, select open a company file and click on next tab
The last and final step is to open portable company file and move it to a new folder
Solution 7: Moving the company file to a local hard drive
Under this process, the user simply needs to move the company file from the server to the C drive
After that, open the company file in QuickBooks
Once done with that, make a portable file and save it to the local C drive
The user needs to now close the company file
And also, restore the portable file from the C: drive and also save it to the server
By the end of the process, collect the company file and try to open it from the server
Solution 8: Update the file location
The user might have to check the file location and if the file is placed on an external hard drive, then performing the steps below is important. Let us have a look:
Step 1: Moving the company file from its original location
The steps mentioned below are applicable only for the server system. If the user is not having the access to the server system, then performing the steps below on the workstations might help.
Start the process by opening the windows start menu on either the server system or the workstation
After that, enter in the file explorer in the search bar and also open the same by double clicking it
The user will then have to open the QuickBooks folder and also press F2 key to pop up the product information window to look for the location of the company file
Now, search for the company file that ends with the QBW or .qbw extension
The user is now supposed to write down the drive’s name and location
Also, put the file back later on
End the process by moving the company file from this folder to the C: drive and then head to the file avoiding the entire folder
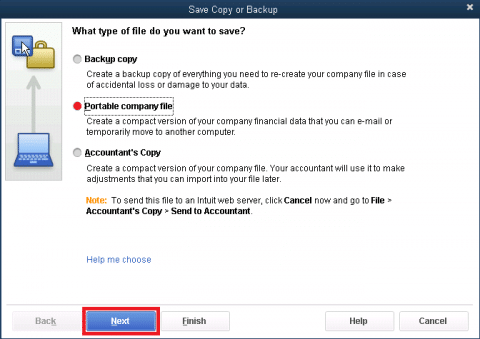
Step 2: Create a portable company file and restore it to the server
Start with opening the QuickBooks desktop on the system having the company file
After that select the open or restore an existing company option
The next step is to browse and open the company file that is moved to C: drive
Once done with that, create a portable company file
Select the file menu and go for the close QuickBooks company option
Reopen QuickBooks
Move to the file menu and pick the open or restore company option
The user is then required to browse for or open the company file that is moved to C: drive
After that, create a portable company file
Now, select the file menu and go for close QuickBooks company option
Reopen QuickBooks
And also, move to the file menu and pick the open or restore company option
Select the option to restore a portable file and click on net tab
The user needs to find the portable file created earlier and hen open the same
Also, click on next tab
And select the drive originally chosen in order to restore the location
Now, tap on save and transfer the company file back on the network
The last step is to click on file menu and select quick QuickBooks option
Conclusion!
We hope that the information and the methods to fix the error shared above in the article might have helped you to resolve QuickBooks error -6177, 0. In case you are still encountering the same error or you have any further queries, feel free to get in touch with our QuickBooks 24/7 helpline number anytime +1-888-510-9198.
Our support team is available 24/7 and they will leave no stone unturned to provide you with the best possible support.
FAQs
How do I fix error 6177 0 in QuickBooks?
The user can come across error code 6177 due to multiple factors, but it can be easily fixed using the steps below: 1. The very first step is to update the file location 2. After that, use the QuickBooks file doctor tool 3. The next step is to update QuickBooks desktop 4. Also, reset multi user hosting 5. The next step is to move the company files to the hard drive
How do I fix corrupted file in QuickBooks?
The user can try fixing this issue using the steps to rebuild data with the help of the rebuild data tool. The steps involved here are: 1. At first, move to the file menu 2. Also, hover over utilities and choose rebuild data 3. The next step is to let the tool repair the file 4. Also, when the tool finishes, make sure to select ok tab 5.The last step is to head to the file menu
What is QuickBooks error code 6177?
QuickBooks error code 6177 is basically belongs to the 6000 error series. It is related to the company file and appears on the screen with a warning message that states: QuickBooks is attempting to open this company file. Before you can open the company file from the computer, you must first open the company file on the computer where the company file is located. (-6177, 0).