Bad debts are the debts that become unrecoverable and are required to be written off, in order to avoid miscalculations in the end. The QuickBooks accounting software allows the users to write off bad debts in QuickBooks by performing some set of steps. To help you in writing off bad debts successfully, here we are with this segment sharing the steps to write off in detail. Note that, the steps for QuickBooks online users and QuickBooks desktop users differ.
Thus, to learn further about writing off bad debts, stick around this segment till the end. Or you can further give us a call at +1-888-510-9198, and discuss your queries with our technical support team. Having said that, let us check out the steps to write off bad debts in QuickBooks.
What is the need to write off bad debts in QuickBooks?
Bad debts are basically recorded when the amount that was supposed to be received from the customer fails to be recovered. Businesses using QuickBooks can consider bad debts as invoices that become uncollectible over the course of time. Thus, writing off these bad debts makes it easy for the business to record the actual profit and the average net turnaround. Writing off bad debts manually might seem to be a tedious task, but QuickBooks makes it a lot easier.
Important Points to Note
Before we proceed with the process of writing off bad debt in Quickbooks Desktop, it is crucial to keep the following points in mind:
Well, a user can write off bad debts as deductions.
Another essential point to consider is that you can get acquainted with all the different types of bad debts and unpaid invoices upon creating a bad debt account.
You can use QuickBooks to write off overpayments.
Steps to Write Off Bad Debts in QuickBooks
The user can try performing the below set of steps to successfully write off bad debts in QuickBooks.
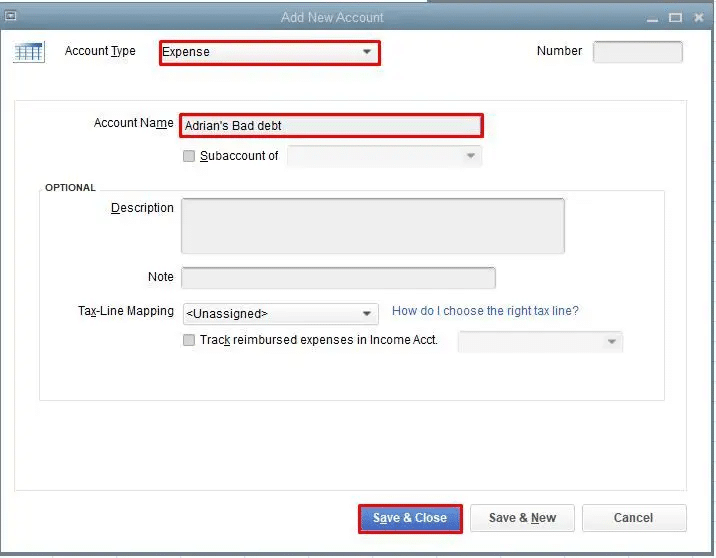
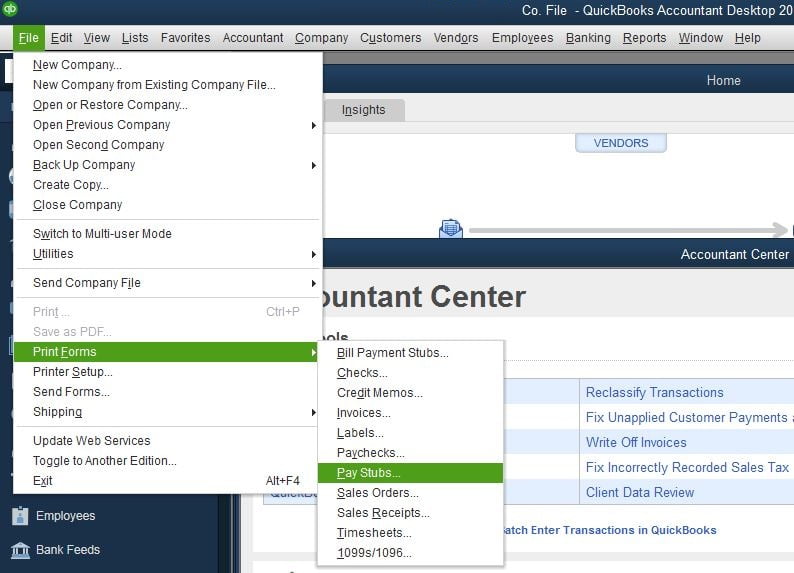
Step 1: Creating a Bad Debts Expense Account
At first, the user needs to open QuickBooks desktop and head to the settings tab
Once done with that click on charts of accounts from the list of options
The next step is to choose new to create a new account
The user should then click on expense option from the account type dropdown
Also, click on the bad debts option in the detail type drop-down
Once done with that click on save and close tabs and you are done
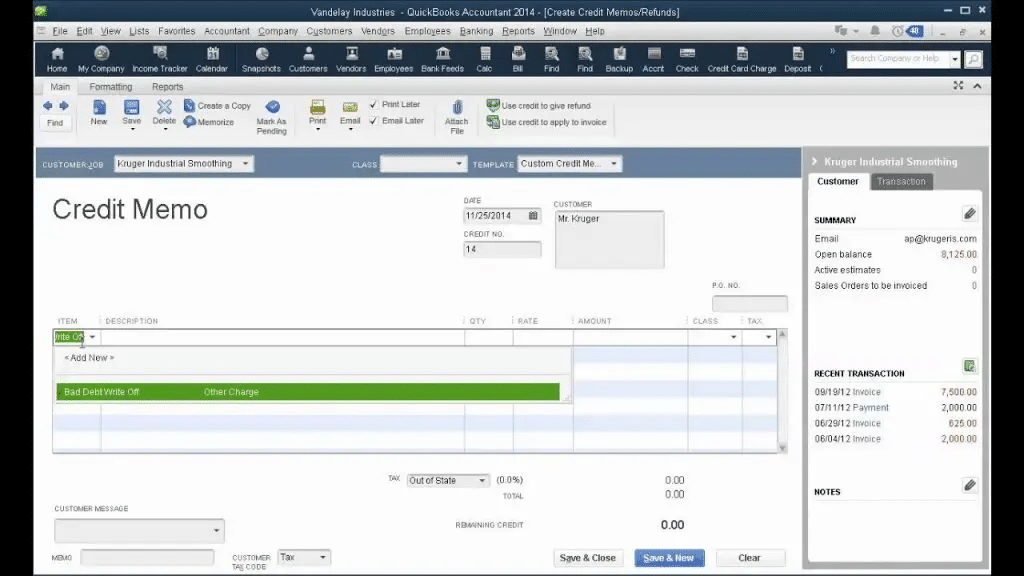
Step 2: Closing Out the Unpaid Invoices
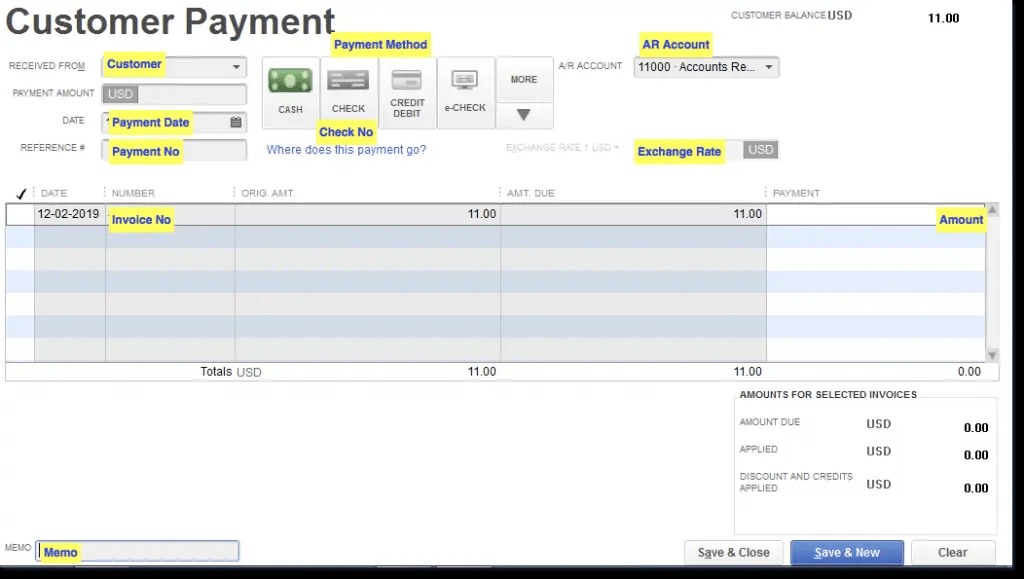
Under this step, the user is supposed to open Customers menu and go for Receive Payments
Once done with that the user should enter in the customer’s name in the Received from field
After that, in Payment amount space type in $0.00 and go for Discounts and credits.
The next step is to enter in the value that is to be written off in the amount of Discount field
After that, for Discount Account, choose the account you added in the previous step, and press Done.
Steps to Write Off Invoices in QuickBooks Online Accountant
You can handle the invoices that you can’t collect with tools to how to write off an invoice in QuickBooks online. QuickBooks on its own applies discounts to zero-out bad invoices and further posts them to the write-off account. This balances both the accounts receivables and expense account. The clients can manually write off bad invoices too. Here is how to write off invoices in QuickBooks online.
Move to the Accountant Tools and further choose Write off invoices
The next step is to set the invoice age, to date, and balance less than filters.
You now have to choose Find invoices.
Also, review the name in the customer column.
Choose the checkboxes for the invoices you want to write off.
And also, go for the write off option.
After that, in the account ▼ dropdown, you need to choose the account you use for bad debts.
And also click on Apply tab.
Also, note that you do not need to enter your closing date password in case you are writing off invoices dated before your closing date. This is how do you write off an invoice in QuickBooks, hope this works for you.
This drives us to the end of this article where we hope that the reader might be successfully able to write off bad debts in QuickBooks. If in case there is any query or if the user needs our assistance at any point of time, then getting in touch with our QuickBooks support team is all that we suggest. Give us a call at +1-888-510-9198, and let our experts handle the issue for you and help you in writing off bad debts successfully in QuickBooks.
FAQs Related to Write off Bad Debts in QuickBooks
How Do I write off an amount in QuickBooks Desktop?
You can write off an amount using the steps below: 1. From the vendors menu, choose pay bills 2. After that, pick the bill that has the balance that you need to write off. 3. Now, choose set discount. 4. Once done with that, choose discount tab and further enter the amount in the amount of discount field. 5. You now have to choose pay selected bills to close the pay bills windows. 6. Choose done in the payment summary window.
How do I write off in QuickBooks online?
Your clients can manually write off their bad invoices. 1. Move to the accountant tools and choose write-off invoices. 2. Set the invoice age, to date, and balance less than filters. 3. Select Find invoices. 4. Review the name in the customer column. 5. Choose the checkboxes for the invoices you want to write off. 6. The last step is to choose write-off.
How do you account for bad debt write off?
The direct write-off method usually takes place after the account receivable is recorded. You must further credit the accounts receivable and debit the bad debts to write it off.
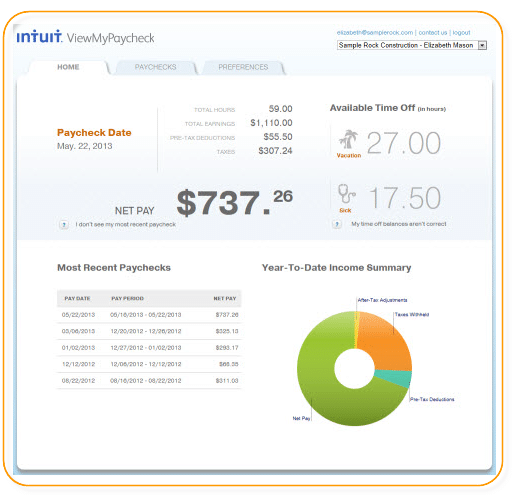
Earlier, employers had to struggle a lot to let the employees access their paycheck data. However, the “View my paycheck” feature introduced by Intuit now lets the users share paycheck details with the employees easily. The QuickBooks workforce further lets an employer invite their employees to view and print the paychecks and W-2s using any system with an internet connection. Not just that, with the workforce the employees can easily access their paychecks along with the timesheets, through TSheets. By simply activating the ViewMyPaycheck option, employees can use their pay stubs and tax details. Activating this feature involves a bunch of steps, which we will be discussing later in this piece of writing. Thus, we recommend you to stick around till the end, and unleash further about Intuit Workforce
If you require further information about Paycheck and QuickBooks Workforce, please feel free to contact QuickBooks Customer Service number+1-888-510-9198. Our dedicated team of technical experts is always available to serve you with the entire process in the least possible time and in the best way.
Introduction to View My Paycheck
View My Paycheck by intuit is available freebie with any web browser. Or it can be accessed with QuickBooks 2009 and also with later intuit account. This View My Paycheck gives authorization to your employees to access their financial information and payroll data whenever, at anytime and anywhere. They can also use this website as an online portal to access their salary information with ease and security.
Some Basic Characteristics of View My Paycheck are:
View My Paycheck helps in assembling all your financial information like your current and year-to-date earnings and withdrawals. Where you can easily get to know how your salary was calculated and where your money is invested.
Also, you can easily get a copy of your pay stub. By just Clicking on the option Save as PDF to save the PDF copy on your system, and then afterwards you can print it for your records.
Then opt for Preferences and hit a checkmark at the Send me an email when new pay stubs are available checkbox. And this will notify you as soon as a new QuickBooks pay stub is uploaded.
Procedure to activate View My Paycheck in QuickBooks
For activating View My Paycheck follow the basic steps mentioned below:
Start this by opening QuickBooks Online and then opt for the Employees in the menu bar.
After that go for the Manage Payroll Cloud Services option and then tick the View My Paycheck option.
Now create a payroll service PIN, when asked. This PIN is used to send pay stub information. You can now confirm the PIN by re-inserting it.
Now send the payroll information to View My Paycheck
Follow the Steps to send the payroll information to View My Paycheck. They are:
Create Paychecks as created before.
Follow all the on-screen instructions given on the window and when a screen on the window appears to confirm printing, then select to Send to Intuit.
Finally, select the send option in the Send/Receive Data.
To start with View My Paycheck as an Employee
For starting with View My Paycheck as an employee you must require following things:
Intuit Account: Log in to intuit account with your credentials. Or you can also create a new account after signing up for View My Paycheck.
Social Security number: You also need to have your social security number and your net salary from the previous salary. After this, View My Paycheck will now verify the above given details.
Following Steps for using View My Paycheck
Start with Opening the web browser and type intuit.com for opening intuit account.
Then opt for to Sign up.
Enter the email address you have. Or if you have an intuit account then directly sign in by using your user ID or password and then move forward as per the given instructions.
Point to be noted: To ensure that you need to run minimum of one payroll so that View My Paycheck is properly set up for your employees
For Log in to View My Paycheck, make a strong password and confirm it, it is also recommended to always use this password while log in to View My Paycheck.
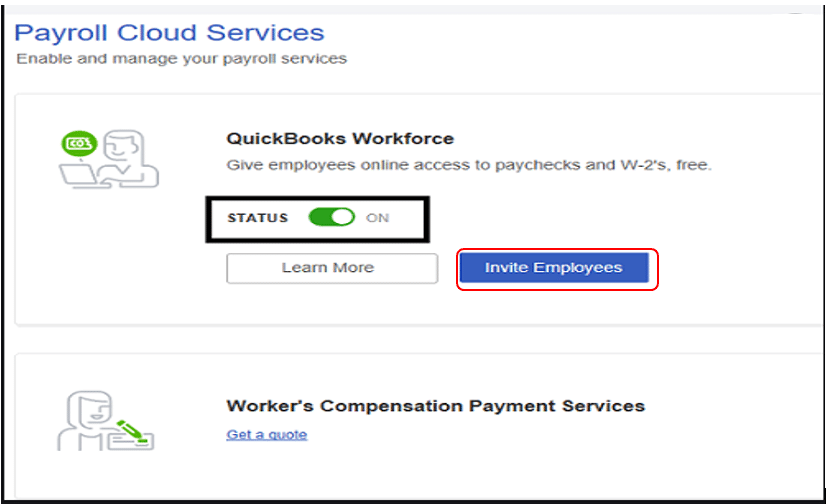
Once the Payroll Cloud Services window is open, hit on the ON to turn the status of QuickBooks Workforce to ON.
After that create or confirm the PIN when asked and then select Save Changes option.
Now in the confirmation window press Return to QuickBooks.
For uploading paycheck information after every payroll, kindly follow steps given below:
In the QuickBooks Desktop company file, create the paychecks as you have normally created earlier.
Then follow all the on-screen guidelines and apart from printing checks make sure to select Send to Intuit® on the Confirmation and follow the Next Steps given in the screen.
After that on the Send/Receive Data window, select Send. When asked, insert your Payroll Service PIN.
Basic steps to send Invitation to the Employees for the QuickBooks Workforce
For this open the QuickBooks Desktop Company and go to the Employees option.
The employees have an option to download and print paychecks. For this, you need to follow the given options:
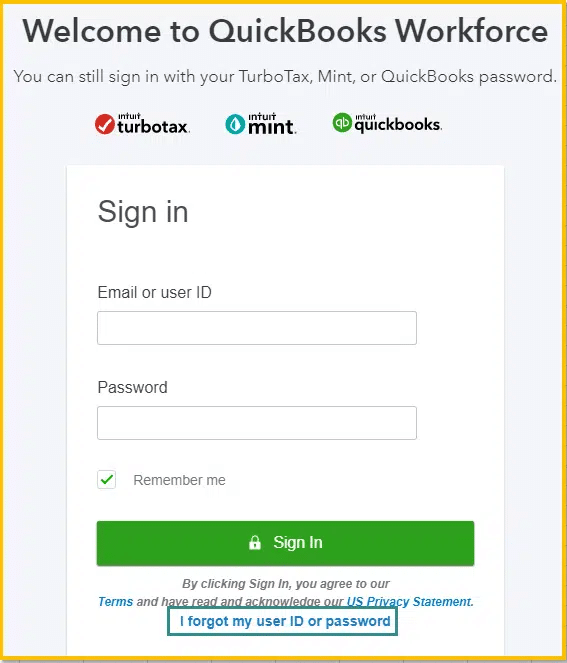
Start with checking whether you are registered on a workfroce account or not.
In case you already have a workforce account, then login to the account otherwise sign up.
After that, go for the paychecks option.
You can see multiple paychecks; in case you choose the right date range and it further allows you to track the data for 1 year.
Once done with that, see the download option on the pay stub and click on it.
Open the pay stub, where you can view, print, and download it.
In case you need to download all the paystubs at once, then you can do this by clicking on the download all.
Winding Up!
Both the View My Paycheck and QuickBooks Workforce have provided enough work flexibility and versatility to the QuickBooks users. Where the Employees can access their essential payroll related information. This on the other hand helps the Employers to save the task who earlier had to take out the printout of the information.
Though it is quite obvious that with the updates at times Errors can occur as well. Therefore, to resolve such technical errors we strongly suggest you get in contact with QuickBooks ProAdvisors and experts. Our QuickBooks team of experts is available at QuickBooks Support toll free number+1-888-510-9198 and fix all your Queries related to View My Paycheck in the least possible time and in the best possible way.
FAQs Related to View my paycheck and QuickBooks Workforce
Where can I view my paycheck?
One can retrieve a pay stub from a bank, especially if the user receives direct deposits from the employer. Moreover, the QuickBooks Workforce View My Paycheck feature lets the user to easily able to access the paychecks.
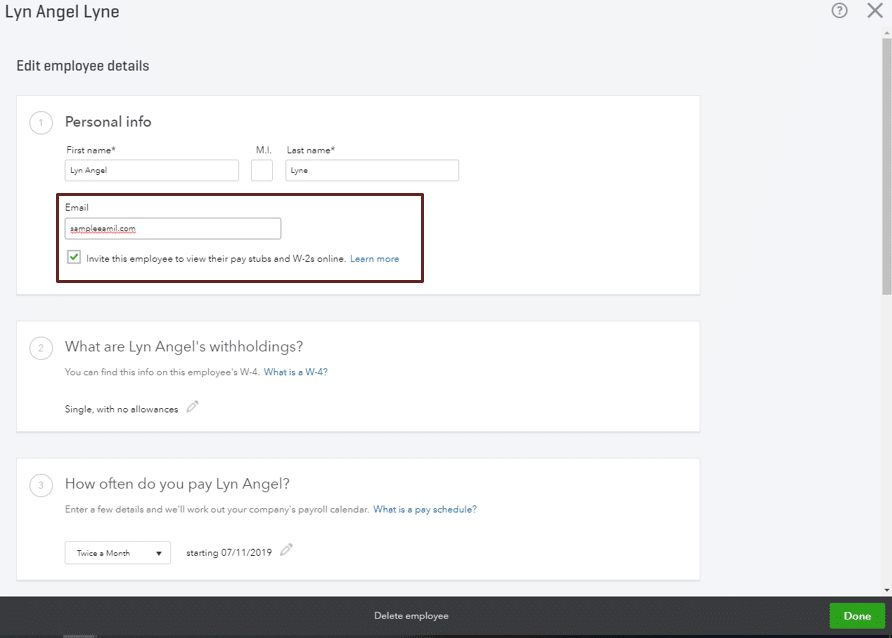
How do I invite Employees to view my paycheck in QuickBooks desktop?
You can invite employees for View my paycheck feature in QuickBooks using the steps below: 1. At first, move to payroll and click on employees. 2. Now choose invite to workforce 3. And then, check the boxes to the names of the employees you wish to invite and then enter the email addresses. 4. You now have to choose and send invitations.
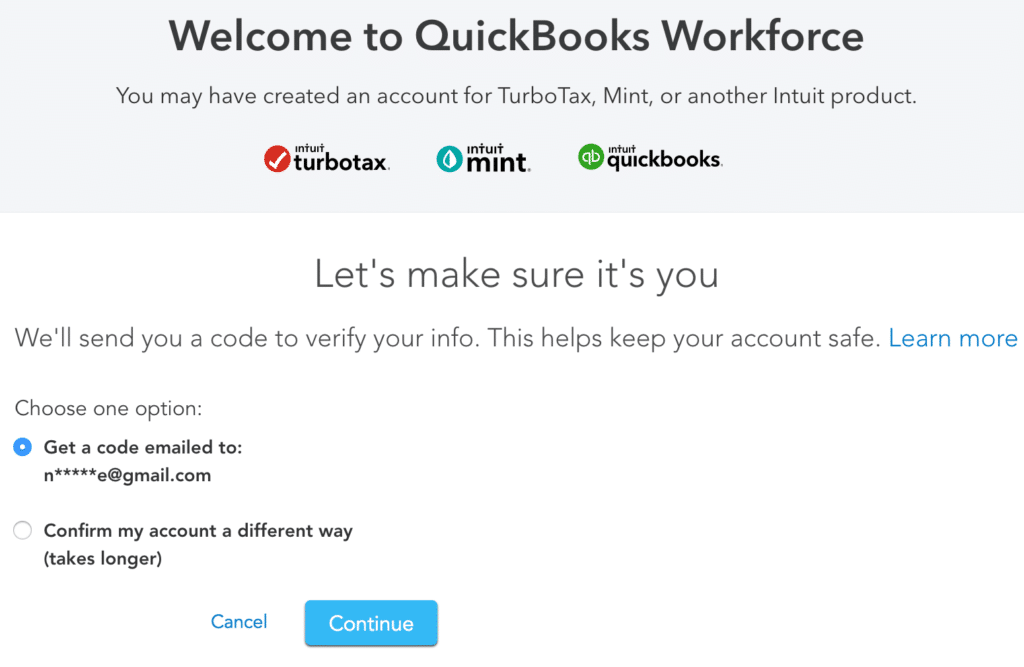
How do I access workforce in QuickBooks?
You can sign in to workforce using the steps below: 1. Open email 2. Choose create account or sign in to accept the invitation. 3. Create an Intuit account with your email and password. 4. In case you already have an Intuit account, then sign in with that email and password.
Want to convert Quicken data into QuickBooks desktop? Then your search ends here.
Well, this article contains every detail about the conversion of Quicken data into QuickBooks desktop that will helpful for all the small business owners who wants to grow their business at an advanced level. They want that their data should no longer be in Quicken but in QuickBooks. Although, convert Quicken data to QuickBooks desktop is quite intricate task but the step-by-step tutorial given in this blog will help you to not lose valuable Quicken data during the transitioning and in the meantime if you require assistance, you can contact QuickBooks support toll free number+1-888-510-9198and our support team will help you instantly. But before implementing those steps, there are certain factors that you must take into consideration for a hassle-free conversion.
Quicken Vs QuickBooks: What are they, And Critical Differences between them.
Both Quicken and QuickBooks are robust financial accounting software that makes your business tasks attainable. As both of them serve the same purpose so they can’t be used simultaneously, so you have to choose one from them that is suitable according to your business necessities. However, both of them are now owned by separate companies, whereas QuickBooks is owned by Intuit Inc. and Quicken is now owned by Aquiline Capital Partners. Some more critical differences between both of them are listed below:
Quicken
QuickBooks
Designed for personal financial management (for the finances of individuals and families)
Designed for the accounting processes of small and mid-sized businesses (creating invoices and can track inventory)
This software is not hosted on cloud.
QuickBooks is cloud host software.
Quicken accepts the payment only through the PayPal online transaction.
QuickBooks can accept payment through Pay Pal, bank debit cards, credit cards as well as from other online transactions.
Quicken can easily handle the Rental property management.
QuickBooks can’t handle the Rental property management.
Quicken can’t do the mileage tracking.
QuickBooks can do the mileage tracking easily.
Quicken is free of cost and more appropriate and easy to use.
QuickBooks is chargeable and more typical to use than Quicken.
Things to Consider Before Transition from Quicken to QuickBooks
Before you begin to convert Quicken to QuickBooks, we have listed some factors that you must be aware of, they are:
Firstly, Conversion of Quicken to QuickBooks is unilateral (one-way) process it means that once you have converted Quicken files to QuickBooks then it cannot be reverted back and it is not possible to open it in Quicken again.
Before converting the file, you have to create the backup of Quicken file you want to convert or else you can convert the copied version of your Quicken data.
As QuickBooks can only convert the windows file of Quicken so if in case you want to use Quicken software on Mac, then you need to convert Quicken Mac files into windows files first.
It would be better to start the conversion process from a new file because of some of the challenges that can come with converting Quicken datato QuickBooks.
Possible instances where you must utilize the Quicken converter to convert Quicken to QuickBooks:
Some of the instances where you need to use the conversion tool are given below:
When the version of Quicken software is not same as the QuickBooks version, you’ll have to use the Quicken converter e.g., to convert files of Quicken 2017 to QuickBooks 2019, Premier, or QuickBooks Pro, for this Quicken converter is used.
When you have a Quicken version that is parallel to the QuickBooks Desktop version, then you can convert directly to QuickBooks using the Conversion Utility instead of Quicken Converter e.g. Conversion of Quicken 2019 to QuickBooks Pro, Premier, or Enterprise 2019.
Quicken converter tool and Conversion utility are only applicable for Windows, they don’t work for Mac data file of Quicken Or else you can develop a new QuickBooks file.
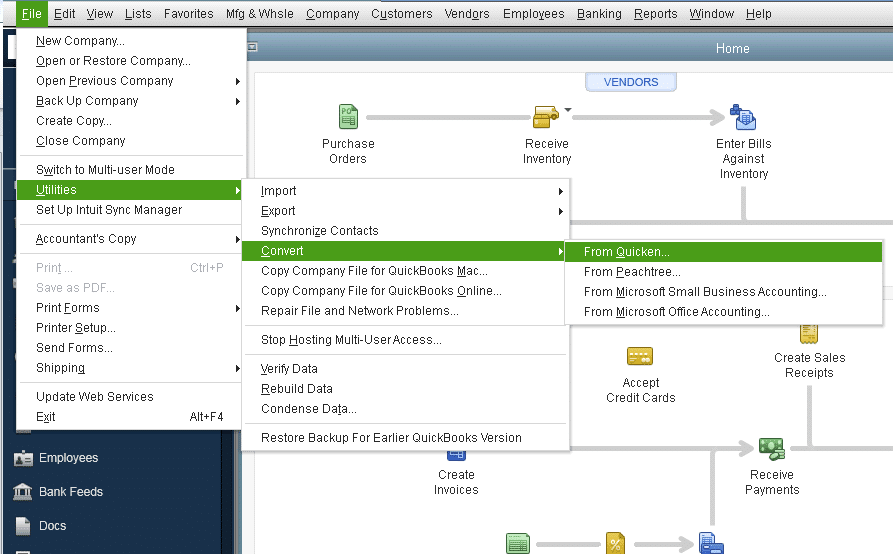
Procedure to Convert Quicken to QuickBooks Desktop
In order to build-up the production in business it is essential to convert Quicken to QuickBooks Desktop.
This conversion can be done in two ways:
Using Quicken Converter tool.
Utilizing the Conversion Utility.
How to Use Quicken Converter tool?
Step 1: Firstly, download the Quicken Converter tool according to your QuickBooks desktop version. After that locate your file in a place where you can easily access it.
Step2: Once it is done now follow the procedure to install the Quicken Converter and then perform the conversion process.
Open the downloaded Converter tool by double clicking on it and then tap on the Next button.
Now click on the ‘I accept the terms in the license agreement’, and click the ‘Next’ option.
Again, to start the installation processes opt for the Next button and then choose ‘Install’.
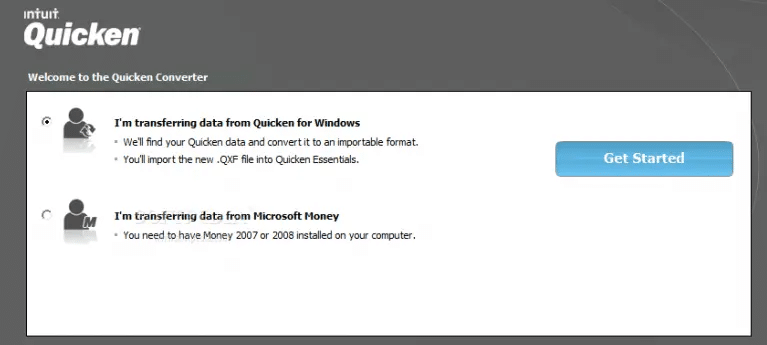
Next click on the ‘Launch Quicken Converter’ option, and then select the ‘Finish’ option.
Click on the option ‘I am transferring data from Quicken for Windows ‘and hit on the ‘Get Started’ option.
After that Choose the ‘Open a data file located on this computer’ option, and Select File.
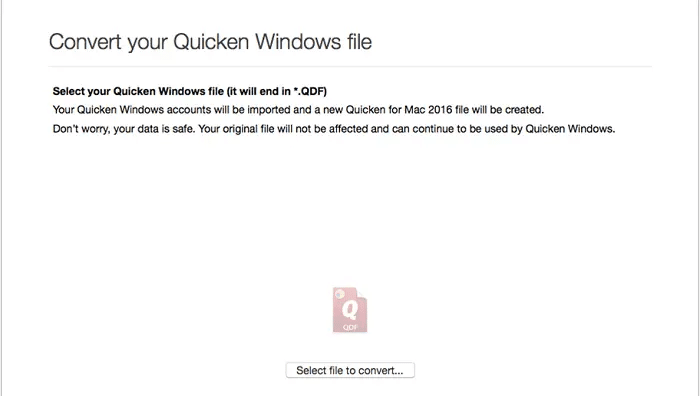
Then search for the Quicken file (.QDF), and hit on the ‘Ok’ option.
Pick out the ‘Convert it’ option then again click on the ‘Ok’ option.
Lastly, click on the ‘Save’ option then go for the ‘Exit’ option to save the Quicken (.QDF) file.
In order to gather more information regarding the Conversion Utility.
Tap on the F1 from the keyboard to go to the Help window in your QuickBooks Desktop
Once the Help window gets opened type “convert from Quicken” in the search bar. This will give you more detail about this conversion utility.
To Sum Up!
Hopefully, this article would be informative, where you can convert the Quicken to QuickBooks easily by performing the above-mentioned procedure in simple steps. However, if you got stuck and need any further assistance, we would recommend you to get in touch with our experts by giving us a call on QuickBooks Data Service Solutions on a Toll-Free Number +1-888-510-9198They are always available to assist you and will resolve the problem in the least possible time.
Learn the easy steps to move QuickBooks Online company files to QuickBooks Desktop
QuickBooks Online is cloud-based accounting software that has many distinguishing features that makes it the most preferable software among businesses. Another trump card of QuickBooks is that it can easily access company files online without any geographical limitations. Although it also lacks certain attributes available on QuickBooks Desktop which makes it very difficult to work in QuickBooks Online for grown businesses or business firms that are trying to expand, so it becomes necessary to switch from QuickBooks Online to Desktop. Also, there can be other reasons that tend you to convert or move the QuickBooks Company data files from online to desktop. However, this process of transfer and conversion of QuickBooks Company files might be quite confusing and onerous for many users.
Thus, if you are seeking for a reliable method that can be performed in the conversion or migration of Company file from QuickBooks online to QuickBooks desktop follow this article till end, here we have described the conversion process in depth.
Moreover, if you want to perform the process on your own manually then feel free to reach out to our 24*7 QuickBooks technical support experts by simply calling them i.e +1-888-510-9198! Our dedicated team of professionals is ready to serve you out round the clock with the entire process in the best possible way.
Fundamental points to keep in mind before carrying out the Conversion Procedure:
As above that this process of conversion might be a little tedious for many users, so to avoid any mess that can be created further in the ongoing process.
There are some fundamental points that need to be taken into consideration before implementation; a few of them are as follows:
User must check the Internet explorer version before carrying out the conversion procedure, it should be version 10 or above otherwise it will create certain issues later, particularly compatibility issues. Hence it is suggested to the user to check the version before conversion by performing the necessary steps and if found outdated then update to the required version of version 10 or above for smooth conversion.
Another factor to keep in my mind is that desktop software should be a 2004 edition or later version as conversion with an older version than 2004 edition or later is not possible.
User should ensure that QuickBooks desktop software should be compatible and internet explorer has to be 32-bit as 64-bit version will show an error and create hindrances in the conversion process.
Direct conversion is not possible if you are using Mac version of QuickBooks. The process of transformation for the Mac version might differ from the normal one.
User should have access to at least one invited accountant account if he/she is already master or company administrators to avoid any disarray later.
User needs an activeX to carry out conversion thus he/she must get active before performing the steps.
Conversion will get restricted to certain item products, vendors, customers, services etc. if you are using a non-US edition.
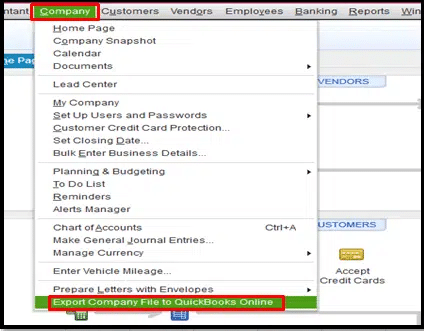
Advanced Steps to Convert and transfer your Company file from QuickBooks Online to QuickBooks Desktop
The user has to perform the below-listed steps after he/she is ready to move the company file from QuickBooks online to QuickBooks desktop:
STEP-1: To set up security settings in Internet explorer or Microsoft Edge.
The process of transferring company files from QuickBooks online to QuickBooks desktop starts with setting up security settings in Internet explorer or Microsoft Edge. Perform the below-listed steps to carry out this process:
Start with right-clicking the Internet explorer icon and drag the mouse to run as an admin option.
Click on run as admin option.
Go to tool icon and choose the internet option.
Go to the security and trusted sites option and click on the sites tab.
In next step, in Add, this website to the zone field, the user needs to enter *.intuit.com and *.qbo.intuit.com
Further, uncheck the “Require server verification for all sites in this zone”.
Close the trusted site’s window and click on Apply option.
Now uncheck the Enable protected mode.
Then Go to the Okay tab.
Next, close the box and re-open Internet explorer to disable the protected mode.
Finally to end the process, leave internet explorer open.
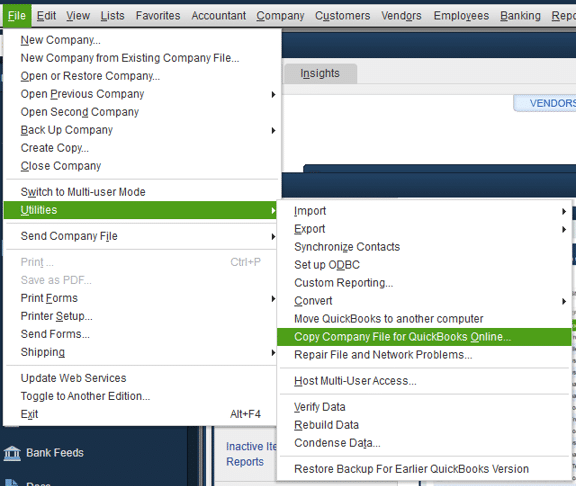
STEP-2: To set up the QuickBooks Desktop for Export.
This second step involves the setting up of QuickBooks Desktop for Export. For this follow the steps in the same way as given below:
At first you are required to right-click the QuickBooks desktop icon.
After you are done with this Go to the Run as admin.
If in case the QuickBooks desktop is not installed in your system, then you can download the trial version.
Once done with the downloading process now you can ensure to move to the File and then select the Close company option.
Finally, leave the QuickBooks desktop open while completing the rest of the steps.
STEP-3: Procedure to export QuickBooks Online data
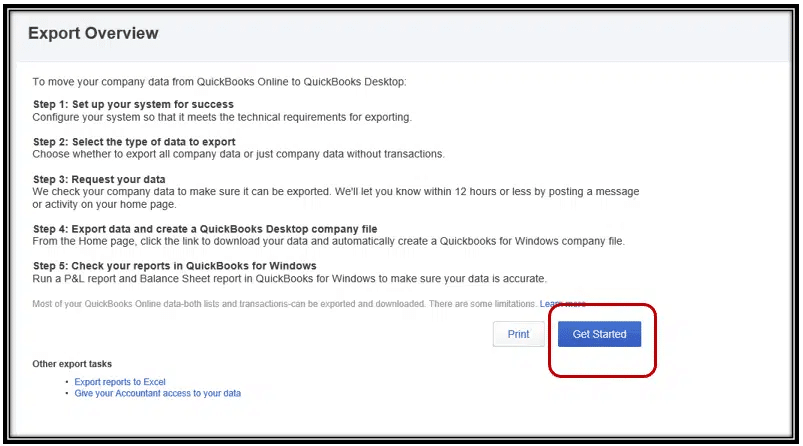
Start this step by opening the version of QuickBooks that the company file will be converted to. Keep in mind not to go with No company open window and avoid opening a company fill till then.
After opening the version login to QuickBooks online account.
Drag your mouse to the gear icon and click on it.
Under tools tab, select the export data option.
Choose the reason from the pop-up window and click on continue tab.
Under the download company data select learn more.
Review the export overview and select the get started tab after the overview.
In next step, go to Install for ActiveX control and choose Install ActiveX Control to confirm the installation.
Once done with installations then choose Continue after option.
Select the data to export and then hit the Continue tab.
Also review the limitations of data to export and again opt for the Continue option.
Finally enter all the relevant contact details, afterward, choose the Continue further.
Important Point: You will receive an email to end the Export Conversion with steps within a few minutes to hours depending upon the amount of data prepare. This recipient of email depicts that data has been compile and now you can move ahead for next step.
STEP 4: To Terminate the Exporting of Data.
This step is the final step of the entire process carry out in the end in order to execute the conversion process.
Now Choose the Export Data in the QuickBooks Online.
Then In QuickBooks Online, First go to the Export page and move to the Setting Tab.
Perform the same steps again and get ready to export the QuickBooks Online Data.
Hit the Continue tab to download on exporting data from QuickBooks Online Page.
Before moving ahead ensure that No Company Open Screen appears and in case Company file Open please verify and visit file and Choose the Close Company option.
Select the Preferred option and then hit the Continue Tab.
Now click On the Download button.
After you are done with download process, save the company file window appears on the screen where you need to choose the location to save the file.
Then a pop-up window appears asking the user where to save the file.
Next go for the Convert Now option.
In the application certificate hit the Yes button prompts each time.
Lastly opt for the Continue and choose the Done option
Click on the Finished Tab and then Run Reports which will end the process.
Well, we are at the end of this article and we hope that the relevant information shared about the Conversion or migration of Company File from QuickBooks Online to QuickBooks Desktop in this article will be productive for you if you follow up the steps as it is.
Yet at any point of time if you still get stuck in exporting files from QuickBooks Online to QuickBooks Desktop then you can straight away contact our QuickBooks Support team of QuickBooks professionals at +1-888-510-9198 Our professionals will technically assist you with utmost dedication in the entire process of conversion. And in no time, they will clear all your clouds of confusion in the best possible way.
FAQs Related to Export and Convert QuickBooks Online data files to Desktop
How to export QuickBooks online data to Desktop?
For exporting the data, you can perform the below steps: 1. Head to the gear icon 2. Click on export data option 3. Click on the export to QuickBooks desktop option
What file format is compatible to export QuickBooks Online data to Desktop?
The file format should be compatible with the version of QuickBooks. The compatible file formats encompass .qbo, ,qfx, ofx, qbj, and csv formats.
How to Export Customer / Vendor Data from QB online to Excel containing all the details , including Tax Registration Id?
You can pull up a Vendor contact list report and a customer contact list report in your QBO account. You’ll then customize it to add the details you want to show and the Tax Registration ID in your vendor and customer list report.
How to learn about different file types and extensions used by QuickBooks Desktop:
No doubt QuickBooks is one of the biggest names in the accounting software industry with its innumerable features. And because of these multitudinous features, file types and extensions used in QuickBooks Desktop by many business owners or accountants. To run their small to medium sized business. While managing all the financial aspects like your invoices, pay bills, tax payment, bank account tracking and cash flow, QuickBooks encounters many types of files. The QuickBooks file extensions are used for different purposes in the program to save the data. Different type of file extensions are used with different editions of QuickBooks. This includes QuickBooks 2017 will be using different file extension than that of used by QuickBooks 2018. So, in order to know more about these file extensions and their types used by QuickBooks read this comprehensive article till the very end.
What do you understand by File Extensions and QuickBooks File Extensions?
At first, File extensions are the abbreviations generally available at the end of the file name. It further indicates the type of content and the purpose of the file.
Some common file extensions used are:
A JPEG uses the .jpg or .jpeg extension (for example, image.jpg)
A Word document uses the .docx extension (for e.g. – CoverLetter.docx)
An Excel spreadsheet uses the .xlsx extension (for example, budget.xls)
Whereas QuickBooks file extensions are exclusively for QuickBooks. QuickBooks file extensions are generally in the format of .xxx. Most commonly used QuickBooks file extensions are .QBW, .QBO, .QBB etc.
Importance of using QuickBooks File Extensions
It is important to emphasize that, different types of QuickBooks file extensions have different aspects. They are further used for different purposes. Let’s check out the importance of different file extensions given below:
File extensions make it easy for the users to determine what type of content a particular file contains. As everything is clearly labeled.
With the help of file extensions, it becomes easy for the user to organize their accounting data. As it categorizes the same kind of file extensions. This prevents data from merging and also facilitates auditing.
By just looking at the file extension user can easily identify the type of file. And this saves a lot of time.
File Extensions help in easy identification of file type that helps desktop to open the file in the right application.
QuickBooks file extensions assist in verification of authentication of data files in order to safeguard data files.
Types of QuickBooks File Extensions that are used commonly:
Different types of file extensions that are commonly used while working with QuickBooks are categorized below:
File Extension
File Type
Characterization
‘.QBW’
QuickBooks Company File
It is used by QuickBooks software to store accounting data, letters, logos, images and other relevant info of company files which is saved by using ‘.qbw’ file extension.
‘.QBO’
QuickBooks Online Bank Statement File
A file saved by ‘.qbo’ extension holds electronic bank statements that can be easily opened up by QuickBooks software during the process of downloading transactions from the back.
Files usually saved by ‘.qbb’ extension are backup files of QuickBooks company file that are created by QuickBooks accounting software and usually hold the backups of financial records, images, logos, templates, and letters.
Files that are saved by ‘.qbm’ extensions are the compressed version of ‘.qbw’ files usually created by QuickBooks accounting software while moving a company file.
‘.QBX’
Accountant’s review copy (Export file)
File with ‘.qbx’ extension are the files crafted by QuickBooks software during the generation of accountant’s review copy of QuickBooks Company file. This is the export file that can be sent to your accountant.
‘.QBA’
QuickBooks Accountant Copy working file.
A file with ‘.qba’ file extension is an accountant copy that is sent by clients for the accountant’s review purposes.
‘.QBJ’
General Journal Entries File
A file with ‘.qbj’ extension is the file created when the user wants to add journal entries created by the accountant, to send a general journal entries file.
‘.QBY’
Accountant’s Copy import file
A file with a .qby extension is the file sent to QuickBooks users after the accountant review their accountant copy and makes changes. This is the import file where users can easily apply changes to the company file.
‘.ND’
Network Data File
While accessing to multi-user mode, QuickBooks usually crafts file with ‘.nd’ as extension that helps QuickBooks to manage the user access settings
‘.TLG’
Transaction Log File
QuickBooks always keeps track of changes made to your company file since the last backup. This QuickBooks software saves this information in a file which is named with a ‘.tlg’ extension. So, the next time when you take a backup of your company file, it will automatically reset the file.
‘.LOG’
Event Log File
Files with ‘.log’ extension are created by QuickBooks to record essential events. These log files are mainly used for troubleshooting purposes. Two types of LOG files are:Qbwin.log – records issues detected during a rebuild.QWC.log – record the QuickBooks Event log errors of Web Connect.
‘.DES’
Layout Designer Template file
File with a ‘.des’ file extension is created by QuickBooks when the user exports a customized form template. It is easy to export this file and can be used in other company files or shared with others.
‘.QBR’
QuickBooks Report Template File.
A file with a ‘.qbr’ extension is created by QuickBooks when the user wants to export a memorized report template.
‘.QBSTBL2.USA ‘
US Tax Table File
A file with ‘.qbstbl2.usa’ is created when you run a payroll in QuickBooks Desktop that gives you the current tax table. This file also gives all the latest payroll info that will be required to calculate the payroll taxes easily.
When the user exports the list info, QuickBooks creates a file that has .iif extension. This file can be used to share lists with other company files.
QBP
QuickBooks Print file
When you set the printing preferences, the software saves them in a file with .qbp extension.
ECML
Entitlement File
When you install or register QuickBooks, a file with .ecml extension is generated, it further communicates to QuickBooks that the user is making use of a licensed product.
QuickBooks Statement Writer Files
File Extension
File Type
QSS
When you customize the statements and reports with QuickBooks statement writer, the software usually saves the settings in a file with .qss as the extension. You can use this file to apply settings to other reports.
QSM
When you use QuickBooks statement writer, it saves the information with .qsm extension. The QSW file can be used in MS excel.
QST
In case there is a specific layout needed by the user, a template file can be used, which is already available. These files can be spotted with .qst as extension.
This particular file can be created during Pass 1 of the rebuild and is further deleted on its own when the rebuild is finished.
QBwin.log
QuickBooks log file
The Qbwin.log file can be further created and updated when the user runs the verify/rebuild option. This particular file will help in identifying log problems and situations connected. The Qbwin.log file is usually stored in QuickBooks installation directory.
QuickBooks Letters Templates folder
Letters folder
The QuickBooks letters templates folder contains the word document templates for the QuickBooks writer letters function.
QBrestor.TMP
Temp restore the file
This particular file is often made at the time of restoring the QBB file, which gets deleted on its own during the restore process.
Inet Folder
Inet
This folder was used to store license information for QuickBooks.
Images Folder
Images folder
It stores temporary copies of images that are used by QuickBooks.
QBInstanceFinder
Instance finder file
You can delete the file, but it usually gets generated again in a few QuickBooks versions.
CONNLOG.TXT
Connection log file
The CONNLOG.TXT file is basically the online banking connection log file, which is a log of reach connection for online banking.
.TDB
QuickBooks Pro Timer files
There is a time tracking data from QuickBooks timer that can be found in the QBTIMER directory.
Note that a separate QBW file is made with the name of Archive copy XX/XX200X with QBW file name. It is a copy of the company file, before being condensed. You can view this file to view the info that was present in the unmodified file.
QBW.TLG
Transaction log file
This file helps in retrieving the lost QuickBooks company file data.
QBW192.168.X.XXmta
Temporary database file
This particular file is made by QuickBooks database server manager and it is further a temporary file that is generated when opening the company file. When the user opens up the main file, this file gets deleted on its own
QuickBooks for MAC
File Extension
File type
Description
QB2016
Company file
This particular version of the company file is for the QuickBooks 2016 Mac.
Plist
Apple property list files
This file stores the registration and preferences.
QB201
Company file
This file is for the QuickBooks version 2019 of Mac.
DM
Apple disk image file
The DM file is a backup QuickBooks company file saved as an apple disk image by QuickBooks.
MAC.QBB
Backup file
Note that you can use this file to move QuickBooks Mac file over the QuickBooks desktop for windows.
Final Words!
There are numerous file extensions and file types available but it is not necessary to know all of them. But the file types and extensions used in QuickBooks Desktop that are listed above are the most commonly known. QuickBooks Desktop uses these extensions where each one has a significant role in business accounting. This article covers everything that is essential for the users to have an outlook on a variety of file extensions. Once you get a general idea about them you will find that they will make processes smoothen. And further produce a faster workflow and also save you time.
Moreover, you can also get in touch with our 24/7 QuickBooks enterprise support team with the help of our dedicated support line i.e. +1-888-510-9198. Our team will provide you with the most relevant information. And we will ensure that all your queries related to QuickBooks are answered in the best possible way.
FAQs Related to File Types and Extensions in QuickBooks
What is the file extension for QuickBooks?
File Extension in QuickBooks is a type of file extension that is exclusively for QuickBooks. The most common QuickBooks file extension is QBW (company file), followed by QBB (backup file) and QBO (bank statement file).
What is company file in QuickBooks?
The company file saves all of your financial info and grows with you. In QuickBooks, you can save multiple company files for multiple businesses. Each business should have its own company file.
What are the different types of QuickBooks files?
There are a bunch of QuickBooks file types. Each file has a certain extension attached to it.


