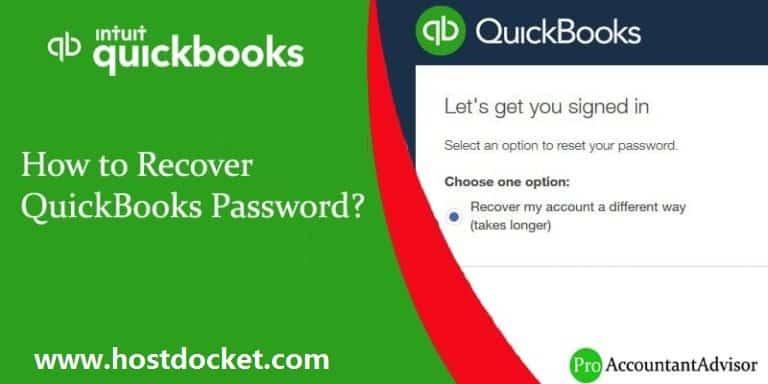
Learn the procedure to recover or reset the lost QuickBooks password For admin or other users:
A QuickBooks administrator password is needed to access all your data which a user have stored all your data in QuickBooks files. To keep a strong password it protects all your business from an unauthorized access related to folks most crucial information or their private details that kept as hidden. However, the requirement to enter a password will also lock you out from accessing the information if you have lost the password. If you any other user have encountered admin password issue in your QuickBooks then read carefully this blog. We have shared few steps that you should follow to reset or recover your QuickBooks desktop password.
QuickBooks is a versatile software that doesn’t only help you in managing your company data and tracking your company’s performance but also keeping your crucial company data safe. The multitasking software itself creates the Admin user for you when you login to the software for the first time and furthermore enables you and other users to create more usernames and passwords. To keep your details safe, QuickBooks Desktop asks you for the password every time you or any other user tries to access company file. Now, at times security updates and other features may require you to reset your password.
This article contains information about resetting the QuickBooks Admin password and other passwords you may have related to using QuickBooks Desktop. If you or any other user have encountered similar issue, and requires to recover or rebuild QuickBooks Admin password or any other password to login to QuickBooks desktop, here are some tips to follow.
Use complex passwords: at least 7 characters (letters, numbers, special characters), at least 1 number, at least one uppercase letter.
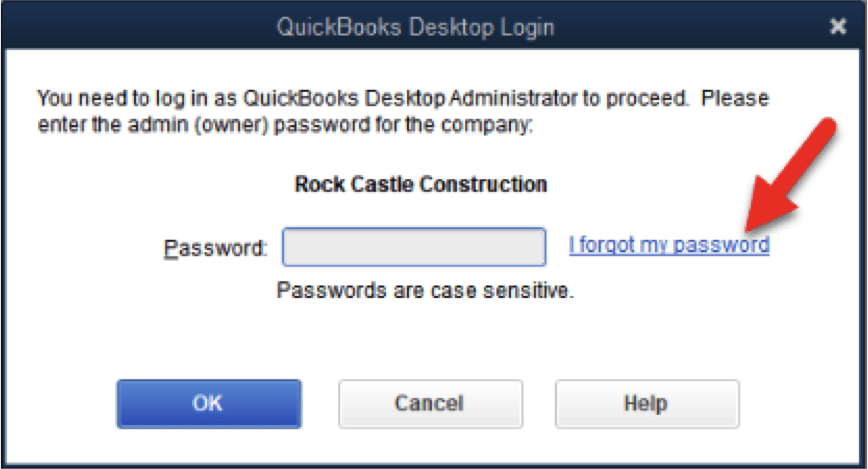
Passwords are case sensitive. Check the Caps Lock and Num Lock keys. One (or both) might be on, or could have been on when you created the password.
The password should not have any space. If you have used space, then retype the password without spaces.
Make sure your keyboard is functioning properly.
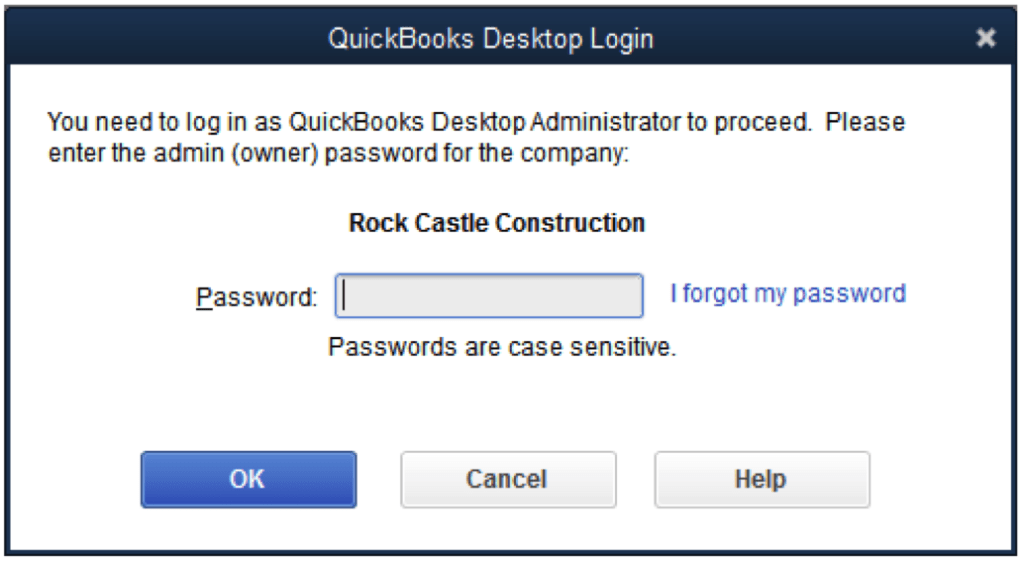
You should be on the right screen. A login screen that demands a password but not a username is the admin’s login screen. If you aren’t admin and you have a non-admin login then close QuickBooks Desktop and reopen it.
The admin password may also be blank. Many users leave admin password to their data file empty or blank. (This practice is, however, not recommended by Intuit, the makers of QuickBooks.)
In case of no password, press “OK” in the login screen without putting any password.
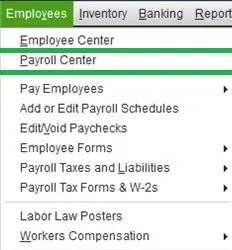
Steps to Reset Password for QuickBooks Desktop Administrator
When you logged in QuickBooks accounting software. This will automatically creates the Admin user, you may be using another log in references added by the Admin. Security updates and other surprising assets may lead you to reset your password.
Go to Company file, choose the company and then Set-up users and Password
Enter your current password
Write your new password in confirm new password box and click OK button
In case you forgot or lost your password, you can try the below-mentioned tips to reset your password in QuickBooks
Reset your Admin password or a user password
Admin password
You need to reset the admin password if:
You don’t have to enter a user name. When you sign in, you only enter a password.
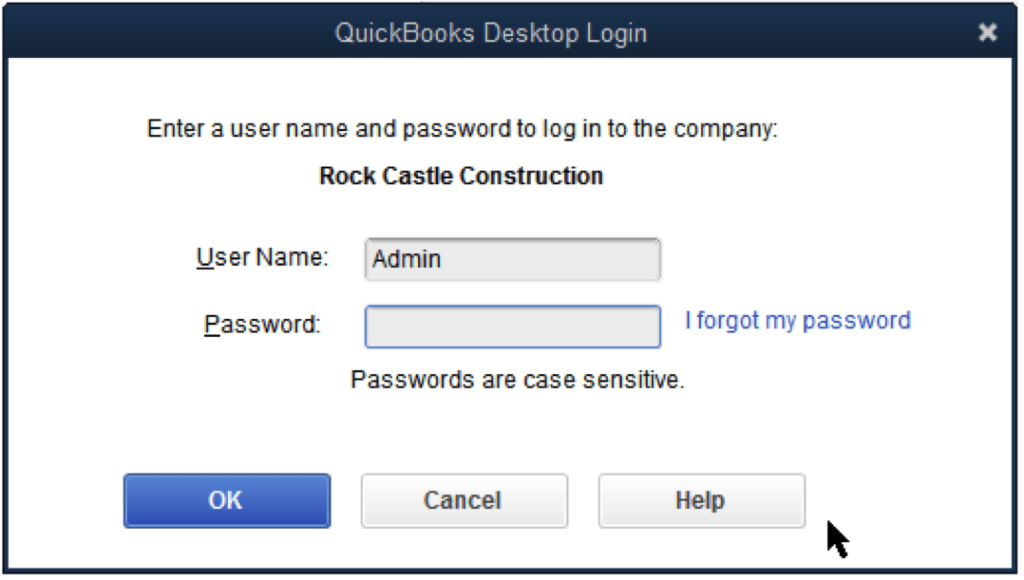
Your User Name is “Admin” or another admin user name you created.
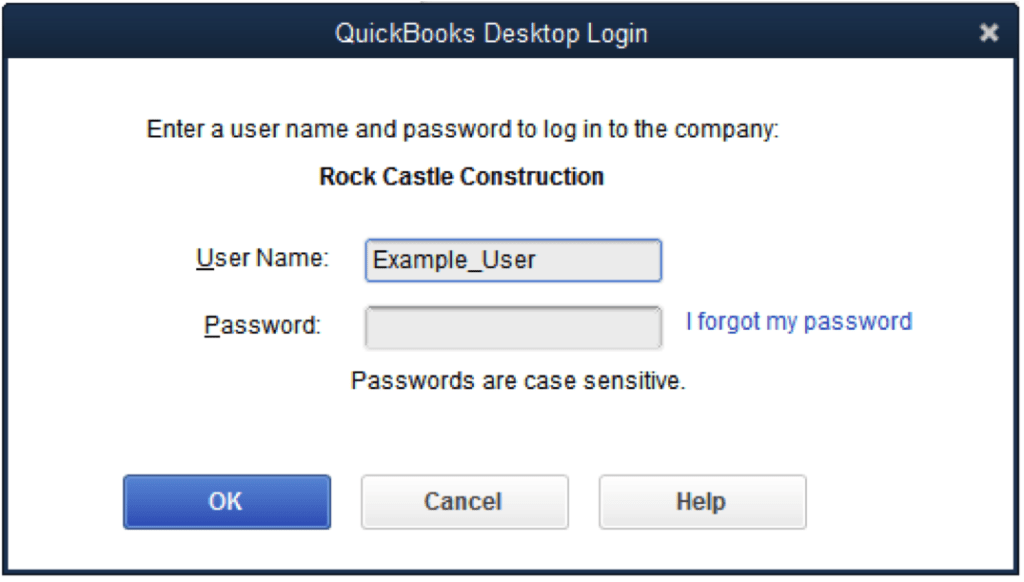
User password
If you’re not an admin user, your QuickBooks admin can reset your password for you. Contact your admin and have them follow the steps in “Reset a user password” section below.
Use Challenge Question to Reset Password
Choose “I forgot my password” on the login screen
Reply to the security question and click OK button.
Press Close when the following message pops up on your screen. “When you removed the password and challenge answer and question, and your company file is no longer password-protected. When you nearby this window, then you create a new password and select and answer your challenge question.”
Open the window and change QuickBooks password
Enter a new password and select a new challenge question
Reset Password for QuickBooks Desktop Admin and other users
To reset QuickBooks admin password checkout the following video and then go through the manual steps given below:
First of all, confirm the latest version of a QuickBooks software version on your operating system. It is the same once you used in the last time which you’ve opened your ‘QuickBooks file‘ with a strong password
Follow the instructions on the new page. Windows users of QuickBooks are directed to fill out an online form, while Mac users are sent directly to technical support for further individual help. Intuit will provide you with either instructions or software to reset the password for your QuickBooks installation, after which you can enter a new password.
Additional method (For QuickBooks 2019 and earlier)
Open your QuickBooks & click on the option ‘I forgot my password‘ when the screen displays ‘QuickBooks login window‘ on a desktop. It asks promptly your security question.
Enter the answer to your security question & click on the ‘OK‘ key button. If it successful a message appears informing that your password get removed
Click to the close or press ‘Alt+F4 keys‘, now enter a ‘New password‘ into a password field, then confirm it and answer for a security question
Fill out the ‘Reset QuickBooks Administrator Password‘ form and click on the ‘OK‘ button. QuickBooks sends an email with an access code that you can enter in the ‘Password Reset Code’ blank field. Your password is removed and you’re prompted to enter a new password and a new answer for a security question
If the password reset doesn’t work
Firstly, you need to double-check the information you have entered there.
After that check and confirm the information matches with what’s in CAMPS.
The above-mentioned steps should help you to reset your password for QuickBooks Desktop. However, If you are facing any trouble regarding resetting your password you can call our round the clock QuickBooks password recovery support team at +1-888-510-9198. Our experts bring with them years of experience as well as innovative tools and technology and can help you fix this or any other accounting related issue in the least possible time.
Frequently Asked Questions!
Should Password for QuickBooks have space?
Well, it should be noted that password should never have space, as it is not accepted while creating password. Make sure to follow the right rules while generating a password to secure your crucial data.
What to do in case of no passwords?
Just incase the user doesn’t have any passwords, then it is suggested to select ok displayed on the login screen without adding any password.
Want to know which QuickBooks version you are using, what is the product code and license number of your QuickBooks? Well, all your queries are addressed in this segment. When a user uses QuickBooks software- widely used accounting software, it is necessary for the user to know about the release and version of the software he/she is using. This helps in troubleshooting the QuickBooks errors so that you can update your QuickBooks version as and when needed. This article will help you check the product number, license number, version, and release date of your QuickBooks Desktop. To unleash the steps involved in checking QuickBooks product versions and releases, make sure to read this segment till the end. Or you can also connect with our technical support professionals, in case you want any of your queries to be addressed by professionals. Give us a call at +1-888-510-9198, and we will provide you with the best possible support and assistance.
Find the version and Check QuickBooks Release of your software
You can follow the instructions given below in order to find the version and release of the QuickBooks software you are using and how you can update it:
Process 1
The user needs to first move to the home screen
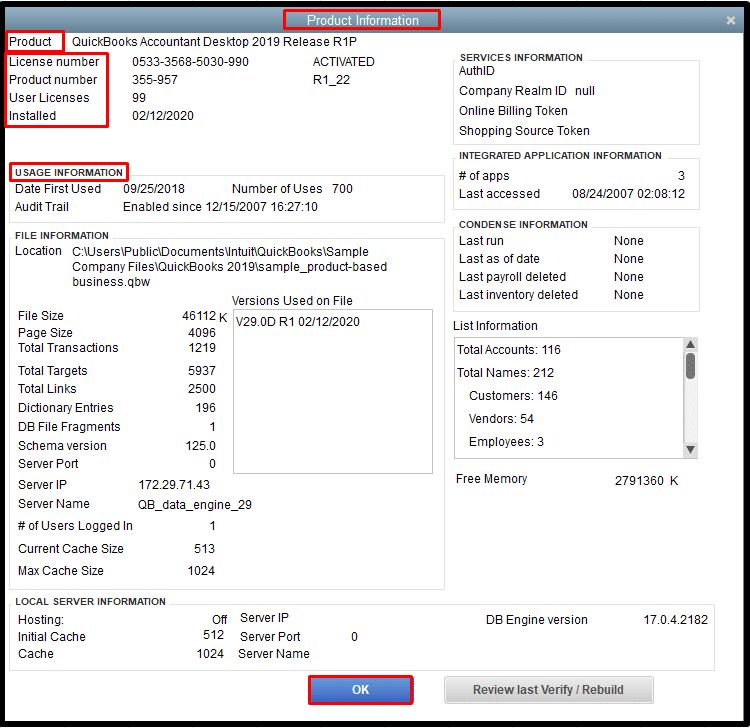
Followed by pressing Ctrl + 1 or F2 key to open the product information window
In the next step, the user will find the version, edition, and release on the screen
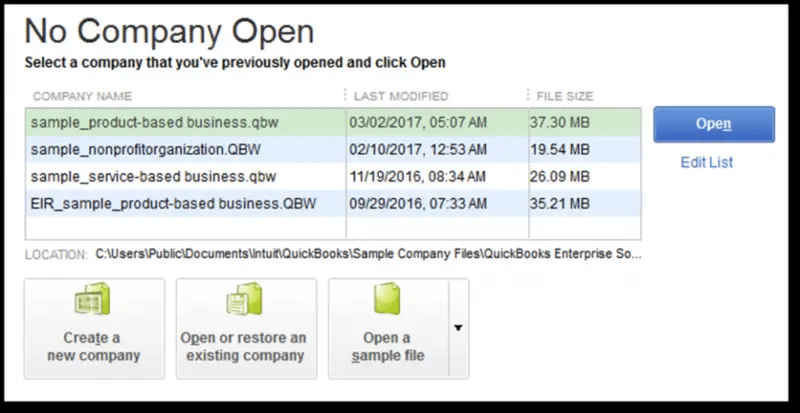
In case the user can’t open QuickBooks to get the product information due to the QuickBooks login screen displaying on the screen and the user does not know the admin password, then it is suggested to click on the cancel tab. And it will automatically open the no company open window by default.
After that, press ctrl key and open QuickBooks by double-clicking the QuickBooks program icon on the desktop
Press ctrl till the window appears and you are done with the process
Process 2
In this process, the user can head to the QuickBooks program icon and right-click on it
After that select the properties tab
And after the properties window appears, click on the shortcut tab and open the file location
This opens the program executable file (QBW2.EXE) on the screen.
After that, Right-click on the QBW32.EXE file
And go for Properties tab
Head to the Properties window and search for the General tab.
The location line will show your QuickBooks version year
Head to the Details tab and also check out the product version,
QuickBooks Desktop (Pro, Premier or Enterprise)
First of all, press the F2 key. Check the product line on the product information window when you want to know the version and release of the software.
You can go the Help menu and then, ‘About Point of Sale’ to check the POS version and release. You can find the edition and version in the product line at the top.
If you want to update QuickBooks Point of Sale, you can check ‘Update QuickBooks Point of Sale for Desktop to the latest release’.
(US only) QuickBooks Merchant Services or QuickBooks Payments
Till time, there is no version available for Merchant Services or Payments and QuickBooks is the only software used as an entry point to the Merchant Services (IMS) Server.
We hope that the above given article helped you to understand the procedure to address your query about check the product number, license number, version, and release date of your QuickBooks Desktop. However, If you need any type of further information on this topic then you can take help from our Intuit Certified Pro Advisors. In order to get instant help & support for you QB issues, you can contact our QuickBooks Support team. We are available with 24 hour of customer service. Dial +1-888-510-9198 and speak with one of our accounting expert.
Some FAQs to Check the product version of QuickBooks
What is QuickBooks product version and how do I check it?
QuickBooks product version is a numerical code that identifies the release version of your QuickBooks software. To check the product version, you can go to the “Help” menu, select “About QuickBooks,” and the version and release numbers will be displayed. If you have any issues with checking your product version, call our toll-free number +1-888-510-9198 for assistance.Add image
What is the latest product version of QuickBooks?
The latest product version of QuickBooks is QuickBooks 2022. To check if you have the latest version installed, follow the steps mentioned in the previous answer. If you need help updating your QuickBooks software, call our toll-free number +1-888-510-9198 for expert assistance.
Can I use QuickBooks without updating to the latest version?
While you can continue to use your existing version of QuickBooks, it’s recommended that you update to the latest version for improved performance, security, and bug fixes. To ensure that your QuickBooks software is up to date, call our toll-free number +1-888-510-9198 and our experts will guide you through the update process.
How do I find my QuickBooks license number?
To find your QuickBooks license number, log in to your Intuit account, select the QuickBooks product you’re using, and the license number will be displayed under “Product Information.” If you need further assistance with finding your license number, call our toll-free number +1-888-510-9198 and our customer support team will assist you.
Learn how to resolve data damage on your QuickBooks company file
Company file in QuickBooks is one of the core elements. It stores your crucial and sensitive data. However, at times, this crucial data file can get damaged or corrupted due to some reasons, which not just puts your data at risk, but also hinders the smooth working of the software. You can experience data damage in QuickBooks due to performance failures, disk failures, power surges, and much more. To help you out in dealing with such annoying errors, we have designed this piece of writing, sharing the complete details about data damage and data corruption issues.
Thus, stick around this piece of writing for further information or you can further connect with our QuickBooks enterprise support team at +1-888-510-9198, and get answers to all your queries from the professionals.
Data damage errors in QuickBooks company file often occur when the software is unable to read the company files properly. It can further be experienced due to various external and internal reasons. You might get an error message or see an unusual behavior in case any sort of data damage occurs. Data corruption or data damage can be a common yet annoying error experience for QuickBooks users. Thus, it is suggested to make regular backups of QuickBooks company files, to avoid any sort of data loss.
Identifying signs for data damage in QuickBooks company file
The signs and symptoms of data damage in QuickBooks company file. Let us have a look:
Issues like a data problem prevents QuickBooks from continuing, in the verify data utility or verify target: values in minor do not match the major on the screen.
Moreover, if there is a negative balance in the transaction history.
Another reason can be if any of the transaction and entry is missing from the lists.
One can also experience a similar issue if the bills paid or invoices are shown unpaid.
Also, if the software runs sluggishly.
In case there are any errors in the balance sheet.
If the user opens the send feedback online and while moving to the bug report window.
Fix data damage on your QuickBooks Desktop company file
Mainly there are two steps to resolve this problem. You can take help from your IT professional or contact our error support team in case you get stuck somewhere by following given steps.
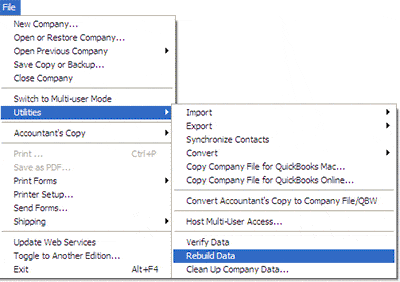
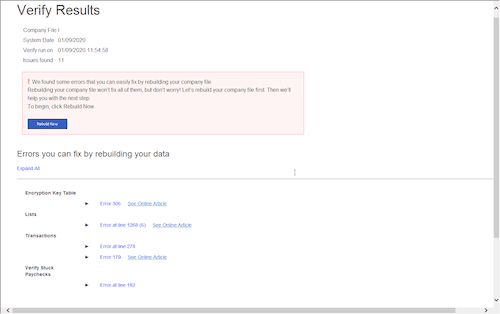
Step 1: Run the Rebuild Data Utility
Go to File menu, choose ‘Utilities > Rebuild Data‘
Select ‘OK‘ button in the backup of the data of QuickBooks company file.
(There are chances that your computer will show that QuickBooks is not responding.) But if the cursor is moving, it means that Rebuild is going on. Let it complete.
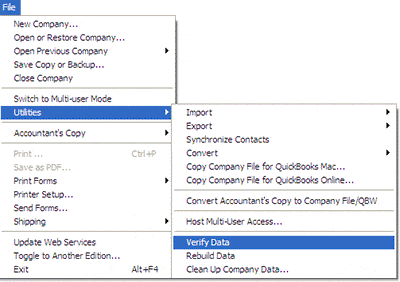
Go to ‘File menu‘ and choose ‘Utilities > Verify Data‘
Select ‘OK‘ if you get the message ‘QuickBooks detected no problem with your data‘.
If there is an issue with the data, you will get the prompt ‘Rebuild Now‘ or ‘View Errors‘.
Now, choose ‘Close‘ and perform the steps below:
Important Note: You can follow the steps below if you find yourself comfortable in reviewing the QBWin.log or QuickBooks.log file.
Find QBWin.log or QuickBooks.log files
Go to the ‘Tech Help‘ window if you are working with a support agent. Go to ‘Open File‘ tab, highlight the log file and select ‘Send log files‘ to Intuit Support. This will send the file as well as enable the agent to view the log files.
Now, check the log file
For Mac: Scroll down to the most recent verify information
For Windows: Search for start verify and locate the most recent file
In the opened file, you need to search by pressing ‘Ctrl+F keys’ for the start ‘Verify‘
Now, find the line which is LVL_ERROR, and look for it in check QuickBooks Learn & Support Site. Also you can see that there is a data damage top LVL errors library
Why should you use Verify and Rebuild features?
Encountering fatal errors while using QuickBooks Desktop
Discrepancies on invoices, bills and other reports that post negative values
Already deposited payment showing in the payment to deposit window
Step 3: Use QuickBooks file doctor from Tool Hub Program
If you are unable to fix the issue using the above rebuild and verify data utility related steps, then try performing the steps associated with file doctor tool to get rid of the issue successfully:
If the users haven’t downloaded it already, then download the QuickBooks tool hub.
After that, open the company file issues tab from there.
You now have to opt for run QuickBooks file doctor.
This might take a minute or so.
Now choose the company file from the drop-down menu and if the file is not identified, go to the browse and search tabs to find the file.
Once done with that, choose check the file option and click on continue tab.
You will then have to enter the admin password for QuickBooks and also click on next.
The scanning process might take some time, depending upon the file size. And once the scan ends, open QuickBooks and the company file.
Step 4: Deletion of Customer Reports and memorized transactions
Another method you can try out for QuickBooks Desktop data damage is deleting customer reports and memorized transactions.
To delete memorized transactions:
Move to the lists, where the user should move to memorized transaction.
After that, click on the edit tab and select deleting the memorized transactions option.
You now have to click on ok tab.
Delete customer reports
You need to click on the reports menu and further select the reports center.
Once done with that, select X.
Also click on ok tab.
Data damage troubleshooting for QuickBooks desktop Mac
If you are a QuickBooks Mac user then the below given steps will help you to resolve the data damage issues of QuickBooks:
Step 1: Re-Sort Files
Re-sorting the lists will help you put your records back in order. In case you have changed the order of a list, resorting will do the needful.
Go to ‘Reports menu‘, and select ‘Company & Financial‘ > ‘Balance Sheet Detail‘
Now, select ‘Options‘, choose ‘Accrual or Cash‘.
If you find that the total assets do not get equal with the liability and equity in all the reports, then you better determine the transaction which is causing the problem.
Take a backup of the company file, ‘Delete and re-enter‘ the transaction
After this, compare the Account report totals to the balances on Chart of Accounts:
Compare the open invoices to accounts receivable balance on the ‘Chart of Accounts‘.
Compare the total in ‘Unpaid Bills report‘ to the ‘Accounts Payable balance‘ on the ‘Chart of Accounts‘
To balance the transaction, rebuild will put out-of-balance transactions in this account. You may also see voided checks in this account
Other than voided checks, you will also find the transactions. Now, again delete and re-enter the transactions.
Undeposited Funds:
Go to ‘Activities‘, select ‘Make Deposits‘ and then, select all. Make sure that the total amount is equal to the balance shown for ‘Undeposited Funds‘ on ‘Chart of Accounts‘. Also, ensure that there are no deposits showing on the deposit.
Step 4: Merge the Damaged Accounts/Items/Names
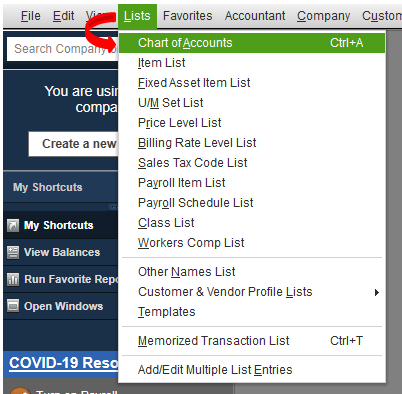
Go to ‘Lists‘ and select ‘Chart of Accounts‘.
In the control key, select the account that has been damaged. Click on ‘Edit Account‘
Make sure you put an asterisk (*) on the name of account
Then, click on ‘Cancel‘
While holding the ‘Control Key‘, select any account and click on ‘New Account‘
Choose the type and enter the original name of the account having problem
Click ‘OK‘
Hold the ‘Control key’ and select original account. Choose ‘Edit Account‘
Now remove the asterisk and select ‘OK‘ button
Click on ‘YES‘ as this will confirm that you desire to merge the accounts
To merge items and names, the same steps will be followed as the ones followed for merging accounts
We hope that the above-prescribed information is helpful for you to resolve data damage on your QuickBooks company file. In case, you are unable to perform the systematic steps of the solution or you seek expert assistance – dial our QuickBooks data recovery number i.e. +1-888-510-9198.
FAQs Related to Data Damage in QuickBooks Company file
How do I repair a QuickBooks desktop data file?
You can try fixing the data file in QuickBooks using the steps related to repair company file with rebuild data tool. 1. The first step is to move to the file menu. 2. Move to the utilities tab and choose rebuild data. 3. The next step is to let the tool repair the file. 4. Click on the ok tab and head to the file menu. 5. Also, let the tool check your file for data issues.
What causes data damage in QuickBooks desktop?
Data damage usually indicates that the company file can’t be read correctly by QuickBooks. This can be caused by factors within QuickBooks or some external factors, especially the ones where the file is located. The majority of data damage issues include LVL errors in the QBWin.
How do I quick fix my file in QuickBooks?
You can fix your file from the tool hub and choose the company file issues and also go for the quick fix my file option. Once done with that click on ok tab when it completes and launch your QuickBooks.
Learn how to setup Email in QuickBooks Desktop Pro
Want to send transactions through webmail or outlook in QuickBooks? Well, QuickBooks lets you send invoices, reports, and much more by simply setting up emails. QuickBooks Desktop has many options like integrating your email with Outlook, Web-mail and QuickBooks mail. If you are currently using Google mail and you want to choose the webmail option but now cannot get it done with Google mail, this segment will help you with the process to setup Email in QuickBooks desktop.
To further explore setting up emails in QuickBooks, make sure to stick around till the end, or you can further connect with us at +1-888-510-9198, and we will assist you with the best support services related to QuickBooks. Having said that, let us further discover about setting up email in QuickBooks.
Often when you email directly from QuickBooks, it saves you time and is one of the best features so far. Setting up email service in QuickBooks is quite easy and can be done by performing certain set of steps. However, you might require the following information to set up email services successfully:
Username and Password
Outgoing and Incoming email addresses
Incoming email server type
Why do You Need to Configure Email Services in QuickBooks?
Configuring email services is essential due to the following reasons:
It sets payment reminders to all the clients via email.
Another reason why email service is essential is that it helps in importing data from particular spreadsheets and adding attachments not more than 2MB.
You can also send the estimates to the clients and direct email invoices with the QuickBooks email setup.
This feature also gives details from the vendors and customers.
And further, allow users to share reports within departments and offices conveniently
Benefits of QuickBooks email setup
Setting up email in QuickBooks can be really beneficial. This feature boosts the overall productivity of the business and ensures making things easier.
One can simply email invoices whenever the customer needs it using this feature
Furthermore, it permits the user to send customers their payment reminders by emailing them invoices.
It serves both as a storage and tracking device for client and vendor contact details.
It further assists in importing data from spreadsheets.
Form a list of the products that you deal with and send them to the vendors using this feature.
Configuration of your email service with QuickBooks desktop
You usually have various options for email integrations like Webmail, Outlook and QB Email when you work with QuickBooks Desktop products. There is a chance that some people cannot get it to work with Gmail.
QuickBooks Email Options:
There’s a chance that you will see all three options for Email in your QuickBooks Desktop preferences. Several versions of QB do not provide all three and even if you have a version which supports all three versions you might not see all the options on some particular computer installations.
WebMail- It was introduced by QuickBooks in the year 2011 and it allows you to connect via Gmail, Yahoo email or your own web-based email service.
Outlook- Outlook support is only there if you have already installed Microsoft Outlook on your computer. It is preferred email integration as it provides the greatest degree of control.
QuickBooks Email- It is the least favorable. It is dependent on Intuit mail servers plus they don’t own web-based email services.
You can configure your QuickBooks via webmail, outlook and email to Email invoices, reports and other transactions. Make sure that your QuickBooks is compatible with your version by checking QuickBooks Desktop system requirements.
Webmail
In the updated version of QuickBooks you can work out with Secure Webmail for an easier connection to your Email service provider and reliable on your QB Desktop version and it’s only vacant for some providers.
QuickBooks 2019 and 2020: Left for Gmail, Yahoo Email, Hotmail and AOL like Mozilla Thunderbird Email Client.
Note: Supports simple text version in Mozilla.
QuickBooks 2018: Available for Gmail and Hotmail/Live clients in the US, Canada and UK.
Newerand QuickBooks 2017 R5- It is available for Gmail users in the United States.
QuickBooks 2017 R4 and older- Secure Webmail not vacant for its version.
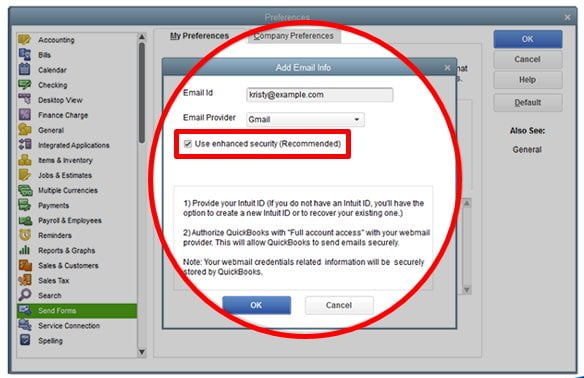
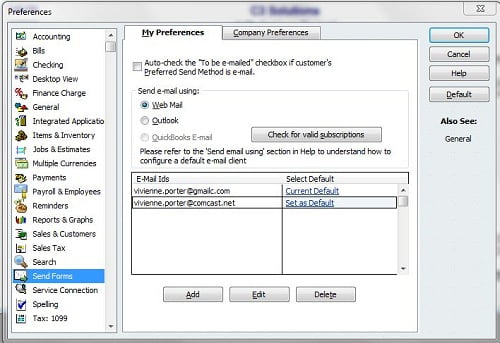
To setup a Secure Webmail:
Initially, select ‘Preferences‘ and then click on ‘Send Forms‘ from the QuickBooks ‘Edit‘ tab.
Choose the ‘Webmail option‘ and then select the ‘Add button‘.
Now, choose your provider from the drop-down list and then input your ‘email address‘.
Make sure that ‘Enhanced Security‘ checkbox is marked.
Click on ‘OK‘ button.
When asked, sign in to ‘Intuit Account‘.
On the screen, you’ll see webmail provider login page.
Sign in and then select ‘Grant Intuit Access‘.
Outlook
Firstly, you have to ‘create a new Outlook email profile‘
If you have Outlook accounts then move to the Next Step.
Select the information to configure Outlook as your Email client.
Username
Password
Incoming email server address
Incoming email server type
Outgoing email server address
Quick tip: You can contact your Internet Service Providers for the above given information.
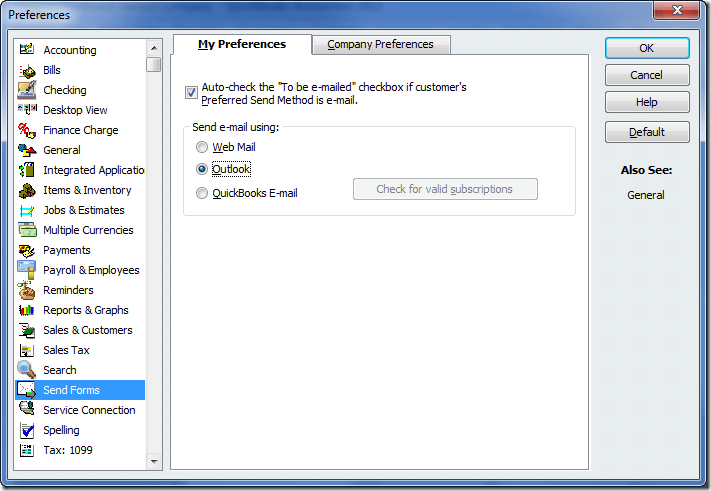
Set up Outlook in QuickBooks.
Quick Tip: Want to see Outlook is missing in QB Desktop Send Form preferences if Outlook is unavailable in your QuickBooks.
Select Preference and then select Send Forms from the QuickBooks Edit menu.
ISP obeys the Webmail servers. QuickBooks automatically select out the information for the many common service providers, like Gmail, Yahoo and Hotmail etc.
Select Preferences and then select Send Forms from the Edit menu in QuickBooks.
Select Webmail and then choose Add button.
Choose your provider from the drop-down list and then input your email address.
QuickBooks Desktop will ask you to enter your webmail password the first time you send an email using regular webmail unlike with Secure Webmail.
If you have issues in open account by password in QuickBooks Desktop and note that webmail providers require the user to confirm configuration for two-step verification.
Fox Cox user: When we send email, the standard SMTP setting of Cox then uses SSL or login information. QuickBooks needs login credentials and prefers SSL connections and hence, use port 25. Use SSL with such alternatives port 587 or 465.
For CableOne users: Make use of these credentials as CableOne uses Google servers.
We hope that with the help of these above-mentioned steps you have now successfully setup Email in QuickBooks Pro version. However, these steps are a bit confusing and consume a lot of time to follow.
In case you are facing any kind of difficulties or unable to do the specific task or you have any other QuickBooks related issues then no need to worry. Please feel free to get in contact with our QuickBooks customer support team at+1-888-510-9198, to share your concerns with one of our Intuit certified ProAdvisor to get 24/7 help.
Frequently Asked Questions (FAQs)
Information required to set up QuickBooks Email?
The information required to set up the service includes email address, username, and password, details of the server along with incoming and outgoing email settings, and a few other things mentioned in our blog in detail.
What is the process to set up Office 365 email in QuickBooks?
The user can set up office 365 in QuickBooks using the steps below: 1. Head to QuickBooks and then select Preferences 2. Choose the icon of email 3. Send emails using by selecting Custom 4. A list of Email Accounts will appear on the screen 5. This list will only be full if you have entered any email accounts and in case you haven’t then the list will be empty 6. In order to add a new account choose the + icon 7. Also, add an account name, then from your email provider add the settings 8. To add any other account repeat the same steps for any other accounts too.
Can QuickBooks desktop automatically email reports?
The feature named Scheduled Reports is available in QuickBooks which helps in emailing reports on a daily and recurring scheduled time.
How to fix QuickBooks email?
This can be done by performing the steps which include: 1. At first, press Windows + R keys simultaneously 2. Now, the run command will open on your screen. 3. The user should now enter control panel there 4. When the control panel will open, head to Programs and Features 5. Select QuickBooks and click on Uninstall/Change 6. Also, click on continue and then on Next 7. The next step is to choose Repair and then click Next 8. Hit ok once done
Interested in accessing QuickBooks accounting software remotely? Well, QuickBooks lets its users remotely access the software and perform necessary accounting activities at a click. QuickBooks remote access lets you work in QuickBooks from a different computer than your server. However, before you can access QuickBooks desktop remotely, you need to map server or host computer as a network drive. And further set up computers that will access the files for multi-user mode and then set up the folder where the company file is stored.
To help you easily access QuickBooks desktop remotely, we have curated this piece of writing sharing the complete information. Note that, in case you have an issue when mapping the drive when you use UNC, try to use the IP address of the server. Moreover, if there is any query or if the user requires our assistance at any point, then contacting our team at QuickBooks enterprise solutions help number i.e. +1-888-510-9198, is suggested.
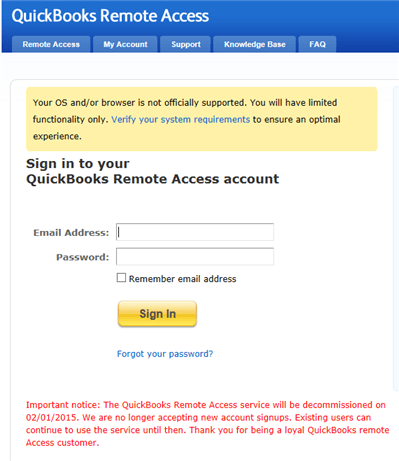
QuickBooks Remote Access is one of the safest and most secure servers with the help of which the users can access the system from any other computer with an Internet connection. QuickBooks Remote makes it easy for the users to access QuickBooks, email, and other programs & documents regardless of place and time. It also allows the users to transport a file or folder between machines. Without any difficulty, QuickBooks remotely allows you to print the documents from a remote computer to a local printer. This simply means that you log in to QuickBooks remotely without being closely present on the system on which it is installed.
Advantages of QuickBooks Desktop Remote Access
With the help of WebEx tool that supports online meetings & communication services, the user can easily and swiftly access the QuickBooks software from anywhere, at any time.
The user can import/export a QB file or a whole folder from one system to another and vice versa
Also, this software saves the traveling time and office infrastructure cost for accounting purpose
Another benefit that it offers is that Copy & Paste among remote machine and local PC’s is possible
It is possible for the users to effortlessly and smoothly print, from the remote system to a local printer
Client or managers can without any hassle track or trace the activities or actions of the accountants
Lastly, one of the basic purposes served by this accounting software is that multiple users can work together on the same QuickBooks file
QuickBooks Remote Access Cost
The user will have to pay for the QuickBooks Remote Access software. As it is not free, it is accessible in two different versions.
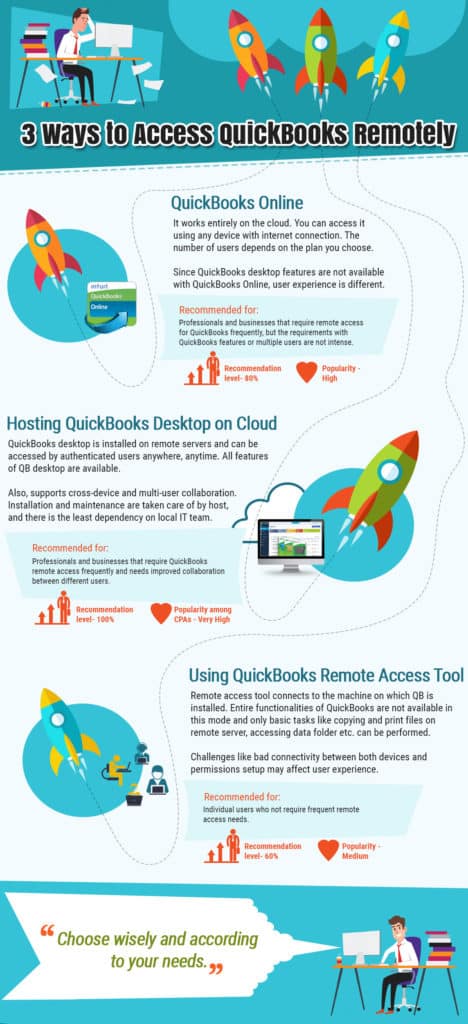
Hosting QuickBooks Desktop on Cloud: The very first option is hosting QuickBooks desktop on cloud, as Authorized hosting of QuickBooks desktop software on any third-party servers is now permitted by Intuit. The authenticated users can access QuickBooks installed on the server of hosting providers from anywhere via Internet.
Using QuickBooks remote access tool: This option is suggested by the experts as this tool can easily connect to the remote system that has the QuickBooks accounting software installed in it. The basic tasks such as copying files from local to remote and vice versa, printing files using local printers, accessing QuickBooks data folders and files remotely, etc. can be smoothly performed by this tool.
Switching to QuickBooks Online: The third and the last option that the users have is to Convert to QuickBooks online (QBO) from QuickBooks desktop. For the ones who don’t know what is QuickBooks online, it is basically a solution from Intuit working entirely on cloud and increasing efficiency of the software. The user can access QuickBooks from any device that has an internet connection.
After that Log-in the account credentials such as registered mail ID, password, etc. on the QuickBooks Remote Access website. It should be noted that before login, the user should launch the Web browser on the system through which he/she needs to access the QuickBooks software remotely
Once done with that, download the remote access tool installation file, followed by tapping the “Setup computer” icon
Now, in the “Nickname” field, the user has to type in the System nickname, and then tap on to the “Next” icon
Moving ahead, the user is supposed to tick the checkbox next to the options to initiate each time a remote session is logged in. The options include: “Automatically reduce screen resolution to match”, “Use full-screen view by default”, “Disable this computer’s keyboard and mouse” and “Make this computer’s screen blank”
Jumping on to the next step, the user is supposed to tick the checkbox next to the applications, in order to attain access remotely on this system
Click the “Next” button
Coming to the end of the process, the user needs to tick mark the box for the authentication option to use. In that case the user can enter a passcode or can also use a phone number. When he/she accesses QuickBooks desktop remotely, the passcode option permits to enter the passcode on the login page. The phone number option needs that the tools call the user, and then prompt for accessing the code each time.
In this process, the very first step is to launch the Web browser on the system. After that log in to the account via the QuickBooks Remote Access website.
The user is then required to check out the box that was used earlier to define the system nickname. After that hit the “Connect” icon.
The user is required to authorize the desktop by using the password or by means of phone authentication. In case the remote tool calls the user and prompts for passcode. Then the user is supposed to enter the passcode on the phone.
To end the process, hit the “Remote Access” drop-down menu, followed by opting for “End QuickBooks Remote Access Session”.
You can work in QuickBooks from different computer than the server. However, you will have to map server or host computer as a network drive. Furthermore, set up computers that will access the files for multi user mode and then set the folder where the company file is stored. In case you have trouble when you map network drive when you use UNC, you can try to use IP address of the server.
Install QuickBooks database server manager on the remote computer
The QuickBooks database server manager is used to configure the QuickBooks server for multi-user access. The steps involved in installing database server manager are:
Once done with that, choose switch to multi-user mode on the QuickBooks file menu
You now have to choose yes in the multi-user hosting setup required window.
Also, note that QuickBooks installs and runs QBDBMgrN.exe as a background service. This service must be running on the system storing the company file even if QuickBooks is not open.
Now, select ok tab on the multi-user setup information window
And then, add necessary users by going to company and selecting users then set up users and roles and choose new tab.
Optional: Turn Network Discovery On and Password Protected Sharing Off
The server requires network discovery turned on and is visible to try opening the file using a UNC path. Along with that, windows will ask for a network password in case the password protected shairng is turned on. In case this happens, you can either log in using the network password or turn off the feature. You can carry out this process on the server or host computer and all the workstations that need access to QuickBooks remotely over the network.
The very first step is to open the control panel.
After that, select network and sharing center and then choose change advanced sharing settings
The next step is to expand the profile type that you are using at the moment.
Now, under network discovery, you need to choose turn on network discovery.
Once done with that, choose turn off password protected sharing under password protected sharing.
The last step is to choose save changes.
Locate then open the company file
You need to first choose open or restore company from the file menu.
The next step is to choose open a company file and hit next tab
Now, browse the location of the company file.
In case your company file is mapped to drive E, then you need to look for the company file name E: in the list.
The user will then have to choose the company file from the list and click on open tab.
Toward the end, enter the username and password.
Conclusive lines!!
With this we come to the conclusion of this post, and we expect that information that we have tried to convey with the help of this article might help the user in accessing QuickBooks desktop remotely. If in case you have any queries or are facing any kind of difficulties – you can contact our QuickBooks certified experts and technicians at our toll-free helpline number i.e. +1-888-510-9198.
Our QuickBooks ProAdvisors will look forward to your concern and provide you with a feasible solution for all your accounting problems. Thus, do not hesitate in talking to our technical support team.
Frequently Asked Questions!
Is QuickBooks remote access still available?
Yes, the remote access feature is still available for users. One can make use of QuickBooks remotely regardless of the location.
What is the purpose of remote access?
The remote access feature allows the user to gain access to their devices over network from any place. The user can also perform different activities, manage company files and also perform all the usual accounting tasks.
What are the requirements for using QuickBooks Remote Access?
The major perks of using this feature of QuickBooks are: 1. QuickBooks should be installed on the remote system 2. The user is required to set up hosting service and mapping the network drive 3. You should have seamless internet connectivity
How to map a network drive?
One can perform the below stated steps to map a network drive: 1. The very first step is to click on windows tab 2. Now, move to my computer 3. Also, click on the computer tab and also select the option to map a network drive 4. The last step is to opt for a drive letter that is unused. 5. Also, click on browse