QuickBooks accounting software offers tons of tools and technologies to tackle the errors that come its way. However, the hassle of downloading multiple tools is not resolved with the QuickBooks tool hub. Additionally, this tool is a one-stop solution offered by Intuit, developer of QuickBooks accounting software. It is an umbrella tool for all QuickBooks tools. The list of tools offered by Intuit includes:
QuickBooks tool hub is without a doubt one-stop solution for all sorts of QuickBooks-related errors. A bunch of tools can be easily accessed using the QuickBooks tool hub. To help you out with the complete details about the QuickBooks tool hub, here we are with this segment.
Thus, make sure to stick around till the end, or you can also connect with our tech team for any further technical assistance at +1-888-510-9198, and we will answer all your queries immediately. Having said that, let us explore further about the QuickBooks tool hub 1.6.0.3 download procedure.
Before diving in deep and exploring the steps to download and access the QuickBooks tool hub, let us briefly understand it first. QuickBooks Tool Hub is a comprehensive utility and a multi-functional asset that lets you access multiple tools all in one place. In addition to that, it is a one-stop solution for all your QuickBooks-related queries, as you can access various tools all under one roof and get rid of multiple errors easily.
This further eliminates the need to download and install multiple tools individually. You can download the QuickBooks tool hub from the official website of Intuit and you can also download QuickBooks Tool hub for Mac. Quickbooks tool hub Windows 10 (64-bit) is compatible with each other. For this:
Once done with that, ensure that it is the latest version.
You now have to open the QuickBooksToolHub.exe file from the download folder.
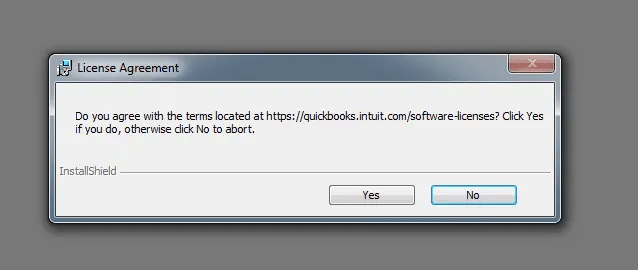
After that, run and agree to all the terms and conditions by following the onscreen prompts.
Toward the end, you will see an icon of the same on the screen, which you need to choose to open the tool hub.
List of Errors that can be fixed with QuickBooks Tool Hub
The list of errors that can be resolved using the QuickBooks tool hub is huge. To find out what issues can QuickBooks tool hub can resolve for you, read ahead:
Installation errors
These kinds of issues arise when you install QuickBooks desktop and you are not able to. In this case, the user will have to click on the installation issue tabs in QuickBooks, which might help you in fixing all the installed associated errors.
Login issues
QuickBooks password can be misplaced by QuickBooks users in certain cases, this is when the user will have to click on the password reset tab and perform the onscreen instructions. This will assist the user in resetting the password successfully.
Company file errors
In such a scenario, the user can also opt for the company file issues tab. This will open up the QuickBooks file doctor and repair the company file. After which the user will have to perform the onscreen prompts to fix the issue.
Connection and network troubles
At the time of facing connectivity issues on a specific network, then one can go for the network issues tab and this will help in fixing the network-related bugs.
Performance bugs
The performance problems tab in the QuickBooks tool hub is helpful in resolving QuickBooks performance-related issues, or when the software slows down.
Errors to fix using QuickBooks Tool Hub
Apart from the list of errors stated above, the errors below can also be fixed with the QuickBooks tool hub.
What makes QuickBooks Tool Hub Download worth the hype?
The tool hub contains some of the great features. Let us have a look:
Simplistic Interface- The tool hub has a plain and simplistic interface. It might not be fancy, but it is intuitive enough that even system novices will have no issue operating it.
Great for fixing company file issues – The tool hub program is great for company file-related issues. Moreover, one can make use of this tool to repair common issues related to the company file.
Network issues – In case you are facing issues related to the network, then the tool hub will surely be of great assistance.
QuickBooks tool hub is free- The tool hub is completely free and needs no associated fees.
System requirements for QuickBooks tool hubDownload
Before starting with the download procedure of the tool hub, it is very much essential to check if the system meets the basic requirements of the software.
Microsoft visual C++ redistributable package
It is essential for the users to have the .Net framework on the system to install the QuickBooks tool hub.
.Net Framework
Another system requirement for the same is net framework.
What are theBenefits of QuickBooks Tool Hub?
Using QuickBooks tool hub comes along with various benefits. Here are some of the most common ones:
Tool hub can be the best option for you if you are facing any sort of network issues
The tool hub is great tool even for company file errors
Its basic and simplistic interface makes it easy to use for the QuickBooks users
QuickBooks tool hub is free to use and there is no fee associated with its usage
Use the below steps to download the tool hub for the first time.
At first, login to the personal computer or laptop, and then visit the official website of QuickBooks through a web browser
The download file shall be differentiated depending on the system configuration that you are using. 32 and 64-bit are the two types of system configurations, you can choose accordingly.
The download file will be in .exe format, it is suggested to save them to an external or internal hard disk connected to your computer
The file will be listed as QuickBooksToolHub.exe
Now, right-click on the direct link, and from the pop-up list choose the ‘save link as’ option
A window will open up, asking you to pick the exact folder to download the .exe file
By default, the browser will open up the ‘Downloads’ folder, but you can also choose your preferred location.
Furthermore, click on the ‘Save’ button
After the download process is over, the browser shall notify you of the same
Head to the folder where you have chosen to Download QuickBooks Tool Hub (Latest version QuickBooks tool hub 1.5.0.0)
Double-click the file
Also, a new window will open up asking you to provide the required authentication to install the file
Furthermore, click on ‘Yes’ button
This will open up the window
The terms and conditions are in the first part of the window. Thus, go through them once
Hit the yes tab
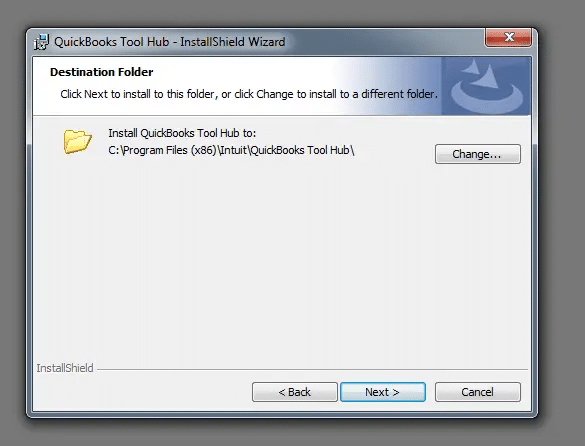
Choose the location to install the tool hub and then hit next tab
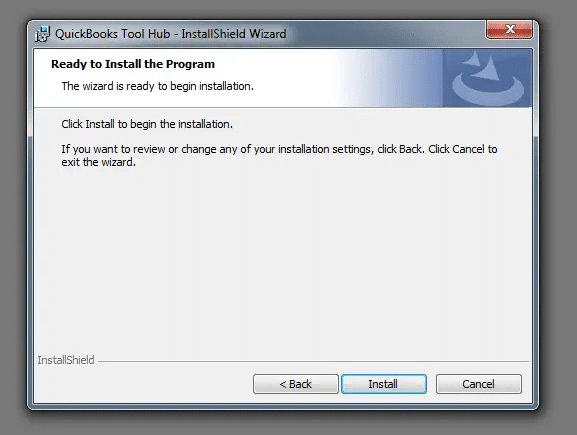
Moreover, hit the install tab
This will start the process
Wait for it to complete
Click upon the ‘Finish’ option to close the window
Open the tool hub by double-clicking on the icon, if it doesn’t start automatically and start using it.
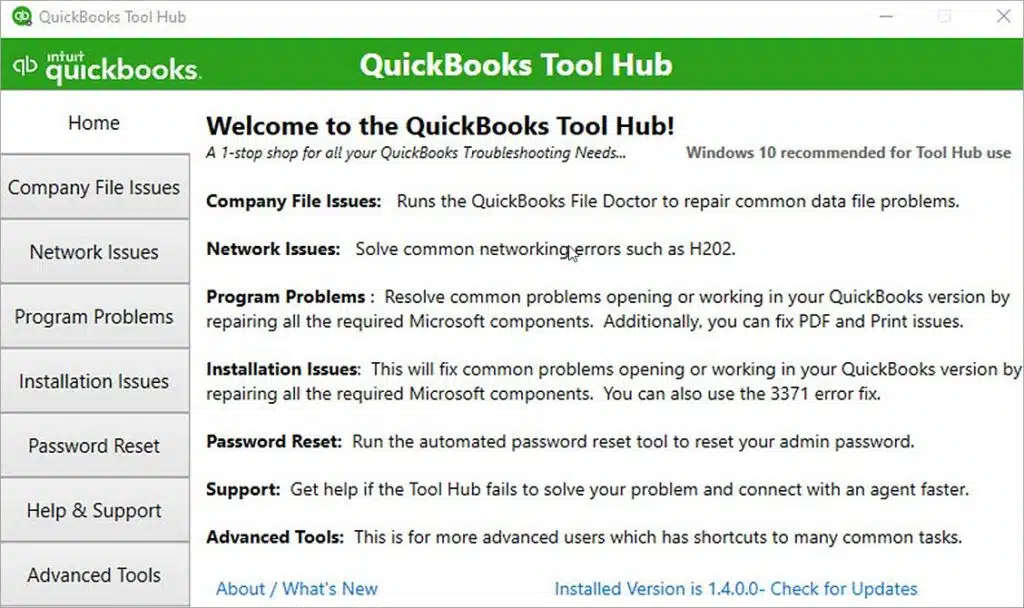
After downloading the QuickBooks tool hub app, the user might see the following components to choose from, as per the requirement or the error.
Home
The home screen shows essential information related to the QuickBooks tool hub for Windows 11. It also specifies the components for specific problems
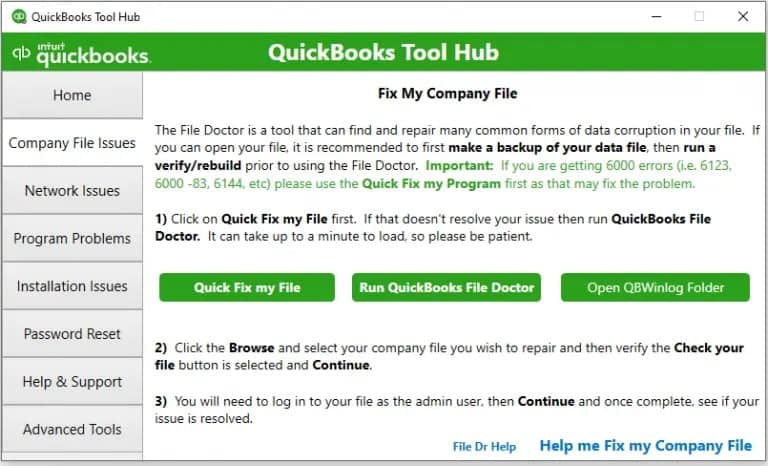
Company File Issues
Option 1: Quick Fix My File
You can use the Quick Fix My File option. In order to use it, click on the Quick Fix My File Tab and then perform the onscreen prompts. In case the tool didn’t rectify the error, then try running QuickBooks Tool Hub.
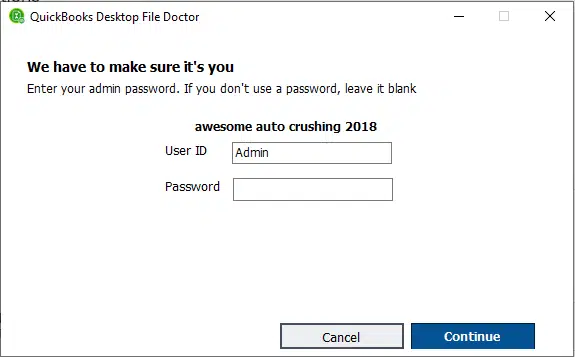
Option 2: Run QuickBooks File Doctor
Another component in the company file issues tab that can be used in case of company file-related problems is QuickBooks File Doctor. Select this tab and run the QBFD tool using the set of steps below:
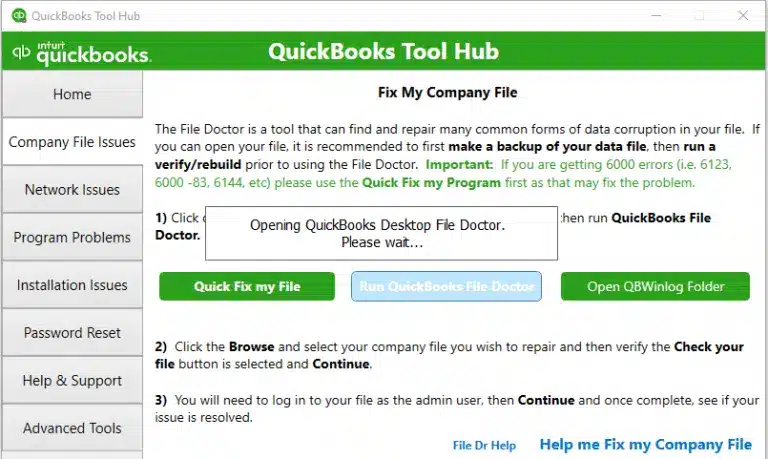
Click on the run QuickBooks file doctor green tab
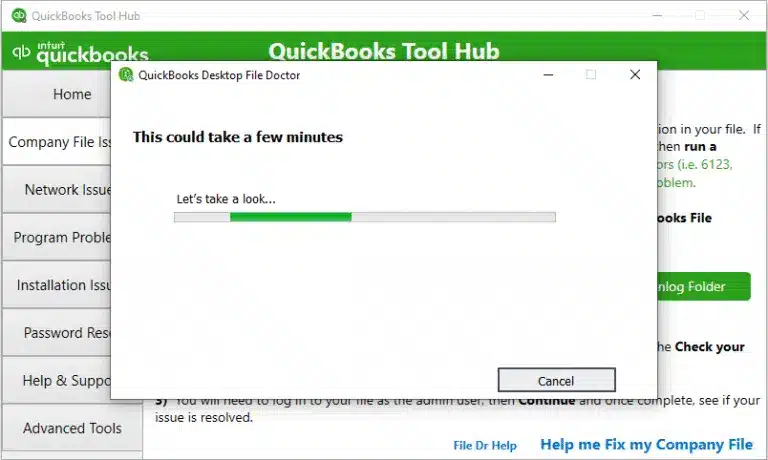
After that wait for it to open up. This might take a minute or so.
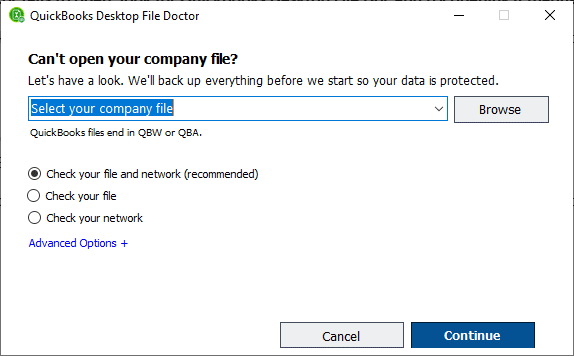
The user should then click on the browse tab and move to the company file that needs fixation
Furthermore, verify that the check your file option is selected
Also, log into the file as admin user.
And hit the continue tab to end the process.
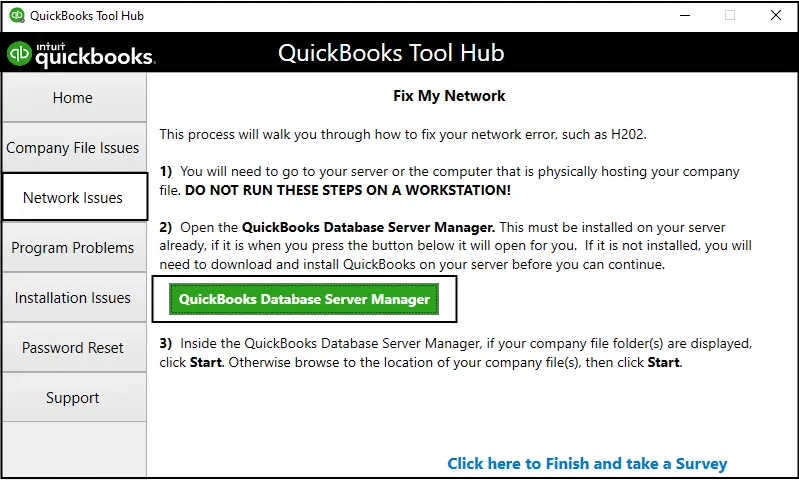
Network issues
The next component can be used for any sort of network issues in QuickBooks. The user can go for QuickBooks database server manager and try to fix the issue.
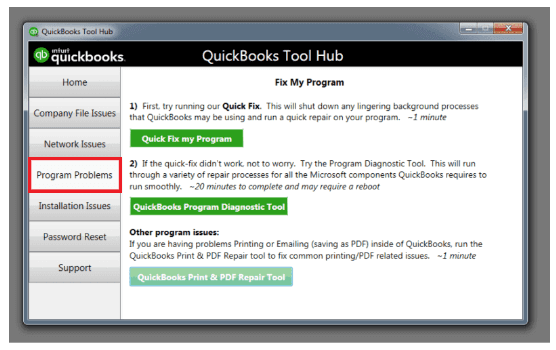
Program Problems
The program problems tab can be selected for any kind of error. This includes Quick Fix My Program QuickBooks program diagnostic tool, and QuickBooks print and pdf repair tool.
Quick Fix My Program:
If you go for this option, then it will end all the background processes from QuickBooks and further run a repair. This process might take some time to complete.
QuickBooks Program Diagnostic Tool
Another crucial tool that can help you in fixing such issues is QuickBooks program diagnostic tool. It will perform the necessary repair processes and works with every Microsoft component that is used by QuickBooks. This scan might take longer time than other tools.
QuickBooks Print and PDF Repair Tool:
This tool works best when there are any sort of printing and emailing issues with QuickBooks desktop or online. This method takes around a minute or so to complete.
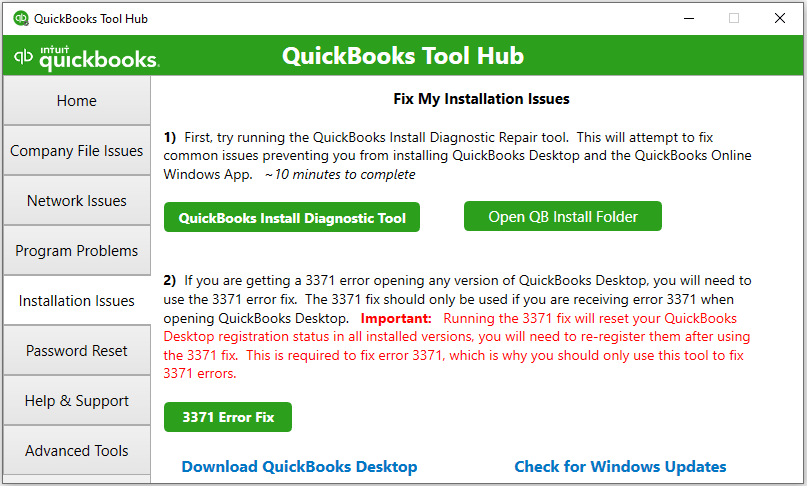
Installation Issues
The installation errors that appear at the time of QuickBooks installation can be easily fixed using this tab. The user will also see QuickBooks install diagnostic tool and QuickBooks clean install tool therein, and use them to fix the install errors.
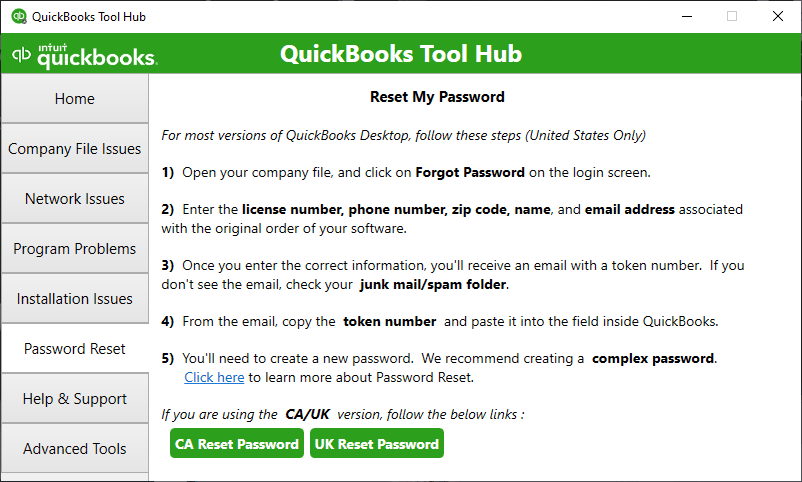
Password Reset
Another component that appears is the password reset. Use this for changing or resetting the QuickBooks password when missed.
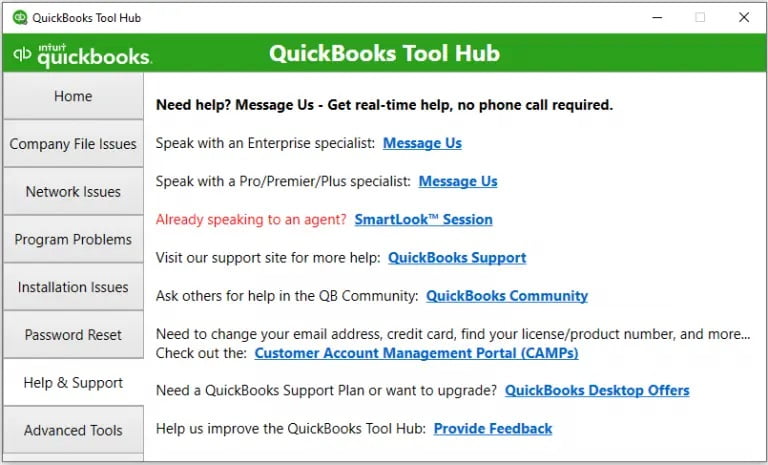
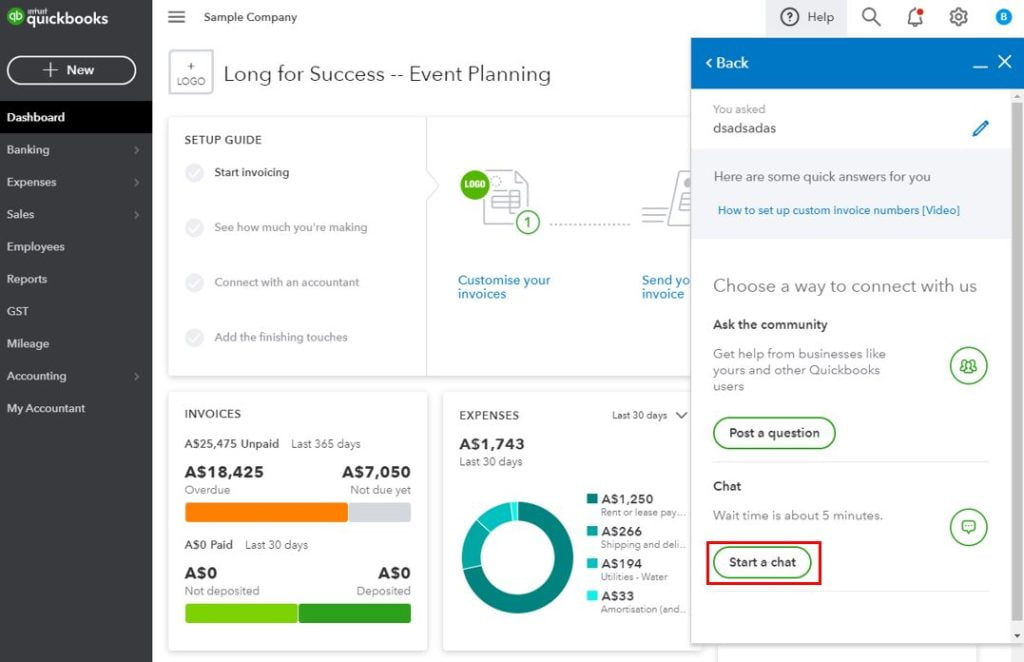
Help & Support
The last component is the support one. This component is helpful at the time of QuickBooks support requirement. This component includes options like message us, a smart-look session, and visit the site.
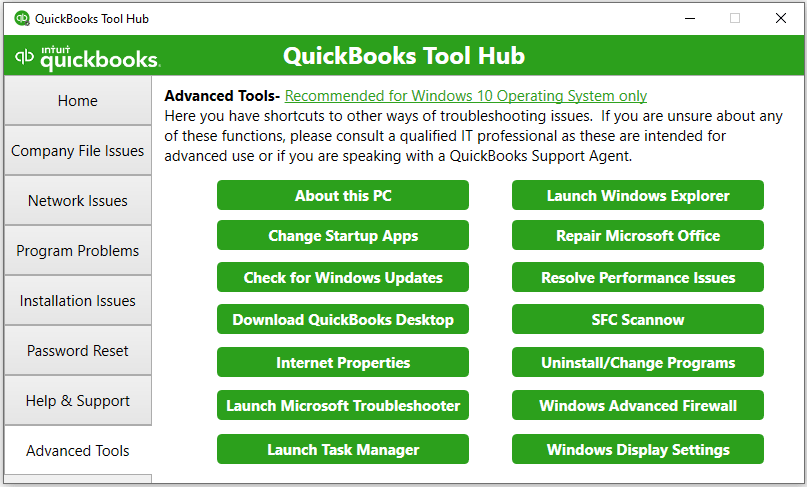
Advanced Tools
If the user is unable to tackle the issues with the above components, then this one would be a savior. You can fix errors like 6000 series, QuickBooks crashing, general issues when working on QuickBooks using these tools.
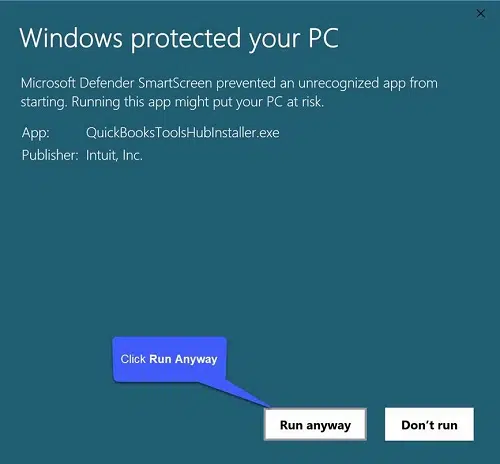
What to do if QuickBooksToolHub.exe has been blocked for download?
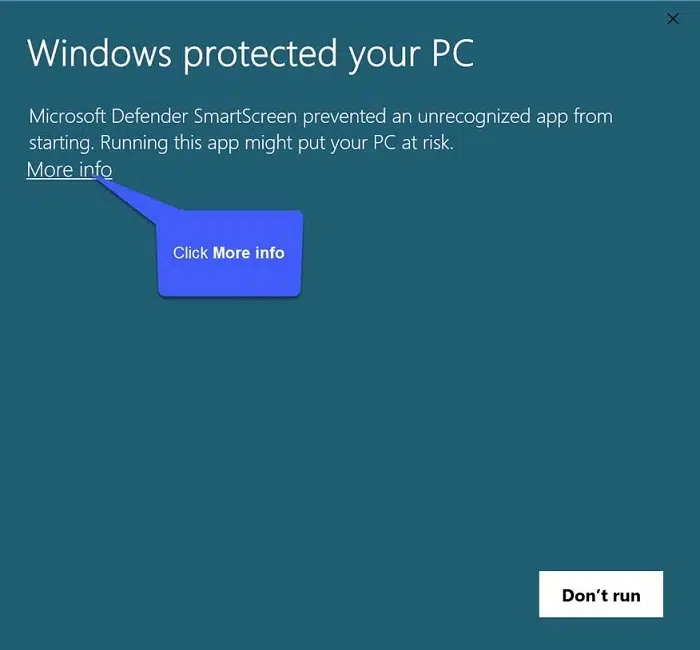
When you get any error message when installing tool hub, it indicates that the QuickBooksToolHub.exe file has been blocked by Windows as it can harm your system. The user can download the tool hub program using a different web browser.
You might get the following error message from Microsoft Defender.
You now have to click on the more info tab.
Further, click on run away option to install tool hub program.
This might take some time to download the file on your system.
After the file download is successful, install it by double-clicking the file.
Conclusion!
By the end of this article, we believe that the user might be well aware with the information related to this error and also the steps that one should take to download QuickBooks Tool Hub and make the best out of it. However, if there is any query, or if the user isn’t able to use the tool properly, then in that case contacting our QuickBooks Enterprise Support team at +1-888-510-9198 would definitely work. We are a team of technically sound QuickBooks professionals who work round the clock to provide the best possible support services. Our tech professionals will further ensure to answer all your queries immediately.
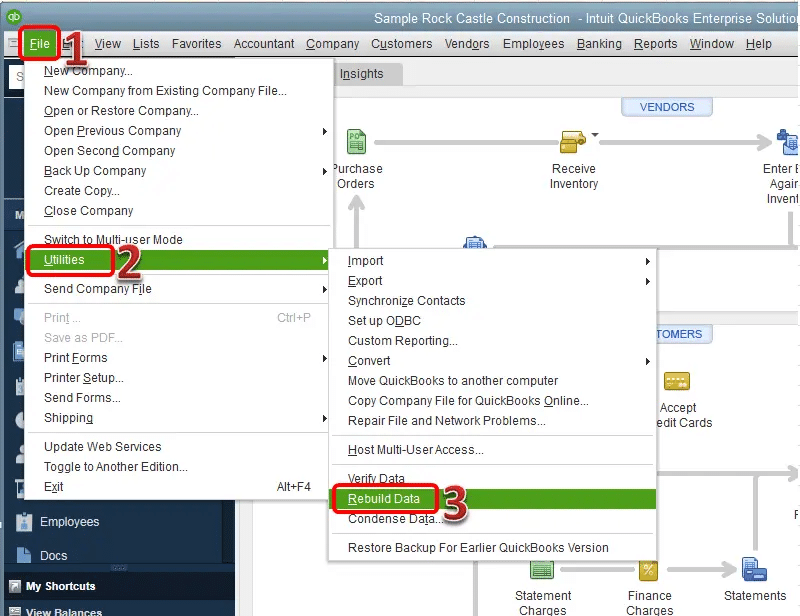
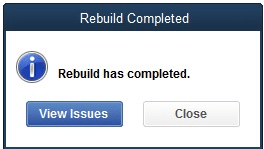
Rebuild QuickBooks doesn’t take much time. The crucial factor for rebuilding time is the size and hardware specifications of the device. However, it will maximum take only 10 minutes to rebuild and repair QuickBooks.
Why is my QuickBooks not working?
QuickBooks stops working when there is an issue with the software itself. It can be seen when there is a problem with the hard drive or if the QuickBooks files are damaged. You can also come across similar issues in case the installation is not proper or if the company file is name is too long. You can fix this issue by either repairing QuickBooks or by using Tool hub.
How does a QuickBooks file Get Corrupted?
QuickBooks files might get corrupted if the system shuts down improperly or the computer being used has a virus or malware attack. Identifying this issue becomes easy with symptoms like automatic shutdown of your device, no response from QuickBooks, error message popping, etc.
How do I download the QuickBooks tool hub?
To download tool hub, you need to head to the official website of Intuit. After the download has been finished, you need to open QuickBooksToolHub.exe file. You will then have to accept the users’ agreement and perform the onscreen prompts to install the QuickBooks tool hub software.
Is QuickBooks tool hub free?
QuickBooks tool hub is designed by Intuit to diagnose and fix various errors that show up in QuickBooks. It is a free-to-use tool and Quickbooks tool hub free download is possible using the Intuit website.
How to run QuickBooks file doctor in the repair tool hub?
You need to open the QuickBooks tool hub and head to the company file issues tab in the QuickBooks repair tool download to run QuickBooks File Doctor.
What are the different tools integrated into the tool hub?
QuickBooks tool hub includes a bunch of tools. These tools are QuickBooks Program Diagnostic Tool, QuickBooks Database Server Manager, and QuickBooks File Doctor.
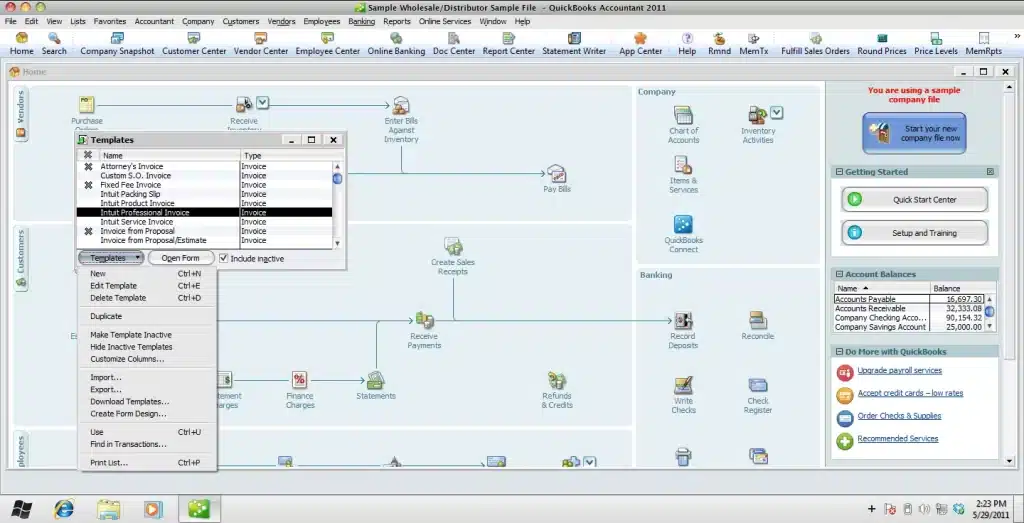
Want to learn the process to fix QuickBooks desktop error C=387? Make sure to read the article till the end. QuickBooks error code C=387 is seen when the registry entry is corrupted or damaged. The user can also face similar issue due to template issues of invoices. As a consequence of such an error, the user might not be able to perform QuickBooks activities. To know what causes such an error and what fixes can be performed to deal with this technical issue, all you need to do is to scroll through the post carefully. The user can also contact our experts at +1-888-510-9198. Get answers to all your queries by contacting our tech support professionals.
QuickBooks error code C 387 is usually seen when you try to access the company file. It is an unexpected error that can be seen due to issues in the template invoices. A warning message that states: “An error has occurred in QuickBooks. Please restart QuickBooks and try again. If you continue to experience this error, please note the C= value and contact technical support.” appears. This error can also be seen due to corrupted, invalid, outdated, or damaged windows registry. You can also expect this issue when an amount exists but fails to show up on any ledger in bank accounts, accounts payable, or both sections. In this article, we are going to define the error code C 387 in detail. Let us have a look:
What leads to QuickBooks desktop error C=387?
The user can end up in such an error due to the following reasons:
The very first reason can be if there is any malware issue
Or if for some reason the system closes improperly as a result of breakdowns, or improper shutdowns
Another reason can be if any of the important files got deleted
At the end of this post, we believe that the user might be able to fix the QuickBooks error code C=387. However, if the user continues to face similar issue even after that, then contacting our QuickBooks Support professionals is highly recommended. The user can give us a call at +1-888-510-9198, and our experts will provide the user with immediate expert assistance.
FAQs related to QuickBooks Error C 387
How do I fix error code C 387 in QuickBooks?
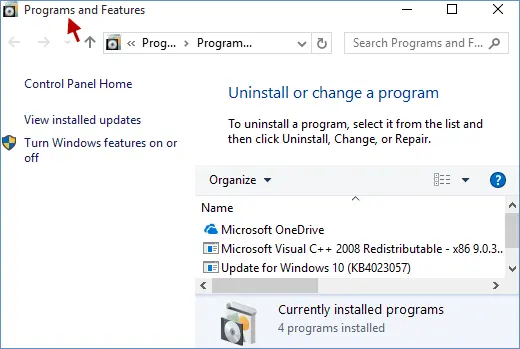
You can try fixing this issue by repairing QuickBooks. 1. Open QuickBooks 2. Open Control panel and head to the programs and features tab. 3. Select uninstall/repair tab. 4. Click on next tab and click on repair now tab. 5. Reboot the system and check if the issue continues
What does QuickBooks error C 387 mean?
QuickBooks error code C 387 occurs when you try to access the company file. It is an unexpected error that occurs due to template invoice issues.
How do I fix errors in QuickBooks desktop?
You can try fixing the errors by using the Install diagnostic tool. 1. Open Tool Hub and access installation issues 2. Open Install diagnostic tool and perform on screen steps. 3. Let the tool identify and fix the issue for you. 4. Reboot the system and check if the issue persists
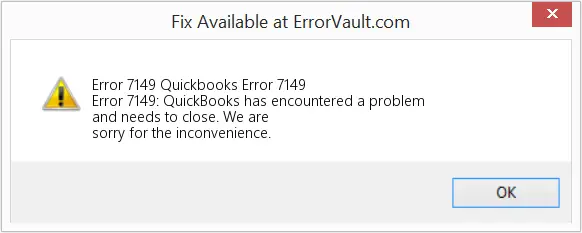
Are you interested in knowing what causes QuickBooks error code 7149 and what solution steps can be performed to deal with it? If yes, then this post can be of great assistance to you. This article is going to talk about the complete set of steps that can be used to tackle through such an error. The QuickBooks error code 7149 is basically a runtime issue that is seen in case of any damage in program files or with the registry files. As a consequence of such an error, the system might crash down, especially when the user tries to open QuickBooks.
This error code comes up with an error message stating “QuickBooks has encountered a problem and needs to close. We are sorry for the inconvenience.” This particular error can be seen due to a couple of reasons which we will be discussing further in this article.
The user is suggested to read the article till the end. Or the user can also get in touch with our QuickBooks support team for any further tech assistance. The user can contact us at +1-888-510-9198, and our team of technically sound QuickBooks professionals will ensure to provide immediate assistance.
The user can end up in such an error due to a couple of reasons. These factors include:
One of the basic causes can be if windows files being corrupted by a virus, trojan, or malware
Another reason can be if QB files gets delete mistakenly
Downloaded files being corrupted can also trigger such an error
Or if QuickBooks installation is not fully complete
Corrupted windows registry due to changes such as QB installation or uninstallation can lead to such an error
Signs and Symptoms of QuickBooks error 7149
The user can identify such an error using the below signs:
QuickBooks or the system freezes again and again
Or if windows run sluggishly or the keyboard and mouse inputs are not visible on the screen
Error code itself appears on the screen
Active application or program window crashes
Few of the antivirus software causes hanging of the system or can affect working of QuickBooks. In that case the antivirus or firewall needs to be disabled.
The below stated methods can be of great assistance in dealing with the QuickBooks error code 7149. Thus, make sure to perform the steps one by one and try to deal with this issue:
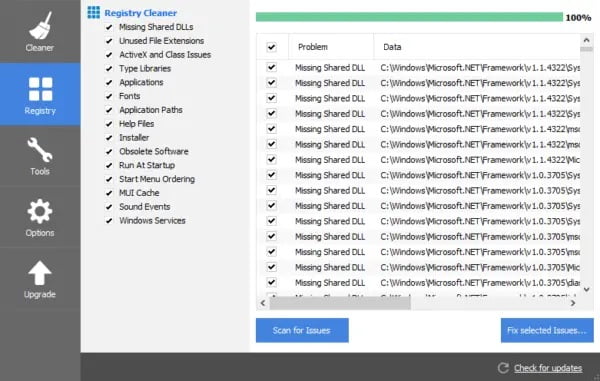
Process 1:Work on the registry keys for QuickBooks and fix them
Often registry keys being corrupted can trigger such an error. Thus, working on them and configuring them can resolve the issue up to certain extent. However, performing the steps alone isn’t suggested unless you are a professional. You should take professional assistance to perform this process.
The very first step is to click on the start tab and also select the run window.
The same is also accessible by clicking on the windows + R
Now, when the run box appears on the screen, the user needs to type regedit into the search bar and click on the enter tab.
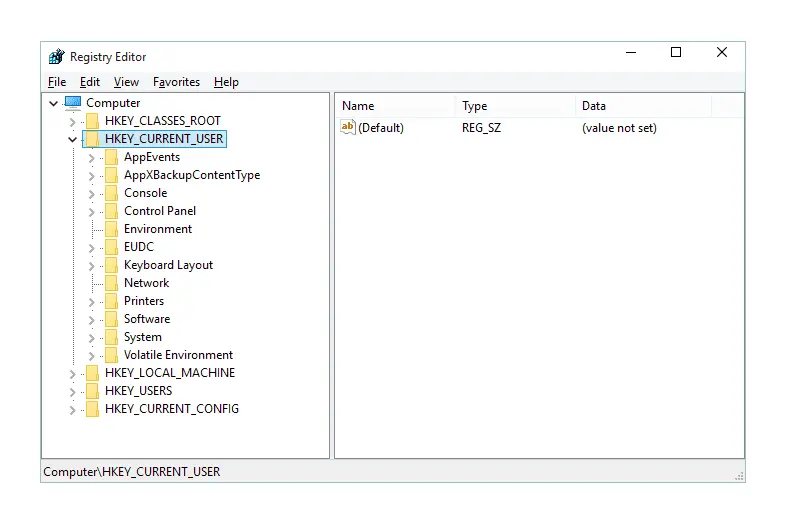
This will open up the registry editor
Check out the installed programs and remove their corresponding keys.
Click on the HKEY_CURRENT_USER.
Follow it up by hitting on Software.
Find and delete the keys related to the names of the already uninstalled apps.
The duplicate keys for the programs that have been uninstalled need to be essentially deleted.
The user neds to click on the Ctrl and F keys together to reveal the Find box.
Type the application’s name within the Find box
Click on the Enter key.
A key will be highlighted if it matches the text being searched.
Delete this key.
One can use F3 to switch between alternatives and subsequently delete them
Remove any unwanted startup components. Continue with the steps below.
Within the Registry Editor, you need to navigate to This P.C. (or My Computer) > HKEY_LOCAL_ MACHINE > Software > Microsoft > Windows > Current Version.
Click on Run, a list of the executable files used during the startup will show up.
Remove the apps as per your preference and requirement, depending on their precedence, in the startup menu.
After performing the operation mentioned above, you now need to perform the same procedure with the paths provided as follows:
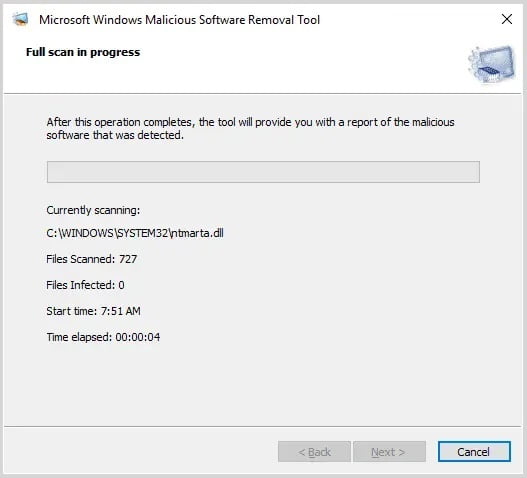
Scanning the system using the antivirus program or windows security essentials is suggested, as sometimes the issue can be seen due to any sort of malware. If there is any threat or malware displayed, then remove it completely or try to restart the system. After performing the steps, the user should try opening QuickBooks.
Process 3: Fix or reinstalling QuickBooks
At first, the user should open control panel and then click on add or remove programs. And look for the same in the start menu
The next step is to navigate to QuickBooks and then right click the same
After that click on repair and then follow on-screen instructions
At the end, the user should restart computer and also try opening QuickBooks.
Process 4: Disable the antivirus services for sometime
In this process, the user should look for the icon of the antivirus software in the taskbar
Once done with that, the user should right click the icon
And then, from the options that come up on the screen, look for the disable option and hit ok
The next step is to try opening QuickBooks
Open the system in the safe mode and then open the system and update it
This will probably fix the issue
Process 5: Close programs
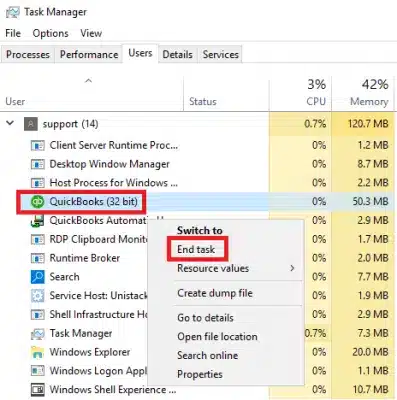
The user needs to first open the task manager by clicking on ctrl + alt + del
The next step is to see the list of programs running
Move to the processes tab and stop the programs one by one and also click on end process tab
The user should then look for the message
Perform the steps to reinstall the application
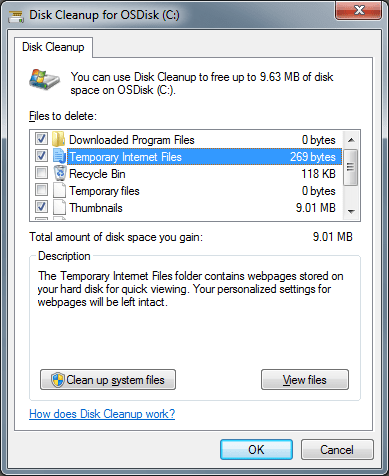
Process 6: Go for Disc Cleanup
Cleaning system junk with Disk Cleanup
It should be noted that a low free space on your PC can lead to QuickBooks error code 7149. Thus, clearing up space on your hard disk is suggested. The user can make use of Disk Cleanup to clean up the primary directory. The steps to be followed are as follows:
The very first step is to access Windows Explorer by hitting Win + E keys buttons.
And then right-click on the C drive and head to Properties.
Also, click on disk cleanup tab to commence the clean-up process
This article is a detailed piece of writing to deal with QuickBooks error code 7149. Performing the steps above might help the user to fix the QuickBooks error code successfully. However, if for some reason the user isn’t able to deal with the issue or if the user is stuck at any point of time, then contacting our QuickBooks support team. We are a team of technically sound QuickBooks professionals, who work round the clock to provide the best possible assistance round the clock to all QuickBooks users. For any kind of technical Support for QuickBooks Enterprise reach us at [email protected] or dial our toll-free number +1-888-510-9198.
The user can try eliminating the QuickBooks error by performing the steps below: 1. Initially head to the tool hub and choose installation issues 2. After that, choose QuickBooks install diagnostic tool 3. When the tool finishes, reboot the system and start QuickBooks desktop and then open the data file
How do I troubleshoot error 7149 in QuickBooks?
The user can try to fix the error code 7149 using the methods below: 1: Repair/Reinstall QuickBooks. 2: Resolve the Corrupt Windows Registry Key. 3: Remove Malware. 4: Disable antivirus software.
How do I restart QuickBooks desktop?
This can be done by double clicking on the ‘logoff’ icon on the hosted desktop. Alternatively, you can right-click on the Start Menu and select Shut down or sign out > Sign out. If done correctly, this will clear your session and restart QuickBooks.
Eager to know what can help you in fixing “QuickBooks search is not working” glitch. The search bar in QuickBooks that has a magnifying glass symbol usually allows the users to look for files, customers, transactions, entries, and various o6ther things. When this option fails to work in QuickBooks, then it often takes more time than usual for these things in the program manually. QuickBooks online and desktop application have one very essential feature which is search. Failure of this search bar can create a lot of issues for the users.
To get a better understanding of the causes and fixes to this particular technical glitch, all you need to do is to go through this article carefully. However, if you need our assistance at any point of time, then getting in touch with our QuickBooks personnel at +1-888-510-9198 is recommended.
Registry errors in QuickBooks are also responsible for the occurrence of such an error.
Often the firewall and third-party software can also lead to such an error
Moreover, if the QuickBooks search index file is damaged, then occurrence of such an error is probable
Effective solutions to fix QuickBooks search is not working Issue
The user can perform the below solution steps to successfully fix the issue.
Procedure 1: Uninstalling and reinstall QuickBooks
One might experience issues in QuickBooks due to various reasons and in certain situations clean installation might work wonders. Thus, a user can perform the steps to clean install in QuickBooks and check if the issue gets fixed by doing so. The major steps to be performed in clean installation are as follows:
At first, the user should uninstall QuickBooks
Later on, run the clean install tool and rename the folders
Procedure 2: Change the name of QuickBooks Search Index File
The user need to first close QuickBooks and click the Windows Start button
The next step is to type *.SearchIndex in the search box and hit Enter
This will navigate the user to the folder containing a QuickBooks company folder where he/she may locate qbw.SearchIndex Folder
The user should then add .old at the end of the folder name
Once done with that, the user should reopen QuickBooks Desktop and click the search icon tab
After that, the user should reopen QuickBooks from the top-left corner of the Windows
And then, click Update Search Information option
The user will then have to click on OK
Check if the QuickBooks search not working error is resolved
Procedure 3: Disable firewall temporarily
It might happen that the user might come across issues due to firewall disturbing the smooth process. This is where the user is suggested to temporarily disable the firewall. This can be done by heading to the control panel.
Procedure 4: Repairing the damaged windows registry
Damaged windows registry can be a major factor triggering such an error. Thus, repairing these registries can help in resolving the issue up to certain extent.
Coming to the conclusion, we expect that the reader might be able to deal with the error successfully making use of the steps that we have tried to mention in this article. But if in case the user isn’t able to tackle out the QuickBooks search is not working error, then contacting our QuickBooks Support professionals at +1-888-510-9198 is suggested. We are a team of professionals who work round the clock to provide the best possible assistance immediately to all QuickBooks users. Feel free to contact us for any query.
FAQs Related to QuickBooks Search not Working
Why can’t I search in QuickBooks?
In case you are using QuickBooks online, then restarting will refresh the browser and related processes to help fix the issue. In order to fix the error, you can try restarting the operating system, whether Mac or windows.
How to do a search in QuickBooks?
You can search for all data in QuickBooks using the steps below: 1. At first, choose edit tab. 2. After that, go for find. 3. You now have to enter what you are looking for in the search box. 4. It should be noted that QuickBooks matches and displays all the results within different areas of the company file. You need to head to the left panel and see the search results.
Why can’t I find a match in QuickBooks online?
At times, the transaction was recorded to the wrong bank account in QuickBooks. Or, the match is not located with the find match tool as the dollar amount is higher than the bank transaction. In that case, the user needs to edit the original transaction and further refresh the bank feed window.
How do I find matches in QuickBooks?
You can try to match with an existing transaction. 1. First find a downloaded record 2. Choose the downloaded record to expand the view 3. Now, review the matching records found in QuickBooks for the possible matching transaction already entered in QuickBooks 4. Choose the link next to each match to get more details.
Steps to Download Bank Feed transactions in QuickBooks Desktop
Searching for the procedure to download bank feed transactions in QuickBooks? Well, your search ends right here. The user can start with the download bank feeds transaction process in QuickBooks only when completed the process for setting up accounts for bank feeds. Note that, the user should ensure to have already performed the steps to backup the QuickBooks company file before performing the steps mentioned below. The user can go through the article to find out the complete set of steps to download the bank feed transactions. For any queries, the user can get in touch with our QuickBooks support team at +1-888-510-9198, and our experts will ensure to provide the user with immediate assistance.
Before performing the steps, it is essential to keep some points into consideration.
It should be noted that the web connect will only work with .qbo files. Files such as QFX, QIF Quicken files won’t work. The third-party applications available on the Intuit Marketplace can handle the QIF files, which makes the process easier for the user.
The user should keep in mind that he/she cannot download transactions into the same QuickBooks company file more than once. However, if the bank might be able to reopen the transactions on their side, then the user would be able to download them again. For any query, contacting the bank is recommended.
Steps to download the transactions using direct connect
The steps below can be helpful in downloading the transactions, but before that note that the first time when you connect, the software will automatically download the maximum number of transactions that are available from your bank. This depends on the bank, and can vary to a year of historical transactions. Majority of the banks might only download the previous 90 days. Continue with the steps to download transactions:
The very first step is to move to the banking menu
After that choose bank feeds centre from the bank feeds option
The user should select the account to connect from the bank accounts list. It is optional to edit or delete items by clicking the drop down, in the send items to the bank section
Click on the download transactions.
It should be noted that if the user has already downloaded the transactions, and haven’t reviewed them yet, then selecting transaction list is recommended
Now, select the synchronize tab.
To download transactions for a specific account only, the user should select sync this account tab.
The next step is to enter your Pin or password for connecting to the bank in the access to window
And lastly, the user should click on ok tab
The user will have to match or add any new ones after downloading the transactions. Also, the user can delete the remaining transactions or just delete the statement, but once deleted can’t be downloaded again to avoid the chance of duplicate entries.
The point to be considered is that some banks will let the user to set a particular date range for the downloads. In case the user’s bank doesn’t provide this option, then he/she can automatically get the maximum number of transactions available the first time he/she download. This can range from 30, 60, 90 or even for more days as per the bank rules. The user can perform the below steps to download using web connect.
In case the user is using QuickBooks desktop
The first step is to move to the banking menu
Select bank feeds and choose banking center
Search for your bank and tap on the download transactions.
This will open a browser window to the bank’s website
The user will then have to sign in to the bank’s website to download the web connect file
In case the user is outside of QuickBooks
The user will first have to open a web browser
And then move to the bank’s website
After that sign into your bank account by practicing the normal process
The next step is to download the transactions as QuickBooks web connect .qbo file
The user should keep in mind that the method for downloading QuickBooks web connect file might vary from bank to bank. If the user isn’t sure about how to perform the process, checking for your bank’s website is suggested
Or the user can reach out to the nearest branch for help
The user will then have to perform the steps to import it into QuickBooks desktop
The above article is written with an intention to provide the best possible information related to downloading bank feed transactions in QuickBooks. If in case the user is stuck at any point of time or the user needs our assistance, then he/she can get in touch with our experts at+1-888-510-9198.
Navigate to the “Banking” menu, select “Bank Feeds,” and then choose your bank. Follow the on-screen prompts to get connected to your bank account and then you can download transactions into your QuickBooks.
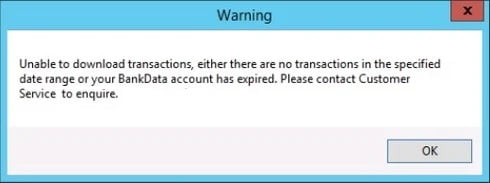
Why can’t I see recent transactions after downloading bank feeds in QuickBooks?
If you can’t find recent transactions in QuickBooks, ensure that you’ve set the correct date range for before downloading the bank feeds. Adjust the date filter to include the time frame that you wish to view in your transactions.