Switching computers? Want to transfer QuickBooks from old computer to a new computer? Well, all this is possible by performing some basic set of steps. To assist in this migration process, Intuit offers a QuickBooks migrator tool that helps in transferring QuickBooks software from their old to new computer with maximum three files, and if the user is using a US version of single-user QB desktop. Not just that, we have designed this piece of writing, sharing the complete details about transferring the software to the new computer. Thus, make sure to stick around the article till the end. Or you can further connect with our tech support team at +1-888-510-9198, and we will provide you with immediate guidance to all sorts of QuickBooks related queries.
Requirements for transfer QuickBooks to another computer
The user system needs a few things to transfer QuickBooks desktop to a new system. Let us have a look:
Make sure to register for the software after the installation and also ensure that the new system is connected to proper internet connection
Also, uninstall QuickBooks desktop from the old system, but before that create a backup of the QuickBooks company file
Keep the QuickBooks software installation disk or the setup file stored on an external device
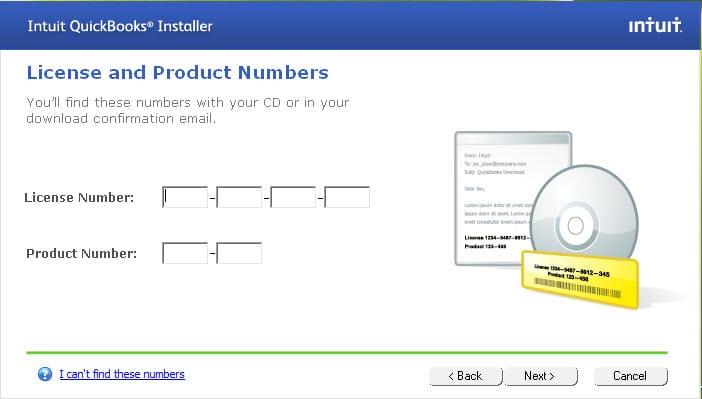
The license and product registration details are other important things
External storage device to store the QuickBooks desktop files
Make sure to have a USB flash drive with enough free space to hold QuickBooks files.
Learn to move or reinstall QuickBooks files to another computer
You can perform the below discussed set of steps to move or reinstall QuickBooks files and data successfully from your old computer to new computer. Let us explore:
How to transfer QuickBooks from one computer to another using Migrator Tool?
Migrator tool is one of the great features of the QuickBooks software. A user can complete the process of transfer in just a few clicks due to this feature only. The transfer will be processed in two parts. However, before beginning the process make sure that you have access to the admin user, as the steps can be performed only the admin users.
How does migrator tool work to transfer QuickBooks from one computer to
another?
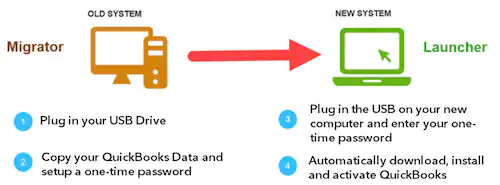
Migrator Tool is also known as Move QuickBooks tool. This tool can be accessed only if you are an Admin user. You will need to create a complex password and need to remember it by writing it somewhere, however, it is required only once.
The migratory tool will allow you to copy max three company files in the USB flash drive along with the supporting documents. The pen drive will physically move the files and the migratory tool will do technical work in background. The tool will also download the right version of QuickBooks Desktop in the new computer and will aid in setting up all the files.
Note: Using migratory tool will not delete any file or reformat your system.
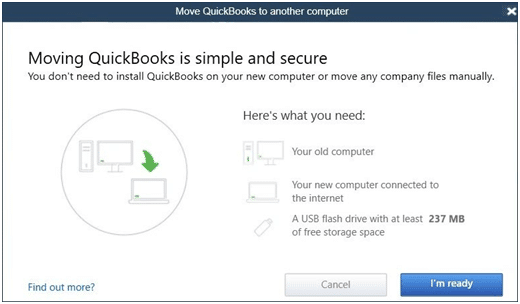
Requirements of migratory tool to transfer QuickBooks to new computer:
There should be an internet connection to the new computer.
The pen drive should have a good amount of empty space. Free space around 150-200 MB is usually required.
Data which gets copied through migratory tool while moving QB to new
PC:
All the data required to run QuickBooks Desktop gets copied, however, the list is as below:
Version and other QB Desktop details
Recent company files- max 3 files with supporting documents
All other related files and custom templates and forms
We have tried to sumnmarized the steps for old and new computers below. Let us evaluate them one by one:
Step 1: On the old Computer
At first, you need to download and save the QuickBooks Migrator tools on a USB flash drive.
After that, you can download it from the official Intuit Website.
Once done with that to the old system plug in the USB drive.
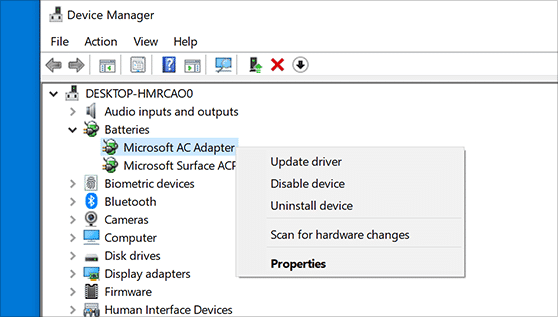
The next step is to open QuickBooks and move towards files> utilities> move QuickBooks to another system.
And further select the option I’m ready.
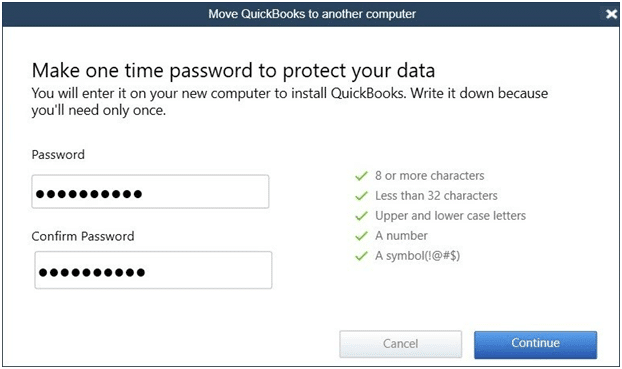
QuickBooks will now ask you for creating a complex password in order to secure the company files in the USB flash drive.
Also, remember that it is a one time password and you will require this password when you plug in a USB into the new system.
You now have to pay attention to the steps that are visible onscreen.
This might take some time, as it mainly depends upon the size of the company files.
Step 2: On the new computer
Here you need to insert the USB drive. The Migrator tool won’t run all alone because of the windows security protocols and this is the explanation that you want to manually run it.
To start the migrator tool, you can open the flash drive and search for Move_QuickBooks.bat file record and later on run it.
Now, enter the one-time password made before, and wait for the tool to finish the process.
QuickBooks migrator tool file will delete upon the completion of the process and other data in the USB will stay untouched.
You can change the name of the files on the old system.
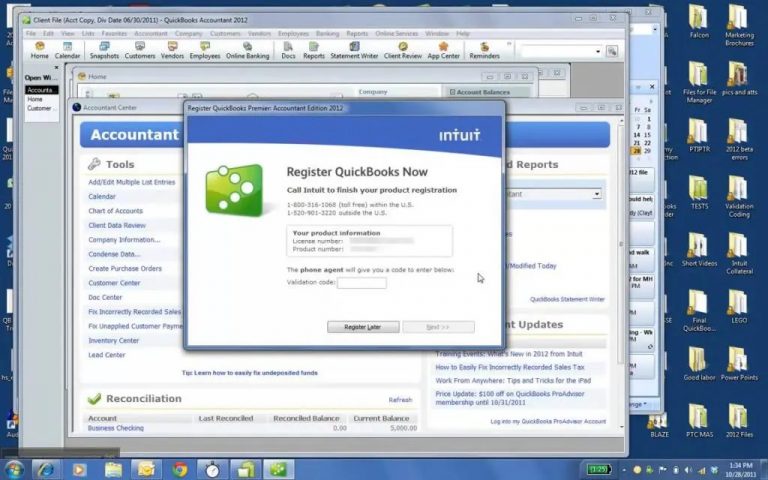
And can further move to the help menu and click on the register QuickBooks.
You can enter all the necessary details like phone number, postal code, and license key for finishing the registration.
What is not copied using migratory tool when QuickBooks is transferred from old to new computer?
Multi-user set configuration.
Payroll or payments services set up in QuickBooks will not be copied as per Intuit policy to protect data.
Intuit Data Protect needs to be uninstalled in the old PC and reinstalled in the new PC
Company files which have not been recently opened will not be copied.
Manual backups created by the user will not be copied.
Manual Procedure to transfer QuickBooks desktop from old computer to a new computer
The users can manually transfer QuickBooks from old computer to new computer. The steps involved in this process are as follows:
Step 1: Create a backup of the company files and QuickBooks license
The first step is to create a backup of company files and QuickBooks product license to the external storage device
The next step is to install the latest or current QuickBooks version to the new system
Once done with that, download and restore the backup file to the new system
After that uninstall the QuickBooks software
Step 2: Restoring the backup of the company files on the new system
Initially, the user needs to install the QuickBooks on the new system
And then, insert the storage device
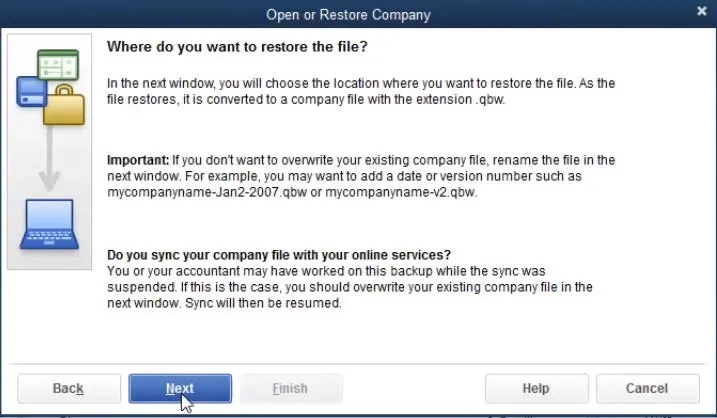
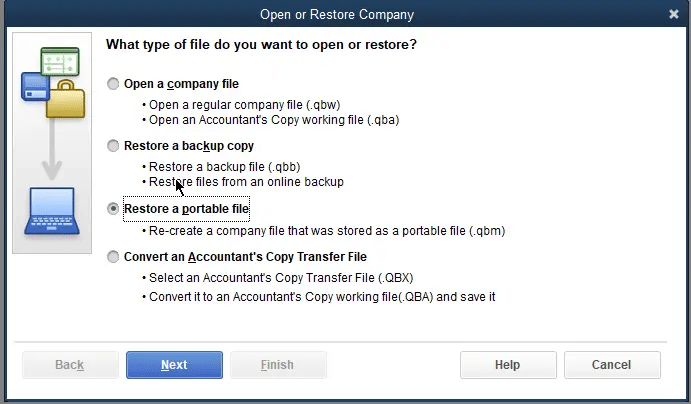
Followed by opening QuickBooks and navigating to the file menu
Later on, choose the open and restore company option
Also, click on restore a backup copy and also click on next tab
After that click on local backup option and head to the backup file created in the old system
The last step is to pick a location in the new system for saving the backup and also click on save tab
Winding Up!
There is no fix time on how much time will it take to complete the process. It completely depends on the internet speed and size of company file. In case you face any issue while following these steps, you can contact our QuickBooks enterprise support team or accounting consulting professionals at toll-free number. i.e. +1-888-510-9198.
FAQs Related to transfer QuickBooks from old computer to new computer
Can I transfer QuickBooks from one computer to another?
You can try to transfer QuickBooks from one computer to another using the steps below: 1. Move to file menu from QuickBooks. 2. Choose utilities and further go for QuickBooks to another computer. 3. Go for I’m ready and then create a one-time password. 4. Perform the on-screen instructions to choose the USB Flash drive you’ll use
Can QuickBooks be installed on two computers?
QuickBooks with a single license can be accessed on multiple computers. However, files are only accessible to a single user, a maximum of two computers, but one at a time.
How long does QuickBooks migration tool take?
90% of conversions are processed in under 12.5 minutes. Whereas, 100% is completed in 72 hours. This usually completes within 45 minutes. However, the data is held in secure AWS servers during migration and destroyed once the conversion is approved.
How do I transfer data from old QuickBooks to new?
To do this, you need to perform the steps below: 1. At first open your new version of QuickBooks desktop 2. Move to the file menu and then choose open or restore company. 3. Choose open a company file and further hit next. 4. In case you have a backup company file instead of a company file, then choose restore a backup copy.
Suddenly encountered error code 6094 in QuickBooks and can’t find a way to culminate it? Well, without a doubt, QuickBooks is a well-built accounting software with advanced features that can assist businesses in performing their daily accounting and bookkeeping activities. However, it is an undeniable fact that it is prone to certain sorts of errors. These errors can be at times tiresome to deal with. One such error that we are going to highlight in this piece of writing is the QuickBooks Error 6094 (6010, 2). It is one among the hundreds of errors. This error usually occurs when QuickBooks fails in launching the web database. In addition to this, you can also face this error if there are some anti-virus programs running in your system, which may include AVG Anti-virus, SpyHunter Malware Blocking, PC Tools Internet Security, and others. Let us delve in deep to understand further about this issue. Moreover, if you feel the need for expert assistance at any point in time, then feel free to reach out to our technical support professionals at +1-888-510-9198, and our technically sound QuickBooks ProAdvisors will make sure that all your queries are addressed immediately. Having said that, let us further explore the information related to the QuickBooks error code 6094.
Talking about QuickBooks error code 6094, it is basically a 6000 series error that often occurs when QuickBooks fails to launch the web database. The same error can be seen due to the security program updates. It appears on the screen with a warning message that states:
Warning: “An error occurred when QuickBooks tried to start the database server that manages access to the QuickBooks company file. Error (-6094,0)”.
There can be a handful of factors instigating this error, which we will be elaborating later in this segment along with the fixes for the same. Let us explore together!
What triggers QuickBooks Error 6094?
The causes due to which QB Error 6094 (6010, 2) takes place are as follows:
Anti-virus programs such as AVG Anti-virus, SpyHunter Malware Blocking, PC Tools Internet Security are the main reasons behind this error.
When the user tries to launch the database server which manages access to the QuickBooks Company file, then this error can occur.
Now that you know the reasons why such an error occurs, it is time to implement the right set of steps to culminate the error permanently. However, you can save your time and effort by consulting with our QuickBooks data recovery team. Let us examine the methods one by one:
Solution 1: PC Tools Internet Security
Restore all the ‘infections’
First of all, open the settings menu and choose ‘Quarantine’
Now, restore all the necessary items
In the meantime, click ‘Yes’ and the click ‘Ok’
After this, you will have to create an exception to avoid QuickBooks directory.
Go to PC Tools Internet Security menu and Click on Settings
Now, choose Global Action List and add files which you want to eliminate from scanning
Now, click OK
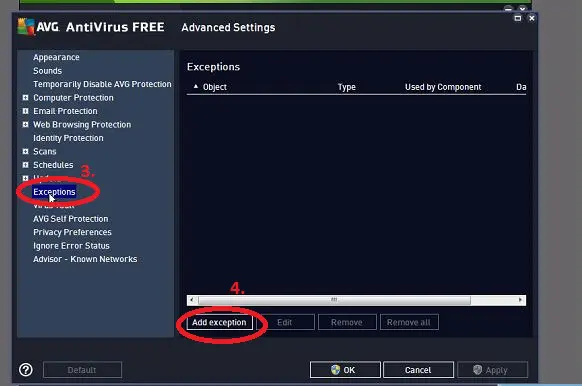
Solution 2: Configure the AVG Anti-virus
Here is the second solution that can help you resolve the QuickBooks Error Code 6094. This solution says that you would need to remove QuickBooks directory from being skimmed.
Close the QuickBooks Desktop and start AVG Anti-Virus User Interface.
Double-click on the Resident shield and click on Manage Exceptions
After this, click and add the path C:\Program Files\Intuit ( Note: The path will be added only when the QuickBooks is installed in a different folder)
After all the above steps, save the changes and click OK ( Note: Make sure that you restore all the QuickBooks files that AVG Anti-Virus quarantined)
Now check if any of the QuickBooks files are quarantined or not.
Click on History in the AVG Anti-Virus User Interface
Select Virus Vault and select any quarantined QuickBooks File.
For example, qb.exe, qbw32.exe, qbdbmgr.exe
Restore all the important files
Now, restart your QuickBooks Desktop.
Verify all the renamed files in the installation Directory
Close QuickBooks Desktop
Go to install directory and click on C:\Program files \Intuit\QuickBooks folder to check the files to be renamed
QuickBooks might recognize antivirus as a threat and further transfer crucial QuickBooks executable files into the QuickBooks folder. The steps listed below can give you an idea about how you can restore QuickBooks from quarantine.
First of all, close all the unnecessary programmed that are running in the background.
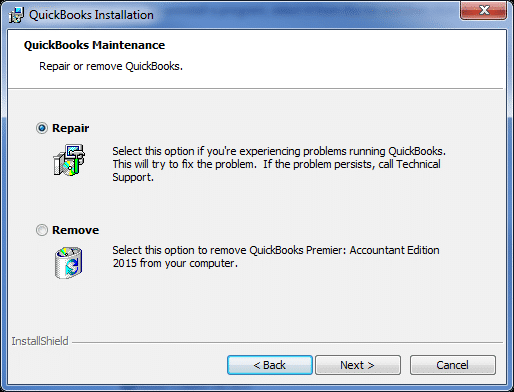
At times, a mere reinstall can fix the issue up to a certain extent, and clean installation is an advanced form that tends to eliminate different errors from their root causes. The steps that can be performed to clean install QuickBooks desktop.
You can run it from the desktop icon, and further navigate to the section under program installation issues.
In order to completely reinstall the program, try to choose QuickBooks clean Install tool and stick to the on-screen directions.
Try rebooting QuickBooks and check if the issue gets fixed.
We recommend you contact support professionals in case you are unable to fix the issue.
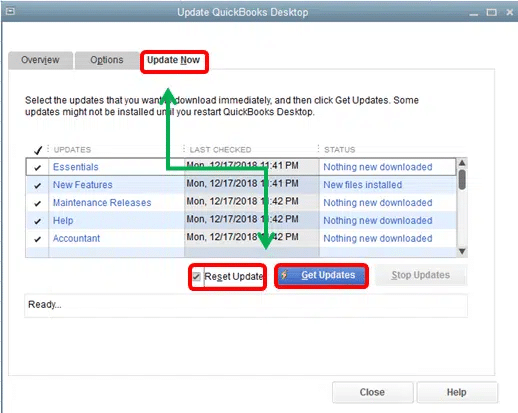
Solution 5: Update QuickBooks to latest release
Often outdated QuickBooks can trigger certain errors in QuickBooks. Thus, it is essential to ensure that the software is updated to the latest release. The steps involved in the procedure to Update QuickBooks to Latest Release are as follows:
Begin the process by launching the QuickBooks desktop software.
You now have to head to the help tab.
Later on, move to the QuickBooks desktop update option.
You can also click on the update now tab.
And choose the get updates tab.
The update process usually takes time.
Eventually, close and re-open QuickBooks to check if the issue is rectified or not.
Solution 6: Remove QuickBooks files from the list of blocked files
You can try removing the blocked files from the list of blocked files, in order to fix the error code 6094 successfully
The very first step is to launch the SpyHunter Software.
Furthermore, you need to click on the System Guard.
Heading forward, choose User Added tab and further look for the QuickBooks files.
You now have to set the QuickBooks files status as Allowed.
In case you are unable to find the QuickBooks files, then simply head back to the added tab.
Moving forward, verify PUP.
And if you find any QuickBooks file in the list, then set its status to allowed.
Moreover, set the status as allowed if you found QuickBooks blocked under PUP.
With the above three solutions, you will be able to get rid of QuickBooks Error 6094. But in case you still face problems, then you can contact us immediately on our QuickBooks enterprise support phone number .i.e. +1-888-510-9198. This number is toll-free and our executives are available 24*7 to assist you.
FAQs
How do I fix error 6094 in QuickBooks?
Try to implement the general steps to fix such an error: 1. Update QuickBooks to the latest release. 2. Try updating the Antivirus software. 3. Access the Antivirus Vault. 4. Access the quarantine folder. 5. Also, restore qbdbmgr.exe and qbdbmgrn.exe files
What is QuickBooks error 6094?
QuickBooks error code 6094 is associated with the database service and would further prevent the service from starting.
How to disable antivirus to fix error 6094 in QuickBooks?
In order to disable the antivirus, you need to simply right-click the antivirus icon on the taskbar, and further click on the option to temporarily disable the program. Later on, try to restart the database service.
What is error code 6010 in QuickBooks?
QuickBooks error code 6010 is a common error that one might come across if access to the network is denied. Moreover, if the antivirus blocks QuickBooks from connecting to the network, then experiencing this issue is probable.
Learn These DIY solutions to fix QuickBooks Display issues on your Own
QuickBooks assists tens of millions of business owners around the globe to meet their goals. It’s fast and easy to use. The software’s competency and overall user experience, however, is at the best when the proper display of QB is accessible. For many reasons, users may sometimes face system issues regarding ‘high-resolution‘ graphic displays (1920*2000 screen resolution or more).
This blog post will let you know of the symptoms, reasons, and troubleshooting steps to help you fix QuickBooks Display Issues. However, you can contact to our QuickBooks online support team at +1-888-510-9198to save your time & efforts.
Early signs of Display Issues in QuickBooks
Transaction form doesn’t fit the computer screen
Sizing icon at the top right corner of the screen does not reflect
A field overwrites and hides its label
Buttons are missing
Huge fonts
Home page is blank
Screen becomes unclear when you maximize or minimize it
Reasons behind the QuickBooks Display Issues
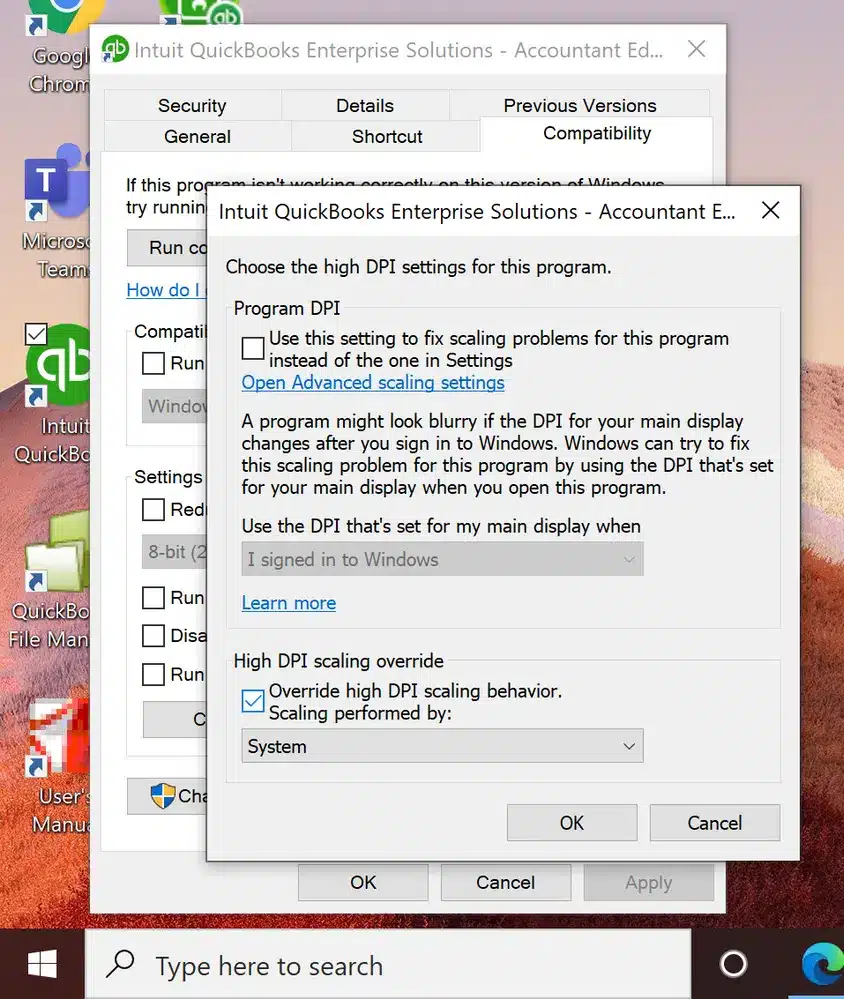
QuickBooks accounting software is designed for Dot per Inch – the default windows setting of smaller (less than 100%) DPI value. Systems with superior resolution display include 125 to 150% DPI Settings and therefore sometimes cause QuickBooks Display issues.
Changing DPI settings is important as QuickBooks accounting software is designed to function with the Windows DPI’s Default settings. Therefore, if you do not use Default values, it may face issues.
Windows 7
Right-click on Desktop and select ‘Screen‘
Choose display settings and click make text and items larger.
You can also select the option next to ‘smaller-100%‘
Save changes (CTRL+Skeys) and reboot the system for the change to take effect
Windows 8/8.1
Right-click on Desktop and select ‘Screen‘
At the bottom of Display settings, select ‘Make text & other items bigger or smaller’
Unmark ‘allow me to select one scaling level for my displays’
Drag the slider to smaller than 100% to make sure that the text and other items are of normal size
Save changes (CTRL+S keys) and reboot the system for the change to take effect
Windows 10
Click the ‘Start‘ button and go to ‘Control Panel‘
Press ‘Windows +X’ keys on the keyboard.
Select ‘Appearance and Personalization’
Go to ‘change item size section’ and tap on ‘Set custom scaling’
From the drop-down list, select 100% and press ‘OK‘ (You can also drag the right/left to adjust the setting)
Click ‘Apply‘ and sign out for changes to take effect.
Solution 4: Modify the screen resolution setting of the computer
Windows 10:
Right-click anywhere on the desktop (except on icons) and select ‘Display‘ option
Select ‘Display‘ on the left pan and then select ‘Advanced display settings‘
Select ‘Display.’ In case there is more than one display attached to your PC, select ‘display you need to modify’
Go to ‘Resolution section,’ and click screen resolution that should be at least ‘1024 x 768‘ or higher.
Click ‘Apply’
Click ‘Keep the changes’
Important: This process allows you precisely 15 seconds to keep the modifications or revert before the window goes back to its previous resolution. It’s recommended to keep the screen resolution of 1920×1080.
Windows 8, 8.1 and 7
Right-click anywhere on the Desktop (except on icons) and select ‘Display‘
Select ‘Screen’ settings.
Find the resolution drop-down menu and select a ‘resolution of 1024x 768‘ or higher as QuickBooks doesn’t work in the resolution setting of lesser than 1024×768.
Choose ‘OK‘.
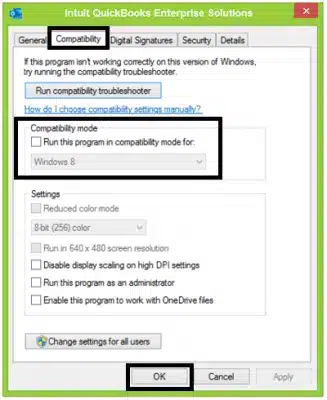
Solution 5: Configure compatibility settings
The user needs to launch the internet explorer and then click on the tools and also choose compatibility view settings
One done with that; the tools menu can be accessed by pressing ALT + T.
Now, verify that the add this website option doesn’t include intuit.com or qbo.intuit.com
Check that the display all websites checkbox is not selected in the compatibility view menu
Uncheck the box next to include updated website listings from microsoft
Close the internet explorer afterward
Check to see whether the display issues in QuickBooks have been fixed by opening the software
Solution 6: Close process running in background
Under this step, you need to reboot the QuickBooks
Click on the windows start tab and also head to the start menu
Once done with that, type in task manager and open the same
You are then required to click on processes tab
This will show the current processes running on the system
Look for a process QuickBooks (32-bit) or exe
Once you spot the process linked with the QuickBooks software, then select the same and click on the end processes tab
Reboot the system, and launch QuickBooks and check if the display issues get fixed.
Solution 7: Change the QBW.ini file
The very first step is to move to the windows option
Type or copy and paste the correct file path for the QuickBooks version and click on enter tab.
We have enlisted four of the most useful solutions in this post to help you fix QuickBooks Display Issues. However, if the problem persists, you can speak to our QuickBooks premier support experts on our toll-free number i.e. +1-888-510-9198 and resume your work within minutes.
Frequently Asked Questions!
How do I fix the screen size in QuickBooks?
To fix the screen size, you can perform the steps below: 1. The user needs to click and drag the QuickBooks window until the upper-left corner of the window meets the upper-left corner of your monitor. 2. After that click and drag the lower-right corner of the QuickBooks window to manually adjust the screen size. 3. Double-click the QuickBooks title bar to maximize the window.
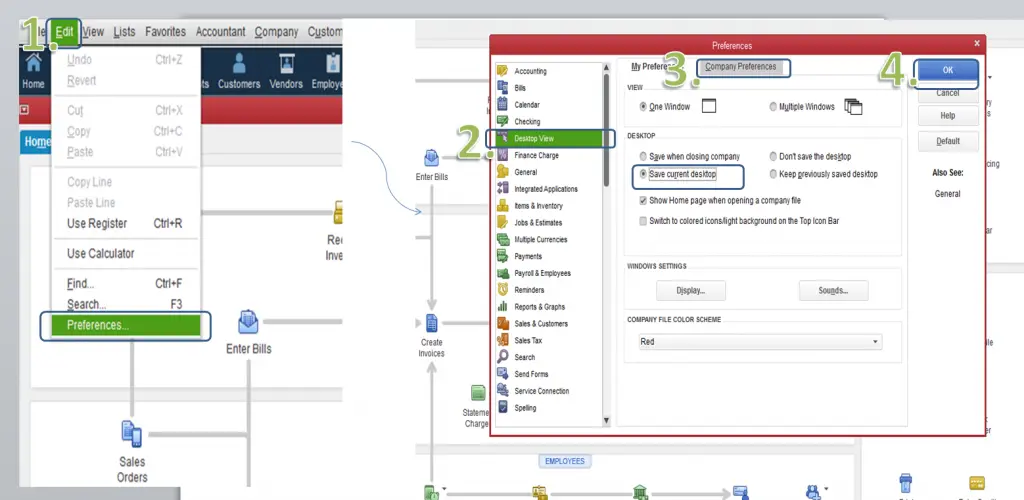
How do I change the display in QuickBooks?
You can customize your QuickBooks toolbar using the steps below: 1. Go to the QuickBooks menu, then select Preferences. 2. Select Toolbar/Tabs. 3. Select the changes you want to make: Select Display Toolbar if you want to see the toolbar while using QuickBooks. Then, select how you want it to show up: Vertical or Horizontal.
How do I fix display issues in QuickBooks?
The user can try performing the below steps to normalize the display issues: Step 1: Adjust the display settings. … Step 2: Change the View Preferences in QuickBooks to resolve QuickBooks 2020 Display Issues. … Step 3: Modify Windows DPI Settings. … Step 4: Change the Screen Resolution settings on the computer.
If you are a QuickBooks user, then backing up the data or the company file is one of the best features offered by this software. This feature not only helps in case of data loss, but also ensures safety of the data from any kind of accidental data loss. However, there can be situations when QuickBooks is unable to backup the company file error, which means that the QuickBooks software is unable to create the backup of the crucial data. In case your company file is unable to back up the data, you might not be able to recover it in emergency cases.
Well, need not panic, as we have come up with this article to assist you in resolving this issue and also finding out the hidden reasons behind such an error. In case you need immediate help or technical support, you can dial our toll-free number +1-888-510-9198 to save your time and efforts, and we will ensure that you are provided with the best possible care and solutions.
What is QuickBooks unable to backup company file error?
QuickBooks may fail to back up the company file, if the backup path is unavailable or faulty. There can be various other situations when you can experience QuickBooks company file fail to create backup error. This error usually appears on the screen with a warning message that states: QuickBooks was unable to back up your company file. QuickBooks could not create a disk image. QuickBooks could not copy the company file. Regular backups are a must in QuickBooks to avoid any sort of data issues, especially when the data is lost. However, when QuickBooks fails to create a backup file, it can create issues for the user and must be dealt with immediately.
Do you know what is back-up of company file?
A few of the non-technical QuickBooks users might not be well aware of the fact what actually is backing up of QuickBooks company file. Basically, a backup is the data that the user needs to re-create the company file. Backing up the company file rescue the users in case of accidental data loss. It is always recommended to backup the company file on a regular basis in order to avoid any kind of issues later on. At the time of backing up the data or the company file, QuickBooks users might encounter certain errors, which include error messages:
You can face backup failed error in QuickBooks due to the following reasons:
The basic cause of the error is the unobtainability of the storage device that generally stores the backup file.
Any kind of damage to the company file might also lead to such an error.
Another reason can be setting up a wrong backup path leading QuickBooks to freeze.
In case the company file name is having more than 65 characters.
One more reason behind such error can be when the user is trying to take backup on an external hard disk.
If the company file is more than 3GB in size, then such error can also be encountered.
It should be noted that, since the real culprit behind the QuickBooks failure to backup error might not be identified instantly, identifying the most appropriate solution might be difficult at first for the QuickBooks users and this might end up in hit and trial method. However, seeking expert assistance by QuickBooks enterprise support team in such cases is recommended, as they have an in-depth knowledge and experience to tackle such errors in one go.
How to fix QuickBooks Unable to Backup Company File Error?
Talking about the methods to get rid of such error, the QuickBooks users have two to three options. We will be discussing each of the methods along with the steps to be followed in each. So, without wasting much time, let us have a look:
Method #1 Setting up QuickBooks Desktop to use the new company file name
To begin with the method, the very first step is to click on ‘Open or Restore‘ an existing company from the QuickBooks ‘File menu‘.
After that, the user is required to choose ‘Open a company file‘, followed by clicking on ‘Next‘.
The last step is to select the ‘New company file name‘ and tap on ‘Open‘.
Method #2 Backup of company file into an external drive or flash drive
In case the first method didn’t help you much, try backing up the data to an external drive using the steps below. However, you need to first switch to multi user mode.
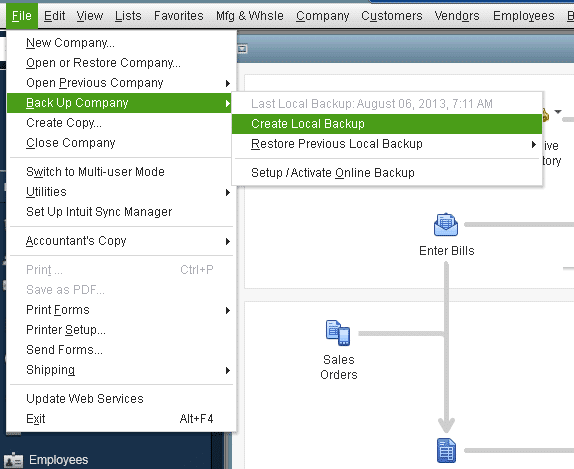
The very first step is to visit the ‘File‘ menu and then choose ‘Save Copy or Backup‘ option.
After that choose the ‘Backup copy‘ and then tap on ‘Next‘.
Once done with that, the user is required to select ‘Local Backup‘, followed by selecting ‘Next‘.
Moving ahead, the user should select ‘Save it now‘, when asked, and then click on ‘Next‘.
After that browse to a location on the local drive and then tap on the ‘save button‘.
Minimize the QuickBooks Desktop and head to the next step.
Now, locate the backup file on the local drive.
Then, right-click on the file, followed by selecting the ‘copy‘ option.
Once done with that, open a ‘Windows Explorer‘ window.
After that, double-click the drive letter that corresponds to the external drive or flash drive to open the same.
Now, right-click on ‘File‘ and then select the ‘Paste‘ option and you are good to go.
Method #3 Rename the QuickBooks Desktop Company file
Before making any kind of changes to your company file, the user is required to take a backup of the same in order to avoid any mess. Also, if the user is using Loan Manager, then he/she is required to recreate the loan manager information once the company file is renamed.
The first step is to ‘launch the Desktop‘ and then open the company file.
Now, the next step is to ‘Press F2 or Ctrl+1‘ which will open the ‘Product Information‘ Window.
Do not forget to note the location of the company file listed in the ‘File information field‘
Now, navigate to the location of the company file. This step might vary with the Windows version, just like:
Windows 10,8.1 and 8: The users of Windows 10, 8.1, and 8 are required to right click the ‘Windows start‘ button and then select the ‘File Explorer’.
Windows 7 and Vista: Whereas, other users are required to right click the ‘Windows start’ button and then select the ‘open windows explorer‘ option.
The next step is to right-click the file and the choose the ‘Rename‘ option
Once done with that, the user is required to type the new company file name and then hit ‘Enter‘. If the Windows prompts the user to confirm the action and then tap on ‘Yes‘.
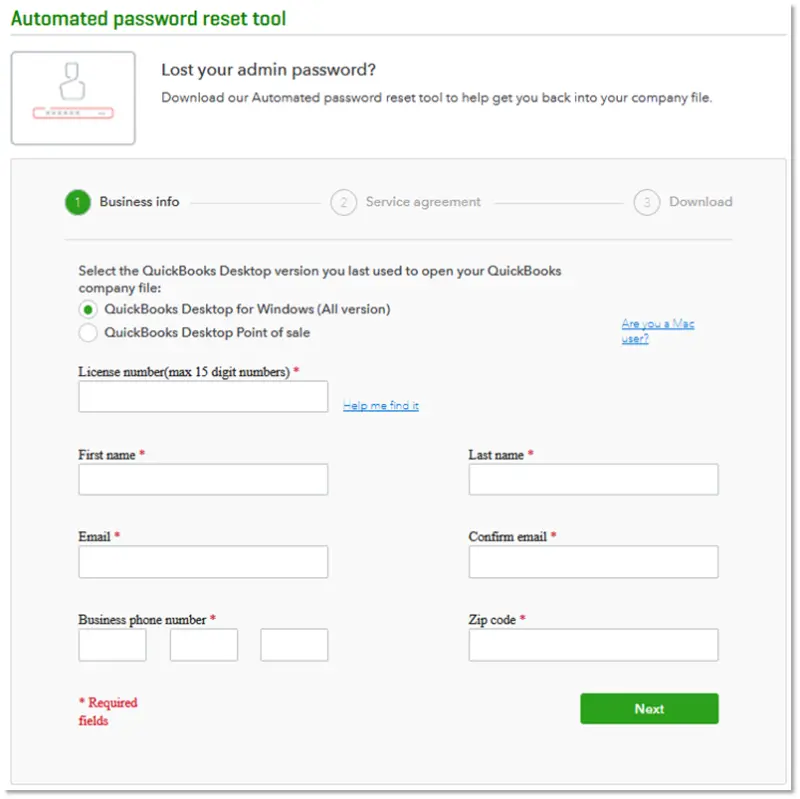
Method #4 Reset the password
Just in case you come across a warning message that states: Your data has not been restored if you failed to enter the correct admin password, then you can perform the set of steps listed below related to the automated password reset tool.
The user is then required to accept the license agreement
Also, run the tool and enter the token number received on mail
Choose the QuickBooks version from QuickBooks desktop products drop down
Select browse for company file
Also, choose the company file you wish to reset the password for
The next step is to enter correct company file admin user name
Lastly, enter the new password and confirm password and choose reset
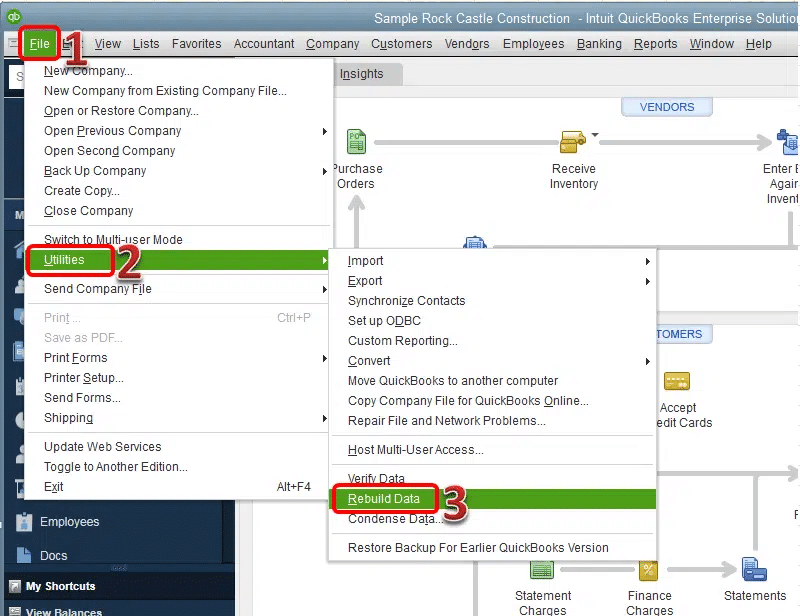
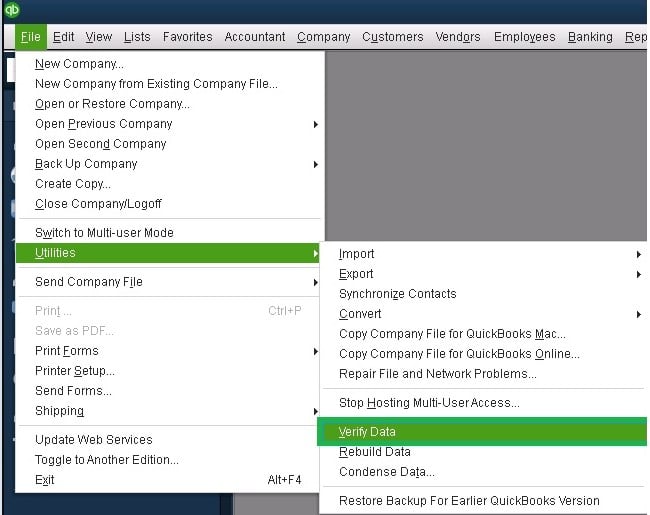
Method #5 Run Verify and Rebuild Utility Tool
QuickBooks allows its users to make use of the verify and rebuild utility to eliminate any sort of data issues. You can try to fix the company file related issues using the steps below.
At first manually repair the QuickBooks file menu by moving to the utilities tab and selecting the rebuild data.
You now have to visit QuickBooks file menu and also move to the utilities tab and verify data tab.
Under this process, save the file in a location that can be accessed easily.
If the file name resembles the other file name, then a message would appear stating: The file name exists. Would you like to overwrite this file?
The last step is to click on No and change the file name.
Conclusion
The backing up of the company file is an unavoidable process. Therefore, if you face any kind of problem while backing up the data or the company file, do not ignore it and immediately look for professional assistance. You can dial our toll-free number .i.e. +1-888-510-9198, and talk to our QuickBooks error support executives regarding QuickBooks associated errors.
FAQs Related to QuickBooks Backup Issues
How do I fix company file issues in QuickBooks desktop?
You can try repairing the company file using the rebuild data tool to fix QuickBooks unable to backup company file error. 1. At first, you need to move to the file menu. 2. After that move to the utilities tab and further choose rebuild data. 3. The next step is to let the tool repair your file 4. After that, hit ok tab. 5. Also, head to the file menu and let the tool check for data issues.
How do I backup my QuickBooks company file?
You can backup the company file manually using the steps below: 1. From the file menu, choose backup. 2. Now, click on the backup company file tab. 3. Also, click on the browse tab to change the filename and indicate the backup location. 4. You now have to click on save tab. 5. Click on ok tab.
How do I upload a company file to QuickBooks?
You can try uploading a company file to QuickBooks using the steps below: 1. Sign in as admin to the company file you need to import. 2. After that, move to the company and choose export company file to QuickBooks online. 3. Once done with that, choose start your export. 4. And also sign in as admin to QuickBooks online company.
How do I update an old QuickBooks company file?
You can try to update your company file using the steps below: 1. Ensure all users sign out of the company file. 2. Open the new version of QuickBooks 3. Move to file and choose open or restore company 4. The next step is to find your company file 5. And sign in to the company file as admin user. 6. Choose update now.
Learn simple steps to convert QuickBooks file from Mac to Windows & Windows to Mac
Moving from QuickBooks Desktop for windows to Mac, or QuickBooks desktop Mac to Windows? Well, in both cases, you don’t need to start over. You can simply convert your file from Mac to windows and vice versa. The conversion process of QuickBooks company file involves a handful of steps, which we will be elaborating in this article right here. Thus, if you are interested in learning more about converting QuickBooks company file, make sure to stick around this piece of writing till the end. Or you can further connect with our QuickBooks mac technical support team via our toll-free number .i.e. +1-888-510-9198, and get answers to all your queries immediately.
Before we proceed further to know the entire procedure, it is better to take a halt and look at some of the important points to keep in mind.
The very first point is that QBES can’t produce a QuickBooks Desktop for Mac backup and the reason for this is that the round trip can’t be used in QuickBooks Enterprise solutions.
Coming to the second point, in case when the accountant has the file, there is no need to enter the into Macintosh file. And if the data is entered into the Macintosh file, then the user might be required to reenter the data when he/she receives the file back.
Another point that the user is required to remember is that the user can change the password when converting a .qbb file which is created using the QuickBooks desktop for Mac. In case the user or the accountant changes the password in order to meet the QuickBooks Desktop for windows requirements, then the new password should be used to convert the file back to QuickBooks Desktop for Mac.
The next point is that the user will further require an admin password to complete the roundtrip process. Well, this is one of the most important points that one can’t avoid missing.
Avoid processing payroll in QuickBooks for Windows version of the file, as QuickBooks for Mac doesn’t have an internal payroll.
Another point that should be kept in mind is that the subscription data, payroll settings, and the payroll data that the user enters will be lost at the time when the file is converted back to QuickBooks for Mac.
The converting procedure is divided into three subsections, namely:
Preparing Macintosh File
Converting QuickBooks file from Mac to Windows
And converting the same file back to QB for Mac.
Each subsection significantly involves a set of steps. So, let us explore each of the subsections and the steps below, respectively.
Preparing
the Macintosh File
The first step is to ‘Copy the company file’ to the desktop.
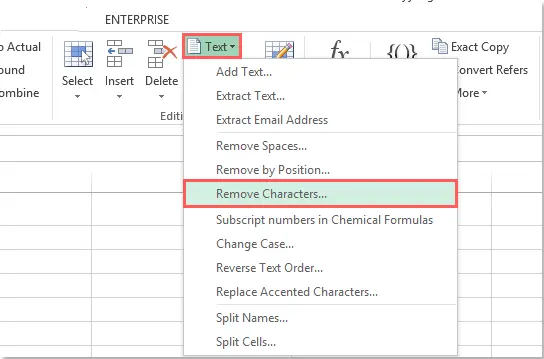
Now, the QB user is required to check for any ‘Special characters‘ in the file name and the company name as well. In case any of the special characters are found, then ‘Rename‘ the file and ensure that all the special characters are removed.
After that, ‘Open‘ the file in QuickBooks.
Once the file gets open, ‘Delete‘ all the ‘memorized transactions‘ and the reports as well.
The next step is to significantly rebuild the company file, by selecting the file option followed by ‘utilities‘ and ‘Rebuild data‘, respectively.
Moving ahead, the user is required to run the custom transaction detail report, and also change the date range to All and enable the ‘Memo‘ column.
For this, the user needs to select ‘Reports> Custom Transaction Detail Report‘
Now, further from the dates drop-down list, select ‘All‘.
And then, from the columns drop-down, choose ‘Memo‘.
Lastly, tap on ‘OK‘ tab to run the report.
The last step in preparing the Macintosh file is to check for any memos with names lengthier than 50 characters or the ones containing any special character.
In case any such name is found, the user is required to ‘Edit‘ the transactions and also remove the memos, followed by rebuilding the file. and with this, the preparation process comes to an end.
How to Convert a QuickBooks file from Mac to Windows?
Once the preparation procedure comes to an end, the next thing is to convert the file for Windows. For this, the user needs to follow certain steps. Let us have a look at the steps:
The first step is to ‘Open‘ the company file in QuickBooks for Mac.
The next step is to significantly choose ‘File> backup to QuickBooks for Windows.‘
Moving ahead, the user requires to specify the file name and also save the location in the ‘Save As‘ window.
Now, click ‘Save‘ and allow the backup process to run.
After that, the user needs to transfer the file to the ‘Windows Computer‘.
The next step is to ‘Open QuickBooks for Windows.’
Once done with the above step, the user requires to select ‘File> Open or Restore Company.‘
Now, choose the ‘Restore a backup copy‘ in the Open or Restore company Window, followed by clicking ‘Next‘.
After that, the user needs to select the ‘Local backup‘ and then tap on to the ‘Next‘ option.
The next step in this process is to find and select the ‘.QBB file‘ that came from the Mac user and then click on ‘Open‘.
The last and final step is to type ‘Yes‘ and then tap on ‘OK‘ when prompted to convert the file.
Steps to Converting the Same file back to the QuickBooks for Mac
Once the above-listed procedures are complete, the next process is to convert the same file back to the QuickBooks desktop for Mac. The steps for this procedure are below:
To begin with the procedure, the user needs to ‘Open the company file‘ in QuickBooks for Windows.
The next step is to choose the ‘File> Utilities> Copy Company File for QuickBooks for Mac‘.
Furthermore, move ahead by saving the file.
After that, ‘transfer‘ the file to the Mac Computer.
The next step is to ‘Open‘ QuickBooks for Mac.
Once done with the above steps, select ‘File> Restore> From a Disk. ‘
Moving forward, the user evidently needs to ‘Select the file.‘
Furthermore, tap on ‘Open‘.
The next step is to click ‘OK‘, when the user is prompted to restore a QuickBooks for Windows file.
Moreover, ‘Enter the name‘ for the restored file.
The last and final step is to click on ‘Save‘.
Steps to convert a QuickBooks for windows file to Mac
It should be noted that you can only move company files from QuickBooks Desktop Pro, Premier, or Premier Accountant Editions. The steps involved are:
Step 1: On windows Computer
At first, Update QuickBooks Desktop for Windows to the latest release.
Now, open the file as the admin.
You now have to head to the file menu and choose utilities tab.
Choose copy company file for QuickBooks Mac, and perform the onscreen steps.
QuickBooks will create a MAC.qbb file.
You might see a message that says It looks like QuickBooks for windows might be a better fit for your company. Make sure to check what data isn’t converted from windows. In case you wish to continue, click on Yes.
Navigate to the folder you wish to save the file in.
After that name the file, and choose save.
Ensure to avoid using special characters in the file name.
Also, move file to your Mac by using any storage device such as USB flash drive, etc.
Step 2: Restore the MAC.qbb backup on your Mac
A MAC.qbb file is a copy of QuickBooks desktop company file that you can restore in QuickBooks for Mac. You can perform the steps below to complete the procedure:
Update QuickBooks Desktop for Mac to the latest release.
You are recommended to close QuickBooks.
Further copy the backup to the documents folder on your Mac.
Once done with that, reopen QuickBooks desktop for Mac, and choose file and also go for open company.
The next step is to choose Mac.qbb file and choose open.
Now, hit ok when asked if you wish to restire a QuickBooks for windows file.
And lastly enter a name for the restored file and hit save tab.
Conversion Error in converting QuickBooks file from Mac to Windows and Windows to Mac
Error in Windows:
When the QuickBooks user opens the file in Windows, then there are chances that the error might occur. The user might get any of the below-listed errors:
Error (-14113, 0)
Error C=116
Solution: If the user is facing any such error, then following
simple steps might work to tackle the error.
First of all, the user needs to open the company file in QuickBooks for Mac
Once done with the above step, the user requires to run the rebuild data utility procedure
And the last and final step is to try to convert the file again.
Errors in Mac:
When the user is unable to open the file in Macintosh after updating QuickBooks Desktop for Mac, there are chances for the error to occur. A pop-up message appears on the screen stating “Cannot Import the Roundtrip file. This was originally created with another version of QuickBooks Desktop for Mac. Please import it into the version with which it was created.”
Solution: To get rid of the error in Mac, the user is required to
follow the steps enumerated below:
The first step is to download and reinstall the previous version and release QuickBooks.
The next step is to restore the backup of the company file from Windows.
Data is not converted from windows to QuickBooks desktop for Mac
Note that QuickBooks for Mac doesn’t support multiple currencies. The accounts and balances are affected by the multiple and home currency settings, you can’t change the settings in QuickBooks for windows company file, you might not be able to convert the data to QuickBooks for Mac. There are certain features that might not convert. This includes the following:
Any data in case multiple current is present in QuickBooks for Windows
Intuit integrated payroll and payroll list items
Online banking transactions that are not acceptable into a register
Online banking aliases
Customized settings for forms such as invoices, estimates, statements, and purchase orders
Multi-user data like usernames
User passwords
Memorized reports
Business planning, expert analysis, and business optimization tools
User added columns to lists
Multiple ship to addresses, preferred send method, and payment information for customer:jobs.
Fixed asset item list
Workers comp list
Transactions type EFP payroll
Budgets creates without associated account
Assembly items
Takes order and back-order tracking
Merchant account services
Unsupported reports
Certain reports that QuickBooks for Mac doesn’t support. In case you want to use them even after knowing that they don’t support, then create most of these reports using the customization, filtering, and memorization.
Profit & Loss Unclassified
Open Purchase Orders by Job
Sales Tax Revenue Summary
Pending Builds
Income Tax Preparation
Profit & Loss Budget Performance
Fixed Asset Listing
Voided/Deleted Transactions (available in Premier versions of QuickBooks for Windows)
Voided/Deleted Transactions History (available in Premier versions of QuickBooks for Windows)
Closing Date Exception (available only in Premier versions of QuickBooks for Windows)
Open Sales Orders by Customers (available in Premier versions of QuickBooks for Windows)
Open Sales Orders by Item (available in Premier versions of QuickBooks for Windows)
Adjusted Trial Balance (available in Premier versions of QuickBooks for Windows)
Adjusting Journal Entries (available in Premier versions of QuickBooks for Windows)
Forecast Overview (available in Premier versions of QuickBooks for Windows)
Forecast vs. Actual (available in Premier versions of QuickBooks for Windows)
All payroll and workers comp reports
Unsupported Report Filters
Note that the following report filters are not supported by QuickBooks for Mac. The balances of balances of memorized reports that were created using filters won’t match balances in the original data file.
Name Email
Paid Thru
Sales Tax Code
Template
Online Status
Printed Status
Voided
Workers Comp Code
Is Adjustment
Moving data from QuickBooks for Mac to Windows and back
At times, the need to convert a QuickBooks file from Mac to Windows and Windows to Mac might arise, due to some or the other reason. The process of converting the file is further famous as round-tripping. Round-tripping is evidently a process which helps the user to send a QuickBooks for Mac file to an accountant with QuickBooks desktop for windows. Note that each program uses a different type of database, the accountant’s copy feature is not available in QuickBooks desktop for Mac.
In such cases, round tripping is of much importance, as it helps the accountant to make changes to a Mac client’s company file. This might sound confusing to some, so it would be better to have a detailed view of the same. Therefore, without further delay, let us learn the entire procedure in detail.
With this, we come to the end of this article, and we hope that after reading the above-enumerated steps, the user might be able to convert QuickBooks file from Mac to Windows and Windows to Mac.
However, if the above enumerated procedure doesn’t work in your favor, then the only option left is to seek professional assistance. You can dial our toll-free QuickBooks support number .i.e. ++1-888-510-9198, and talk to our executives for professional guidance.
We have a pool of experts and professionals who have in-depth knowledge of QuickBooks, and with this knowledge, they make sure to answer every query of the QuickBooks users.
Frequently Asked Questions!
Is it essential to update QuickBooks for Mac before converting files to windows?
Well, it is important to do so, and can use the steps below: 1. The first step is to uninstall the QuickBooks for Mac 2. After that download it again 3. Also, move to the QuickBooks download and update section 4. Look for updates if they are any available 5. Perform the onscreen steps to install the latest version
What is round-tripping?
Round tripping basically is the process to convert files from QuickBooks for Mac to QuickBooks for windows and vice versa.
Can same QuickBooks files be used on Mac and windows?
Well, it is not possible to do, as both operating systems are different and have distinct databases. You can only convert a file present on either of the software to the other and vice versa.