Earlier, employers had to struggle a lot to let the employees access their paycheck data. However, the “View my paycheck” feature introduced by Intuit now lets the users share paycheck details with the employees easily. The QuickBooks workforce further lets an employer invite their employees to view and print the paychecks and W-2s using any system with an internet connection. Not just that, with the workforce the employees can easily access their paychecks along with the timesheets, through TSheets. By simply activating the ViewMyPaycheck option, employees can use their pay stubs and tax details. Activating this feature involves a bunch of steps, which we will be discussing later in this piece of writing. Thus, we recommend you to stick around till the end, and unleash further about Intuit Workforce
If you require further information about Paycheck and QuickBooks Workforce, please feel free to contact QuickBooks Customer Service number+1-888-510-9198. Our dedicated team of technical experts is always available to serve you with the entire process in the least possible time and in the best way.
Introduction to View My Paycheck
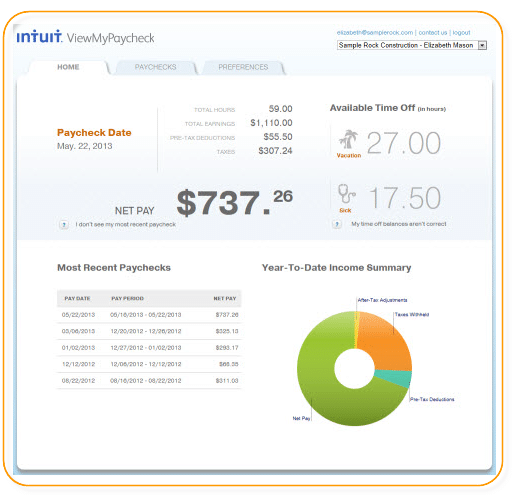
View My Paycheck by intuit is available freebie with any web browser. Or it can be accessed with QuickBooks 2009 and also with later intuit account. This View My Paycheck gives authorization to your employees to access their financial information and payroll data whenever, at anytime and anywhere. They can also use this website as an online portal to access their salary information with ease and security.
Some Basic Characteristics of View My Paycheck are:
View My Paycheck helps in assembling all your financial information like your current and year-to-date earnings and withdrawals. Where you can easily get to know how your salary was calculated and where your money is invested.
Also, you can easily get a copy of your pay stub. By just Clicking on the option Save as PDF to save the PDF copy on your system, and then afterwards you can print it for your records.
Then opt for Preferences and hit a checkmark at the Send me an email when new pay stubs are available checkbox. And this will notify you as soon as a new QuickBooks pay stub is uploaded.
Procedure to activate View My Paycheck in QuickBooks
For activating View My Paycheck follow the basic steps mentioned below:
Start this by opening QuickBooks Online and then opt for the Employees in the menu bar.
After that go for the Manage Payroll Cloud Services option and then tick the View My Paycheck option.
Now create a payroll service PIN, when asked. This PIN is used to send pay stub information. You can now confirm the PIN by re-inserting it.
Now send the payroll information to View My Paycheck
Follow the Steps to send the payroll information to View My Paycheck. They are:
Create Paychecks as created before.
Follow all the on-screen instructions given on the window and when a screen on the window appears to confirm printing, then select to Send to Intuit.
Finally, select the send option in the Send/Receive Data.
To start with View My Paycheck as an Employee
For starting with View My Paycheck as an employee you must require following things:
Intuit Account: Log in to intuit account with your credentials. Or you can also create a new account after signing up for View My Paycheck.
Social Security number: You also need to have your social security number and your net salary from the previous salary. After this, View My Paycheck will now verify the above given details.
Following Steps for using View My Paycheck
Start with Opening the web browser and type intuit.com for opening intuit account.
Then opt for to Sign up.
Enter the email address you have. Or if you have an intuit account then directly sign in by using your user ID or password and then move forward as per the given instructions.
Point to be noted: To ensure that you need to run minimum of one payroll so that View My Paycheck is properly set up for your employees
For Log in to View My Paycheck, make a strong password and confirm it, it is also recommended to always use this password while log in to View My Paycheck.
Once the Payroll Cloud Services window is open, hit on the ON to turn the status of QuickBooks Workforce to ON.
After that create or confirm the PIN when asked and then select Save Changes option.
Now in the confirmation window press Return to QuickBooks.
For uploading paycheck information after every payroll, kindly follow steps given below:
In the QuickBooks Desktop company file, create the paychecks as you have normally created earlier.
Then follow all the on-screen guidelines and apart from printing checks make sure to select Send to Intuit® on the Confirmation and follow the Next Steps given in the screen.
After that on the Send/Receive Data window, select Send. When asked, insert your Payroll Service PIN.
Basic steps to send Invitation to the Employees for the QuickBooks Workforce
For this open the QuickBooks Desktop Company and go to the Employees option.
The employees have an option to download and print paychecks. For this, you need to follow the given options:
Start with checking whether you are registered on a workfroce account or not.
In case you already have a workforce account, then login to the account otherwise sign up.
After that, go for the paychecks option.
You can see multiple paychecks; in case you choose the right date range and it further allows you to track the data for 1 year.
Once done with that, see the download option on the pay stub and click on it.
Open the pay stub, where you can view, print, and download it.
In case you need to download all the paystubs at once, then you can do this by clicking on the download all.
Winding Up!
Both the View My Paycheck and QuickBooks Workforce have provided enough work flexibility and versatility to the QuickBooks users. Where the Employees can access their essential payroll related information. This on the other hand helps the Employers to save the task who earlier had to take out the printout of the information.
Though it is quite obvious that with the updates at times Errors can occur as well. Therefore, to resolve such technical errors we strongly suggest you get in contact with QuickBooks ProAdvisors and experts. Our QuickBooks team of experts is available at QuickBooks Support toll free number+1-888-510-9198 and fix all your Queries related to View My Paycheck in the least possible time and in the best possible way.
FAQs Related to View my paycheck and QuickBooks Workforce
Where can I view my paycheck?
One can retrieve a pay stub from a bank, especially if the user receives direct deposits from the employer. Moreover, the QuickBooks Workforce View My Paycheck feature lets the user to easily able to access the paychecks.
How do I invite Employees to view my paycheck in QuickBooks desktop?
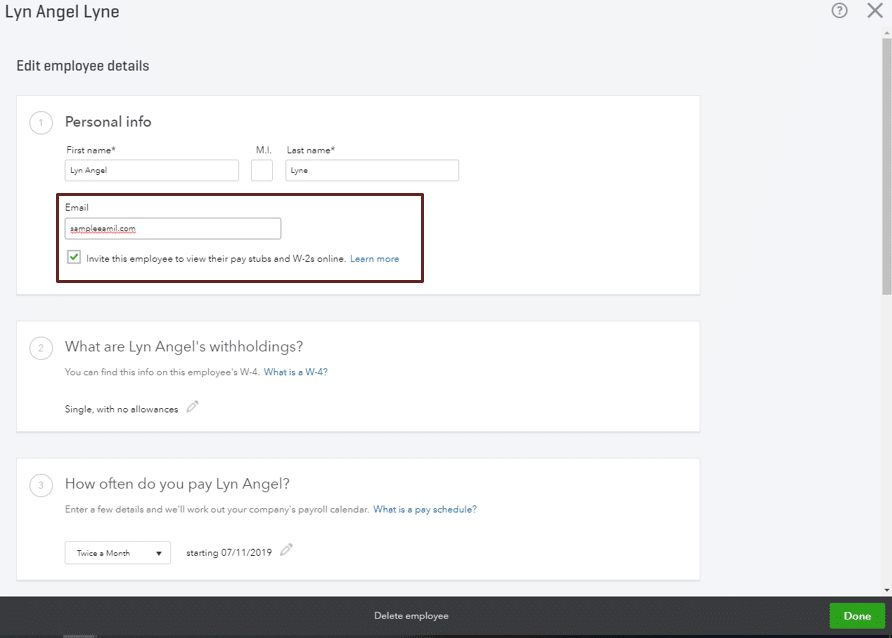
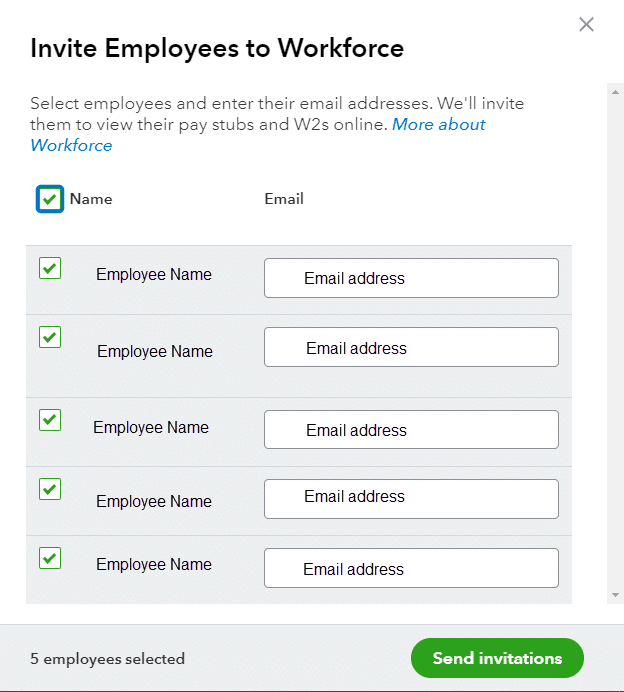
You can invite employees for View my paycheck feature in QuickBooks using the steps below: 1. At first, move to payroll and click on employees. 2. Now choose invite to workforce 3. And then, check the boxes to the names of the employees you wish to invite and then enter the email addresses. 4. You now have to choose and send invitations.
How do I access workforce in QuickBooks?
You can sign in to workforce using the steps below: 1. Open email 2. Choose create account or sign in to accept the invitation. 3. Create an Intuit account with your email and password. 4. In case you already have an Intuit account, then sign in with that email and password.
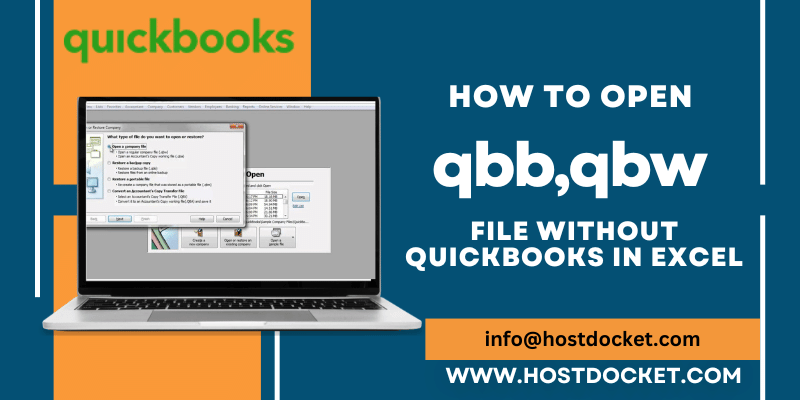
Do you know how to open QuickBooks File saved in QBB, QBBW and QBX or in any other format without QuickBooks? If no, then at this point need not to worry guys instead read this whole post till the end where we have talked in detail about how to open QuickBooks Company files without QuickBooks? But before moving ahead it is very important to understand about various kinds of QuickBooks File extensions then move ahead to step-by-step procedure to open QBW files, QBM files, QBB files, or QBX files extensions. But if you feel lethargic in following this whole post and want some Quick suggestions then you can immediately dial the QuickBooks Support number +1-888-510-9198 and talk with our certified Pro Advisor about your trouble, they will help you in accessing the QuickBooks company file without QuickBooks remotely or on call.
Let us know the know more about this important QuickBooks File Extensions
It is very important to know the contrast between various QuickBooks File Extensions like Qbb, Qbw, Qbx etc where each of them serves different functions. They are as follows:
QBB: This is a type of file extension which is used to create or store a backup file in QuickBooks where all your data is stored in this backup file only.
QBW: This is a type of file extension that is used create or save a QuickBooks data file. It plays a very significant role in QuickBooks by storing all the documents related to QuickBooks in our windows working system of company files. These files also store financial data, templates, letters, logos, images, financial statements, cash flow management, business planning, and all business-related important data.
QBX: This is a type of file extension that creates files that contain every one of the duplicates of Accountant in QuickBooks. Here QuickBooks desktop user uses .qbx file extension to send a copy of company file to the accountant.
Basic methods to open QuickBooks file without QuickBooks
Follow the basic methods to open QuickBooks file without opening QuickBooks:
Method I: To open or read a QBW File without QuickBooks
If you want to open or read a QBW file at first you need to convert it into excel format.
At first navigate to all programs in your computer system.
Thereafter hit on the Intuit option present over there.
Now Choose the QuickBooks company file which you want to open without QuickBooks or want to export from QB.
For opening the QuickBooks company file, right-click on the QB Company file.
Click on the options of customer, vendors, or employee given in the top-left corner.
Then, tap on the option of Customer Center.
Convert the file ‘.qbw’ into excel format
For this go to the top of the screen, and then opt for Excel. Then, click on Export Excel.
Verify and follow all the details shown in the prompt window then, click on the Export button.
After converting file into excel now open the file in the Microsoft Excel.
Tap on the Data option on the left side of the screen then press the option of other resources.
In the end, find the exported file in the prompt window screen. And, if you cannot locate the file then copy and paste the file to the desktop, so that later on you can easily search the file.
At the end, you can open the file when it is converted successfully.
Method 2: To open or read a QBB file without opening QuickBooks
For analyzing company data or company information you have to convert a QBB file to excel, follow the below discussed procedure step-by-step:
At first click on the QB company file in the QuickBooks Desktop.
Then, navigate to the file option.
After that, find the QB company file which is having an extension ‘.QBB’ then open it.
Now shift to the single user mode in the file option field.
After that click in the Export option in the File option.
And press the button of ‘Send the report to the New Excel spreadsheet’.
In the final step press the Ok button.
Method 3: To open or read a QBX file without QuickBooks
As discussed above QBX type of file is accountant’s duplicate file which you cannot utilize directly. So for using this type of file firstly you need to convert this type of file into QBW file.
Initially start the procedure by clicking on the Windows start menu.
Then, click on the all programs tab.
After that a list appears on the screen, move down to the screen and Select intuit option.
Next open the folder for choosing the QuickBooks option.
Now you have to pick the QuickBooks company file to be export from QuickBooks software.
After that, tap the open option in the file menu.
Type in the user password if asked further.
On the top of the screen hit the customer, vendors, or employees list.
Choose and click on the customer center.
Or you can even import QBW file to an excel document. For this, follow the procedure discussed below:
Select the excel option displayed at the top of the screen.
After that opt for to export excel option.
After assigning name and location to it save the file and hit the Export option.
Now open the imported excel file in the old version. This will require excel version 2010 or later.
Adopt the current version of excel to access the QBW files without using QuickBooks.
After that, click on the Data tab.
Then, hit on the other resources tab.
Find out the .qbw file in windows.
If you are unable to find out the .qbw file, then find the file separately.
Finally, click on the new qbw file that will open up directly.
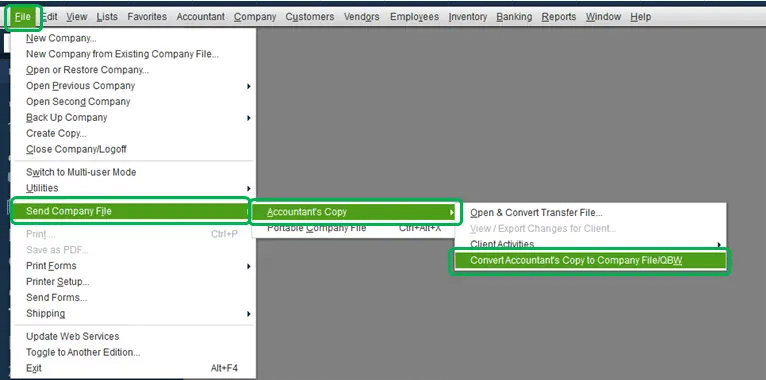
Method 4: To convert QBX file to open QBW file without using QuickBooks
By converting .qbw file you can simply open the .qbw file.
To begin this start with the QuickBooks file.
Then navigate to the File menu and hit on the send company file.
Now Opt for the accountant’s copy.
Select the convert accountant’s copyoption to company file/qbw.
Click on the Ok tab.
Select the location where you want to save the file.
After that, click on the save tab.
End the process by clicking on the Ok tab.
Wrapping up!
Hopefully by performing the above given steps, it will be become relatively easy for you to open quickbooks file without QuickBooks Desktop. However, if somehow you are unable to execute the above-mentioned process, then in that case without wasting much time, we would suggest you to immediately contact our QuickBooks desktop support team with a toll-free number +1-888-510-9198 Our QB Team members are available for you 24/7 hours to provide proper resolutions and better assistance. Be in touch with technical experts to get your issues resolved quickly.
Accessing a company file located on a remote computer might seem to be a bit difficult to many QuickBooks users. However, a few basic steps can conclude the entire process. To help you out in successfully accessing a company file located on a remote computer, we have designed this piece of writing sharing the complete details to open QuickBooks Desktop Company file located on a remote computer. So, for further information, make sure that you read this post carefully till the end. But before moving ahead to the process let us know the basic requirements to access QuickBooks company files remotely.
NOTE: In case of any trouble in mapping the network drive using UNC, we would suggest you to try the same process by using the IP address of the server. Whereas, if it does not work out, try to contact an IT professional for this.
However, if you feel the need for certified QuickBooks professionals at any point in time, then do not hesitate in connecting with our technical support team at +1-888-510-9198, and we will provide you with immediate support services.
Pre- Requisite for accessing QuickBooks Company File remotely on a Computer or a server
First of all it is very important for the user to map server or host computer as a network drive for personal workstations.
Before starting with the process, you are required to set the folder where the company file is located.
You are also required to set up computers that are supposed to access the files for multi-user mode.
Also line up QuickBooks Desktop username and watchword.
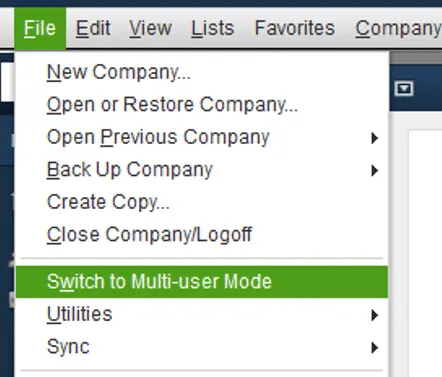
Now then opt for switch to multi-user mode from the QuickBooks file menu
Next step in the process is to select yes in the multi-user hosting setup required window.
Important point to be noted here is that QuickBooks desktop installs and runs qbdbmgrn.exe as a background service. This service must be running on the computer storing the company file, even if the QuickBooks desktop is not open.
After that you need to click on OK on the multi-user setup information window.
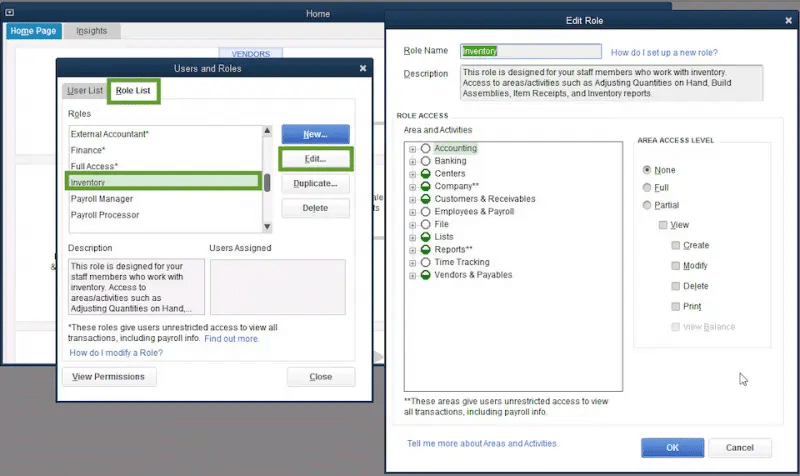
Now moving towards the end, you are required to add necessary users by moving to company options and then select essential users which are then followed by opting for set up users and roles option.
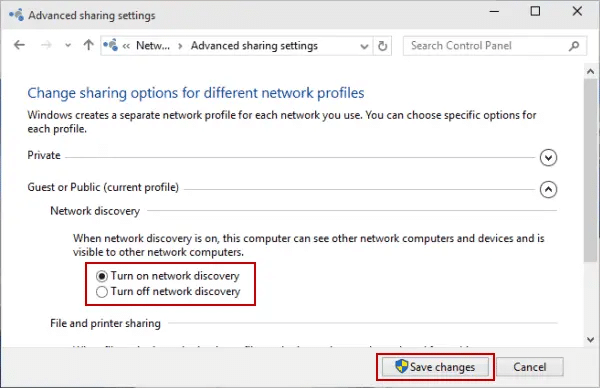
Step 2: Turning network discovery on and turning password protected sharing off.
This step is optional and not mandatory to perform. Here server needs to turn on and visible for network discovery and is apparent to try to open the file using the UNC path. Along with that, if password-protected sharing is turned on, Windows will ask for a network password. In this scenario if this happens, you can either log in using the network password or turn off the feature.
QuickBooks users have to perform this process on all workstations required to remotely QuickBooks server or host computer and network.
At first, go to the start menu and on the search bar type Control Panel to click on it.
Then Choose Network and Sharing Center, then click on the Change advanced sharing settings.
Now Open the Profile type that you are using currently.
After that, choose Turn on network discovery, under Network Discovery.
Then click on Turn off password-protected sharing under the Password protected sharing option.
Lastly, Click on Save to save all the changes.
You can perform this process on server or Host computer and all the workstations that need to access file over the network.
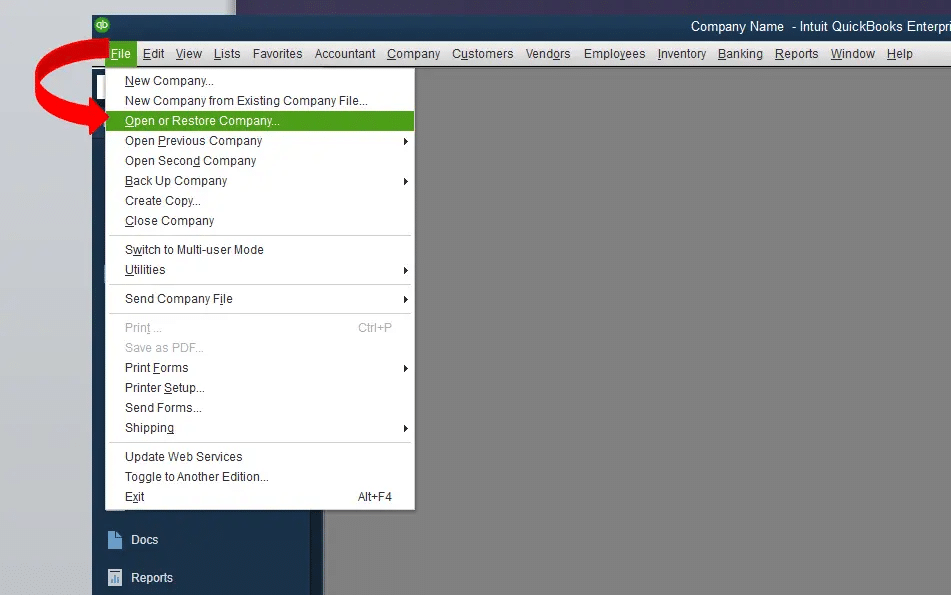
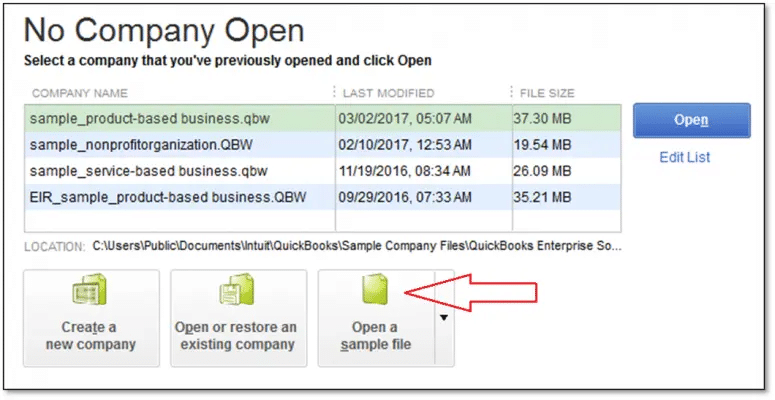
Once the process is done, users have to spot the location of the Company file and open it.
Initially, Go to the File menu, and click on Open or Restore Company.
Now from the Open a sample company file, Choose Next and find the location of the Company file.
For an instance: if your company file is saved in drive E, then search your Company Files Name in drive E
Here you have to select the Company file with the file extension (.qbw) from the list and click on Open.
Once this is done insert your username and password, if required.
Winding Up!
Follow the above steps sequentially; hope you will simply access company file that is placed on a remote computer. But if in case you are experiencing difficulty in opening the company file located on a remote system even after carrying out the steps mentioned above, then you are advised to immediately connect with our QuickBooks techie experts and accounting professionals using QuickBooks toll free helpline number i.e. +1-888-510-9198. Our QuickBooks enterprise support team will be available to assist you in one single call. They are available 24 hours a day to provide the best assistance to all users within the shortest possible time and you can get instant help with your query.
FAQs Related to Access Company File Located on a Remote Computer
How do I access my QuickBooks company file remotely?
You can remote access QuickBooks using the steps below: 1. Open the web browser and log in to your account on the official website. 2. Move to the box next to the defined computer name and choose connect in the action column. 3. Enter the passcode or use phone authentication and authorize the computer.
How do I open a company file from a shared drive?
Choose network from the windows start menu. Display the host computer’s files in the window and further locate the company file folder. In case it asks for a passcode, you enter the username and password to access it.
How do I access my QuickBooks company from another computer?
You can install the QuickBooks database manager on your remote computer. The steps involved are: 1. Download and install QuickBooks on the main computer. 2. After that choose switch to multi user mode. 3. Now, choose yes in the multi user hosting setup required window. 4. Once done with that choose ok on the multi user setup information window.
How do I open a QuickBooks company backup file?
You can restore a backup company file using the steps below: 1. Go to the file menu in QuickBooks and choose open or restore company. 2. Choose restore a backup copy and hit next. 3. Once done with that, choose local backup and hit next. 4. Browse your computer for your backup company file. 5. Choose a folder to decide where to save your restored company file
Have you ever heard of QuickBooks workforce? How to create Workforce in QuickBooks? How does QuickBooks Workforce work? Is there a cost for installing it? Is QuickBooks Workforce secure?
These are the numerous Queries that usually all the QB users have about QuickBooks Workforce. Are you among them? If yes, then All right, need not to worry. To assist you we came up with this useful write-up. Here you will get to know each and everything about QuickBooks Workforce.
However, in case of trouble in the set-up process if you want any technical help then you are free to reach out to our QB tech experts by simply calling them i.e. +1-888-510-9198! Our dedicated team of professionals is ready to serve you out round the clock with the entire process in the best possible way. Before moving towards the set-up process let’s get to know more about QuickBooks Workforce.
What is the Basic idea of QuickBooks Workforce?
QuickBooks Workforce is the most widely used online portal tool in QuickBooks that creates a good understanding between you and your employees by allowing the employees to access and check out (24/7) all their payroll-related information.
QuickBooks Workforce is considered as a part of payroll services where employees have to fill the credentials in order to access them to view and print their pay stubs and W-2 easily. Also, with the help of this payroll services employees get notified with the email that their pay stubs are ready to view and print. On the other hand after installing QuickBooks Workforce, you can also pay salary, bonus and overtime payments to employees by using the payroll option.
Remember that QuickBooks Workforce is compatible with Intuit’s QuickBooks 2009 version or newer. It is essential to Set up QuickBooks Workforce in your QuickBooks software by installing a revised version.
How this QuickBooks Workforce functions?
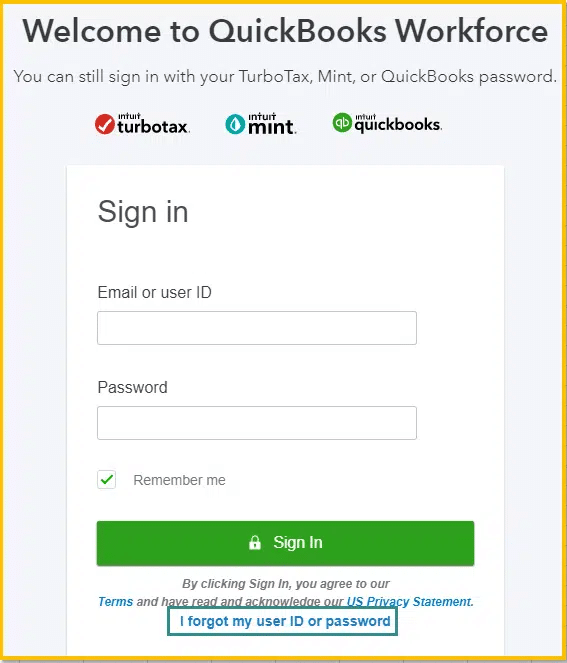
As we already know that QuickBooks is a web based self-service portal that allow employees to safely access and review their payment information by simply inviting them. And the employees who use Intuit’s payroll and accounting services can login and use QuickBooks Workforce easily with their QuickBooks credentials.
On the other hand, if employers want to use the QuickBooks Workforce, they can simply turn on QuickBooks Desktop’s Payroll Cloud services window because QB Workforce is integrated with intuit QuickBooks’s desktop version. Also, in QuickBooks Payroll service Employees invited by employers can add and update their personal information for signing up in all its versions and can have access to QB Workforce.
Is there a cost for installing or signing up the QuickBooks Workforce?
There is no cost for installing or signing up for QuickBooks Workforce. Except that you should have an active subscription to QuickBooks. QB Workforce is a pre-install feature of QB Desktop and Online Payroll But to start this you just need to activate it. Only point to keep in mind is that you need a basic or enhanced version of QuickBooks Desktop and any version of QuickBooks Online accountant in order to activate it.
How to Set up QuickBooks Workforce in QuickBooks Desktop!
For setting up of the workforce account you just need to use the link send by your employee. Though it takes only a few steps to set up account in QB Workforce. Once it is done it enables you to generate paychecks automatically in your QuickBooks and employees will also start getting notification about it and can check their own pay roll information.
Follow the steps given below to get QuickBooks Workforce set-up:
Activate QuickBooks Workforce
QuickBooks users can instantly access QB Workforce solution from their accounts after logging it but it must be activated. But before you get started ensure that you have latest version of QuickBooks desktop running and updated pay roll feature in your system. Otherwise, if you are using old version, you or your employee might face trouble in logging in or they may get an error message while accepting your invites. The steps involved in setting up Intuit workforce in QuickBooks Desktop are as follows:
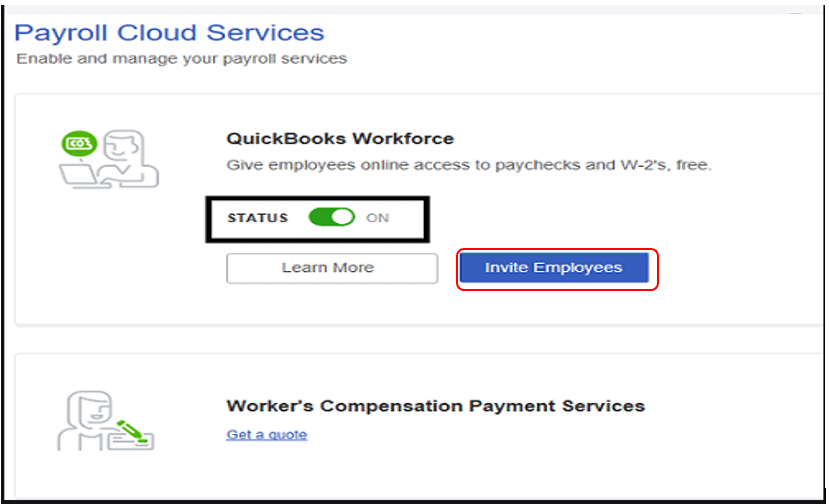
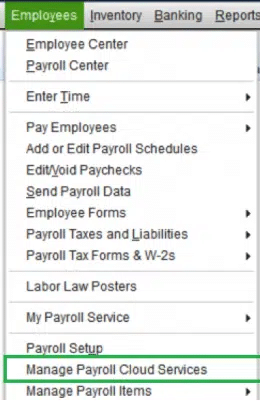
In QuickBooks desktop company, choose employees option and further Manage payroll cloud services. If you do not see the Manage Payroll Cloud Services tab, then make sure to have the latest QuickBooks desktop.
You are now supposed to toggle the status to “on” status in the Payroll Cloud Services windows under Intuit Workforce.
You will then be required to create or confirm a PIN used for sending the payroll data.
Once done with that, make sure to select Save Changes option.
Furthermore, go for return to QuickBooks in the confirmation window.
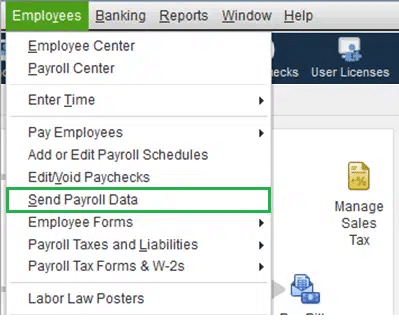
When the user runs payroll, it is crucial to Upload the paycheck info to Intuit when asked. Note that the users need to upload the pay stubs. For uploading paycheck info after each payroll, you can perform the steps below.
In QuickBooks Desktop company file, create paychecks as it is done normally.
Make sure to click on Send to Intuit on the confirmation and then next steps screen.
Now, on send/receive data window, click on send.
When asked, enter the payroll service PIN.
Note that, if you ever forget to select to send to Intuit after creating paychecks. You can visit the employees and click on send payroll data.
Upload Historical Pay Data
If you are first time user and you really want your employee to review their payment information in QuickBooks Workforce then you need to upload their historical paychecks. This step is optional if QB Workforce is configured already. Although to upload historical Pay data can be done easily by simply following the instructions given by intuit on their website. They are as follows:
Upload and send payroll data to intuit and the select the right data range.
But before uploading and for future pay stubs select current calendar year pay data by using QuickBooks PIN. This is to let it get attached to your employee’s information.
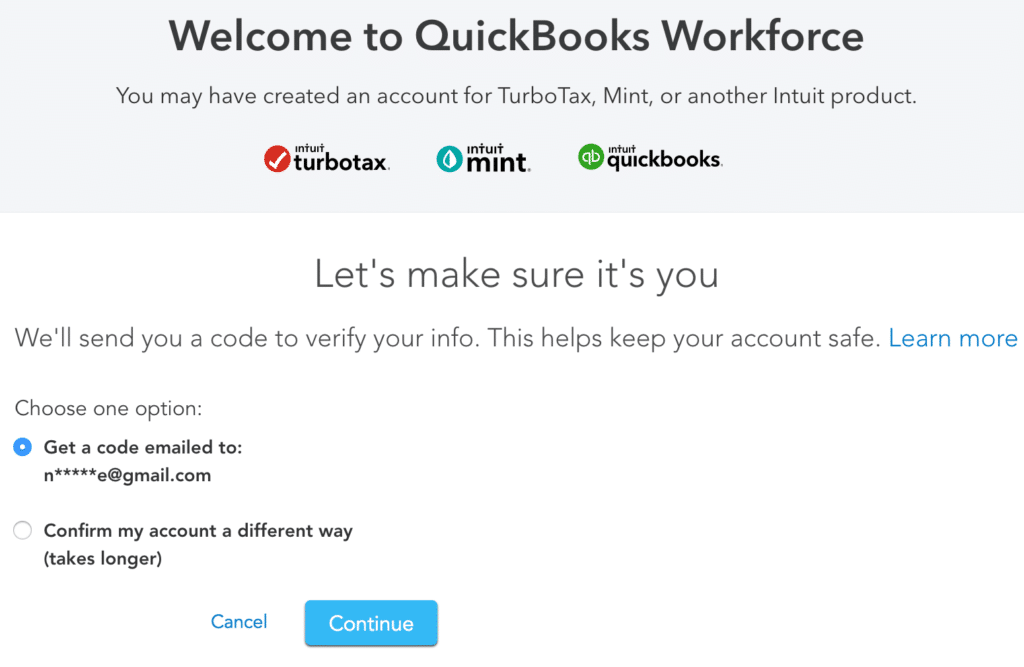
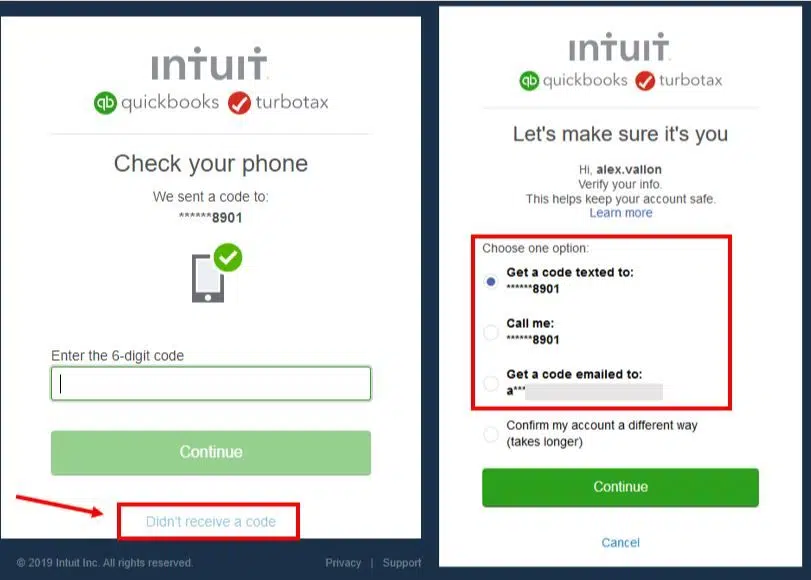
Confirm your account information via a code
In case asked to confirm the account information with code, you can continue with the steps enumerated below. Note that when you sign in to QuickBooks workforce using Intuit account login, then you might be asked to confirm the account information with the help of a confirmation code. The steps involved here are:
You need to first select How you would like to receive the code?
Once done with that, choose Continue, and the code will be sent to you.
In case you do not have access to the email listed, choose Confirm my account a different way for updating email.
Note that, do not leave the screen before entering the confirmation code.
Also, open another window if needed.
Once done with this, you need to retrieve the confirmation code. This might take some time, and the code might arrive in the mailbox after a couple of minutes.
You might further be required to check the bulk/junk/spam mail folder to see if the code went there.
The next step is to enter the code and click on Continue.
In case you did not get the code, then select didn’t recieve a code option.
Send invites to your employees For QuickBooks Workforce
Once the QB Workforce is activated from your QuickBooks Desktop account next you can do is to invite your employees to use it from their accounts. For this, go to Manage Payroll services cloud page where the names of your employees have been already preloaded in the list. Here, you can send invites to as many employees as you can choose provided that they have already signed up their account or created their profiles. Once they accept your invites fresh pay stubs and W 2‘s is now available on QuickBooks Workforce. But make sure to remind them to allow notifications and submit all their relevant and required personal and financial information for W 2’s and Bank account numbers.
How to Set up Intuit Workforce in QuickBooks Online Payroll
QuickBooks Online Payroll users can use and access QuickBooks Workforce with any version of QuickBooks Online. It’s very easy and can be done in few steps also. They are as follows:
Addition of Employees to QuickBooks Workforce
In order to add employees automatically, employers can select employees and their e-mail addresses in the Employees Section of the Payroll tab.
Set up the accounts of employees by E-mail
Notify your employees about invitation through QuickBooks Online Payroll center. Also reassure them to complete the form. Now they can review their paystubs and W-2 s information in this way.
Use T sheets Time Tracking. [OPTIONAL]
This step is optional where only premium and elite users of QuickBooks Online can use this T sheets Time tracking feature. They can also invite their employees to use this feature.
Is QuickBooks Workforce Secure to Use?
As you and your employees are sharing very private information, so usually the most important question most people have about QuickBooks Workforce is if it’s secure to use. Therefore it becomes important to rely on its security.
Like all QuickBooks programs, QuickBooks Workforce is also secure to use. Here both the employee and the employer have sign in and verify the identities where each employee accesses the system. Also, each employee has to go through the two-factor authentication to ensure the security of their information.
Final Words!
To Sum up, QuickBooks Workforce is a fantastic option in future for both the employer and the employees because of its ease of use. It also gives immediate access to their pay related information whenever they require. Intuit Workforce generates pay outs that are more user-friendly, accurate, and timely and documented on paper. And if you still you got stuck in any problem related to this or if you have any query, you must dial QuickBooks Customer Service Number+1-888-510-9198. And you can get in touch with our QuickBooks professionals soon to resolve the problem
Want to convert Quicken data into QuickBooks desktop? Then your search ends here.
Well, this article contains every detail about the conversion of Quicken data into QuickBooks desktop that will helpful for all the small business owners who wants to grow their business at an advanced level. They want that their data should no longer be in Quicken but in QuickBooks. Although, convert Quicken data to QuickBooks desktop is quite intricate task but the step-by-step tutorial given in this blog will help you to not lose valuable Quicken data during the transitioning and in the meantime if you require assistance, you can contact QuickBooks support toll free number+1-888-510-9198and our support team will help you instantly. But before implementing those steps, there are certain factors that you must take into consideration for a hassle-free conversion.
Quicken Vs QuickBooks: What are they, And Critical Differences between them.
Both Quicken and QuickBooks are robust financial accounting software that makes your business tasks attainable. As both of them serve the same purpose so they can’t be used simultaneously, so you have to choose one from them that is suitable according to your business necessities. However, both of them are now owned by separate companies, whereas QuickBooks is owned by Intuit Inc. and Quicken is now owned by Aquiline Capital Partners. Some more critical differences between both of them are listed below:
Quicken
QuickBooks
Designed for personal financial management (for the finances of individuals and families)
Designed for the accounting processes of small and mid-sized businesses (creating invoices and can track inventory)
This software is not hosted on cloud.
QuickBooks is cloud host software.
Quicken accepts the payment only through the PayPal online transaction.
QuickBooks can accept payment through Pay Pal, bank debit cards, credit cards as well as from other online transactions.
Quicken can easily handle the Rental property management.
QuickBooks can’t handle the Rental property management.
Quicken can’t do the mileage tracking.
QuickBooks can do the mileage tracking easily.
Quicken is free of cost and more appropriate and easy to use.
QuickBooks is chargeable and more typical to use than Quicken.
Things to Consider Before Transition from Quicken to QuickBooks
Before you begin to convert Quicken to QuickBooks, we have listed some factors that you must be aware of, they are:
Firstly, Conversion of Quicken to QuickBooks is unilateral (one-way) process it means that once you have converted Quicken files to QuickBooks then it cannot be reverted back and it is not possible to open it in Quicken again.
Before converting the file, you have to create the backup of Quicken file you want to convert or else you can convert the copied version of your Quicken data.
As QuickBooks can only convert the windows file of Quicken so if in case you want to use Quicken software on Mac, then you need to convert Quicken Mac files into windows files first.
It would be better to start the conversion process from a new file because of some of the challenges that can come with converting Quicken datato QuickBooks.
Possible instances where you must utilize the Quicken converter to convert Quicken to QuickBooks:
Some of the instances where you need to use the conversion tool are given below:
When the version of Quicken software is not same as the QuickBooks version, you’ll have to use the Quicken converter e.g., to convert files of Quicken 2017 to QuickBooks 2019, Premier, or QuickBooks Pro, for this Quicken converter is used.
When you have a Quicken version that is parallel to the QuickBooks Desktop version, then you can convert directly to QuickBooks using the Conversion Utility instead of Quicken Converter e.g. Conversion of Quicken 2019 to QuickBooks Pro, Premier, or Enterprise 2019.
Quicken converter tool and Conversion utility are only applicable for Windows, they don’t work for Mac data file of Quicken Or else you can develop a new QuickBooks file.
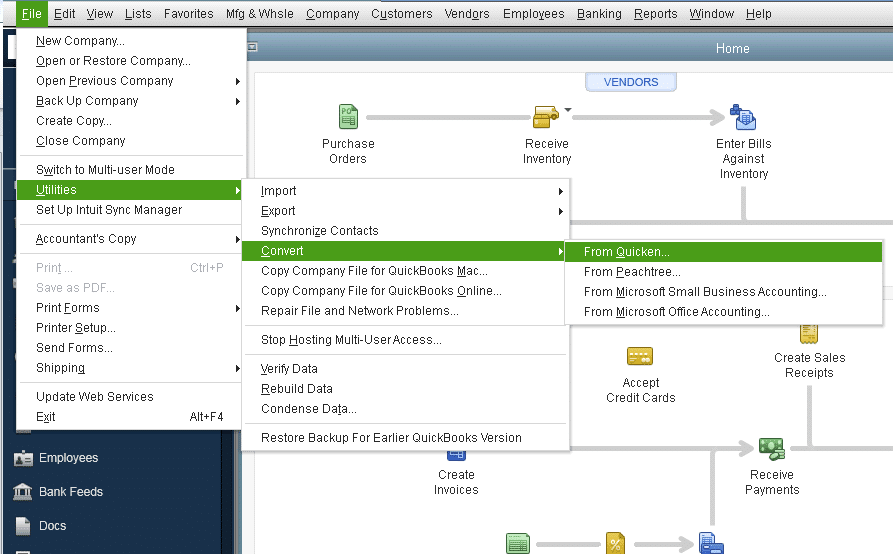
Procedure to Convert Quicken to QuickBooks Desktop
In order to build-up the production in business it is essential to convert Quicken to QuickBooks Desktop.
This conversion can be done in two ways:
Using Quicken Converter tool.
Utilizing the Conversion Utility.
How to Use Quicken Converter tool?
Step 1: Firstly, download the Quicken Converter tool according to your QuickBooks desktop version. After that locate your file in a place where you can easily access it.
Step2: Once it is done now follow the procedure to install the Quicken Converter and then perform the conversion process.
Open the downloaded Converter tool by double clicking on it and then tap on the Next button.
Now click on the ‘I accept the terms in the license agreement’, and click the ‘Next’ option.
Again, to start the installation processes opt for the Next button and then choose ‘Install’.
Next click on the ‘Launch Quicken Converter’ option, and then select the ‘Finish’ option.
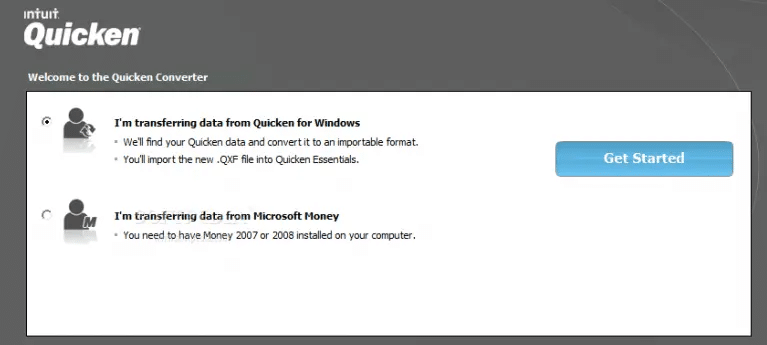
Click on the option ‘I am transferring data from Quicken for Windows ‘and hit on the ‘Get Started’ option.
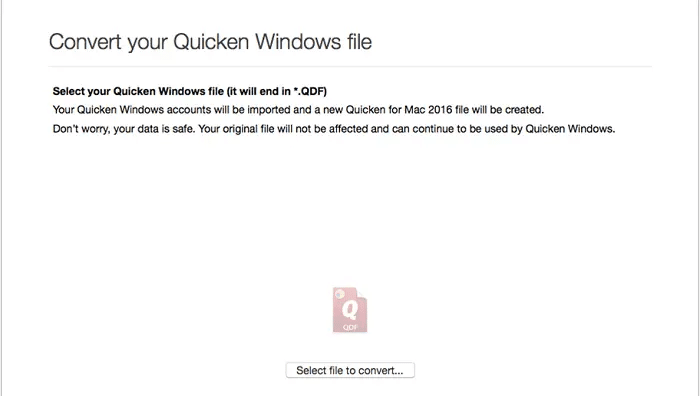
After that Choose the ‘Open a data file located on this computer’ option, and Select File.
Then search for the Quicken file (.QDF), and hit on the ‘Ok’ option.
Pick out the ‘Convert it’ option then again click on the ‘Ok’ option.
Lastly, click on the ‘Save’ option then go for the ‘Exit’ option to save the Quicken (.QDF) file.
In order to gather more information regarding the Conversion Utility.
Tap on the F1 from the keyboard to go to the Help window in your QuickBooks Desktop
Once the Help window gets opened type “convert from Quicken” in the search bar. This will give you more detail about this conversion utility.
To Sum Up!
Hopefully, this article would be informative, where you can convert the Quicken to QuickBooks easily by performing the above-mentioned procedure in simple steps. However, if you got stuck and need any further assistance, we would recommend you to get in touch with our experts by giving us a call on QuickBooks Data Service Solutions on a Toll-Free Number +1-888-510-9198They are always available to assist you and will resolve the problem in the least possible time.


