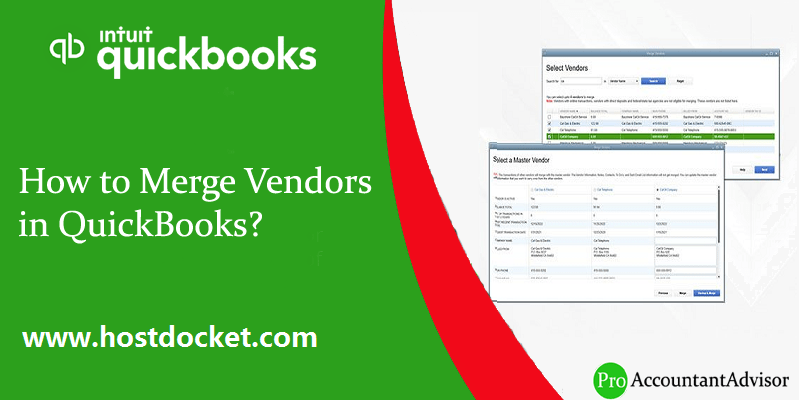
Comprehensive Guide to merge Vendors in QuickBooks
QuickBooks accounting software is packed with features and functionalities loved by entrepreneurs all across the globe. This software comes with manifold constructive features, and one such feature is allowing the users to merge vendors. As per the latest feature of QuickBooks, the user can merge up to four vendors at a time with much ease.
We have come up with this blog with an aim to answer some of the most commonly asked questions such as: Can I merge Vendors in QuickBooks? How many vendors can be merged in QuickBooks? How to merge vendors in QuickBooks Online? What do you mean by merging vendors in QuickBooks? If you are also having any such query, then stay tuned with the article and clear all your clouds of confusion. However, for expert assistance, you can also reach out to our QuickBooks support team by dialing our toll-free number .i.e. +1-888-510-9198.
Many QuickBooks users doubt whether it is possible to merge vendors or not. Well, it is very much possible to merge vendors in QuickBooks. The process of merging vendors permits the users to consolidate all the transactions. The best part is that the users are not required to enter the transactions over and over again, one after the other. The merging process basically deletes one vendor and at the same time, reassigns the entire relevant data to the other vendor. You cannot make any changes after performing the above steps. This means that everything is permanent, from deletion of one vendor to transfer of the data to another.
Points to remember before beginning with the merging procedure
Well, before you begin with the merging procedure, it is better to update yourself with certain pointers that you should definitely keep in mind. To make it easier for you, we have jotted down a few of them:
Always ensure that you are in single-user mode, and if by any chance you are using the multi-user mode, then don’t think much simply switch to the single-user mode.
The next point that requires your attention is to turn off the Multi-currency feature.
Ensure that he/she is not merging paid through online banking vendors, tax authorities vendors, and also the direct deposit vendors.
Another matter to be considered is that the merging process can’t be reversed once performed. Thus, double-check before merging the vendors and ensure that you are merging the accounts that really need to be merged.
Why do you need to merge vendors in QuickBooks Desktop?
Merging vendors in QuickBooks gives an extra edge to business, as it resolves the issue of duplicacy. When you merge vendors in QuickBooks, it simply lets you combine transactions. The users need not to add the transactions, again and again, one after one. Merging vendors means that you delete a vendor and at the same time, assign the entire data that is relevant to other vendors. After all the steps are done, the process cannot be reversed. This indicates that the merger process is permanent same as the deletion of one vendor’s data.
Merge Vendors in QuickBooks Desktop
You can avail of QuickBooks merge vendors feature using the steps below.
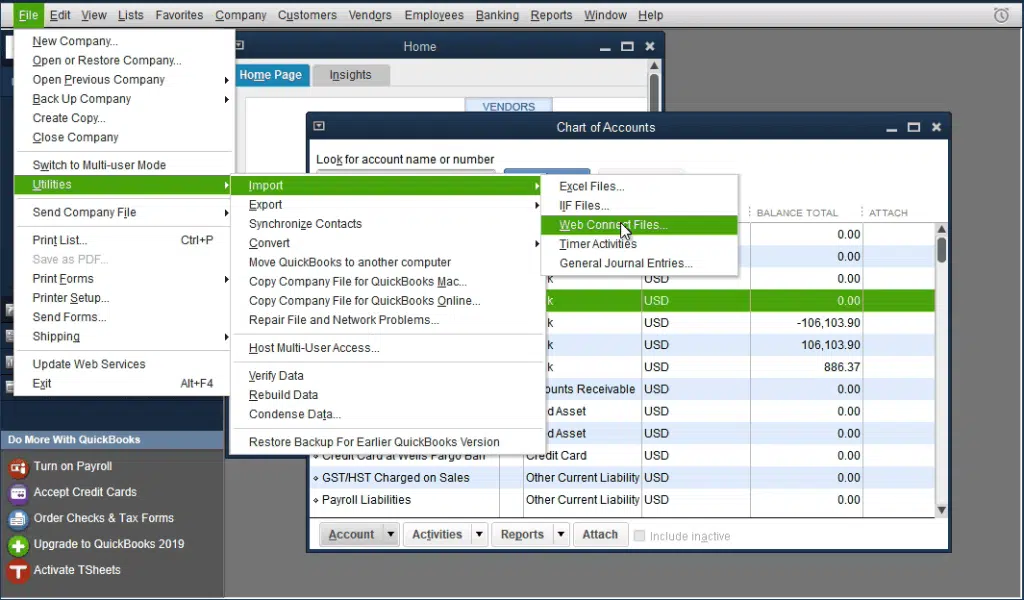
Initially, in your QuickBooks account, head to the Vendor Center and choose vendors.
After that note the vendor that you want to merge.
The next step is to find the vendor that needs merging and also right-click on it.
The user will then have to choose the edit tab and add the name of the vendor with whom you wish to merge it.
The last step is to choose the ok tab and then after the confirmation screen shows up, choose the Yes tab.
There can be two alternatives, one for the QuickBooks Desktop Accountant Edition: In this, the user has to visit the Accountant menu and then select the Client Data Review, followed by visiting the Merge Vendors option
For QuickBooks Desktop Enterprise, the user has to visit the company menu and then select the Accounting tools, followed by visiting the merge vendors option.
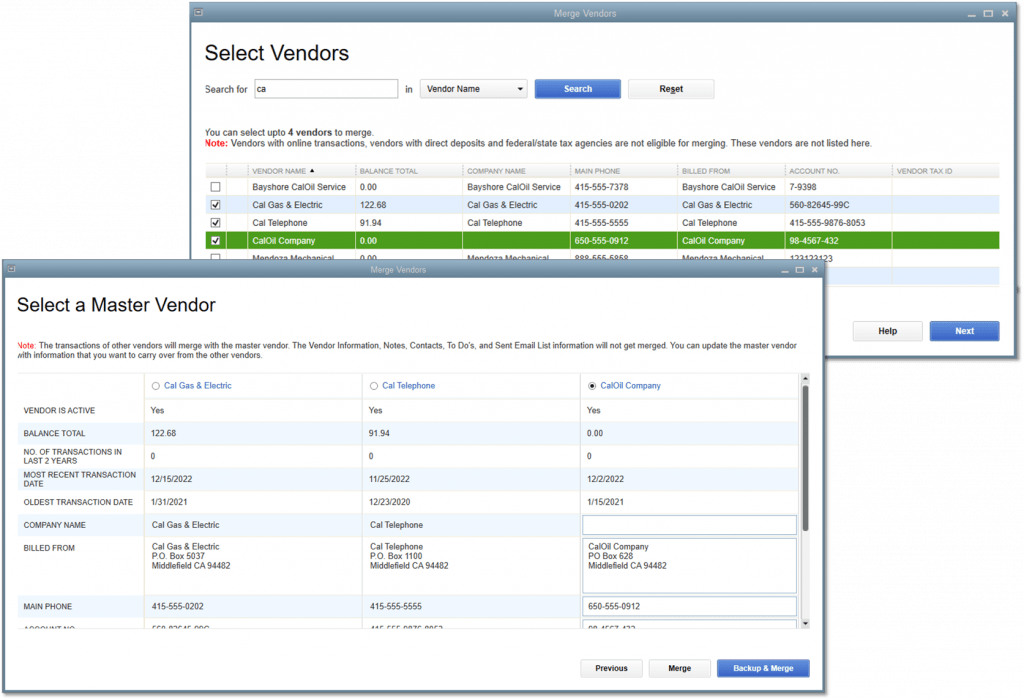
Moving ahead, in the merge vendors window, select the vendors to be merged, and then tap on the Next option.
Now, select the Master Vendor option and then click on the Merge option
The last step is, on the confirmation prompt Yes, on the Merge Complete Window, the user is required to select the OK option.
Merging vendors in QuickBooks Desktop 2018 and below
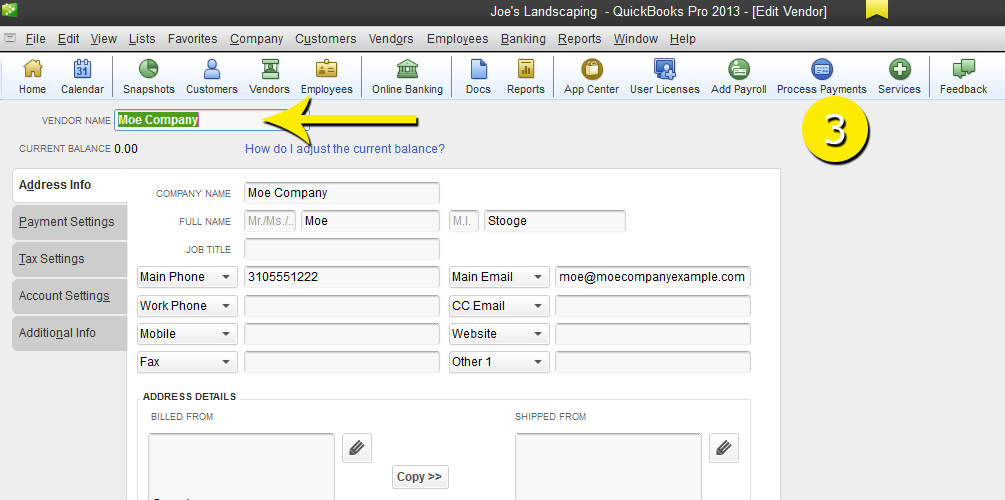
The very first step is to select the Vendors menu and then opt for the Vendor Center.
Moving ahead, right-click on the Vendor’s name to keep, followed by selecting Edit Vendor.
Now, the next step is to copy the vendor’s name.
After that, tap on the Cancel option to return to the vendor center.
After following the above steps, right-click on the vendor’s name to merge. And further, choose the Edit Vendor.
In the next step, the user needs to replace the vendor name with one copied.
After that choose the OK option.
The last step is to tap on the Yes option, at the time when a prompt is displayed to proceed to merge.
With this, we come to the end of this article, with the hope that this article might be helpful to you in any manner. By following the above-scribbled steps, the user can easily merge vendors in QuickBooks.
Use the Merge Vendors tool in Accountant and Enterprise Editions
In the QuickBooks desktop accountant edition, you need to first go to the accountant menu.
After that, choose client data review, and further click on merge vendors.
For QuickBooks desktop enterprise, move to the company menu, choose accounting tools, and then merge vendors.
Once done with that, choose the vendors you want to merge and choose the next tab.
The next step is to choose a primary vendor and click on merge.
The last step is to choose yes to merge the vendors and further hit the ok tab.
However, if you are finding difficulty in merging vendors, even after following the above steps, then all you need to do is dial our toll-free number .i.e. +1-888-510-9198. And our QuickBooks accounting and bookkeeping experts and highly qualified professionals will be there to assist you in a single call. Do not hesitate to call our technicians anytime, as they remain active round the clock to provide the best possible services to our clients.
FAQs Related to Merge Vendors in QuickBooks
How do I merge two clients in QuickBooks?
In order to merge duplicate clients, you need to sign in to QuickBooks online accountant as an admin. You further needs to choose the gear icon and merge duplicate clients. And choose get started.
Can you merge accounts in QuickBooks?
Yes, you can merge two accounts in QuickBooks online by simply selecting the accounts that you want to merge. And further specify which account you want to keep and which account you wish to delete.
What accounts Cannot be merged in QuickBooks?
QuickBooks makes use of some accounts as the default for certain features. These, like accounts connected to online banking, cannot be merged or deleted. In case you are merging accounts that have reconciliation reports, then save those reports first. The account being merged may not keep the reconciliation history.
Why do we merge an account in QuickBooks?
Just in case you have duplicate accounts, customers, or vendors, you can simply merge them. This further moves all the data into the one you want to keep and also makes the duplicate one inactive.
Switching computers? Want to transfer QuickBooks from old computer to a new computer? Well, all this is possible by performing some basic set of steps. To assist in this migration process, Intuit offers a QuickBooks migrator tool that helps in transferring QuickBooks software from their old to new computer with maximum three files, and if the user is using a US version of single-user QB desktop. Not just that, we have designed this piece of writing, sharing the complete details about transferring the software to the new computer. Thus, make sure to stick around the article till the end. Or you can further connect with our tech support team at +1-888-510-9198, and we will provide you with immediate guidance to all sorts of QuickBooks related queries.
Requirements for transfer QuickBooks to another computer
The user system needs a few things to transfer QuickBooks desktop to a new system. Let us have a look:
Make sure to register for the software after the installation and also ensure that the new system is connected to proper internet connection
Also, uninstall QuickBooks desktop from the old system, but before that create a backup of the QuickBooks company file
Keep the QuickBooks software installation disk or the setup file stored on an external device
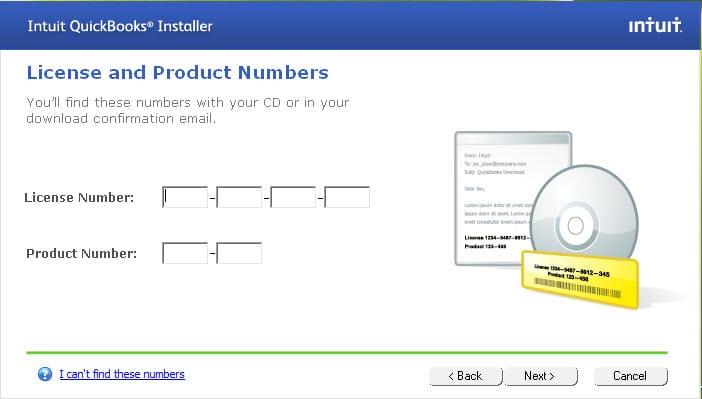
The license and product registration details are other important things
External storage device to store the QuickBooks desktop files
Make sure to have a USB flash drive with enough free space to hold QuickBooks files.
Learn to move or reinstall QuickBooks files to another computer
You can perform the below discussed set of steps to move or reinstall QuickBooks files and data successfully from your old computer to new computer. Let us explore:
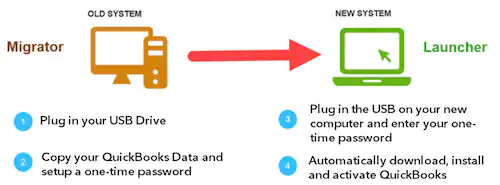
How to transfer QuickBooks from one computer to another using Migrator Tool?
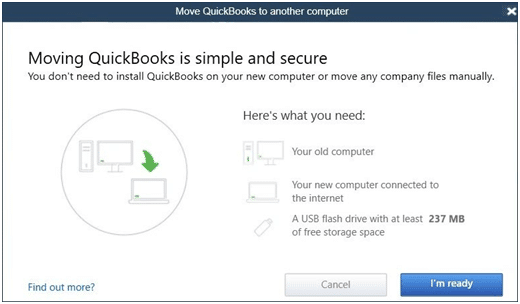
Migrator tool is one of the great features of the QuickBooks software. A user can complete the process of transfer in just a few clicks due to this feature only. The transfer will be processed in two parts. However, before beginning the process make sure that you have access to the admin user, as the steps can be performed only the admin users.
How does migrator tool work to transfer QuickBooks from one computer to
another?
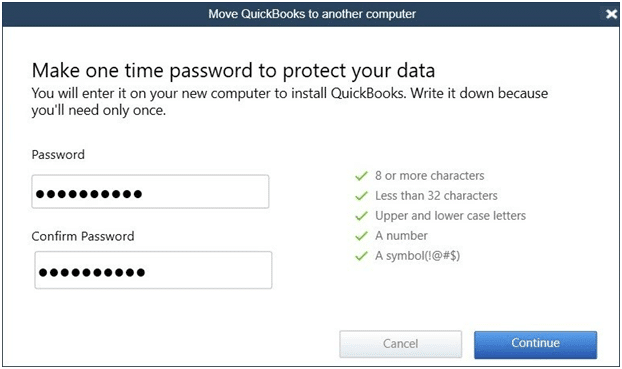
Migrator Tool is also known as Move QuickBooks tool. This tool can be accessed only if you are an Admin user. You will need to create a complex password and need to remember it by writing it somewhere, however, it is required only once.
The migratory tool will allow you to copy max three company files in the USB flash drive along with the supporting documents. The pen drive will physically move the files and the migratory tool will do technical work in background. The tool will also download the right version of QuickBooks Desktop in the new computer and will aid in setting up all the files.
Note: Using migratory tool will not delete any file or reformat your system.
Requirements of migratory tool to transfer QuickBooks to new computer:
There should be an internet connection to the new computer.
The pen drive should have a good amount of empty space. Free space around 150-200 MB is usually required.
Data which gets copied through migratory tool while moving QB to new
PC:
All the data required to run QuickBooks Desktop gets copied, however, the list is as below:
Version and other QB Desktop details
Recent company files- max 3 files with supporting documents
All other related files and custom templates and forms
We have tried to sumnmarized the steps for old and new computers below. Let us evaluate them one by one:
Step 1: On the old Computer
At first, you need to download and save the QuickBooks Migrator tools on a USB flash drive.
After that, you can download it from the official Intuit Website.
Once done with that to the old system plug in the USB drive.
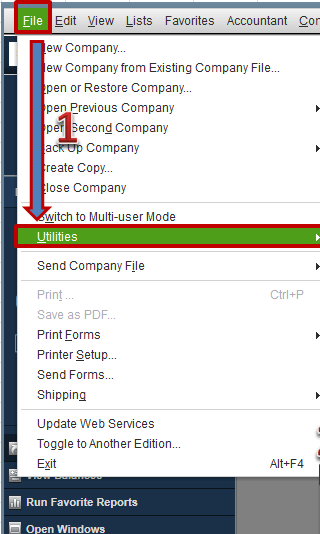
The next step is to open QuickBooks and move towards files> utilities> move QuickBooks to another system.
And further select the option I’m ready.
QuickBooks will now ask you for creating a complex password in order to secure the company files in the USB flash drive.
Also, remember that it is a one time password and you will require this password when you plug in a USB into the new system.
You now have to pay attention to the steps that are visible onscreen.
This might take some time, as it mainly depends upon the size of the company files.
Step 2: On the new computer
Here you need to insert the USB drive. The Migrator tool won’t run all alone because of the windows security protocols and this is the explanation that you want to manually run it.
To start the migrator tool, you can open the flash drive and search for Move_QuickBooks.bat file record and later on run it.
Now, enter the one-time password made before, and wait for the tool to finish the process.
QuickBooks migrator tool file will delete upon the completion of the process and other data in the USB will stay untouched.
You can change the name of the files on the old system.
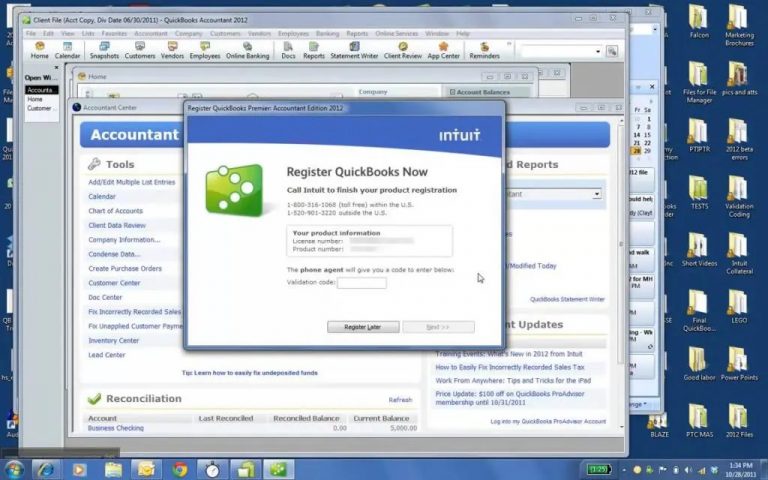
And can further move to the help menu and click on the register QuickBooks.
You can enter all the necessary details like phone number, postal code, and license key for finishing the registration.
What is not copied using migratory tool when QuickBooks is transferred from old to new computer?
Multi-user set configuration.
Payroll or payments services set up in QuickBooks will not be copied as per Intuit policy to protect data.
Intuit Data Protect needs to be uninstalled in the old PC and reinstalled in the new PC
Company files which have not been recently opened will not be copied.
Manual backups created by the user will not be copied.
Manual Procedure to transfer QuickBooks desktop from old computer to a new computer
The users can manually transfer QuickBooks from old computer to new computer. The steps involved in this process are as follows:
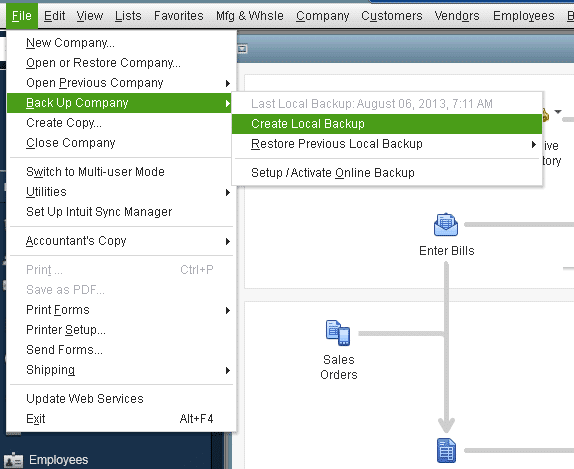
Step 1: Create a backup of the company files and QuickBooks license
The first step is to create a backup of company files and QuickBooks product license to the external storage device
The next step is to install the latest or current QuickBooks version to the new system
Once done with that, download and restore the backup file to the new system
After that uninstall the QuickBooks software
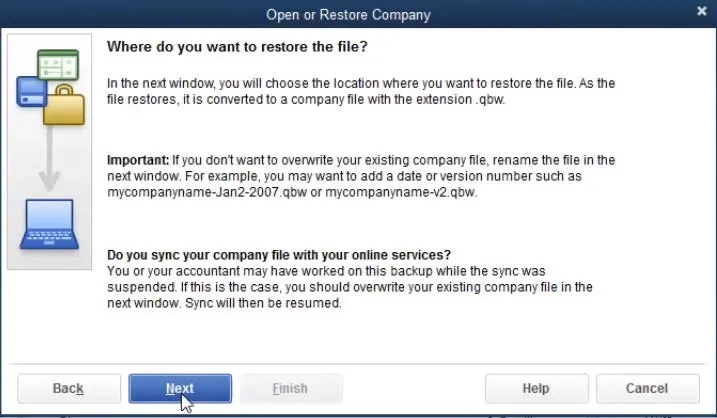
Step 2: Restoring the backup of the company files on the new system
Initially, the user needs to install the QuickBooks on the new system
And then, insert the storage device
Followed by opening QuickBooks and navigating to the file menu
Later on, choose the open and restore company option
Also, click on restore a backup copy and also click on next tab
After that click on local backup option and head to the backup file created in the old system
The last step is to pick a location in the new system for saving the backup and also click on save tab
Winding Up!
There is no fix time on how much time will it take to complete the process. It completely depends on the internet speed and size of company file. In case you face any issue while following these steps, you can contact our QuickBooks enterprise support team or accounting consulting professionals at toll-free number. i.e. +1-888-510-9198.
FAQs Related to transfer QuickBooks from old computer to new computer
Can I transfer QuickBooks from one computer to another?
You can try to transfer QuickBooks from one computer to another using the steps below: 1. Move to file menu from QuickBooks. 2. Choose utilities and further go for QuickBooks to another computer. 3. Go for I’m ready and then create a one-time password. 4. Perform the on-screen instructions to choose the USB Flash drive you’ll use
Can QuickBooks be installed on two computers?
QuickBooks with a single license can be accessed on multiple computers. However, files are only accessible to a single user, a maximum of two computers, but one at a time.
How long does QuickBooks migration tool take?
90% of conversions are processed in under 12.5 minutes. Whereas, 100% is completed in 72 hours. This usually completes within 45 minutes. However, the data is held in secure AWS servers during migration and destroyed once the conversion is approved.
How do I transfer data from old QuickBooks to new?
To do this, you need to perform the steps below: 1. At first open your new version of QuickBooks desktop 2. Move to the file menu and then choose open or restore company. 3. Choose open a company file and further hit next. 4. In case you have a backup company file instead of a company file, then choose restore a backup copy.
QuickBooks is the largest accounting software working for the various business owners and serving them with the best facilities for bookkeeping and maintaining accounts. For years, QuickBooks has always proved to be a notable tool for all users. QuickBooks has always been a trustworthy software that ensures full safety to the transactions in the accounts. Not only this, but it also has highly advanced and new features for making the work simpler. In this article, we will learn how to record vendor refund in QuickBooks desktop.
You can learn the various processes to record the refund in QuickBooks appropriately just by following the procedures given in this article. For more details, you can reach out to our technical support team at +1-888-510-9198, and they will provide you with immediate support and assistance.
These are the best solutions and procedures to record vendor refund in QuickBooks Desktop. We assure you that following these steps according to your needs will definitely make the process easier. We recommend you to talk to our professionals for any other query that you face during the procedures. However, you can anytime contact us at +1-888-510-9198 and make the use of our QuickBooks enterprise support expert’s knowledge and get the relevant solutions for all types of issues related to QuickBooks.
FAQs Related to Record Vendor Refunds in QuickBooks Desktop
How do I record a vendor refund in QuickBooks Desktop?
You can record a vendor refund by creating a bill for the amount of the deposit and further apply it to the deposit. The steps involved here are: 1. At first, head to the vendors menu, and further choose enter bills. 2. You now have to select the vendor who sent the refund in the vendor field. 3. The next step is to enter the amount of the refund in the amount due field. 4. Choose the expense tab. 5. And also, choose a wash account in the account field.
How do I handle a refund in QuickBooks desktop?
In QuickBooks, you need to perform the below steps: 1. The very first step is to choose the customers menu and further select credit memos/refunds. 2. The next step is to choose the customer you need to refund in the customer job dropdown. 3. Once done with that, enter the product and services you need to refund. 4. And also choose save and close tabs.
How do I enter a vendor credit invoice in QuickBooks?
You can perform the below steps to apply vendor credit in QuickBooks online. 1. Start with entering the vendor credit. 2. After that move to the + new option and under vendors choose vendor credit. 3. The next step is to further choose the vendor’s name from the dropdown menu. 4. Further, identify the invoices and sales receipts for which you received credit.
From company file issues to other random errors, experiencing errors in QuickBooks is something that you do not have a skip button for. Thus, using QuickBooks repair tool and bunch of other tools come in handy. In this segment, we will be talking about how you can get done with the QuickBooks issues and repair QuickBooks with QuickBooks repair tools. There are a lot of tools that can be of much help in fixing QuickBooks issues, which we will be discussing later in this segment.
QuickBooks file corruption can be tough to spot. But once you know the issue and the reason, it will be easy for you to fix the problem. Knowing when the issue occurred and what were the last changes you made in your QuickBooks Desktop can be helpful.
Some of the most common QuickBooks company file errors are as follows:
In Verify Data Utility section you may see error report like – A data error prevents QB from continuing.
An error message pops up on your screen or the Qbwin.log file – Verify Target: Values in minor do not match major.
QuickBooks account names start with an asterisk (*) and created by QuickBooks because the original accounts were missing.
Your QuickBooks may abruptly shut down while saving or deleting a transaction.
Flawed balance sheets and other reports in which the total number of assets don’t match the number of liabilities and equity.
Entries or transactions missing from lists.
QuickBooks takes longer than usual time to open and operations also are sluggish.
Paid invoices, bills and transactions show as unpaid. A negative balance shows in transaction history.
HTML code in Bug Report in Send Feedback online section.
Identifying issues in QuickBooks is simple if you observe its working closely. Data damage and other errors may be of different types and symptoms may also vary, however, a strange data at any time could be a sign.
Knowing the reason behind QuickBooks error can assist you in finding the solution to QuickBooks issues. The following reasons may cause data damage in QuickBooks.
The size of the QuickBooks file is exceeding the healthy limit.
RAM, network interface cards, Virtual Memory, routers, and other resources missing.
Fluctuating power causing damage in hard the drive in the absence of proper UPS.
The system wasn’t shut down properly post last use and caused QuickBooks database corruption.
Virus or other malicious software infected QuickBooks database.
There may be more reasons than provided here to cause damage in the QuickBooks company file.
How to Prevent QuickBooks company file corruption?
It’s better to stop a QuickBooks error from occurring than finding a solution later. Here are some of the most dependable tips to avoid corruption in QB company file.
Creating backups of your company file and keeping them at different locations is one of the best tricks to prevent data loss and damage.
You can also create an online backup of your data to keep from losing physical backups.
Make sure that the size of QB database doesn’t exceed the healthy limit. You can reduce the size of the database with the help of third-party tools.
Avoid all the other reasons that cause data corruption.
As discussed above, QuickBooks users may receive different types of issues and errors. Though a few of the errors may be prevented from occurring, it’s not uncommon for users to still receive them. Since QuickBooks is an innovative accounting software, it comes equipped with many inbuilt features and tools that help fix many of the common errors.
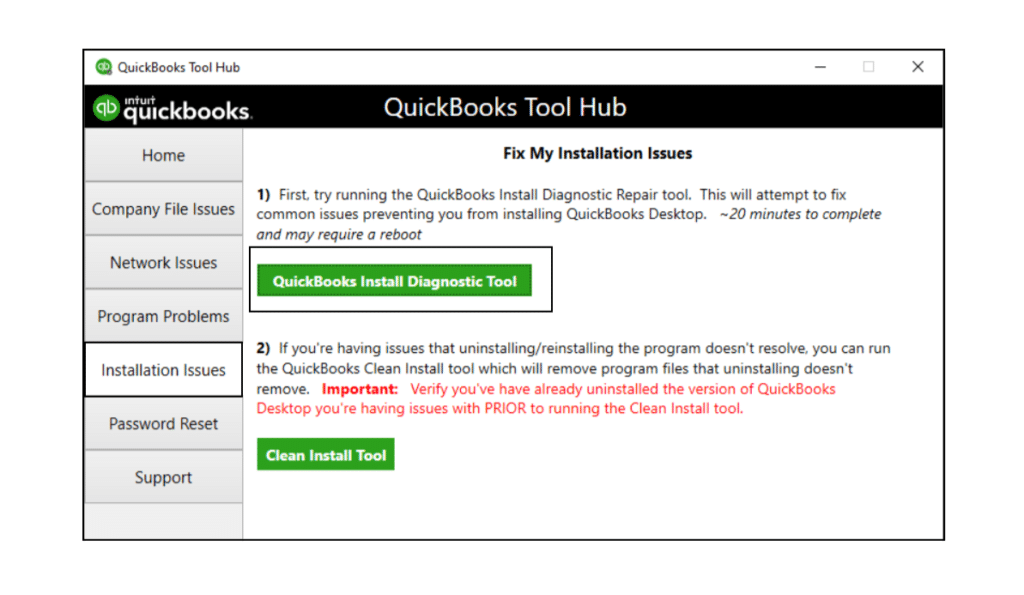
Some of the most popular QuickBooks desktop tools are:
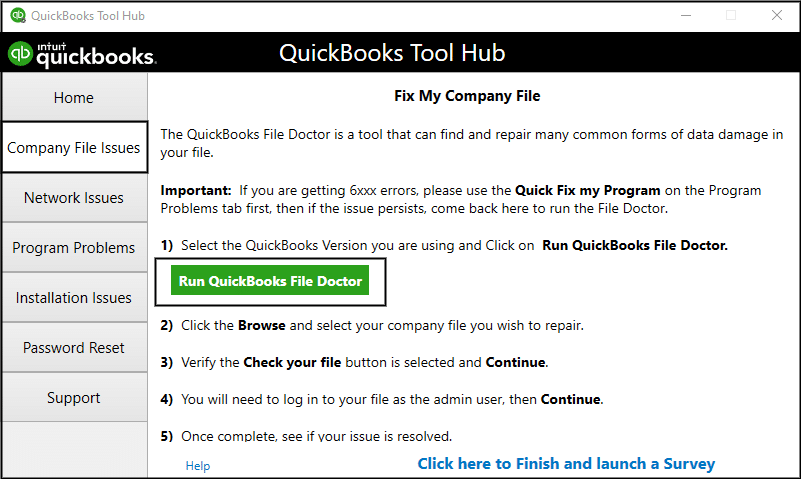
QuickBooks File Doctor stand-alone version, which can be downloaded from the internet.
QBFD is useful in fixing a wide selection of file and data corruption issues, network setup errors, and windows setup errors.
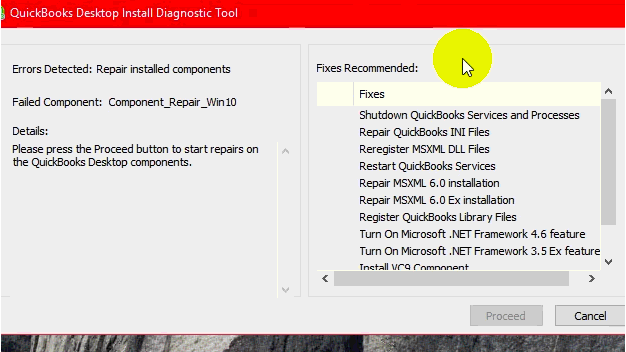
2. QuickBooks Component Repair tool
This QuickBooks component repair tool assists users to solve those issues that prevent QB software from running. This tool helps in reducing the costs and improves customer satisfaction. The steps involved in downloading and using the component repair tool are as follows:
The first step is to download the tool and close all programs running in the background
After that, click on the download button on the QuickBooks component repair tool setup file
The next step is to double click the file to open and perform the onscreen steps to complete the installation process
Restart the system and run the tool.
The user is then required to reboot the system and close all programs
Now, the tool will diagnose the issues and perform any necessary step
All the above-mentioned tools are free and help solve a wide variety of errors. Many of the times, they show up themselves when a problem occurs. But if they don’t automatically appear on the screen, you can use them manually. Please ensure that you are using the latest version of them to fix QuickBooks errors.
While QuickBooks repair tools can help you to fix many of the common QB errors, they can’t fix all issue. If you are unable to get rid of a QB error with the help of free diagnostic and repair tools, you can contact our QuickBooks support experts at +1-888-510-9198. With cutting-edge tools and technology and years of experience, we can help you fix all QuickBooks-related issue.
Frequently Asked Questions!
How do I repair QuickBooks desktop?
One can try to repair QuickBooks by using the Quick Fix program. It’ll run a quick repair on your program. For this, you can use the QuickBooks Tool Hub, choose Program Problems and then go for Quick Fix my Program. Also, start QuickBooks Desktop and open your data file.
How to uninstall QuickBooks desktop?
To uninstall QuickBooks and repair it, the below steps can help. 1. At first, open the Windows Start menu. 2. Now look for Control Panel and then open the same. 3. Choose Programs and Features or Uninstall a Program. 4. From the list of programs, choose the version of QuickBooks Desktop you want to remove. 5. Lastly, choose Uninstall/Change, Remove and then Next.
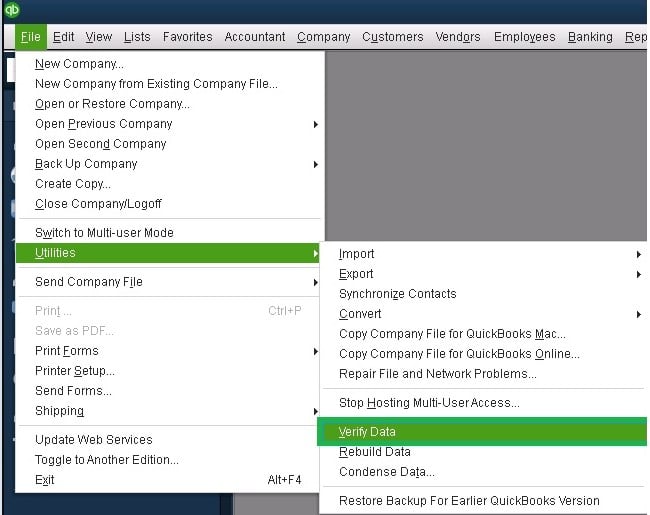
How to rebuild data in QuickBooks?
The user can rebuild data in QuickBooks using the steps below: 1. The first step is to choose file 2. After that select Utilities. 3. Also, go for the Rebuild Data. 4. And then, choose OK to close all windows. 5. QuickBooks will ask to make a backup before rebuilding your company file, select OK 6. Once the rebuild is finished, select OK.
How do I fix errors in QuickBooks?
The user can try to eliminate the issues by performing the steps related to every issue. One can simply connect with the QuickBooks support team for any sort of further technical assistance.
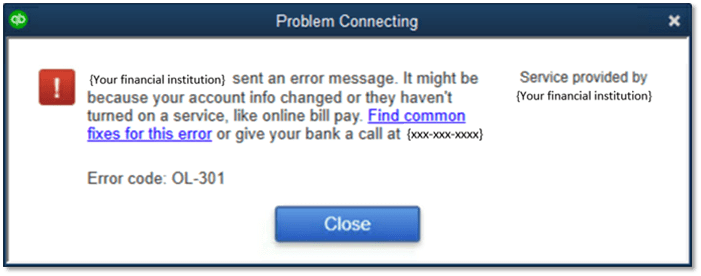
Errors in QuickBooks are extremely annoying. However, dealing through such glitches becomes easy, once you identify those errors. One such error that we are going to talk about today is QuickBooks Error OL-301. This error isn’t a commonly encountered one, thus might seem to be a bit difficult to tackle with. This error usually arises due to connection problem with the financial institution while using the direct Connect. QuickBooks accounting software is highly vulnerable to this error code. In this technical blog post, we are going to let you know about the process to resolve the QuickBooks Error OL-301 & its causes. Learn how to fix Error OL 301 when trying to connect to your bank or download transactions in QuickBooks Desktop. You can also connect with our QuickBooks error support team for any further QuickBooks-related assistance.
Whilst using QuickBooks frequently, you might see this error code known as OL-301. Well, one of the potential reasons why OL-301 error appears is – connection problem in the financial institution while using the Direct Connect or a there is a company file issue. We are just making an attempt through this article to endow you with the directions that you should pursue to fix the QuickBooks error OL- 301.
Erroneous information can lead to such an error. Thus, it is recommended to fetch the bank account information correctly.
In case the login details provided by the user don’t match the actual login details.
The branch of the bank blocks the bank account.
Sometimes the server of the registered bank is down.
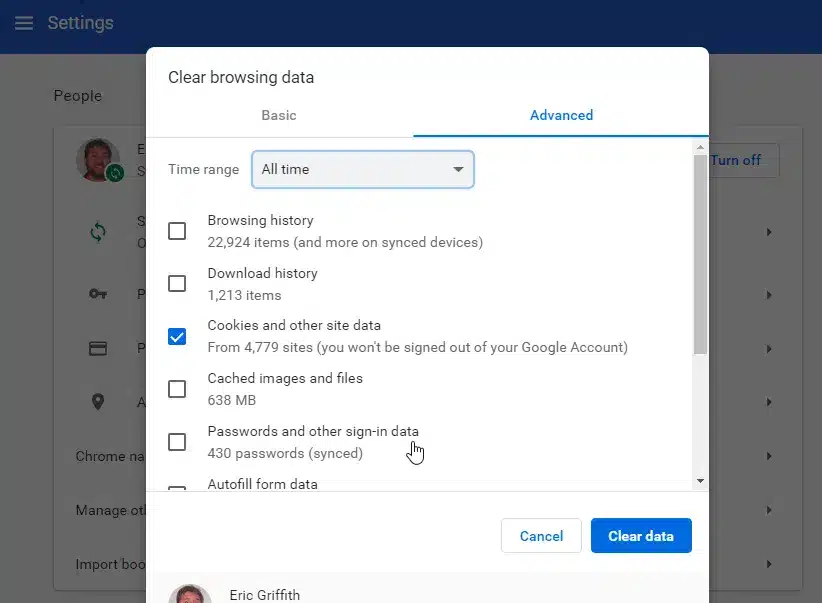
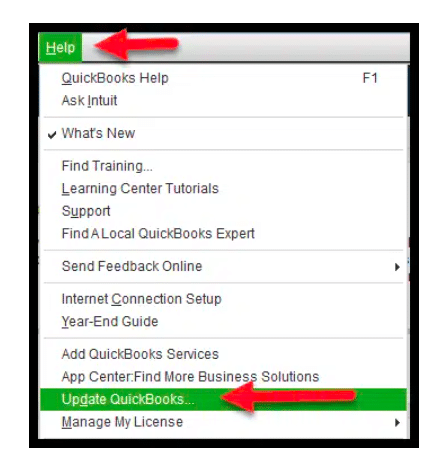
If you do not update the QuickBooks to the newer version after then you’ll have to continue with the “Delete Temporary Internet files” field shown below:
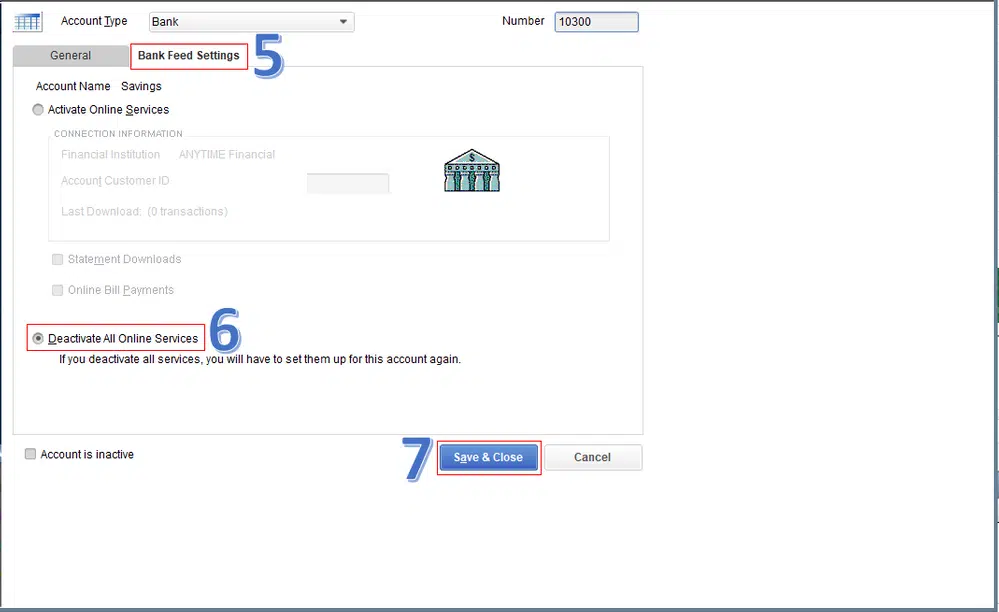
Initially, you should choose the “Tools” option and later select the “Online Center” icon.
Click on the drop-down arrow that states Financial Institution. Later than that, you should choose the financial institution.
Now, press the “CTRL+Shift” keys simultaneously and then hit onto the “Contact Info” icon.
In the drop-down list, you will have to opt one of the accounts that is affiliated with the bank.
From the list, hit onto the Financial Institution Branding & Profile and later click on the “Refresh” button.
Hit onto the “OK” icon and later go online by choosing the “Update/Send” tab.
You have to restart the online sessions.
After that open network and internet in control panel.
Once done with that, go for Internet and choose general tab.
Scroll to the browsing history and further click on delete tab.
The last step is to confirm the deletion of the temporary files and also click on ok tab.
You need to first run QuickBooks and navigate to the banking option.
Further, click on Account having pendency in transaction.
The next step is to click on for review tab.
Once done with that, look for the pending transaction matching the transaction already in QuickBooks.
Now, select the transaction and go for find match option.
A list of matches will be visible, you need to click on the correct match.
Head to the save option.
If, pending transaction is not having a matching transaction in Quickbooks, then make new transaction after selecting the transaction and head to the add button.
Now, when all pending transactions are matched, you need to click on QuickBooks and verify if all transactions are matching.
After that, try downloading the transactions one more time, and the process should now finish successfully without the issue.
Conclusion
Hopefully, this technical article would be helpful for you..! If the problem persists even after following the above steps are prescribed, then you can contact our QuickBooks online support team at their toll-free number i.e. ++1-888-510-9198.
FAQs
What is error code OL-301 in QuickBooks?
The OL-301 is often seen when there is an issue connecting to the financial institution when using direct connect. To fix this issue, one simply needs to either perform some basic set of steps or connect with the financial institution.
How to fix bank feed in QuickBooks desktop?
The user can try to perform the below stated set of steps to fix bank feed in QuickBooks: · At first, download bank feed transactions in a test company file · Now, check if the file from the bank is compatible with QuickBooks · After that, refresh the connection with the bank · And create and merge accounts · Also, turn off and activate online banking again
How to fix QuickBooks OL-334?
To fix the OL 334 error in QuickBooks, you simply need to: · Enable the TLS 1.2 in internet options · Make a new test company file · Run the account setup when holding Ctrl key · Create a new account and merge accounts · Deactivate all accounts
What is a banking error in QuickBooks?
Bank error in QuickBooks usually mean there may be a problem on your bank’s end. Their website may be undergoing maintenance or have server issues. This can stop the online bank connection to QuickBooks.