Suddenly encountered error code 6094 in QuickBooks and can’t find a way to culminate it? Well, without a doubt, QuickBooks is a well-built accounting software with advanced features that can assist businesses in performing their daily accounting and bookkeeping activities. However, it is an undeniable fact that it is prone to certain sorts of errors. These errors can be at times tiresome to deal with. One such error that we are going to highlight in this piece of writing is the QuickBooks Error 6094 (6010, 2). It is one among the hundreds of errors. This error usually occurs when QuickBooks fails in launching the web database. In addition to this, you can also face this error if there are some anti-virus programs running in your system, which may include AVG Anti-virus, SpyHunter Malware Blocking, PC Tools Internet Security, and others. Let us delve in deep to understand further about this issue. Moreover, if you feel the need for expert assistance at any point in time, then feel free to reach out to our technical support professionals at +1-888-510-9198, and our technically sound QuickBooks ProAdvisors will make sure that all your queries are addressed immediately. Having said that, let us further explore the information related to the QuickBooks error code 6094.
Talking about QuickBooks error code 6094, it is basically a 6000 series error that often occurs when QuickBooks fails to launch the web database. The same error can be seen due to the security program updates. It appears on the screen with a warning message that states:
Warning: “An error occurred when QuickBooks tried to start the database server that manages access to the QuickBooks company file. Error (-6094,0)”.
There can be a handful of factors instigating this error, which we will be elaborating later in this segment along with the fixes for the same. Let us explore together!
What triggers QuickBooks Error 6094?
The causes due to which QB Error 6094 (6010, 2) takes place are as follows:
Anti-virus programs such as AVG Anti-virus, SpyHunter Malware Blocking, PC Tools Internet Security are the main reasons behind this error.
When the user tries to launch the database server which manages access to the QuickBooks Company file, then this error can occur.
Now that you know the reasons why such an error occurs, it is time to implement the right set of steps to culminate the error permanently. However, you can save your time and effort by consulting with our QuickBooks data recovery team. Let us examine the methods one by one:
Solution 1: PC Tools Internet Security
Restore all the ‘infections’
First of all, open the settings menu and choose ‘Quarantine’
Now, restore all the necessary items
In the meantime, click ‘Yes’ and the click ‘Ok’
After this, you will have to create an exception to avoid QuickBooks directory.
Go to PC Tools Internet Security menu and Click on Settings
Now, choose Global Action List and add files which you want to eliminate from scanning
Now, click OK
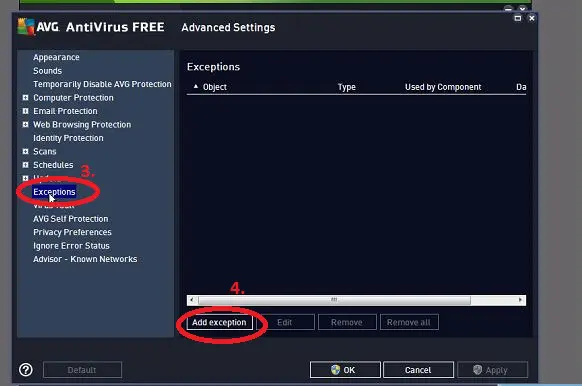
Solution 2: Configure the AVG Anti-virus
Here is the second solution that can help you resolve the QuickBooks Error Code 6094. This solution says that you would need to remove QuickBooks directory from being skimmed.
Close the QuickBooks Desktop and start AVG Anti-Virus User Interface.
Double-click on the Resident shield and click on Manage Exceptions
After this, click and add the path C:\Program Files\Intuit ( Note: The path will be added only when the QuickBooks is installed in a different folder)
After all the above steps, save the changes and click OK ( Note: Make sure that you restore all the QuickBooks files that AVG Anti-Virus quarantined)
Now check if any of the QuickBooks files are quarantined or not.
Click on History in the AVG Anti-Virus User Interface
Select Virus Vault and select any quarantined QuickBooks File.
For example, qb.exe, qbw32.exe, qbdbmgr.exe
Restore all the important files
Now, restart your QuickBooks Desktop.
Verify all the renamed files in the installation Directory
Close QuickBooks Desktop
Go to install directory and click on C:\Program files \Intuit\QuickBooks folder to check the files to be renamed
QuickBooks might recognize antivirus as a threat and further transfer crucial QuickBooks executable files into the QuickBooks folder. The steps listed below can give you an idea about how you can restore QuickBooks from quarantine.
First of all, close all the unnecessary programmed that are running in the background.
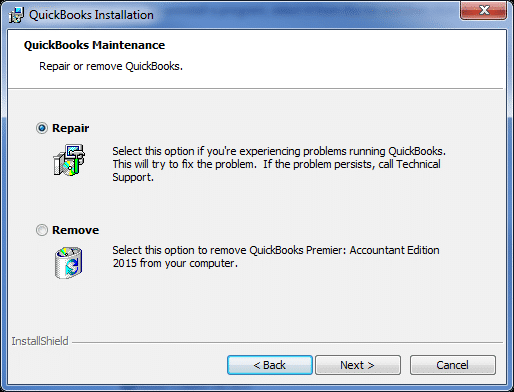
At times, a mere reinstall can fix the issue up to a certain extent, and clean installation is an advanced form that tends to eliminate different errors from their root causes. The steps that can be performed to clean install QuickBooks desktop.
You can run it from the desktop icon, and further navigate to the section under program installation issues.
In order to completely reinstall the program, try to choose QuickBooks clean Install tool and stick to the on-screen directions.
Try rebooting QuickBooks and check if the issue gets fixed.
We recommend you contact support professionals in case you are unable to fix the issue.
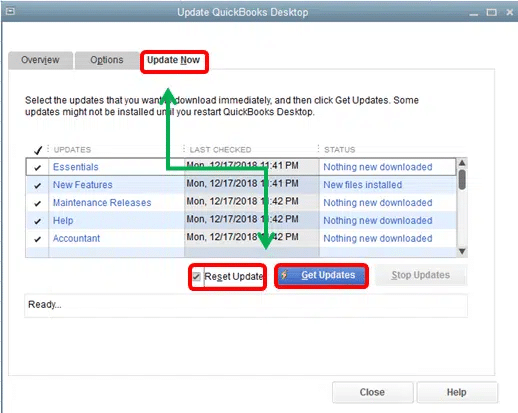
Solution 5: Update QuickBooks to latest release
Often outdated QuickBooks can trigger certain errors in QuickBooks. Thus, it is essential to ensure that the software is updated to the latest release. The steps involved in the procedure to Update QuickBooks to Latest Release are as follows:
Begin the process by launching the QuickBooks desktop software.
You now have to head to the help tab.
Later on, move to the QuickBooks desktop update option.
You can also click on the update now tab.
And choose the get updates tab.
The update process usually takes time.
Eventually, close and re-open QuickBooks to check if the issue is rectified or not.
Solution 6: Remove QuickBooks files from the list of blocked files
You can try removing the blocked files from the list of blocked files, in order to fix the error code 6094 successfully
The very first step is to launch the SpyHunter Software.
Furthermore, you need to click on the System Guard.
Heading forward, choose User Added tab and further look for the QuickBooks files.
You now have to set the QuickBooks files status as Allowed.
In case you are unable to find the QuickBooks files, then simply head back to the added tab.
Moving forward, verify PUP.
And if you find any QuickBooks file in the list, then set its status to allowed.
Moreover, set the status as allowed if you found QuickBooks blocked under PUP.
With the above three solutions, you will be able to get rid of QuickBooks Error 6094. But in case you still face problems, then you can contact us immediately on our QuickBooks enterprise support phone number .i.e. +1-888-510-9198. This number is toll-free and our executives are available 24*7 to assist you.
FAQs
How do I fix error 6094 in QuickBooks?
Try to implement the general steps to fix such an error: 1. Update QuickBooks to the latest release. 2. Try updating the Antivirus software. 3. Access the Antivirus Vault. 4. Access the quarantine folder. 5. Also, restore qbdbmgr.exe and qbdbmgrn.exe files
What is QuickBooks error 6094?
QuickBooks error code 6094 is associated with the database service and would further prevent the service from starting.
How to disable antivirus to fix error 6094 in QuickBooks?
In order to disable the antivirus, you need to simply right-click the antivirus icon on the taskbar, and further click on the option to temporarily disable the program. Later on, try to restart the database service.
What is error code 6010 in QuickBooks?
QuickBooks error code 6010 is a common error that one might come across if access to the network is denied. Moreover, if the antivirus blocks QuickBooks from connecting to the network, then experiencing this issue is probable.
Learn These DIY solutions to fix QuickBooks Display issues on your Own
QuickBooks assists tens of millions of business owners around the globe to meet their goals. It’s fast and easy to use. The software’s competency and overall user experience, however, is at the best when the proper display of QB is accessible. For many reasons, users may sometimes face system issues regarding ‘high-resolution‘ graphic displays (1920*2000 screen resolution or more).
This blog post will let you know of the symptoms, reasons, and troubleshooting steps to help you fix QuickBooks Display Issues. However, you can contact to our QuickBooks online support team at +1-888-510-9198to save your time & efforts.
Early signs of Display Issues in QuickBooks
Transaction form doesn’t fit the computer screen
Sizing icon at the top right corner of the screen does not reflect
A field overwrites and hides its label
Buttons are missing
Huge fonts
Home page is blank
Screen becomes unclear when you maximize or minimize it
Reasons behind the QuickBooks Display Issues
QuickBooks accounting software is designed for Dot per Inch – the default windows setting of smaller (less than 100%) DPI value. Systems with superior resolution display include 125 to 150% DPI Settings and therefore sometimes cause QuickBooks Display issues.
Changing DPI settings is important as QuickBooks accounting software is designed to function with the Windows DPI’s Default settings. Therefore, if you do not use Default values, it may face issues.
Windows 7
Right-click on Desktop and select ‘Screen‘
Choose display settings and click make text and items larger.
You can also select the option next to ‘smaller-100%‘
Save changes (CTRL+Skeys) and reboot the system for the change to take effect
Windows 8/8.1
Right-click on Desktop and select ‘Screen‘
At the bottom of Display settings, select ‘Make text & other items bigger or smaller’
Unmark ‘allow me to select one scaling level for my displays’
Drag the slider to smaller than 100% to make sure that the text and other items are of normal size
Save changes (CTRL+S keys) and reboot the system for the change to take effect
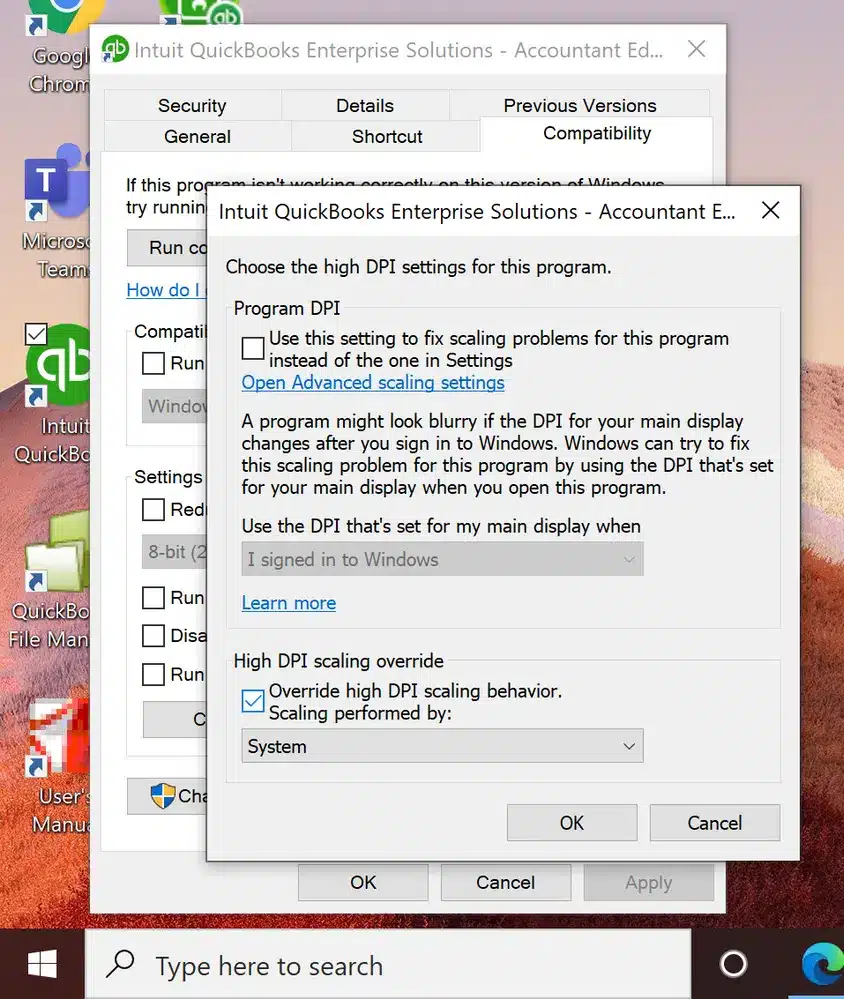
Windows 10
Click the ‘Start‘ button and go to ‘Control Panel‘
Press ‘Windows +X’ keys on the keyboard.
Select ‘Appearance and Personalization’
Go to ‘change item size section’ and tap on ‘Set custom scaling’
From the drop-down list, select 100% and press ‘OK‘ (You can also drag the right/left to adjust the setting)
Click ‘Apply‘ and sign out for changes to take effect.
Solution 4: Modify the screen resolution setting of the computer
Windows 10:
Right-click anywhere on the desktop (except on icons) and select ‘Display‘ option
Select ‘Display‘ on the left pan and then select ‘Advanced display settings‘
Select ‘Display.’ In case there is more than one display attached to your PC, select ‘display you need to modify’
Go to ‘Resolution section,’ and click screen resolution that should be at least ‘1024 x 768‘ or higher.
Click ‘Apply’
Click ‘Keep the changes’
Important: This process allows you precisely 15 seconds to keep the modifications or revert before the window goes back to its previous resolution. It’s recommended to keep the screen resolution of 1920×1080.
Windows 8, 8.1 and 7
Right-click anywhere on the Desktop (except on icons) and select ‘Display‘
Select ‘Screen’ settings.
Find the resolution drop-down menu and select a ‘resolution of 1024x 768‘ or higher as QuickBooks doesn’t work in the resolution setting of lesser than 1024×768.
Choose ‘OK‘.
Solution 5: Configure compatibility settings
The user needs to launch the internet explorer and then click on the tools and also choose compatibility view settings
One done with that; the tools menu can be accessed by pressing ALT + T.
Now, verify that the add this website option doesn’t include intuit.com or qbo.intuit.com
Check that the display all websites checkbox is not selected in the compatibility view menu
Uncheck the box next to include updated website listings from microsoft
Close the internet explorer afterward
Check to see whether the display issues in QuickBooks have been fixed by opening the software
Solution 6: Close process running in background
Under this step, you need to reboot the QuickBooks
Click on the windows start tab and also head to the start menu
Once done with that, type in task manager and open the same
You are then required to click on processes tab
This will show the current processes running on the system
Look for a process QuickBooks (32-bit) or exe
Once you spot the process linked with the QuickBooks software, then select the same and click on the end processes tab
Reboot the system, and launch QuickBooks and check if the display issues get fixed.
Solution 7: Change the QBW.ini file
The very first step is to move to the windows option
Type or copy and paste the correct file path for the QuickBooks version and click on enter tab.
We have enlisted four of the most useful solutions in this post to help you fix QuickBooks Display Issues. However, if the problem persists, you can speak to our QuickBooks premier support experts on our toll-free number i.e. +1-888-510-9198 and resume your work within minutes.
Frequently Asked Questions!
How do I fix the screen size in QuickBooks?
To fix the screen size, you can perform the steps below: 1. The user needs to click and drag the QuickBooks window until the upper-left corner of the window meets the upper-left corner of your monitor. 2. After that click and drag the lower-right corner of the QuickBooks window to manually adjust the screen size. 3. Double-click the QuickBooks title bar to maximize the window.
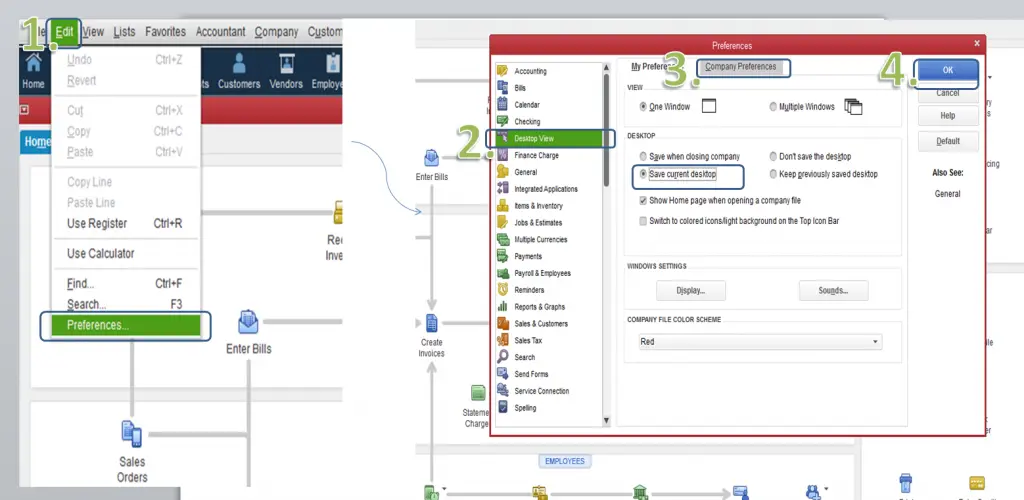
How do I change the display in QuickBooks?
You can customize your QuickBooks toolbar using the steps below: 1. Go to the QuickBooks menu, then select Preferences. 2. Select Toolbar/Tabs. 3. Select the changes you want to make: Select Display Toolbar if you want to see the toolbar while using QuickBooks. Then, select how you want it to show up: Vertical or Horizontal.
How do I fix display issues in QuickBooks?
The user can try performing the below steps to normalize the display issues: Step 1: Adjust the display settings. … Step 2: Change the View Preferences in QuickBooks to resolve QuickBooks 2020 Display Issues. … Step 3: Modify Windows DPI Settings. … Step 4: Change the Screen Resolution settings on the computer.
If you are a QuickBooks user, then backing up the data or the company file is one of the best features offered by this software. This feature not only helps in case of data loss, but also ensures safety of the data from any kind of accidental data loss. However, there can be situations when QuickBooks is unable to backup the company file error, which means that the QuickBooks software is unable to create the backup of the crucial data. In case your company file is unable to back up the data, you might not be able to recover it in emergency cases.
Well, need not panic, as we have come up with this article to assist you in resolving this issue and also finding out the hidden reasons behind such an error. In case you need immediate help or technical support, you can dial our toll-free number +1-888-510-9198 to save your time and efforts, and we will ensure that you are provided with the best possible care and solutions.
What is QuickBooks unable to backup company file error?
QuickBooks may fail to back up the company file, if the backup path is unavailable or faulty. There can be various other situations when you can experience QuickBooks company file fail to create backup error. This error usually appears on the screen with a warning message that states: QuickBooks was unable to back up your company file. QuickBooks could not create a disk image. QuickBooks could not copy the company file. Regular backups are a must in QuickBooks to avoid any sort of data issues, especially when the data is lost. However, when QuickBooks fails to create a backup file, it can create issues for the user and must be dealt with immediately.
Do you know what is back-up of company file?
A few of the non-technical QuickBooks users might not be well aware of the fact what actually is backing up of QuickBooks company file. Basically, a backup is the data that the user needs to re-create the company file. Backing up the company file rescue the users in case of accidental data loss. It is always recommended to backup the company file on a regular basis in order to avoid any kind of issues later on. At the time of backing up the data or the company file, QuickBooks users might encounter certain errors, which include error messages:
You can face backup failed error in QuickBooks due to the following reasons:
The basic cause of the error is the unobtainability of the storage device that generally stores the backup file.
Any kind of damage to the company file might also lead to such an error.
Another reason can be setting up a wrong backup path leading QuickBooks to freeze.
In case the company file name is having more than 65 characters.
One more reason behind such error can be when the user is trying to take backup on an external hard disk.
If the company file is more than 3GB in size, then such error can also be encountered.
It should be noted that, since the real culprit behind the QuickBooks failure to backup error might not be identified instantly, identifying the most appropriate solution might be difficult at first for the QuickBooks users and this might end up in hit and trial method. However, seeking expert assistance by QuickBooks enterprise support team in such cases is recommended, as they have an in-depth knowledge and experience to tackle such errors in one go.
How to fix QuickBooks Unable to Backup Company File Error?
Talking about the methods to get rid of such error, the QuickBooks users have two to three options. We will be discussing each of the methods along with the steps to be followed in each. So, without wasting much time, let us have a look:
Method #1 Setting up QuickBooks Desktop to use the new company file name
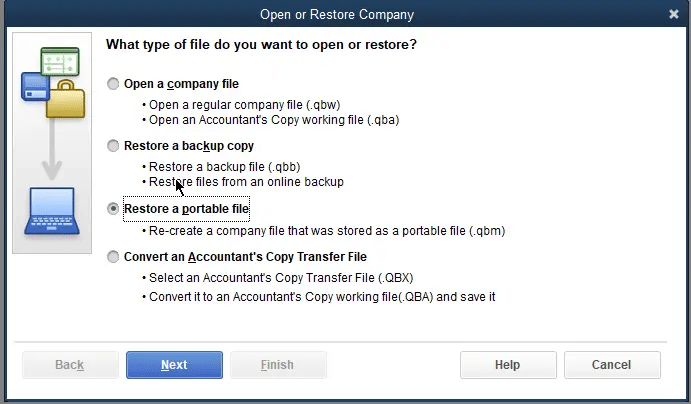
To begin with the method, the very first step is to click on ‘Open or Restore‘ an existing company from the QuickBooks ‘File menu‘.
After that, the user is required to choose ‘Open a company file‘, followed by clicking on ‘Next‘.
The last step is to select the ‘New company file name‘ and tap on ‘Open‘.
Method #2 Backup of company file into an external drive or flash drive
In case the first method didn’t help you much, try backing up the data to an external drive using the steps below. However, you need to first switch to multi user mode.
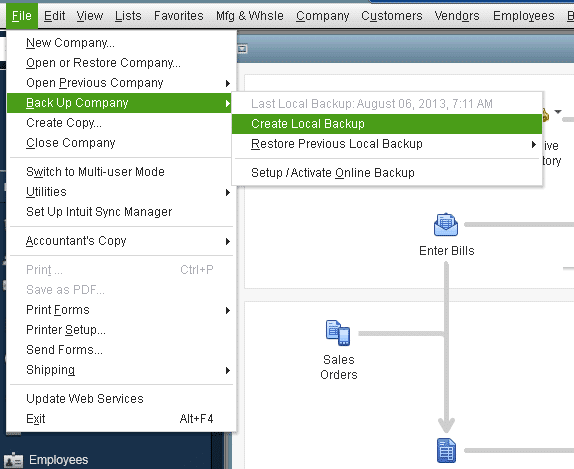
The very first step is to visit the ‘File‘ menu and then choose ‘Save Copy or Backup‘ option.
After that choose the ‘Backup copy‘ and then tap on ‘Next‘.
Once done with that, the user is required to select ‘Local Backup‘, followed by selecting ‘Next‘.
Moving ahead, the user should select ‘Save it now‘, when asked, and then click on ‘Next‘.
After that browse to a location on the local drive and then tap on the ‘save button‘.
Minimize the QuickBooks Desktop and head to the next step.
Now, locate the backup file on the local drive.
Then, right-click on the file, followed by selecting the ‘copy‘ option.
Once done with that, open a ‘Windows Explorer‘ window.
After that, double-click the drive letter that corresponds to the external drive or flash drive to open the same.
Now, right-click on ‘File‘ and then select the ‘Paste‘ option and you are good to go.
Method #3 Rename the QuickBooks Desktop Company file
Before making any kind of changes to your company file, the user is required to take a backup of the same in order to avoid any mess. Also, if the user is using Loan Manager, then he/she is required to recreate the loan manager information once the company file is renamed.
The first step is to ‘launch the Desktop‘ and then open the company file.
Now, the next step is to ‘Press F2 or Ctrl+1‘ which will open the ‘Product Information‘ Window.
Do not forget to note the location of the company file listed in the ‘File information field‘
Now, navigate to the location of the company file. This step might vary with the Windows version, just like:
Windows 10,8.1 and 8: The users of Windows 10, 8.1, and 8 are required to right click the ‘Windows start‘ button and then select the ‘File Explorer’.
Windows 7 and Vista: Whereas, other users are required to right click the ‘Windows start’ button and then select the ‘open windows explorer‘ option.
The next step is to right-click the file and the choose the ‘Rename‘ option
Once done with that, the user is required to type the new company file name and then hit ‘Enter‘. If the Windows prompts the user to confirm the action and then tap on ‘Yes‘.
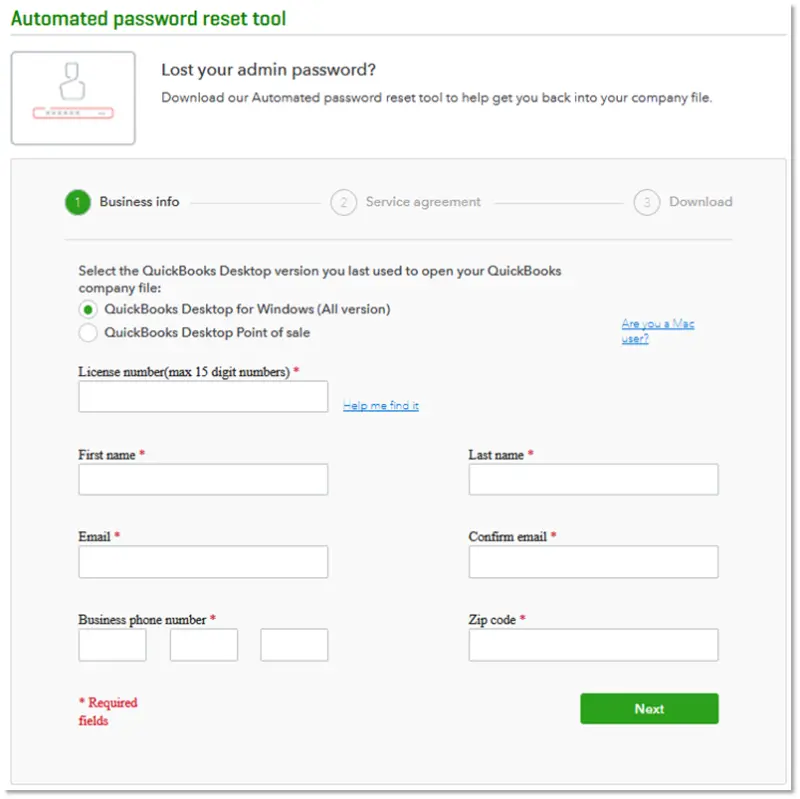
Method #4 Reset the password
Just in case you come across a warning message that states: Your data has not been restored if you failed to enter the correct admin password, then you can perform the set of steps listed below related to the automated password reset tool.
The user is then required to accept the license agreement
Also, run the tool and enter the token number received on mail
Choose the QuickBooks version from QuickBooks desktop products drop down
Select browse for company file
Also, choose the company file you wish to reset the password for
The next step is to enter correct company file admin user name
Lastly, enter the new password and confirm password and choose reset
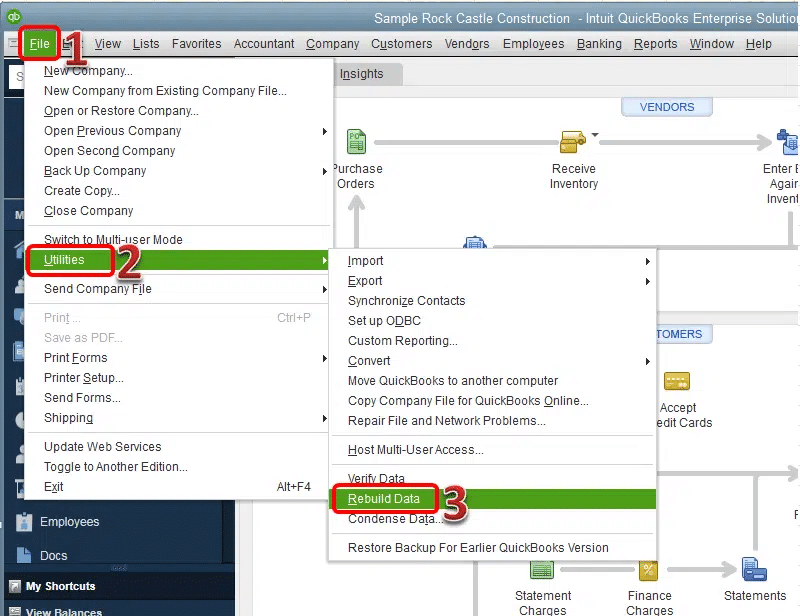
Method #5 Run Verify and Rebuild Utility Tool
QuickBooks allows its users to make use of the verify and rebuild utility to eliminate any sort of data issues. You can try to fix the company file related issues using the steps below.
At first manually repair the QuickBooks file menu by moving to the utilities tab and selecting the rebuild data.
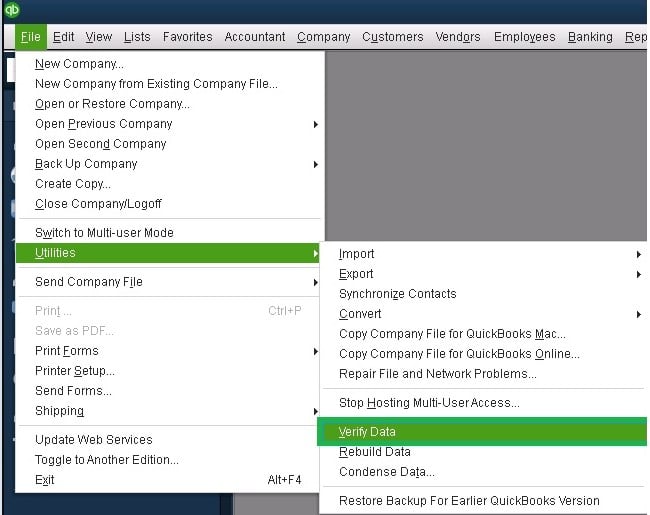
You now have to visit QuickBooks file menu and also move to the utilities tab and verify data tab.
Under this process, save the file in a location that can be accessed easily.
If the file name resembles the other file name, then a message would appear stating: The file name exists. Would you like to overwrite this file?
The last step is to click on No and change the file name.
Conclusion
The backing up of the company file is an unavoidable process. Therefore, if you face any kind of problem while backing up the data or the company file, do not ignore it and immediately look for professional assistance. You can dial our toll-free number .i.e. +1-888-510-9198, and talk to our QuickBooks error support executives regarding QuickBooks associated errors.
FAQs Related to QuickBooks Backup Issues
How do I fix company file issues in QuickBooks desktop?
You can try repairing the company file using the rebuild data tool to fix QuickBooks unable to backup company file error. 1. At first, you need to move to the file menu. 2. After that move to the utilities tab and further choose rebuild data. 3. The next step is to let the tool repair your file 4. After that, hit ok tab. 5. Also, head to the file menu and let the tool check for data issues.
How do I backup my QuickBooks company file?
You can backup the company file manually using the steps below: 1. From the file menu, choose backup. 2. Now, click on the backup company file tab. 3. Also, click on the browse tab to change the filename and indicate the backup location. 4. You now have to click on save tab. 5. Click on ok tab.
How do I upload a company file to QuickBooks?
You can try uploading a company file to QuickBooks using the steps below: 1. Sign in as admin to the company file you need to import. 2. After that, move to the company and choose export company file to QuickBooks online. 3. Once done with that, choose start your export. 4. And also sign in as admin to QuickBooks online company.
How do I update an old QuickBooks company file?
You can try to update your company file using the steps below: 1. Ensure all users sign out of the company file. 2. Open the new version of QuickBooks 3. Move to file and choose open or restore company 4. The next step is to find your company file 5. And sign in to the company file as admin user. 6. Choose update now.
Identify the methods to fix QuickBooks Error: Could not connect to the email server
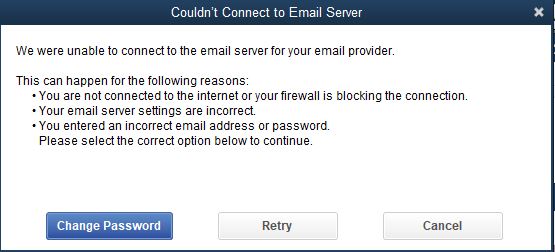
At times, unlike always when you enter your email password, you might get a warning message i.e., Couldn’t Connect to Email Server: We were unable to connect to the email server for your email provider. or QuickBooks was unable to send your form for the following reason: QuickBooks was unable to connect to the remote server but could not understand the server’s response. Please try again to see if the problem has been correct on the server. You can often experience this issue with the Yahoo email address. To help you out in eliminating this particular issue in QuickBooks, we have designed this piece of writing sharing the complete information related to fixing the error that could not connect to the email server.
Warning
Couldn’t Connect to Email Server We were unable to connect to the email server for your email provider
OR
QuickBooks was unable to send your form for the following reason: QuickBooks was able to connect to the remote server but could not understand the server’s response. Please try again to see if the problem has been corrected on the server.
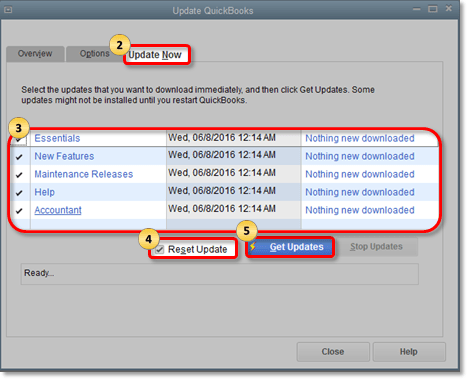
The next step is to ensure the product is selected. In case it is not, visit the ‘Change link‘ and then choose the ‘QuickBooks product‘.
Now, choose the ‘update‘ button to ‘download‘ the ‘update file‘.
The final step is to choose the ‘Setup automatic updates‘ to learn the way to set QuickBooks to automatically download and also install the latest updates.
#Step 2: Check the settings in the web mail preferences
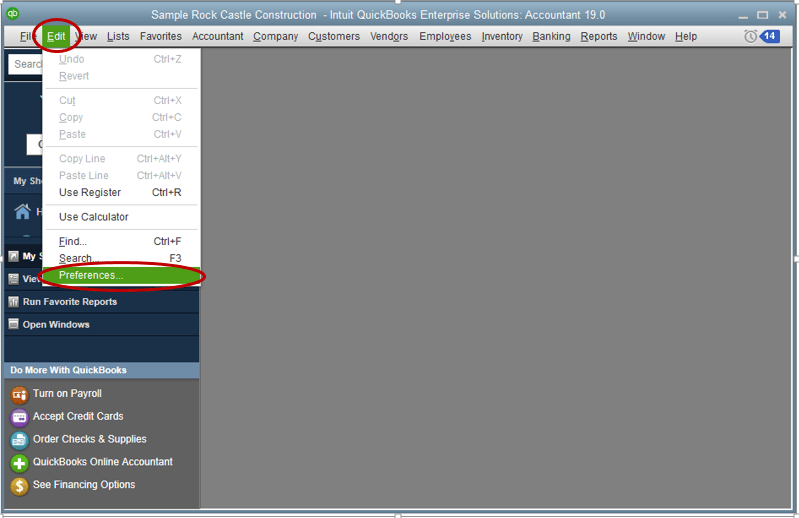
The user is required to choose ‘Preferences‘, from the QuickBooks ‘Edit‘ menu.
After that, select the ‘Send forms option‘, on the left pane.
Moving ahead, the user should choose the email account that they are using, under the ‘My preferences‘ option, followed by selecting the ‘Edit‘ option.
Now the next step is to go to the ‘SMTP Server details‘ section in the ‘edit email info screen‘, followed by ‘setting the server name and port‘ to the email provider settings. The user should refer to ‘Set up the email service in QuickBooks desktop‘ for a list of ‘SMTP Server‘ and Ports.
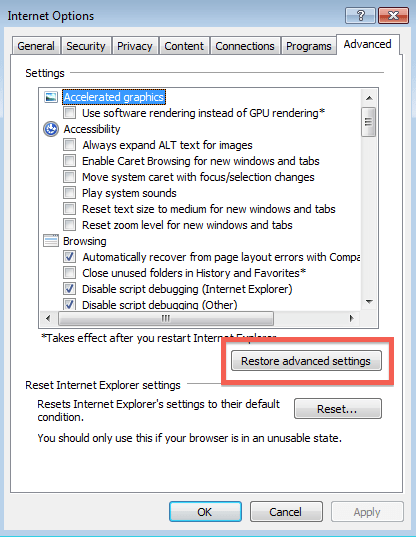
#Step 3: Reset Internet Explorer settings to default
To begin with, the user is required to open ‘Internet Explorer‘, and then choose the ‘Tools menu (Alt + T)‘ or the ‘gear icon‘.
After that choose the ‘Internet options‘.
Now, visit the ‘Advanced tab‘, and then ‘Restore Advanced Settings‘.
The last step is to choose ‘OK‘, followed by close the browser.
After following the above steps, a situation can arise when the user might determine that the antivirus is blocking the outgoing mails. In such situations, it is better to consult an IT professional in order to avoid any further mess. In case the error persists, the user can perform the following solution according to the error messages that they encounter.
If you still get the error message after trying all three solutions, you may want to perform the suggested solution in the error message.
Error Message
Solution
You are not connected to the internet or your firewall is blocking the connection error
If this error appears, try to open Internet Explorer and then try to access the website.
Your email server settings are incorrect error
If your email server settings are incorrect, then authenticate the settings by carrying out the steps mentioned in Solution 2.
You entered an incorrect email address or password
Try to login to your email through web browser and make sure your login credentials are correct.
In case the error persists, feel free to get in touch with QuickBooks premier support experts. You can also try once by creating the new admin user to resolve the issue. However, consulting professionals would be a better option in order to avoid any kind of further mess. You can dial our toll-free number i.e. +1-888-510-9198 and talk to our executives for any further information.
Frequently Asked Questions
How to Link my email with QuickBooks?
In order to link your email with the QuickBooks software, you can simply perform a couple of steps, which include: Opening the QuickBooks edit menu. Perform instructions and choose preferences Go for the forms and then opt for Webmail. The next step is to click on the Add option from the dropdown, follow the instructions and click OK.
How to fix Email issues in QuickBooks?
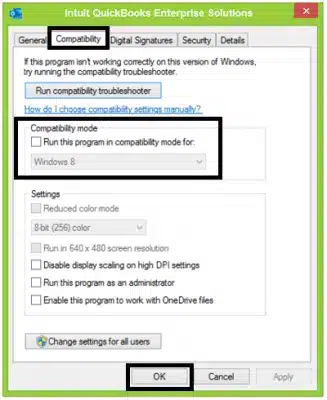
Often users might come across email issues in QuickBooks. To get rid of these issues, one is required to head to the QuickBooks icon, and right-click and choose Properties. After that go for the Compatibility tab. And also unmark Administrator if you run this program. The user will also have to click OK and then restart the computer with an upgraded configuration.
Can the Wrong Email ID and Password lead to this Error in QuickBooks?
Yes. Using wrong email ID and password often leads to the error QuickBooks could not connect to the email server.
All about fixing error Outlook is missing in send forms preferences
QuickBooks Desktop users often face many errors. Though this application is known to do wonders but errors often hinder the smooth functioning of the organizations. A common problem is missing Microsoft Outlook in QuickBooks Desktop send forms preferences. The Microsoft Outlook actually helps in sending different kinds of forms through email. Users however, get the three options like webmail account, outlook or QuickBooks e-mail.
In this article, we have discussed about the problem and shared 8 troubleshooting steps to resolve the error. Also you can take help from our QuickBooks support team to resolve the ongoing problem in QuickBooks. Give us a call at our technical support number i.e., +1-888-510-9198, and get assistance from certified QuickBooks professionals.
What causes the Outlook is missing in send forms preferences error?
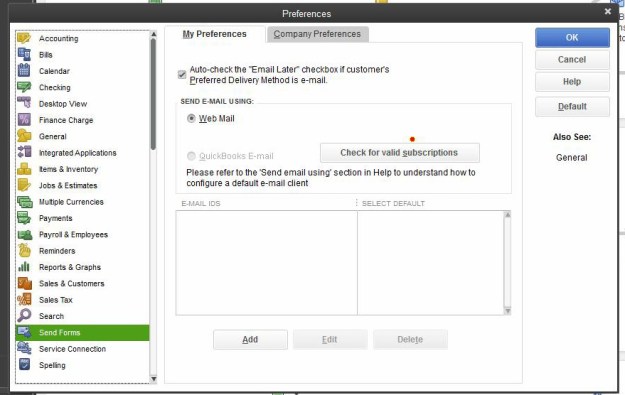
In case, you use Microsoft Outlook, it might not show the option of Edit -> Preferences -> Send Forms -> My Preferences.
Below are few reasons of this issue:
One of the reasons can be that you are using an older click to run a version of Microsoft Office like the 2010 one.
There is an issue with the older Microsoft Office Click-to-Run version. The Office also doesn’t support many of the programs which includes the QuickBooks Desktop. In order to get smooth operations update to the latest version of QuickBooks Desktop as well as Click to Run 2016.
Another reason can be that your profile is not set up in Microsoft Outlook.
When Outlook is not set as a default program then you might face the error.
In Internet Explorer, Outlook may not be selected as the preferred email program.
QuickBooks might be hosted in the Cloud and the service provider do not have the office installed in the application where it is hosted
One must note that Intuit doesn’t
support Microsoft applications and that’s why if you face any issues seek
assistance from an IT professional. Some of the common risks are
Windows/ MS office errors
Inability to reinstall MS office after loss of its license number.
Important:
On your Microsoft Office, click to Run is a best option to delivering and updating the MS office to the broadband user using streaming and MS virtualization technologies.
The older click to run version does not provide the integration for programs like QuickBooks desktop. So you are using a current version of QuickBooks desktop and click to the ‘Run‘ version.
In your ‘Outlook Help‘ menu, choose the option of ‘Microsoft Office Outlook‘
After this validate the information of the version as well as the build number to install the version of outlook and again check it for easily send and set up email.
Once done you can also ‘check the version of your Microsoft outlook‘ by examining the QuickBooks ribbon.
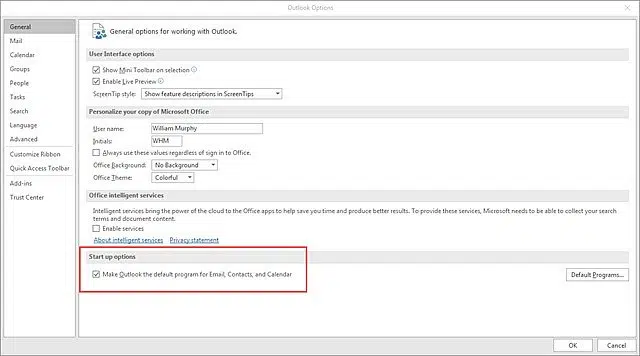
Once done, now select the ‘options‘ Start-up, under which choose the Set Outlook the default email, calendars, contacts checkbox etc.
Outlook 2007 and previous versions:
First Select ‘Tools‘ and then go to ‘Options‘
Now click on the ‘Other‘ tab
In the General Setting, choose ‘Make Outlook the default email program‘.
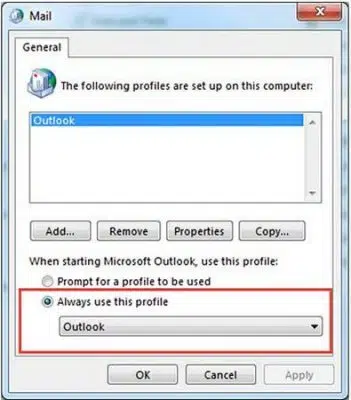
In case, you have many QuickBooks profiles, then you will get the option to choose your profile every time you start-up. If any of the profiles are not selected as default, then QuickBooks will not be able see Outlook, so select a profile and then click to ‘set as default‘.
Solution 3: On Internet Explorer, set default email plan
One must note that prior to checking Microsoft Outlook, Microsoft email or the outlook express, you must be able to send and receive email from the profile.
First thing to do is in Internet Explorer select ‘Tools‘ and ‘Internet Options‘
Now choose the ‘Program‘ tab.
After this follow the instructions provided for the version of Internet explorer you have.
For Internet Explorer 9.0, 8.0 and 7.0
First thing to do is at the bottom of the window, tap on the ‘Set Program‘
Now click on ‘set your default programs‘
Once done, select your ‘email applications‘.
You have to set this program as default and for that click on ‘OK‘
Now select the ‘Set Program access’ and computer defaults.
Choose ‘Microsoft Windows‘.
After this you have to click the drop-down arrow and then choose ‘Use my Microsoft email program‘,
Now click on ‘OK‘ button.
For Internet Explorer 6.0:
First Close and then reopen ‘Internet Explorer‘
Now select ‘Tools‘ then ‘Internet Options‘ and then click on the ‘Programs‘ tab.
After this in the ‘Internet Program‘ choose ‘Outlook as your Email program‘ by clicking on ‘OK‘.
Now select ‘Edit‘ and then ‘Preferences‘.
Select to ‘Send Forms‘ and the tap on ‘My Preferences‘.
In the Send email section ‘sign into your email‘.
Solution 4: In Windows editing the Mail Profile Setting
The first thing to do is close QuickBooks.
Now you have to click on ‘Windows tab‘ and then open the ‘Control Panel’
In the mail you will get ‘Mail option‘ in the results screen, click on it
After this you have to choose the option ‘Show Profile‘
Users note that the WIN.INI file is basically a windows system file and it has some settings which consists some used for email.
Click on the ‘Windows key‘ on your keyboard and then type ‘C:\Windows\‘ and press ‘Enter‘ key.
Now you have to press the right button on the ‘WIN.INI file‘ after which you have to click on the option ‘Copy and paste the file‘. The file will use a separate location as a backup. You have to copy and paste the file into a different location as backup.
Once the file is located separately, go back to the ‘C:\Windows folder‘ and the open ‘WIN.INI file‘.
The file will display different headings, so choose one such as email.
You will not have to show (mail) section, after this add it to the end of the file along with text below.
In case the mail section is present but the text below is not in that section then you have to add it.
EMAIL
MAPI=1
MAPIX=1
Once you are done editing the file , save and then close it.
Now restart QuickBooks.
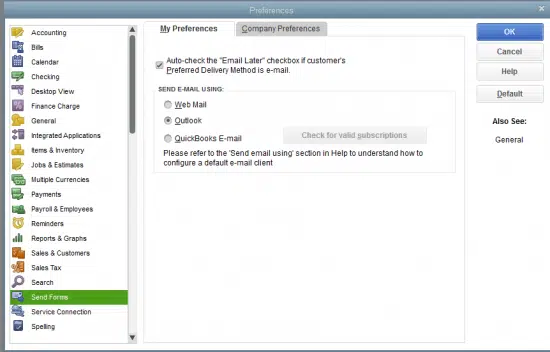
Click the ‘Edit menu’ and select the ‘preferences‘ and then send the form preferences. After this outlook will now be an option.
Important
Do note that in case it doesn’t troubleshoot then you have to edit ‘WIN.INI‘ again and get rid of the text that you added or replace the whole file with the copy that was saved earlier.
In case you cannot edit ‘WIN.INI file‘ because of Windows user access approvals then login as the ‘Windows Administrator‘ user and try again.
Solution 6: Run Detect and fix in Outlook
You can gain a lot of knowledge in detecting and fixing the errors with Outlook 2007 or its later versions. You can checkout the following article in order to Repair an Office application.
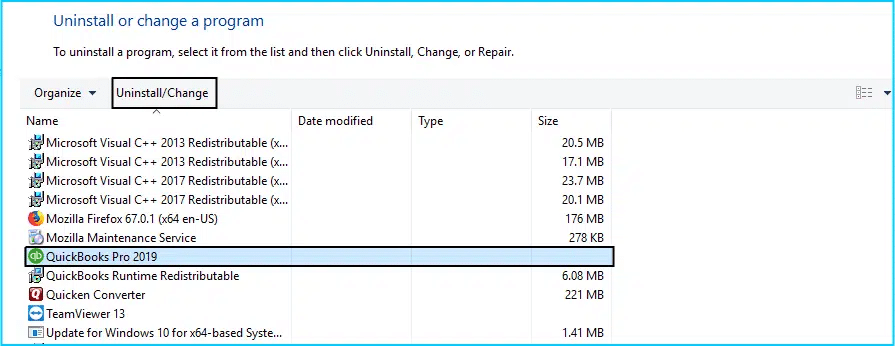
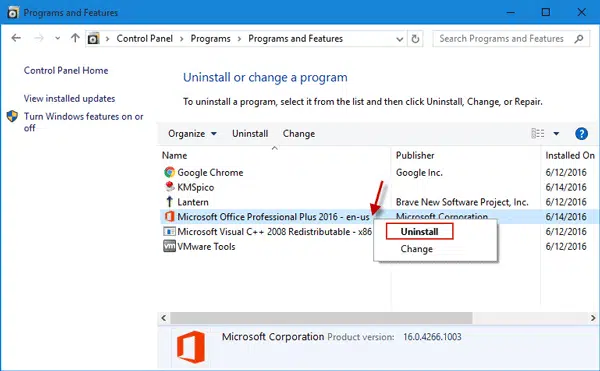
Solution 7: Uninstall and reinstall Office and QuickBooks
In this article we tried to showcase the issue of Outlook is missing in send forms preferences, its causes and also the solutions. In case, the problem still persists then you have to seek assistance from QuickBooks payroll customer service team by dialing +1-888-510-9198 who are available 24/7 to offer solution to every kind of error. We are Intuit certified ProAdvisors and help you to resolve your accounting hinders in no time.
FAQs Related to Outlook is missing in QuickBooks when send forms preferences
Why is Outlook not showing as an option in QuickBooks?
In case the Microsoft outlook version isn’t supported, then you simply need to upgrade or switch to a supported version of Microsoft Outlook to let QuickBooks use your Microsoft Outlook. You can face this issue if the profile isn’t setup or isn’t setup correctly in Microsoft Outlook.
How do I allow QuickBooks to use Outlook?
You can set up outlook to work with QuickBooks using the set of steps below: 1. At first, move to the QuickBooks edit menu. 2. After that, choose preference and send forms. 3. You now have to choose Outlook and click on Ok tab.
How do I make Outlook my default email in QuickBooks?
You can try changing email client to Outlook using the steps below: 1. Initially, open Outlook. 2. After that, go to Outlook and choose preferences. 3. The next step is to choose general. 4. Furthermore, choose the make outlook the default application for email, contacts, and calendar checkbox.
Why is my QuickBooks not letting me send emails?
Well, you can try modifying your antivirus settings if that is the case. Make sure QuickBooks has the right permissions. Further, look up specific steps for how to set up permissions in your antivirus program for how to set up permissions. Or you can follow the links if you are a Norton or McAfee user.