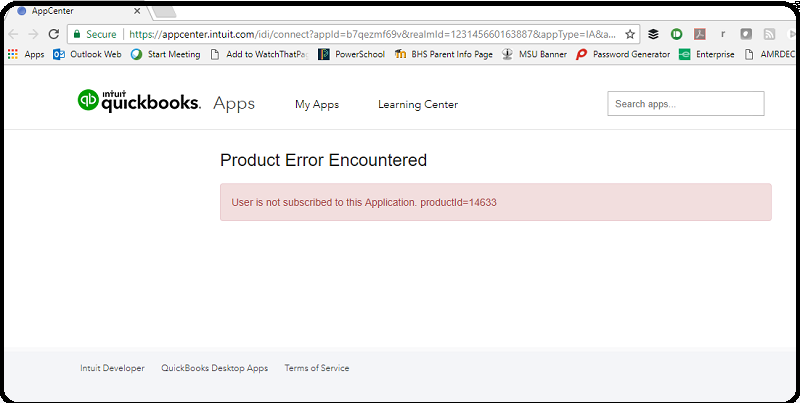
QuickBooks Software is being used by all over the world. In fact, it is regarded as one of the best accounting software and it has changed the way of accounting. Moreover, it has reaped many gains for small and medium businesses. However, being just a software, it often faces issues affecting the operation of an organization. In this blog I am going to focus on the solution of Error: “You are Currently not Subscribed to any Services”.
This error is a typical error and there could be various reasons behind to it. In many cases users may receive error message “you are currently not subscribed to any services” on their desktop screen. However, if you are looking for further help our QuickBooks error support team is always there to help you.
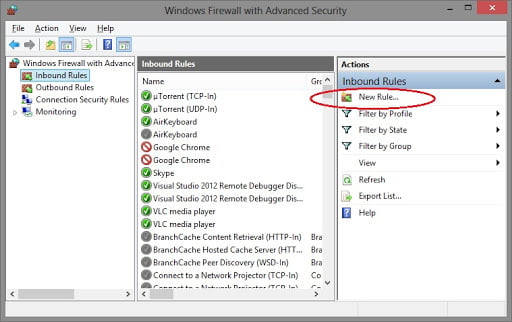
Steps to Correct Error: You are currently not subscribed to any services
In case you find that you are not subscribed and need to create new company file, the below mentioned information can guide you through it. It is best you start the QuickBooks Online company with a free trial. Users can either convert the present QuickBooks desktop into QBO or simply start a new company but without making use of any existing data in it. Once you get the free trial you can subscribe to it
In order to start a trial first visit the website:
If this the first time signing up for a QuickBooks service, then users will have to provide information in the required fields.
And click on Sign In if already have access to QuickBooks online company.
Step 2.
Once the above steps done click on Continue to Trial.
Step 3.
Go through the prompts. For US and Canada users the setup interview second step will ask users if they want to import their data from QuickBooks for Windows or Mac version.
Step 4.
Once this is done users have to provide the requested information and finally the trial will be ready to use.
If you still have queries or not able to subscribe, then take assistance from QuickBooks Support team. Or you can seek help from our Intuit Certified ProAdvisors by calling +1-888-510-9198. Help is available 24/7 by our experts.
In the past few years, QuickBooks has emerged as an advanced and user friendly accounting software. Millions of small and mid-sized business owners trust it to run and manage their organizations. A host of complicated functions such as accounting, bookkeeping, payroll, and filing taxes can be performed with ease with the assistance of this software. Intuit, the maker of QuickBooks also keeps introducing new updates and upgrades to make it more competent.
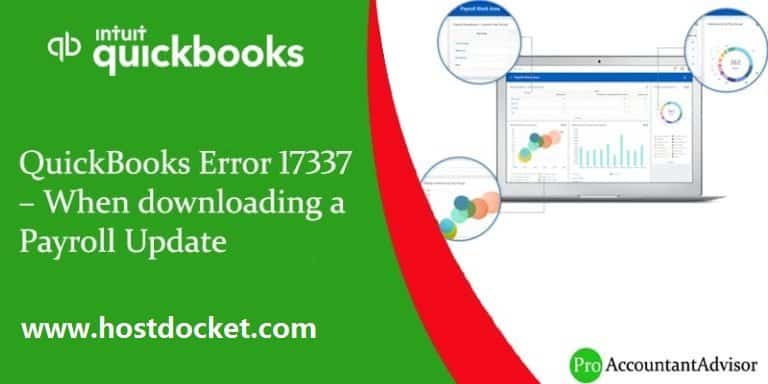
While working on this software, users might encounter some or the other error, which include QuickBooks error code 17337. If you are also facing any such error, then reading this article till the end can work well. However, in case the user needs expert assistance, then he/she can make a call at our toll-free number i.e. +1-888-510-9198 in past few years.
The user might encounter malfunction, the software might slow down or QuickBooks stop working. Error 17337 often obstruct the functioning of the software. This blog is created to discuss about QuickBooks error 17337 in detail. Also, the main objective of this post is to inform you of the causes and the best solutions of the error.
According to Intuit, Payroll error code 17337 occurs when a user is updating QuickBooks payroll service. This error mainly caused by Internet Explorer settings or incorrect SSL settings that are not completely configured for secured websites.
There can be two valid solutions to get rid of the issue. Follow the below mentioned ways to fix the QuickBooks error 17337.
Step 1: Configuring Internet Explorer’s SSL Settings in QuickBooks
The first step is to select Help and then Internet Connection Setup in QuickBooks.
After choosing the right Internet Connection, click on Next.
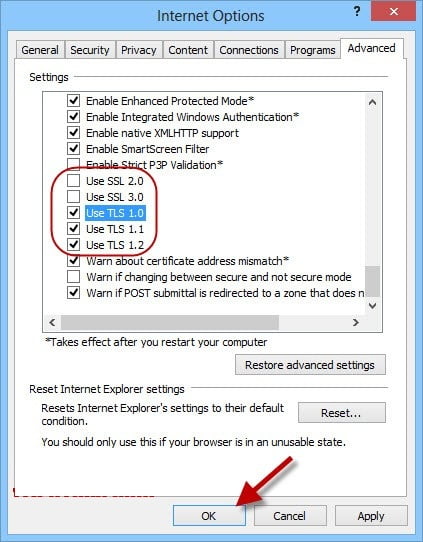
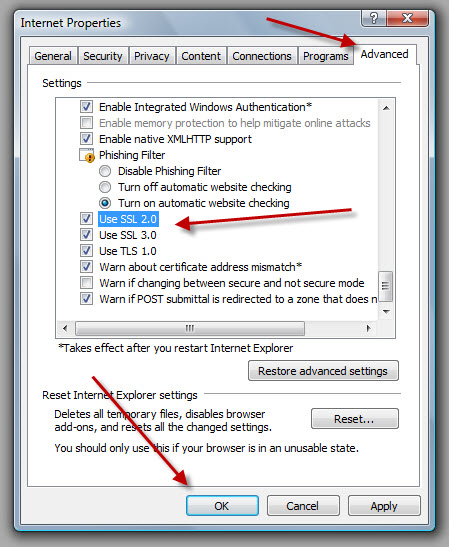
Then, click on Advanced Connection Settings (If this is not present as an option then go on with the step that follows this one in order to configure the SSL settings in the Internet Explorer.
Now Click on the Advanced tab.
After this select SSL 2.0 and SSL 3.0 check-boxes.
Also, the user is required to click on Apply. In order to close the Internet Connection Settings windows, Click OK button.
Configuring Internet Explorer SSL Settings in QuickBooks – Screenshot
Followed by clicking on Done to close the Internet Connection Setup.
And also close any instances of Internet Explorer, if there are any.
Following any of the above methods can help the QuickBooks users to get rid of QuickBooks error code 17337. However, if still the problem persists, then seek professional assistance by dialing our toll-free +1-888-510-9198. Our QuickBooks Payroll support team will look forward to your concern and provide you a feasible solution for your problems. We will be glad to offer you quick and precise solutions. Thus, do not hesitate in talking to our team for expert guidance.
FAQs Related to QuickBooks payroll error 17337
How do I fix a network connection failure in QuickBooks?
For this: 1. Select the Reload button or press F5 on your keyboard (Command + R if you’re using a Mac) to download the entire page. 2. If the problem persists, restart your browser and then sign in to QuickBooks Online.
What causes QuickBooks to stop working?
In case you have corruption on your hard drive. Your program files or QuickBooks Desktop installation may be damaged. You may have a damaged Windows operating system.
How do I fix a license error in QuickBooks?
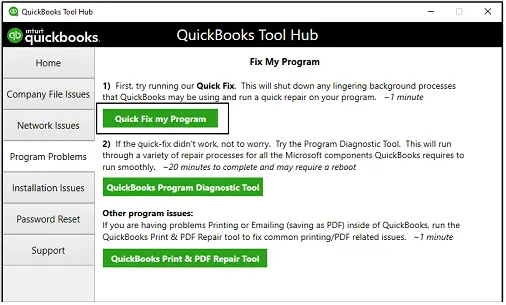
To fix a license error, you need to: 1. Open the QuickBooks Tool Hub 2. Select Installation Issues. 3. Select QuickBooks Install Diagnostic Tool. 4. When the tool finishes, restart your computer and start QuickBooks Desktop, then open your data file and try to activate.
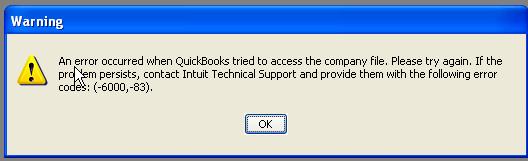
QuickBooks error 6000 83 usually occurs when QuickBooks tries to access the company file. This particular error basically belongs to the 6000 series error and is usually associated with the company file. It is possible that the user might come across this issue while attempting to open, restore or back up the QuickBooks Company file. To help you understand this error better and fix the issue permanently, here we are with this segment sharing what causes and fixes QuickBooks error code 6000 83. Thus, stick around this segment carefully or you can seek help from certified professional & experienced QuickBooks technicians, by calling our QuickBooks technical support at +1-888-510-9198. All your queries will be answered immediately by our technical sound QuickBooks ProAdvisors.
QuickBooks error code 6000 83 is a 6000 series error related to the company file. It appears on the screen with a warning message: An error occurred when QuickBooks tried to access the company file. Please try again. If the problem persists, contact Intuit Technical Support and provide them with the following error codes: (-6000, -83).
Or
You do not have sufficient permissions to the specified folder. To use QuickBooks in a multi-user environment, you must have read/write access and create/delete rights to the folder where the company file is stored.
quickbooks error message 6000-83 screenshot
What May Cause QuickBooks Error 6000, 83?
Check out the possible reasons due to QuickBooks Error -6000, -83 appears: –
This error can also appear if you are using a non-U.S. or non-Canadian version of Windows. Or if you are having a ‘Regional Language Settings’ option in Windows which is set to some other language apart from English.
The troubleshooting steps depend on the action performed when the error occurs. Please select from the under given situation & pursue the suggested troubleshooting steps.
Condition 1: Open the QuickBooks company file stored on a Windows Server
You may find that copying QB company file to the computer during error fixation is more efficient than resolving it on the network. Once the trouble fixed, copy the QB file back to its original network location.
Solution 1: Use the QuickBooks File Doctor to fix the error
Use the QuickBooks File Doctor to resolve the QB company file or network related issues.
Firstly download the QuickBooks file doctor tool from here
Install and run this file doctor tool on your system.
This toll will automatically scan the server errors and resolve them automatically.
Finally restart your computer system once.
Solution 2: Turn off hosting on all Workstations that Access the file Over the Network
If you’re using the QuickBooks desktop on more than one system, configure only one of them to host the QB company file.
Follow these steps to turn off hosting on all workstations.
Open the QuickBooks Desktop. Choose the “File” icon, & then select the “Utilities” tab.
From the list, if you see:
Host Multi-User Access – The computer is not hosting the QB company file & you can go to the next system.
Stop Hosting Multi-User Access – Select that option, then:
In the ‘Stop hosting multi-user Access’ window, click on the “Yes” icon.
In the ‘Company file must be closed’ window, click on the “Yes” icon to continue & go to the next computer.
You can see the manual troubleshooting steps that QuickBooks File Doctor automatically performs in Solution 1. You are supposed to utilize the following solution steps if the QuickBooks File Doctor is unable to run successfully on the system.
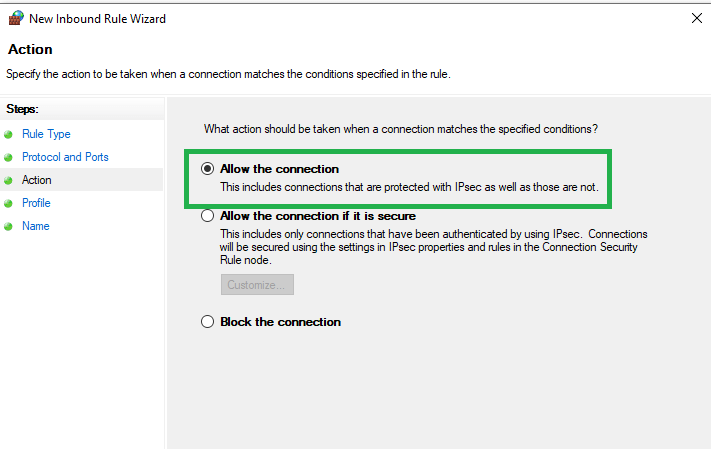
Configure QuickBooks files for the firewall or anti-virus
Note: Intuit does not endow support service for firewall associated issues.
See the Configure of Firewall & Internet security settings for QuickBooks Desktop updates and also network access to view the exceptions needed.
Pursue the instructions from the firewall maker’s website to configure the firewall to allow Internet access to the QuickBooks files on the entire system.
Verify the permissions to access the QB company file
To confirm that permissions arrange correctly, see the Setup folder(s) and file(s) permissions to share the QuickBooks company files.
If you want to place permissions, go to the ‘Set Windows’ access permissions to share QB company files.
Scan the QuickBooks company files
You want to scan the complete folder where the QuickBooks company file(s) are situated or stored to create the ‘Network Descriptor’ file(s) with .nd extension. The *.nd extension file(s) stores the details/information’s about the system where the file(s) are hosted.
Go to the ‘QuickBooks Database Server Manager’ screen, hit onto the “Add Folder” icon and search the folders that contain QB company file(s).
Once all QB folders are added, hit onto the “Scan” icon.
Under the ‘QuickBooks Company Files’ option, you will see the data files.
Browse to each & every folder that contains QB company files. Then, ensure that the .qbw,.nd file was created or build for each of the QB company data file(s).
Check the hosting on the computers
If you are using the QuickBooks Database Server Manager (QBDSM) on the server in the network environment, then the server computer supposes to be the only computer with the hosting feature turned on.
Turn on the hosting on the server computer and scan the QB company files.
Open/access the QuickBooks application, then go to the “File” option and choose the “Utilities” tab.
From the list, if you notice:
Host Multi-User Access: It simply means that the system is not hosting the QB company file. Thus, you suppose to use the next system.
Stop Hosting Multi-User Access: Choose this preference, then:
Go to the ‘Stop hosting multi-user Access’ screen, and then hit onto the “Yes” tab.
Close the company file window, and then hit onto the “Yes” to continue & later, go to the next computer.
Server
Press onto the “Taskbar” window & choose the “Task Manager” tab.
Go to the ‘Image Name’ column, search for the QBDBMgrN.exe. (Go to the column heading to alphabetize the list.)
In case, you don’t see the QBDBMgrN.exe on the list, ensure that the QuickBooksXX service is on the system:
Log in the system as a Full Administrator. (Contact the system administrator to log in as full admin.)
Hit onto the “Start” or “Windows” tab & choose the “Run” tab. Go to the “Open” section, and type in the services.msc, and then tap on the “OK” tab.
Locate the service given below for the corresponding QuickBooks Desktop version:
QB version 2020: QuickBooksDB30
QuickBooks 2019: QuickBooksDB29
QB version 2018: QuickBooksDB28
QuickBooks 2017: QuickBooksDB27
QB version 2016: QuickBooksDB26
Ensure that you choose the Automatic startup type & also the service started currently
If the service is not yet started, then perform right-click on it & choose the “Start” tab.
In case the startup type isn’t Automatic and then performs double-click on the service. In the Startup type drop-down, choose the “Automatic” option.
Go to the QBDBMgrN.exe file in a row; confirm that the “User Name” column entry is correct
If the QuickBooks 2018, the entry should be QBDataServiceUser28
In the QuickBooks 2017, the entry should be QBDataServiceUser27
If the QuickBooks 2016, the entry should be QBDataServiceUser26
Open/access the QB company file from a different location
Use host computer to open/access the QB file.
Navigate to the systemwhere the QB company file is saved /stored.
In case, the only system that stored or installed the Server is hosting computer, then move to the ‘Copy file’ option to some other location.
Open the QuickBooks Desktop application and also the QB Company file that receiving the error warning message.
If you are capable of opening the QB company file from this system, then check the QB company file.
If you are unable to do so, then proceed with step B.
In case, you are getting instructions from QuickBooks to rebuild the QB company file, then go ahead and do it.
Note: In case, QuickBooks Desktop application identifies no issues/problems with the QB company file, and the error or issue persists, then you should proceed with Step B.
Copy the QB file to other location.
Open/access the folder that stores/contain the QB company file.
Perform right-click on the ‘filename’ & then choose the “Copy” tab.
Perform right-click on the empty area on the desktop screen & choose the “Paste” option.
Turn-on the QuickBooks Desktop application & then, open the QB company file on the desktop.
Note: If you experience the QB error warning message, it means that the QB company file might be distorted /damaged. In such a case, you have 3 options:
Restore the QB company file backup.
Recover the lost QB data with the help of ‘QuickBooks Auto Data Recovery’.
Send the QuickBooks company file to the QuickBooks Data Recovery Team. To request the QB data recovery service from the official Intuit Data Services, you must get in touch with the technical support. (Fees may apply.)
If the QuickBooks company file opens successfully, copy the QB file(s) back to its original location.
Note: Ensure the original QB Company file name renamed before copying the file that freshly opened from the computer. Make sure that you do not paste new QB company file over the existing QuickBooks company file.
Open/access the folder(s) that contains the original (damaged) QB company file, and then rename the file by adding OLD or DAMAGED at the beginning of the file name.
For Instance: If the original QB company file name was ‘CompanyFile’, rename this file as OLD_CompanyFile or DAMAGED_CompanyFile.
Close the QuickBooks application.
Copy/replicate the QB company file(s) from the computer and then paste the same file(s) to the folder where it initially saved/ stored.
Open the QuickBooks application & open the QB company file from its initial location.
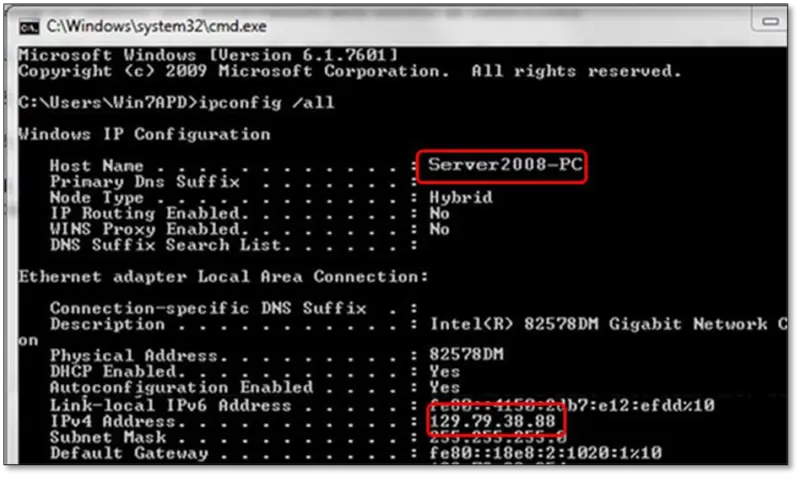
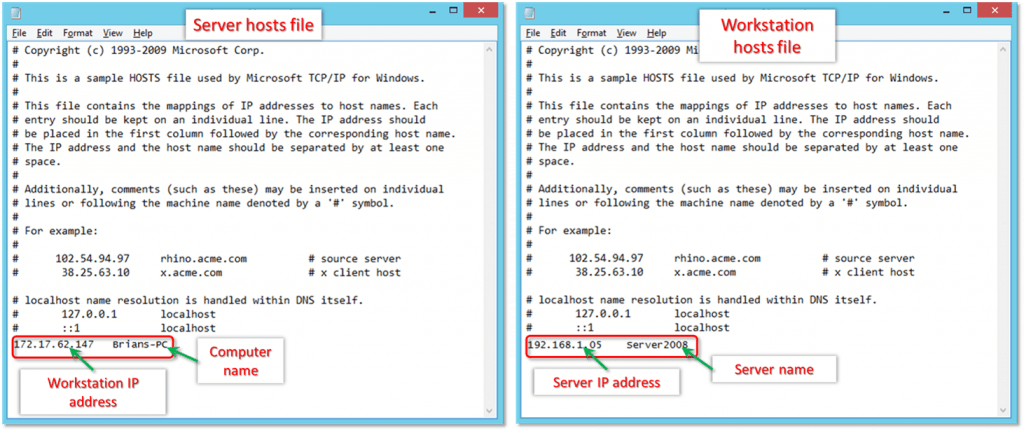
Edit the Windows hosts file(s) on the desktop with the correct IP address & Windows Server name.
Note: Hosts files generally deal with Static IP addresses. If the network is utilizing the Dynamic addressing, this might create problems if the server is rebooted and acquires a different IP address than configured in the Hosts file.
The Windows server should be configured to maintain the same address for the network at all the times.
Firstly Close your QuickBooks desktop.
Now select the Start menu and Computer, on the server
Then go to:
C: \ Windows \ System32 \ Drivers \ Etc
C: \ Windows \ Syswow64 \ Drivers \ Etc
After that double-click the hosts file option.
Choose Notepad to select a program to open up with.
You need to Enter the IP address followed by Computer name server will have workstation IP and computer name while workstation will certainly have Web server IP and also computer name.
When entering these details, just use the Tab key instead of the space bar to different IP address and computer system name.
Condition 2: Open the QuickBooks Company file stored on a Linux server
Tips to Remember: The solution mentioned below for (QuickBooks Error 6000 83) must be performed by the system administrator with good knowledge of operating the Linux operating system. Also, he/she supposed to have complete insight of network operations and permission to install properly while configuring the QuickBooks Enterprise Solution Linux Database Server Manager.
On the keyboard, hold the “Windows + R” key simultaneously to open/ access the ‘Run’ window.
Type-in the ‘CMD’ and later, hit onto the “OK” tab.
Go to the command prompt, type-in the Ping (Name of Linux Server) & hit the “Enter” tab.
Solution 2: Edit the hosts file
Use the IP address & Linux server name to ‘Edit’ the hosts file from the workstation.
Case Sensitive Linux File System
Ensure that you are using the right case while specifying the QB Company file name that you desire to open/access via Windows client. For instance, if you state the company B instead of company b, Windows can open/access the Linux server but the database will unable to access/open the QB file.
Shut-down the QuickBooks Desktop application.
On the keyboard, hold the “Windows + E” key simultaneously to open/access the ‘Computer’ window.
In the Local Disc, navigate to (‘C ’ => ‘Windows folder’ icon => ‘System32 folder’ tab => ‘drivers folder’ tab => etc. folder.
Use ‘Notepad’ to open/access the hosts file.
Once the last IP address listed, edit or add the IP address of the server.
Hit onto the “Tab” key, and then type in the server name.
Save the file, and then open/access the QuickBooks & QB company file.
In case you see such an error when creating a backup, then here is what can be done to rectify it. It should be noted that, if you store the company file on a server, then move it to the local hard drive. After you are done with the fixation of the error, you need to move the company file back to the server. In case you use Intuit data protect, you can reach out to our professionals for assistance.
Initially, you need to close QuickBooks on the server system, the one that hosts the company file.
After that, move to the file menu and choose Quit QuickBooks desktop.
Once done with that, open the Windows start menu.
You now have to type File Explorer into the search bar and further open File Explorer.
The next step is to choose my computer from the navigation bar.
Choose C drive
And further, right-click on the screen and choose the new tab and also the folder to create a new file folder.
Assign it a name as QB Test Folder.
You now have to carry out the steps to create a backup company file. When QuickBooks asks the location to save the file, save it in the folder created in the steps above.
Now, perform the steps to restore the company file using a new backup.
In case you do not see error 6000 83, then start using your backup as the main company file. Do not use old company files anymore. Rename it, to avoid accidental use.
Solution 1: Change/Alter the QuickBooks file extension
Whenever you try to restore a QB company file, it will create a QB company file with a .qbw extension as a suffix. If the backup procedure creates a QB file with either a .qbm or a .adr extension, then you must rename the QuickBooks file extension to .qbw & try to open/access the renamed QB file. For instance, rename the ‘My Company Name.qbm’ to ‘My Company Name.qbw’.
Note: If required, alter the system Windows settings, this will enable you to see QB file extensions.
Go to the QuickBooks Company file, and then hit onto the “F2” key to open/access the Product Information screen.
Under the “File Information” field in the “Location” section, highlight & copy the file location and then paste it on the system notepad.
In case, you are using the QB multi-user environment then shut-down the QuickBooks application on all the computers utilizing the QB Company file(s).
Perform right-click on the “Windows” or “Start” icon and then click on the “Explore” tab. Go to the QB company file location as you noted in step 2.
Perform right-click the “File Name” tab & then choose the “Rename” option.
Enter the new QB company file name & then hit onto the “Enter” tab.
Note: If prompted to verify that you rename the QB file, confirm that you had type-in and saved the new QuickBooks filename correctly. Finally, click on the “Yes” tab.
Not acceptable: Business\Fred\Fred’s Documents\My Business $.Business – The quotation mark (‘) and the dollar sign ($) are special characters. The Fred’s Documents folder and the My Business $.qbw file should both rename.
Note: If you need to restore your backup to a network location, restore it to your computer first. Once the backup restored, copy the restored file to the network location.
In the “File” menu, select the “Open or Restore Company” tab.
Choose the “Restore a backup copy” option and then click on the “Next” tab.
Choose the “Local backup” option & hit onto the “Next” tab.
Browse to the backup QuickBooks file [Companyname].qbb, and then choose the “Open” tab.
Go to the ‘Open and Restore a Company’ screen, then hit onto the “Next” tab.
Go to the “Save Company File” screen; eliminate any special characters or spaces mentioned in the “File Name” section, then choose the “Save” tab.
Note: If QuickBooks file is on a mapped network Drive, then try to open/access it by using the UNC path (or reverse, switch from allocated to UNC path).
Hopefully, this segment might turn out to be helpful for you and you have successfully resolved your problems accurately. However, the steps are a little bit technical and it might be possible that these steps might not help out in your case. Also, there is a possibility you couldn’t perform the above steps accurately.!
Well in this scenario you don’t need to worry, you can contact our QuickBooks customer support team immediately for help. Feel hassle free to dial our toll-free number .i.e. +1-888-510-9198 to resolve QuickBooks Error 6000 83 with 100% success rate.
Some Common Questions Regarding QuickBooks Error 6000 83:
What is QuickBooks Error 6000 83, and why does it occur?
QuickBooks Error 6000 83 is a common error code that appears when users try to open, restore, or backup a QuickBooks company file. It usually indicates a file access issue, which can be caused by a variety of factors, such as network connectivity problems, incorrect folder permissions, damaged company files, or interference from antivirus software.
How can I fix QuickBooks Error 6000 83?
The solutions for QuickBooks Error 6000 83 can vary depending on the underlying cause of the error. Some common troubleshooting steps include running the QuickBooks File Doctor tool, verifying file permissions and network connectivity, disabling antivirus software temporarily, restoring a backup of the company file, or seeking assistance from a QuickBooks expert. However, it’s important to note that some causes of the error may be more complex and require advanced technical knowledge.
Can QuickBooks Error 6000 83 be prevented in the future?
While there is no foolproof way to prevent QuickBooks Error 6000 83 from occurring, there are some best practices that can minimize the risk of encountering the error. These include regularly backing up QuickBooks company files, ensuring that all network connections are stable and secure, setting appropriate folder permissions, avoiding using special characters in file names, and keeping QuickBooks and antivirus software up to date. Additionally, it’s important to maintain good communication with your IT team or QuickBooks support provider to promptly address any issues that may arise.
Over the past few years, QuickBooks has gained so much popularity that these days majority of the small and medium businesses are using this accounting software. But after all it is just a software and like every other software, QuickBooks is also prone to some technical errors, one such error is QuickBooks error series 15XXX. In this technical article, we are going to focus on QuickBooks 15xxx (15000 series) errors which is a series of most common error codes that has been reported by many users. These error codes generally occur while downloading QuickBooks desktop or payroll updates. Incorrect configuration of Microsoft Internet Explorer might also cause these errors.
In order to protect the system and its content, the QuickBooks accounting software attempts to verify the digital signature of files that are downloaded via the program. If the QuickBooks accounting software can’t verify the digital signature of any file, then in that case the 15000 series error could be seen. If you want to know how to fix this bug, then stick to the article till the end, or you can also get in touch with our QuickBooks error support team via our toll-free number i.e. +1-888-510-9198. Our support team will ensure to provide you with the best possible support services in no time.
Simple process to Fix QuickBooks Payroll Error 15000 (15xxx) Series
The user can easily follow these troubleshooting methods in order to solve QuickBooks 15xxx series error. Also, he/she can take assistance from QuickBooks help team, in case the user is having some issues related to technical aspects.
Important: Before proceeding, remember that you have to install the latest version of Internet Explorer. (You can download it from Microsoft download center). If you already have latest IE version and still receiving the error then consult with your IT professional or go with Microsoft support.
Solution 5: Configure your firewall and anti-virus defender
The user is required to set-up your firewall program and anti-virus defender to check that your QuickBooks files are save and secure. If firewall is not configured and this can cause QuickBooks files to be corrupted when attempting to download updates or reinstalling any version into your system.
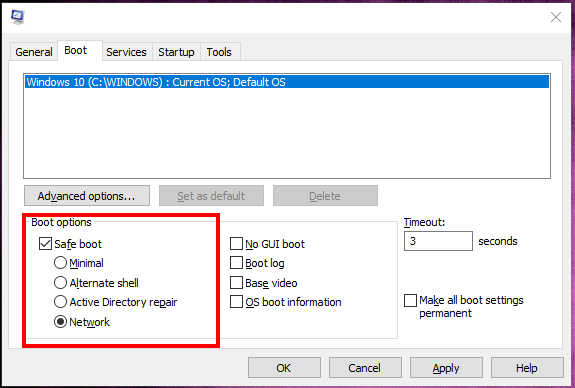
Solution 6: Download the Updates in Safe Mode
In case, the error still persists after follow the above steps then try to download the updates in safe mode.
First of all, the user is supposed to open your system in safe mode
After that, download the updates again
If it gets successful then restart your system in normal mode
Finally try to re-download the update
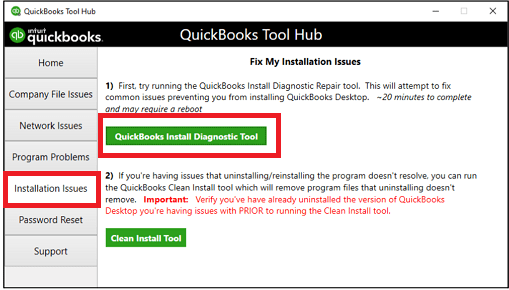
Solution 7: Run QuickBooks Install Diagnostic Tool
One can try performing the below set of steps to make use of the QuickBooks install diagnostic tool and eliminate the 15xxx series error. Let us have a look:
The very first step is to choose re-launch QuickBooks tool hub
Click on the installation issues tab in the tool hub
After that, choose the QuickBooks install diagnostic tool
The tool will start the fixation process
Reboot the system after the program fixes the installation and update issue
Rectifying QuickBooks error 15XXX series is not as difficult, as the users consider it to be. Carrying any of the above stated methods might help the QuickBooks users to get rid of the issue without any hassle. If by these methods, the error is not fixed then seek help from professionals or call the QuickBooks payroll Support service providers.
You need to dial +1-888-510-9198 and ask your query directly to our support executives. Our team of experts and certified professionals will help you in tackling the issue in the best possible way. Thus, do not hesitate in talking to our team, we will be happy to help you!
Frequently Asked Questions!
How do I fix error 15215 in QuickBooks?
To fix this error in QuickBooks, you can simply perform a windows restart in the selective startup mode. The steps involved in this process are as follows: 1. The very first step is to close QuickBooks desktop 2. And then, on the computer, select run 3. Now, in the run field, enter msconfig 4. And then, the system configuration utility will open 5. After that, you need to choose the selective startup and clear the load startup items checkbox 6. Followed by clicking on the save your changes tab 7. The last step is to reboot the system when asked
What is payroll update error in QuickBooks?
A bunch of errors in QuickBooks can occur due to various reasons, however, certain errors can be seen when updating the payroll in QuickBooks. If the download updates or shared location is mapped to a presently unavailable drive, then you can come across payroll update error in QuickBooks.
What is QuickBooks 15222 when updating QuickBooks desktop?
The error code 15222 occurs when the application is unable to establish a connection with the internet to download the update files, and this can happen due to various reasons like anti-spyware, anti-adware, anti-malware, etc.
QuickBooks online has marked its presence in the accounting and bookkeeping market in the past few years. However, just like the other accounting software, QuickBooks is prone to certain error, and one such error that we are going to elaborate today is the QuickBooks banking error 103. Banking Error 103 and 310 are very common QuickBooks errors. The banking error 103 means that the login credentials that have been entered in the QuickBooks Online are not accepted by the financial institution’s website. While error 310 is when the login request is stopped till the users update the sign in information in QuickBooks Online so that the bank cannot lock the account access.
In case you are also experiencing similar error, then reading this segment right here will help. Just in case you require any sort of assistance, then in that case contacting our tech support team at +1-888-510-9198, and we will provide you with instant support services.
What is QuickBooks error 103?
Before we dig in deep, it is important to get a grip on to the QuickBooks error code 103 and 310. QuickBooks error 103 usually takes place when you sign-in to QuickBooks online and the details you mention doesn’t match with the one on the website of the financial institution. This particular error states that QuickBooks is no longer accepting your login request. It further indicates that the login process is paused as the user is updating their login details with QuickBooks online version which also restricts the bank to lockout the account access. To prevent the bank locking your access to the bank, then you need to update the login information in QuickBooks online.
Fixing QuickBooks Banking Errors 103 and 310 Like a Professional
Below are the solution steps for Banking error codes 103 and 310. Follow every steps in serial in order to resolve these errors in systematic way.
Solution 1:
First click on the Verify your Credentials link which is shown within the error message. In a different window will open for the bank’s website where users can re-enter their login credentials. Do not auto-fill the entries, instead manually type the username and password.
Then log out of the bank’s website.
After this come back to QuickBooks Online and again enter the same username as well as password in the same format needed in the bank.
Now Click on Update Sign-in Info.
Note: In case the users cannot see the link verify your Credentials, then try updating the account within QuickBooks Online.
On the upper right corner,
Click on the Update button.
Run at least three updates during the non-peak hours.
Users should make sure that they are connected to the correct URL of the bank account otherwise when they click on Verify your Credentials link the bank website might not come or they will not be able to successful log into their account. The users can also try to verify the bank connection by finding the bank’s login web page URL or the URL after they log into their bank accounts.
Try finding for the bank using the URL used outside of QuickBooks Online so as to login to the bank account and once you get it copy it.
In case users are not successful, they can find the banks using the URL after having logged into their account. However, few extensions like the slash (/) needs to be removed from the URL. This will help in finding the correct website.
Important: To solve error 310, users should verify if the username and the password that they are using are accepted by the bank website.
Follow these given steps:
From the left menu select Banking.
Click on the Pencil icon for the account.
Click on the Edit Sign-in info.
Then click on the hyperlink for the bank’s website which is at the top of the
After this a new window will open for bank’s website. Users should ensure that they are able to access their accounts via this site and they also have to confirm that they can find account details without any error.
Note: In case the login information is accepted then the account needs to be manually updated. If the problem still persists and the error 103 and 310 doesn’t get fixed seek help from customer care using the below mentioned information.
Name of the financial institution being used.
The bank name that is being selected during the set-up of the account.
The website link that is used to connect to the users bank outside of QuickBooks Online and once successfully logged in the URL of that.
The type of account being connected to like business, personal, cash, management etc.
The error code which is being displayed: 103 or 310.
Many of the banks need the users to sign-in with a special access instead of the common password. In that case, users should check it with their respective bank if they are using the right credential. In case the issue is not solved then seek help from customer care service providers.
For US only: Key Bank Customers
In case users get these errors, they have to log into the account from the bank’s site and ensure that the option to allow third party is selected.
(Self-Service Tab > Security Center)
Key Bank accounts may also have the following path to allow third-party access: login > User Profile > Third Party Access > select phone to authenticate (MFA)
These steps help you to connect and disconnect required number of bank accounts with QuickBooks. However, if you still have any problem or have any query, you can contact our QuickBooks online support team at +1-888-510-9198 to get the best solution of your problems. Our support lines remains active 24/7 to help you.