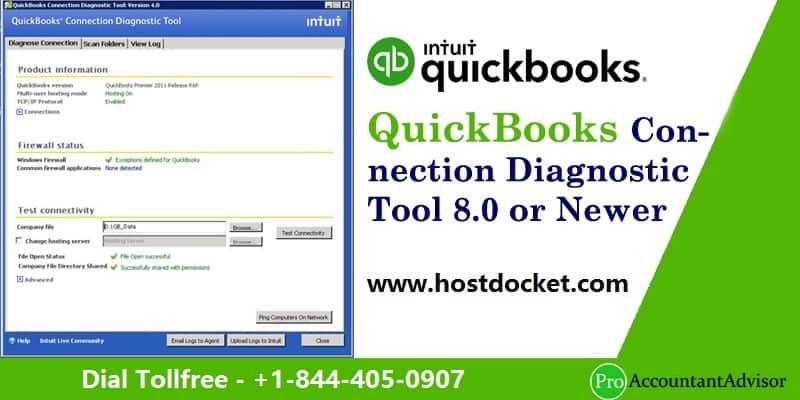
QuickBooks Connection Diagnostic Tool is helps fixing a wide variety of errors in QuickBooks Pro, Payroll, and Premier with data file, data recovery, download, update, upgrade, and more. It helps in fixing multiple errors, especially 6000 series errors. In this article, we will discuss in detail the features, benefits, installation process and ways to use QuickBooks Connection Diagnostic Tool. You can simply ring up at our toll-free number i.e. +1-844-499-6700. Our QuickBooks support team will ensure to answer all your queries in the least possible time.
This tool can troubleshoot the multi-user & networking errors while accessing the company file. The QuickBooks Connection Diagnostic Tool is a specially designed tool to fix the H series Errors & 6000 series errors such as 6000 304, 6000 77, 6000 80, 6000 83. With this feature, the users are able to develop an appropriate & sufficient connection with the other application such as QuickBooks database manager (QBDM) and QuickBooks company records. The devices with the Microsoft Windows 7, Windows XP, or Windows Vista are only compatible with the Connection Diagnostic Tool. Moreover, it supports only QuickBooks 2008 and newer or QuickBooks Enterprise Solutions 8.0 or newer.
The users can download, install and run the QuickBooks connection diagnostic tool to resolve the warning messages or error messages that might appear in front of you while installing the QuickBooks Desktop software. Also, this tool or feature is also widely known as QBNetDiagTool.exe, QBServerUtilityMgr.exe etc. However, The version 4.0 software is the most famous tool as it has an inbuilt antivirus tool to keep it free from the viruses.
List of issues that are encountered
Unable to connect QuickBooks to the database
QuickBooks Database connecting issues
Firewall post issues
Perks of using QuickBooks connection diagnostic tool
The benefits of using connection diagnostic tool are many. Here is a quick list.
The tool assists in resolving countless errors faced by the users.
You can fix issues where employees make certain entries that do not get updated on QuickBooks.
Using the tool saves a lot of time and effort and simplifies the process of resolving errors.
You can identify and resolve errors that appear when installing the software
It further assists in rectifying unexpected errors and multi-user errors in QuickBooks desktop.
Important points to consider
Before heading forward, note that in case you are using QuickBooks desktop 2016, then it is probable that you might receive reminders and prompts to use QuickBooks File Doctor. In that case follow what this article says and choose the version mentioned here.
File Doctor tool works for QuickBooks Desktop for Windows, but QuickBooks Connection Diagnostic Tool works for QuickBooks for Mac as well.
This tool offers proper connections between QuickBooks database server manager and the Company File for both H series errors (H202 and H505) and 6000 errors (6000 83, 6000 77, 6000 80, 6000 304) making the fixation process easier
It is suggested to use QuickBooks 2008 or a later version on MS Windows 7, Vista or XP for the connection diagnostic tool to avoid any mess
Also, note that the tool can be downloaded from Intuit’s official website to fix error texts that show up while installing QB Desktop. However, 4.0 is the most commonly used version.
What issues QuickBooks connection diagnostic tool fix?
There are certain issues that can be fixed using a connection diagnostic tool. These errors include:
QuickBooks database access denied
Another error can be inappropriate configured windows firewall
Blank vendor and customer list in the accounting software can also be eliminated using the connection diagnostic tool.
Corrupted or damaged company can also be fixed using this tool.
Missing company files
When to run QuickBooks connection diagnostic tool?
The following situations might call for using this tool.
In case of unexpected errors in QuickBooks like those in the 6000 series.
If there is any virus affecting the QuickBooks functions.
Or issues related to the QuickBooks database
Errors associated with Windows firewall.
Damaged or corrupted QuickBooks files.
To fix multi-user errors, which usually fall in the category of H series errors in QuickBooks.
Steps to download QuickBooks connection diagnostic tool
The steps below can be performed to download the connection diagnostic tool successfully.
Start the process by clicking on the Official download link of the QuickBooks connection diagnostic tool.
The next step is to Save the file in the system.
The user should then open the installer name as QBInstall_tool_vs.exe.
And also shut down the running programs in the background.
After that restart the program
Avoid any kind of further issues and ascertain to have a good Internet connection.
The user should then clear all the applications in the background.
End the process by performing the steps related to installation.
Steps to Install the QuickBooks Connection Diagnostic Tool
After the download process, the below steps can be performed for installation.
The user is first required to check the system to ensure there isn’t a version of the QuickBooks Connection Diagnostic Tool already installed.
After that download the tool from the OEM website and click on the icon twice after it appears on your desktop.
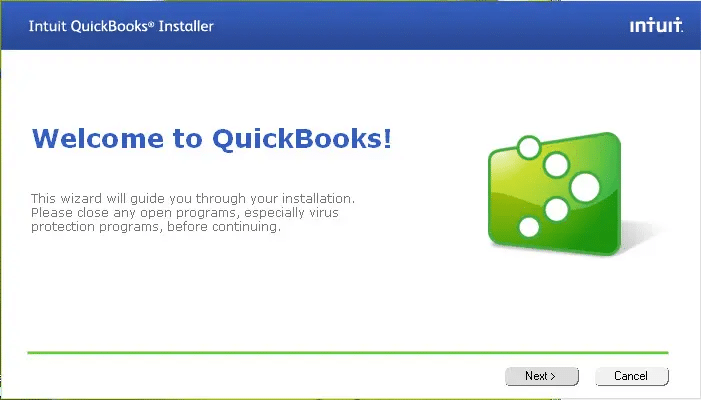
Perform the prompts that show up on your computer screen for installation:
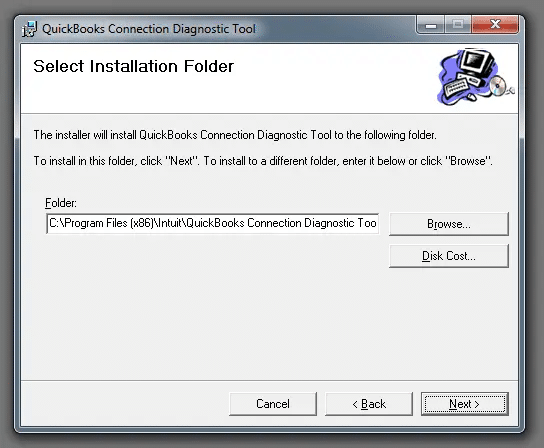
Also, hit the Next tab when screen displays: “Welcome to the QuickBooks connection diagnostic tool setup wizard“.
Now click on Next to choose Installation folder.
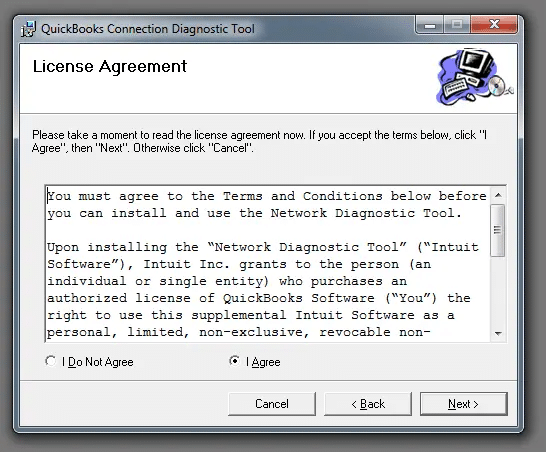
Tap on the I agree circle to accept the license agreement of the software.
The .NET framework must be configured properly, especially for Windows 10.
Wait for the application to open
Click on the icon
Head to the directory that contains the company file which is to be diagnosed.
Do not use the Network connectivity option, if you are using Single user mode.
Type in the Admin and password, after the message box appears on the screen.
Click on ok tab
Select whether you are using the host system or a Workstation PC.
The process might take some time, wait for it to complete
Steps to Employ QuickBooks connection diagnostic tool
After the installation comes employing process. The steps below can help the user in employing the tool.
At first, click on the QuickBooks icon.
Avoid opening the corrupted file.
Also, tap on the Utilities tab and then Repair the file option.
Hit the Network problems tab.
Click on Yes to collect the personal information related to QuickBooks and it’s data.
Head to the folder that has the company files and search and open the one that is corrupted
Click on the Show advanced settings
After that a list of items in a drop-down will appear on the screen.
Go for the issue that relates with the current issue.
First of all, Download, install and run the QuickBooks connection diagnostic tool as instructed in the download device tab. After that just Perform double-click on the connection diagnostic tool to run on the device. Once this procedure completed, follow the troubleshooting steps mentioned below:
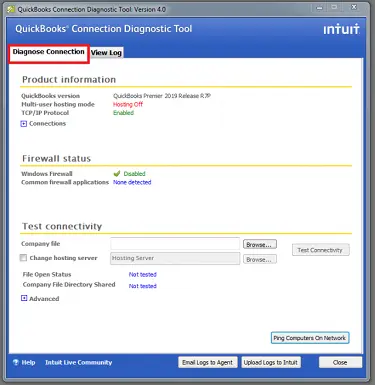
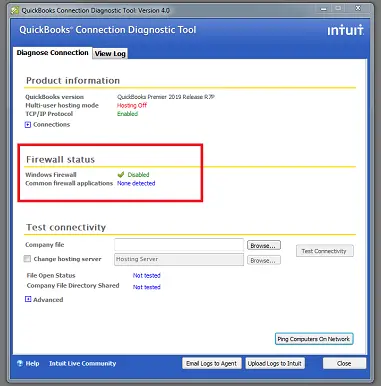
1. Diagnose Connection tab
The Diagnose Connection tab enables the users to make sure that you are able to access the company data file from the computer, no matter if its single-user or multi-user. The error code appears again & again if the permissions are not set accurately, or if it has blocked ports or firewall.
2. Firewall Status
The Firewall Status feature shows the basic instruction about the firewall on the display.
3. Test Connectivity
This feature will enable you to check the workstation or computer connectivity.
Procedure to test the computer’s connectivity
In the initial step of the process, the user will see a tab to locate the company file, next to the Company File field.
Select the “Change Hosting Server” If the network is set up in the Linux systems & it is in the Alternate mode.
Note: All statuses suppose to appear as “Not Applicable” in blue before the users run the connectivity test.
Once you run the connectivity test, either you will see all the statuses in Green or Red in color. The Green color signifies that there is no problem and the Red color signifies that some problem has been detected.
After that the user will have to select the “Test Connectivity” tab
There can be a situation, when the connectivity test might fail if the File Open Status appears as Red. In this case, the user will witness the “Advanced” section where all the checked areas are mentioned. Click on “What do these mean?”
The user is then required to resolve the relevant status to run the tool again. And then, check if there any problem still exists or not.
In case the problem exists now and you open the “File Open Status”. You will see the Successful message pop-up on your display.
Important Note: The 4.0 variation software is the most suggested version which is available on some site. Couple of year later on Intuit launched QuickBooks File Doctor tool which have a more powerful tool as well as advanced attributes.
How you can test your workstation’s connectivity?
You can test the workstation’s connectivity using the set of steps listed below:
The very first step is to click on the tab near the company file field to search the company file.
Also, ensure that you are using Linux system when the network setup is available in alternate mode.
One can choose to pick the change hosting server checkbox.
Every status must appear on not applicable in blue before you instigate the connectivity test.
After the test is run, status should appear in green which denotes that no threats are found or red denoting threats found.
Press the test connectivity
In case the file open status appeared in red, then the test has failed and you would see the advanced section showing section that was checked
Click on what do these mean?
After the relevant status is fixed, rerun the diagnostic tool to find out if there are any more issues.
Once you receive a message denoting the success of the process, repeat the steps mentioned above on all systems that have QuickBooks.
Wait for the tool to run and the error might be fixed. This process largely depends upon the company file size and network speed.
I hope the above given information related to QuickBooks connection diagnostic tool are helpful to you. In case you have any queries related to this tool then you can get in touch with our experts. We, Host Docket have a specialized team of efficient and certified professionals who can resolve all the issues related to your accounting software.
We provide support for all the QuickBooks versions – QuickBooks Pro, QuickBooks Premier, & QuickBooks Enterprise. In the meanwhile, if you are encountering any discrepancy with the QB software, it could be any QuickBooks Error, Installation issue, QuickBooks Data loss, or other. In such scenario, all you recommended to do is to make a call on their toll-free helpline number with no hesitation i.e. +1-844-499-6700.
Frequently Asked Questions!
What errors QuickBooks connection diagnostic tool can fix?
The QuickBooks connection diagnostic tool can fix the errors such as H202, H505, or 6000 series errors. It can fix the issues with firewall settings, network configuration, and other network-related errors.
Where can I get Program Diagnostic Tool option in QuickBooks?
You can simply download the connection diagnostic tool from the official Intuit website or from the tool hub program.
How do I fix a connection error in QuickBooks?
You can fix a connection error in QuickBooks using the steps below: 1. The very first step is to run connection diagnostic tool to identify and fix network related issues 2. Verify that your network setup is correct and also that all computers are connected to the same network. 3. Check the firewall and antivirus settings to ensure that they are not blocking QuickBooks. 4. Make sure that QuickBooks is updated 5. Also, ensure to contact QuickBooks technical support professionals
Came across: Can’t communicate with the company file due to a firewall error in QuickBooks and can’t find the right ways to fix it? Well, the QuickBooks cannot communicate with the company file error shows up on the screen when the network firewall is interrupting the connection. This is often seen when the user tries to connect to the network company file. Moreover, you can come across similar issue when updating the operating system or the software. It shows up on the screen with the following error message:
Error:
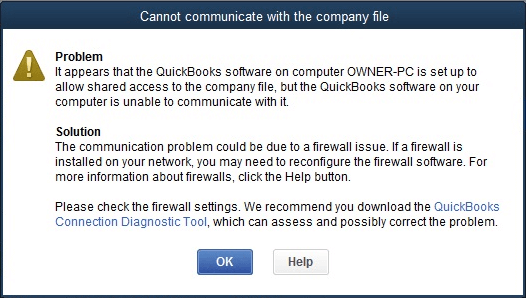
Cannot communicate with the company file due to a firewall
Problem
It appears that the QuickBooks software on computer QWNER-PC is set up to allow shared access to the company file, but the QuickBooks software on your computer is unable to communicate with it.
This error can be a bit annoying to handle. Thus to help you in dealing with such an error, here we are with this piece of writing sharing the complete set of steps and procedures that you can implement to successfully get rid of the QuickBooks unable to communicate with the company file issue. However, in case you are seeking for any sort of technical guidance, then reaching out to our technical support team at +1-844-499-6700, and our technical support professionals will clear all your clouds of confusion.
What causes QuickBooks unable to communicate with the company file due to firewall?
A bunch of factors can stop your company file to communicate with QuickBooks. The common reasons include:
A firewall latest version is not present in any network.
How to Solve “Error: QuickBooks Cannot Communicate with the Company File”?
Getting rid of the QuickBooks cannot communicate with the company file issue becomes easier, once you implement the steps and procedures discussed below. Let us evaluate each of the measures one by one:
Solution 1: Use the QuickBooks File Doctor tool
You can follow the steps to download the QuickBooks tool hub program and further QuickBooks file doctor tool. The tool will perform a mini repair of the server and the firewall. Once it is completed, you need to open the company file in QuickBooks desktop. The steps that can be performed over here are:
Step 1: Download and install QuickBooks tool hub
The QuickBooks tool hub usually helps in fixing a bunch of errors. You simply need to close QuickBooks to make use of the tool hub. Note that, use Tool Hub on Windows 10, 64-bit.
Also, note that if you have installed the tool hub earlier, then you can find what version you have.
Choose the home tab and the version will be on the bottom.
Open the file downloaded in the previous step.
Perform the onscreen steps to install and agree to the terms and conditions.
After the installation ends, double-click the icon to open the tool hub.
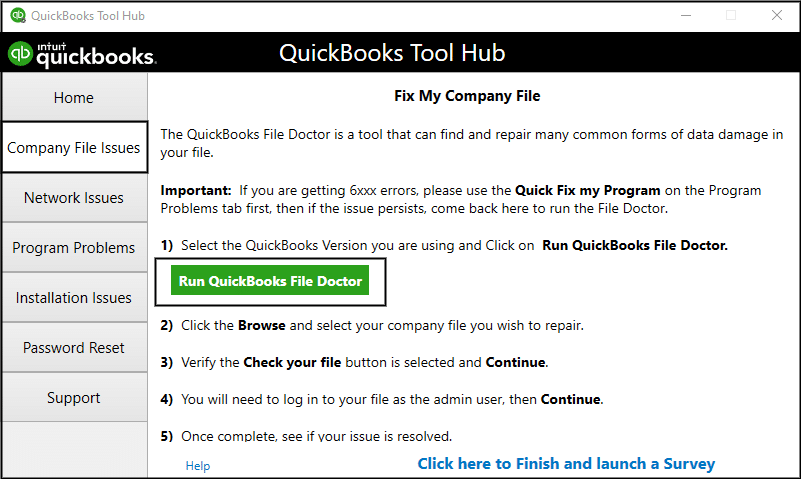
Step 2: Run QuickBooks file doctor
You need to open the tool hub and select the company file issues tab.
Once done with that, choose Run QuickBooks, file doctor.
It can take up to one minute for the file doctor to open.
It should be noted that if QuickBooks File Doctor doesn’t open, then you need to look for QuickBooks File Doctor and open it manually.
In QuickBooks File Doctor, you need to choose the company file from the drop-down menu.
In case you do not see your file, then choose browse and search to find the file.
Now, choose Check your file and then hit the Continue tab.
The next step is to enter the QuickBooks admin password and choose next.
Solution 2: Update QuickBooks to the Latest Release
QuickBooks automatically downloads updates whenever they are available. When the update is downloaded, you will see the update available on the status bar in the top right corner. The next step is to install the update. It will install on its own if you close the software and keep the system turned on. To manually install it, you need to perform the steps below.
Choose update available and go for install now to install the update.
Now, wait for update to get installed. This might take some time.
Open QuickBooks once the update is installed.
In case you have a payroll subscription, you need to download the latest payroll tax table to process payroll in QuickBooks.
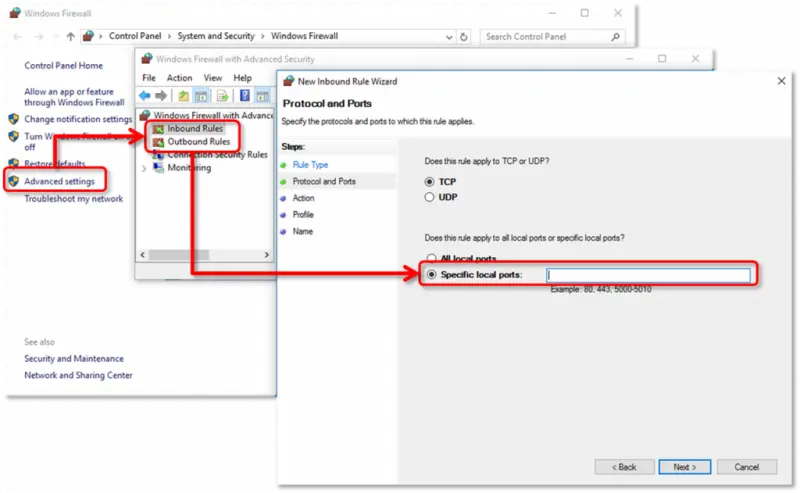
Solution 3: Configure Windows and third-party Firewall
Note: Intuit does not provide support for firewall or anti-virus programs. You may need to take help from the service provider for assistance with installing and setting up of your program. Here are the steps that can be performed to configure firewall for QuickBooks
Step 1: Click on QuickBooks Setup
First ensure that you’ve installed QB software in your PC. It has the latest QuickBooks updation that has been applied and allow to open the company file.
Then log in to your QuickBooks as an administrator with admin permissions.
This will promote by QB users and gives the Axis permission to access the QuickBooks company files.
If QuickBooks is running as Administrator or it has elevated mode (shield on the desktop icon) then please run Axis as Administrator too.
Note: If you are using Microsoft Windows XP, Vista, 7, 8 or 8.1 then please ensure that you have User Account Control (UAC) set to ON or Always Notify. (If changing UAC, you will need to reboot Windows for the change to take affect).
However, if you are using a 64-bit version of Windows operating system & receives an unable to connect a message that you should make it as turn UAC as turned off and then try to reboot it in a normal mode and then try a connection to connect it freshly.
Close any crashed instances of QuickBooks (qbw32.exe), by using the Windows task manager icon that is labeled as on the desktop.
Ensure you have only one QuickBooks company file open.
If a user connects directly to QuickBooks and are unable to remove or delete the old connection, then select it as:
Click on Edit
Choose Preferences list
And then Integrated Application list
Finally retry to establish a new connection.
If errors continue then follow the next step as explained below:
Step 2: Refresh your QuickBooks Interface files Rapidly
If you want to connect with QuickBooks and is unable to launch the connection. In case the files are not compatible with QuickBooks.
You need to refresh it by following the below steps as indicated here:
Get to take back up as safely the Company Data File.
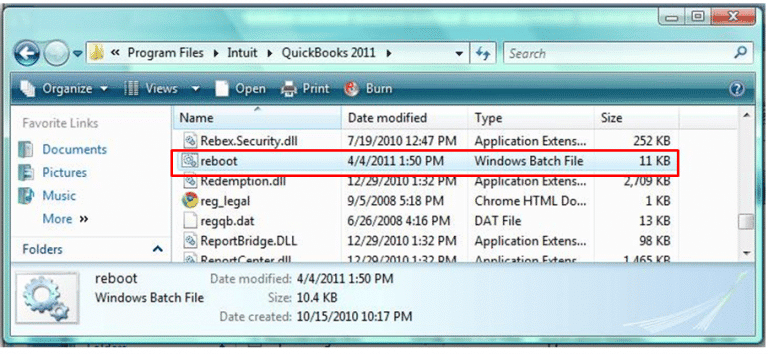
Then find the file Reboot.bat (it was found in C:\Program files\Intuit\QB).
Run in as administrator or give one right click.
Reboot your PC & then try to connect your system to another.
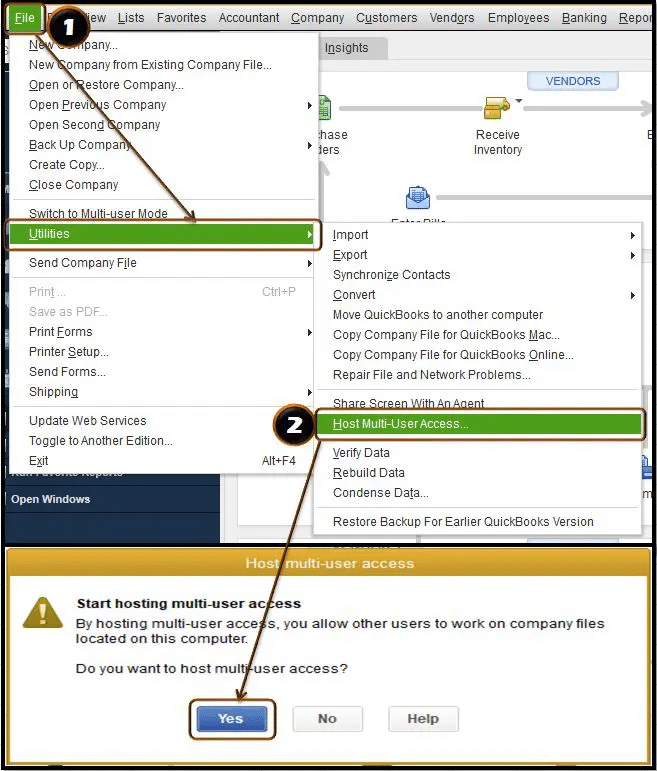
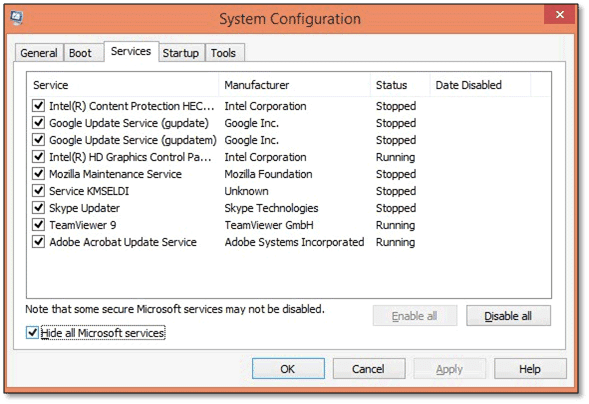
If you are using QuickBooks in a multi-user mode, only one computer should host the company file. Scanning the company file using the Database Server Manager turns hosting on.
Turn off hosting in all Workstations:
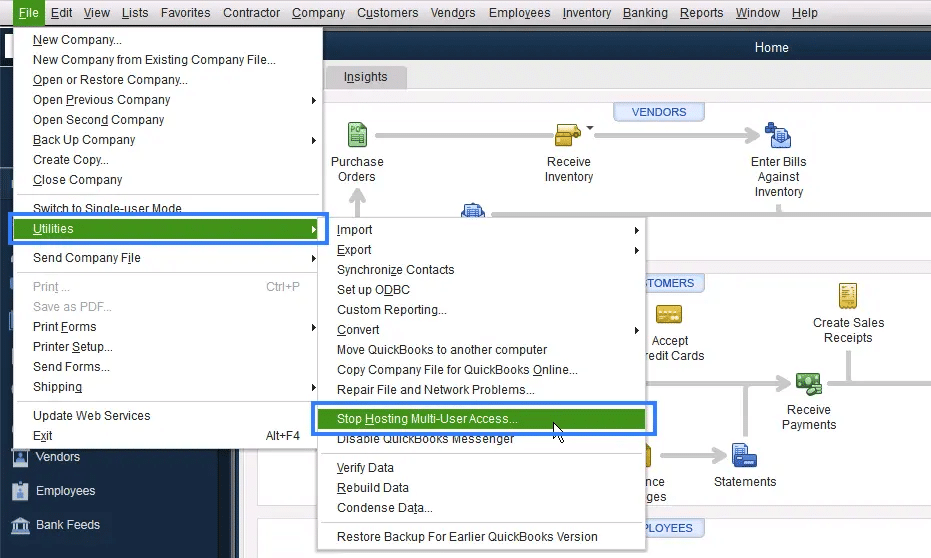
Select Utilities from the QuickBooks File menu.
Click Stop Hosting Multi-User Access.
Click Yes on the confirmation message.
Ensure that Hosting on the server system is on:
On your keyboard, Open the task manager by Pressing the Ctrl+ Alt+ Delete keys to open the task Manager.
Now search the QBDBMgrN.exe in the Image Name column
If you are not able to search the QBDBMgrN.exe file, ensure that QuickBooksXX service is running on your server.
Important: You may need to log in as the system administrator to perform the following steps.
Type Windows+R to open the Run window, on your keyboard.
Now Type in services.msc and then click OK.
Find the running file QuickBooksDBXX of your QuickBooks. (For example: QuickBooks 2017: QuickBooksDB27, QuickBooks 2016: QuickBooksDB26)
Ensure that the startup type is Automatic.
Verify that the entry in the User Name is correct, in the QBDBMgrN.exe row
The user’s name depends on your QuickBooks version. (Example: QuickBooks Desktop 2017: QBDataServiceUser27, QuickBooks Desktop 2016: QBDataServiceUser26)
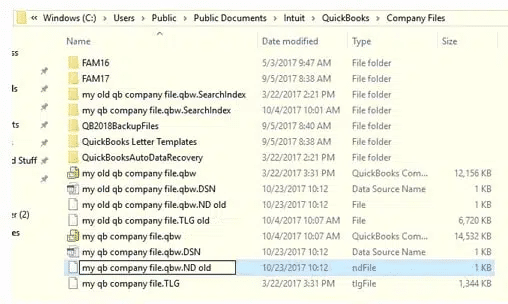
Solution 5: Create/build the Network Data (.ND) file(s)
For information, we would like to inform you that Network Data (.nd) file is a type of QuickBooks file that stores or keeps all the data/information of the host computer that contains QuickBooks company files. This particular file is a self-generated or automatically created when the user scans the QB folder or any open QuickBooks company files.
On the keyboard, tap on the “Windows” or “Start” key once & enter the ‘QuickBooks Database Server Manager’ (QBDSM) in the search box. Choose the ‘QuickBooks Database Server Manager’ (QBDSM).
NOTE: In the ‘Program List’, if you are unable to see the QuickBooks Database Server Manager (QBDSM) then it is suggested that you should uninstall & reinstall QuickBooks application. Ensure that you choose the second option, “I’ll be using QuickBooks on this computer, AND I’ll be storing our company file here so it can be shared over our network to guarantee the installation of QuickBooks Database Server Manager”.
Go to the ‘QuickBooks Database Server Manager (QBDSM) display, click on the “Add Folder” tab, and search to locate the folder containing the QB company file(s).
Once adding all folders, click on the “Scan” tab.
Once you scan all the QB folders, go to the ‘QuickBooks Company Files’ section to see it.
Go to the ‘QuickBooks Company File’ location and make sure to create .nd extension files for each QB data file.
Ensure that the host multi-user access option is off on the workstations. These are basically the systems that are connected to the network that don’t host the company files. The server system should be the only one hosting.
You need to first open QuickBooks on one of the workstations.
Avoid opening the company file. Rather choose the file menu and then hover over utilities.
The next step is to head to the next workstation, in case you see the host multi-user access option.
In case stop hosting multi-user access is an option, then go for it.
After you have verified all the workstations, you need to head to the server system and reset the hosting settings.
You need to open the QuickBooks on the server.
Head to the file menu and hover to the utilities tab.
In case the host multi-user access option is available, then this will reset the multi-user mode.
The next step is to repeat the process one more time and choose host multi-user access.
Winding Up!
I hope you found this article helpful. For more queries, just ask your doubts about the error QuickBooks Cannot Communicate With the Company File then connect to our Certified Advisors at our QuickBooks technical help department number +1-844-499-6700. We are available round the clock and get quality assistance over email or by call.
Some FAQs Related to QuickBooks cannot communicate with the company
What to do if QuickBooks is not communicating with my company file?
First, try restarting both your computer and QuickBooks. If that doesn’t work, try opening the company file in multi-user mode. If the problem persists, make sure that your QuickBooks software and Windows operating system are up to date. If none of these steps solve the issue, contact QuickBooks support at +1-844-499-6700 for further assistance.
How can I resolve the error message “QuickBooks is unable to communicate with the company file”?
Try opening the company file in multi-user mode. If that doesn’t work, make sure that your QuickBooks software, Windows operating system, and firewall settings are all up to date. If you continue to receive the error message, it may be a network issue. Contact QuickBooks support at +1-844-499-6700 for help resolving network issues.
What causes QuickBooks to not communicate with the company file?
There are a number of reasons why QuickBooks may not be able to communicate with the company file, including outdated software or operating systems, network issues, and firewall restrictions.
Is it possible to access my company file if QuickBooks is not communicating with it?
No, if QuickBooks is unable to communicate with the company file, you will not be able to access it until the issue exists.
A company file is a core element of QuickBooks and it is a must for every QuickBooks user to create one. It consists of all the crucial financial information of the company. QuickBooks lets a user to save multiple company files for multiple businesses separately. Creating a company file in QuickBooks or setting up a new company file in QuickBooks involves a bunch of steps. To help you setup a new company file in QuickBooks successfully, here we are with this segment. Stick around this segment to understand QuickBooks company files in a better way. On the contrary, if you are new and don’t want to risk your crucial data, simply reach out to our technical support team at +1-844-499-6700, and let our certified team professionals help you with your company file creation.
Having said that, let us unleash the entire process to create a company file in QuickBooks.
Setup a new company file in QuickBooks from scratch
This process will work if you are looking forward to create a new company file from scratch. However, if you already have an existing company file saved on your system, then make sure to use a different name for this one. Using the same name can cause to data loss as it might overwrite the existing file. The steps involved in this process of creating a new company file are:
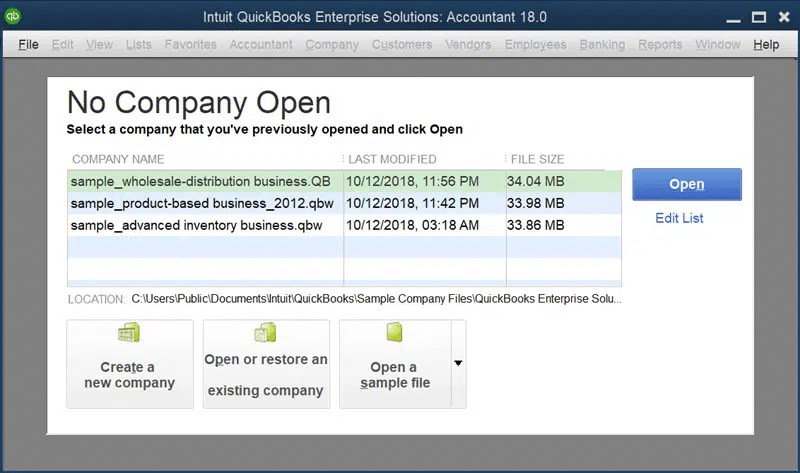
Open QuickBooks initially.
Further, go for Create a new company option in the no company open window.
This will further lead you to two different options i.e., Express start and Detailed start.
Let us understand the steps involved in both cases.
Option 1: Express Start
In case you go for an express start, you simply need to choose express start to get it started right away.
Further enter only the business name, industry, and type to setup a new company file in QuickBooks.
You will have to open QuickBooks
Further, click on Create a new company on the no company open window.
Another option that you can opt for is a detailed start process, where you will have to perform the steps in a more detailed manner and enter all the information from the very initials.
Begin by opening QuickBooks.
Head to the no company open window.
Click on create a new company.
Further, opt for the detailed start tab.
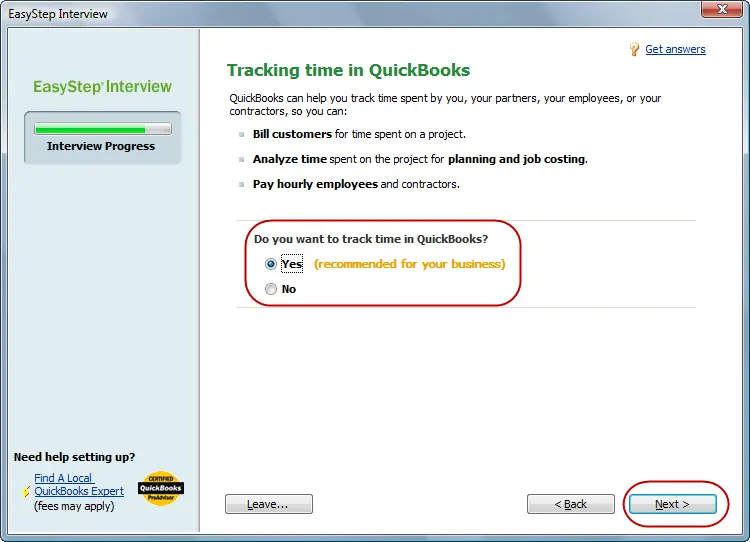
Enter the information on the easy-step interview screen and click on the next tab.
Select the industry type and go for the next tab.
You will then have to spot the type of business entity and further click on the next tab.
The next step is to set the fiscal year for which you want to create a company file and click on the next tab.
After that, set up the QuickBooks admin password and click on the next tab.
Choose the location to save the company file and click on the save tab.
The last step is to customize the QuickBooks software by clicking on the next tab and do it later by clicking on leave.
After selecting any of the above options, perform the onscreen steps and complete the setup. Ensure to keep the earlier points in mind.
End the process and start working on your company file.
Setting up a new company in QuickBooks
Towards the end of every year, QuickBooks accounting software permits the users to create new company file from existing in QuickBooks desktop. This is to cut down on the necessity to enter the data in every initial company file setup. Note that, it is not essential to close a company file at the end of every year. However, a few QuickBooks users prefer it to maintain proper records and avoid a pile-up of transactions over the course of years ultimately hampering the system’s productivity. Before beginning with the procedure to QuickBooks set up new company, let us unleash the benefits of starting a new company file at the end of the year.
Is creating a new year-end company file in QuickBooks beneficial?
Well, there are a few basic perks that are associated with the creation of a new company file toward the end of the year. Let us find out what those benefits are:
Large files usually deteriorate the performance of a system. Thus, creating a new file at the end of the year divides the data into different files making it easy to store and avoiding any hamper to the system’s productivity.
Another perk associated with this procedure is that it adds up to the data security against accidental data tempering, as it prevents any changes in the previous year’s tax reporting data.
This feature can further be helpful in restructuring and cleaning up the current data by simply removing the unused items, accounts, and names.
Important points to implement before starting a new company file
Before you begin the process, it is essential to keep a check on the following pointers. Note that, you need to have an active subscription of either standard, basic, or enhanced payroll. Moreover, you will further have to print the reports mentioned later on December 31st of the closing year. These reports might be required when you recreate the year-end balances of the account receivables and accounts payable in the new company file. Not just that, these reports might further be required when you are recording the opening balances for all the balance sheet accounts. Also, you will have to enter the outstanding banking transactions, stock status, and inventory values.
Customer balance detail report
Here you need to head to the reports menu
Move to Customers and Receivables option
Select customer balance details
Vendor balance detail report
Navigate to the reports menu
Choose vendors and payables and also select the vendor balance details option
Standard balance sheets
Head to the reports menu for standard balance sheets
Go for the company and financials and select the balance sheet standard option.
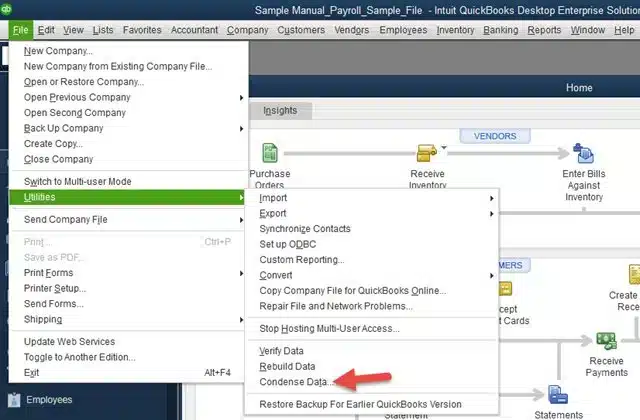
Setup a new company file in QuickBooksPro and Premier
Below are some steps that would help you setup a new company file in QuickBooks Pro and QuickBooks Premier:
Go to the ‘File’ menu, select utilities, and click on ‘Clean Up Company Data’
Rebuild all the outstanding balances in the accounts receivable either by re-creating individual invoices or you can create balance forward invoices for a lump sum customer balance.
From the ‘Vendors menu‘, recreate all the vendor balances along with the Enter Bills option.
These bills will be directly charged to the ‘Uncategorized Expense Account‘ as opposed to individual expense accounts.
The feature will not be available to payroll users due to critical payroll information in payroll files.
The feature is not available to QuickBooks online banking users due to the security and time-related data from financial institutions.
Further steps are as below:
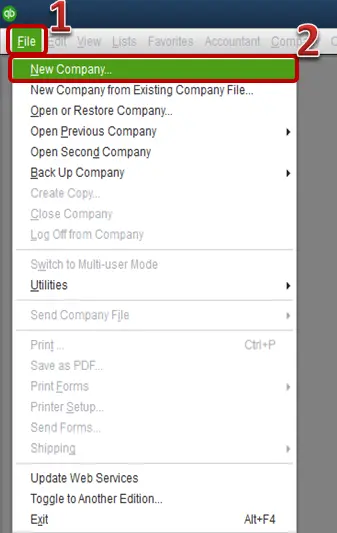
Choose File > New Company
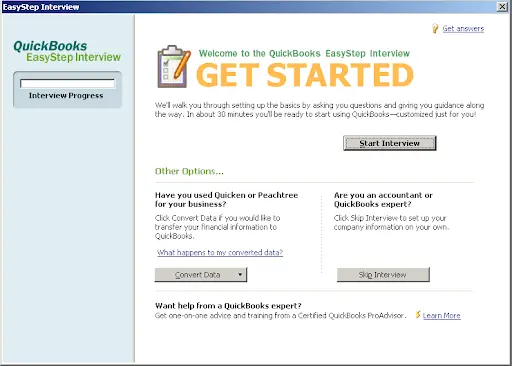
Click on Start Interview in the window of EasyStep Interview.
Follow all the instructions given on-screen and enter the information for your new company file.
This brings us to the end of this particular segment sharing details about how to set up a new company in QuickBooks successfully. Creating a company file isn’t a tough nut to crack if you have gone through the right steps to implement it. On the contrary, if you are still unable to create a company file or if you are dicey with the procedure, then do not hesitate in connecting with our technical support professionals using our toll-free QuickBooks support number i.e., +1-844-499-6700, and our expert will ensure to answer all your queries immediately.
FAQs Related to Set up a New Company File
Can you have 2 company files in QuickBooks?
You can have multiple companies under the same QuickBooks online account. Each company file is its own paid subscription. However, you can access them with the same sign-in info.
How do I open another company file in QuickBooks?
To open and use a secondary company file in QuickBooks. You can perform the below steps: 1. Double-click the second company file’s name. 2. After that, double-click the QuickBooks icon. 3. You now have to head to the file menu. 4. Further, choose open second company.
What is a QuickBooks company file?
When you create a company file in QuickBooks, it creates a file with a .qbw extension. This file further holds your company file and the account info.
How do I set up multiple companies in QuickBooks?
You can do this by performing the steps below: 1. Move to the file menu and further choose new company. 2. You now have to perform the onscreen instructions to set up a new company file for each business or location. 3. Once done with that enter the necessary information such as the company name and the contact information.
Company file is the core QuickBooks element, which when doesn’t work properly can create a nuisance. At times, due to certain reasons, QuickBooks might show an error that states: cannot open QuickBooks company file. When a user is unable to open the company file in QuickBooks, it restricts him/her from carrying out any activity in QuickBooks. Thus, such an error can be extremely devastating for QuickBooks users. To help you tackle such situation, here we are with this article sharing the complete details about how you can eliminate cannot open QuickBooks company file error successfully.
To learn further, make sure to stick around this piece of writing. Or you can further get in touch with our technical support team at +1-844-499-6700, and we will help you get through this company file issue and answer all your queries related to QuickBooks.
What is Cannot Open QuickBooks Company File Error?
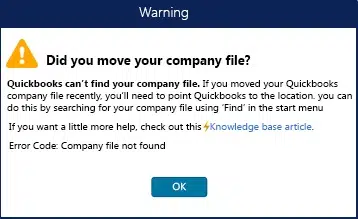
When you try to open company file in QuickBooks, it might show up an error with a warning message “QuickBooks can’t find company file. If you moved your QuickBooks company file recently, you’ll point QuickBooks to the location. You can do this by searching for your company file using ‘Find‘ in the start menu.” This error can often be experienced when the company file gets damaged or if QuickBooks stops working for some reason. There can be a couple of factors causing this issue, which we will be explaining later in this segment.
You can come across the following error message on the screen:
Warning:
QuickBooks can’t find your company file. If you moved your QuickBooks company file recently, you’ll point QuickBooks to the location. You can do this by searching for your company file using ‘Find‘ in the start menu. Error Code: QuickBooks Company file not found
What causes qbw.lck can’t be found error in QuickBooks?
This issue can affect the business operations of any organization, but it can be easily solved. Some of the common reasons behind not being able to open QuickBooks company file or QuickBooks can’t find company file error are listed below.
When the company file was used for the last time it was damaged.
Due to corrupt hard drive file storage, the company file is damaged
Problems with the location and extension of the file.
A conflicting *QBW.tlg.file
You might use an older version of QuickBooks software to open the files.
There might be some issues with reports in your file.
Now Press and also hold the Ctrl key while double-clicking the QuickBooks Desktop icon.
Keep in mind: Do hold the Ctrl key up until you have the No Company Open window in QuickBooks.
If the program fails to open while holding the Ctrl key, see QuickBooks Desktop does not begin for steps to resolve, as the following will certainly not aid.
If the program does open up, proceed below.
Verify that only one computer is hosting your company file. Turn off hosting in all computer systems other than the web server.
From the QuickBooks File menu, select Utilities.
Click Stop hosting multi-user access.
Stop Hosting Multi-User Access – Screenshot
Important Note: If you see anything other than Stop hosting multi-user access, it suggests hosting is currently switched off on that computer.
Once you confirm that hosting is disabled, proceed below.
Make sure that your QuickBooks Desktop Program is not damaged.
Solutions to fix Cannot open QuickBooks Company file
Now you know what actually causes QuickBooks company file not opening error or QuickBooks cant find company file error, it is time to perform the necessary steps to fix it.
Solution 1: Rename TLG and ND Files
Open the company file from the place it has been saved.
Now right-click on the transaction log file and change its name to OLD.qbw.TLG. This file has the same name as that of the company file with a TLG file extension.
After this open the company file and automatically QuickBooks will create a .TLG and ND files.
If the above steps didn’t help much, try performing this procedure to verify the network connectivity. You need to first find the name of the server system. And continue with the steps below:
Press the Windows + R tab.
Now, you need to open the Run dialog box.
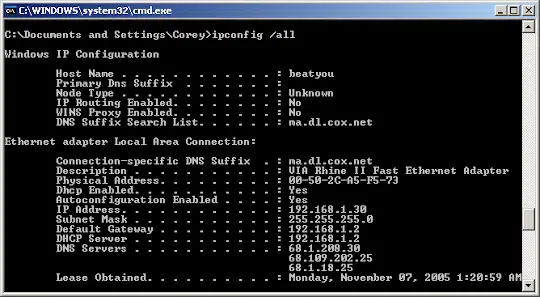
Heading forward, enter in CMD and hit the enter tab.
Further, type ipconfig/all and click on the enter tab.
Note down the server names.
And further enter ping and the name of the server in the next window.
You now have to click on the enter tab.
And you will see a reply for each packet.
In case you get any packet loss, then it indicates that there are some issues with the network connection.
Once the update ends, check the file extension. It should only have the .qbw extension. Extensions like QBB, QBM, etc, should be avoided.
The file should have been compressed. Continue with the below steps:
You need to first right-click the QB company file.
Further, move to properties and also the advanced tab.
Now, highlight the box next to clear the compress and encrypt.
Also, click on OK to conclude.
Solution 9: Turn off hosting on your workstations
In case you host your company file on a network, then you simply need to turn off host multi-user access on your workstations. Only the server computer should host the file.
At first, you should open QuickBooks on one of your workstations.
Once done with that, avoid opening the company file.
Instead, move to the file menu and then select the utilities tab.
In case you see host multi-user access, then avoid selecting it.
Further, move on to the next workstation. This one isn’t the problem.
However, in case you see stop hosting multi-user access, then go for it.
And continue with the steps on all workstations
Once you have checked your workstations, you can head to the server system. This is the computer that hosts the company files. Here you need to carry out the steps below:
At first, open QuickBooks on the server computer.
Also, open the file and further utilities tab.
In case the host multi-user access is an option, go for it.
Switch the multi-user setting off and on.
At first, you need to move to the file, utilities tab, and further choose stop hosting multi-user access.
Now, navigate to the file and utilities, also choose host multi-user access.
Try opening the company file and check if the issue continues.
Solution 10: Don’t save the desktop when you close QuickBooks
QuickBooks usually re-open any windows left open when you close your company file. In case you have a large report or several windows set to open on their own, then QuickBooks might freeze when starting up. To open the company file without saved windows, you can continue with the steps below:
You need to first open QuickBooks desktop.
After that, in the no company open, choose your company file.
Now, press and hold the Alt key and select open.
Do not let go ALt until the file opens. In case QuickBooks asks you to sign in, then release ALT and enter your password.
Also, press and hold ALT again and click on the OK tab.
In case the company opens successfully, then turn off the save the desktop when closing preference.
You need to head to the edit tab and select preferences.
Further, go for the desktop view.
Also, select Don’t Save the Desktop and hit the OK tab.
Close and open QuickBooks and try opening the company file.
Conclusion!
I hope the above-given troubleshooting steps have helped you in fixing QuickBooks cannot open company file. If you are still encountering the same issue or facing any other type of concern associated with QuickBooks, then you can get help from our QuickBooks enterprise technical support team. Dial +1-844-499-6700 and speak with a live expert today to your all your problems…!
Frequently Asked Questions!
What is a company file in QuickBooks?
QuickBooks company file is the core file of the software that saves financial information and other crucial information. The default file location is C:\Users\Public\Public Documents\Intuit\QuickBooks\Company Files. As the company file contains crucial data, it is essential to take a timely backup of the file.
How to install QuickBooks desktop?
Installing the QuickBooks desktop software involves a certain set of steps. One can easily install the software from the official Intuit website. However, it should be noted that to access the software one might need a product key and license number.
What are .tlg and .nd files in QuickBooks?
The nd and tlg files are a part of the QuickBooks file. .Nd and .tlg stand for the network data file and transaction log file respectively and they are configuration files that allow QuickBooks to access a company file in a network or multi-user environment.
What is the QuickBooks file doctor tool?
Intuit offers a couple of tools to eliminate errors in QuickBooks, one such tool is the QuickBooks file doctor tool. It is designed to eliminate issues related to the company file and other related files. One can easily access this tool from the QuickBooks tool hub.
Planning to switch to QuickBooks online or import your QuickBooks desktop company file to QuickBooks online? Well, if that is the case, no need to start over again. Simply moving your desktop file to a QuickBooks online company can help you fix the issue. Moving to QuickBooks Online from QuickBooks desktop offers a lot of benefits. It involves a bunch of steps. Thus, to help you out with your migration process, here we are with this piece of writing sharing the complete information related to moving or converting QuickBooks desktop files to QuickBooks online.
However, if you are new to QuickBooks or aren’t well-versed in the technical aspects of the software, you can simply get in touch with our technical support team having sound knowledge related to QuickBooks desktop and online. All you need is to ring us up at +1-844-499-6700, and all your queries will be answered immediately. Having said that, let us check out the migration process and unleash some more information.
Benefits of Converting QuickBooks Desktop to QBO
One of the benefits you can reap by converting QuickBooks Desktop to QuickBooks Online is that it is free of cost. Intuit doesn’t charge anything for importing data to the online version.
You can easily compare reports from the current year to the previous year.
Work with multiple QuickBooks windows open at once
All editions
All editions
Work with my customers
Create and manage invoices and bill customers
All editions
All editions
Create and manage estimates, send to customers, convert to invoices, and use progress invoicing
All editions; Progress invoicing in Plus only
All editions
Track sales, accept payments, and calculate sales tax
All editions, with QuickBooks Payments
Not available
Track sales and expenses in multiple currencies
Essentials, Plus
All editions
Track projects including time expenses, pending payments, unbilled work
Plus
All editions
Invoice with batch invoicing
Not available
All editions
Prevent sales to customers with overdue invoices
Not available
Enterprise
Work with my suppliers
Manage bills and pay suppliers
Essentials, Plus
All editions
Billable expenses
Plus
All editions
Track and manage contractors
All editions
All editions
Manage employee data
Track employee time, including billable hours
Essentials, Plus
All editions
Pay employees, e-file payroll taxes, and print and file T4s
All editions, with Enhanced Payroll
All editions, with Payroll subscription
Connect to my bank, download transactions, and reconcile
All editions
All editions
Use online banking
Undo previous bank reconciliations
By an accountant, in QuickBooks Online Accountant
All editions
Use the FIFO method to track inventory quantities, sales revenue, and COGS
Plus
Enterprise, with Advanced Inventory
Use Average Costing method to track inventory
Not available
All editions
Manage inventory
Set and manage inventory reorder points
All editions
All editions
Track income and expenses and organize according to tax categories
All editions
All editions
Run custom, Profit & Loss, expense, and balance sheet reports
All editions
All editions
Create and run reports
Forecast sales and expenses
Plus
Premier, Enterprise
Create custom reports with Intuit Statement Writer
Not available
Enterprise
Use Advanced Reporting
Not available
Enterprise
Steps to move your QuickBooks desktop files to QuickBooks online
QuickBooks Online is being used by small and medium businesses all across the globe. Users can access QuickBooks anytime from anywhere making business operations lot easier. In fact, they can back up their data from data anywhere. And that is the reason why many people are converting to QuickBooks Online from QuickBooks desktop. Let us explore the steps one by one:
Before you proceed, note that you have 60 days from the time you create your QuickBooks online account to move your data. In case you are not sure how old your company is, you simply have to sign in to QuickBooks online. Further, refresh the page for personalized information.
Important: Ensure that your QuickBooks software is updated to the latest release. 1. For this, you need to first navigate to QuickBooks and Press F2 or Ctrl + 1, in order to open the product information window. 2. You need to further check your current version and release. In case you have the QuickBooks versions and releases or higher: 2019 R17, 2020 R15, 2021 R10, and 2022 R5, it will be easy to migrate.
Ensure that the company file isn’t too big to export.
In this step, you need to first update QuickBooks.
And further to ensure that the total target is less than 750,000, you need to press ctrl +1 on your keyboard.
Note: In case the file exceeds the target limit, it will not be converted to QuickBooks online. The only option is to import lists and balances in QuickBooks online or start fresh.
You now have to print a copy of your sales tax liability report.
And further, enter adjustment entries after your move.
Move to the reports menu, and further choose vendors and payables.
Also, choose sales tax liability.
You now have to choose all from the dates dropdown ▼
From the print dropdown ▼, choose save as PDF.
Also opt for the folder you want to save it in, name the file, and choose save.
Step 2: Move your QuickBooks desktop file to QuickBooks Online
The next step in this migration process is to move your QuickBooks desktop files to QuickBooks online. However, it should be noted that if you are using QuickBooks version 2018 or older, then you can move your data to QuickBooks online with an online tool.
QuickBooks Desktop Pro or Premier
You need to first sign in as admin to the company file you need to import.
Further, head to the company and choose export company file to QuickBooks online.
Choose start your export.
And also, sign in as admin to QuickBooks online company.
The next step is to opt for choose online company option and select the QuickBooks online company you wish to replace with the company file.
Now, hit the continue tab.
Also, in case you track inventory in QuickBooks, then check out the below options:
Choose Yes to bring them over and further enter the as of date. Also, use the first day after your last tax filing period as your inventory start date.
Opt for no if you want to set up new items later in QuickBooks online.
Further, enter agree in the text field and also choose replace.
You now have to choose yes, go ahead and replace the data.
Lastly, click on replace tab.
QuickBooks Desktop Enterprise
Note that, if you make use of advanced features like advanced reporting and advanced inventory, then it is suggested to start fresh, as some of the data won’t move to QuickBooks online. In case you want to keep using these features in the enterprise, then go for cloud-enabled QuickBooks desktop enterprise.
Under this process for QuickBooks enterprise, you need to sign in as admin to desktop company file you want to move.
Now press ctrl + 1 to open the product information window.
Also, press ctrl + B + Q and further hit the ok tab to display the export window.
The next step is to select Get Started on the export window.
Furthermore, sign in as admin to QuickBooks online company.
Also, choose the online company and further choose the QuickBooks online company you want to replace with the company file.
Hit continue.
And if you track inventory in QuickBooks Desktop, then be sure with the below options:
Choose Yes to bring them over, and further specify the as of date.
Also, note that you need to use the first day after your last tax filing period as your inventory start date.
Now, choose No if you want to set up new items later in QuickBooks online.
You need to now enter agree in the text field and further choose replace tab.
Towards the end, it is recommended to choose Yes, go ahead and replace the data, and hit replace tab.
Step 3: Get ready to use QuickBooks online
Now that your company file is all set up, it is time to start with QuickBooks online. With QuickBooks online, you can now connect your bank or credit card account. Further, create and send invoices to your customer. And also track your bills and make payments.
Migration steps for QuickBooks Desktop to QuickBooks Online
Here is what the migration process of QuickBooks desktop to QuickBooks online involves:
Back up your company file
In QuickBooks desktop, you need to backup your QuickBooks data on a regular basis, to avoid any sort of data loss. Whereas, in QuickBooks online, the data is stored securely in the cloud. Thus, it doesn’t require any manual backup.
In case you use multi-user mode, move to the file menu and choose switch to single-user mode.
Further head to the file menu and choose Create Backup.
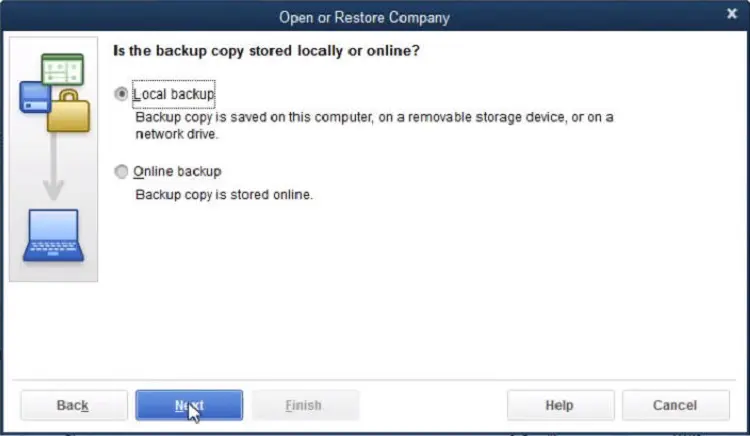
Also, select the local backup.
You now have to choose local backup in the window and hit next.
The next step is to choose browse in the local backup only, and further choose where you want to save your backup company file.
Set the number of backups you want to keep.
Hit ok when you are ready to proceed.
Choose Save it Now and further hit next.
A confirmation message will show up when the backup is completed.
Head to file menu and choose switch single user mode.
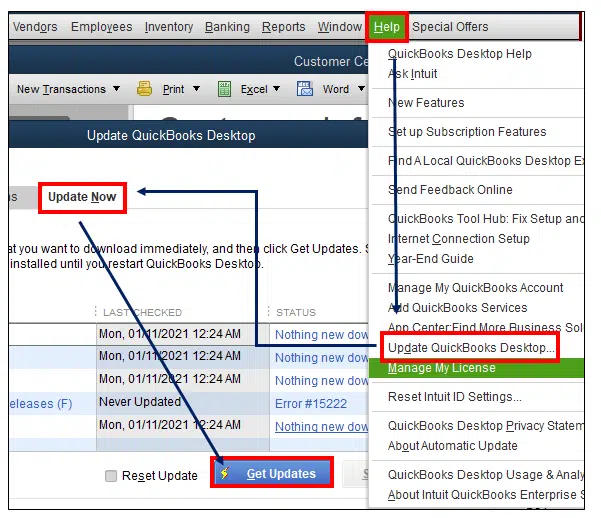
Now, click on help tab and further hit update QuickBooks desktop.
You now have to opt for update now.
Also, choose get updates and hit close.
The next step is to choose file and hit exit.
Moving ahead, reboot QuickBooks.
In case you have payroll, run it now.
Remove Minsitere due Revenue (Companies outside Quebec only)
You need to choose suppliers and then move to supplier center
Further identify Minsitere due revenue
Now, open the supplier
Move to sales tax settings
Uncheck all the boxes
And further mark the supplier as inactive
Hit ok tab to close the window
Turn off payroll in the QuickBooks desktop file
It is essential to avoid payroll issues post-migration, it is suggested to turn off in the QuickBooks desktop file prior to starting the migration.
Choose edit tab and further opt for preferences from the dropdown menu.
The preferences window will show up.
You now have to choose payroll and employees from the left-side menu bar.
Also, choose the company preferences tab in the preferences window.
Now, hit no payroll option.
Save your Sales tax liability report
You can save or print a copy of your sales tax in QuickBooks Online. Further might require it to enter adjustment entries after migrating. The steps involved in this procedure are:
You need to navigate to the reports menu and further choose suppliers and payables.
Also, choose sales tax liability.
From the dates dropdown, choose all.
Now, at the top, from the print dropdown, you need to choose save as pdf.
Further choose the folder you want to save it in, name the file, and choose save.
After you have saved the file, you can print it if you would like a hard copy.
Export your reports and lists
Exporting reports and lists is optional. This is required only when your company has in excess of 700,000 targets. Otherwise, you can skip to creating a QuickBooks online account.
in QuickBooks desktop, you need to head to reports menu and further choose report center
Moving ahead, find and open any report.
Also, choose the desired date range from the dates dropdown menu.
Now, choose excel on the toolbar.
You can also choose print or email to save the report as PDF.
Heading forward, from the excel dropdown, choose create new worksheet to create a new excel workbook or to update an existing workbook with the data in the open report.
Choose update the existing worksheet.
Also, choose Export and locate the workbook on your computer.
In case you want to format the data a specific way, then choose advanced.
Moreover, if a message says your report has too many columns, choose advanced.
Now, choose and uncheck the space between the columns checkbox.
Also, hit ok tab.
And towards the end choose ok tab when you are ready to export.
Create QuickBooks online account
You now need to create your QuickBooks online subscription to complete the process. Review the list of options to choose the plan that suits you. Also, keep a check on the system requirements. When prompted to sign in, you can use the same credentials you used to sign in to your QuickBooks desktop account. If you missed it for some reason, then try to reset your QuickBooks desktop password.
Using QuickBooks Online much convenient than the desktop version and that’s why more and more people are shifting to it today. Hopefully, these provided steps will help you to Convert your QuickBooks Desktop to QuickBooks Online.
If you are not able to do or there is any problem you are facing while following these steps, you can contact our QuickBooks helpline number and get quick help from US based best accounting experts. Our QuickBooks online support team is available 24*7 to help you, dial today our helpline .i.e. +1-844-499-6700.
Some FAQs on Convert from QuickBooks Desktop to online
What are the benefits of converting from QuickBooks Desktop to QuickBooks Online?
Converting to QuickBooks Online allows for remote access to your financial data, automatic software updates, and better collaboration with your team. Plus, it’s a cloud-based solution, which means you won’t have to worry about backing up your data or losing it due to computer malfunctions.
How can I get help with the QuickBooks Desktop to Online conversion process?
If you need assistance with the conversion process, you can reach out to our toll-free number at +1-844-499-6700. Our customer support team can guide you through the steps and answer any questions you may have.
Can all QuickBooks Desktop data be converted to QuickBooks Online?
Most data can be converted to QuickBooks Online, but some features and data types may not transfer over. For example, if you use the QuickBooks Desktop payroll feature, you’ll need to set up payroll in QuickBooks Online separately. Make sure to review the list of what will and won’t convert before starting the conversion process.
How long does it take to convert from QuickBooks Desktop to QuickBooks Online?
The time it takes to convert depends on the amount of data you have and the complexity of your company file. Typically, the process can take several hours to complete. However, our customer support team can provide a more accurate estimate based on your specific situation.
Do I need to cancel my QuickBooks Desktop subscription after converting to QuickBooks Online?
Yes, you’ll need to cancel your QuickBooks Desktop subscription after successfully converting to QuickBooks Online. This will prevent you from being charged for both subscriptions. Don’t forget to do this step, as it can save you money in the long run. Remember, if you need any assistance with the conversion process or have further questions, feel free to reach out to our toll-free number at +1-844-499-6700.


![QuickBooks cannot communicate with the company file – [Fixed]](https://www.hostdocket.com/wp-content/uploads/2018/04/Resolve-error-cannot-communicate-with-the-company-file-due-to-firewall-1.jpg)