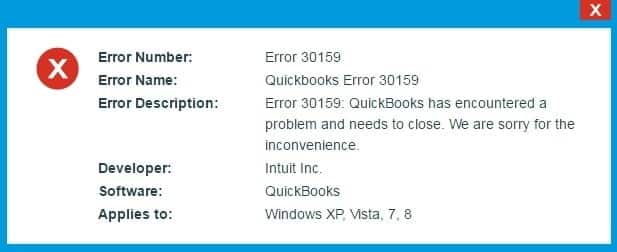
QuickBooks error code 30159 is basically a payroll error that you can come across when trying to upgrade the payroll. Errors in QuickBooks can be extremely annoying, and dealing with issues immediately is crucial to avoid any further nuisance. Talking about QuickBooks error 30159, it usually appears on the screen with a warning message that states: QuickBooks has encountered a problem and needs to close.
Payroll errors in QuickBooks aren’t very common. However, you can experience such issues when trying to add an existing payroll subscription to your QuickBooks payroll account. Such an error can be further triggered due to misconfigured system files in Windows.
Furthermore, when running Windows-compatible programs, there is the probability of coming across this issue in QuickBooks. To further learn about this issue, make sure to read this piece of writing till the end. You can also get in touch with our technical support team at +1-888-510-9198, for any further QuickBooks-related assistance.
What is QuickBooks Error 30159?
QuickBooks error 30159 usually shows up with a warning message: QuickBooks has encountered a problem and needs to close. We are sorry for the inconvenience. This error can further show up due to a variety of reasons as your QuickBooks subscription has ended, or the payroll subscription has expired. To fix this issue, you would have to check if the payroll subscription is active or not. You can further use the QuickBooks tool hub to diagnose the reason. Moreover, if the subscription has ended then you would have to buy the subscription again and this error will be resolved.
The QuickBooks error 30159 can cause damage to the data of the company so it needs to be fixed. The main symptoms of this error are it crashes the program error, the PC often crashes while working on it or the system runs very slowly. Payroll update error 30159 occurs due to several reasons and they are listed below.
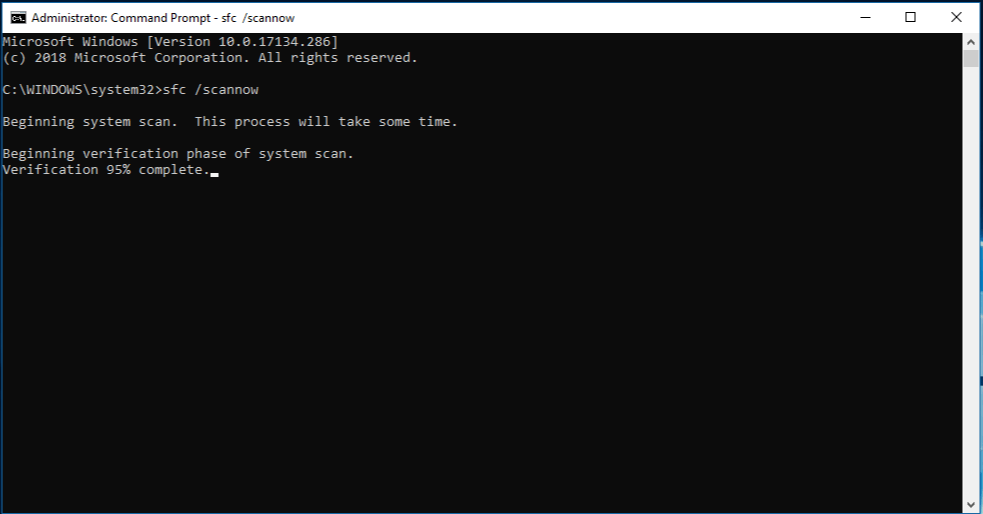
Login as the “System Administrator” on your computer.
Hit on the “Windows” or “Start” button, on your keyboard.
After that Press “Windows + R“ keys together to open the run box.
Type “cmd” and then hit “Enter” key, on your keyboard.
A black screen will open on your desktop screen.
Type “sfc/scannow” and then hit on the “Enter” key.
This process will take few seconds to complete.
Once the process is done, follow the screen instructions on your desktop screen to restore the corruptions problem of system files.
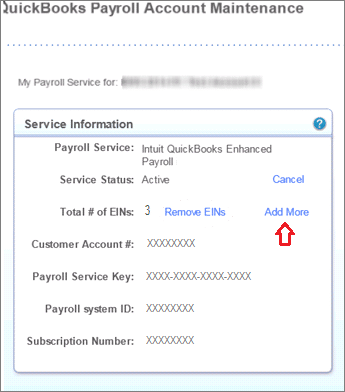
Method 4: Adding EIN to your company file
First of all Login to your QuickBooks as “System Admin“.
After that hit a click on “Choose Payroll” option.
Now, the users needs to click on “Use my Existing Payrolls Service“.
A newly window named “Account Maintenance” appears on your desktop screen.
After that hit a click on “Add file” option.
Check on the radio button that is labeled as “Add EIN Number“.
Note: It should be noted that in case the radio button is disabled, then it means that the user has already subscribed to “EIN Number” for your company.
After that click on the “Next” button.
Check out the information and open your QuickBooks.
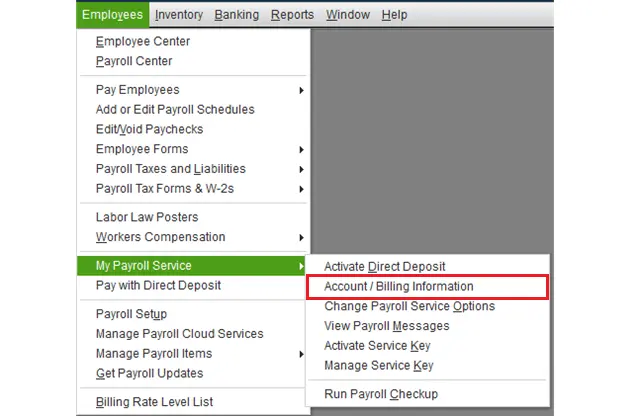
Method 5: Edit and Re-enter your payroll service key
You need to first proceed to the employees menu.
Further, opt for the My payroll service option.
You now have to click on the manage service key and also click on account/billing information.
The next step is to find and choose your payroll service key and opt for the remove tab.
Once done with that, click on the add tab.
And also enter your active payroll service key.
Hit the finish tab and click on OK to end the process.
Method 6: Perform QuickBooks error scanning
You need to first download the QuickBooks payroll error utility.
Further, follow it up by installing the program.
You now have to click on the scan and start tab with the scanning process.
After that, select QB-related issues after the scanning process ends.
Towards the end, reboot your system.
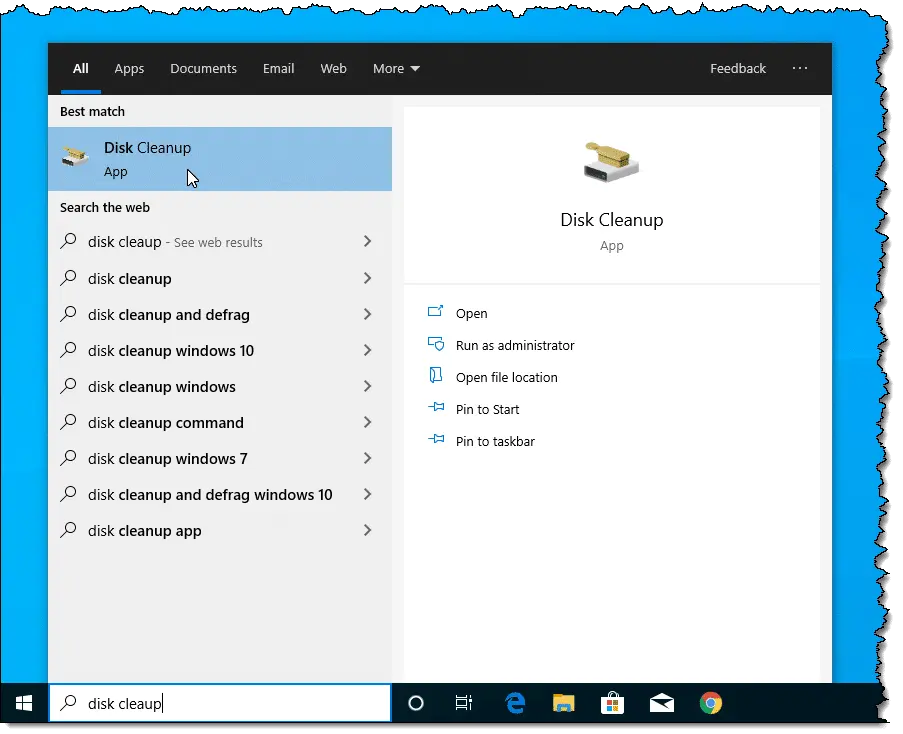
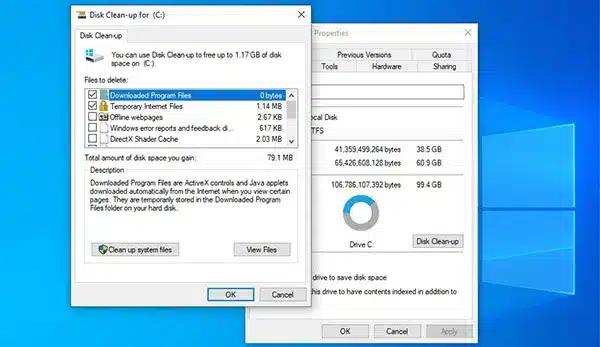
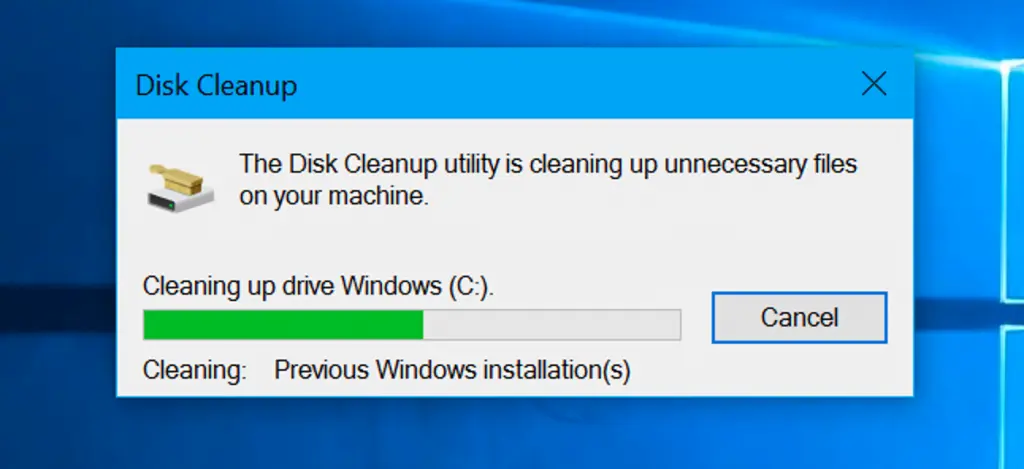
Method 7: Perform disk cleanup in Windows
Under this process, you need to wipe off the temporary files by clicking on the start tab.
Once done with that, click on the enter tab.
Choose the drive that you want to free up.
Also, click on the OKtab.
The next step is to select and remove all unwanted files and further click on the ok tab.
Now, select clean up system files in disk cleanup.
Select the file types and click on the ok tab.
This would remove all unimportant files from the system and further create the required space.
QuickBooks error code 30159 is not complicated and can be easily fixed. I hope you have successfully troubleshooted this error from your QuickBooks. If the problem persists, then we recommend you to seek assistance from our QuickBooks online support team by dialing +1-888-510-9198, and getting quick help from the experts. Our certified ProAdvisor’s are capable to handle your all type of issues related to QuickBooks.
Some Quick FAQs relating to QuickBooks Error 30159
What is QuickBooks Error 30159, and what causes it?
QuickBooks Error 30159 is a common error that occurs when the user tries to update or install QuickBooks software. It is usually occurs due to incorrect or incomplete installation, virus or malware attacks, corrupt system files, or registry errors. Other reasons for the error can be an outdated version of Windows or QuickBooks software, an incomplete installation of QuickBooks Payroll, or problems with the .NET Framework.
How can I fix QuickBooks Error 30159?
There are several methods you can use to fix QuickBooks Error 30159. Some of these methods include: 1. Run the QuickBooks Payroll update tool to fix the error. 2. Update your Windows and QuickBooks software to the latest version. 3. Verify your payroll subscription and make sure it’s active. 4. Perform a clean installation of QuickBooks software. 5. Use the QuickBooks file doctor tool to repair any damaged files.
How can I prevent QuickBooks Error 30159 from occurring?
To prevent QuickBooks Error 30159 from occurring, you can take the following steps: 1. Make sure your QuickBooks and Windows software is always up-to-date. 2. Regularly run antivirus and malware scans to protect your system from virus attacks. 3. Ensure that you have a stable and reliable internet connection when updating or installing QuickBooks software. 4. Avoid installing multiple versions of QuickBooks software on the same computer. 5. Always create a backup of your QuickBooks data to prevent data loss.
QuickBooks error code 6150, 1006 belongs to the 6000-error series, which is usually related to the company file. You can come across this issue when opening or using company files. Another situation where you come across such an error is when you try to open the backup file by changing the extension. There can be a bunch of factors triggering such an error in QuickBooks, which we will be elaborating on later in this segment.
Thus, make sure to stick around this piece of writing till the end. Or you can further connect with our technical support team for any sort of QuickBooks-related assistance. Reach out to us at +1-888-510-9198, and we will provide you with immediate support services for all sorts of QuickBooks-related queries.
What is QuickBooks error 6150, -1006?
QuickBooks error 6150, -1006 is one of the commonly encountered errors that could be seen when the user finds that he/she is unable to open the company file. When the user encounters this error, the very first thing to do is to detect the actual cause, and then move to the resolving procedures. If you are also facing any such error, then this article will help in fixing it without any hassle.
The following error messages may show on your desktop screen when error 6150 and 1006 occurs:
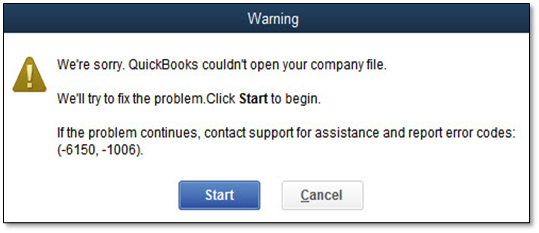
An error occurred when QuickBooks tried to create, open, or use the company file. Please try again. If the problem persists, contact Intuit Technical Support and provide them with the following error codes: (6150 and -1006).
We are sorry. QuickBooks couldn’t open your company file. We’ll try to fix the problem. Click start to begin. If the problem continues, contact support for assistance and report error code: (6150, -1006)
Another error message that can appear out of nowhere is: “Unhandled exception has occurred in your application. If you click Continue. the application will ignore this error and attempt to continue”
Factors that might trigger this error -6150, -1006
You can experience such an error due to the following factors:
When you try to save QuickBooks Mac file while using QuickBooks Windows, then experiencing this issue is pretty common.
You might also experience a similar issue in case of an incorrect extension for QuickBooks.
Another trigger for such an error can be if the QBW or the company file gets damaged. This would require creating a portable backup file.
You can end up in this issue if accessing a portable file without opening the software.
Moreover, if you have deleted QuickBooks-related files mistakenly
You can face this issue when accessing a portable file (.qbm) without opening the software.
If your QuickBooks software is not installed properly on the system, then you can experience this issue.
Another possible factor can be damaged Windows registry files.
Any virus or malware attack can also trigger this error for you.
Important Points to Remember:
If the folder where the QuickBooks company file is stored has DECRYPT_INSTRUCTIONS (.txt or .html) document, then the system is infected.
Along with QuickBooks company file, the CryptoWall virus can harm other files and programs as well.
Also, Intuit Data Services won’t be able to repair the infected files for the corruption is severe.
Signs of QuickBooks error code 6150, -1006
There are certain indicators of the QuickBooks error code 6150, 1006, that would help you in spotting the error and perform the right set of steps to eliminate it. These indicators include:
One of the basic signs can be if your system crashes quite frequently when you run the same program
You can also experience the issue when the error displays on the screen itself and crashes the program window.
Another possible trigger can be if the windows run sluggishly and don’t respond to the keyboard and mouse inputs.
Just in case your system freezes for a few seconds, then you might experience this issue.
Quick Fix for QuickBooks error 6150
Before you jump on to the entire procedure to eliminate the issue, you can try performing these quick fixes.
Note that if you came across this issue due to a file extension of the company file, then try replacing the file extension and saving the company file with the right file extension.
Furthermore, you can try ensuring that the company file is initiated on another system.
Try to reinstall the software to update the file and software.
Save the QuickBooks Macintosh in the Mac system to avoid any errors.
Moreover, before opening the company file, make sure to update your system to the latest version.
If you have received QuickBooks Error -6150, -1006, you can try the following solutions. However, you can take instant help from QuickBooks error support team to resolve this error.
Solution 1: Restore a backup of company file
The user will be able to fix QuickBooks Error 6150, -1006 by restoring the backup of company file. The point to be noted here is that after the user converts a company file to a later version of QB, he/she cannot open it in a previous version. In case the user wants to use the previous QB version, then in that case he/she needs to restore a backup file created using that version.
Steps to restore a backup company file:
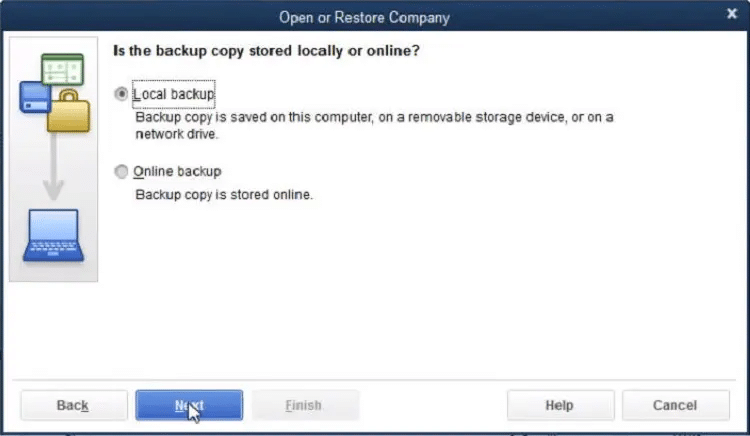
Firstly visit the QuickBooks File menu and then hit Open or Restore Company.
The next step is to select Open or Restore a Backup Copy and hit Next.
Now opt for the Local Backup and Next options respectively.
And then opt for the location of the backup file from the drop-down.
After that select the backup file.
Followed by clicking Open and then hitting Next.
Moving ahead, the user is required to select the location where the user wants to restore the file from the save in drop-down.
Now, type a new file name in the file name field and then save it as the type field should populate QuickBooks files (*.QBW).
Coming towards the end, hit Save and respond to all the messages that pop up appropriately before the restoration starts.
The final step is to click Save and then carefully read and respond to any messages that appear before restoration begins.
If the user still faces error code 6150, -1006, then it is recommended to move to the next solution.
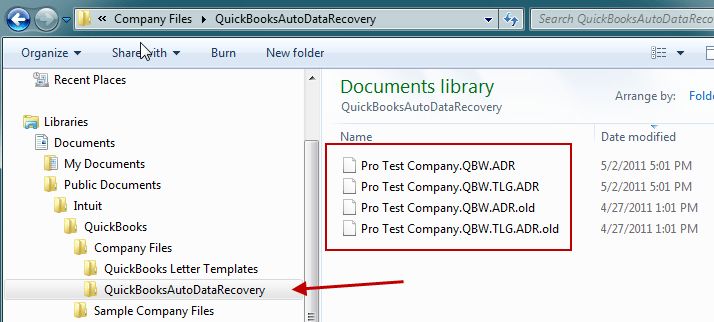
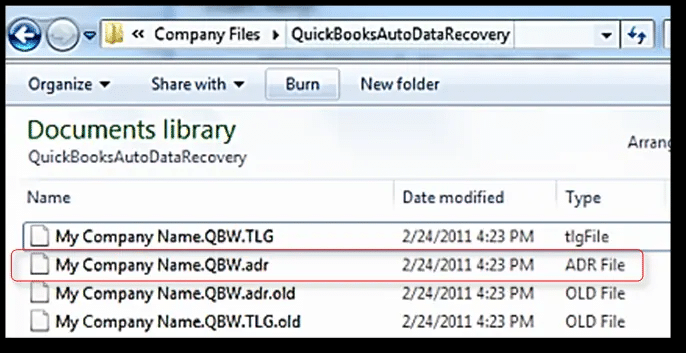
Solution 2: Recover lost data with QuickBooks Auto Data Recovery
If you have QuickBooks Desktop with Auto Data Recovery (ADR), then you may be able to able to recover almost all of your data if data loss or corruption happens.
Note that QuickBooks auto data recovery is not compatible with QuickBooks Pro, Premier, and Enterprise.
Moreover, the tool is not available for the accountant version of QuickBooks.
The file size should not exceed 1.5 GB.
It requires an updated version of the software.
Solution 3: Create QuickBooks Desktop Company File
A QuickBooks Desktop company file holds the financial records of a company. If you’re new to QuickBooks, you should start with creating a company file. In case you already have a company file, you can upgrade the file or check if it is the appropriate time to begin with a new company file to replace your old file.
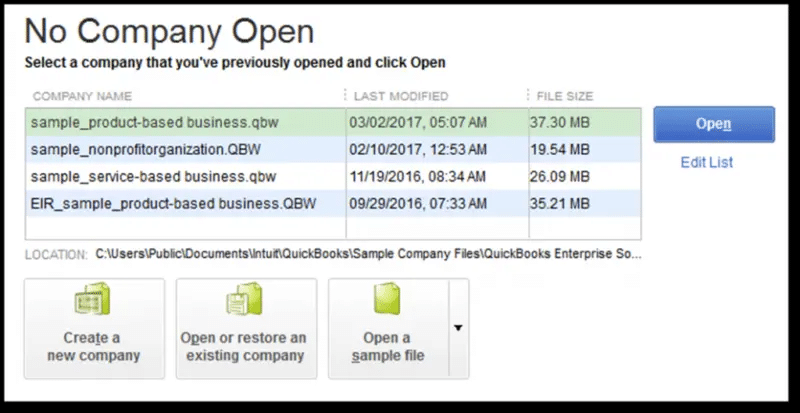
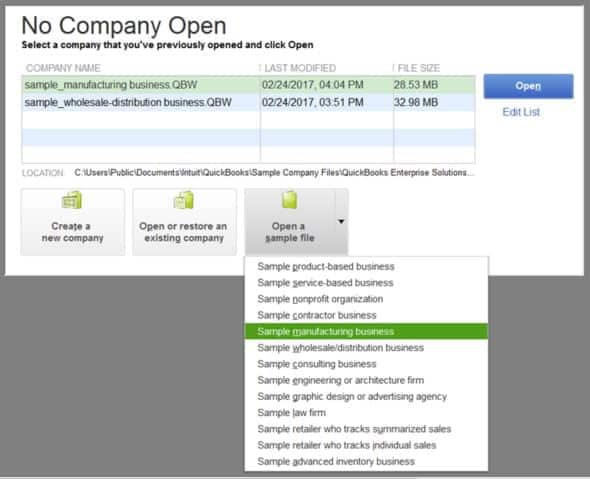
First of all, open QuickBooks Desktop.
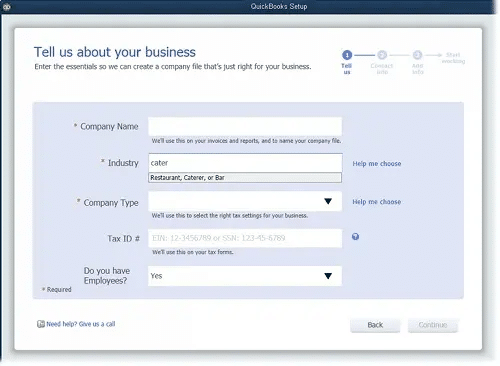
Then visit the “No Company Open” window and select Create a new company.
Choose Express Start or Detailed Start.
Express Start:
Type in all the necessary details in QuickBooks Setup window.
(Select Help Me choose to read the description for every business type and the preset chart of accounts that QuickBooks will craft for you per company.)
Choose Create Company.
Once your company file is created, start creating your customers, chart of accounts and services or do that later by selecting Start Working.
Detailed Start:
Provide information on the Easy Step Interview screen and select Next.
Select your Industry and hit Next.
Select your type of business entity and select Next.
Set your fiscal year’s first month and select Next.
Choose your QuickBooks administrator password and select Next.
Choose the location where you wish to store your company file and select Save.
Hit next to customize your QuickBooks or select Leave (you can do that later).
In certain cases, the CryptoWall virus and other infected software can cause Error -6150, -1006 and also prevent the user from opening QuickBooks accounting software. The user can simply follow the steps listed below, in order to get rid of this kind of issue.
First of all, the user is supposed to open the Windows Start menu.
After that, type File Explorer in the search bar. Along with that, the user needs to open the File Explorer.
The next step in this process is to look for and open a QuickBooks folder that could be located on the C: drive.
After that, the user needs to look for the files that have decrypt or instructions. (.txt or .html)
Solution 5: Use the QuickBooks file doctor tool
QuickBooks file doctor tool is designed in a way to eliminate issues related to the company file. You can perform the steps below to access this tool in QuickBooks.
In case the user is unable to detect any of the files that fits the description, then in that case the system is completely fine. This brings us to the end of the article, and we hope that this article assists you in fixing QuickBooks Error Code 6150, -1006. In case the issue persists even after following all the given steps or you have any other QB-related issue, then you can simply contact our 24×7 QuickBooks support team at +1-888-510-9198 We will be pleased to help you.
What is error 6150 and 1006 in QuickBooks Enterprise?
You can face QuickBooks error 6150 and 1006 in case the QBW or the company file gets damage. This would create a portable backup file. And you can face issues when accessing a portable file without opening the software.
What is error code 6150 1004?
The Error code 6150 1004 is seen with a warning message that states “An error occurred when QuickBooks tried to create, open or use the company file”. In case the problem persists, feel free to reach out to our technical team.
What is a QuickBooks ADR file?
QuickBooks desktop offers a feature i.e., Auto Data Recovery, which can be helpful in case of data loss or corruption. This feature allows you to recover all or nearly all the data.
How do I repair a QuickBooks backup file?
To repair a backup file in QuickBooks, you need to head to the file menu and further hover over utilities tab and choose rebuild data. On the QuickBooks information window, choose the ok tab. Perform onscreen steps to save a backup and let the tool fix the file for you.
How do I fix a firewall issue in QuickBooks?
To fix a firewall issue in QuickBooks, first you need to get the QuickBooks Tool Hub and then run QuickBooks File Doctor. It will diagnose the issue and then you can proceed with fixing it.
It has been reported by many QB users that after the successful installation of QuickBooks desktop when they entering their validation code or license & product number for activating QuickBooks desktop, few error messages are occurring on their computer screen. Here, in this blog I am going to talk about these QuickBooks desktop activation issue and what should you do when you encounter them. However, If you have any query regarding this, you can reach out to QuickBooks error support team to resolve all QB errors in no time.
If you are a QB user then you also may get the following error message after entering your validation code or license and product number for QuickBooks activation.
This service is temporarily unavailable. Please try again later.
You have entered incorrect license/product numbers. Please check the numbers carefully.
Are you looking for the best way to resolve these error QuickBooks desktop activation issue? Don’t worry, these errors can be easily solved with the help of the below suggested solution methods.
Important Points to Remember before Performing any of the Suggested Solutions
Check if QuickBooks is already active
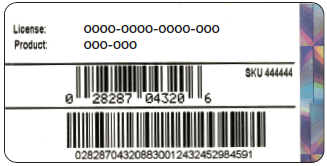
Verify the license and product code of the QuickBooks software you are using (Note: License number and product version match the one on the sticker on the QuickBooks product package)
For any downloaded product check the confirmation mail from Intuit at the time of purchase.
In case you have QuickBooks on a CD then check the sticker on the CD Package.
In case of ProAdvisors, visit member support for installation code.
If you get the error “The validation code is incorrect” or “This service is temporarily unavailable” then check recommended solutions and then execute the appropriate way to fix the problem during QuickBooks desktop activation
Solution 1: Verify the system date & time settings are correct.
First, close QuickBooks Desktop.
Then right click on the “Windows Taskbar” icon and then select to “Change the time and date“.
Click on the “Date and Time” icon and set them.
Then, click on the “Apply“ tab and after that on “OK” icon.
After this, open the QuickBooks desktop and the click on the “Help” tab then Activate QuickBooks followed by the “Activation“ tab.
Finally, enter the ‘Validation Code‘ and then click on the “Next” icon.
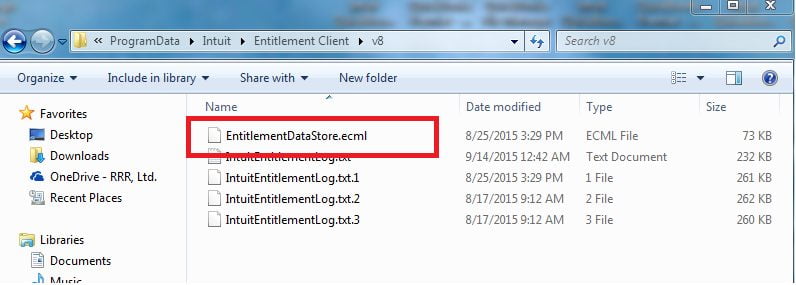
When QuickBooks Desktop is installed you have to provide the license number as well as product code to complete the process of installation and validate your copy of QuickBooks. At times an encrypted file with all those information may be damaged and it is then QuickBooks will not open and may display the error message. In such situations, removing or deleting the entitlement file and then re-entering the license and produce data will help solve the issue.
Delete EntitlementDataStore.ecml file
At first, close the QuickBooks Desktop.
Make sure that all QuickBooks processes are no longer running.
From the keyboard, press the “Ctrl + Shift + Esc” keys and after this the “Task Manager“ tab opens.
Go to the ‘Windows 10:Click “More Details” to show task manager.
After this, click on the “Process“ tab.
Then sort the processes alphabetically by clicking on the processor name header.
For all examples of ‘QBW32.EXE‘, click the “Search“ option and then “End Job” icon.
Open the ‘Entitlement Data folder‘ for your operating system and version of QuickBooks.
On the keyboard, press the “Windows + R” keys so as to open the “Run“ window.
Enter the “C: \ ProgramData \ Intuit \ Entitlement Client \ v8 (or v6)” and then tap “Enter” (Folder location is similar for all variants QuickBooks desktops and QuickBooks Desktop Enterprise .)
Right-click the “EntitlementDataStore.ecml file” and choose “Delete” option.
Click the ‘Yes‘ icon to confirm that you want to delete the file.
Lastly, open the company file and then follow the instructions to register the application.
Solution 4: Run QBInstall Tool
In case you are not able to install or open QuickBooks Desktop, then QuickBooks Installation Diagnostics tool (OBInstall) can help. This tool is designed in such a way that automatically identifies and fixes the problems with .NET Framework, C ++, and MSXML.
There is no need or doing any manual steps as the most of the work will be done by the tool saving a lot of your time that would otherwise been used to solve the issue.
At times when QuickBooks function gets damaged or any problem cannot be fixed then uninstall the QuickBooks Desktop. After this rename the installation files back and again reinstall the QuickBooks Desktop to your system. This whole process is called clean install.
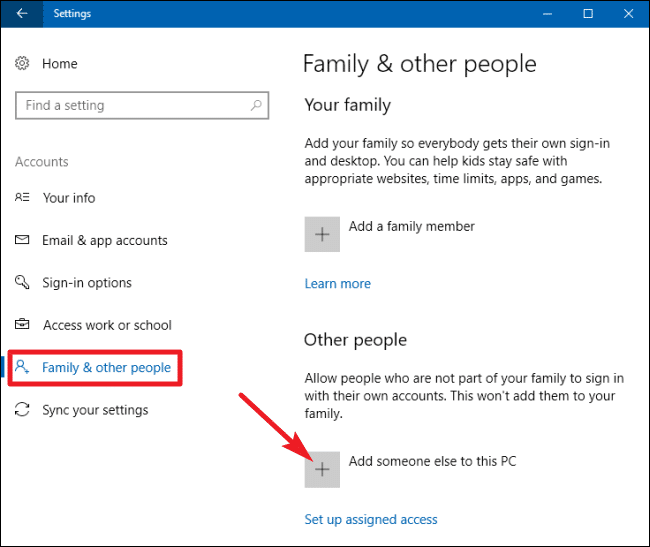
Solution 6: Create a new Windows Administrator
For Windows 10
Sometimes, it is important to try new windows users to eliminate user account damage.
At first, select the “Start“ icon and click on the “Settings” tab.
Now, Select the ‘accounts‘ section & also click the “Family& other users” option.
Under ‘Other User‘ icon, just click “Add“ an additional person to this computer system.
Below of the web page, click ‘I do not have the sign-in information for this person‘.
At the end of the next page, click the “Add users“ icon without a Microsoft account.
Enter the name of the new account.
Now, click the “Finish By default“ icon, the new account is established as the standard user.
After than click on the recently created account as well as click on the “account type“.
Click the drop-down menu as well as choose the “Admin” tab
Now click on the “OK” tab.
Second last after creating new users, logout from Windows and also sign-in back as a new user.
After that Open the “QuickBooks desktop” and also choose the “Help” icon > “Activate QuickBooks” icon > “Start Activation” icon.
Note: (For the Canadian version of QuickBooks, click on the “Help” tab > “Register QuickBooks” tab > “Register” tab).
If these troubleshooting steps fixes your error then make a decision whether to keep or get rid of the new administrative user as well as continue to use the existing one.
For
Windows 8
Open the system window, tap on the “Windows + E” key on the keyboard simultaneously.
At the top of the screen, choose the “Computer” tab and select the “Open Control Panel” tab.
Choose the “User Accounts” tab => “Manage another account” tab.
Once the ‘Manage Account’ screen appears, choose the “Add a new user in PC settings” option.
Type-in the username & domain name, and then choose the “Next” icon.
Choose the ‘Administrator access’ for this new user, then choose the “Finish” tab.
Once you create a new user, sign-out & sign back in as a new user.
Open the QuickBooks & attempt to register by selecting the “Help” tab => “Activate QuickBooks” tab => “Begin Activation” tab. (In QuickBooks Canadian version, you should go to “Help” tab => “Register QuickBooks” tab => “Start Registration” tab.)
For Windows 7
Choose the “Windows” or “Start” tab, and then select the “Control Panel” tab.
Select the “User Accounts” tab, and then “Manage Use Accounts” tab.
Once the “User Accounts” screen opens, select the “Add” tab.
Type-in the new user name & domain name, and then choose the “Next” tab.
Choose the ‘Administrator access’ for this new user, then choose the “Finish” icon.
Once you created a new user, sign-out & sign-in the windows as a new user.
Open the QuickBooks & make an attempt to register it by selecting the “Help” tab => “Activate QuickBooks” tab => “Start Activation” tab. (For the QuickBooks Canadian version, go to the “Help” tab => “Activate QuickBooks” tab => “Begin Registration” tab.)
We hope this article helped you to solve the QuickBooks desktop activation issue. If none of the above solutions resolve the validation code issue then we recommend you to seek assistance from our certified QuickBooks support Proadvisor team. Dial our toll-free +1-888-510-9198 to directly connect with us.
Some FAQs Related to QuickBooks Desktop Activation Issue
What is QuickBooks Desktop activation and why is it necessary?
QuickBooks Desktop activation is a process that verifies the authenticity of your software and allows you to use all its features. It is necessary because without activation, you will not be able to use QuickBooks Desktop for accounting and financial management.
How can I activate QuickBooks Desktop using the product key?
To activate QuickBooks Desktop using the product key, you need to open the software and go to the Help menu. From there, select “Activate QuickBooks Desktop” and follow the instructions on the screen. If you face any issues during activation, you can call our toll-free number +1-888-510-9198 for assistance.
What should I do if QuickBooks Desktop activation fails?
If QuickBooks Desktop activation fails, you should check if you have entered the correct product key and other details. If the issue persists, you can try restarting your computer and then activating the software again. If you still face issues, you can contact QuickBooks Desktop support for assistance.
Can I activate QuickBooks Desktop on multiple computers with one product key?
No, you cannot activate QuickBooks Desktop on multiple computers with one product key. Each installation of QuickBooks Desktop requires a unique product key, and you need to purchase separate licenses for each computer.
How long does QuickBooks Desktop activation take?
QuickBooks Desktop activation usually takes only a few minutes, depending on your internet speed and the performance of your computer. If the activation process takes longer than expected, you can contact QuickBooks Desktop support for assistance. Don’t hesitate to call our toll-free number +1-888-510-9198 if you face any activation issues or have any other queries related to QuickBooks Desktop.
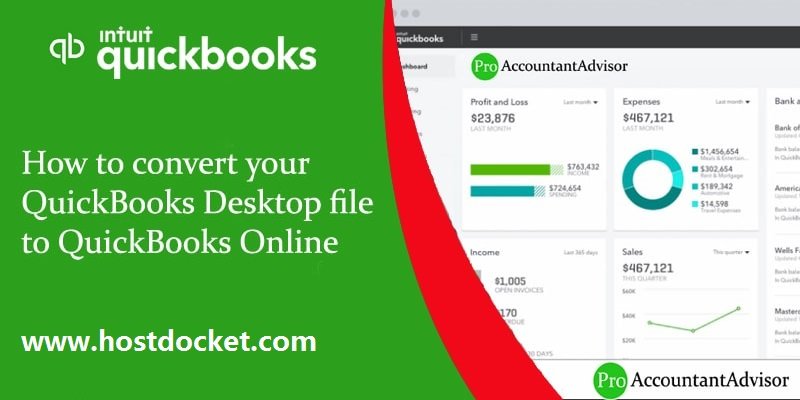
Planning to switch to QuickBooks online or import your QuickBooks desktop company file to QuickBooks online? Well, if that is the case, no need to start over again. Simply moving your desktop file to a QuickBooks online company can help you fix the issue. Moving to QuickBooks Online from QuickBooks desktop offers a lot of benefits. It involves a bunch of steps. Thus, to help you out with your migration process, here we are with this piece of writing sharing the complete information related to moving or converting QuickBooks desktop files to QuickBooks online.
However, if you are new to QuickBooks or aren’t well-versed in the technical aspects of the software, you can simply get in touch with our technical support team having sound knowledge related to QuickBooks desktop and online. All you need is to ring us up at +1-888-510-9198, and all your queries will be answered immediately. Having said that, let us check out the migration process and unleash some more information.
Benefits of Converting QuickBooks Desktop to QBO
One of the benefits you can reap by converting QuickBooks Desktop to QuickBooks Online is that it is free of cost. Intuit doesn’t charge anything for importing data to the online version.
You can easily compare reports from the current year to the previous year.
Work with multiple QuickBooks windows open at once
All editions
All editions
Work with my customers
Create and manage invoices and bill customers
All editions
All editions
Create and manage estimates, send to customers, convert to invoices, and use progress invoicing
All editions; Progress invoicing in Plus only
All editions
Track sales, accept payments, and calculate sales tax
All editions, with QuickBooks Payments
Not available
Track sales and expenses in multiple currencies
Essentials, Plus
All editions
Track projects including time expenses, pending payments, unbilled work
Plus
All editions
Invoice with batch invoicing
Not available
All editions
Prevent sales to customers with overdue invoices
Not available
Enterprise
Work with my suppliers
Manage bills and pay suppliers
Essentials, Plus
All editions
Billable expenses
Plus
All editions
Track and manage contractors
All editions
All editions
Manage employee data
Track employee time, including billable hours
Essentials, Plus
All editions
Pay employees, e-file payroll taxes, and print and file T4s
All editions, with Enhanced Payroll
All editions, with Payroll subscription
Connect to my bank, download transactions, and reconcile
All editions
All editions
Use online banking
Undo previous bank reconciliations
By an accountant, in QuickBooks Online Accountant
All editions
Use the FIFO method to track inventory quantities, sales revenue, and COGS
Plus
Enterprise, with Advanced Inventory
Use Average Costing method to track inventory
Not available
All editions
Manage inventory
Set and manage inventory reorder points
All editions
All editions
Track income and expenses and organize according to tax categories
All editions
All editions
Run custom, Profit & Loss, expense, and balance sheet reports
All editions
All editions
Create and run reports
Forecast sales and expenses
Plus
Premier, Enterprise
Create custom reports with Intuit Statement Writer
Not available
Enterprise
Use Advanced Reporting
Not available
Enterprise
Steps to move your QuickBooks desktop files to QuickBooks online
QuickBooks Online is being used by small and medium businesses all across the globe. Users can access QuickBooks anytime from anywhere making business operations lot easier. In fact, they can back up their data from data anywhere. And that is the reason why many people are converting to QuickBooks Online from QuickBooks desktop. Let us explore the steps one by one:
Before you proceed, note that you have 60 days from the time you create your QuickBooks online account to move your data. In case you are not sure how old your company is, you simply have to sign in to QuickBooks online. Further, refresh the page for personalized information.
Important: Ensure that your QuickBooks software is updated to the latest release. 1. For this, you need to first navigate to QuickBooks and Press F2 or Ctrl + 1, in order to open the product information window. 2. You need to further check your current version and release. In case you have the QuickBooks versions and releases or higher: 2019 R17, 2020 R15, 2021 R10, and 2022 R5, it will be easy to migrate.
Ensure that the company file isn’t too big to export.
In this step, you need to first update QuickBooks.
And further to ensure that the total target is less than 750,000, you need to press ctrl +1 on your keyboard.
Note: In case the file exceeds the target limit, it will not be converted to QuickBooks online. The only option is to import lists and balances in QuickBooks online or start fresh.
You now have to print a copy of your sales tax liability report.
And further, enter adjustment entries after your move.
Move to the reports menu, and further choose vendors and payables.
Also, choose sales tax liability.
You now have to choose all from the dates dropdown ▼
From the print dropdown ▼, choose save as PDF.
Also opt for the folder you want to save it in, name the file, and choose save.
Step 2: Move your QuickBooks desktop file to QuickBooks Online
The next step in this migration process is to move your QuickBooks desktop files to QuickBooks online. However, it should be noted that if you are using QuickBooks version 2018 or older, then you can move your data to QuickBooks online with an online tool.
QuickBooks Desktop Pro or Premier
You need to first sign in as admin to the company file you need to import.
Further, head to the company and choose export company file to QuickBooks online.
Choose start your export.
And also, sign in as admin to QuickBooks online company.
The next step is to opt for choose online company option and select the QuickBooks online company you wish to replace with the company file.
Now, hit the continue tab.
Also, in case you track inventory in QuickBooks, then check out the below options:
Choose Yes to bring them over and further enter the as of date. Also, use the first day after your last tax filing period as your inventory start date.
Opt for no if you want to set up new items later in QuickBooks online.
Further, enter agree in the text field and also choose replace.
You now have to choose yes, go ahead and replace the data.
Lastly, click on replace tab.
QuickBooks Desktop Enterprise
Note that, if you make use of advanced features like advanced reporting and advanced inventory, then it is suggested to start fresh, as some of the data won’t move to QuickBooks online. In case you want to keep using these features in the enterprise, then go for cloud-enabled QuickBooks desktop enterprise.
Under this process for QuickBooks enterprise, you need to sign in as admin to desktop company file you want to move.
Now press ctrl + 1 to open the product information window.
Also, press ctrl + B + Q and further hit the ok tab to display the export window.
The next step is to select Get Started on the export window.
Furthermore, sign in as admin to QuickBooks online company.
Also, choose the online company and further choose the QuickBooks online company you want to replace with the company file.
Hit continue.
And if you track inventory in QuickBooks Desktop, then be sure with the below options:
Choose Yes to bring them over, and further specify the as of date.
Also, note that you need to use the first day after your last tax filing period as your inventory start date.
Now, choose No if you want to set up new items later in QuickBooks online.
You need to now enter agree in the text field and further choose replace tab.
Towards the end, it is recommended to choose Yes, go ahead and replace the data, and hit replace tab.
Step 3: Get ready to use QuickBooks online
Now that your company file is all set up, it is time to start with QuickBooks online. With QuickBooks online, you can now connect your bank or credit card account. Further, create and send invoices to your customer. And also track your bills and make payments.
Migration steps for QuickBooks Desktop to QuickBooks Online
Here is what the migration process of QuickBooks desktop to QuickBooks online involves:
Back up your company file
In QuickBooks desktop, you need to backup your QuickBooks data on a regular basis, to avoid any sort of data loss. Whereas, in QuickBooks online, the data is stored securely in the cloud. Thus, it doesn’t require any manual backup.
In case you use multi-user mode, move to the file menu and choose switch to single-user mode.
Further head to the file menu and choose Create Backup.
Also, select the local backup.
You now have to choose local backup in the window and hit next.
The next step is to choose browse in the local backup only, and further choose where you want to save your backup company file.
Set the number of backups you want to keep.
Hit ok when you are ready to proceed.
Choose Save it Now and further hit next.
A confirmation message will show up when the backup is completed.
Head to file menu and choose switch single user mode.
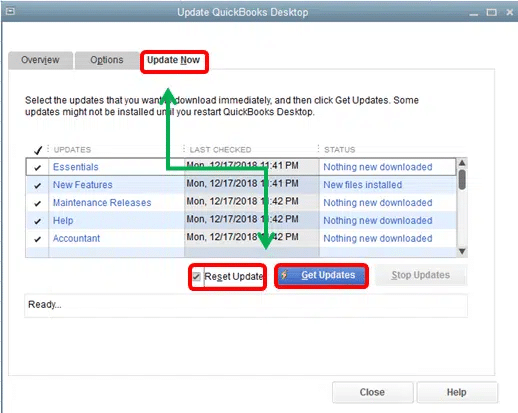
Now, click on help tab and further hit update QuickBooks desktop.
You now have to opt for update now.
Also, choose get updates and hit close.
The next step is to choose file and hit exit.
Moving ahead, reboot QuickBooks.
In case you have payroll, run it now.
Remove Minsitere due Revenue (Companies outside Quebec only)
You need to choose suppliers and then move to supplier center
Further identify Minsitere due revenue
Now, open the supplier
Move to sales tax settings
Uncheck all the boxes
And further mark the supplier as inactive
Hit ok tab to close the window
Turn off payroll in the QuickBooks desktop file
It is essential to avoid payroll issues post-migration, it is suggested to turn off in the QuickBooks desktop file prior to starting the migration.
Choose edit tab and further opt for preferences from the dropdown menu.
The preferences window will show up.
You now have to choose payroll and employees from the left-side menu bar.
Also, choose the company preferences tab in the preferences window.
Now, hit no payroll option.
Save your Sales tax liability report
You can save or print a copy of your sales tax in QuickBooks Online. Further might require it to enter adjustment entries after migrating. The steps involved in this procedure are:
You need to navigate to the reports menu and further choose suppliers and payables.
Also, choose sales tax liability.
From the dates dropdown, choose all.
Now, at the top, from the print dropdown, you need to choose save as pdf.
Further choose the folder you want to save it in, name the file, and choose save.
After you have saved the file, you can print it if you would like a hard copy.
Export your reports and lists
Exporting reports and lists is optional. This is required only when your company has in excess of 700,000 targets. Otherwise, you can skip to creating a QuickBooks online account.
in QuickBooks desktop, you need to head to reports menu and further choose report center
Moving ahead, find and open any report.
Also, choose the desired date range from the dates dropdown menu.
Now, choose excel on the toolbar.
You can also choose print or email to save the report as PDF.
Heading forward, from the excel dropdown, choose create new worksheet to create a new excel workbook or to update an existing workbook with the data in the open report.
Choose update the existing worksheet.
Also, choose Export and locate the workbook on your computer.
In case you want to format the data a specific way, then choose advanced.
Moreover, if a message says your report has too many columns, choose advanced.
Now, choose and uncheck the space between the columns checkbox.
Also, hit ok tab.
And towards the end choose ok tab when you are ready to export.
Create QuickBooks online account
You now need to create your QuickBooks online subscription to complete the process. Review the list of options to choose the plan that suits you. Also, keep a check on the system requirements. When prompted to sign in, you can use the same credentials you used to sign in to your QuickBooks desktop account. If you missed it for some reason, then try to reset your QuickBooks desktop password.
Using QuickBooks Online much convenient than the desktop version and that’s why more and more people are shifting to it today. Hopefully, these provided steps will help you to Convert your QuickBooks Desktop to QuickBooks Online.
If you are not able to do or there is any problem you are facing while following these steps, you can contact our QuickBooks helpline number and get quick help from US based best accounting experts. Our QuickBooks online support team is available 24*7 to help you, dial today our helpline .i.e. +1-888-510-9198.
Some FAQs on Convert from QuickBooks Desktop to online
What are the benefits of converting from QuickBooks Desktop to QuickBooks Online?
Converting to QuickBooks Online allows for remote access to your financial data, automatic software updates, and better collaboration with your team. Plus, it’s a cloud-based solution, which means you won’t have to worry about backing up your data or losing it due to computer malfunctions.
How can I get help with the QuickBooks Desktop to Online conversion process?
If you need assistance with the conversion process, you can reach out to our toll-free number at +1-888-510-9198. Our customer support team can guide you through the steps and answer any questions you may have.
Can all QuickBooks Desktop data be converted to QuickBooks Online?
Most data can be converted to QuickBooks Online, but some features and data types may not transfer over. For example, if you use the QuickBooks Desktop payroll feature, you’ll need to set up payroll in QuickBooks Online separately. Make sure to review the list of what will and won’t convert before starting the conversion process.
How long does it take to convert from QuickBooks Desktop to QuickBooks Online?
The time it takes to convert depends on the amount of data you have and the complexity of your company file. Typically, the process can take several hours to complete. However, our customer support team can provide a more accurate estimate based on your specific situation.
Do I need to cancel my QuickBooks Desktop subscription after converting to QuickBooks Online?
Yes, you’ll need to cancel your QuickBooks Desktop subscription after successfully converting to QuickBooks Online. This will prevent you from being charged for both subscriptions. Don’t forget to do this step, as it can save you money in the long run. Remember, if you need any assistance with the conversion process or have further questions, feel free to reach out to our toll-free number at +1-888-510-9198.
Steps to Manually Resolve QuickBooks Reconciliation Discrepancy
QuickBooks is a robust accounting software that has helped millions of small and mid-sized business owners meet their financial goals. And a variety of tools and features make it the optimum software that it is today. One of those features is “Reconciliation in QuickBooks” that ensures that all your business transactions are displayed accurately on your account. But at times there might be Reconciliation Discrepancy in QuickBooks that may impact your productivity.
In this blog post we are going to discuss Reconciliation Discrepancy in QuickBooks, its reasons and solutions. However, HostDocket team provides QuickBooks support & help to resolve all the errors and problems related to QuickBooks software. You can dial our toll-free helpline number +1-888-510-9198 anytime to speak directly with one of the accounting expert.
If you have already reconciled your account, but it displays a different balance in the next reconciliation – your QuickBooks account has Reconciliation Discrepancy. Finding and spotting such alterations may be tiring and frustrating.
What Causes QuickBooks Reconciliation Discrepancy?
It may occur because of reconciliation adjustments like journal entries, modified, added, or deleted reconciled transactions. Also QuickBooks Reconciliation discrepancies may also occur by one of the following reasons:
Reconciliation arrangement.
Past reconciled transaction have been an alteration, deleted or added.
Steps to Fix issues when you’re reconciling in QuickBooks Desktop
In most cases, you receive prompt and notifications from QB Desktop that assist you identify reconciliation discrepancies. You must pay due attention to the issue immediately as later it may pile up and pose bigger issue. Here are a few reports that may show upon your desktop:
Reconciliation Discrepancy Report
Transaction Detail Report
Missing Checks Report
Below are the troubleshooting steps you can try to fix bank reconciliation discrepancies in QuickBooks.
Step 1: Missing or Modified Transactions
Reconciled transactions modified, added, or deleted post your last reconcile will have an impact on the opening balance. There are different reports applicable in QB Desktop that will assist you distinguish discrepancies and fix transactions.
The Reconciliation Discrepancy Report shows you transactions arranged by statement date altered since the last reconciliation date.
First, Go to the “Report“, select “Banking” and click “Reconciliation Discrepancy” from the Reports menu.
Select the Right Account and click “OK“.
Read and review the report to analyze any discrepancies.
Missing Checks Reports allow you to find absent transactions.
Select “Banking“, and then clicks “Missing Checks” from the “Reports Menu“.
Choose the Appropriate Account and click “OK“.
Read and review the report for transactions that mismatch with your bank statement.
Transaction Details Report assists you to recognize a transaction that was changed or modified.
Choose “Custom Reports” and click “Transaction Details” from the “Reports Menu“.
Once the Display tab opens, select the following:
Date Form.
Date To.
Select the following in Filter Tab:
Account.
Entered/Last Modified.
Date From
Date To.
Step 2: Reconciliation Adjustment
A forced past reconciliation developing to reconciliation adjustment may be the reason of a discrepancy. To solve the reconciliation discrepancy issue, you would require reviewing and evaluating the QuickBooks Reconciliation Discrepancy account for the improper adjustment.
Open Lists menu and click “Chart of Accounts“.
Double-click and open the “Reconciliation Discrepancy Account“.
Select the appropriate filter from the Dates drop-down menu.
Important Points
In case you are unable to identify the transactions in the register that you have to rectify, you will have to undo existing reconciliation till the time the opening balance is rectified.
After the opening balance is rectified, you can continue with reconciling the current month, ensuring the opening balance is rectified for every month. If you find that the beginning balance for any month is incorrect, you can rectify it by recreating a beginning (zero) balance.
If a transaction that took place years ago was changed or removed lately, you may have to undo bank reconciliations for the previous years.
We have sorted all the necessary details about Reconciliation Discrepancy and possible solutions, and hope that you find this article helpful. In case you need assistance for reconciliation discrepancy in QuickBooks or looking for more details on it, you can contact us at our QuickBooks payroll support number at +1-888-510-9198. We provide assistance 24/7.