Suddenly experienced QuickBooks error 1904 and can’t find a quick for it? Well, QuickBooks error code 1904 is basically an error that can be seen when you try to install QuickBooks desktop. There can be a bunch of situations when you come across this issue in QuickBooks. However, to help you out in dealing with this particular glitch in QuickBooks, we have designed this piece of writing right here, sharing the complete details about QuickBooks error 1904, the factors causing it, and of course quick fixes for the same.
Thus, make sure to stick around till the end of this piece of writing, or you can further connect with our technical support team at +1-888-510-9198, and they will provide answers to all your queries.
What is QuickBooks error 1904?
As we mentioned earlier, QuickBooks error 1904 is basically an installation error that appears on the screen stating:
Error
Description
Intuit QuickBooks Installer
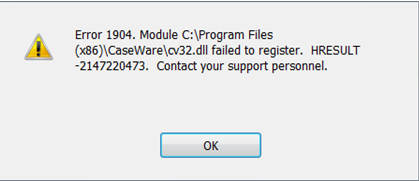
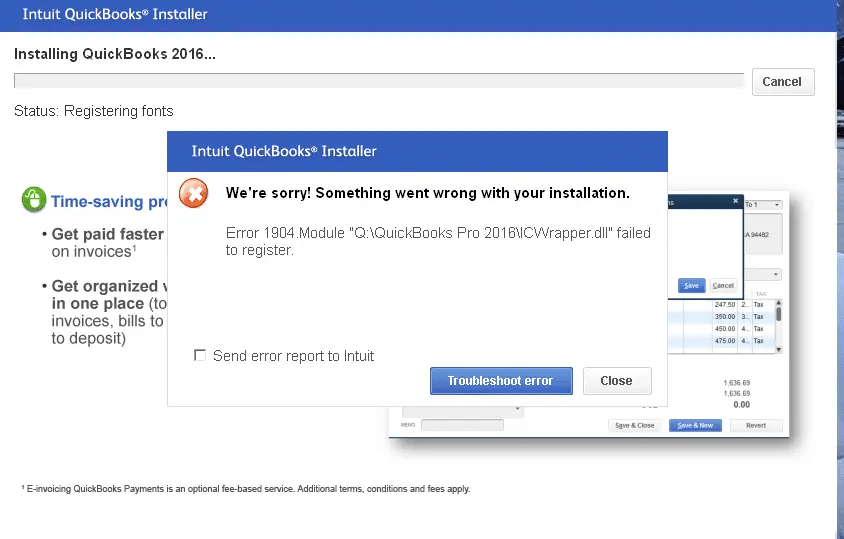
Error 1904: [file path / name / extension] failed to register,
Warning
Error 1904: IcWrapper Dll Failed To Register
You can come across this issue in QuickBooks if the company files are missing from the database. As a consequence of this error, the system might not work properly and the installation process might stop in the middle. This QuickBooks error can also arise while QB Desktop installation after upgrading the operating system such as Windows Vista to Windows 7. Or if the system wasn’t rebooted after the QuickBooks upgrade.
In case, there are multiple QB errors appear on the display and they exclusively state the ICWrapper.dll, qbprefs.dll, RcnFndRequestHandler.dll & qbupdate.exe (among others), then the trouble is possibly caused by the Microsoft Visual C++ damaged component.
There are a bunch of reasons behind QuickBooks error 1904. Let us have a look:
It is caused when your company files get damaged or corrupted suddenly. The settings of the file may be incorrect.
Sometimes, this QuickBooks error 1904 could be caused due to having several multiple issues and you might receive messages mentioning specific files such as dll, qbupdate.exe & many more. This problem is usually caused when the file or a folder is damaged the MS Visual C++.
After upgrading the operating system from one version to another, you might receive this error as it is possible that you have not rebooted your computer system after upgrading.
Major signs of QuickBooks error code 1904?
You can identify the issue using the below signs:
Some crucial company files are missing
The system is getting slow
If the updates on the system aren’t available automatically
If the Hard drive and other read-write devices are facing issues related to permissions
A repeated message about “Error 1904: [file path / name / extension] failed to register” is seen on the screen
Important Points to Remember
Before you perform the steps below, make sure to keep the following pointers in mind:
One must update Windows on all the systems that are running QuickBooks in multi-user mode.
Update QuickBooks on server and workstations, in case of multi-user mode.
Ensure that you run QuickBooks in admin mode
Refresh the internet and LAN connectivity.
How to Fix Error: 1904 when you install QuickBooks Desktop?
In order to troubleshoot QuickBooks log in error 1904, Execute the following fixation steps in the order shown to resolve the problem.
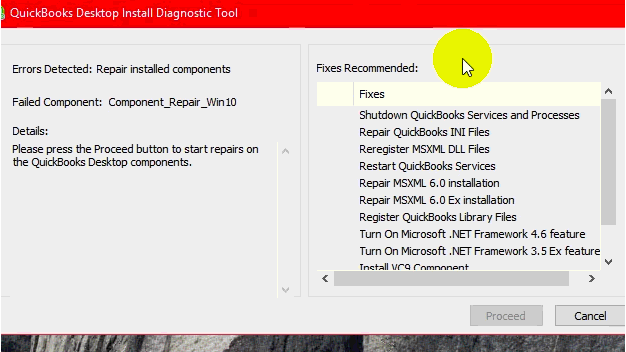
Solution 1: Run the QuickBooks Install Diagnostic tool
Select the “Ignore” tab on the error message & let the QB installation complete. DO NOT open QuickBooks software.
If running the tool unable to fix the error, then activate the built-in Administrator & install QuickBooks software under the built-in administrator account.
Solution 2: Activate the built-in or hidden administrator
Follow the given steps to activate the built-in administrator:
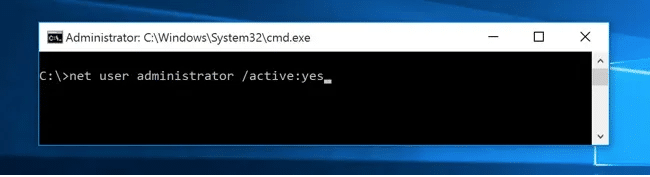
Step 1:Activate the Built-in Administrator
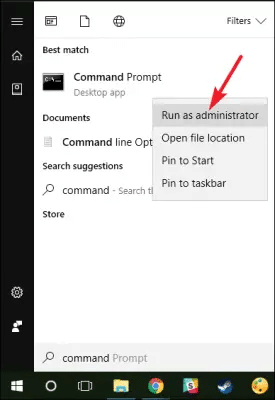
Tap the “Windows” button on the keyboard.
Type in the “CMD”. Right-click on the “CMD/ Command Prompt/ cmd.exe” & choose the “Run as Administrator”.
In the command prompt window, enter the “net user administrator /active:yes” and hit the “Enter” tab.
A quick tip: In case you see any error, type in the “net user administrator /active” instead.
Step 2: Switch to the built-in Administrator Account
Press the “Ctrl+Alt+Delete” on the keyboard simultaneously, then choose the “Switch UserWindows 8 users”: hit the “Windows” button & choose the user icon on the upper right of the display.
Hit the “Ctrl+Alt+Delete” at a time & choose the “default Administrator account” icon.
Step 3:Hide the built-in Administrator Account
Click on the “Windows” button on the keyboard.
Type in the “CMD” in the search box. Press right-click on the “CMD/ Command Prompt/ cmd.exe” & choose the “Run ad Administrator” tab.
In the command prompt screen, type in the “net user administrator /active:no” and hit the “Enter” key.
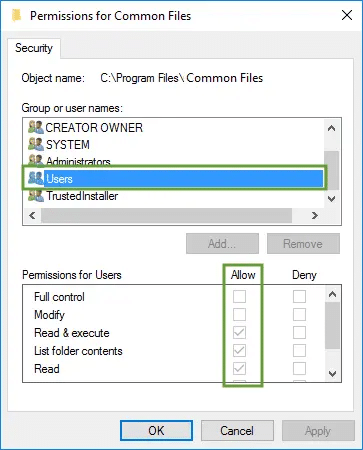
4:Change installation directory security settings
Browse to the “C:\Program Files\Common Files”.
Perform right-click on the “Common Files” folder & choose the “Properties” tab.
Select the “Edit” icon under the “Security”tab, & then choose the “Users” under the “Group or user names” icon.
Under the “Permissions for users” tab, choose the allow for the following permissions:
After installing QuickBooks accounting software, switch to the original user log in.
Important Note: If you precisely followed the entire steps, then you don’t have any of the following special cases, & you’re still getting the same error, we suggest that you contact the QuickBooks Experts to diagnose the hassle.
Solution 3: Manually configure damaged Windows components
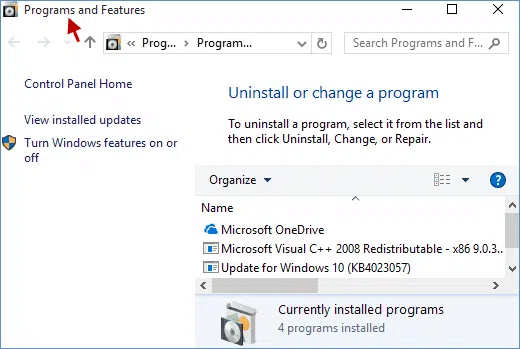
Step 1: Repair the .NET Framework
To fix this, the user needs to head to the control panel and fix issues related to Microsoft.net framework
Now, from the list of installed programs, select .Net framework
Also, move to the programs and features page
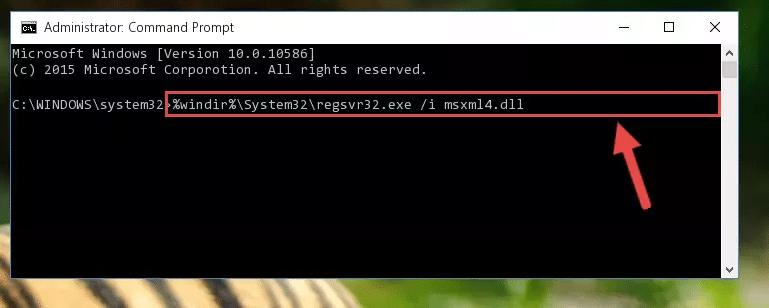
Step 2: Register the MSXML.dll
For 64 Bit OS
The user needs to click on the start tab
And then enter CMD into the search bar
The next step is to right-click the CMD icon and this will open the context menu
Select run as admin tab
After the window opens the command prompt, enter cmd and get the C: root directory
Now, press the keyboard shortcut “CD windows/ syswow64 /”.
After locating syswow64, enter “regsvr32 MSXML6.dll”
Now hit enter again
Try to install QuickBooks and check if the issue
For 32 Bit OS
At first, press windows + R to open the run window
Click on enter to add cmd to the box
Enter “regsvr32 MSXML6.dll”
Hit the enter tab again to proceed
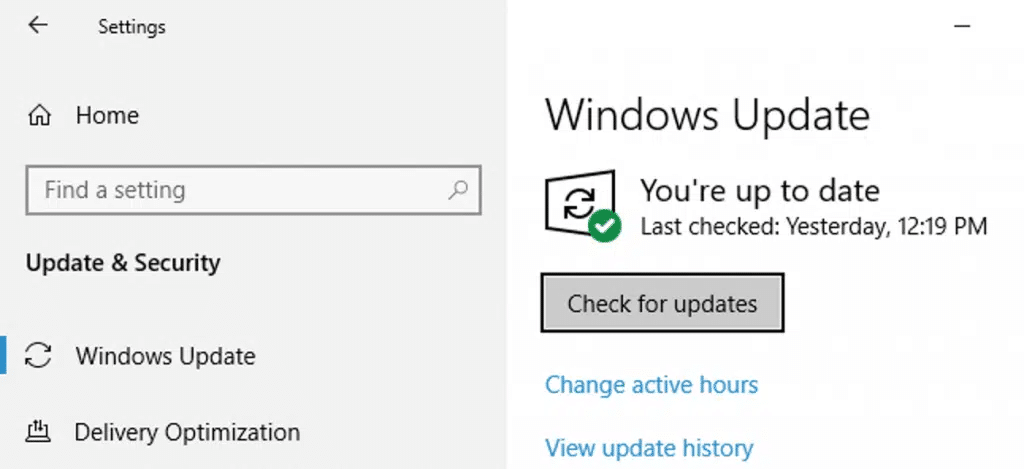
Solution 4: Updating the Operating system
For Windows 10
The first step is to click on Windows Start tab
And then head to the update and security tab
Once done with that choose Windows Update tab
And click on Check for updates
This will show any update, if available
After that select the updates you want and click on update tab
Reboot your system
Now, launch QuickBooks after the upgrade gets installed properly and check if the issue gets resolved or not
For Windows 8.1
Head to the settings tab
And then, click on change PC settings
Now, click on update and recovery and choose windows update
The user should now, click on check now link
Choose view details tab
You might a bunch of options with the download sizes
Click on the suitable one
And then reboot the system after the update ends
Login to QuickBooks again
Additional Alternatives to Fix QuickBooks Installation Error 1904 (Failed to Register)
Head to the antivirus or security software
Fine-tune the internet bandwidth to download the installation source accurately
While QuickBooks installation on the computer in the presence of Bitdefender, you suppose to add the C:\Program Files\Common Files (for 32-bit machines) or C:\Program Files\Intuit (C:\Program Files(x86)\Intuit (for 64-bit machines) to the Bitdefender exclusion list. Turning off or disabling the Bitdefender will not resolve this problem.
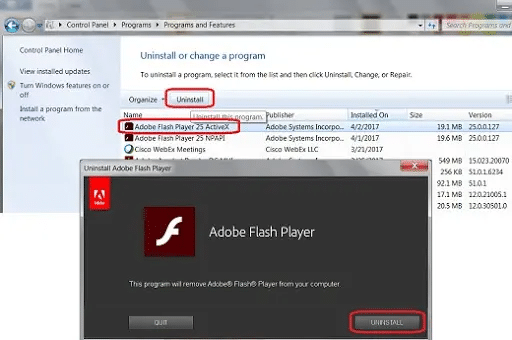
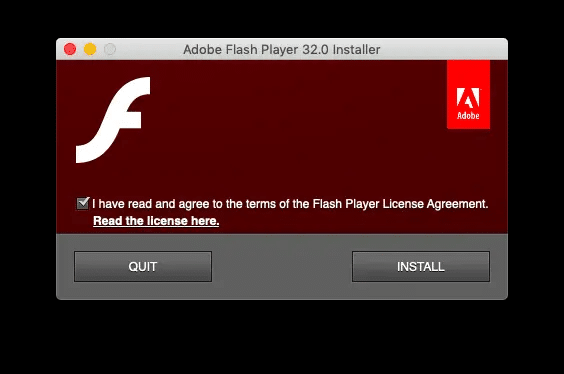
Condition 2: If the error arises while Adobe Flash Player installation
Hopefully, this article would be beneficial for you to resolve the QuickBooks error code 1904 easily. However, if you still find it difficult or much time consuming – you can seek the high-quality QuickBooks technical support from our certified ProAdvisors.
For the best accounting solution under one roof, dial our toll-free helpline number i.e. +1-888-510-9198. We will be more than happy to help you.
QuickBooks Error 1904 refers to an issue that occurs when QuickBooks is unable to register or start a component or module during installation or while opening the software. This error may appear as “Error 1904: [file path/name] failed to register.”
How can I fix QuickBooks Error 1904?
If you’re facing QuickBooks Error 1904, you can try the following steps to resolve the issue: Install the latest Windows updates Disable User Account Control (UAC) Run the QBInstall Tool Reinstall QuickBooks Desktop If the issue still persists, you can contact our QuickBooks Error Support team at +1-888-510-9198 for assistance.
What causes QuickBooks Error 1904?
QuickBooks Error 1904 may be caused by several factors including damaged or missing system files, outdated Windows operating system, and conflicts with other software installed on your computer.
Is QuickBooks Error 1904 a common issue?
Yes, QuickBooks Error 1904 is a common issue faced by many QuickBooks users. It is most likely to occur during the installation process or when trying to open the software.
Can I get QuickBooks Error 1904 resolved by an expert?
Yes, you can get QuickBooks Error 1904 resolved by a QuickBooks expert. Our QuickBooks Error Support team is available 24/7 at +1-888-510-9198 to assist you with resolving the issue and ensuring smooth functioning of your software.
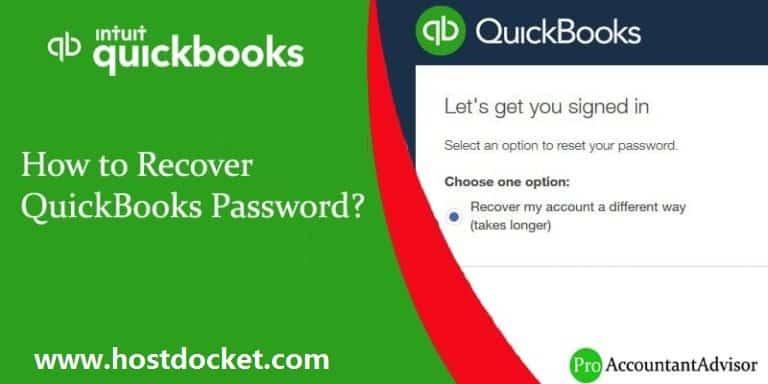
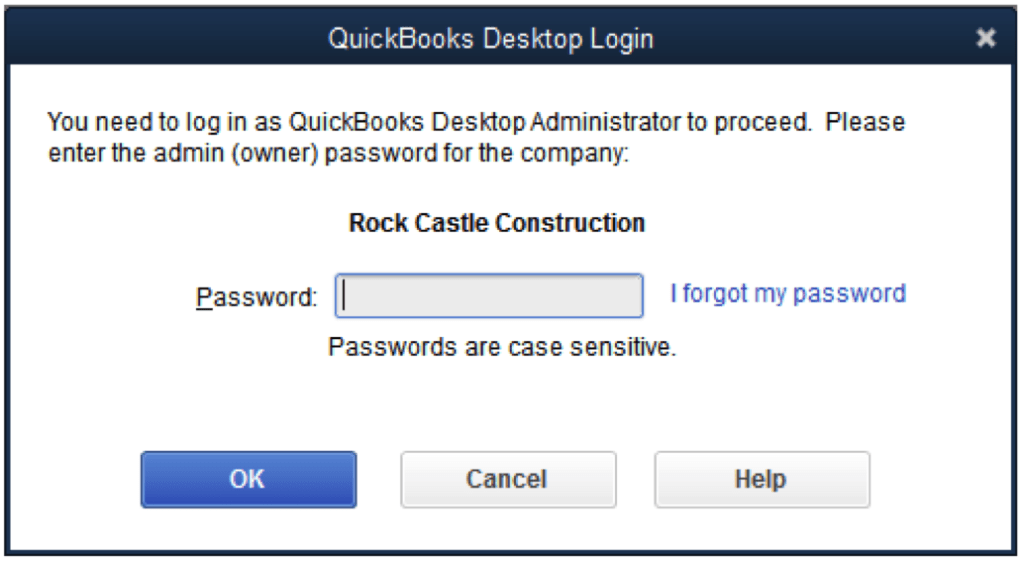
Learn the procedure to recover or reset the lost QuickBooks password For admin or other users:
A QuickBooks administrator password is needed to access all your data which a user have stored all your data in QuickBooks files. To keep a strong password it protects all your business from an unauthorized access related to folks most crucial information or their private details that kept as hidden. However, the requirement to enter a password will also lock you out from accessing the information if you have lost the password. If you any other user have encountered admin password issue in your QuickBooks then read carefully this blog. We have shared few steps that you should follow to reset or recover your QuickBooks desktop password.
QuickBooks is a versatile software that doesn’t only help you in managing your company data and tracking your company’s performance but also keeping your crucial company data safe. The multitasking software itself creates the Admin user for you when you login to the software for the first time and furthermore enables you and other users to create more usernames and passwords. To keep your details safe, QuickBooks Desktop asks you for the password every time you or any other user tries to access company file. Now, at times security updates and other features may require you to reset your password.
This article contains information about resetting the QuickBooks Admin password and other passwords you may have related to using QuickBooks Desktop. If you or any other user have encountered similar issue, and requires to recover or rebuild QuickBooks Admin password or any other password to login to QuickBooks desktop, here are some tips to follow.
Use complex passwords: at least 7 characters (letters, numbers, special characters), at least 1 number, at least one uppercase letter.
Passwords are case sensitive. Check the Caps Lock and Num Lock keys. One (or both) might be on, or could have been on when you created the password.
The password should not have any space. If you have used space, then retype the password without spaces.
Make sure your keyboard is functioning properly.
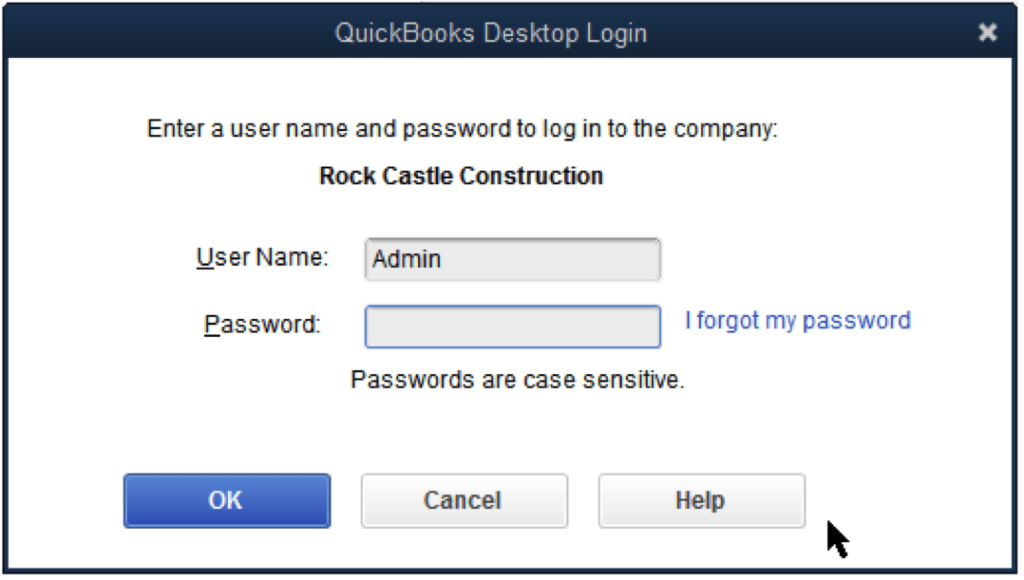
You should be on the right screen. A login screen that demands a password but not a username is the admin’s login screen. If you aren’t admin and you have a non-admin login then close QuickBooks Desktop and reopen it.
The admin password may also be blank. Many users leave admin password to their data file empty or blank. (This practice is, however, not recommended by Intuit, the makers of QuickBooks.)
In case of no password, press “OK” in the login screen without putting any password.
Steps to Reset Password for QuickBooks Desktop Administrator
When you logged in QuickBooks accounting software. This will automatically creates the Admin user, you may be using another log in references added by the Admin. Security updates and other surprising assets may lead you to reset your password.
Go to Company file, choose the company and then Set-up users and Password
Enter your current password
Write your new password in confirm new password box and click OK button
In case you forgot or lost your password, you can try the below-mentioned tips to reset your password in QuickBooks
Reset your Admin password or a user password
Admin password
You need to reset the admin password if:
You don’t have to enter a user name. When you sign in, you only enter a password.
Your User Name is “Admin” or another admin user name you created.
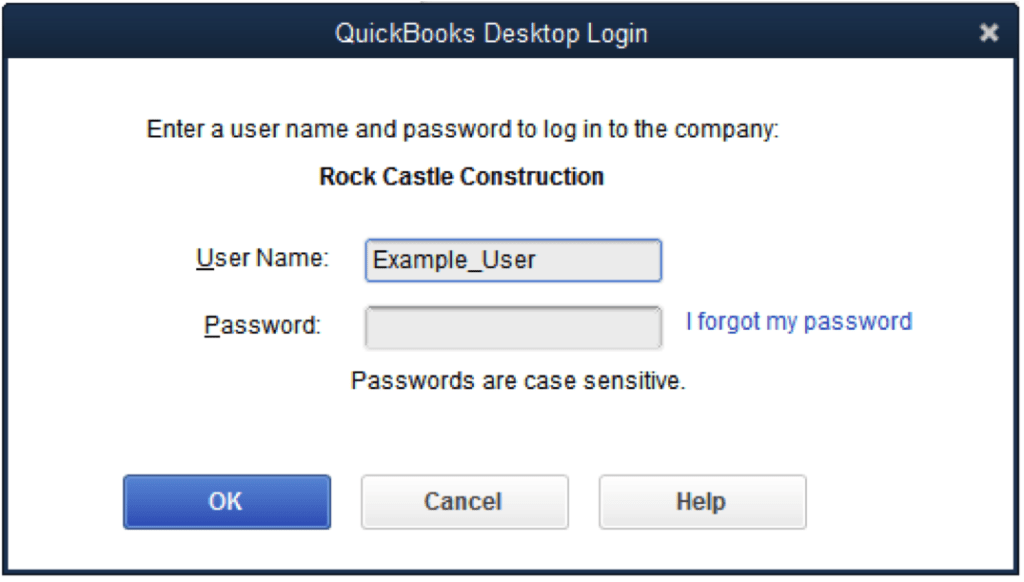
User password
If you’re not an admin user, your QuickBooks admin can reset your password for you. Contact your admin and have them follow the steps in “Reset a user password” section below.
Use Challenge Question to Reset Password
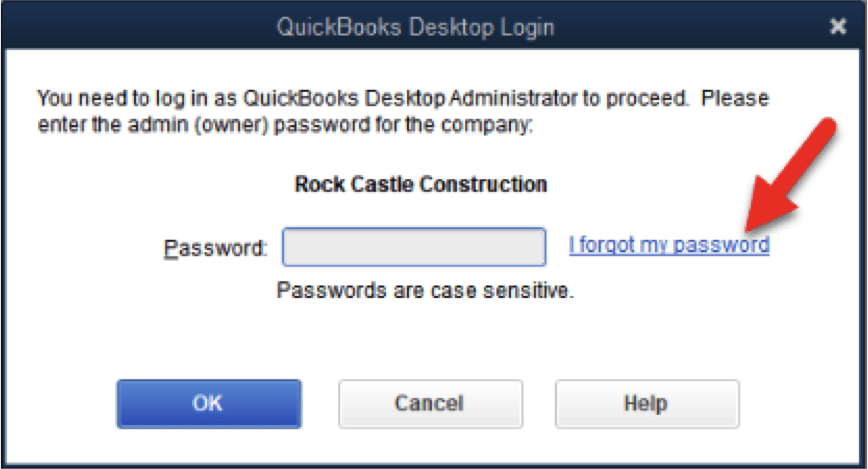
Choose “I forgot my password” on the login screen
Reply to the security question and click OK button.
Press Close when the following message pops up on your screen. “When you removed the password and challenge answer and question, and your company file is no longer password-protected. When you nearby this window, then you create a new password and select and answer your challenge question.”
Open the window and change QuickBooks password
Enter a new password and select a new challenge question
Reset Password for QuickBooks Desktop Admin and other users
To reset QuickBooks admin password checkout the following video and then go through the manual steps given below:
First of all, confirm the latest version of a QuickBooks software version on your operating system. It is the same once you used in the last time which you’ve opened your ‘QuickBooks file‘ with a strong password
Follow the instructions on the new page. Windows users of QuickBooks are directed to fill out an online form, while Mac users are sent directly to technical support for further individual help. Intuit will provide you with either instructions or software to reset the password for your QuickBooks installation, after which you can enter a new password.
Additional method (For QuickBooks 2019 and earlier)
Open your QuickBooks & click on the option ‘I forgot my password‘ when the screen displays ‘QuickBooks login window‘ on a desktop. It asks promptly your security question.
Enter the answer to your security question & click on the ‘OK‘ key button. If it successful a message appears informing that your password get removed
Click to the close or press ‘Alt+F4 keys‘, now enter a ‘New password‘ into a password field, then confirm it and answer for a security question
Fill out the ‘Reset QuickBooks Administrator Password‘ form and click on the ‘OK‘ button. QuickBooks sends an email with an access code that you can enter in the ‘Password Reset Code’ blank field. Your password is removed and you’re prompted to enter a new password and a new answer for a security question
If the password reset doesn’t work
Firstly, you need to double-check the information you have entered there.
After that check and confirm the information matches with what’s in CAMPS.
The above-mentioned steps should help you to reset your password for QuickBooks Desktop. However, If you are facing any trouble regarding resetting your password you can call our round the clock QuickBooks password recovery support team at +1-888-510-9198. Our experts bring with them years of experience as well as innovative tools and technology and can help you fix this or any other accounting related issue in the least possible time.
Frequently Asked Questions!
Should Password for QuickBooks have space?
Well, it should be noted that password should never have space, as it is not accepted while creating password. Make sure to follow the right rules while generating a password to secure your crucial data.
What to do in case of no passwords?
Just incase the user doesn’t have any passwords, then it is suggested to select ok displayed on the login screen without adding any password.
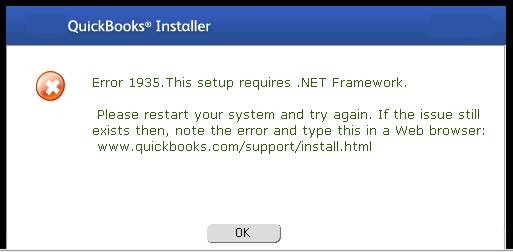
Clueless upon receiving an error message on your screen? Well, you might see an error message QuickBooks Error 1935: An Error Occur While Installing QuickBooks or .NET Framework, when working your QuickBooks accounting software. In this article, we are going to discuss one common QuickBooks error which may bug you until you get it fixed. The error is QuickBooks Error 1935 that often appears while installing QuickBooks or .NET Framework. This error seems to be file issue that usually shows up on the screen when you try installing QuickBooks. To understand what actually the QuickBooks error 1935 is all about and what actually can help you fix the issue, make sure you scroll through the segment till the end.
The image as shown below is similar which appears on your desktop.
QuickBooks Error 1935 is an Installation Error that generally occurs when a user tried to Install the important programs while QuickBooks is running on the Windows Startup mode. This is a common error and can be fix with the help of few troubleshooting methods given below in this blog.
When installing QuickBooks or Microsoft .NET Framework, you may see one of the following error messages in your desktop screen:
Error 1935: This setup requires .NET Framework.
Error 1935: An error occurred during the installation of the assembly.
What Causes QuickBooks Error Code 1935?
Another installation is using Microsoft .NET Framework system files.
Antivirus is not allowing the software installation.
.NET Framework needs to be installed.
.NET Framework is damaged, or any program is denying the installation.
To resolve QB error code 1935 you can perform the following given procedures or contact to QuickBooks error support to get help.
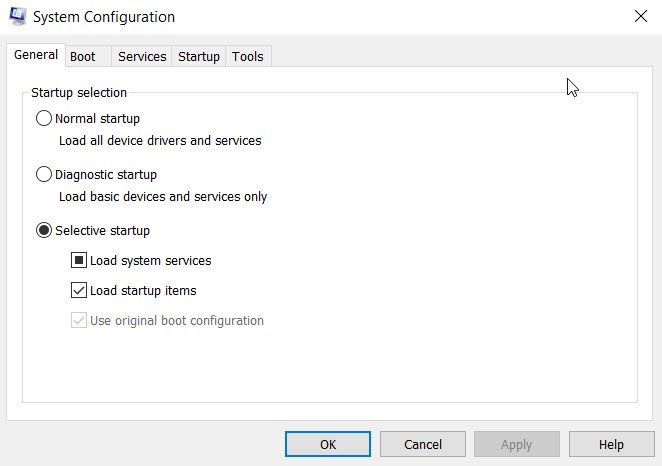
Procedure 1: Selective Startup
The very first step is to press Ctrl+R to open the run window.
And then, enter misconfig and click on the enter key.
Once done with that, click on Selective Startup.
Also head to the General tab, Load system services, and Load startup items.
The user needs to click on the services tab.
After that click on Hide all Microsoft services
And also, click Disable.
Ensure to uncheck the Hide all Microsoft services box.
Search for the list of services and ensure that the windows installer box has been checked.
Hit ok tab
And then click on restart.
The next step is to uninstall and reinstall your QuickBooks desktop software.
Open the run window and enter misconfig.
Now select the normal startup and hit ok tab
The last step is to reboot the system and save changes
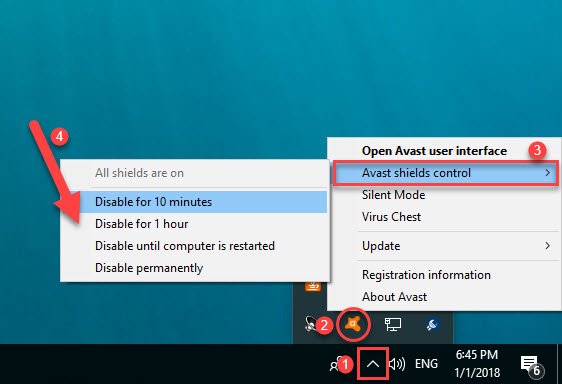
Procedure 2: Disable Your Antivirus Temporarily
At times, the third-party antiviruses tend to block the functioning of QuickBooks ending up in these errors. The reason is that the antiviruses consider QuickBooks installation or update as malicious activity. Thus, it is suggested to temporarily disable or uninstall the antivirus till the error is fixed. And re-enable it later on when the process completes.
Procedure 3: Checking .Net Framework
At first, the user is supposed to open the control panel
And furthermore, search for the option stating turn windows features ON or OFF
The next step is to check .NET framework 4.5, if enabled or not
If not, then make sure to turn it on
Close the Windows Feature window and reboot your computer.
Once done with that hit ok tab to repair the .net framework by unticking the box and rebooting the system
The last step is to Re-enable .NET Framework. Restart your computer.
Procedure 4: Update Windows
Outdated windows can trigger such an error in QuickBooks. And thus, it is always suggested to keep the windows updated to the latest version. This can be done using the below steps:
The very first step is to head to the search bar of the start menu
And then enter in update windows or check for updates
It will open up the settings and will show the updates available, if any
The user is then required to perform the onscreen steps to update the windows to the latest version
And also reboot the system to save changes
Procedure 5: Use the Install Diagnostic Tool
The very first step is to download and install the QuickBooks Tool Hub
Once done with that open the same and head to the installation issues tab
Now, click on the QuickBooks install diagnostic tool tab
And this will run the tool
Let the tool perform a scan for the errors and fix the issue accordingly
You can contact us for any QuickBooks related issue at our QuickBooks Error Support. We are available round the clock and will be glad to assist you in the hour of need. We have a reputation for offering the quick and precise solutions to our clients.
If you have any type of questions and other queries in your mind you can ask it to us anytime. In order to obtain Advice from our QB Experts, you should call to our QuickBooks support number by dialing +1-888-510-9198. We will be happier to help you in that.
What is QuickBooks Error 1935 and why does it occur while installing the .NET Framework?
QuickBooks Error 1935 is an installation error that occurs when QuickBooks is unable to install the required Microsoft .NET Framework components. This error is typically caused by system conflicts, outdated or damaged .NET Framework versions, or interference from third-party applications.
What should I do if I still encounter QuickBooks Error 1935 after trying the suggested solutions?
If you still experience QuickBooks Error 1935 after attempting the suggested solutions, contact our QuickBooks support team for further assistance. Our experts are available to help you 24/7 at our toll-free number +1-888-510-9198. They will guide you through additional troubleshooting steps and ensure the successful installation of the .NET Framework.
How can I resolve QuickBooks Error 1935 while installing the .NET Framework?
To resolve QuickBooks Error 1935, try the following steps: Update your Windows operating system. Repair or reinstall the .NET Framework. Temporarily disable antivirus and other security software. Perform a clean boot of your computer. Use the QuickBooks Install Diagnostic Tool. Can I continue using QuickBooks without installing the .NET Framework? The .NET Framework is a crucial component for the proper functioning of QuickBooks. Failure to install the .NET Framework may result in limited functionality, crashes, or other errors. It is highly recommended to resolve QuickBooks Error 1935 and install the required .NET Framework components to ensure the software’s optimal performance.
How can I prevent QuickBooks Error 1935 from occurring in the future?
To minimize the risk of encountering QuickBooks Error 1935, make sure to: Regularly update your Windows operating system. Keep the .NET Framework up to date. Maintain up-to-date antivirus and security software. Perform regular system maintenance and cleanups. Remember, if you need assistance with QuickBooks Error 1935 or any other QuickBooks-related issue, don’t hesitate to contact our support team at our toll-free number +1-888-510-9198.
QuickBooks is one of the best accounting software available in the world. Since its inception small to big organizations have immensely benefited. So much so that now companies are completely dependent on this application. Even though it has many perks, users often face various errors which affect the smooth functioning of the organization. To combat such a situation, it is advised to use the inbuilt QuickBooks file Doctor.
The Built-in QuickBooks file doctor is considered one of the best ways to solve various types of errors, files and issues related to data like corruption, network problems, windows set up issues and more. This application is integrated in the desktop version and when any error occurs the inbuilt file doctor will automatically be intimated about it. In this article, we have tried to include all possible information about the built-in QuickBooks file doctor. To learn further, make sure to read this article till the end, or you can also connect with our tech support professionals at +1-888-510-9198, and our technical support team will answer all your queries successfully.
Important points that you need to know about Built-in QuickBooks File Doctor tool:
This application works only for US, CA and UK version of QuickBooks
QuickBooks need not be installed on your computer. It uses file and data repair.
This application makes use of network and diagnosis repair. In this case QuickBooks should be installed in the desktop running the internal File doctor.
The in-built QuickBooks file doctor supports windows 10, windows 8, windows 7 and Server 2003-2012.
In case the .NET framework 2.0 isn’t there on your desktop then the internal QuickBooks File Doctor will install it through the diagnostic tool.
Different Types of QuickBooks Desktop File Doctor Tool
There are basically two types of file doctor tool, namely:
QBFD stand-alone version- This one is used from the server where only the QuickBooks database server manager component is installed, in order to host file.
QuickBooks file doctor tool built-in version- It is available in QuickBooks 2016 and later versions.
Essential points to consider before running QuickBooks File Doctor Tool
Before you head to the steps ahead, make sure to consider the below pointers:
It is important to have the admin credentials before accessing the file doctor tool.
Proper internet connection is also important
There is a certain file size limit i.e., 1.5 GB that you should comply with.
Make sure that you have installed a single version of QuickBooks on the system.
Update QuickBooks to the latest version before you access QBFD.
The file doctor tool can be accessed only by users of QuickBooks Windows OS and not for the MAC users.
The Cons of using File Doctor in QuickBooks
In case of data damage issues, if you are not able to open the file only then run the file doctor. If you can open the file and work on it then in that case don’t run the application.
The company file that needs to be uploaded in QuickBooks file doctor should be less than 2 GB.
While the tool is still open you can restart and download. However, if the tool is not open then the upload will start all over again.
In order to run the network diagnosis, you must be signed in as Administrator.
If the desktop windows user account control is ON then the application will be re-launched with elevated admin privileges.
Many of the errors in QuickBooks are automatically resolved by the built-in QuickBooks File Doctor. In this situation you will get a blue start button. Click On the Start button and automatically the QBFD will be intimidated.
The first thing to do is open QuickBooks to the ‘No company open window‘. Don’t log into the file.
Once done, choose the ‘file‘ and then click on ‘Utilities‘ and on ‘Repair file‘ and finally on ‘Network Problems‘.
After this a message dialogue box opens click on ‘OK‘. Once done QBFD will relaunch along with admin rights.
Now select ‘YES‘ to the ‘Windows UAC Prompt‘
In order to open the built-in file doctor, select the ‘green wench‘ icon.
Now click on ‘Continue‘.
Now you will be directed to sign-in to your company file page, so type the QuickBooks Admin username and password and then select ‘Next‘
After this choose ‘Advanced Settings‘. Select the ‘Diagnosis File‘
Then Click ‘Next‘
After the diagnosis is complete open the company file to see of the issue has been resolved.
This can be the first case where the tool is unable to come up to any kind of issue. This requires re-login to the company file, and if by chance the error continues, set up the Auto data recovery and then enter the transactions since the last backup.
2. QBFD diagnoses and resolves an issue
Another case can be if the QB file doctor tool detects an issue, then tap on “Open new company”, when the process ends. This is one of the most favorable outcomes of the process.
3. Issue detected, but error can’t be resolved
Such a situation might occur when you run the File doctor tool, and it requires you to run the auto data recovery tool, as well as enter the transactions in a manual manner, ever since the last backup or upload the file on its own.
Winding Up
If you have still have queries about built-in QuickBooks File Doctor tool then you can seek assistance from QuickBooks premier support team who are available 24/7 to provide you service by dialing our toll-free number +1-888-510-9198.
FAQs related to Built-in file doctor tool
What errors can be resolved using file doctor tool?
Errors like: Error code -6150, Error code -6000 -82, QB Error code -6000 -305, Error code -6000 -301, Network errors Installation errors, Error in updating QuickBooks, Firewall port poorly configured, QB Error 6147, or Error -6130, and other 6000 series errors, Multi-user mode errors, Damaged company files, Damaged Windows registry, H series errors, and a bunch of other errors can be rectified using QuickBooks file doctor tool.
What is the QuickBooks file doctor stand-alone version?
QBFD stand-alone version is one of the versions of the tool that can be used from the server where only the QuickBooks database server manager component is installed, in order to host the file.
What is a company file?
The company file is a core component in QuickBooks that can be accessed easily using the admin credentials. The file carries the crucial data of the company and should be backed up timely to avoid any data loss.
What is QuickBooks tool hub?
Intuit allows its users to access certain tools to eliminate issues related to the software. And QuickBooks tool hub is a one-stop destination, where the user can access all the tools required to deal with certain errors in QuickBooks.
A firewall is network security device or security software which is specially designed to obligate the unauthorized access based upon certain sets of the rule. Irrespective of the firewall location, whether it’s present on the server or computer, it can easily capable to block/stop the communication between the QuickBooks Point of Sale company data & computer. The Point of Sale utility is comprised of the ability to automatically detect & configures the firewall if it finds that the connections are blocked. Although, there are many time when the firewall required to configure manually by the users.
In this post, we are going to discuss about how a QB user can configure the firewall for QuickBooks Point of sale by their own. While going through manual configuration, the users should read the manual provided by the firewall program. So that they can perform the configuration accurately. You can further go through this piece of writing for further information. However, if you need any sort of technical guidance, then in that case, give us a call at +1-888-510-9198, and our technically sound QuickBooks professionals will ensure to provide you with the best possible solutions immediately.
Processes that is Interrupted by the Blocking of QuickBooks POS
Below are few programs that will be interrupted when the security program blocks the QuickBooks Point of Sale utility:
Electronic Funds Transfer: Processing of the Intuit’s Merchant Credit Card
Database Server Manager: Capability to connect & record transactions/changes to the company file
Intuit Entitlement Service: Product license & user validation
Most of the time Point of Sale automatically configure the firewall for you whenever the connectivity gets blocked. However, few-times you need to configure your firewall manually. If you are going to configure your firewall application manually, you should review the appropriate sections of the manual that has provided with the firewall program.
Steps to Configure Manually Windows firewall for QuickBooks Point of Sale?
Points to Remember:
Firstly, You should have the authority on ‘Windows Administrator‘ rights to perform.
Ensure to add the required ‘Firewall ports‘ & ‘Executable files‘ for the Point of Sale utility (In case, the firewall security is a third-party program).
It is recommended to contact the developer of the 3rd party program to know – How to add port & file exemptions.
Manual Steps to Configure the Windows Firewall
First of all, You need to Press ‘Windows+R‘ keys, the ‘Run‘ command will open.
After that, Type ‘Control‘ & hit the ‘OK‘.
The ‘Control Panel‘ will appear.
On the right upper corner of the display, set the “View by” to Small Icons.
Now Choose the ‘Windows Firewall‘.
After that Choose the ‘Advanced Settings‘.
Select the ‘Inbound‘ option there.
Now Click on the ‘New Rule‘.
Choose the ‘Port‘, and then Hit the ‘Next‘.
Type the numbers of the ports, and then hit the ‘Next‘.
Choose ‘Allow Connection‘, and then select the ‘Next‘ option.
Give a certain name to your firewall rule, and then finally press the ‘Finish‘ button.
Important Note: While manually configuring the firewall of the device for QuickBooks. You will see questions with several options like deny, grant, block, permit, or something similar option. You have to select all the positive options like permit, allow, or grant the permission. The action is performed for one question or for a specific file or folder wont be automatically applied to all the files or folder in the POS program.
Perhaps, it could be possible that the client still encounters the problem with configuring the firewall in QuickBooks point of sale or any other issue related to QB. Well, you don’t have to be worry…!! Host Docket is a firm and dedicated team of certified Intuit accounting experts to resolve all the issues, no matter if it is related to firewall configuration, QB errors, QB Installation, or anything.
Also you can directly contact us at +1-888-510-9198. In the meanwhile, If you have still questions then feel free to contact us at our QuickBooks support number anytime.
FAQs Related to Firewall Configuration for QuickBooks POS
How do I set up firewall in QuickBooks Desktop?
You can set up firewall port exception using the steps below: 1. At first, open Windows start menu. 2. Now, enter windows firewall into the search bar and also open windows firewall. 3. Once done with that choose advanced settings. 4. The next step is to right click the inbound rules and later on create outbound rules. 5. Choose port and hit next. 6. After that ensure that TCP is selected.
How do I fix firewall issues in QuickBooks?
To fix firewall issues in QuickBooks, you need to perform the steps below: 1. At first, open QuickBooks database server manager and there choose start scan, in case the company file gets displayed. 2. If not, then browse to the location of company file, and choose start scan. 3. The QuickBooks database server manager will repair the firewall and security permissions on its own.
What is the firewall standard configuration?
Configuring firewall involves configuring domain names and internet protocol addresses and completing various other actions to keep firewall secure. Note that the firewall configurations are based on network types that can be set up with security rules.
How do I stop windows firewall from blocking QuickBooks?
You can simply add an exception for QuickBooks in firewall ports using the steps below: 1. At first, click on the windows tab. 2. Further, in the search bar, enter firewall 3. You now have to click on enter tab. 4. Click on windows firewall option. 5. And then, click on the advanced settings tab. 6. Once done with that, right click on the inbound rules field. 7. Select new rule 8. Also, click on port. “