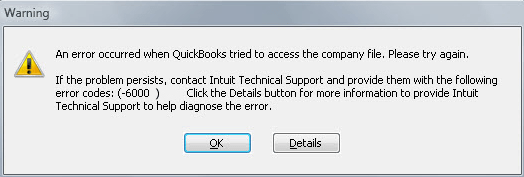
QuickBooks error 6000 is one of the first ones on the list. QuickBooks error code 6000 occurs when a user tries to access or open the company file. Errors that are associated with the company file should be eliminated as soon as possible, as these errors can hamper the crucial data, ultimately creating further issues. Coming to QuickBooks error 6000, it usually occurs when there is some issue with the company file and further prevents you from accessing the company file.
To help you deal with such errors in QuickBooks, we have tried to summarize this article with the complete information related to QuickBooks error 6000. From factors triggering the error to effective procedures that you can implement. This piece of writing shares the complete information. For more details, make sure to read this article till the end. Or you can further get on a call with our QuickBooks enterprise support team at +1-888-510-9198 and let the experts answer all your queries.
When QuickBooks error code 6000 and others occur it displays 3 or 4 more digit errors with the message that indicates it is unable to open the company file. The following are the different -6000 series which are the major errors and make the file corrupt most of the time:
There might be a number of possible reasons that can be a reason of occurring the QuickBooks error code 6000. Few are as:
The firewall is blocking QuickBooks files from access
Any damage in TLG file
Installation files of QuickBooks are missing or damaged
Multiple users log into the company file at the same time
An issue with Internet setup configuration
Important note before you move ahead!
Now that you know about the signs and causes of QuickBooks Error code 6000, you will be willing to know the solution to it. I mean, that’s the reason why you are reading this article, isn’t it? But before we tell you all about the troubleshooting steps, let us also tell you that updating QuickBooks and running the File Doctor tool can sometimes fix error 6000 and many other similar errors. So do it before you indulge in the tedious and time taking and you may save yourself some precious time.
Signs and Symptoms of QuickBooks Error 6000
The below can be the common signs to identify QuickBooks error 6000 easily. Let us have a look:
Frequent desktop crashes can be a common sign to identify this issue.
Another easy-to-identify sign can be if the error message itself appears on the screen.
You can further spot this issue, if the system gets slow, and sluggishly responds to the inputs.
If your desktop or QuickBooks freezes again and again when performing the same activity, then it indicates this particular issue.
As we mentioned earlier, error code 6000 in QuickBooks can be easily rectified using some basic set of steps. Let us evaluate the measures to eliminate such an error in QuickBooks.
Condition 1: You are Opening the QuickBooks file locally
It simply implies that you are accessing/opening the QuickBooks Company file that is present on the same system having QuickBooks.
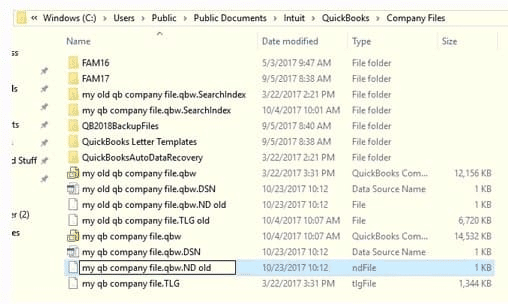
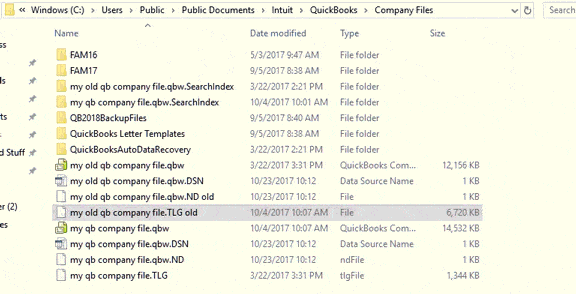
Solution 1: Renaming the .ND & .TLG files:
The .ND and .TLG where the files are part of QuickBooks which gets installed along with access to files in either a network or the multi-user environment help in removing the glitches with the software.
If the files get corrupted or damaged along with the errors and opening of the QB files with no such cause to happen during re-scan or while using QuickBooks with the files which automatically gets stored at the QuickBooks database server manager thus making the right backup.
Firstly, open the folder where the company file is present.
After that, look for the files with the same name as your company files but with extensions .ND and .TLG.
company_file.qbw.nd
company_file.qbw.tlg
Once done with that right-click on each file and select the Rename option and type OLD at the end of each file name. (For example – company_file.qbw.nd.OLD)
Finally, open your QuickBooks again and try to sign in to your company file.
If still the error persists there, go with the next solution.
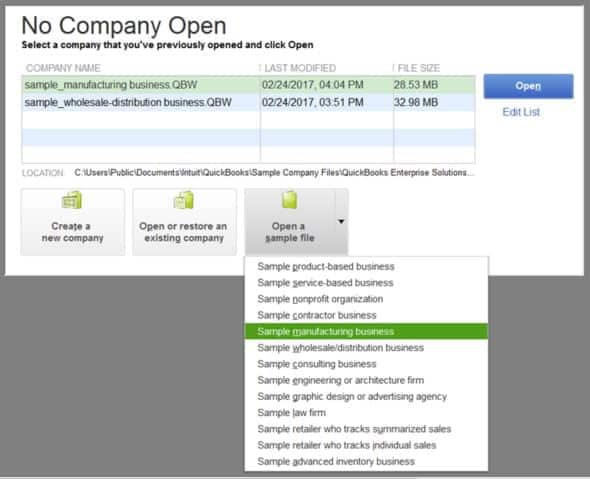
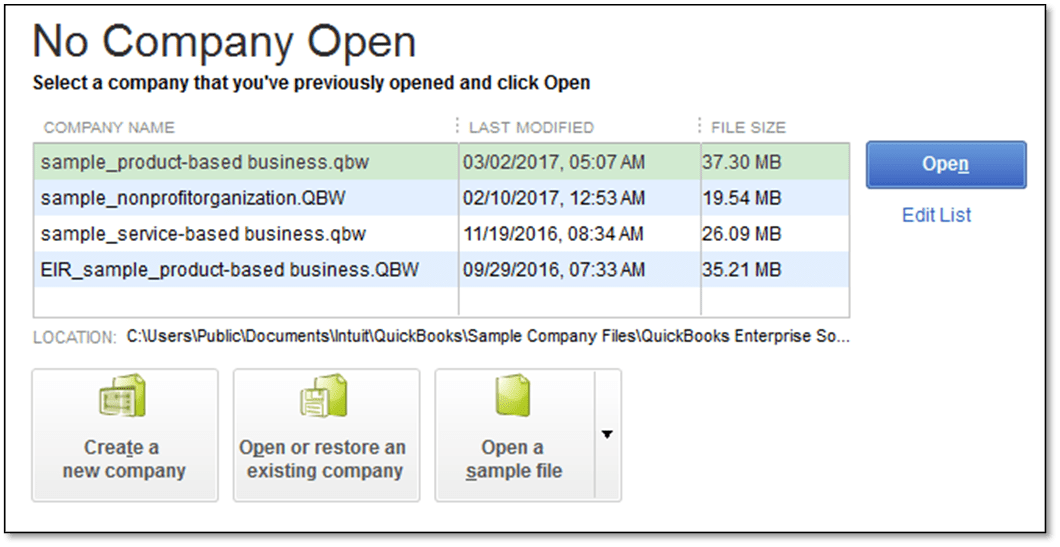
Open a sample company file with the testing if the problem lies with the company file along with the QuickBooks application. The sample company file does not open along with the error. This indicates that the QuickBooks installation gets damaged along with getting repaired.
If we understand the QuickBooks along with the installation and damage then the indication of repairing the file could be done in the following ways:
In the ‘No Company Open’ window, select the “Open a sample file” icon and then choose any form with the list of sample company files.
If the sample file opens, it proceeds to solution 3 and the sample file returns the same with the error message which is repair the QuickBooks installation files.
Solution 3: Copy the QuickBooks File on the desktop
By copying the file on the desktop and opening it to test if there is a problem with the location of the company file. If the file opens and gets saved on the desktop, then the location gets probably damaged or it either gets “too deep” and it also exceeds the file system with the path limitation:
The file is corrupt if it still doesn’t open after changing its location. Follow the given steps:
Open the folder that contains your company file
Find the file with the extension of .QBW
Get the right click on the file and select the “Copy” icon. Get on the desktop with the right click & get anywhere on the desktop, and then select the “Paste” option
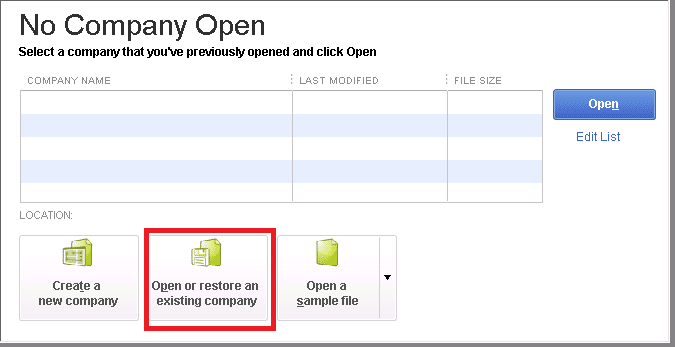
While holding down the control key, along with opening QuickBooks you will see the “No Company” no open window
Click the “Open” icon or the Restore along with the existing company.
If still you get the same error, follow the next solution.
If the company file did not open even when it was moved to a different location, then a person can restore a backup copy of the company file to check if the problem is with the current company file (.QBW).
If you are experiencing trouble while restoring the backup follow the given steps below:
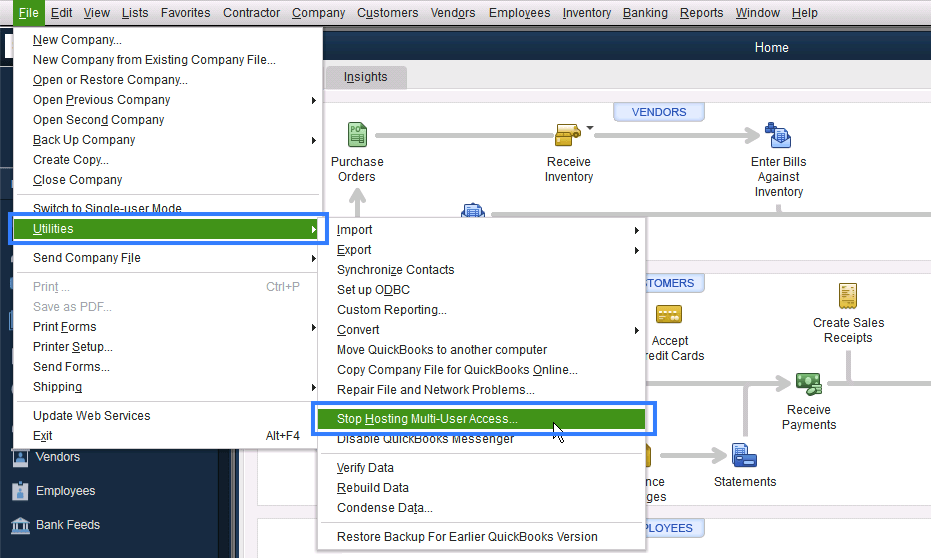
First of all ensure that your computer is not hosting.
Open company file.
Find the file with the “Menu” option; choose the “Utilities” tab.
If the “Stop Hosting Multi-User Access” is visible:
Select the “Stop Hosting Multi-user Access” option.
In the Stop Hosting multi-user access windows, select the “YES” tab.
Click the “YES” tab.
Make sure the path to the company file is no more than 210 characters long:
Furthermore, go to the location of the company file.
In addition to that from the top, copy the path from the address bar.
Paste it on the notepad and count the characters including the spaces. (For example: C:\Documents and Settings\All Users\Documents\Intuit\QuickBooks\Sample Company Files\QuickBooks 2018\Sample_company_file.qbw is 125 characters.)
Try restoring the company file again.
Go for the next solution if the error still remains there.
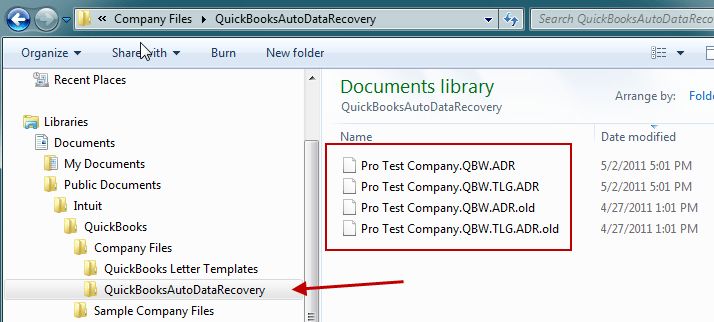
Solution 5: Use ADR tool to restore the backup
If the company file is corrupt, recover lost data with QuickBooks Auto Data Recovery.
The .ND and .TLG files belong to your QuickBooks data. These are configuration data files that enable QuickBooks to access a company file in a network or multi-user setting. You will certainly experience these errors when you open your QuickBooks data files. Renaming these files will not cause you to lose QB files. These files are automatically re-created when you re-scan using the QuickBooks database server manager and open your company file.
Open the folder that contains your company file.
Also, find the files with the same name as your company files but with extensions .ND and .TLG give the company a better way to search the file.
Right-click each file, and then there is a process to select rename.
Adding the word OLD at the end of each file name. For Ex: company_file.qbw.nd.OLD
Restart or re-scan the database server manager
The purpose of Database Server Manager is to host your QuickBooks company files. It is best to restart the DBSM and also re-scan the QuickBooks files after you rename the .ND and .TLG files.
Go to the “Start” and then click “All Programs” icon => “QuickBooks” icon => “QuickBooks Database Server Manager” (QBDSM).
After which select the “Scan folders” tab.
Then, click on the “Add folder” tab (if no folders are present). Highlight the folder with the files, and select Scan.
Confirm that the bottom box shows the company file having an issue. It would show up stating “QuickBooks Company files”.
Also, there is a need to ‘Try to open the file again’.
Open the QuickBooks once more and try to sign in just to get the company file.
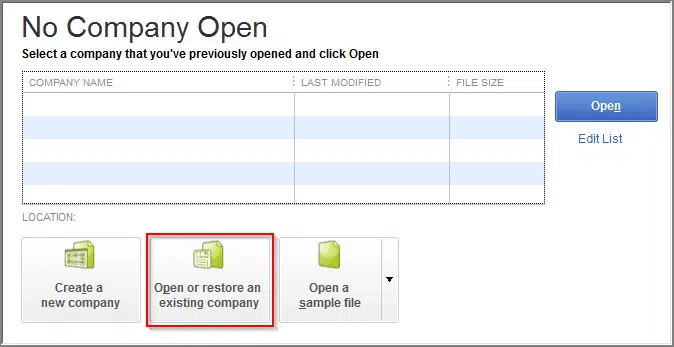
Solution 3: Open the company file locally
There is a need to ‘Open the company file locally’. If one of the files opens while then it is saved on the desktop, the location is probably damaged or it is “too deep”. If it is exceeded with the file system having the path limitation and still does not open after changing the location, there is a possibility that the file is damaged.
Firstly open the folder that contains your company file
With the extension of .QBW, one can find the QB file
Right-click on the QB file, then select the “Copy” icon after performing right-click on the QB file
To get on to the desktop, one just needs to right-click on the desktop, and then select the “Paste” icon
Press the Control key while opening QuickBooks to open no company open window
There is a need to select the “Open or restore an existing company” option
Also, there is a need to move to the desktop, and after which one can find the QB Company file that you copied & open
Solution 4: Open a Sample Company File Locally Installed on a Workstation
Opening a sample company file installed on a workstation. Then pull out the details through the QuickBooks data file. Also, opening the sample company file, which one could test, and the problem with the possible lies with the company file or the QuickBooks application. In case a sample company file does not open and instead returns an error, it is an indication that the QuickBooks installation is damaged and should be repaired.
In the “No Company Open” window, select the “Open a Sample File” option, then one can choose from the list of the sample company files
Moreover, if the sample file opens, there is a need to proceed to solution 4
If the sample file returns the same error message, repair your QuickBooks installation
Solution 5: Close all QuickBooks processes
Here you need to login as the Administrator on the server computer.
Now Press the “Ctrl+Shift+Esc” key simultaneously to bring up the ‘Task Manager’.
Furthermore, show the processes for all the users by selecting the “Users” tab.
Highlight each QuickBooks process (QBW32.EXE, qbupdate.exe, and QBDBMgr.exe), then select the “End Task” tab.
Also, there is a need to open the QB company file in multi-user mode.
If still the error persists, then one can proceed to solution 6.
One can check the folder permission manually so that if one encounters these errors one can try to rectify them
Additionally, if you find the file location, it means that it does not have the right permission
Checkmark the folder permissions to share QB company files
Now try to open the QuickBooks file again
If one can still get the same error, there is a need to proceed to solution 7
Solution 7: Configure the Anti-Virus & firewall Software
Configuring the firewall ports and Anti-Virus Software is the best of the ways to get rid of QB errors. Also, one could encounter errors if your firewall and Anti-virus program block access to specific QuickBooks programs or files. This way you can configure your firewall ports and also set up an exception to your anti-virus software.
Hopefully, this technical article will be beneficial for you to understand the deepest insight of the QuickBooks error code 6000. However, if you face any further hassle associated with this error code or any other one – you can freely dial our QuickBooks desktop support number i.e. +1-888-510-9198. Our certified ProAdvisor will look forward to your concern and provide you with a feasible solution in no time.
QuickBooks Error 6000 is a common error encountered by users when trying to open or access a company file. This error is usually caused by issues related to the network setup, damage, or corrupt .TLG files, or insufficient file permissions.
How can I resolve QuickBooks Error 6000 on my own?
To resolve QuickBooks Error 6000, you can follow several troubleshooting steps, such as updating QuickBooks, renaming .ND and .TLG files, opening the company file locally, and checking file permissions. If the issue persists, don’t hesitate to call our toll-free number +1-888-510-9198 for expert assistance.
Can QuickBooks Error 6000 lead to data loss or corruption?
QuickBooks Error 6000 itself doesn’t cause data loss or corruption. However, if the error is a result of a damaged or corrupt company file, it might lead to data loss. It’s essential to take regular backups and follow the recommended troubleshooting steps to protect your data. If you need assistance, you can contact us.
What should I do if I can’t resolve QuickBooks Error 6000 on my own?
If you’re unable to resolve QuickBooks Error 6000 despite following the troubleshooting steps, don’t worry. Our QuickBooks experts are here to help. Call our toll-free number +1-888-510-9198, and our team will provide you with step-by-step guidance and assistance to resolve the issue.
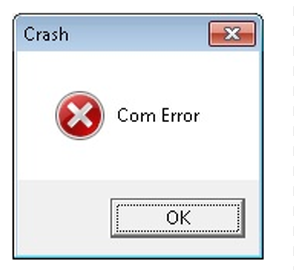
QuickBooks crashing is different but facing crash com error in QuickBooks is whole new level of stress. Well, when you open, work, or send forms in your QuickBooks, you might experience the error message: Crash: Com Error. Even when emailing invoices, many QuickBooks users run into this annoying error. Rectifying such errors becomes essential, as they can further affect the smooth working. To help you deal with these errors, we have drafted this article right here sharing the complete details about the crash com error in QuickBooks. In order to explore what crash com error is all about, stick around this piece of writing or you can further connect with our QuickBooks error support team via our toll-free number i.e. +1-888-510-9198. Our technically sound QuickBooks professionals will ensure that all your queries are addressed immediately.
Crash com error in QuickBooks desktop is one of the most common errors that users face. This error causes a lot of problems especially because the software consists of a lot of financial data and records. This issue can be seen when the user tries to send emails, invoices, paystubs, transactions or reports. Crash com error can end up in losing the unsaved data, which can be very disheartening for QuickBooks users. However, this crash com error can be rectified using a few possible solutions, which will be discussed later in this article.
Triggers to QuickBooks Crash Com Error
There can be a plenty of causes to QuickBooks Crash Com Error, a few of which are scribbled below:
In case the Windows or MS-Office components are missing or damaged, then it is probable to encounter crash com error.
There might be chances that any kind of virus or Trojan hampering the software.
Or if any malicious software mistakenly deletes the crucial QuickBooks related files.
The Error can also be seen, when the antivirus or firewall program blocks the QuickBooks communication process.
The user can also encounter this error, when the QuickBooks software fails to communicate with the client or email service.
Another trigger to the error can be if the QuickBooks components get damaged somehow.
When can users encounter crash com error in QuickBooks?
Before deploying any kind of solutions, let us first understand, when can the user stumble upon this error. Let us have a look at the list of the situations when the user can face this annoying error.
Best Solution Steps to Resolve Crash com error in QuickBooks desktop
Here you can find the best solution methods to fix this QuickBooks Error. Please follow these given troubleshooting steps:
Solution 1: Make Outlook as a default Mail app
Setting Microsoft Outlook as your default mail app can eliminate the issue to a certain extent. You can make use of the steps below to set Outlook as default mail app.
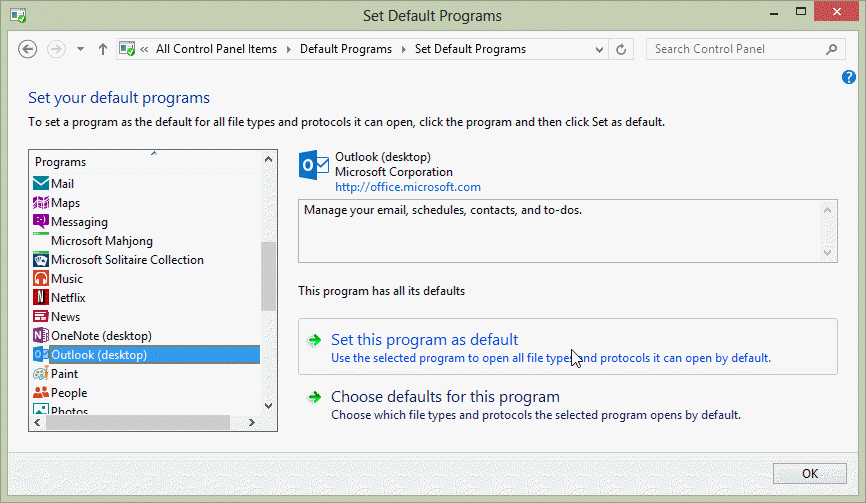
To begin with, the user needs to visit the Control Panel, then Default Program and Set Default Program
And then select MS outlook.
And lastly, make it as the default program by clicking OK button.
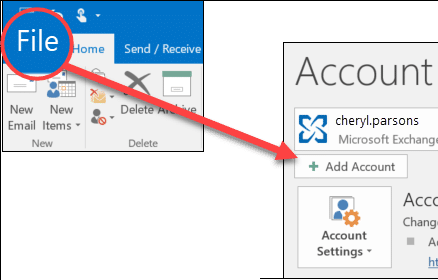
In this process, the user is supposed to move to the MS Outlook and then select the File Menu
The next step is to select Add Account to start the setup process
And then provide the email address and then select on the Connect tab
Outlook will automatically the right server settings and once done select Connect
After this enter the password for the email address provided and then click on OK button
And finally choose OK and finish the complete set up
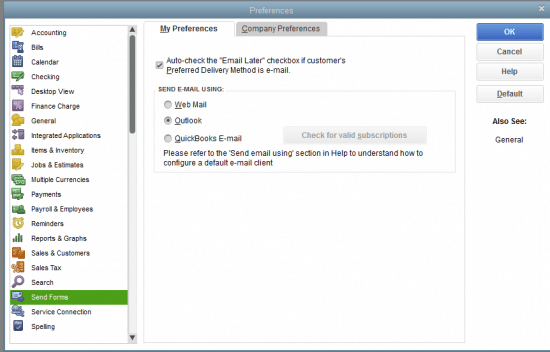
Important: If QuickBooks Desktop is not able to identify Outlook, (to examine this, go to Edit > Preferences > Send Forms > My Preferences tab to see if you have the option to choose Outlook) you might should reboot the computer and repair QuickBooks. You could additionally create a new Windows user profile. If the new Windows account does not discover Outlook in QuickBooks preferences, repair work QuickBooks.
Solution 3: Toggle the Mail Settings
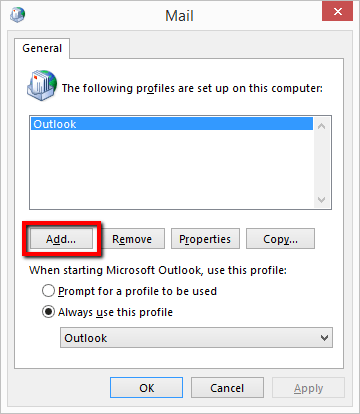
To begin with, go to the Control Panel and then click Mail
After that select Microsoft Outlook
Followed by selecting Show Profile in the Mail Set Up
In case the Always Use this profile tab is already selected then you have to choose a prompt for the profile and then select Apply button.
Always Use this profile to toggle the selection back and then apply it
And then, under the profile name add a name and then select OK button
By following the onscreen instructions provide the email account that you want to use.
Lastly, select Use this profile drop down and then select newly create profile and click on Apply then click OK button.
Solution 5: Fix Office and Windows Update for Run
Often certain features of Microsoft Office like excel, word etc. Do not work properly. They can be easily fixed by restarting the system, but when that doesn’t help you have to get it repaired. Here are the ways to repair it.
Make a right click on the Windows start button in the Windows 8 or 10 version and then select Apps and feature on the pop-up menu bar
After this select the feature or product of Microsoft which you want to fix and then select modify option
Either you will get Click to Run or MSI-based installation, it all depends on the version of Microsoft
Click to Run
Make sure everything is alright when you want to repair the programs of Office. Select on Online Repair and then select Repair.
MSI- Based
First change the installation, then select Repair and click on Continue button.
Instructions will be provided on the screen follow them and complete the repair process.
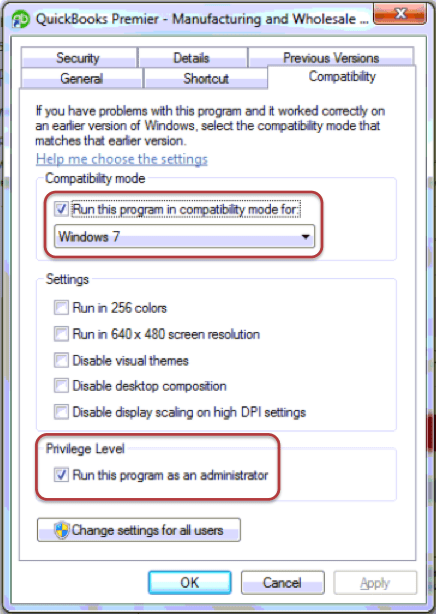
First select the QuickBooks icon on the desktop and then select QuickBooks option on Compatibility Mode
Check the box in the Compatibility Mode section after choosing Compatibility and run this program in that mode
After this select Windows 7 from the drop down
Go to the privilege level section and check run this program as the administrator
Finally Apply and then choose OK button
Solution 7: Adding new Windows Admin user
At times, adding a new windows admin user can help in dealing with such annoying errors in QuickBooks. The steps involved in the procedure are as follows:
At first you need to open the windows start menu and then choose all programs option.
You now have to open the windows start menu and further go for all programs option.
Once done with that, open windows small business server and further go for windows SBS console.
The next step is to click on users and groups and choose to add a new user account.
You now have to follow the add a new user account wizard.
Followed by giving the new user, admin rights.
Also, click on the finish tab and log on to windows with the new user.
Solution 10: Update QuickBooks to the latest release
If the Crash Com Error persists even after performing all the above-mentioned troubleshooting steps, update QuickBooks to the latest release. This issue isn’t present in the latest release of the Software. The steps you should perform are:
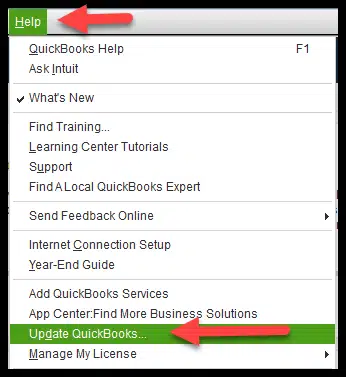
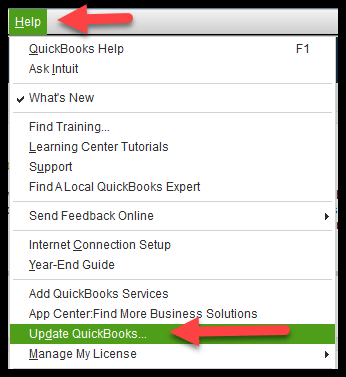
The very first step is to move to the help menu and choose Update QuickBooks option.
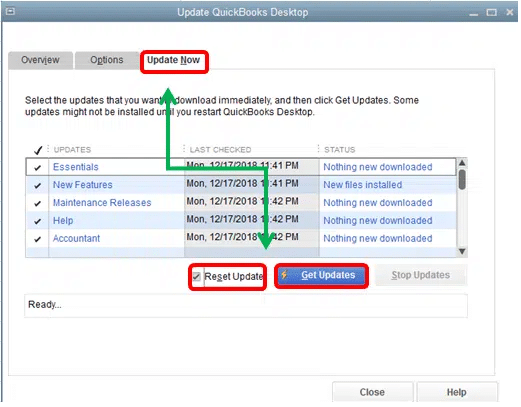
Now, move to the update now tab, and choose the reset updates checkbox to clear all the previous update downloads.
You now have to choose the get updates option to begin the download process.
Reboot QuickBooks after the download is complete.
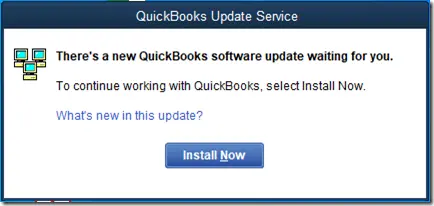
You will then have to accept the option to install the latest release.
Method 11: Configuring QuickBooks firewall and security exception
The user can first add QuickBooks firewall exceptions to the communication funnel.
Crash com error generally damages the system, yet you can save QuickBooks data by following these above given simple steps. These troubleshooting steps have proven to be of great help in order to efficiently handle the QuickBooks com error. We hope that you found this blog helpful to fix crash com error in QuickBooks.
However, if the crash com error still has not been fixed then reach out to the QuickBooks enterprise support team as they will provide you with an instant solution to this problem. Dial ++1-888-510-9198 and get assistance from our experts.
Frequently Asked Questions (FAQs)– QuickBooks Crash Com Error
What situations create QuickBooks crash com error other than mailing invoices?
One can experience this issue in the following situations: 1. Attaching any specific file 2. While saving any file 3. Opening to QuickBooks Check Register 4. Viewing a report
What if Microsoft Outlook is unable to Detect QuickBooks?
In case the Microsoft Outlook cannot identify the QuickBooks software, then perform the steps below: 1: First, open QuickBooks Desktop. 2: And then, click on Edit and select Preferences. 3: Now, choose send Forms followed by choosing My Preferences
How do you fix COM error in QuickBooks?
You can try creating windows user with admin rights using the steps below: 1. Create windows user with admin rights 2. Log on to windows with new user 3. Re-open QuickBooks
Why does QuickBooks keep crashing?
QuickBooks might crash if there is issue with the system itself or if the software is not updated to the latest release.
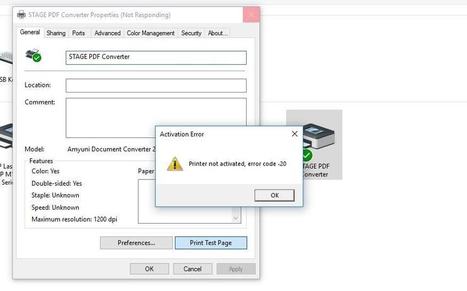
Experiencing QuickBooks printer not activated error 20? And don’t know what can be done to eliminate such error? If yes, then reading this piece of writing will surely help. The QuickBooks printer not activated error 20 can be experienced when your operating system is not aligning with the QuickBooks existing version creating issues when printing. Just in case you are running your QuickBooks 2009 on windows 10, then it might show up automatic notifications of updates have stopped working like the QuickBooks doesn’t update on its own. Printer not activated Error Code -20 is just one of the most common error message encountered by QuickBooks users. This error generally takes place when a user try to install or upgrade to a newer Windows version. Usually, the major cause of this issue is the deleted KEY_CURRENT_CONFIG\Software key.
Because of this error, users are not able to publish or send the invoices and payslips which leads to the further inconvenience for business owners. This is a common error that may cause by lots of other applications besides QuickBooks, but its significance on QuickBooks is greater than any other software. There are a bunch of factors triggering such an error, which we will be elaborating later in this segment, along with the fixes for the same. To learn further, make sure to read this article carefully, or connect with our tech team at +1-888-510-9198, and we will help you with your queries right away.
What causes QuickBooks Error 20 -Printer not activated problem?
Here are some of the possible reasons are given below:-
This error code is usually appears due to elimination/deletion of the ‘HKey_current_config\software’ key. QuickBooks program works on the same registry key as well. This situation leads to the condition where the outdated key stops the application as well as printer to run properly. It has been experienced that many program/applications use that same registry key..! It tends to cause malfunctioning of the software and other software’s as well.
This error can also be occur when the multiple QuickBooks versions are installed in the computer. This arrangement doesn’t harm the system but it could be a possible reason. If the multiple versions of QuickBooks application installed in a system have different directory then there is no problem.
In case, the same error code or error message appears again and you are unable to save/download the invoice, bill, or payslip as PDF..! It simply means that the QuickBooks application isn’t compatible with the PDF driver & operating system.
How to Fix Printer Not Activated – Error Code -20 on Windows 7 or later versions?
If the problem is associated with the problem, “Printer not activated? Error – 20” on the Windows 7, Windows 8 or later versions. In such scenario, you need to perform the solution steps given below:-
1. At first, close the final draft:
For Windows 8 or later:
Click on the “Start” or “Windows” icon on the display.
Perform right-click on the ‘Final Draft9/8 tile’.
Choose the ‘Run as Administrator’ tab.
For Window 7/Vista:
In the Windows 7, go to the “Start” icon => “Programs” tab.
Select the ‘Final Draft 9/8’.
Choose the ‘Run as Administrator’ tab.
Try again to save the documents In PDF format. Now, you will able to save your script as PFD with no issues.
2. Change the Directory:
Note: you need to consider the following points before changing the directory.
Generate the Backup: Before you make any changes in the present registry make sure that you create a backup. Use the old registry if in case you are unable to solve the issues with the modified registry.
For any further complications, you must be prepared with a system recovery point.
3. Create the Backup Registry:
At first, hit onto the “Registry Editor” tab.
Go to the folder tree in the left bar and click on the ‘Computer’ icon.
Then, hit onto the “File” icon => “Export” tab => “Save” icon.
4. Create the System Restore Point:
At first, click on the “Start” or “Windows” icon.
Search for the ‘System Restore’ option, click on the ‘Create a New Restore Point’ option.
Go to the “System Properties” screen.
Enable the “Protection Setting”.
If the function is disabled, click “Configure” and set the protection.
Finish with clicking Apply and OK button.
These settings will automatically create a system restore point.
Note: Before you make modifications to the Registry, ensure you take a back-up of your computer registry files and create a system restore point in case something else fails whilst you’re doing the actions you should have the ability to restore the system.
Once the re-installation process gets complete, the program along with the printer will work again.
Restart your computer system to let the changes to take place.
Note: If the problem is with PDF converter only, then you are advised to uninstall the old driver and install a compatible driver with your operating system.
Solution 2: Manually Edit or Update the Registry key
This issue can be solved by upgrading your Windows 7 operating system. A clean installation of windows 7 wouldn’t cause such type of critical errors.
There are 2 ways of manually updating the registry key.
Method 1: Grant permission by using Registry Editor
Open your registry editor.
On your system keyboard, click Windows + R to open the Run dialog box.
Type regedit command.
Now right click on the regedit & then select the option to Run as Administrator
Search HKEY_CURRENT_CONFIG as now you have to get access the registry editor.
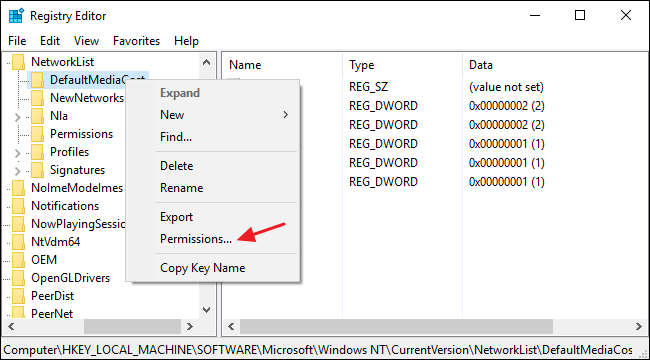
Choose the permission after right clicking the software folder name.
You need to verify that user has the full access control of the table.
Finally click on to the OK button and close the window & also registry editor option.
After performing the above steps QuickBooks has the access to all keys and printer that should work in fine condition.
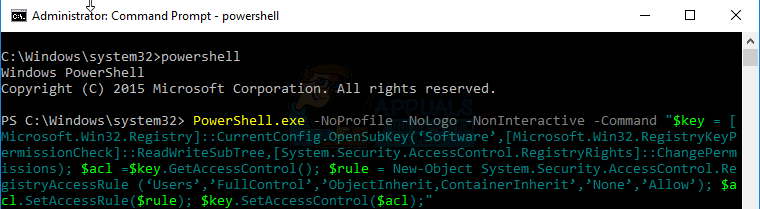
Method 2: Grant permission using Powershell script
This options described only for Windows 10 users. You can update your registry key editor manually by granting permission using Powershell script.
Note: The user account control who is looking for the permission should be logged in. A user account also has the access by using the command prompt.
Click on the Start button.
Now type cmd
After that select Run as an administrator by giving one right click cmd.
Type Power shell in the command prompt and also press Enter key.
Finally copy and paste the following code as it is showing on the command prompt.
If your error continues even after performing the set of steps discussed above, then in that case, we recommend you to perform the procedures discussed below.
Procedure 1: Use QuickBooks print and pdf repair tool
Initially, you need to download the PDF and print repair tool or use it from the QuickBooks tool hub
Followed by running the tool in admin mode
Once done with that, the application will run with a red background and will let you find the solution.
You now have to ensure that the QuickBooks software is updated to the latest version.
Ensure that the printer is printing out of your desktop
Restart the system after running the tool
Ascertain that all other applications running are closed.
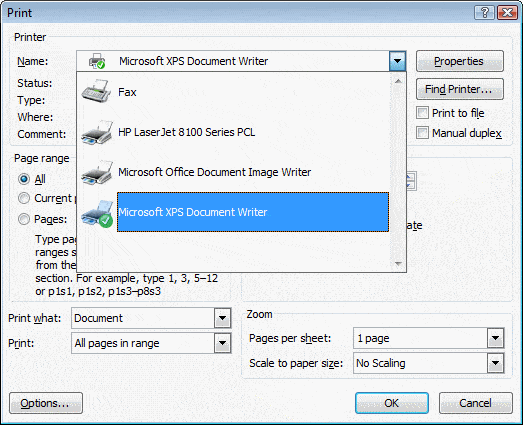
Procedure 2: Fix Microsoft Document Writer
In this procedure, you need to right click the QuickBooks icon and then chose properties tab.
Once done with that, you need to click on the find target option
After that, you need to double click the install application or exe to install the pdf converter
Now, click on ok after the installation process finishes
You now have to click on windows start tab and then select run or search
You are then required to enter the control printers and pick the printers window and click on ok tab
The user will then have to right click the Document converter and click on the print properties if you are a windows 7 user.
Windows XP users can tap on the Document converter and click on rename tab
The last step is to check the version of QuickBooks and release installed, also enter the correct name and click on enter tab.
Procedure 3: Check the Microsoft document writer
The Microsoft Document Writer provides windows capabilities to support QuickBooks in saving information in any format like PDF. In case the window component is not found, then such error occurs when you want to print a document from the QuickBooks software installed on the desktop. The steps involved in this process are as follows:
You need to find the QuickBooks icon on your main window screen and right click it to choose open file location.
After that, get the temp folder and look out for the folder matching version of the current QuickBooks software.
You now have to browse the cursor along that folder to further open the third-party folder inside
Now, find the exe file and double click it for installation
Move back after the installation is done and head to the main QuickBooks software and open it to register the license.
The installation stops in the middle, you can start it again, there’s no issue with that.
Once everything said is done, try printing your desired documents from QuickBooks itself.
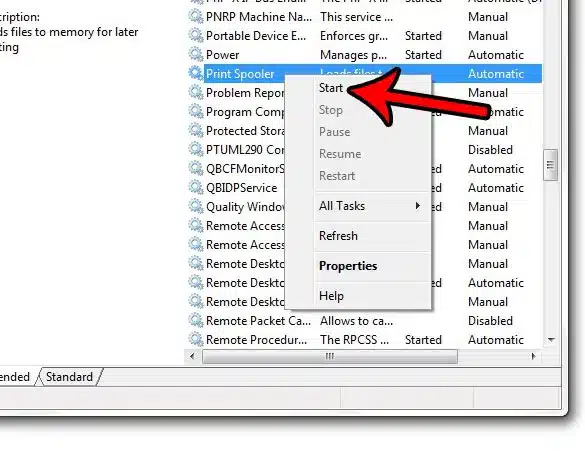
Procedure 4: Check and configure print spooler service
You need to first click on Windows + R at the same time and type MSC in the window that pops up named Run box.
Right click on the print spooler service from the list of services shown to choose the properties tab.
Click on the stop tab to stop the print spooler service.
Wait a few seconds and then pick the start tab to initiate the services again.
Close all the window pop-ups now and try printing a document or saving a PDF to print directly from QuickBooks.
Procedure 5: Check QuickBooks pdf capabilities with QBprint.qbp file and repair it
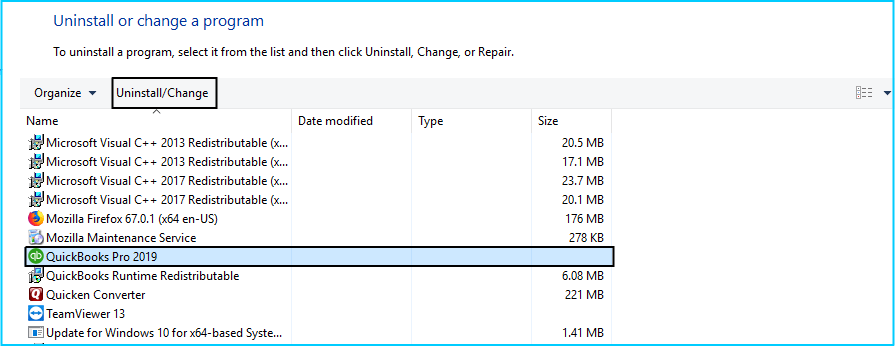
Search the control panel from the windows search and head to the programs and features under it.
You now have to head to the list of the programs installed on the desktop and find QuickBooks.
Right click it to select change option and initiate the repairing only to follow the lead by the given set of instruction.
After the QuickBooks repair, restart the system and let the updates take place.
Try printing a document or save it as a PDF.
Winding Up!
We hopefully think the above given methods resolves your QuickBooks printer not activated error code 20 and now you are able to print your files using QuickBooks.
However, if you are still troubling with this error and want any help regarding this issue, you can dial our QuickBooks customer support number .I.E. +1-888-510-9198 to get immediate help from the experts. We provide extreme services and quality assistance with effective solutions.
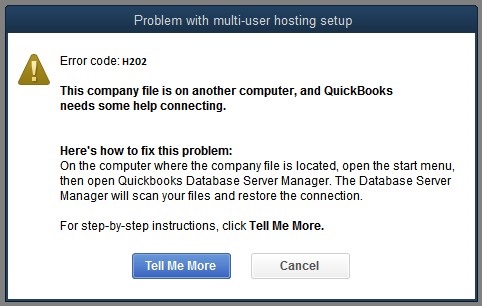
Trying to switch to multi-user mode in QuickBooks but are unable to due to QuickBooks error H202? Well, error code H202 in QuickBooks is often seen when you try to run QuickBooks in multi-user mode or when the software fails to open a company file that is stored on another system. Such an error shows up with a warning message indicating that the multi-user connection to the server is blocked.
Moreover, QuickBooks error H202 indicates that the QuickBooks company file is located on a different system and the software needs some help in connecting to it. This particular error is a multi-user mode error and might further prevent you from opening a company file that is stored on another computer.
To help you fix this issue, we have come up with this segment sharing the complete details so as to how you can get rid of QuickBooks error code H202 easily without hampering your company file data. Thus, keep reading this article and find out the ways to fix this H series error easily. However, you can also get in touch with our QuickBooks support professionals using our toll-free number i.e., +1-888-510-9198, and get your queries resolved by a certified professional.
What is QuickBooks Error H202? (Multi-User Switching Issue)
QuickBooks error H202 basically falls under the H series error category, which is majorly related to multi-user mode. QB users have reported this error often when either switching from single-user mode to multi-user mode or when opening a company file in multi-user mode. As mentioned earlier, you can experience this issue when trying to access a company file stored on another system.
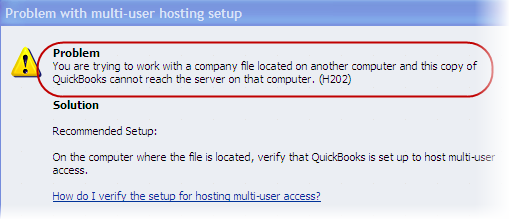
You can come across the following warning messages when QuickBooks error H202 occurs:
Error
Description
Problem
You are trying to work with a company file that is located on another computer, and this copy of QuickBooks cannot reach the server on that computer. (H202)
Problem with multi-user hosting setup
QuickBooks could not open the file in multi-user mode. (H202)
Fixing QuickBooks error code H202 becomes easy, once you understand what factors can lead to this issue. This article will help you understand the causes, signs and symptoms, as well as the effective ways that can be implemented to fix the issue. Thus, keep reading!
Majorly any sort of communication issue between QuickBooks desktop and the server can cause this error in QuickBooks. Below discussed are the core reasons why you can come across QuickBooks H202 error. Let us have a look:
The Hosting configuration setting is incorrect. If that is the case, then you can experience this error.
Or in case the QB file setting option blocks access to the company file. Thus, it blocks incoming or outgoing communication.
In case there is any damage or inappropriate .ND files configuration that allows the database file through QuickBooks, then you can see this error.
If the QuickBooks software is unable to search the main IP address of the host system or by using some other IP address.
A company data file is not communicating easily to the server.
If the setting of DNS is improper or incomplete.
The QuickBooks service like QuickBooksDBXX/QBCF is not started.
Firewall or a security software is blocking the communication to the company file, in such a situation also error H202 is most likely to occur.
When a user tries to work with a company file & it is located in a multi–user mode & this replicates the QuickBooks that is unable to reach the server on your system.
What are the Signs and symptoms of error H202 in QuickBooks?
You can identify the QuickBooks error H202 easily, considering the following signs and symptoms. Let us evaluate:
Unable to switch to multi-user mode in QuickBooks.
If after trying a lot of times, you are unable to open a company file located on another computer.
If the system or the QuickBooks software freezes again and again for a couple of seconds.
Before you start with the methods to fix QuickBooks error H202, make sure to log in QuickBooks as admin. You can perform a handful of methods to get rid of QuickBooks error H202. Let us have a look:
Method 1: Run QuickBooks Tool Hub on Server
Step 1: From Tool Hub Program, run QuickBooks File Doctor Tool
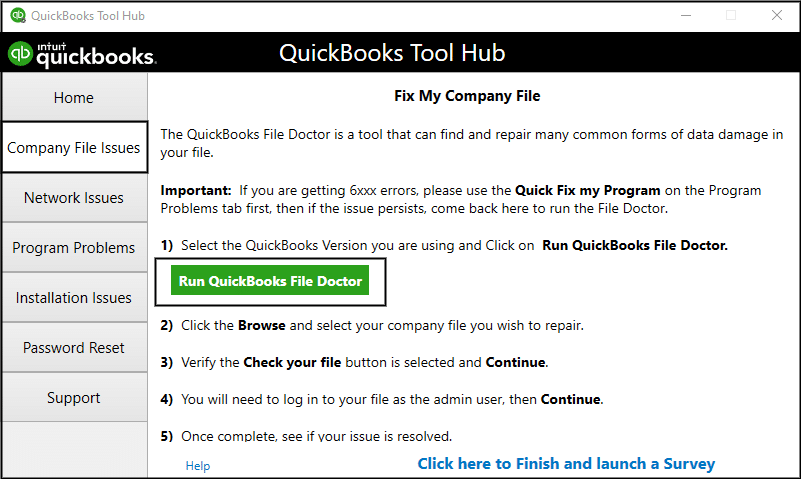
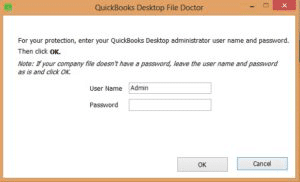
QuickBooks File Doctor Tool is basically a tool designed to diagnose and troubleshoot different errors like QuickBooks errors H101, H202, H303, or H505. To use this tool, you will first have to download QBFD from official Intuit site or you can also make use of QuickBooks Tool hub to access this tool. The steps involved in this process are listed below:
Now, install and run the QuickBooks tool hub program using the onscreen steps.
The next step is to open QuickBooks Tool hub and head to the company file issues tab.
Also, click on Run QuickBooks File Doctor option.
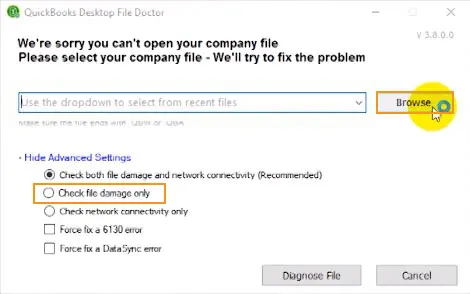
Now, in QuickBooks file doctor, you need to go for Company file from the dropdown menu. If you are unable to identify the file, then click on browse and search to find the file.
After that, you need to click on Check your file and Network checkbox and then click on Continue tab.
Towards the end, you need to enter your QuickBooks Admin Password and then click on next tab.
Note that the scan time usually depends on the file size and in most cases, it usually takes around 5 minutes. After the scan ends, you need to open the QuickBooks software and the company file.
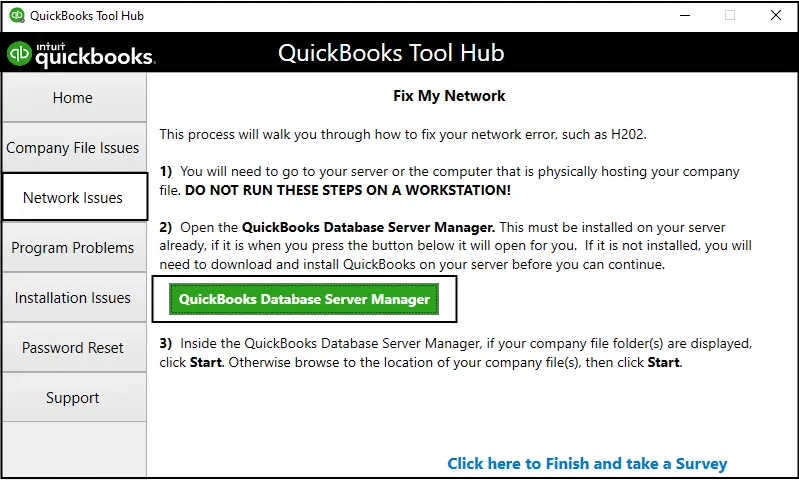
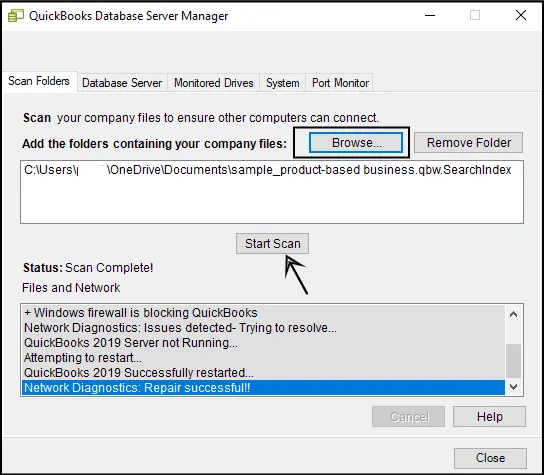
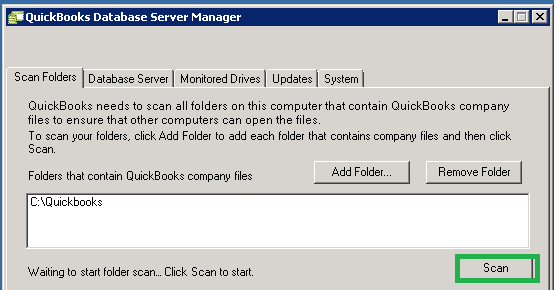
Step 2: Install and run QuickBooks database server manager on your server
Initially, you need to open QuickBooks Tool hub and select network issues tab.
After you are done within the QuickBooks database server manager, look for the folder that has company files stored. You can further use the Browse feature to find this folder.
The user will then have to click on Start Scan tab.
QBDBSM will now repair your firewall permissions on its own.
After the scan process ends, you are supposed to click on close tab.
On each of the workstations where the error shows up, you need to launch QuickBooks.
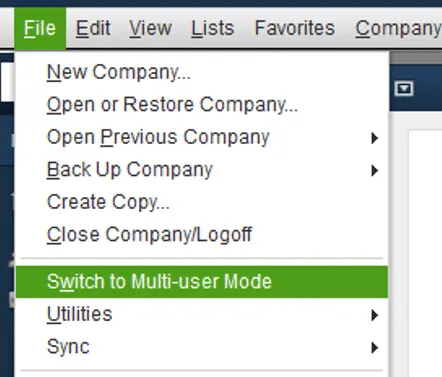
Furthermore, click on File menu.
And then, head to Switch to multi user mode.
In case you now use QuickBooks in multi user mode, the error won’t show up. In case the error still occurs, then proceed to the steps below.
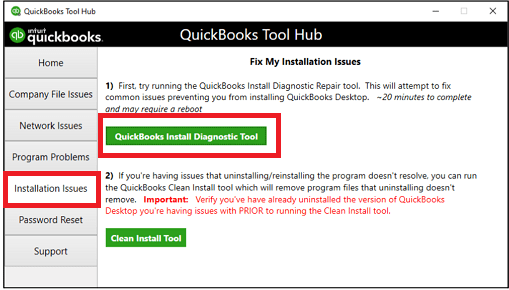
Step 3: QuickBooks Install Diagnostic Tool
You need to first open QuickBooks tool hub on the server system.
Further, head to Installation issues tab from the tool hub.
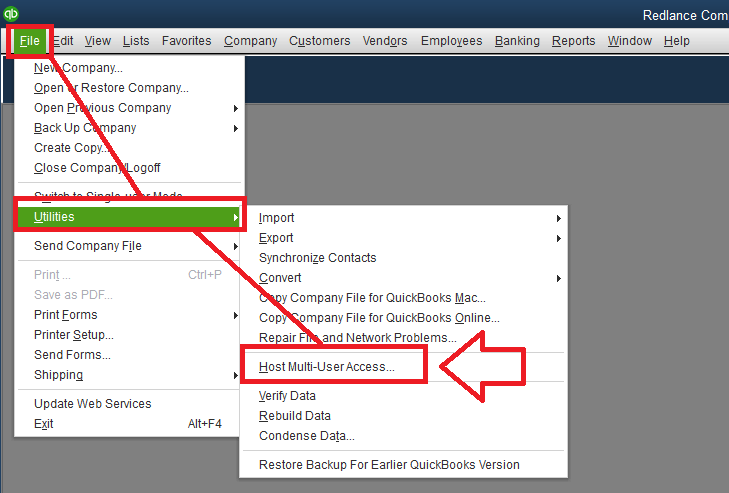
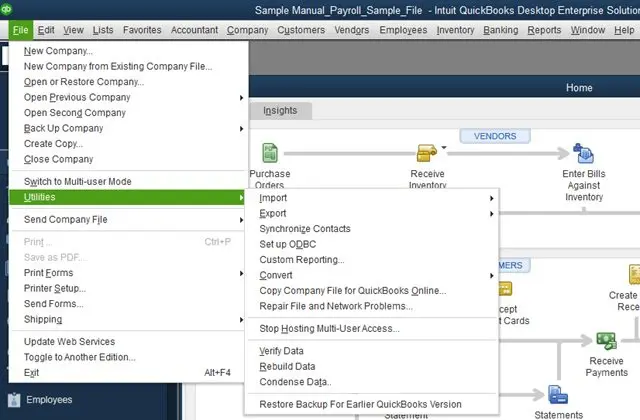
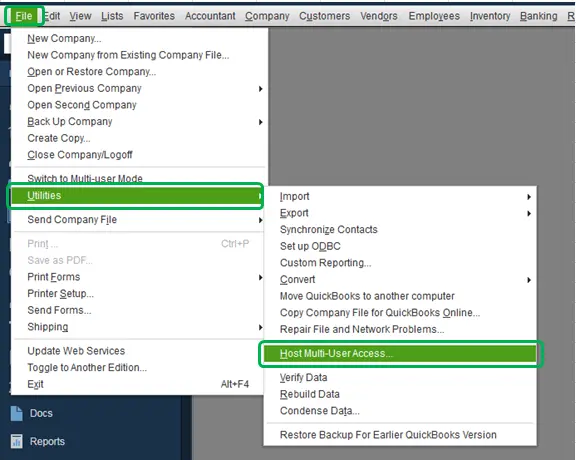
The initial step is to open QuickBooks on the hosting system and then select “File” & click on “Utilities“.
And then, see the list of “Host Multi-User” to Access it, this computer is not hosting the file. Move to the next system. Note one thing don’t change anything on your workstation.
If you see “Stop Hosting Multi-User Access“, select it.
Ensure that company file must be closed, click to “Yes” option.
Method 3: Verify the QuickBooks Services
In case the server is running in a full version of QuickBooks, then you can perform the following steps to start multi-user hosting mode.
When on the server, open QuickBooks Desktop.
After that, head to the File and then the Utilities tab.
Now, select Host Multi-User access option from the list.
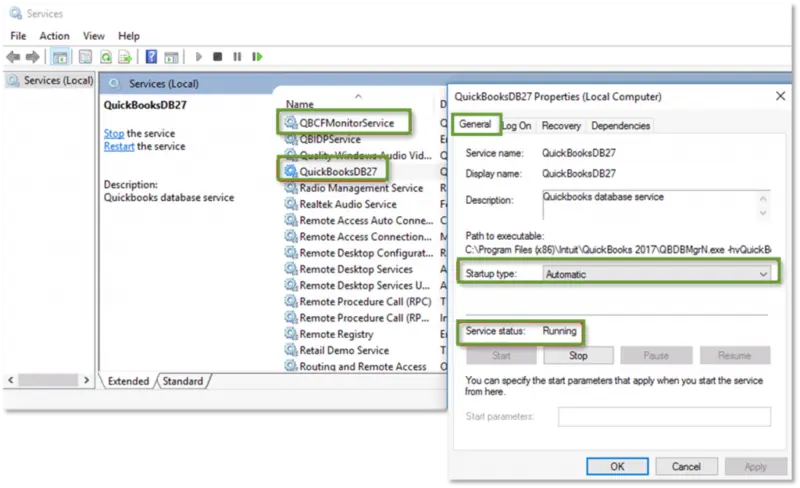
To verify the running status of QuickBooksDBXX and QBCFMonitorService on the server, you can continue with the below steps:
Click on the Windows “Start” button.
And then press the keys as “Windows + R” keys to run the program.
In that running dialog box, type as “MSC” and hit “Enter” key.
You now have to select QuickBooksDBXX
After that, choose Startup type, in case it is Automatic or not.
If the startup type is not set as Automatic, then make sure to do it immediately.
Now, check the Service Status and ensure it shows Running.
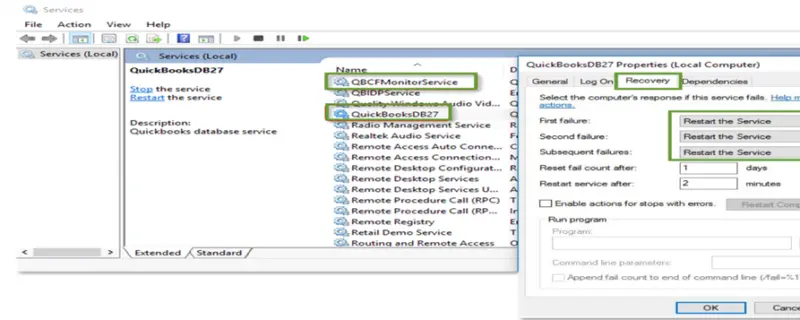
Now move to the Recover Tab and go for it.
Head to the drop-down menus for first, second, and subsequent failures and select Restart the Service of all these.
You are now required to click on Apply and ok tab to confirm the changes respectively.
Once done with that, you need to carry out all of the above steps for QBCFMonitorService.
Method 4: Ping your server from a workstation to check for network issues
There might be a firewall issue if you see QuickBooks Error Code H202 on one or more of your workstations. To fix the issue Ping your server from each workstation where you are getting Error H202.
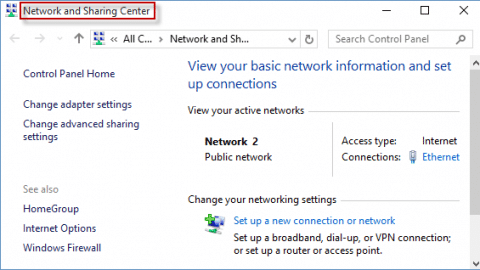
Step 1: Turn on Network Discovery on your server computer
On your server computer and workstations, Open the “Windows Start Menu“.
After that type Network into the search and then open Network and sharing center.
After that choose change advanced sharing settings.
Ensure that you have selected Turn on network discovery in the Network Discovery and File and Printer sharing sections.
Step 2: Get your server name from your server
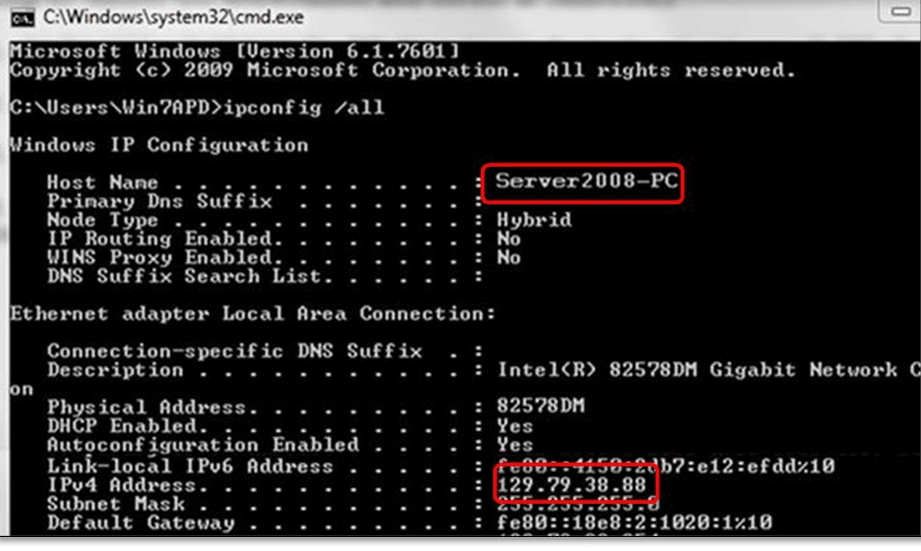
First of all, you need to open the Windows Start menu on your server computer.
After that type “Run” into the search and then open Run box.
After that type “CMD” into the Run window, and then hit on Enter key.
Now type “ipconfig/all” into the command window, and then press Enter key.
After that search the Host Name in the Windows IP Configuration section. You will find your server’s name is on the right.
Now you have to note down the hostname and copy it to a word file so that you can access it quickly.
Step 3: Test Network Connectivity
Under this step, you need to head back to the workstation to test the server. You might find these steps a bit tricky to perform. Thus, it is suggested to consult an IT professional for help.
The very first step is to open Run window by clicking on the Windows + R in the system where you get the error code H202
After that, type CMD in the box, and click on the ok tab
Once done with that, you need to ping the server
Type ping_server name and click on the enter tab.
You can perform the steps mentioned above on all systems that receive the same error.
Just in case the response you receive is slow, then there might be some issue with the network and a repair is required.
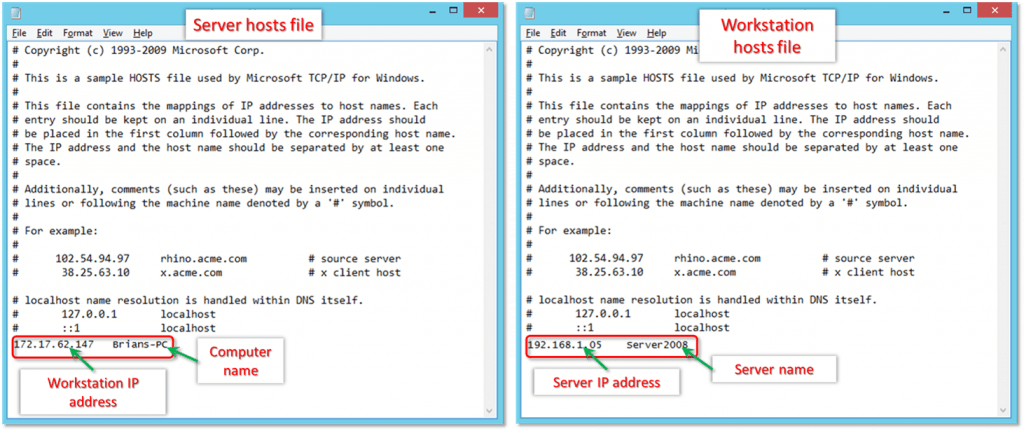
Method 5: Go to Windows Host File and Add Server
You need to first close all Windows open on the system.
After that, head to C:\Windows\System32\Drivers\Etc or C:\Windows\System64\Drivers\Etc on the server.
The next step is to double-click the hosts file and choose Notepad on being prompted for a program.
You now have to enter in the IP address and then the name of the system. For the server, you need to enter IP and the name of the system. For computer, you will have to enter IP of the server and the computer name.
To separate the computer name and IP address, click on Tab key rather than the Space bar.
Try opening Quickbooks in multi-user mode and check if the issue is resolved or not.
Method 6: Add Services QuickBooksDBXX and QBCFMonitor to the admin group
Offer QuickBooksDBXX and QBCFMonitorService Windows admin permission on the server. In case these services do not already have admin permission, then ensure that they get it as this may fix the issue. See if you can use the software in multi-user mode.
Method 7: Configure system firewall settings
At times, your system firewall might block the data exchange between QuickBooks and the server. In that scenario, you need to perform the steps to configure QuickBooks firewall settings, to ascertain uninterrupted communication between QB and the server.
Create exceptions in the settings of the System Firewall
Make changes to system firewall permissions and then open QuickBooks on all the systems.
Within QuickBooks, opt for switch to multi-user mode under the file menu.
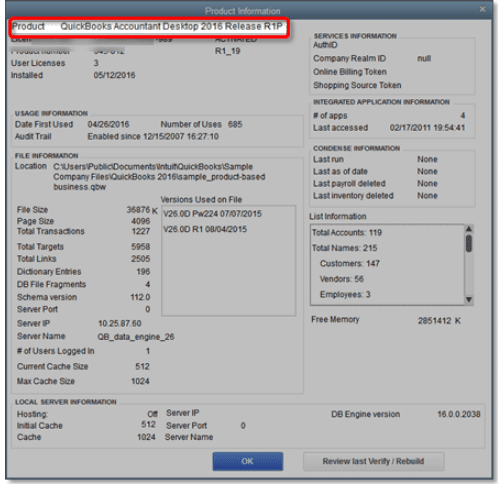
It is essential that no other client system is trying to host the same company file. This can be ensured using the set of steps below:
Start by launching QuickBooks.
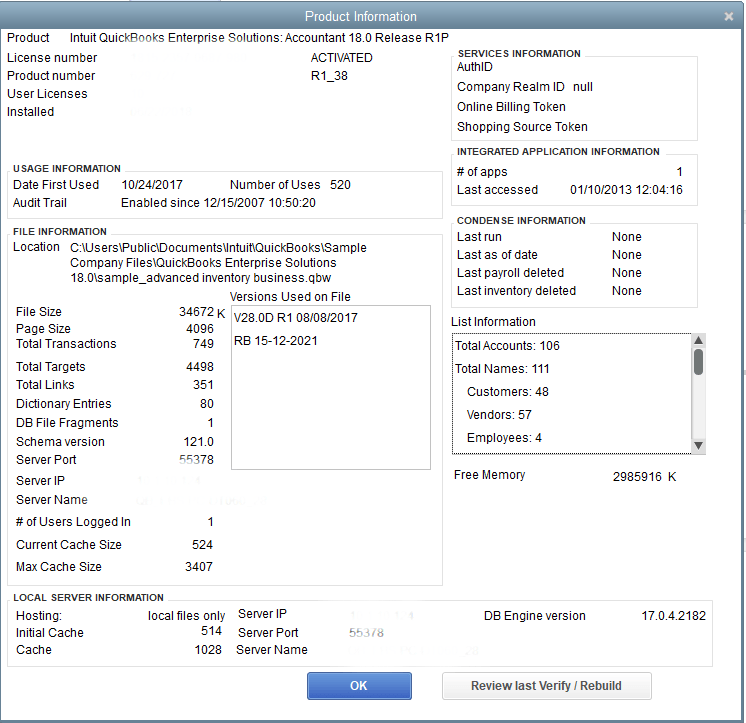
Press F2 key to reveal the product information window.
You are now required to select hosting to reflect local files only under the local server information.
Method 11: Include QuickBooks ports in firewall
In order to ensure that the firewall doesn’t obstruct the multiuser mode, you need to make sure that the firewall includes the QuickBooks ports. Here is a quick list that you can use to configure firewall ports for QuickBooks.
QuickBooks 2019 doesn’t have any static Firewall Ports: The ports are automatically renewed once you can run the company file in the Database server manager.
Method 12: Alter QBGlobalAppConfig.ini file on the Fedora Linux Server
You need to open Linux Terminal Window and also access QBGlobalAppConfig.ini
After that check the default range for ports and further delete the spaces before and after the = equal sign.
QuickBooks version
…from
to…
QuickBooks Desktop Enterprise 22.0
55398 = 5
55398 = 5
QuickBooks Desktop Enterprise 21.0
55393 = 5
55393 = 5
QuickBooks Desktop Enterprise 20.0
55388 = 5
55388 = 5
QuickBooks Desktop Enterprise 19.0
55383 = 5
55383 = 5
QuickBooks Desktop Enterprise 18.0
55378 = 5
55378 = 5
QuickBooks Desktop Enterprise 17.0
55373 = 5
55373 = 5
You can find the complete list of ports in Install Linux Database Server Manager
Ensure to save the QBGlobalAppConfig.ini file.
The last step is to stop and reboot the QBDBFILEMON and QBDBMGRN services.
Getting rid of the QuickBooks error H202 isn’t a tough nut to crack. Using the above-discussed measures can successfully help you eliminate the error permanently. However, if the same error persists, then connect with our QuickBooks support phone number i.e. +1-888-510-9198. Our technical support team will ensure that your queries are addressed immediately and you are able to get rid of the errors in QuickBooks permanently.
Frequently Asked Questions!
What does QuickBooks error H202 mean?
This is a common error code that can occur in QuickBooks when you are trying to access a company file in multi-user mode.
What error message QuickBooks displays on screen when QuickBooks Error H202 occurs?
“Error H202: QuickBooks could not reach the server. This error can be caused by a variety of reasons, including network connectivity, firewall issues, or incorrect hosting configuration settings.”
How do I fix Windows firewall is blocking QuickBooks?
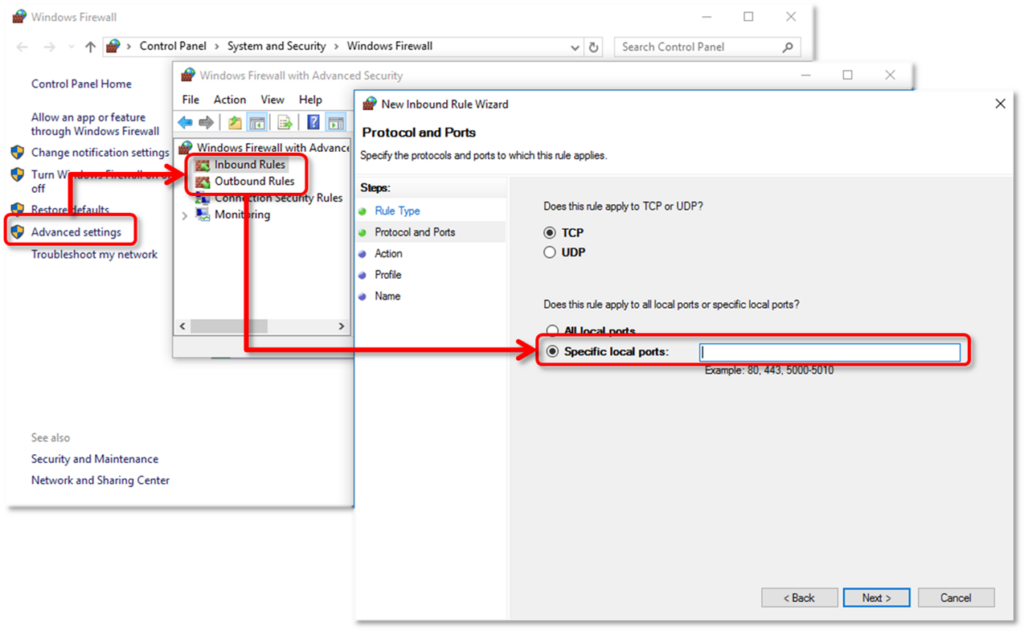
In case you are experiencing an issue where Windows Firewall is blocking QuickBooks, you can try the following steps to resolve the issue: 1: Add QuickBooks to the Windows Firewall exception list 2: Create a new Inbound Rule 3: Disable the Windows Firewall temporarily
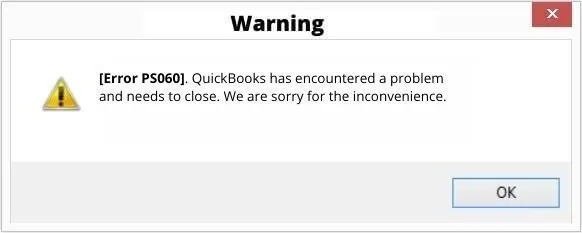
QuickBooks error PS060 is an error that shows up with a warning message: “Current Enhanced Payroll Service is Unavailable”, then the error code PS060 can be the reason. This error occurs often while using the payroll service in QuickBooks. If you are also facing QuickBooks payroll error PS060, then this article can be a savior for you. In today’s article, we will be discussing the relevant causes, as well as the quick fixes to the error code PS060. However, if you want an expert team to resolve the issue for you, then in that case, you can simply make a call at our toll-free number i.e. +1-888-510-9198, and our QuickBooks payroll support executives and certified professionals will help you in get rid of the issue in no time.
QuickBooks Error PS060 is a common error that accounting software users may receive. An error message “Current Enhanced Payroll Service is Unavailable” might pop up on the screen, disrupting the smooth working of payroll. Though this error is not very critical, it is not very easy to fix it either. Besides, you will not be able to access QuickBooks until you get this payroll error taken care of.
What leads to Payroll Error PS060
No single factor leads to this type of error, which means that there are more than one reasons that might end up causing QuickBooks error code PS060. In order to fix this error, it is necessary to know the root cause of this error. We have listed below the factors causing the error code PS060. Let us have a look:
Note: A major cause of this error is settings with the expiry date. QuickBooks Payroll periodically checks the expiration date of the subscription by connecting to QuickBooks. Your billing information should be updated to keep accessing QuickBooks accounting software without any hassle.
This error may show up on the screen if Intuit’s server is down
Intuit doesn’t offer support to old versions of QuickBooks. This payroll error might also be seen, in the case of an old version of the payroll
There can be situation, when the third-party security software might block QuickBooks
Malicious software such as Virus and Malware may also cause Payroll Error PS060
In case the error is caused due to a server issue of Intuit, then the user will be required to have some patience and wait until the website server of Intuit starts working once again.
Solution 3: Download and install the latest version of software
Solution 4: Check the settings of 3rd party software
If the reason behind the error is any sort of third party application interference or any kind of malware infection, then in that case, the user is supposed to get the entire ADPS scanned. The problem can also be resolved by the customer support.
Solution 5: Check for connectivity issues
Check if your computer is connected to the internet. Internet connectivity issue is one of the most common causes behind the occurrence of this error. Speak to your internet service provider if it can’t be fixed at your end. The steps to be performed here are as follows:
Start the process by opening the internet explorer and try to access a safe website
In case you access the website successfully then head to the steps below
In case the error occurs when accessing the website, then check the internet connection settings for any misconfiguratons
Ensure to set date and time correctly on the system
And now, open the internet explorer
Followed by selecting the tools tab
And also, choose the internet options
The user will then have to click on the option reset/restore default under the advanced menu
Implementing any of the above stated methods might help the users to fix QuickBooks Payroll Error PS060. However, if by any chance none of the methods work in your favor, then in that case, the user can get in touch with our experts, or speak to our 24×7 QuickBooks error support experts team at +1-888-510-9198 for quick and precise solutions.
Some FAQs Related to QuickBooks payroll error PS060
How to fix payroll errors in QuickBooks?
To fix the payroll errors, one needs to perform the steps below: 1. The very first step is to click on the help menu 2. After that, select about QuickBooks 3. Once done with that press Ctrl + Alt + Y and then click on next tab 4. Choose the employee that was underpaid in the employee summary information window 5. Now, double-click the employee’s name 6. And review the ytd adjustment details 7. The last step is to click on ok tab
How to reset payroll in QuickBooks?
You can reset the payroll which will undo the payroll data saved. The steps you need to perform are: 1. The first step is to head to the employee tab and then choose the pay employees 2. Now, choose scheduled payroll or unscheduled payroll 3. The next step is to choose resume scheduled payroll 4. After that right click the employee’s name that is highlighted in yellow 5. The last step is to choose revert paychecks
How to fix QuickBooks error PS036?
To resolve QuickBooks Error PS060, you can try updating the payroll tax tables manually. If the problem persists, you can contact our QuickBooks Payroll Support team at +1-888-510-9198 for assistance.
What is payroll error in QuickBooks online?
Payroll errors in QuickBooks online occur when you have recently made changes to your payroll, like if you add a new employee or create a new pension scheme. This can be fixed by deleting the new employees before deleting the pay run. Once you’ve made changes to the final period of the final tax year, you can add the employees back in QuickBooks.
What should I do if I receive QuickBooks Error PS060 while updating payroll tax tables?
If you receive QuickBooks Error PS060 while updating payroll tax tables, you should immediately contact our QuickBooks Payroll Support team at +1-888-510-9198 for assistance. Our team of experts will assist you in resolving the issue quickly and efficiently.


![How to Fix QuickBooks Error H202? [Updated Fixation Methods]](https://www.hostdocket.com/wp-content/uploads/2020/02/QuickBooks-error-H202.png)